• Skip to primary navigation
  • Skip to main content
  • Skip to primary sidebar
Homesmad

Homesmad

  • Home
  • Breakfast & Brunch
  • Appetizers & Snacks
  • Dinner
  • Dessert
  • About
  • Privacy Policy
  • Contact
Homesmad
  • Home
  • Breakfast & Brunch
  • Appetizers & Snacks
  • Dinner
  • Dessert
  • About
  • Privacy Policy
  • Contact

Mini Halloween Pizzas: Spooky Fun for Kids & Adults!

October 3, 2025 by Lily author

Mini Halloween Pizzas are here to transform your spooky season into a delightfully delicious and creative culinary adventure! I find that Halloween is a time for playful frights and fantastic treats, and I believe that themed food truly elevates the celebratory spirit. Gone are the days of simple candy; now, we’re all looking for engaging ways to infuse holiday magic into every bite. Who doesn’t adore pizza? Now, imagine that universally beloved dish shrinking into adorable, individual-sized portions, perfectly adorned with ghoulish grins, friendly monster faces, or even spooky spiderwebs. These bite-sized wonders combine the comforting familiarity of classic pizza with the whimsical charm of Halloween, making them an irresistible addition to any gathering. They are incredibly versatile, allowing for endless creativity with toppings, and are surprisingly simple to assemble, making them a fantastic activity for kids and adults alike. Whether you’re hosting a monstrous bash or simply want to bring some festive cheer to a family dinner, these Mini Halloween Pizzas are an absolute crowd-pleaser that I’m thrilled to share with you.

Mini Halloween Pizzas: Spooky Fun for Kids & Adults! this RECIPE

Ingredients:

  • For the Pizza Dough:
    • 2 lbs (approx. 900g) good quality store-bought pizza dough, fresh or thawed frozen. I find this quantity is perfect for a decent batch of mini pizzas, usually yielding about 20-24 small ones depending on how generously you size them. If you’re feeling adventurous, feel free to use your favorite homemade pizza dough recipe!
    • 2-3 tablespoons extra virgin olive oil, plus a little extra for brushing the dough and greasing your baking sheets. A good quality olive oil really enhances the flavor of the crust.
    • All-purpose flour or cornmeal, for dusting your work surface and baking sheets. This is essential to prevent sticking and give your crust a lovely texture.
  • For the Spooky Sauce:
    • 1 (15-ounce / 425g) can crushed tomatoes or a high-quality marinara sauce. I often opt for plain crushed tomatoes and season it myself for the freshest taste.
    • 2 cloves garlic, minced very finely.
    • 1 teaspoon dried oregano.
    • 1/2 teaspoon dried basil.
    • 1/4 teaspoon red pepper flakes (optional, for a subtle hint of heat that adult ghouls might appreciate).
    • 1/2 teaspoon sugar (a secret ingredient that beautifully balances the acidity of the tomatoes).
    • Salt and freshly ground black pepper, to taste.
  • For the Cheesy Layer:
    • 8 ounces (approx. 225g) low-moisture part-skim mozzarella cheese, shredded. This cheese melts wonderfully and helps prevent your mini pizzas from becoming too watery.
    • 4 ounces (approx. 115g) white cheddar cheese, shredded or thinly sliced. This provides a fantastic contrast, especially when crafting “ghosts” or “mummy bandages.”
    • 2 ounces (approx. 55g) provolone cheese, thinly sliced. I love using this for cutting into specific, crisp shapes like ghost outlines or mummy wraps because it holds its form well.
  • For the Frightful Toppings:
    • 1/2 cup pitted black olives, sliced into thin rings (perfect for spider bodies) or halved (great for spider legs or creepy eyes).
    • 1/4 cup green olives, sliced (for alien eyes, monster accents, or just a splash of color).
    • 1 small red bell pepper, thinly sliced or cut into small shapes (e.g., tiny pumpkin faces, bat wings, or even spooky letters).
    • 1 small yellow bell pepper, thinly sliced or cut into small shapes (e.g., crescent moons, stars, or a contrasting color for monster features).
    • 1 small green bell pepper, thinly sliced or cut into small shapes (e.g., witches’ hats, Frankenstein stitches, or a ghoulish green accent).
    • 1/2 cup mini pepperoni slices. These are incredibly versatile for mummy bandages, monster eyes, or just classic mini pepperoni pizzas.
    • Fresh basil leaves or fresh parsley, finely chopped, for garnish and a burst of fresh flavor at the end.
    • Optional: Jalapeño slices, thinly cut into monster mouths or jagged teeth for those who enjoy a little spice.
    • Optional: Small cookie cutters in various Halloween shapes (ghosts, bats, pumpkins, stars, tiny circles) to easily cut cheese or peppers.

Equipment You’ll Need:

  • Large baking sheets (at least 2, possibly 3 depending on the size of your oven and the number of pizzas you’re making).
  • Parchment paper or silicone baking mats (these are lifesavers for preventing sticking and easy cleanup).
  • Rolling pin.
  • Various round cookie cutters (ranging from 2-inch to 4-inch diameter for your mini pizza bases). Alternatively, the rim of a drinking glass works perfectly.
  • A small, sharp knife or a pizza cutter.
  • Small Halloween-themed cookie cutters (these are really fun for shaping cheese, peppers, and other toppings).
  • Cutting board.
  • Small mixing bowl (for preparing your sauce).
  • Pastry brush (for oiling your dough).
  • Spatula or pizza peel (for transferring pizzas to and from the baking sheets).
  • Grater (if you’re using block cheese instead of pre-shredded).
  • A small saucepan (if you’re simmering your own crushed tomatoes for sauce).

Phase 1: Preparing Your Halloween Pizza Base

This is where the magic begins, laying the foundation for our spooktacular mini Halloween pizzas!

  1. Bring Dough to Room Temperature: If your pizza dough is straight from the fridge or freezer, let it sit on your kitchen counter for at least 30-60 minutes (or several hours if frozen and thawing) before you start. This makes it much easier to roll out and work with, preventing it from snapping back constantly. I usually unwrap it and lightly oil it, covering it with a clean towel to prevent it from drying out.
  2. Preheat Oven and Prep Baking Sheets: Position an oven rack in the middle of your oven. Preheat your oven to 425°F (220°C). While it’s heating, line your baking sheets with parchment paper or silicone baking mats. Then, lightly dust the parchment paper with a little flour or cornmeal. This extra step helps achieve a crispy bottom crust.
  3. Roll Out the Dough: Lightly flour your clean work surface. Divide your pizza dough into two or three manageable portions. Take one portion and, using your rolling pin, roll it out into a thin sheet, about 1/8 to 1/4 inch thick. Aim for an even thickness so your mini pizzas cook consistently.
  4. Cut Out Pizza Circles: Using your round cookie cutters (or the rim of a drinking glass), cut out as many circles as you can from the rolled-out dough. Gather the scraps, gently knead them together, let them rest for 5-10 minutes, and then re-roll and cut out more circles until you’ve used all the dough. This is a very satisfying part of making mini pizzas!
  5. Transfer and Pre-bake (Optional but Recommended): Carefully transfer your dough circles to the prepared baking sheets, leaving a little space between each one. If you desire an extra-crispy crust that stands up well to toppings, I highly recommend a quick pre-bake. Brush each dough circle lightly with olive oil. Pop the baking sheets into the preheated oven for 3-5 minutes, just until the dough starts to puff up slightly and begins to look set, but not browned. This step is a game-changer for preventing soggy bottoms, especially with all our fun Halloween toppings! Remove from the oven and set aside.
  6. Prepare Your Spooky Sauce: While your dough is resting or pre-baking, prepare your sauce. If you’re using canned crushed tomatoes, pour them into a small saucepan. Add the minced garlic, dried oregano, dried basil, red pepper flakes (if using), and sugar. Season generously with salt and freshly ground black pepper. Bring the sauce to a gentle simmer over medium-low heat, stirring occasionally, for about 10-15 minutes. This allows the flavors to meld beautifully. If you’re using pre-made marinara, you can simply warm it gently or use it straight from the jar, though I still recommend adding a touch of fresh garlic and herbs for extra zest.

Phase 2: Crafting Spooky Toppings

Now for the really creative and fun part – transforming our ingredients into ghoulish delights!

  1. Shred Your Cheeses: If you’re using block cheese, grab your grater and shred your mozzarella and white cheddar. If you’re using pre-shredded, you’re one step ahead! Set aside in separate bowls. Thinly slice your provolone if it’s not already pre-sliced.
  2. Slice Your Olives: Take your pitted black olives and slice about half of them into thin rings for future spider bodies or small accents. Halve the remaining black olives lengthwise, as these will be perfect for spider bodies or monster eyes. Slice your green olives into rings as well.
  3. Prepare Your Bell Peppers: This is where your Halloween cookie cutters can shine!
    • Red Bell Pepper: Wash, core, and deseed the red bell pepper. Slice it into thin planks. Using a small, sharp knife or tiny cookie cutters, cut out mini pumpkin shapes, little triangles for eyes, and jagged mouths for jack-o’-lanterns. You can also cut out tiny bat shapes or other scary silhouettes.
    • Yellow Bell Pepper: Prepare similarly to the red pepper. Use it to cut out crescent moons, small stars, or even little yellow ghost shapes to add variety.
    • Green Bell Pepper: Core and deseed. Cut thin strips or use a small knife to create “Frankenstein stitches,” tiny witches’ hats, or other green accents. These can also be used for monster eyebrows or just some eerie green color.

    Alternatively, you can simply thinly slice all the bell peppers and let your guests arrange them creatively, but pre-cutting makes the assembly much smoother, especially with little helpers!

  4. Ready Your Pepperoni: Keep your mini pepperoni slices as they are; their size is perfect for mini pizzas. For mummy pizzas, you might want to cut some into thinner strips, which can be done easily with kitchen shears.
  5. Gather Other Garnishes: Finely chop your fresh basil or parsley. Have your jalapeño slices ready if you’re including them. Arrange all your prepared toppings in small bowls – it’s like setting up a haunted buffet for your pizzas!

Phase 3: Assembling Your Mini Halloween Pizzas

Now for the truly artistic part – bringing our spooky visions to life on each mini pizza!

  1. Sauce the Bases: Take your pre-baked (or fresh, if you skipped the pre-bake) mini pizza crusts. Using a small spoon, spread a thin, even layer of your spooky sauce over each one, leaving a small border around the edge for the crust. Don’t go too heavy on the sauce, as it can make the pizza soggy.
  2. Lay Down the Mozzarella Base: Sprinkle a generous amount of shredded mozzarella cheese over the sauce on each mini pizza. This forms the primary cheesy layer and is crucial for holding all your spooky toppings in place.
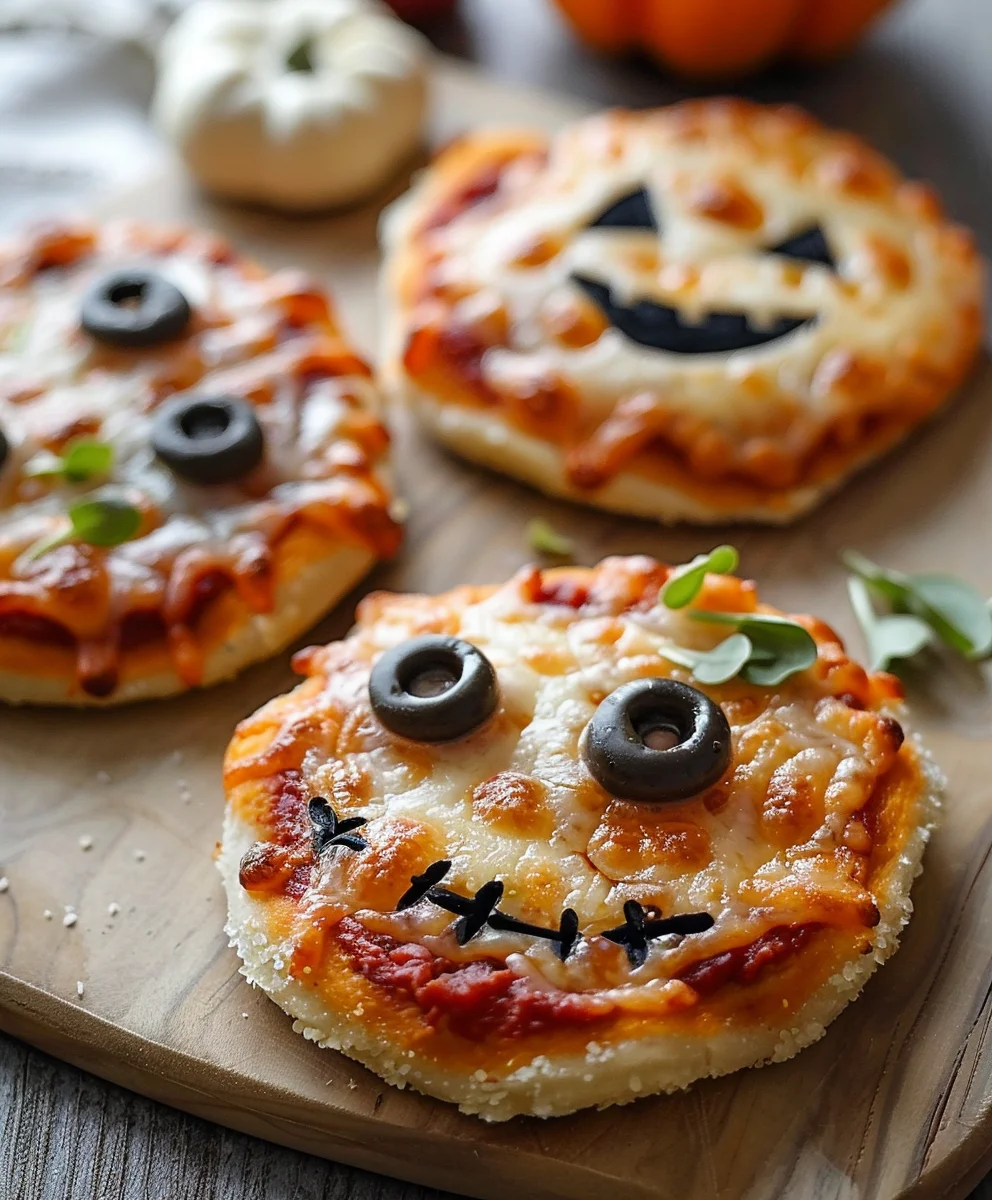
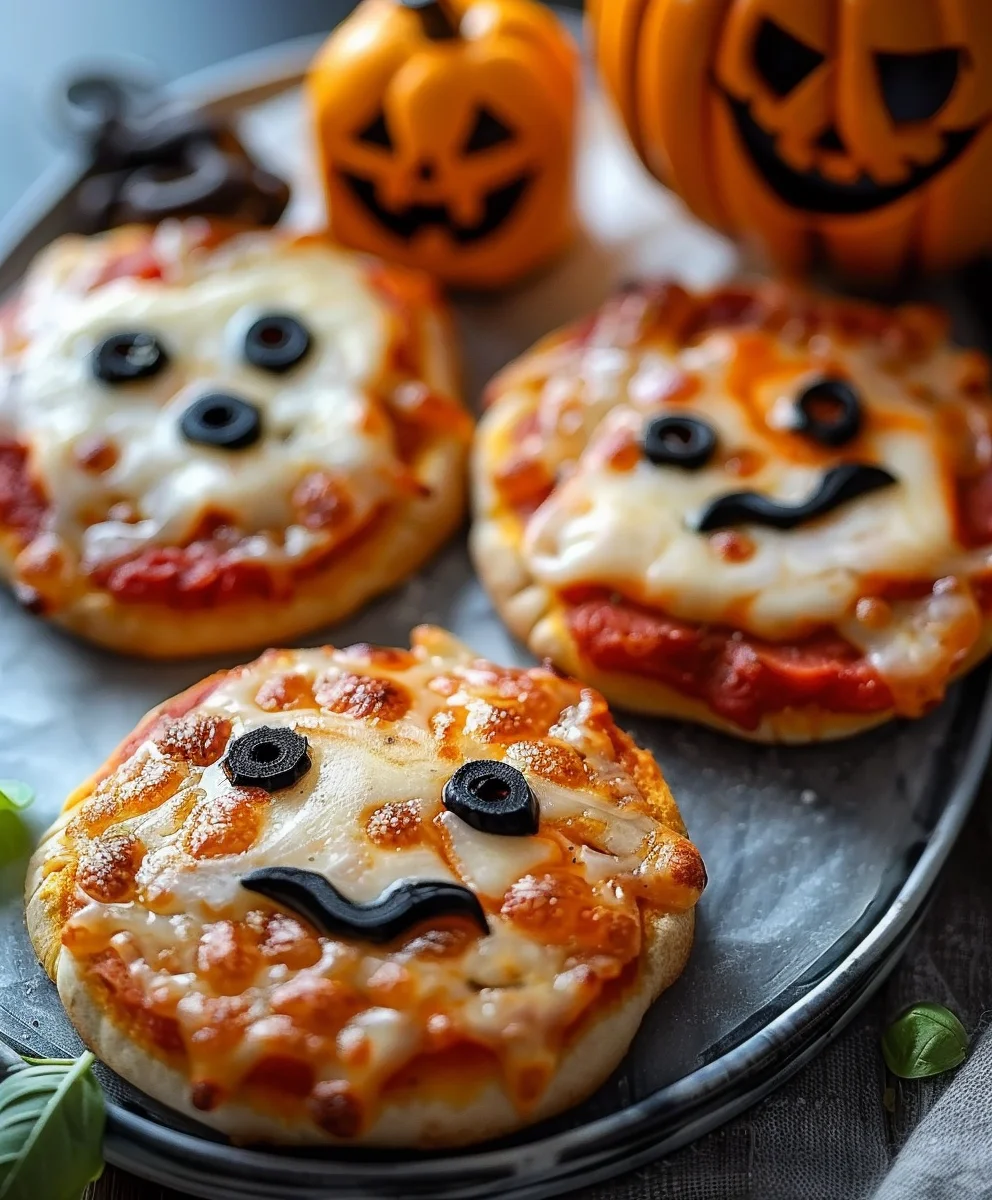
  3. Create Spooky Designs: This is where your creativity comes out to play! Here are some ideas for your “Mini Halloween Pizzas”:
    • Mummy Pizzas:

      On top of the mozzarella, lay thin strips of provolone or white cheddar cheese in a crisscross pattern, mimicking mummy bandages. Leave a small gap near the top for the “eyes.” Place two mini pepperoni slices (or small black olive rings) in that gap to be the mummy’s peeking eyes. You can even add a tiny dot of sauce or a small piece of green olive in the center of the pepperoni for pupils!

    • Spider Pizzas:

      Place a halved black olive (cut side down) in the center of the mozzarella for the spider’s body. Then, arrange thin strips of black olive rings (or even thin strips of black bell pepper if you’re feeling fancy) radiating out from the body to create the spider’s eight legs. You can vary the size of the spider from cute to truly terrifying!

    • Ghost Pizzas:

      Using a small ghost-shaped cookie cutter, cut a ghost shape out of a slice of provolone or white cheddar cheese. Carefully place this cheese ghost on top of the mozzarella layer. Then, use two tiny pieces of black olive for the ghost’s eyes. You can also make a slightly larger ghost with one large ghost cookie cutter and then arrange smaller toppings around it.

    • Jack-o’-Lantern Pizzas:

      Place a small, round slice of yellow or red bell pepper on top of the mozzarella. Then, take the tiny triangular pieces of bell pepper you cut earlier and arrange them as eyes and a nose. Use a jagged piece of bell pepper or a thin slice of jalapeño for the grinning, spooky mouth.

    • Bat Pizzas:

      For something a little different, you can cut small bat shapes out of black olives or slices of green bell pepper. Place these bats flying over your cheesy landscape. Tiny red bell pepper slivers can be used for glowing red eyes for the bats.

    • Monster Pizzas:

      Get truly wild! Use green olive slices for one large cyclops eye, or two smaller ones. Add thin strips of green bell pepper for Frankenstein stitches, or use jalapeño slices for monstrous teeth. Mini pepperoni can be used for blushing monster cheeks or multiple eyes. Let your imagination run wild here!

    Don’t be afraid to mix and match. You can have a different spooky design on each mini pizza, making for a truly varied and exciting Halloween platter!

Phase 4: Baking Your Frightfully Delicious Creations

The moment of truth! Get ready for your kitchen to smell absolutely incredible.

  1. Arrange on Baking Sheets: Carefully transfer your fully assembled mini Halloween pizzas to your prepared baking sheets, making sure they are not overcrowded. Give them a little breathing room so they can bake evenly.
  2. Bake to Perfection: Place the baking sheets into your preheated 425°F (220°C) oven. Bake for 8-12 minutes. The exact timing will depend on your oven and how thin your crusts are.
  3. Check for Doneness: Keep a close eye on them! You’ll know they’re ready when the crusts are golden brown and crisp, the cheese is beautifully melted and bubbly, and the toppings are slightly tender. If you used the pre-baking step, they might bake a little faster.
  4. Rotate if Necessary: If you notice some pizzas are browning faster than others, rotate the baking sheets halfway through the baking time for even cooking.
  5. Cool Slightly: Once baked, carefully remove the baking sheets from the oven. Let the mini pizzas cool on the sheets for 2-3 minutes before transferring them. This allows the cheese to set slightly, making them easier to handle and preventing toppings from sliding off.

Phase 5: Serving and Spooky Presentation Tips

The final flourish to make your Mini Halloween Pizzas truly unforgettable!

  1. Transfer to Serving Platter: Use a spatula or pizza peel to transfer your warm, bubbly mini pizzas to a large serving platter. Arrange them artfully to showcase all your different spooky designs.
  2. Garnish for Freshness: Just before serving, sprinkle your finely chopped fresh basil or parsley over the pizzas. This adds a burst of fresh flavor and a vibrant green color that contrasts beautifully with the warm cheese and toppings.
  3. Creative Presentation Ideas:
    • Haunted Graveyard: Arrange the pizzas on a dark serving tray. You can even sprinkle some dried oregano or basil around them to mimic “dirt.”
    • Spiderweb Platter: If you have a round platter, you can use a small squeeze bottle of sauce (or even a little balsamic glaze) to draw a spiderweb pattern on the platter before arranging the pizzas.
    • Candlelight Ambiance: Serve your mini Halloween pizzas under dim lighting with some flickering LED candles to enhance the spooky atmosphere.
    • Label Your Monsters: If you made many different monster designs, you could even create small, fun labels for each type (e.g., “Mummy Bites,” “Spider Slices,” “Ghostly Grub”).
  4. Serve Warm: These mini pizzas are best served warm, straight from the oven, when the cheese is at its ooey-gooey best. They’re perfect as an appetizer for a Halloween party or a fun, themed dinner for the family.

Chef’s Notes & Troubleshooting Tips:

Even seasoned chefs encounter little hiccups! Here are some extra tips to ensure your Mini Halloween Pizzas are a monstrous success:

  • Dough Too Sticky or Dry?

    If your dough is too sticky to work with, add a tiny bit more flour to your work surface and rolling pin. If it’s too dry and tearing, mist it lightly with water or brush with a little olive oil, and let it rest for another 10 minutes to rehydrate and relax the gluten.

  • Soggy Crust Syndrome?

    The pre-baking step is your best friend here! If you skipped it and find your crusts are a bit soft, don’t fret. Next time, give them that crucial 3-5 minute initial bake. Also, ensure you don’t overload the pizzas with too much sauce or very wet toppings (like fresh tomatoes) without proper drainage.

  • Cheese Not Melting Properly?

    Using low-moisture part-skim mozzarella is key for a good melt without too much oil separation. If your cheese isn’t melting beautifully, your oven might not be hot enough, or your pizzas might be too far from the heat source. Ensure your oven is fully preheated to the correct temperature.

  • Creative Topping Variations:

    • Veggie Monsters: Think beyond peppers! Thinly sliced zucchini can be cut into scales, mushrooms can be spooky eyes, or corn kernels can be monster teeth.
    • Meat Lover’s Horrors: Crumbled cooked sausage (perhaps with a touch of red pepper for a fiery look), or thinly sliced ham cut into eerie shapes.
    • Sweet & Spooky: For a dessert pizza twist, use a cream cheese “sauce” with fruit cut into Halloween shapes and a drizzle of chocolate for webs! (Though that’s a whole other recipe!)
  • Making Ahead & Storage:

    You can prepare your sauce and chop most of your toppings a day in advance. Store them separately in airtight containers in the refrigerator. The assembled (but unbaked) pizzas can be covered loosely and refrigerated for an hour or two, but they’re truly best when baked immediately after assembly. Leftover baked mini pizzas can be stored in an airtight container in the fridge for 2-3 days. Reheat them in a toaster oven or a regular oven at 350°F (175°C) for a few minutes until warmed through and crispy again.

  • Gluten-Free or Vegan Options:

    Many stores now offer excellent gluten-free pizza doughs and crusts that work wonderfully for mini pizzas. For a vegan option, substitute regular mozzarella with a plant-based shredded mozzarella alternative and omit any meat toppings. You can still create incredibly fun and spooky designs with veggies and vegan cheese!

  • Involving the Kids:

    This is truly a fantastic recipe for getting kids involved! Let them help roll out the dough, cut out the circles, spread the sauce, and especially get creative with arranging the spooky toppings. Just be mindful of sharp knives and hot ovens, supervising closely.

I hope you have an absolute blast making these Mini Halloween Pizzas. They’re not just food; they’re edible art, perfect for adding a touch of festive fright to your celebrations!

Mini Halloween Pizzas: Spooky Fun for Kids & Adults!

Conclusion:

So there you have it – my absolute favorite recipe for creating the most unforgettable Halloween experience right in your kitchen. We’ve journeyed through the simple, yet incredibly creative, steps that transform ordinary ingredients into extraordinary, spooky delights. What truly makes these Mini Halloween Pizzas a must-try isn’t just their adorable, festive appearance; it’s the sheer joy they bring to the process of making them and the infectious delight they spark in everyone who takes a bite. Imagine the laughter, the delighted gasps, and the immense satisfaction of knowing you’ve whipped up something both incredibly fun and undeniably delicious that perfectly captures the spirit of the season.

These aren’t just snacks; they’re conversation starters, memory makers, and the perfect edible centerpiece for any ghoulish gathering. Their ease of preparation means even the busiest ghost or goblin can conjure them up with minimal fuss, making them an ideal choice for last-minute party preparations or a cherished family activity on a chilly autumn evening. The hands-on nature of this recipe, particularly the decorating phase, provides a fantastic opportunity for kids and adults alike to unleash their inner artists, making each pizza a unique, edible masterpiece. It’s a recipe that promises not just a tasty treat, but a cherished festive tradition for years to come.

Serving Suggestions to Enhance Your Spooky Spread:

Now, let’s talk about how to truly elevate your Mini Halloween Pizzas experience. While they shine brightest as the undisputed star of your Halloween party appetizer spread, their versatility knows no bounds. Consider serving them alongside a vibrant green salad for a balanced weeknight dinner – perhaps a ‘swamp monster’ salad with a zesty vinaigrette to complement the rich pizza flavors! For a casual family movie night, pile them high on a rustic wooden platter with some spooky dips like a blood-red marinara, a creamy, ‘graveyard goo’ green pesto, or even a smoky roasted red pepper dip, providing an interactive and flavorful experience for all.

They also make fantastic lunchbox surprises for the kids the next day, bringing a touch of Halloween magic and cheer to their school lunches, surely making them the envy of the cafeteria. Or, if you’re hosting a more elaborate sit-down meal, consider serving one or two Mini Halloween Pizzas as an exciting and whimsical first course, playfully setting the tone for the rest of your feast and piquing your guests’ appetites. Don’t forget that these mini marvels are also perfectly portable, making them excellent contributions to potlucks, school events, or office parties – just be sure to keep them warm in an insulated carrier to maintain their fresh-baked goodness and melty cheese appeal.

Unleash Your Creativity with Variations:

The true beauty of this recipe lies in its remarkable adaptability. Don’t be afraid to let your culinary creativity run wild and transform these pizzas into something uniquely yours! While I’ve guided you through some classic spooky designs, consider experimenting with different shapes for your crusts. Think ghost outlines using a simple ghost-shaped cookie cutter, intricate bat wings, or even tiny pumpkin shapes to add even more festive flair to your edible canvas. For toppings, the sky’s the limit, and this is where the real fun begins. Swap out the pepperoni for sliced black olives, artfully arranged to create creepy spider bodies on a luscious cheese web, or use thinly sliced green peppers for Frankenstein’s monster stitches and hair, adding a touch of edible artistry.

For a vibrant vegetarian option, strategically placed mushroom slices can be arranged to look like spooky, eerie eyes peeking out from the cheesy surface, or a colorful mix of finely diced bell peppers and corn can create a vibrant, edible mosaic that’s as pleasing to the eye as it is to the palate. Cheese varieties can also add a whole new dimension of flavor and texture – a smoky provolone for a ‘haunted’, deep flavor, or a luxurious blend of sharp cheddar and gooey mozzarella for extra pull and irresistible meltiness. And for those with an adventurous sweet tooth looking for an unconventional yet delightful twist, consider a ‘dessert pizza’ variation: use a simple sugar cookie dough crust, spread with cream cheese ‘frosting’ dyed spooky colors (think ghastly green or eerie purple), and lavishly decorated with gummy worms, candy corn, chocolate ‘dirt’ crumbles, and even edible googly eyes. Imagine the sheer delight of offering both savory and sweet Mini Halloween Pizzas at your gathering, catering to every craving! You could even set up a interactive build-your-own station, laying out an array of various spooky toppings and letting your guests, young and old, unleash their inner mad scientists and create their personalized Halloween masterpieces.

I genuinely hope you’re feeling incredibly inspired and excited to give these wonderful Mini Halloween Pizzas a try in your own kitchen. They are truly more than just a recipe; they are an invitation to create, to celebrate, and to enjoy the undeniable magic and festive spirit of Halloween with all your loved ones. There’s something truly special and deeply rewarding about seeing your culinary creations come to life, especially when they bring such genuine smiles, enthusiastic cheers, and spooky delight to everyone around the table.

So, gather your ingredients, put on your favorite spooky playlist, perhaps some classic monster mash tunes, and let the fun begin! And once you’ve conjured up your own glorious batch of these delightful treats, please don’t keep the magic to yourself. I would absolutely love to hear all about your experience. Did you discover a new, ingenious topping combination that became an instant hit? Did your kids get enthusiastically involved in decorating their own monstrous or friendly spooky faces? Did these fantastic pizzas become the undisputed hit of your Halloween party, leaving everyone clamoring for more? Share your stories, your creative photos, and your invaluable tips in the comments below! Your creativity inspires me and helps other home cooks discover new, exciting ways to enjoy their cooking and make their celebrations even more memorable. Happy haunting, and most importantly, happy baking!


Mini Halloween Pizzas

Mini Halloween Pizzas

Transform your spooky season with Mini Halloween Pizzas! These bite-sized wonders combine classic pizza comfort with whimsical Halloween charm, perfect for any gathering. Easy to assemble, they’re a delightful activity for kids and adults, elevating your festive spirit one delicious bite at a time.

Prep Time
30 Minutes

Cook Time
10 Minutes

Total Time
40 Minutes

Servings
8 mini pizzas

Ingredients

  • 8 mini pizza crusts (store-bought or homemade)
  • 1 cup pizza sauce
  • 2 cups shredded mozzarella cheese
  • 8 slices mozzarella cheese (for ghost shapes)
  • 12 slices beef pepperoni
  • 1 small black olive, sliced (for eyes)
  • 1 orange bell pepper, cut into pumpkin shapes

Instructions

  1. Step 1
    Preheat oven to 425°F (220°C). Line baking sheets with parchment paper.
  2. Step 2
    Spread pizza sauce evenly over each of the 8 mini pizza crusts, leaving a small border for the crust. Top with a generous amount of shredded mozzarella cheese.
  3. Step 3
    Decorate with spooky designs: For Mummy Pizzas, arrange beef pepperoni slices as bandages. For Ghost Pizzas, place ghost-shaped mozzarella slices (cut from the 8 slices) and use small black olive slices for eyes. For Jack-o’-Lantern Pizzas, use pieces of the orange bell pepper (cut into pumpkin shapes) to create faces.
  4. Step 4
    Carefully place assembled mini pizzas on the prepared baking sheets.
  5. Step 5
    Bake for 8-12 minutes, or until crusts are golden brown and cheese is beautifully melted and bubbly. Exact timing depends on your oven and crust thickness.
  6. Step 6
    Remove from oven and let cool on the baking sheets for 2-3 minutes before transferring to a serving platter. Serve warm.

Important Information

Nutrition Facts (Per Serving)

It is important to consider this information as approximate and not to use it as definitive health advice.

Allergy Information

Please check ingredients for potential allergens and consult a health professional if in doubt.

« Previous Post
Spooky Halloween Eyeball Jello Treats - Fun & Creepy!
Next Post »
Black Velvet Cheesecake Cookies: Rich & Decadent Treat

If you enjoyed this…

Hot Bubble Up Pickle Dip Bake – The Ultimate Party Appetizer

Sweet and Spicy Whipped Feta Crostini with Hot Honey Delight

French Onion Meatballs: A Delicious & Easy Recipe

Primary Sidebar

Browse by Diet

BreakfastDinnerLunchDessertAppetizer

Sweet Peach Yogurt Parfait Delight

One of my fondest memories is from a lazy summer afternoon spent at my grandmother’s house. The sun filtered through the kitchen window, casting a warm glow over the table where she would create her culinary magic. It was during one of those blissful moments that I first tasted her Peach Yogurt Parfait with Honey and Granola. The sweet aroma of ripe peaches mingling with creamy yogurt and the crunch of granola was nothing short of heavenly. It felt like summer captured in a bowl, and I still remember the joy of diving in with a spoon, each layer revealing a new burst of flavor.

When I think about that parfait, I can almost hear the gentle hum of the bees outside, reminding me of the floral notes that honey brings to every bite. The vibrant yellows and soft oranges of the peaches contrast beautifully with the creamy white yogurt and the golden crunch of granola. It’s a dish that not only looks delightful but also tastes like a celebration of fresh, wholesome ingredients.

What makes my version of this Peach Yogurt Parfait special is the careful balance of flavors and textures. I use ripe, juicy peaches, drizzled with locally sourced honey, and a homemade granola that’s bursting with nuts and seeds for an extra crunch. It’s a simple dish, but every layer is crafted with love and attention.

Let me show you exactly how to make this delightful parfait, so you can bring a bit of that summer magic into your kitchen!

Sweet Peach Yogurt Parfait Delight

Why You’ll Love This Recipe

  • Delightfully creamy texture from the Greek yogurt, paired with the juicy sweetness of fresh peaches.
  • Ready in under 20 minutes, making it a quick and satisfying breakfast or snack option.
  • Budget-friendly, using common ingredients that you may already have in your pantry.
  • Customizable with your favorite granola and nuts, allowing you to tailor each parfait to your taste.
  • Perfectly balanced flavors with the bright acidity of lemon juice and the sweetness of honey enhancing the peaches.

Ingredients

  • For the Parfait:
  • 2 cups plain Greek yogurt (or vanilla yogurt for a sweeter option)
  • 2 large ripe peaches, diced (about 2 cups)
  • 1 tablespoon fresh lemon juice (to prevent browning of peaches)
  • 2 tablespoons honey (plus more for drizzling)
  • 1 teaspoon vanilla extract (optional for extra flavor)
  • For the Granola:
  • 1 cup granola (store-bought or homemade; see notes for a simple granola recipe)
  • 1/4 cup sliced almonds (optional for added crunch)
  • 1/4 cup shredded coconut (optional for added flavor)

Let’s dive into some key ingredients that make this Peach Yogurt Parfait so delightful! First, the Greek yogurt is not only creamy but also packed with protein, making it a satisfying option for breakfast or a snack. If you’re looking for a sweeter option, you can easily substitute it with vanilla yogurt, though it may alter the overall flavor balance. Next, the ripe peaches are the star of the show; their natural sweetness shines through, so I recommend choosing peaches that yield slightly to pressure, indicating they’re perfectly ripe. If peaches aren’t in season, feel free to use nectarines or even frozen peaches—just thaw them before use. Finally, honey adds a lovely floral sweetness that ties everything together. If you prefer, maple syrup can serve as a delicious substitute.

Step-by-Step Instructions

  1. Start by preparing the peaches. Wash them thoroughly, then slice and dice them into bite-sized pieces. In a medium bowl, toss the diced peaches with 1 tablespoon of fresh lemon juice to prevent browning. Set aside for about 5 minutes while the lemon juice works its magic.
  2. In a separate bowl, combine the Greek yogurt, 2 tablespoons of honey, and 1 teaspoon of vanilla extract if using. Stir the mixture until smooth and thoroughly blended. This should take about a minute. Avoid overmixing to maintain the creaminess of the yogurt.
  3. Now it’s time to layer your parfait. Grab a clear glass or bowl to showcase your beautiful creation. Start with a generous spoonful of the yogurt mixture at the bottom—about 1/4 cup will do. Use a spoon to spread it evenly.
  4. Add a layer of the diced peaches over the yogurt, ensuring they cover the yogurt completely. You might want to use about half of what you have prepared—roughly 1 cup. This layer should be visually appealing, so arrange the peaches neatly.
  5. Sprinkle 1/4 cup of granola over the peaches. This adds a delightful crunch. Make sure to distribute it evenly to ensure every bite has that satisfying texture. Avoid packing it down too tightly, as you want it to maintain its crunch.
  6. Repeat the layers: spoon in another 1/4 cup of yogurt, followed by another cup of peaches, and another sprinkle of granola. You should have at least two layers, but feel free to add more depending on your glass size.
  7. Finish off your parfait with a drizzle of honey on top for added sweetness and a touch of elegance. If you’re using sliced almonds or shredded coconut, sprinkle them on top now. It adds a lovely visual contrast and extra flavor.
  8. Serve immediately or refrigerate for up to 30 minutes before serving to allow the flavors to meld together. However, I recommend enjoying it fresh to maintain the granola’s crunch.

Pro Tips for the Best Peach Yogurt Parfait With Honey And Granola

  • Make sure to choose ripe peaches for the best flavor and texture. A common mistake is using unripe fruit, which can lead to a less enjoyable parfait. Look for peaches that are fragrant and slightly soft to the touch.
  • Use a clear glass to assemble your parfait; this not only makes for a beautiful presentation but also allows you to see the colorful layers, which adds to the enjoyment of eating it.
  • For an even creamier texture, consider whipping the Greek yogurt with a hand mixer for a couple of minutes before layering. This small adjustment makes a huge difference in mouthfeel.
  • Be mindful of the granola-to-yogurt ratio. Too much granola can overwhelm the parfait, while too little can make it feel too creamy. Aim for about 1/4 cup of granola per layer for the perfect balance.
  • If you’re making this for a gathering, consider preparing the yogurt and peaches ahead of time and layering them just before serving. This ensures the granola stays crunchy!

Variations & Serving Ideas

There are so many ways to get creative with your Peach Yogurt Parfait! For a tropical twist, swap out the peaches for mangoes or pineapples and top with coconut flakes. If you prefer a berry flavor, mix in some blueberries or strawberries with the peaches for added color and taste. For a nutty version, incorporate chopped walnuts or pecans instead of almonds.

As for serving ideas, this parfait pairs beautifully with a side of scrambled eggs for a hearty breakfast or fresh fruit salad for a light lunch. You might also enjoy it alongside whole grain toast with almond butter for an energizing snack. The contrast of flavors and textures will elevate your meal experience!

Storage, Make-Ahead & Reheating

The Peach Yogurt Parfait is best enjoyed fresh, but you can prepare some components ahead of time. Store the layered parfait in an airtight container in the refrigerator for up to 24 hours. However, be cautious; the granola may lose its crunch if stored too long. You can freeze the yogurt and peach mixture for up to 2 months; just remember to thaw it in the refrigerator overnight before serving.

If you plan to enjoy this dish the next day, it can taste even better as the flavors meld together. Just remember to add the granola right before serving to keep its delightful crunch!

Frequently Asked Questions

Can I make Peach Yogurt Parfait With Honey And Granola ahead of time?

Yes — in fact, it tastes even better the next day as the flavors meld. However, I recommend waiting to add the granola until just before serving to maintain its crunch.

What can I substitute for Greek yogurt?

If you prefer a lighter option, you can substitute Greek yogurt with regular yogurt or a dairy-free alternative like coconut yogurt. Just remember that this may alter the creaminess and flavor profile slightly.

Can I use frozen peaches for this parfait?

Absolutely! Just make sure to thaw the frozen peaches before using them. They will still add great flavor, though the texture may be slightly softer than fresh peaches.

How do I make the parfait vegan?

To make a vegan version, substitute the Greek yogurt with a plant-based yogurt alternative, and replace honey with maple syrup or agave nectar. This keeps the parfait sweet while adhering to a vegan diet.

What other fruits can I use in this recipe?

You can mix and match fruits based on your preference. Try using strawberries, blueberries, raspberries, or even bananas. Just make sure to adjust the lemon juice as needed to prevent browning.

Sweet Peach Yogurt Parfait Delight

Final Thoughts

The Peach Yogurt Parfait with Honey and Granola is a delightful blend of creamy yogurt, sweet peaches, and crunchy granola that creates a satisfying and nourishing treat. Each layer bursts with flavor, making it a perfect choice for breakfast or a light dessert.

This is the kind of recipe I come back to again and again, especially when I want something refreshing and wholesome to start my day. The harmony of sweet and tart flavors, combined with the delightful crunch, never fails to lift my spirits!

I encourage you to give this parfait a try and indulge in its comforting goodness. Feel free to share your results or even add your own twist—perhaps a sprinkle of cinnamon or a handful of nuts. Enjoy creating your perfect parfait!

Print
clock clock iconcutlery cutlery iconflag flag iconfolder folder iconinstagram instagram iconpinterest pinterest iconfacebook facebook iconprint print iconsquares squares iconheart heart iconheart solid heart solid icon

Peach Yogurt Parfait


  • Author: Lily author
  • Total Time: 15 minutes
  • Yield: 4 servings 1x
Pin Recipe
Print Recipe

Description

This Peach Yogurt Parfait combines creamy Greek yogurt, juicy peaches, and crunchy granola for a delightful treat. It’s a perfect breakfast or snack that captures the essence of summer in every bite.


Ingredients

Scale
  • For the Parfait:
  • 2 cups plain Greek yogurt (or vanilla yogurt for a sweeter option)
  • 2 large ripe peaches, diced (about 2 cups)
  • 1 tablespoon fresh lemon juice (to prevent browning of peaches)
  • 2 tablespoons honey (plus more for drizzling)
  • 1 teaspoon vanilla extract (optional for extra flavor)
  • For the Granola:
  • 1 cup granola (store-bought or homemade; see notes for a simple granola recipe)
  • 1/4 cup sliced almonds (optional for added crunch)
  • 1/4 cup shredded coconut (optional for added flavor)

Instructions

  1. Start by preparing the peaches. Wash them thoroughly, then slice and dice them into bite-sized pieces. In a medium bowl, toss the diced peaches with 1 tablespoon of fresh lemon juice to prevent browning. Set aside for about 5 minutes while the lemon juice works its magic.
  2. In a separate bowl, combine the Greek yogurt, 2 tablespoons of honey, and 1 teaspoon of vanilla extract if using. Stir the mixture until smooth and thoroughly blended. This should take about a minute. Avoid overmixing to maintain the creaminess of the yogurt.
  3. Now it’s time to layer your parfait. Grab a clear glass or bowl to showcase your beautiful creation. Start with a generous spoonful of the yogurt mixture at the bottom—about 1/4 cup will do. Use a spoon to spread it evenly.
  4. Add a layer of the diced peaches over the yogurt, ensuring they cover the yogurt completely. You might want to use about half of what you have prepared—roughly 1 cup. This layer should be visually appealing, so arrange the peaches neatly.
  5. Sprinkle 1/4 cup of granola over the peaches. This adds a delightful crunch. Make sure to distribute it evenly to ensure every bite has that satisfying texture. Avoid packing it down too tightly, as you want it to maintain its crunch.
  6. Repeat the layers: spoon in another 1/4 cup of yogurt, followed by another cup of peaches, and another sprinkle of granola. You should have at least two layers, but feel free to add more depending on your glass size.
  7. Finish off your parfait with a drizzle of honey on top for added sweetness and a touch of elegance. If you’re using sliced almonds or shredded coconut, sprinkle them on top now. It adds a lovely visual contrast and extra flavor.
  8. Serve immediately or refrigerate for up to 30 minutes before serving to allow the flavors to meld together. However, I recommend enjoying it fresh to maintain the granola’s crunch.
  • Prep Time: 15 mins
  • Cook Time: 0 mins
  • Category: Breakfast
  • Method: No-cook
  • Cuisine: American

Nutrition

  • Serving Size: 1 parfait
  • Calories: 250
  • Sugar: 20 g
  • Sodium: 50 mg
  • Fat: 5 g
  • Saturated Fat: 2 g
  • Unsaturated Fat: 3 g
  • Trans Fat: 0 g
  • Carbohydrates: 40 g
  • Fiber: 3 g
  • Protein: 10 g
  • Cholesterol: 10 mg

Keywords: Choose ripe peaches for the best flavor and texture. Use a clear glass for a beautiful presentation. For creaminess, consider whipping the yogurt before layering. Be mindful of the granola-to-yogurt ratio. Prepare yogurt and peaches ahead of time for gatherings, layering just before serving.

Did you make this recipe?

Share a photo and tag us — we can't wait to see what you've made!

Sun-Kissed Frozen Orange Cream Slush

As a child, summer days felt like they lasted forever. I remember the sticky heat wrapping around me as I played outside, my laughter mingling with the sounds of the neighborhood. But nothing could cool me down quite like the moment I’d spot my grandmother, laboring over her blender, whipping up her famous Frozen Orange Creamsicle Slush. That vibrant orange treat, with its frosty texture and sweet citrus aroma, was like a burst of sunshine in a cup. Just one sip, and I could feel the coolness wash over me, sparking pure joy.

This Frozen Orange Creamsicle Slush has a way of making you feel like a kid again. Its creamy, dreamy consistency is a delightful balance of bright orange and soft vanilla, inviting you to dive right in. The refreshing tang of orange dances on your tongue, while the smooth creaminess envelops you in a comforting embrace. It’s a nostalgic treat that’s perfect for hot summer afternoons or anytime you need a little pick-me-up.

What makes my version of this slush stand out is the addition of a hint of vanilla bean, which elevates the flavor and adds an extra layer of richness. Plus, it’s super easy to whip up with just a few simple ingredients that you probably already have on hand! So, if you’re ready to relive those sun-soaked memories, let me show you exactly how to make it.

Sun-Kissed Frozen Orange Cream Slush

Why You’ll Love This Recipe

  • Each slush is a perfect blend of creamy vanilla and zesty orange, creating a nostalgic flavor reminiscent of summer days.
  • This refreshing treat is ready in under 15 minutes, making it an ideal quick dessert for unexpected guests or hot afternoons.
  • With just 8 simple ingredients, it’s budget-friendly, ensuring you don’t have to break the bank to enjoy a delicious slush.
  • The slush has a perfectly smooth texture, thanks to the combination of ice and ice cream, providing a delightful contrast to the bright citrus flavors.
  • It’s highly customizable; you can easily adjust the sweetness and add fresh herbs for a unique twist that suits your taste.

Ingredients

  • 2 cups orange juice (freshly squeezed or store-bought)
  • 1 cup vanilla ice cream
  • 1 cup crushed ice
  • 1/2 cup milk (whole or 2%)
  • 1/4 cup granulated sugar (adjust based on sweetness preference)
  • 1 teaspoon vanilla extract
  • Zest of 1 orange (for added flavor)
  • Fresh orange slices and mint leaves (for garnish)

The star of this Frozen Orange Creamsicle Slush is the orange juice, which provides the vibrant, citrusy base. Freshly squeezed juice will yield the brightest flavor, but store-bought options can be just as convenient. If you’re opting for store-bought, choose 100% pure juice with no added sugars for the best results. Another essential ingredient is the vanilla ice cream; it adds creaminess and sweetness. You can substitute it with dairy-free ice cream if you’re looking for a vegan option. Whole or 2% milk complements the ice cream, creating a smooth blend. If you want a lower-calorie version, almond or oat milk can be good alternatives.

Lastly, the granulated sugar can be adjusted based on your sweetness preference. If you prefer a more natural sweetener, consider using honey or agave syrup. The orange zest enhances the flavor profile, providing an aromatic pop that brings the whole slush together. Don’t skip it! It adds an extra layer of brightness that makes this slush truly special.

Step-by-Step Instructions

  1. Start by preparing your ingredients. Gather 2 cups of orange juice, 1 cup of vanilla ice cream, and 1 cup of crushed ice. Make sure the ice is finely crushed, as larger chunks can make blending difficult.
  2. In a blender, combine the orange juice, vanilla ice cream, crushed ice, and 1/2 cup of milk. Add 1/4 cup of granulated sugar and 1 teaspoon of vanilla extract. If you like a sweeter slush, consider adding a bit more sugar at this stage.
  3. Add the zest of 1 orange to the blender. This step is crucial for enhancing the citrus flavor of your slush. Make sure not to include the bitter white pith—only the flavorful zest.
  4. Blend the mixture on medium-high speed for about 30-45 seconds. Stop once the ingredients are fully combined and the slush has a smooth, even consistency. If you notice large chunks of ice, blend for an additional 10-15 seconds. Avoid over-blending, as this can make the slush too liquidy.
  5. Once blended, taste the slush. If it needs more sweetness, add a little more sugar and blend for a few more seconds. If it’s too thick, you can add a splash of milk to reach your desired consistency.
  6. Pour the slush into glasses. This recipe typically serves 4, but you can easily double it for larger gatherings. Use a spoon to help guide the slush into the glasses if needed.
  7. Garnish each serving with fresh orange slices and mint leaves. The mint not only adds a pop of color but also a refreshing aroma that complements the citrus flavors beautifully.
  8. Serve immediately and enjoy! If you’ve made extra, you can refrigerate it for a short time, but it’s best enjoyed fresh.

Pro Tips for the Best Frozen Orange Creamsicle Slush

  • Don’t skip the orange zest! It’s a game-changer for flavor. Always zest before juicing to make it easier.
  • Use a high-powered blender for the best texture. A standard blender may struggle with ice, leading to uneven consistency. If you have a food processor, that can work too, but ensure the ice is finely crushed.
  • Adjust the ice-to-liquid ratio carefully. If your slush is too thick, it won’t blend well. Start with less ice and add more until you reach your preferred texture.
  • Be cautious with the sugar! Always start with the lower amount, as you can easily add more, but it’s hard to fix an overly sweet slush.
  • For a fun twist, consider adding a splash of coconut milk or a handful of fresh fruit like strawberries or pineapple. This not only enhances the flavor but also adds a beautiful color contrast.

Variations & Serving Ideas

There are countless ways to put a spin on your Frozen Orange Creamsicle Slush. Consider making a tropical version by adding in some pineapple juice or coconut milk for a delightful tropical twist. If you’re feeling adventurous, try incorporating a handful of frozen mango or peach slices for added sweetness. For a lighter version, swap out the vanilla ice cream for Greek yogurt for a creamy yet tangy alternative.

As for serving ideas, this refreshing slush pairs wonderfully with light summer dishes like grilled chicken skewers, fish tacos, or a simple salad topped with citrus vinaigrette. The bright, zesty flavors of the slush complement these dishes perfectly, making them an ideal pairing for a sunny day.

Storage, Make-Ahead & Reheating

This Frozen Orange Creamsicle Slush is best enjoyed fresh, but if you have leftovers, you can store them in an airtight container in the fridge for up to 2 days. Just keep in mind that the slush may lose some of its texture over time as the ice melts. It doesn’t freeze well, as the ice will turn into a solid block. If you must freeze it, blend again after thawing to restore the slushy consistency. This treat is best the day you make it, as the flavors meld together beautifully overnight, enhancing its deliciousness.

Frequently Asked Questions

Can I make Frozen Orange Creamsicle Slush ahead of time?

Yes — in fact, it tastes even better the next day as the flavors meld. However, it’s best to enjoy it fresh, as the texture can change if stored for too long. If you need to prepare it ahead, keep it in the fridge and re-blend before serving.

What kind of orange juice should I use?

For the best flavor, use freshly squeezed orange juice. However, if you’re short on time, opt for 100% pure store-bought juice without added sugars. This will ensure that your slush remains flavorful and refreshing.

Can I substitute the vanilla ice cream?

Absolutely! If you’re looking for a dairy-free option, coconut milk ice cream or a non-dairy vanilla ice cream can work wonderfully. They will still provide the creamy texture and sweetness you desire.

How can I adjust the sweetness of my slush?

You can easily adjust the sweetness by modifying the amount of sugar added. Start with 1/4 cup and taste the mixture before blending. If you prefer it sweeter, add more sugar gradually until it reaches your desired level.

What should I do if my slush is too thick?

If your slush is too thick, simply add a splash of milk or orange juice and blend again. This will help achieve a more drinkable consistency while maintaining the slushy texture. Adjust gradually to reach your preferred thickness.

Sun-Kissed Frozen Orange Cream Slush

Final Thoughts

The Frozen Orange Creamsicle Slush is a delightful blend of refreshing citrus and creamy goodness, making it a perfect treat for warm days or any time you crave a taste of nostalgia. The way the bright orange flavor dances with the creamy texture truly elevates this slush, transforming it into a satisfying escape from the everyday.

This is the kind of recipe I come back to again and again, especially when I’m looking to cool down or impress guests at a summer gathering. It’s simple to make and always brings smiles all around! I encourage you to try this recipe for yourself—don’t hesitate to share your results or even put your own spin on it. Happy slushing!

Print
clock clock iconcutlery cutlery iconflag flag iconfolder folder iconinstagram instagram iconpinterest pinterest iconfacebook facebook iconprint print iconsquares squares iconheart heart iconheart solid heart solid icon

Frozen Orange Creamsicle Slush


  • Author: Lily author
  • Total Time: 15 minutes
  • Yield: 4 servings 1x
Pin Recipe
Print Recipe

Description

This Frozen Orange Creamsicle Slush is a refreshing treat that combines creamy vanilla and zesty orange flavors. Perfect for hot summer days, it brings back nostalgic memories with every sip.


Ingredients

Scale
  • 2 cups orange juice (freshly squeezed or store-bought)
  • 1 cup vanilla ice cream
  • 1 cup crushed ice
  • 1/2 cup milk (whole or 2%)
  • 1/4 cup granulated sugar (adjust based on sweetness preference)
  • 1 teaspoon vanilla extract
  • Zest of 1 orange (for added flavor)
  • Fresh orange slices and mint leaves (for garnish)

Instructions

  1. Start by preparing your ingredients. Gather 2 cups of orange juice, 1 cup of vanilla ice cream, and 1 cup of crushed ice. Make sure the ice is finely crushed, as larger chunks can make blending difficult.
  2. In a blender, combine the orange juice, vanilla ice cream, crushed ice, and 1/2 cup of milk. Add 1/4 cup of granulated sugar and 1 teaspoon of vanilla extract. If you like a sweeter slush, consider adding a bit more sugar at this stage.
  3. Add the zest of 1 orange to the blender. This step is crucial for enhancing the citrus flavor of your slush. Make sure not to include the bitter white pith—only the flavorful zest.
  4. Blend the mixture on medium-high speed for about 30-45 seconds. Stop once the ingredients are fully combined and the slush has a smooth, even consistency. If you notice large chunks of ice, blend for an additional 10-15 seconds. Avoid over-blending, as this can make the slush too liquidy.
  5. Once blended, taste the slush. If it needs more sweetness, add a little more sugar and blend for a few more seconds. If it’s too thick, you can add a splash of milk to reach your desired consistency.
  6. Pour the slush into glasses. This recipe typically serves 4, but you can easily double it for larger gatherings. Use a spoon to help guide the slush into the glasses if needed.
  7. Garnish each serving with fresh orange slices and mint leaves. The mint not only adds a pop of color but also a refreshing aroma that complements the citrus flavors beautifully.
  8. Serve immediately and enjoy! If you’ve made extra, you can refrigerate it for a short time, but it's best enjoyed fresh.
  • Prep Time: 15 min
  • Cook Time: 0 min
  • Category: Dessert
  • Method: Blending
  • Cuisine: American

Nutrition

  • Serving Size: 1 serving
  • Calories: 200
  • Sugar: 30 g
  • Sodium: 50 mg
  • Fat: 5 g
  • Saturated Fat: 3 g
  • Unsaturated Fat: 2 g
  • Trans Fat: 0 g
  • Carbohydrates: 40 g
  • Fiber: 1 g
  • Protein: 2 g
  • Cholesterol: 20 mg

Keywords: Don't skip the orange zest! It's a game-changer for flavor. Always zest before juicing to make it easier.

Did you make this recipe?

Share a photo and tag us — we can't wait to see what you've made!

Zesty Lemon Poppy Seed Delight

One rainy afternoon, I found myself in my grandmother’s cozy kitchen, the kind that always smelled like warmth and love. She was whipping up her famous Lemon Poppy Seed Loaf, a recipe that had been passed down through generations. As the batter came together, the zesty aroma of fresh lemons filled the air, mingling perfectly with the nutty fragrance of poppy seeds. I can still picture her, apron-clad, as she expertly drizzled a vibrant citrus icing over the loaf, creating a glossy, sun-kissed finish that beckoned us to dive in. It was a moment that sparked my own passion for baking, and this recipe has become a cherished staple in my home ever since.

When you take a bite of this Lemon Poppy Seed Loaf, it’s like a burst of sunshine on your palate. The loaf is beautifully golden, with a tender crumb that melts in your mouth. Each slice is speckled with tiny poppy seeds, adding a delightful crunch that contrasts beautifully with the tangy sweetness of the lemon. And that citrus icing? It’s the finishing touch that elevates this loaf from ordinary to extraordinary, with its bright, zesty flavor dancing on your taste buds.

This recipe stands out because it embraces simplicity while delivering on flavor. I’ve added a hint of vanilla to the batter, enhancing the overall taste and making it even more indulgent. Trust me, once you make this Lemon Poppy Seed Loaf With Citrus Icing, it’ll become a go-to in your baking repertoire.

So, let me show you exactly how to make it!

Zesty Lemon Poppy Seed Delight

Why You’ll Love This Recipe

  • Moist and tender crumb that melts in your mouth, thanks to the perfect balance of butter and buttermilk.
  • Bright, zesty lemon flavor paired with crunchy poppy seeds, creating a delightful texture and taste experience.
  • Easy to whip up in just about an hour, perfect for last-minute gatherings or a cozy afternoon treat.
  • Budget-friendly with everyday ingredients, making it an accessible option for all home bakers.
  • The citrus icing adds a sweet tang that elevates the loaf, turning a simple recipe into a showstopper!

Ingredients

  • 1 ½ cups (190g) all-purpose flour
  • 1 teaspoon baking powder
  • ½ teaspoon baking soda
  • ½ teaspoon salt
  • 3 tablespoons poppy seeds
  • ½ cup (115g) unsalted butter, softened to room temperature
  • 1 cup (200g) granulated sugar
  • 2 large eggs
  • 1 teaspoon vanilla extract
  • 1 teaspoon lemon zest (from about 1 medium lemon)
  • ½ cup (120ml) buttermilk
  • 2 tablespoons fresh lemon juice

For the Citrus Icing:

  • 1 cup (120g) powdered sugar
  • 2 tablespoons fresh lemon juice
  • 1 tablespoon orange juice
  • 1 teaspoon lemon zest (for garnish, optional)

Let’s dive into the key ingredients that make this Lemon Poppy Seed Loaf so special. The all-purpose flour provides the structure and base for the loaf, while the baking powder and baking soda ensure it rises perfectly, giving the loaf a light texture. For a gluten-free variation, you could substitute the flour with a gluten-free all-purpose blend. Poppy seeds not only add a delightful crunch but also contribute to the unique flavor profile that pairs well with the citrus notes.

Unsalted butter is crucial for achieving the buttery richness that makes this loaf so moist. If you’re looking for a dairy-free option, coconut oil or a vegan butter can be used instead. The buttermilk is another essential component, providing acidity that activates the baking soda for a fluffy texture. If you don’t have buttermilk on hand, you can easily make a substitute by mixing ½ cup of milk with 1 tablespoon of vinegar or lemon juice and letting it sit for about 5 minutes.

Step-by-Step Instructions

  1. Preheat your oven to 350°F (175°C). Grease a 9×5-inch loaf pan or line it with parchment paper for easy removal later.
  2. In a medium mixing bowl, whisk together 1 ½ cups of all-purpose flour, 1 teaspoon of baking powder, ½ teaspoon of baking soda, ½ teaspoon of salt, and 3 tablespoons of poppy seeds. This helps to evenly distribute the baking agents and ensures a uniform rise.
  3. In a large mixing bowl, cream together ½ cup of softened unsalted butter and 1 cup of granulated sugar using an electric mixer on medium speed for about 3-4 minutes, until the mixture is light and fluffy. Make sure to scrape down the sides of the bowl occasionally.
  4. Add 2 large eggs, 1 teaspoon of vanilla extract, and 1 teaspoon of lemon zest to the creamed butter and sugar, mixing until fully combined. You want a smooth consistency, so ensure there are no lumps of butter.
  5. In a small bowl, combine ½ cup of buttermilk and 2 tablespoons of fresh lemon juice. Alternately add the dry ingredients and buttermilk mixture to the butter mixture, starting and ending with the dry ingredients. Mix just until combined; do not overmix, as this can lead to a dense loaf.
  6. Pour the batter into the prepared loaf pan. Smooth the top with a spatula, ensuring it’s even. Bake in the preheated oven for 50-60 minutes, or until a toothpick inserted in the center comes out clean. The edges should be lightly golden brown, and the center should feel just set.
  7. Once baked, remove the loaf from the oven and allow it to cool in the pan for about 10 minutes. Then, transfer it to a wire rack to cool completely. Resist the urge to slice too soon, as it will be crumbly if it’s still warm.
  8. While the loaf is cooling, prepare the citrus icing. In a medium bowl, whisk together 1 cup of powdered sugar, 2 tablespoons of fresh lemon juice, and 1 tablespoon of orange juice until smooth. If the icing is too thick, you can add a little more juice to reach your desired consistency.
  9. Once the loaf is completely cool, drizzle the citrus icing over the top. If you like, sprinkle with an additional teaspoon of lemon zest for an extra pop of flavor and color.

Pro Tips for the Best Lemon Poppy Seed Loaf With Citrus Icing

  • Be careful not to overmix your batter; this is a common mistake that can lead to a dense loaf. Mix just until the dry ingredients are incorporated for a light and fluffy texture.
  • Use room temperature ingredients, especially the butter and eggs. This helps to create a smoother batter and ensures even baking. Take your eggs out of the fridge about 30 minutes before you start.
  • For a more pronounced lemon flavor, consider adding a little lemon extract in addition to the zest and juice. Just a half teaspoon can elevate the citrus notes significantly.
  • When measuring your flour, spoon it into the measuring cup and level it off with a knife instead of scooping directly from the bag. This prevents packing and ensures you don’t end up with a dry loaf.
  • Invest in a good quality loaf pan; it makes a difference in heat distribution, which ensures even baking. If your pan is dark-coated, reduce the oven temperature by 25°F to prevent over-browning.

Variations & Serving Ideas

For a delightful twist, consider adding blueberries or raspberries to the batter for a fruity burst of flavor. You can also experiment with different citrus fruits—try lime or grapefruit zest and juice for a refreshing change. For a healthier option, substitute half of the all-purpose flour with whole wheat flour for added fiber without compromising too much on texture.

This Lemon Poppy Seed Loaf pairs beautifully with a light salad, such as a mixed greens salad with a vinaigrette, or a cup of tea for a cozy afternoon treat. It also complements a creamy cheese platter, as the acidity of the loaf balances rich cheeses perfectly. Lastly, a scoop of vanilla ice cream on the side creates a delightful contrast of temperatures and flavors!

Storage, Make-Ahead & Reheating

This Lemon Poppy Seed Loaf can be stored at room temperature for up to 3 days if wrapped tightly in plastic wrap. If you want to keep it longer, it freezes well for up to 3 months. To freeze, wrap the loaf tightly in plastic wrap and then in aluminum foil to prevent freezer burn.

When you’re ready to enjoy it again, simply thaw it in the fridge overnight. Reheat individual slices in the microwave for 15-20 seconds or in a toaster oven until warmed through. Interestingly, many people find that this loaf tastes even better the next day, as the flavors have time to meld!

Frequently Asked Questions

Can I make Lemon Poppy Seed Loaf With Citrus Icing ahead of time?

Yes — in fact, it tastes even better the next day! You can make the loaf a day in advance, allowing the flavors to develop. Just be sure to store it in an airtight container to maintain its moisture.

Can I substitute the poppy seeds?

Absolutely! If you don’t have poppy seeds on hand or prefer an alternative, you can use sesame seeds for a similar crunch or omit them entirely for a smooth loaf.

What can I use instead of buttermilk?

If you don’t have buttermilk, you can easily create a substitute by mixing ½ cup of milk (dairy or plant-based) with 1 tablespoon of vinegar or lemon juice. Let it sit for 5 minutes before using in the recipe.

How can I make this recipe gluten-free?

To make a gluten-free version of this Lemon Poppy Seed Loaf, substitute the all-purpose flour with a gluten-free all-purpose flour blend. Just ensure that the blend contains a binding agent like xanthan gum for the best results.

What is the best way to store leftover loaf?

Leftover Lemon Poppy Seed Loaf should be stored in an airtight container at room temperature for up to 3 days. For longer storage, wrap it tightly and freeze for up to 3 months. Thaw it before serving for the best texture.

Zesty Lemon Poppy Seed Delight

Final Thoughts

The Lemon Poppy Seed Loaf with Citrus Icing is truly a delightful treat that brings a burst of brightness to any occasion. The zesty lemon flavor combined with the subtle crunch of poppy seeds creates a satisfying balance, while the citrus icing adds a touch of sweetness that perfectly complements the loaf’s tanginess.

This is the kind of recipe I come back to again and again, especially when I want to brighten up a gloomy day or celebrate a small victory. The aroma that fills the kitchen as it bakes is absolutely heavenly! I encourage you to give this recipe a try; you might just find it becoming a beloved staple in your home. Don’t forget to share your results or even add your own unique twist—I can’t wait to see what you create!

Print
clock clock iconcutlery cutlery iconflag flag iconfolder folder iconinstagram instagram iconpinterest pinterest iconfacebook facebook iconprint print iconsquares squares iconheart heart iconheart solid heart solid icon

Lemon Poppy Seed Loaf


  • Author: Lily author
  • Total Time: 20 minute
  • Yield: 1 loaf 1x
Pin Recipe
Print Recipe

Description

This Lemon Poppy Seed Loaf is a delightful treat that combines zesty lemon flavor with crunchy poppy seeds. Topped with a citrus icing, it’s perfect for any occasion.


Ingredients

Scale
  • 1 ½ cups (190g) all-purpose flour
  • 1 teaspoon baking powder
  • ½ teaspoon baking soda
  • ½ teaspoon salt
  • 3 tablespoons poppy seeds
  • ½ cup (115g) unsalted butter, softened to room temperature
  • 1 cup (200g) granulated sugar
  • 2 large eggs
  • 1 teaspoon vanilla extract
  • 1 teaspoon lemon zest (from about 1 medium lemon)
  • ½ cup (120ml) buttermilk
  • 2 tablespoons fresh lemon juice
  • 1 cup (120g) powdered sugar
  • 2 tablespoons fresh lemon juice
  • 1 tablespoon orange juice
  • 1 teaspoon lemon zest (for garnish, optional)

Instructions

  1. Preheat your oven to 350°F (175°C). Grease a 9×5-inch loaf pan or line it with parchment paper for easy removal later.
  2. In a medium mixing bowl, whisk together 1 ½ cups of all-purpose flour, 1 teaspoon of baking powder, ½ teaspoon of baking soda, ½ teaspoon of salt, and 3 tablespoons of poppy seeds. This helps to evenly distribute the baking agents and ensures a uniform rise.
  3. In a large mixing bowl, cream together ½ cup of softened unsalted butter and 1 cup of granulated sugar using an electric mixer on medium speed for about 3-4 minutes, until the mixture is light and fluffy. Make sure to scrape down the sides of the bowl occasionally.
  4. Add 2 large eggs, 1 teaspoon of vanilla extract, and 1 teaspoon of lemon zest to the creamed butter and sugar, mixing until fully combined. You want a smooth consistency, so ensure there are no lumps of butter.
  5. In a small bowl, combine ½ cup of buttermilk and 2 tablespoons of fresh lemon juice. Alternately add the dry ingredients and buttermilk mixture to the butter mixture, starting and ending with the dry ingredients. Mix just until combined; do not overmix, as this can lead to a dense loaf.
  6. Pour the batter into the prepared loaf pan. Smooth the top with a spatula, ensuring it’s even. Bake in the preheated oven for 50-60 minutes, or until a toothpick inserted in the center comes out clean. The edges should be lightly golden brown, and the center should feel just set.
  7. Once baked, remove the loaf from the oven and allow it to cool in the pan for about 10 minutes. Then, transfer it to a wire rack to cool completely. Resist the urge to slice too soon, as it will be crumbly if it’s still warm.
  8. While the loaf is cooling, prepare the citrus icing. In a medium bowl, whisk together 1 cup of powdered sugar, 2 tablespoons of fresh lemon juice, and 1 tablespoon of orange juice until smooth. If the icing is too thick, you can add a little more juice to reach your desired consistency.
  9. Once the loaf is completely cool, drizzle the citrus icing over the top. If you like, sprinkle with an additional teaspoon of lemon zest for an extra pop of flavor and color.
  • Prep Time: 15 mins
  • Cook Time: 50-60 mins
  • Category: Dessert
  • Method: Baking
  • Cuisine: American

Nutrition

  • Serving Size: 1 slice
  • Calories: 200
  • Sugar: 15 g
  • Sodium: 150 mg
  • Fat: 8 g
  • Saturated Fat: 5 g
  • Unsaturated Fat: 3 g
  • Trans Fat: 0 g
  • Carbohydrates: 30 g
  • Fiber: 1 g
  • Protein: 3 g
  • Cholesterol: 40 mg

Keywords: Be careful not to overmix your batter; this is a common mistake that can lead to a dense loaf. Use room temperature ingredients for a smoother batter and even baking.

Did you make this recipe?

Share a photo and tag us — we can't wait to see what you've made!

  • Privacy Policy
  • Terms Of Service
  • Contact
  • About
  • GDPR

Copyright © 2025 Homesmad