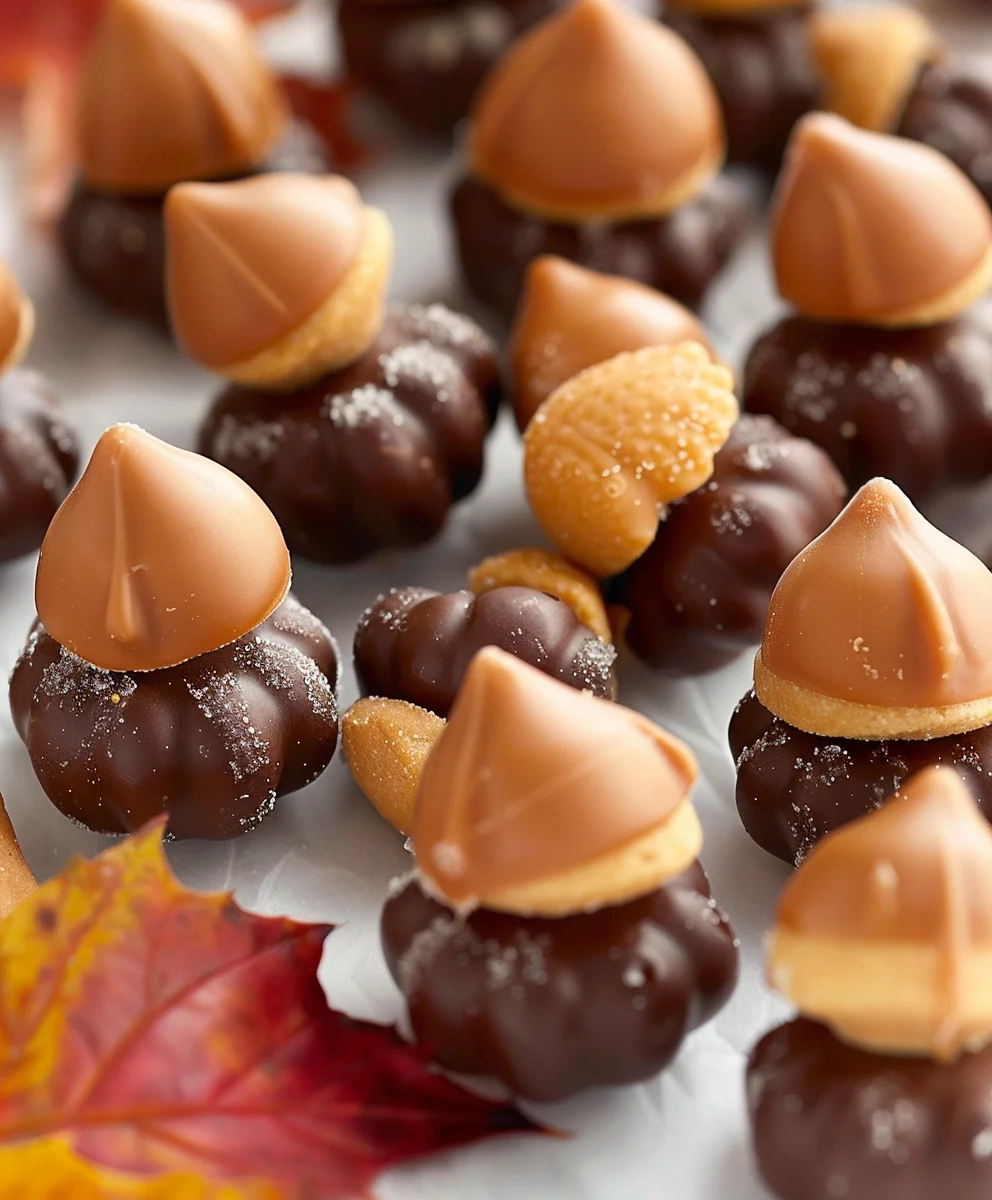
Candy Acorns! There’s something utterly charming about these miniature treats that perfectly capture the essence of autumn’s bounty and the cozy spirit of the harvest season. I’m delighted to share with you a recipe for what I consider one of the most delightful and visually appealing no-bake confections. Their irresistible combination of creamy peanut butter filling, a satisfying crunch from a cookie cap, and a delicate chocolate “stem” makes them a universally beloved delight for both children and adults. They truly are a highlight of any seasonal gathering.
While not steeped in ancient culinary history like some traditional desserts, these delightful Candy Acorns have quickly become a cherished modern classic, especially popular for fall festivities, Thanksgiving tables, and even as charming additions to woodland-themed parties. Their appeal lies in their ability to evoke a sense of nostalgic simplicity and natural beauty, transforming humble ingredients into something truly special and memorable. Easy to prepare and requiring no oven, they offer a wonderful opportunity for creativity in the kitchen, making them a fantastic activity for all ages to enjoy together.
Ingredients:
- 1 bag (approximately 10-12 oz) Hershey’s Kisses: I usually go for the classic milk chocolate, but feel free to experiment with any flavor you love, like special dark, caramel-filled, or even Hugs for a different color! Just make sure they are unwrapped and ready to go. You’ll likely get about 50-60 acorns from one bag, depending on the exact weight.
- 1 box (11 oz) Mini Nilla Wafers: These delightful little cookies form the perfect base for our acorn cap. Their size and shape are just right, and their subtle vanilla flavor complements the chocolate beautifully. You’ll definitely want the mini ones for authentic acorn proportions, as regular Nilla Wafers would be too large and overwhelm the delicate Kiss.
- 1 bag (10-12 oz) Mini Chocolate Chips: These will be our charming little acorn caps! Semi-sweet or milk chocolate chips both work wonderfully. Make sure they’re not too tiny if you want a more pronounced cap, but the standard mini size is usually perfect. The points of these chips perfectly mimic the tiny stem of an acorn.
- 1/2 cup Creamy Peanut Butter (optional, but highly recommended): This acts as our edible “glue” to hold everything together. Make sure it’s creamy, not crunchy, for smooth application. It not only provides excellent adhesion but also adds a fantastic, complementary flavor to the chocolate. If you have nut allergies or prefer to avoid peanut butter, melted chocolate or even a thick frosting can be used as an alternative adhesive.
- 1/4 cup Melted Chocolate (optional): If you’re not using peanut butter as glue, or if you want to add extra drizzles or embellishments, a small amount of melted chocolate (milk, dark, or white) will come in handy. You can easily melt chocolate chips in a microwave-safe bowl in short bursts, stirring frequently, or use a double boiler for a gentler melt.
- 1/4 cup Pretzel Sticks (optional, for stems): For an added touch of realism and a lovely salty crunch, small pretzel sticks make fantastic acorn stems. You’ll want the thin, short kind, often labeled as “pretzel snaps” or “mini pretzel sticks.” These can be easily broken into smaller, appropriate-sized pieces.
- 1/4 cup Shelled Nuts (optional, for alternative caps): Think slivered almonds, pecan halves, or even small walnut pieces. These can replace the mini chocolate chips for a more rustic, textured acorn cap, adding a different aesthetic and flavor profile.
- 1/2 cup Powdered Sugar (optional, for glaze or dusting): If you want to make a simple glaze for drizzling or dipping, or just a light dusting for a “snowy” effect, powdered sugar is your base. It’s incredibly versatile for adding extra flair.
- 1-2 tablespoons Milk or Water (optional, for glaze): To mix with powdered sugar to create a thin, pourable glaze. Start with a small amount and add more gradually to achieve your desired consistency.
- Food Coloring (optional): For tinting your powdered sugar glaze if you want to add a splash of festive color, perhaps for a holiday spread or a themed party. Gel food colorings work best for vibrant hues without thinning the glaze too much.
- Assorted Sprinkles (optional): For a little extra sparkle and fun! Nonpareils, jimmies, or even edible glitter can transform your acorns into festive treats.
- Parchment Paper or Wax Paper: Essential for a non-stick surface to place your finished `Candy Acorns` while they set. This prevents sticking and makes cleanup a breeze.
- Baking Sheet or Large Plate: To hold the parchment/wax paper and provide a stable, flat surface for your work and for the acorns to set.
Gathering Your Supplies and Prepping:
Before we dive into the fun of assembly, a little preparation goes a long way to ensure a smooth and enjoyable experience. Trust me, having everything laid out and ready makes the process much more relaxed, especially if you’re making a big batch or involving little helpers! This careful pre-planning is a small investment that yields big returns in efficiency and enjoyment, ensuring your `Candy Acorns` come together beautifully.
- Unwrap Your Hershey’s Kisses: This is perhaps the most time-consuming part, but it’s a great task to do upfront. Carefully unwrap all of your Hershey’s Kisses. I find it helpful to put on some music or a podcast while I do this; it turns a mundane task into a relaxing warm-up for the creative process ahead. Place the unwrapped Kisses in a bowl or on a plate where they’re easily accessible. The number of Kisses you unwrap will dictate how many `Candy Acorns` you can make, so plan accordingly based on your desired yield.
- Prepare Your Workspace: Lay out a sheet of parchment paper or wax paper on a baking sheet or a large, flat plate. This provides a non-stick surface for your finished acorns to set, preventing them from sticking and making cleanup a breeze. Having a dedicated drying area ready helps streamline the assembly line and keeps your counter clean. Ensure you have ample space, as you’ll want to place your completed acorns without them touching each other initially.
- Organize Your Core Ingredients: Open your bag of Mini Nilla Wafers and your bag of Mini Chocolate Chips. Have your creamy peanut butter (if using as adhesive) ready to go, perhaps in a small bowl for easy access. If you’re using melted chocolate as your adhesive, now would be a good time to gently melt a small amount. You can do this in a microwave-safe bowl in 15-20 second intervals, stirring well after each, until smooth. Alternatively, a double boiler method works beautifully for a slower, more controlled melt, which is particularly useful for white chocolate or if you want to keep the chocolate melted for longer. Remember, we just need a little bit of melted chocolate for “glue,” not a whole bowlful for dipping, unless you plan to add extra drizzles later.
- Optional Prep for Variations: If you’re going for pretzel stems, have your pretzel sticks broken into small, approximately 1/2-inch to 3/4-inch pieces. I find it easiest to break them by hand over a small bowl. If you’re using nuts for caps, have them portioned out. If a glaze is in your future, measure out your powdered sugar and milk/water into separate bowls. Getting these optional components ready now means you won’t interrupt your flow during the main assembly, allowing for a more seamless and enjoyable crafting experience.
A little tip: If your kitchen is particularly warm, or if you’re finding the Kisses are getting soft in your hands, consider popping your unwrapped Kisses into the fridge for about 10 minutes before you start. This makes them a bit firmer and less likely to melt in your hands during assembly, ensuring your `Candy Acorns` maintain their lovely, pristine shape. This also helps any adhesive, especially melted chocolate, to set more quickly once applied.
Assembling Your Candy Acorns: The Classic Method:
This is where the magic truly happens! Making `Candy Acorns` is wonderfully simple, making it a fantastic project for all ages. It’s a great way to unleash a little creativity without needing any advanced baking skills. The beauty of this recipe lies in its straightforward steps and the delightful outcome. You’ll be amazed at how quickly these charming treats come together!
- Start with Your Acorn Body: Pick up one unwrapped Hershey’s Kiss. This will be the main, conical body of our acorn. Hold it gently by its flat base. Its distinct shape is perfect for mimicking the bottom of a real acorn.
- Apply the “Glue”: Now, you’ll need your adhesive to bond the Kiss to the cookie. This step is crucial for the structural integrity of your `Candy Acorns`.
- Using Peanut Butter: My preferred method! Take a small dollop of creamy peanut butter (about a quarter of a teaspoon) on your finger or a butter knife. Spread a thin, even layer of peanut butter on the flat bottom of the Hershey’s Kiss. You don’t need a lot, just enough to create a sticky surface that covers the entire flat chocolate base. The peanut butter adds a fantastic flavor dimension that perfectly complements the chocolate and Nilla Wafer!
- Using Melted Chocolate: If you’re opting for melted chocolate, dip the flat bottom of the Hershey’s Kiss directly into your small bowl of melted chocolate, or carefully spread a tiny bit with a toothpick or small brush. Again, a thin layer is all you need. Be relatively quick, as melted chocolate sets faster than peanut butter, especially if it’s not kept warm.
- Using Frosting: A small dot of store-bought or homemade frosting (like a thick buttercream) can also work effectively. Just a tiny dab will do the trick, providing a sweet alternative adhesive.
- Attach the Nilla Wafer Base: Immediately after applying your “glue” to the Kiss, gently press the flat, adhesive-covered side of the Kiss onto the flat side of a Mini Nilla Wafer. Center it as best you can, ensuring the Kiss sits squarely on the wafer. The Wafer forms the base of your acorn, creating that classic shape. Apply a little bit of gentle, even pressure to ensure it adheres well, but not so much that you crush the cookie or deform the delicate Kiss.
- Prepare for the Acorn Cap: Now, for the finishing touch on the cap. Apply another tiny dab of your chosen adhesive (peanut butter or melted chocolate works best here for the cap as well) to the very center of the top, rounded portion of the Mini Nilla Wafer. This small dab will be the anchor for your acorn’s “hat.”
- Place the Mini Chocolate Chip: Take one mini chocolate chip and gently press its flat side onto the peanut butter or melted chocolate dab on the Nilla Wafer. The point of the chocolate chip should face upwards, mimicking the tiny stem on a real acorn cap. This step truly brings the `Candy Acorns` to life, giving them their characteristic, instantly recognizable look.
- Set Aside to Dry: Carefully transfer your newly assembled `Candy Acorn` to your prepared parchment or wax paper-lined baking sheet. Arrange them in neat rows, giving each acorn a little space. Repeat the process for all remaining Kisses, Wafers, and chocolate chips. Allow them to set for at least 30 minutes at room temperature, or longer if your adhesive needs more time to firm up (especially if using melted chocolate in a warm room). For quicker setting, you can pop the baking sheet into the refrigerator for 10-15 minutes, which is highly recommended for firmer results.
Look at them! Aren’t they just adorable? These classic `Candy Acorns` are perfect as they are, simple yet utterly charming. But if you’re feeling adventurous and want to explore more creative avenues, we can definitely take them to the next level with some fun variations and embellishments!
Elevating Your Candy Acorns: Creative Variations and Embellishments:
While the classic `Candy Acorns` are perfectly charming and delicious in their simplicity, there are so many delightful ways to customize them. These variations allow you to match a specific theme, holiday, or just to add a personal touch that makes your treats stand out. These creative additions can also help stretch your imagination and make your batch of acorns truly unique, turning a simple candy into a miniature work of art.
Peanut Butter Delight Acorns:
If you’re a peanut butter lover (like me!), you can enhance that flavor even further. After assembling your basic acorn, you can drizzle a little extra melted peanut butter (just warm it slightly in the microwave to make it runny) over the top of the Nilla Wafer cap. For a firmer, more pronounced peanut butter cap, you can create a simple peanut butter “dough.” Mix about 1/4 cup powdered sugar with 2 tablespoons creamy peanut butter (and a tiny splash of milk if needed) to form a thick, pliable paste. Roll tiny balls of this mixture and flatten slightly to use as caps instead of chocolate chips. This creates an even more pronounced peanut butter flavor profile, perfect for those who adore the classic chocolate-peanut butter combination.
Chocolate Drizzle Extravaganza:
Who doesn’t love more chocolate? Once your basic `Candy Acorns` have set and are firm, melt a small amount of contrasting chocolate (e.g., white chocolate if you used milk chocolate Kisses, or dark chocolate if you used white chocolate Kisses). Using a spoon, a piping bag with a tiny hole, or even a ziploc bag with a corner snipped off, drizzle thin lines of the melted chocolate over the caps and sides of your acorns. You can create a crisscross pattern, random swirls, or elegant zig-zags. Let the drizzles set completely on the parchment paper before handling. This adds a sophisticated, gourmet touch and significant visual appeal, making your `Candy Acorns` look professionally decorated.
Nutty Cap Acorns:
For a more rustic, autumnal feel, substitute the mini chocolate chips with small nuts for the acorn caps. Slivered almonds, small pecan halves, or even tiny pieces of walnuts work beautifully. Just use a small dab of melted chocolate or peanut butter to adhere the nut piece to the top of the Nilla Wafer. The natural texture and unique shape of the nuts give a wonderful, realistic, and earthy look to your `Candy Acorns`, making them especially fitting for Thanksgiving, fall harvest festivals, or any nature-themed gathering. Plus, it adds a delightful crunch!
Pretzel Stem Acorns:
To add a realistic stem and a delightful salty crunch that balances the sweetness, prepare your pretzel sticks by breaking them into small pieces, about 1/2 to 3/4 inch long. After placing your mini chocolate chip (or nut) cap on the Nilla Wafer, gently press one end of a pretzel stick into the top, pointy part of the chocolate chip. The chocolate chip itself provides a soft enough surface for the pretzel to anchor. If using a nut, you might need a tiny extra dab of melted chocolate to secure the pretzel stem firmly to the nut. This is an excellent addition that provides both visual interest and a textural contrast that guests will absolutely love!
Colored Glaze Acorns:
Want to make your `Candy Acorns` pop with vibrant color? Whisk together 1/2 cup powdered sugar with 1-2 tablespoons of milk or water until you have a smooth, pourable glaze. Start with less liquid and add gradually until you reach your desired consistency – thick enough to coat but thin enough to flow. Divide the glaze into small bowls and add a drop or two of food coloring to each, stirring to combine for different colors. You can then dip the tops of your Nilla Wafer caps into the glaze, or simply drizzle it over the entire acorn. Place them back on parchment paper to allow the glaze to set completely, which may take an hour or two. This is particularly fun for themed parties, baby showers, or to match specific holiday decorations.
Sprinkle Fun:
Before any melted chocolate or glaze has fully set, gently sprinkle some colorful sprinkles over your `Candy Acorns`. This is especially appealing if you’re making them for children’s parties, birthday celebrations, or to celebrate any festive occasion. Nonpareils, jimmies, edible glitter, or even themed sprinkle mixes (like autumn leaves or tiny stars) can add a delightful pop of color and a festive sparkle! Simply hold the acorn over a plate to catch excess sprinkles, minimizing waste and mess.
Tips for Perfect Candy Acorns:
Making `Candy Acorns` is generally straightforward and incredibly rewarding, but a few insider tips can ensure your batch turns out absolutely perfect every single time. These little tricks can save you time, prevent common mishaps, and help you achieve beautifully crafted treats that look as good as they taste.
- Keep Your Kisses Cool: As mentioned before, if your kitchen is warm, your Hershey’s Kisses can get a bit soft and difficult to handle. This can lead to smudged chocolate and misshapen acorns. A quick 10-minute chill in the refrigerator before assembly makes them much firmer and less prone to melting from the heat of your hands. This small, proactive step can prevent frustration and keep your acorns looking pristine and professional.
- Less is More with Adhesive: Whether you’re using peanut butter, melted chocolate, or frosting, remember that a little goes a long way. You only need a tiny dab or a thin layer to firmly secure the components. Too much adhesive can easily ooze out from under the Nilla Wafer or the chocolate chip cap, making your `Candy Acorns` messy and less appealing. Furthermore, excessive adhesive takes longer to set, potentially causing components to slip or shift before drying.
- Work in Batches (if needed): If you’re making a very large quantity of `Candy Acorns` for a big event, or if you’re using an adhesive that sets relatively quickly (like melted chocolate, especially in a cooler room), consider working in smaller batches. Assemble 10-15 acorns at a time, allowing that batch to set slightly, then move on to the next set. This ensures that your adhesive doesn’t harden before you’ve had a chance to attach all your components properly.
- Consider Your Nilla Wafers: While Mini Nilla Wafers are the gold standard for `Candy Acorns` due to their perfect size and mild flavor, if you absolutely can’t find them, don’t despair! You can use regular-sized Nilla Wafers and carefully break them into smaller, appropriate-sized pieces, or explore other small, round, plain cookies like shortbread buttons or even certain types of vanilla sandwich cookie thins (just use one side). The key is to find something that is not too crumbly and provides a stable base that is roughly proportional to the Hershey’s Kiss.
- Let Them Set Completely: Patience is a virtue, especially in candy making! Ensure your `Candy Acorns` have completely set and the adhesive is firm before attempting to move, stack, or package them. If the adhesive isn’t fully firm, your delightful creations might fall apart when handled, which is quite disappointing after all your effort. Refrigerating them for 15-30 minutes is often the quickest and most reliable way to achieve a solid set, particularly if you’ve used melted chocolate.
- Involve the Kids: This is a fantastic kid-friendly activity that fosters creativity and fine motor skills! The steps are simple enough for even young children to participate in, especially the unwrapping of the Kisses and the assembly of the components. Just be mindful of any potential mess with the adhesive (especially peanut butter!). It’s a wonderful way to create lasting memories and delicious treats together, and kids absolutely love seeing their creations come to life.
- Experiment with Flavors: Don’t limit yourself to just classic milk chocolate Kisses and plain Nilla Wafers! Be adventurous. Try dark chocolate Kisses for a richer flavor, caramel-filled Kisses for an extra sweet surprise, or even white chocolate Kisses for a different color palette. You could also try different flavored wafer cookies if you can find them (e.g., lemon wafers for a citrusy twist, though Nilla is truly a classic for a reason!). The possibilities for flavor combinations are delightful.
With these tips in your arsenal, you’re well on your way to crafting a stunning display of `Candy Acorns` that are as fun to make as they are to eat! Each step is designed to maximize your success and enjoyment.
Storage and Enjoyment:
Once your `Candy Acorns` are beautifully assembled, fully set, and looking their absolute best, you’ll want to ensure they stay fresh, firm, and delicious until they’re ready to be devoured. Proper storage is key to maintaining their delightful texture and preventing them from melting, becoming stale, or losing their charming appearance. These simple guidelines will help you preserve your hard work and ensure maximum enjoyment.
- Airtight Container is Your Best Friend: The most important rule for storing your `Candy Acorns` is to place them in an airtight container. This prevents air exposure, which can cause the Nilla Wafers to go stale and become soft, and can also cause the chocolate to “bloom.” Chocolate blooming is a harmless white film that can form on the surface, but it’s not as aesthetically pleasing. A good, sealable container will protect both texture and appearance.
- Cool, Dry Place: Store the airtight container in a cool, dry place. A pantry or a cupboard away from direct sunlight, heat sources (like ovens or stovetops), and high humidity is ideal. Room temperature is usually perfectly fine, as long as it’s not too warm (ideally below 75°F or 24°C). If your home tends to be warm, or during particularly hot weather, storing them in the refrigerator might be a better and safer option to prevent melting.
- Refrigeration for Longevity or Warm Climates: If you’ve used peanut butter as your adhesive (which can soften in very warm conditions), or if your home is particularly warm, refrigerating your `Candy Acorns` will help them maintain their firmness and extend their shelf life. Just be aware that refrigeration can sometimes cause a slight “sweating” or condensation when they are brought back to room temperature, which might make the Nilla Wafers a tiny bit softer momentarily. This is usually very minimal and doesn’t significantly impact the taste or overall enjoyment. If refrigerating, consider placing wax paper or parchment paper between layers of acorns to prevent them from sticking together.
- Avoid Freezing: I generally don’t recommend freezing `Candy Acorns`. While technically possible, freezing and thawing can negatively affect the texture of the Nilla Wafers, making them soggy or crumbly. It can also exacerbate chocolate blooming once thawed. They are definitely best enjoyed fresh and stored at refrigerator or cool room temperature.
- Shelf Life: When stored properly in an airtight container at room temperature, `Candy Acorns` typically stay fresh and delicious for up to 1-2 weeks. If refrigerated, their shelf life can extend a bit longer, up to 3 weeks, though in my experience, they are usually devoured long before reaching that point! The main concern for freshness and quality over time is the Nilla Wafers, which can become stale if not protected from air.
- Serving Suggestions:
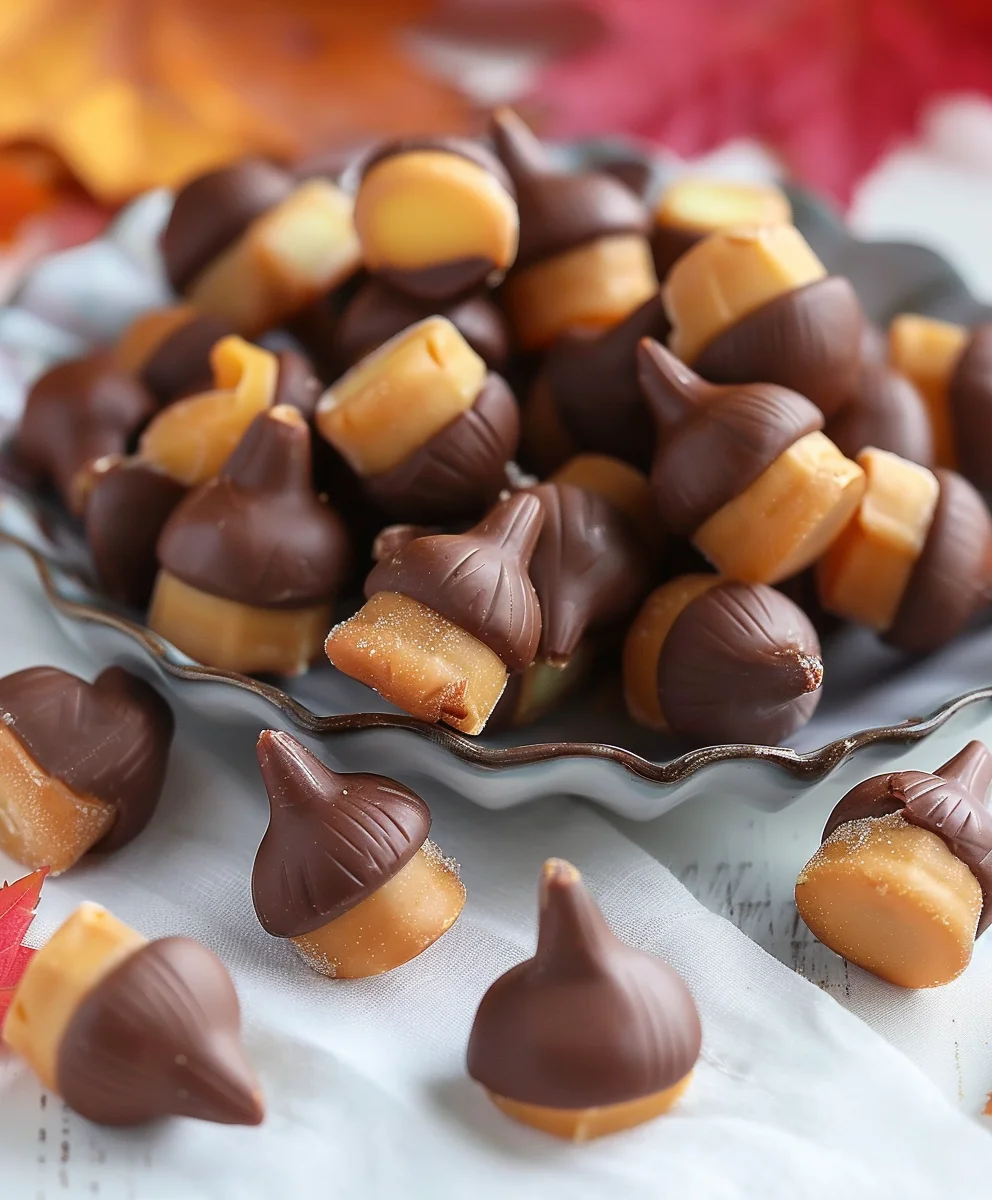
- Dessert Platter Extravaganza: Arrange your `Candy Acorns` on a beautiful dessert platter or tiered stand for any gathering. They are especially charming and appropriate for fall holidays like Thanksgiving, harvest festivals, or even as part of a woodland-themed party spread. Their unique shape makes them a delightful centerpiece.
- Thoughtful Edible Gifts: Package a few `Candy Acorns` in small cellophane bags tied with festive ribbons, or arrange them in a decorative box. They make delightful, homemade, and personal gifts for teachers, neighbors, co-workers, or friends during the holiday season or any special occasion.
- Creative Cake or Cupcake Toppers: Use them as adorable and edible toppers for cupcakes, or arrange them around the base or on top of a fall-themed cake. They add a whimsical and utterly delicious decoration that guests will adore.
- Simple Snack Time Treat: Of course, they are perfect for simply enjoying as a sweet treat with a cup of coffee or tea, as a quick afternoon pick-me-up, or whenever you crave a little bite of chocolatey goodness.
No matter how you choose to enjoy them, these `Candy Acorns` are sure to bring smiles and satisfy any sweet tooth. Their delightful appearance makes them an instant conversation starter, and their simple, classic flavors are universally loved. Happy munching on your homemade autumnal delights!
Conclusion:
And there you have it! We’ve journeyed through the simple, delightful process of creating what I genuinely believe will become one of your new favorite autumn treats. If you’ve been searching for that perfect confection that marries rustic charm with irresistible flavor, then this recipe is truly your answer. I can’t emphasize enough how much joy these little bites bring, not just in their consumption, but in their creation too. There’s something inherently satisfying about transforming a few humble ingredients into something so visually appealing and utterly delicious. It’s the kind of recipe that makes you feel like a kitchen wizard, capable of conjuring up magic with minimal effort.
Why these Candy Acorns are an absolute must-try: Firstly, their undeniable charm. They are simply adorable, perfect for capturing the essence of fall and bringing a touch of whimsical nature to your table. Secondly, their incredible ease of preparation. Seriously, if you’ve ever felt intimidated by baking or candy making, this recipe is designed to boost your confidence. No complicated techniques, no special equipment – just pure, unadulterated fun. Thirdly, the taste! The rich, creamy base perfectly complemented by the chocolate and a hint of crunchy nut is a symphony of textures and flavors that will have everyone reaching for just one more. They’re sweet without being cloyingly so, comforting, and utterly addictive. They encapsulate everything wonderful about cozy, seasonal treats, making them ideal for everything from a quiet evening snack to a bustling holiday gathering. I promise you, once you taste these, you’ll understand why I’m so enthusiastic about them.
Now, let’s talk about how you can showcase your wonderful creations or even put your own spin on them. These delightful bites are incredibly versatile! For serving, imagine them artfully arranged on a rustic wooden platter amidst a scattering of real fall leaves for a stunning centerpiece at your Thanksgiving dinner. They also make magnificent additions to any holiday cookie exchange, where their unique appearance is sure to stand out among the usual suspects. Packaged in small, clear cellophane bags tied with twine, they become the most charming edible party favors for a fall-themed gathering or even a simple “thinking of you” gift for neighbors and friends. I love pairing them with a warm mug of spiced apple cider or a robust cup of coffee for an afternoon treat. For the kids (and the kids at heart!), a glass of milk or a cup of hot cocoa makes them an even more special indulgence.
Feeling adventurous and want to explore variations? Go for it! Instead of the suggested nut butter, why not try almond butter or even cashew butter for a slightly different flavor profile? You could swap out the chocolate chips for white chocolate, or even use candy melts in festive fall colors like orange, yellow, or deep red to create a truly vibrant display. A tiny sprinkle of sea salt on top of the wet chocolate coating before it sets can add a wonderful contrast and elevate the flavors beautifully. Experiment with different types of small cookies or even crumbled graham crackers for the base to see which texture you prefer. You could also mix a pinch of cinnamon or nutmeg into the base mixture for an extra layer of autumnal warmth. The possibilities are truly endless, and that’s one of the things I love most about this recipe – it’s a fantastic canvas for your own creativity.
So, now it’s your turn! I genuinely encourage you to carve out a little time, gather your ingredients, and give this recipe a whirl. I promise it will be a rewarding experience, filled with delicious aromas and even more delicious results. Don’t be shy; embrace the fun of making these beautiful treats. And please, once you’ve made your batch of these incredible Candy Acorns, I would absolutely love to hear about your experience! What variations did you try? Who did you share them with? Did they become an instant hit in your household? Share your thoughts and photos with us; your feedback and creativity are what make this community so special. Happy making, and enjoy every single delightful bite!
Candy Acorns
These delightful no-bake Candy Acorns capture the essence of autumn with their chocolate kiss body, crunchy cookie cap, and chocolate chip stem. Easy to make and universally loved, they’re a highlight for any seasonal gathering.
Ingredients
-
11 oz chocolate kisses (any flavor)
-
75 mini vanilla wafers
-
1 cup baking chips (any flavor), divided
-
1 tsp coconut oil
Instructions
-
Step 1
Unwrap all chocolate kisses. Line a baking sheet with parchment paper to prepare your workspace. -
Step 2
Melt 1/2 cup of the baking chips with the coconut oil in short microwave bursts, stirring until smooth. This mixture will serve as your edible adhesive. -
Step 3
Take one unwrapped chocolate kiss. Spread a thin layer of the melted chocolate adhesive on its flat bottom. Gently press the chocolate kiss onto the flat side of a mini vanilla wafer, centering it to form the acorn’s base. -
Step 4
Apply a tiny dab of the melted chocolate adhesive to the center of the wafer. Carefully press one of the remaining baking chips onto this dab, with its point facing upwards to mimic an acorn stem. -
Step 5
Place each assembled candy acorn on the prepared parchment-lined baking sheet. Repeat for all ingredients. Allow them to set at room temperature for at least 30 minutes, or refrigerate for 10-15 minutes for quicker setting, until firm.
Important Information
Nutrition Facts (Per Serving)
It is important to consider this information as approximate and not to use it as definitive health advice.
Allergy Information
Please check ingredients for potential allergens and consult a health professional if in doubt.