• Skip to primary navigation
  • Skip to main content
  • Skip to primary sidebar
Homesmad

Homesmad

  • Home
  • Breakfast & Brunch
  • Appetizers & Snacks
  • Dinner
  • Dessert
  • About
  • Privacy Policy
  • Contact
Homesmad
  • Home
  • Breakfast & Brunch
  • Appetizers & Snacks
  • Dinner
  • Dessert
  • About
  • Privacy Policy
  • Contact

Slow Cooker Beef Manhattan: Easy, Tender & Flavorful Meal

October 8, 2025 by Lily author

Slow Cooker Beef Manhattan is more than just a meal; it’s a warm, comforting hug in a bowl, effortlessly prepared to perfection. Imagine stepping through your front door after a long day, greeted by the irresistible aroma of tender beef slowly braising in a rich, savory gravy – that’s the promise this incredible recipe delivers. I understand the longing for a hearty, traditional dish without the fuss, and that’s precisely what I’m thrilled to share with you today.

Historically, the classic Beef Manhattan, often served open-faced with mashed potatoes and luscious gravy, has been a beloved staple in American diners, cherished for its comforting, home-style appeal. It evokes a sense of nostalgia, bringing back memories of simpler times and wholesome, satisfying meals. I’ve taken that heartwarming tradition and adapted it for the modern kitchen, making it incredibly accessible for even the busiest schedules.

Why You’ll Fall in Love with This Slow Cooker Beef Manhattan

People adore this dish for countless reasons. The slow cooking process works magic, transforming a simple cut of beef into something incredibly fork-tender, practically melting in your mouth with every bite. The rich, deeply flavored gravy, infused with the essence of the beef and savory seasonings, is simply divine, blanketing everything in its luxurious warmth. It’s the ultimate combination of taste, texture, and unparalleled convenience, allowing you to achieve gourmet-level comfort food with minimal hands-on effort. Prepare to make this a new favorite in your culinary repertoire!

Slow Cooker Beef Manhattan: Easy, Tender & Flavorful Meal this RECIPE

Ingredients:

  • For the Slow Cooker Beef:
    • Beef Chuck Roast: 3-4 pounds, a beautiful piece of well-marbled beef is key for tenderness and flavor in our Slow Cooker Beef Manhattan.
    • Olive Oil: 2 tablespoons, for searing the beef and sautéing our aromatics, adding a layer of rich flavor.
    • Yellow Onions: 2 large, peeled and roughly chopped. These will melt down into the sauce, providing a foundational sweetness and depth.
    • Garlic: 4-6 cloves, minced. Fresh garlic is indispensable for a robust, aromatic gravy.
    • Beef Broth: 4 cups (32 ounces), low sodium. This forms the liquid base for our braise, ensuring the beef stays incredibly moist.
    • Condensed Cream of Mushroom Soup: 1 (10.5 ounce) can. Don’t knock it ’til you try it! This contributes a creamy richness and umami bomb to the gravy.
    • Dry Onion Soup Mix: 1 (1 ounce) packet. This little packet is a secret weapon, adding a concentrated burst of savory onion flavor and seasoning.
    • Worcestershire Sauce: 2 tablespoons. A splash of this adds a complex, tangy, and slightly savory note that rounds out the beef flavor beautifully.
    • Dried Thyme: 1 teaspoon. Earthy and aromatic, thyme is a classic companion to beef and slow-cooked dishes.
    • Bay Leaves: 2 whole leaves. These infuse a subtle, herbaceous aroma into the braising liquid, enhancing the overall complexity.
    • Salt and Freshly Ground Black Pepper: To taste, for seasoning the beef and adjusting the final gravy. Be generous but mindful, as the soup mixes contribute some sodium.
  • For the Creamy Mashed Potatoes:
    • Potatoes: 3 pounds (about 6-8 medium Russet or Yukon Gold potatoes), peeled and quartered. These starchy wonders are the perfect canvas for soaking up all that delicious gravy.
    • Whole Milk or Half-and-Half: ½ cup, warmed. This helps achieve that silky, smooth texture without cooling down the potatoes too much.
    • Unsalted Butter: ¼ cup (½ stick), softened. For unparalleled richness and a comforting dairy note.
    • Salt and White Pepper: To taste. White pepper is great for mashed potatoes as it provides the flavor without visible flecks, maintaining a pristine appearance.
  • For Assembling the Slow Cooker Beef Manhattan:
    • Sturdy Sandwich Bread: 1 loaf (such as Texas toast, thick-sliced white bread, or even brioche). You’ll want something that can stand up to the gravy without becoming immediately soggy. About 2 slices per person.
    • Fresh Parsley: ¼ cup, finely chopped (optional, for garnish). A sprinkle of fresh herbs adds a pop of color and freshness.

Preparing the Beef and Aromatics for the Slow Cooker

  1. Prepare the Beef Roast: First things first, let’s get our star ingredient ready. Take your 3-4 pound beef chuck roast and pat it thoroughly dry with paper towels. This step is crucial for achieving a good sear, which in turn develops incredible flavor for our Slow Cooker Beef Manhattan. Carefully trim any large pieces of excess fat or silverskin, but don’t be too aggressive; a little fat renders down beautifully, keeping the meat moist and adding richness. Once trimmed, generously season the entire surface of the beef roast with about 1 teaspoon of salt and ½ teaspoon of freshly ground black pepper. Really rub it in there – we want every bite to be seasoned perfectly.
  2. Sear the Beef for Maximum Flavor: Now, let’s build some foundational flavor. Heat 2 tablespoons of olive oil in a large, heavy-bottomed pot or Dutch oven over medium-high heat until it shimmers. You want it nice and hot. Carefully place the seasoned chuck roast into the hot oil. Sear the beef for 3-5 minutes per side, turning it with tongs, until a deep, golden-brown crust has formed on all surfaces. Don’t rush this part; that crust is where a tremendous amount of savory, caramelized flavor comes from. Once beautifully seared, carefully remove the beef from the pot and set it aside on a plate.
  3. Sauté the Aromatics: Reduce the heat to medium. Add the roughly chopped large yellow onions to the same pot, along with another drizzle of olive oil if needed. Sauté the onions for about 5-7 minutes, stirring occasionally, until they start to soften and become translucent. They’ll also pick up some of those delicious browned bits from the bottom of the pot (known as fond), which will further enrich our gravy.
  4. Infuse with Garlic: Once the onions are soft, add the 4-6 cloves of minced garlic to the pot. Cook for just 1 minute more, stirring constantly, until the garlic becomes fragrant. Be careful not to burn the garlic, as burnt garlic can taste bitter; we’re just aiming for that wonderful aromatic punch.

Building the Flavorful Braising Liquid in the Slow Cooker

  1. Deglaze the Pot (Optional but Recommended): If you’re using a separate slow cooker, you can deglaze your searing pot now. Pour in about ½ cup of the beef broth into the pot with the onions and garlic. Use a wooden spoon to scrape up any browned bits stuck to the bottom. This step adds immense depth to our gravy, capturing all that caramelized goodness. Once scraped, transfer the onion-garlic mixture and the deglazing liquid to your slow cooker. If you’re using a slow cooker with a searing function, you can often do this step directly in the slow cooker pot.
  2. Combine Liquids and Seasonings: Now, into your slow cooker, pour in the remaining 3½ cups of low-sodium beef broth. Add the entire can of condensed cream of mushroom soup, the packet of dry onion soup mix, and 2 tablespoons of Worcestershire sauce. Give everything a good whisk to combine these ingredients thoroughly until the soup and onion mix are well dissolved and incorporated into the broth. This mixture will become the incredibly rich and savory gravy for our Slow Cooker Beef Manhattan.
  3. Add Herbs and Place the Beef: Stir in the 1 teaspoon of dried thyme and drop in the 2 bay leaves. Finally, carefully place your seared beef chuck roast into the slow cooker, nestling it down into the flavorful liquid. Make sure the beef is mostly submerged; if it’s not, you can add a little more beef broth, ensuring it’s at least halfway covered. This ensures even cooking and maximum moisture.

Slow Cooking Perfection for Tender Beef Manhattan

  1. Set the Slow Cooker: Secure the lid on your slow cooker. Cook on the LOW setting for 7-9 hours, or on the HIGH setting for 4-5 hours. The exact cooking time will depend on your specific slow cooker and the size and thickness of your roast. The goal is for the beef to be incredibly tender – so tender that it easily shreds with a fork. Resist the urge to lift the lid during cooking, especially during the first few hours, as this releases heat and significantly extends the cooking time.
  2. Check for Tenderness: After the recommended cooking time, gently test the beef with two forks. If it pulls apart easily, it’s done! If there’s still resistance, continue cooking for another 30-60 minutes until it reaches that fall-apart tender stage.
  3. Shred the Beef and Thicken the Gravy: Carefully remove the cooked beef roast from the slow cooker and transfer it to a large bowl or cutting board. Using two forks, shred the beef into bite-sized pieces, discarding any large pieces of fat or gristle that haven’t rendered down. While the beef is cooling slightly, remove the bay leaves from the slow cooker liquid. At this point, you have a beautiful, rich gravy. If you prefer a thicker gravy, you can make a cornstarch slurry (1 tablespoon cornstarch mixed with 2 tablespoons cold water) and whisk it into the hot liquid in the slow cooker. Cook on high for another 15-20 minutes, stirring occasionally, until the gravy reaches your desired consistency. Taste the gravy and adjust seasonings with additional salt and pepper if needed. Return the shredded beef to the slow cooker, tossing it gently to coat it in the luscious gravy. Keep it on the “warm” setting while you prepare the mashed potatoes and bread.

Preparing the Essential Accompaniments: Creamy Mashed Potatoes and Sturdy Bread

  1. Prepare the Potatoes: While the beef is slow cooking or resting, it’s time to tackle our creamy mashed potatoes. Peel your 3 pounds of Russet or Yukon Gold potatoes and cut them into even quarters. Placing them in cold water immediately after cutting prevents discoloration. Place the quartered potatoes into a large pot and cover them with cold water by about an inch. Add a generous pinch of salt to the water – this seasons the potatoes from the inside out. Bring the water to a boil over high heat, then reduce the heat to medium-low and simmer for 15-20 minutes, or until the potatoes are fork-tender. You should be able to easily pierce them with a fork.
  2. Mash the Potatoes to Perfection: Drain the cooked potatoes thoroughly in a colander. Return the hot, drained potatoes to the empty pot or a large mixing bowl. Over low heat, gently warm ½ cup of milk or half-and-half in a small saucepan or microwave. This prevents cooling down your hot potatoes when added. Add the warmed milk and ¼ cup of softened unsalted butter to the potatoes. Using a potato masher, ricer, or even a stand mixer with the paddle attachment, mash the potatoes until they are smooth and creamy, with no lumps remaining. Be careful not to overmix, as this can make the potatoes gluey.
  3. Season the Mashed Potatoes: Taste your creamy mashed potatoes and season generously with salt and white pepper until they are perfectly seasoned to your liking. The white pepper is a nice touch here as it provides flavor without leaving dark specks. Keep the mashed potatoes warm until serving time.
  4. Prepare the Bread: For the bread, you have a few options. If using Texas toast, you can toast it lightly in a toaster or under the broiler until just golden, but still soft. For regular thick-sliced white bread, a quick toast is ideal, or you can serve it untoasted if you prefer it softer. The key is to have a sturdy base that can absorb the gravy without dissolving. Some people even like to butter and lightly grill their bread for an extra layer of flavor and texture.

Assembling Your Delicious Slow Cooker Beef Manhattan

  1. Layer the Foundation: Now for the grand finale – assembling your Slow Cooker Beef Manhattan! Lay 2 slices of your chosen sturdy bread on each plate. This will be the base for our flavorful feast.
  2. Add the Creamy Comfort: Generously spoon a hearty portion of the warm, creamy mashed potatoes directly on top of the bread slices. Spread it out slightly, creating a soft, inviting bed.
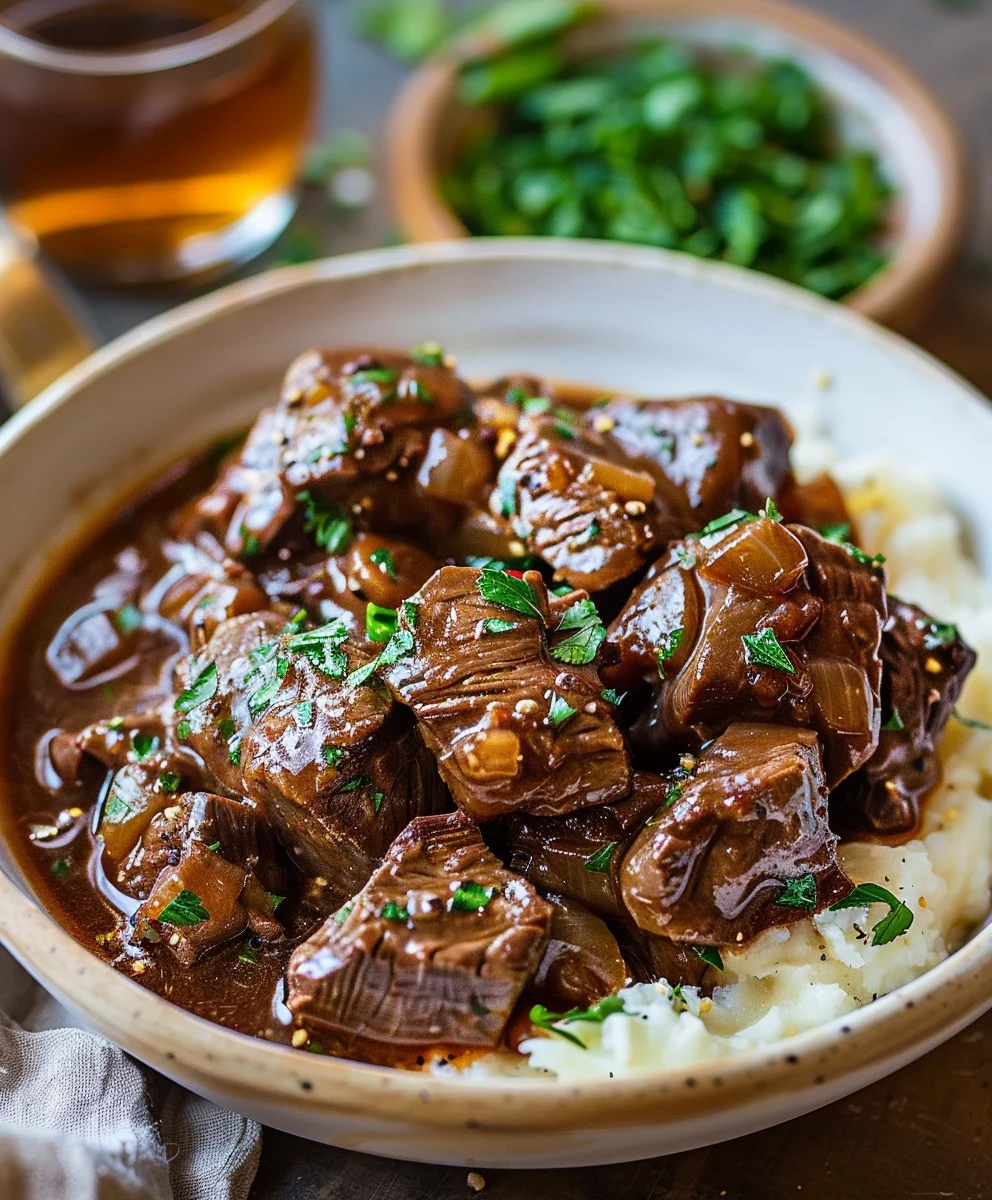
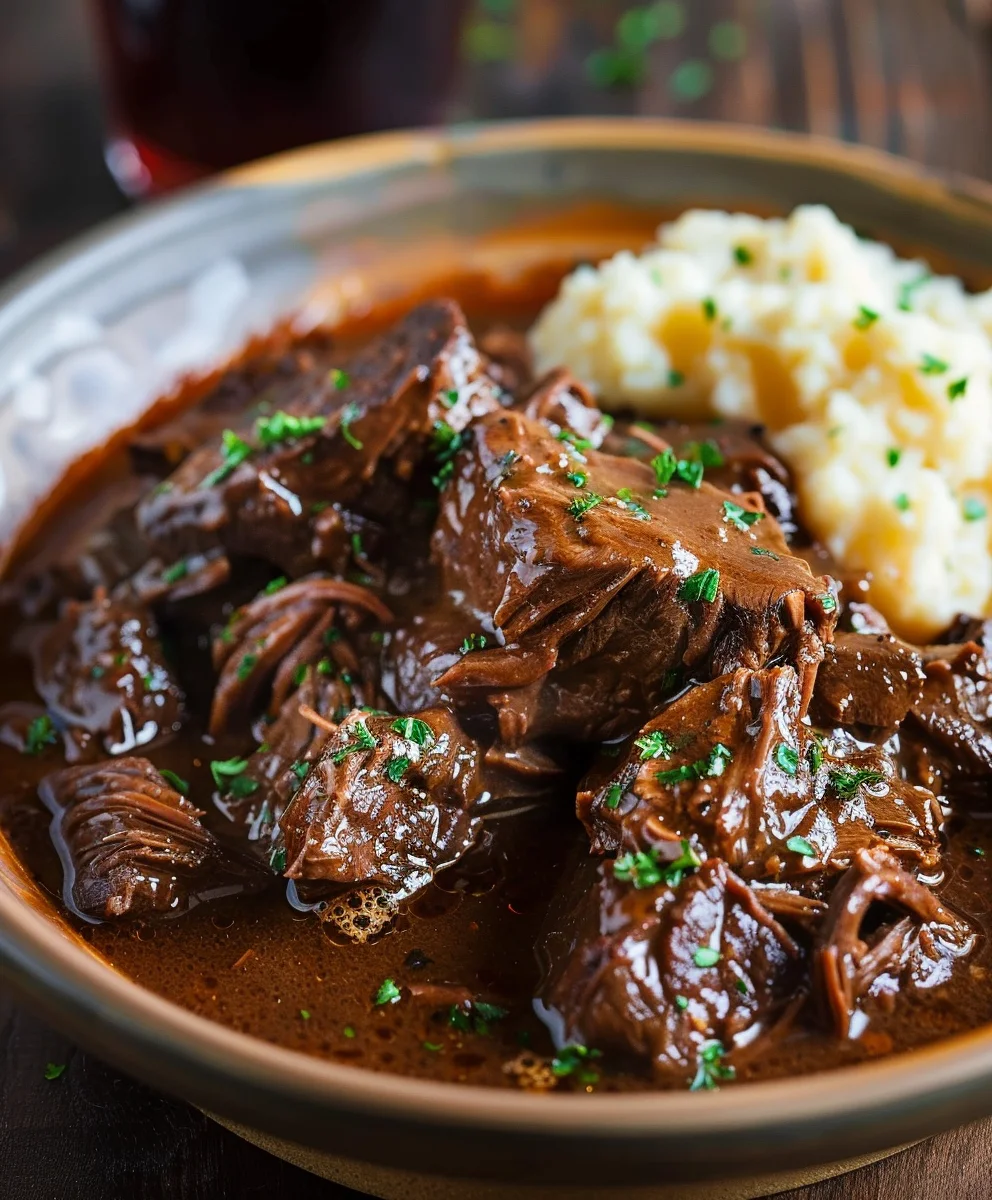
  3. Pile on the Tender Beef: Next, take a large serving of the incredibly tender, gravy-coated shredded beef and pile it high on top of the mashed potatoes. Make sure to get plenty of that rich, savory gravy with the beef, as it’s a huge part of the Slow Cooker Beef Manhattan experience.
  4. Ladle Extra Gravy: Don’t be shy! Ladle a generous extra spoonful or two of the warm, luscious gravy over the entire dish, ensuring every component is drenched in that wonderful flavor. The goal is for the gravy to soak into the bread and mingle with the mashed potatoes, creating an unforgettable bite.
  5. Garnish and Serve Immediately: If desired, sprinkle a little freshly chopped parsley over the top for a pop of color and a fresh herbaceous note. Serve your Slow Cooker Beef Manhattan immediately, while everything is piping hot. This dish is pure comfort food, perfect for a cozy family dinner, and it truly showcases the magic of slow cooking. Enjoy the fruits of your labor and savor every tender, gravy-soaked bite!

Slow Cooker Beef Manhattan: Easy, Tender & Flavorful Meal

Conclusion:

Well, my friends, we’ve reached the grand finale of our culinary journey, and I genuinely hope you’re as excited as I am about what we’ve just created. This isn’t just another dinner; it’s an experience, a warm embrace in a bowl, and frankly, a secret weapon for anyone looking to impress with minimal fuss. I truly believe that once you dive into this recipe, you’ll understand exactly why it’s destined to become a staple in your kitchen. This dish exemplifies the very best of home cooking: rich flavor, incredible tenderness, and unparalleled ease.

What truly sets this particular recipe apart, making it an absolute must-try, is its magical blend of convenience and gourmet flavor. The slow cooker does all the heavy lifting, transforming humble ingredients into something extraordinary while you go about your day. Imagine coming home to the intoxicating aroma of tender beef, bathed in a rich, savory gravy, infused with aromatic vegetables. The meat is so fall-apart tender it practically melts in your mouth, absorbing every nuance of the carefully selected spices and liquids. It’s comfort food elevated, designed to nourish both body and soul, and perfect for those chilly evenings or when you simply crave something deeply satisfying. This recipe offers that rare combination of being incredibly easy to prepare yet yielding results that taste like they came from a high-end restaurant, proving that you don’t need hours over a hot stove to create something truly spectacular.

Serving Suggestions to Elevate Your Meal:

Now, let’s talk about making this magnificent meal complete. While delicious on its own, this dish truly shines when paired with the right accompaniments. My absolute favorite way to serve it is nestled atop a generous bed of creamy, buttery mashed potatoes. The velvety potatoes soak up that incredible gravy, creating a symphony of textures and flavors that is simply divine. Another fantastic option is wide egg noodles, perfectly cooked al dente, providing a comforting chewiness that complements the tender beef beautifully. If you’re looking for something a bit lighter, a fluffy pile of steamed white rice or even a hearty quinoa can serve as an excellent canvas for the rich sauce. Don’t forget the bread! A crusty baguette or some warm dinner rolls are perfect for soaking up every last drop of that glorious gravy – trust me, you won’t want to waste a single drop. For a touch of freshness and color, a simple green salad with a light vinaigrette makes a wonderful side, cutting through the richness just enough. And for garnish? A sprinkle of fresh parsley or chives adds a lovely pop of color and a hint of herbaceous brightness right before serving. A glass of a robust red wine, like a Cabernet Sauvignon or a Merlot, would also pair splendidly with the deep, complex flavors of the beef.

Creative Variations and Customizations:

One of the things I love most about cooking is the freedom to personalize, and this recipe is wonderfully adaptable. If you’re feeling adventurous, consider adding a handful of sliced mushrooms during the last hour of cooking for an earthy depth, or some colorful bell peppers for a touch of sweetness and vibrant hue. For those who enjoy a little heat, a pinch of red pepper flakes or a dash of your favorite hot sauce can add a subtle kick without overpowering the main flavors. You could also experiment with different herbs – a sprig of fresh thyme or rosemary tucked into the slow cooker alongside the beef would infuse the dish with a wonderful, fragrant aroma. Thinking about variations for leftovers? This dish is even better the next day! You could shred any remaining beef and pile it onto toasted buns for delicious open-faced sandwiches, topped with extra gravy. Or, mix the shredded beef and gravy with some cooked pasta for a quick and easy weeknight meal. If you’re looking to lighten things up, you could swap some of the potatoes or noodles for roasted root vegetables like carrots and parsnips, which would sweeten and deepen the overall profile. The beauty of the Slow Cooker Beef Manhattan is its versatility; feel free to make it truly your own, adjusting ingredients to suit your taste and what you have on hand.

Your Culinary Adventure Awaits!

So, what are you waiting for? I wholeheartedly encourage you to carve out some time this week, gather your ingredients, and give this incredible recipe a try. You deserve to experience the pure joy of a meal that demands so little effort but delivers such immense flavor and comfort. It’s more than just food; it’s an opportunity to create cherished memories around the dinner table, a moment of warmth and satisfaction that truly embodies home cooking at its finest. I am genuinely excited for you to discover the magic of this dish. Once you’ve made it, please don’t keep it a secret! I would absolutely love to hear about your experience. Did you add any unique twists? What did you serve it with? Share your photos, your triumphs, and your feedback in the comments section below or on your favorite social media platforms. Your culinary adventures inspire me and our entire community. Let’s spread the word about this amazing meal and celebrate the simple pleasure of a perfectly cooked, comforting dish. Happy cooking, and I can’t wait to hear all about your delicious Slow Cooker Beef Manhattan!


Slow Cooker Beef Manhattan

Slow Cooker Beef Manhattan

Slow Cooker Beef Manhattan is a comforting, easy-to-prepare meal, featuring fork-tender beef braised in a rich, savory gravy. This traditional dish is adapted for modern convenience, delivering gourmet-level comfort with minimal effort.

Prep Time
30 Minutes

Cook Time
7 Hours

Total Time
30 Minutes

Servings
4-6 servings

Ingredients

  • 2 to 3 lbs beef chuck roast, cut into large chunks
  • 2 tablespoons olive oil
  • 2 large yellow onions, roughly chopped
  • 4-6 cloves garlic, minced
  • 4 cups (32 ounces) low-sodium beef broth
  • 1 (10.5 ounce) can condensed cream of mushroom soup
  • 1 (1 ounce) packet dry onion soup mix
  • 2 tablespoons Worcestershire sauce
  • ¼ cup apple cider vinegar
  • 1 teaspoon dried thyme
  • 2 whole bay leaves
  • Salt and freshly ground black pepper, to taste
  • 4 cups prepared mashed potatoes
  • 1 loaf sturdy sandwich bread (e.g., Texas toast), 2 slices per person
  • ¼ cup fresh parsley, finely chopped (optional, for garnish)

Instructions

  1. Step 1
    Pat beef chuck roast dry, trim excess fat, and season generously with salt and pepper. Heat olive oil in a large, heavy-bottomed pot over medium-high heat until shimmering. Sear beef for 3-5 minutes per side until a deep, golden-brown crust forms on all surfaces. Remove beef and set aside.
  2. Step 2
    Reduce heat to medium. Add chopped yellow onions to the same pot and sauté for 5-7 minutes until soft. Add minced garlic and cook for 1 minute until fragrant. If using a separate slow cooker, deglaze the pot with ½ cup beef broth, scraping up browned bits, then transfer the onion-garlic mixture and liquid to your slow cooker.
  3. Step 3
    In the slow cooker, add remaining 3½ cups beef broth, cream of mushroom soup, dry onion soup mix, Worcestershire sauce, apple cider vinegar, dried thyme, and bay leaves. Whisk well to combine. Carefully place seared beef into the liquid, ensuring it’s mostly submerged.
  4. Step 4
    Secure the lid and cook on LOW for 7-9 hours, or HIGH for 4-5 hours, until the beef is incredibly fork-tender and easily shreds. Avoid lifting the lid during cooking.
  5. Step 5
    Carefully remove beef from the slow cooker and shred it into bite-sized pieces, discarding bay leaves and any large fat pieces. If desired, thicken the gravy by whisking in a cornstarch slurry (1 tbsp cornstarch mixed with 2 tbsp cold water) and cooking on high for 15-20 minutes. Return shredded beef to the slow cooker and toss to coat in the luscious gravy. Keep warm.
  6. Step 6
    Warm the prepared mashed potatoes. Prepare your chosen sturdy sandwich bread (e.g., toast Texas toast lightly, or serve thick-sliced white bread untoasted/lightly toasted).
  7. Step 7
    On each plate, lay 2 slices of sturdy bread. Generously spoon warm mashed potatoes on top, then pile high with the tender, gravy-coated shredded beef. Ladle extra gravy over the entire dish. Garnish with fresh parsley, if desired, and serve immediately while piping hot. Enjoy!

Important Information

Nutrition Facts (Per Serving)

It is important to consider this information as approximate and not to use it as definitive health advice.

Allergy Information

Please check ingredients for potential allergens and consult a health professional if in doubt.

« Previous Post
Pizza Grilled Cheese: The Ultimate Comfort Food Mashup!
Next Post »
Cranberry Turkey Stuffing Balls: Festive & Flavorful Bites

If you enjoyed this…

Jalapeño Popper Chicken Enchiladas: The Ultimate Cheesy Dish!

Spicy Maple Chicken & Coconut Rice: A Flavorful Feast

Island Coconut Pepper Rice: A Tropical Flavor Escape

Primary Sidebar

Browse by Diet

BreakfastDinnerLunchDessertAppetizer

Sweet Peach Yogurt Parfait Delight

One of my fondest memories is from a lazy summer afternoon spent at my grandmother’s house. The sun filtered through the kitchen window, casting a warm glow over the table where she would create her culinary magic. It was during one of those blissful moments that I first tasted her Peach Yogurt Parfait with Honey and Granola. The sweet aroma of ripe peaches mingling with creamy yogurt and the crunch of granola was nothing short of heavenly. It felt like summer captured in a bowl, and I still remember the joy of diving in with a spoon, each layer revealing a new burst of flavor.

When I think about that parfait, I can almost hear the gentle hum of the bees outside, reminding me of the floral notes that honey brings to every bite. The vibrant yellows and soft oranges of the peaches contrast beautifully with the creamy white yogurt and the golden crunch of granola. It’s a dish that not only looks delightful but also tastes like a celebration of fresh, wholesome ingredients.

What makes my version of this Peach Yogurt Parfait special is the careful balance of flavors and textures. I use ripe, juicy peaches, drizzled with locally sourced honey, and a homemade granola that’s bursting with nuts and seeds for an extra crunch. It’s a simple dish, but every layer is crafted with love and attention.

Let me show you exactly how to make this delightful parfait, so you can bring a bit of that summer magic into your kitchen!

Sweet Peach Yogurt Parfait Delight

Why You’ll Love This Recipe

  • Delightfully creamy texture from the Greek yogurt, paired with the juicy sweetness of fresh peaches.
  • Ready in under 20 minutes, making it a quick and satisfying breakfast or snack option.
  • Budget-friendly, using common ingredients that you may already have in your pantry.
  • Customizable with your favorite granola and nuts, allowing you to tailor each parfait to your taste.
  • Perfectly balanced flavors with the bright acidity of lemon juice and the sweetness of honey enhancing the peaches.

Ingredients

  • For the Parfait:
  • 2 cups plain Greek yogurt (or vanilla yogurt for a sweeter option)
  • 2 large ripe peaches, diced (about 2 cups)
  • 1 tablespoon fresh lemon juice (to prevent browning of peaches)
  • 2 tablespoons honey (plus more for drizzling)
  • 1 teaspoon vanilla extract (optional for extra flavor)
  • For the Granola:
  • 1 cup granola (store-bought or homemade; see notes for a simple granola recipe)
  • 1/4 cup sliced almonds (optional for added crunch)
  • 1/4 cup shredded coconut (optional for added flavor)

Let’s dive into some key ingredients that make this Peach Yogurt Parfait so delightful! First, the Greek yogurt is not only creamy but also packed with protein, making it a satisfying option for breakfast or a snack. If you’re looking for a sweeter option, you can easily substitute it with vanilla yogurt, though it may alter the overall flavor balance. Next, the ripe peaches are the star of the show; their natural sweetness shines through, so I recommend choosing peaches that yield slightly to pressure, indicating they’re perfectly ripe. If peaches aren’t in season, feel free to use nectarines or even frozen peaches—just thaw them before use. Finally, honey adds a lovely floral sweetness that ties everything together. If you prefer, maple syrup can serve as a delicious substitute.

Step-by-Step Instructions

  1. Start by preparing the peaches. Wash them thoroughly, then slice and dice them into bite-sized pieces. In a medium bowl, toss the diced peaches with 1 tablespoon of fresh lemon juice to prevent browning. Set aside for about 5 minutes while the lemon juice works its magic.
  2. In a separate bowl, combine the Greek yogurt, 2 tablespoons of honey, and 1 teaspoon of vanilla extract if using. Stir the mixture until smooth and thoroughly blended. This should take about a minute. Avoid overmixing to maintain the creaminess of the yogurt.
  3. Now it’s time to layer your parfait. Grab a clear glass or bowl to showcase your beautiful creation. Start with a generous spoonful of the yogurt mixture at the bottom—about 1/4 cup will do. Use a spoon to spread it evenly.
  4. Add a layer of the diced peaches over the yogurt, ensuring they cover the yogurt completely. You might want to use about half of what you have prepared—roughly 1 cup. This layer should be visually appealing, so arrange the peaches neatly.
  5. Sprinkle 1/4 cup of granola over the peaches. This adds a delightful crunch. Make sure to distribute it evenly to ensure every bite has that satisfying texture. Avoid packing it down too tightly, as you want it to maintain its crunch.
  6. Repeat the layers: spoon in another 1/4 cup of yogurt, followed by another cup of peaches, and another sprinkle of granola. You should have at least two layers, but feel free to add more depending on your glass size.
  7. Finish off your parfait with a drizzle of honey on top for added sweetness and a touch of elegance. If you’re using sliced almonds or shredded coconut, sprinkle them on top now. It adds a lovely visual contrast and extra flavor.
  8. Serve immediately or refrigerate for up to 30 minutes before serving to allow the flavors to meld together. However, I recommend enjoying it fresh to maintain the granola’s crunch.

Pro Tips for the Best Peach Yogurt Parfait With Honey And Granola

  • Make sure to choose ripe peaches for the best flavor and texture. A common mistake is using unripe fruit, which can lead to a less enjoyable parfait. Look for peaches that are fragrant and slightly soft to the touch.
  • Use a clear glass to assemble your parfait; this not only makes for a beautiful presentation but also allows you to see the colorful layers, which adds to the enjoyment of eating it.
  • For an even creamier texture, consider whipping the Greek yogurt with a hand mixer for a couple of minutes before layering. This small adjustment makes a huge difference in mouthfeel.
  • Be mindful of the granola-to-yogurt ratio. Too much granola can overwhelm the parfait, while too little can make it feel too creamy. Aim for about 1/4 cup of granola per layer for the perfect balance.
  • If you’re making this for a gathering, consider preparing the yogurt and peaches ahead of time and layering them just before serving. This ensures the granola stays crunchy!

Variations & Serving Ideas

There are so many ways to get creative with your Peach Yogurt Parfait! For a tropical twist, swap out the peaches for mangoes or pineapples and top with coconut flakes. If you prefer a berry flavor, mix in some blueberries or strawberries with the peaches for added color and taste. For a nutty version, incorporate chopped walnuts or pecans instead of almonds.

As for serving ideas, this parfait pairs beautifully with a side of scrambled eggs for a hearty breakfast or fresh fruit salad for a light lunch. You might also enjoy it alongside whole grain toast with almond butter for an energizing snack. The contrast of flavors and textures will elevate your meal experience!

Storage, Make-Ahead & Reheating

The Peach Yogurt Parfait is best enjoyed fresh, but you can prepare some components ahead of time. Store the layered parfait in an airtight container in the refrigerator for up to 24 hours. However, be cautious; the granola may lose its crunch if stored too long. You can freeze the yogurt and peach mixture for up to 2 months; just remember to thaw it in the refrigerator overnight before serving.

If you plan to enjoy this dish the next day, it can taste even better as the flavors meld together. Just remember to add the granola right before serving to keep its delightful crunch!

Frequently Asked Questions

Can I make Peach Yogurt Parfait With Honey And Granola ahead of time?

Yes — in fact, it tastes even better the next day as the flavors meld. However, I recommend waiting to add the granola until just before serving to maintain its crunch.

What can I substitute for Greek yogurt?

If you prefer a lighter option, you can substitute Greek yogurt with regular yogurt or a dairy-free alternative like coconut yogurt. Just remember that this may alter the creaminess and flavor profile slightly.

Can I use frozen peaches for this parfait?

Absolutely! Just make sure to thaw the frozen peaches before using them. They will still add great flavor, though the texture may be slightly softer than fresh peaches.

How do I make the parfait vegan?

To make a vegan version, substitute the Greek yogurt with a plant-based yogurt alternative, and replace honey with maple syrup or agave nectar. This keeps the parfait sweet while adhering to a vegan diet.

What other fruits can I use in this recipe?

You can mix and match fruits based on your preference. Try using strawberries, blueberries, raspberries, or even bananas. Just make sure to adjust the lemon juice as needed to prevent browning.

Sweet Peach Yogurt Parfait Delight

Final Thoughts

The Peach Yogurt Parfait with Honey and Granola is a delightful blend of creamy yogurt, sweet peaches, and crunchy granola that creates a satisfying and nourishing treat. Each layer bursts with flavor, making it a perfect choice for breakfast or a light dessert.

This is the kind of recipe I come back to again and again, especially when I want something refreshing and wholesome to start my day. The harmony of sweet and tart flavors, combined with the delightful crunch, never fails to lift my spirits!

I encourage you to give this parfait a try and indulge in its comforting goodness. Feel free to share your results or even add your own twist—perhaps a sprinkle of cinnamon or a handful of nuts. Enjoy creating your perfect parfait!

Print
clock clock iconcutlery cutlery iconflag flag iconfolder folder iconinstagram instagram iconpinterest pinterest iconfacebook facebook iconprint print iconsquares squares iconheart heart iconheart solid heart solid icon

Peach Yogurt Parfait


  • Author: Lily author
  • Total Time: 15 minutes
  • Yield: 4 servings 1x
Pin Recipe
Print Recipe

Description

This Peach Yogurt Parfait combines creamy Greek yogurt, juicy peaches, and crunchy granola for a delightful treat. It’s a perfect breakfast or snack that captures the essence of summer in every bite.


Ingredients

Scale
  • For the Parfait:
  • 2 cups plain Greek yogurt (or vanilla yogurt for a sweeter option)
  • 2 large ripe peaches, diced (about 2 cups)
  • 1 tablespoon fresh lemon juice (to prevent browning of peaches)
  • 2 tablespoons honey (plus more for drizzling)
  • 1 teaspoon vanilla extract (optional for extra flavor)
  • For the Granola:
  • 1 cup granola (store-bought or homemade; see notes for a simple granola recipe)
  • 1/4 cup sliced almonds (optional for added crunch)
  • 1/4 cup shredded coconut (optional for added flavor)

Instructions

  1. Start by preparing the peaches. Wash them thoroughly, then slice and dice them into bite-sized pieces. In a medium bowl, toss the diced peaches with 1 tablespoon of fresh lemon juice to prevent browning. Set aside for about 5 minutes while the lemon juice works its magic.
  2. In a separate bowl, combine the Greek yogurt, 2 tablespoons of honey, and 1 teaspoon of vanilla extract if using. Stir the mixture until smooth and thoroughly blended. This should take about a minute. Avoid overmixing to maintain the creaminess of the yogurt.
  3. Now it’s time to layer your parfait. Grab a clear glass or bowl to showcase your beautiful creation. Start with a generous spoonful of the yogurt mixture at the bottom—about 1/4 cup will do. Use a spoon to spread it evenly.
  4. Add a layer of the diced peaches over the yogurt, ensuring they cover the yogurt completely. You might want to use about half of what you have prepared—roughly 1 cup. This layer should be visually appealing, so arrange the peaches neatly.
  5. Sprinkle 1/4 cup of granola over the peaches. This adds a delightful crunch. Make sure to distribute it evenly to ensure every bite has that satisfying texture. Avoid packing it down too tightly, as you want it to maintain its crunch.
  6. Repeat the layers: spoon in another 1/4 cup of yogurt, followed by another cup of peaches, and another sprinkle of granola. You should have at least two layers, but feel free to add more depending on your glass size.
  7. Finish off your parfait with a drizzle of honey on top for added sweetness and a touch of elegance. If you’re using sliced almonds or shredded coconut, sprinkle them on top now. It adds a lovely visual contrast and extra flavor.
  8. Serve immediately or refrigerate for up to 30 minutes before serving to allow the flavors to meld together. However, I recommend enjoying it fresh to maintain the granola’s crunch.
  • Prep Time: 15 mins
  • Cook Time: 0 mins
  • Category: Breakfast
  • Method: No-cook
  • Cuisine: American

Nutrition

  • Serving Size: 1 parfait
  • Calories: 250
  • Sugar: 20 g
  • Sodium: 50 mg
  • Fat: 5 g
  • Saturated Fat: 2 g
  • Unsaturated Fat: 3 g
  • Trans Fat: 0 g
  • Carbohydrates: 40 g
  • Fiber: 3 g
  • Protein: 10 g
  • Cholesterol: 10 mg

Keywords: Choose ripe peaches for the best flavor and texture. Use a clear glass for a beautiful presentation. For creaminess, consider whipping the yogurt before layering. Be mindful of the granola-to-yogurt ratio. Prepare yogurt and peaches ahead of time for gatherings, layering just before serving.

Did you make this recipe?

Share a photo and tag us — we can't wait to see what you've made!

Sun-Kissed Frozen Orange Cream Slush

As a child, summer days felt like they lasted forever. I remember the sticky heat wrapping around me as I played outside, my laughter mingling with the sounds of the neighborhood. But nothing could cool me down quite like the moment I’d spot my grandmother, laboring over her blender, whipping up her famous Frozen Orange Creamsicle Slush. That vibrant orange treat, with its frosty texture and sweet citrus aroma, was like a burst of sunshine in a cup. Just one sip, and I could feel the coolness wash over me, sparking pure joy.

This Frozen Orange Creamsicle Slush has a way of making you feel like a kid again. Its creamy, dreamy consistency is a delightful balance of bright orange and soft vanilla, inviting you to dive right in. The refreshing tang of orange dances on your tongue, while the smooth creaminess envelops you in a comforting embrace. It’s a nostalgic treat that’s perfect for hot summer afternoons or anytime you need a little pick-me-up.

What makes my version of this slush stand out is the addition of a hint of vanilla bean, which elevates the flavor and adds an extra layer of richness. Plus, it’s super easy to whip up with just a few simple ingredients that you probably already have on hand! So, if you’re ready to relive those sun-soaked memories, let me show you exactly how to make it.

Sun-Kissed Frozen Orange Cream Slush

Why You’ll Love This Recipe

  • Each slush is a perfect blend of creamy vanilla and zesty orange, creating a nostalgic flavor reminiscent of summer days.
  • This refreshing treat is ready in under 15 minutes, making it an ideal quick dessert for unexpected guests or hot afternoons.
  • With just 8 simple ingredients, it’s budget-friendly, ensuring you don’t have to break the bank to enjoy a delicious slush.
  • The slush has a perfectly smooth texture, thanks to the combination of ice and ice cream, providing a delightful contrast to the bright citrus flavors.
  • It’s highly customizable; you can easily adjust the sweetness and add fresh herbs for a unique twist that suits your taste.

Ingredients

  • 2 cups orange juice (freshly squeezed or store-bought)
  • 1 cup vanilla ice cream
  • 1 cup crushed ice
  • 1/2 cup milk (whole or 2%)
  • 1/4 cup granulated sugar (adjust based on sweetness preference)
  • 1 teaspoon vanilla extract
  • Zest of 1 orange (for added flavor)
  • Fresh orange slices and mint leaves (for garnish)

The star of this Frozen Orange Creamsicle Slush is the orange juice, which provides the vibrant, citrusy base. Freshly squeezed juice will yield the brightest flavor, but store-bought options can be just as convenient. If you’re opting for store-bought, choose 100% pure juice with no added sugars for the best results. Another essential ingredient is the vanilla ice cream; it adds creaminess and sweetness. You can substitute it with dairy-free ice cream if you’re looking for a vegan option. Whole or 2% milk complements the ice cream, creating a smooth blend. If you want a lower-calorie version, almond or oat milk can be good alternatives.

Lastly, the granulated sugar can be adjusted based on your sweetness preference. If you prefer a more natural sweetener, consider using honey or agave syrup. The orange zest enhances the flavor profile, providing an aromatic pop that brings the whole slush together. Don’t skip it! It adds an extra layer of brightness that makes this slush truly special.

Step-by-Step Instructions

  1. Start by preparing your ingredients. Gather 2 cups of orange juice, 1 cup of vanilla ice cream, and 1 cup of crushed ice. Make sure the ice is finely crushed, as larger chunks can make blending difficult.
  2. In a blender, combine the orange juice, vanilla ice cream, crushed ice, and 1/2 cup of milk. Add 1/4 cup of granulated sugar and 1 teaspoon of vanilla extract. If you like a sweeter slush, consider adding a bit more sugar at this stage.
  3. Add the zest of 1 orange to the blender. This step is crucial for enhancing the citrus flavor of your slush. Make sure not to include the bitter white pith—only the flavorful zest.
  4. Blend the mixture on medium-high speed for about 30-45 seconds. Stop once the ingredients are fully combined and the slush has a smooth, even consistency. If you notice large chunks of ice, blend for an additional 10-15 seconds. Avoid over-blending, as this can make the slush too liquidy.
  5. Once blended, taste the slush. If it needs more sweetness, add a little more sugar and blend for a few more seconds. If it’s too thick, you can add a splash of milk to reach your desired consistency.
  6. Pour the slush into glasses. This recipe typically serves 4, but you can easily double it for larger gatherings. Use a spoon to help guide the slush into the glasses if needed.
  7. Garnish each serving with fresh orange slices and mint leaves. The mint not only adds a pop of color but also a refreshing aroma that complements the citrus flavors beautifully.
  8. Serve immediately and enjoy! If you’ve made extra, you can refrigerate it for a short time, but it’s best enjoyed fresh.

Pro Tips for the Best Frozen Orange Creamsicle Slush

  • Don’t skip the orange zest! It’s a game-changer for flavor. Always zest before juicing to make it easier.
  • Use a high-powered blender for the best texture. A standard blender may struggle with ice, leading to uneven consistency. If you have a food processor, that can work too, but ensure the ice is finely crushed.
  • Adjust the ice-to-liquid ratio carefully. If your slush is too thick, it won’t blend well. Start with less ice and add more until you reach your preferred texture.
  • Be cautious with the sugar! Always start with the lower amount, as you can easily add more, but it’s hard to fix an overly sweet slush.
  • For a fun twist, consider adding a splash of coconut milk or a handful of fresh fruit like strawberries or pineapple. This not only enhances the flavor but also adds a beautiful color contrast.

Variations & Serving Ideas

There are countless ways to put a spin on your Frozen Orange Creamsicle Slush. Consider making a tropical version by adding in some pineapple juice or coconut milk for a delightful tropical twist. If you’re feeling adventurous, try incorporating a handful of frozen mango or peach slices for added sweetness. For a lighter version, swap out the vanilla ice cream for Greek yogurt for a creamy yet tangy alternative.

As for serving ideas, this refreshing slush pairs wonderfully with light summer dishes like grilled chicken skewers, fish tacos, or a simple salad topped with citrus vinaigrette. The bright, zesty flavors of the slush complement these dishes perfectly, making them an ideal pairing for a sunny day.

Storage, Make-Ahead & Reheating

This Frozen Orange Creamsicle Slush is best enjoyed fresh, but if you have leftovers, you can store them in an airtight container in the fridge for up to 2 days. Just keep in mind that the slush may lose some of its texture over time as the ice melts. It doesn’t freeze well, as the ice will turn into a solid block. If you must freeze it, blend again after thawing to restore the slushy consistency. This treat is best the day you make it, as the flavors meld together beautifully overnight, enhancing its deliciousness.

Frequently Asked Questions

Can I make Frozen Orange Creamsicle Slush ahead of time?

Yes — in fact, it tastes even better the next day as the flavors meld. However, it’s best to enjoy it fresh, as the texture can change if stored for too long. If you need to prepare it ahead, keep it in the fridge and re-blend before serving.

What kind of orange juice should I use?

For the best flavor, use freshly squeezed orange juice. However, if you’re short on time, opt for 100% pure store-bought juice without added sugars. This will ensure that your slush remains flavorful and refreshing.

Can I substitute the vanilla ice cream?

Absolutely! If you’re looking for a dairy-free option, coconut milk ice cream or a non-dairy vanilla ice cream can work wonderfully. They will still provide the creamy texture and sweetness you desire.

How can I adjust the sweetness of my slush?

You can easily adjust the sweetness by modifying the amount of sugar added. Start with 1/4 cup and taste the mixture before blending. If you prefer it sweeter, add more sugar gradually until it reaches your desired level.

What should I do if my slush is too thick?

If your slush is too thick, simply add a splash of milk or orange juice and blend again. This will help achieve a more drinkable consistency while maintaining the slushy texture. Adjust gradually to reach your preferred thickness.

Sun-Kissed Frozen Orange Cream Slush

Final Thoughts

The Frozen Orange Creamsicle Slush is a delightful blend of refreshing citrus and creamy goodness, making it a perfect treat for warm days or any time you crave a taste of nostalgia. The way the bright orange flavor dances with the creamy texture truly elevates this slush, transforming it into a satisfying escape from the everyday.

This is the kind of recipe I come back to again and again, especially when I’m looking to cool down or impress guests at a summer gathering. It’s simple to make and always brings smiles all around! I encourage you to try this recipe for yourself—don’t hesitate to share your results or even put your own spin on it. Happy slushing!

Print
clock clock iconcutlery cutlery iconflag flag iconfolder folder iconinstagram instagram iconpinterest pinterest iconfacebook facebook iconprint print iconsquares squares iconheart heart iconheart solid heart solid icon

Frozen Orange Creamsicle Slush


  • Author: Lily author
  • Total Time: 15 minutes
  • Yield: 4 servings 1x
Pin Recipe
Print Recipe

Description

This Frozen Orange Creamsicle Slush is a refreshing treat that combines creamy vanilla and zesty orange flavors. Perfect for hot summer days, it brings back nostalgic memories with every sip.


Ingredients

Scale
  • 2 cups orange juice (freshly squeezed or store-bought)
  • 1 cup vanilla ice cream
  • 1 cup crushed ice
  • 1/2 cup milk (whole or 2%)
  • 1/4 cup granulated sugar (adjust based on sweetness preference)
  • 1 teaspoon vanilla extract
  • Zest of 1 orange (for added flavor)
  • Fresh orange slices and mint leaves (for garnish)

Instructions

  1. Start by preparing your ingredients. Gather 2 cups of orange juice, 1 cup of vanilla ice cream, and 1 cup of crushed ice. Make sure the ice is finely crushed, as larger chunks can make blending difficult.
  2. In a blender, combine the orange juice, vanilla ice cream, crushed ice, and 1/2 cup of milk. Add 1/4 cup of granulated sugar and 1 teaspoon of vanilla extract. If you like a sweeter slush, consider adding a bit more sugar at this stage.
  3. Add the zest of 1 orange to the blender. This step is crucial for enhancing the citrus flavor of your slush. Make sure not to include the bitter white pith—only the flavorful zest.
  4. Blend the mixture on medium-high speed for about 30-45 seconds. Stop once the ingredients are fully combined and the slush has a smooth, even consistency. If you notice large chunks of ice, blend for an additional 10-15 seconds. Avoid over-blending, as this can make the slush too liquidy.
  5. Once blended, taste the slush. If it needs more sweetness, add a little more sugar and blend for a few more seconds. If it’s too thick, you can add a splash of milk to reach your desired consistency.
  6. Pour the slush into glasses. This recipe typically serves 4, but you can easily double it for larger gatherings. Use a spoon to help guide the slush into the glasses if needed.
  7. Garnish each serving with fresh orange slices and mint leaves. The mint not only adds a pop of color but also a refreshing aroma that complements the citrus flavors beautifully.
  8. Serve immediately and enjoy! If you’ve made extra, you can refrigerate it for a short time, but it's best enjoyed fresh.
  • Prep Time: 15 min
  • Cook Time: 0 min
  • Category: Dessert
  • Method: Blending
  • Cuisine: American

Nutrition

  • Serving Size: 1 serving
  • Calories: 200
  • Sugar: 30 g
  • Sodium: 50 mg
  • Fat: 5 g
  • Saturated Fat: 3 g
  • Unsaturated Fat: 2 g
  • Trans Fat: 0 g
  • Carbohydrates: 40 g
  • Fiber: 1 g
  • Protein: 2 g
  • Cholesterol: 20 mg

Keywords: Don't skip the orange zest! It's a game-changer for flavor. Always zest before juicing to make it easier.

Did you make this recipe?

Share a photo and tag us — we can't wait to see what you've made!

Zesty Lemon Poppy Seed Delight

One rainy afternoon, I found myself in my grandmother’s cozy kitchen, the kind that always smelled like warmth and love. She was whipping up her famous Lemon Poppy Seed Loaf, a recipe that had been passed down through generations. As the batter came together, the zesty aroma of fresh lemons filled the air, mingling perfectly with the nutty fragrance of poppy seeds. I can still picture her, apron-clad, as she expertly drizzled a vibrant citrus icing over the loaf, creating a glossy, sun-kissed finish that beckoned us to dive in. It was a moment that sparked my own passion for baking, and this recipe has become a cherished staple in my home ever since.

When you take a bite of this Lemon Poppy Seed Loaf, it’s like a burst of sunshine on your palate. The loaf is beautifully golden, with a tender crumb that melts in your mouth. Each slice is speckled with tiny poppy seeds, adding a delightful crunch that contrasts beautifully with the tangy sweetness of the lemon. And that citrus icing? It’s the finishing touch that elevates this loaf from ordinary to extraordinary, with its bright, zesty flavor dancing on your taste buds.

This recipe stands out because it embraces simplicity while delivering on flavor. I’ve added a hint of vanilla to the batter, enhancing the overall taste and making it even more indulgent. Trust me, once you make this Lemon Poppy Seed Loaf With Citrus Icing, it’ll become a go-to in your baking repertoire.

So, let me show you exactly how to make it!

Zesty Lemon Poppy Seed Delight

Why You’ll Love This Recipe

  • Moist and tender crumb that melts in your mouth, thanks to the perfect balance of butter and buttermilk.
  • Bright, zesty lemon flavor paired with crunchy poppy seeds, creating a delightful texture and taste experience.
  • Easy to whip up in just about an hour, perfect for last-minute gatherings or a cozy afternoon treat.
  • Budget-friendly with everyday ingredients, making it an accessible option for all home bakers.
  • The citrus icing adds a sweet tang that elevates the loaf, turning a simple recipe into a showstopper!

Ingredients

  • 1 ½ cups (190g) all-purpose flour
  • 1 teaspoon baking powder
  • ½ teaspoon baking soda
  • ½ teaspoon salt
  • 3 tablespoons poppy seeds
  • ½ cup (115g) unsalted butter, softened to room temperature
  • 1 cup (200g) granulated sugar
  • 2 large eggs
  • 1 teaspoon vanilla extract
  • 1 teaspoon lemon zest (from about 1 medium lemon)
  • ½ cup (120ml) buttermilk
  • 2 tablespoons fresh lemon juice

For the Citrus Icing:

  • 1 cup (120g) powdered sugar
  • 2 tablespoons fresh lemon juice
  • 1 tablespoon orange juice
  • 1 teaspoon lemon zest (for garnish, optional)

Let’s dive into the key ingredients that make this Lemon Poppy Seed Loaf so special. The all-purpose flour provides the structure and base for the loaf, while the baking powder and baking soda ensure it rises perfectly, giving the loaf a light texture. For a gluten-free variation, you could substitute the flour with a gluten-free all-purpose blend. Poppy seeds not only add a delightful crunch but also contribute to the unique flavor profile that pairs well with the citrus notes.

Unsalted butter is crucial for achieving the buttery richness that makes this loaf so moist. If you’re looking for a dairy-free option, coconut oil or a vegan butter can be used instead. The buttermilk is another essential component, providing acidity that activates the baking soda for a fluffy texture. If you don’t have buttermilk on hand, you can easily make a substitute by mixing ½ cup of milk with 1 tablespoon of vinegar or lemon juice and letting it sit for about 5 minutes.

Step-by-Step Instructions

  1. Preheat your oven to 350°F (175°C). Grease a 9×5-inch loaf pan or line it with parchment paper for easy removal later.
  2. In a medium mixing bowl, whisk together 1 ½ cups of all-purpose flour, 1 teaspoon of baking powder, ½ teaspoon of baking soda, ½ teaspoon of salt, and 3 tablespoons of poppy seeds. This helps to evenly distribute the baking agents and ensures a uniform rise.
  3. In a large mixing bowl, cream together ½ cup of softened unsalted butter and 1 cup of granulated sugar using an electric mixer on medium speed for about 3-4 minutes, until the mixture is light and fluffy. Make sure to scrape down the sides of the bowl occasionally.
  4. Add 2 large eggs, 1 teaspoon of vanilla extract, and 1 teaspoon of lemon zest to the creamed butter and sugar, mixing until fully combined. You want a smooth consistency, so ensure there are no lumps of butter.
  5. In a small bowl, combine ½ cup of buttermilk and 2 tablespoons of fresh lemon juice. Alternately add the dry ingredients and buttermilk mixture to the butter mixture, starting and ending with the dry ingredients. Mix just until combined; do not overmix, as this can lead to a dense loaf.
  6. Pour the batter into the prepared loaf pan. Smooth the top with a spatula, ensuring it’s even. Bake in the preheated oven for 50-60 minutes, or until a toothpick inserted in the center comes out clean. The edges should be lightly golden brown, and the center should feel just set.
  7. Once baked, remove the loaf from the oven and allow it to cool in the pan for about 10 minutes. Then, transfer it to a wire rack to cool completely. Resist the urge to slice too soon, as it will be crumbly if it’s still warm.
  8. While the loaf is cooling, prepare the citrus icing. In a medium bowl, whisk together 1 cup of powdered sugar, 2 tablespoons of fresh lemon juice, and 1 tablespoon of orange juice until smooth. If the icing is too thick, you can add a little more juice to reach your desired consistency.
  9. Once the loaf is completely cool, drizzle the citrus icing over the top. If you like, sprinkle with an additional teaspoon of lemon zest for an extra pop of flavor and color.

Pro Tips for the Best Lemon Poppy Seed Loaf With Citrus Icing

  • Be careful not to overmix your batter; this is a common mistake that can lead to a dense loaf. Mix just until the dry ingredients are incorporated for a light and fluffy texture.
  • Use room temperature ingredients, especially the butter and eggs. This helps to create a smoother batter and ensures even baking. Take your eggs out of the fridge about 30 minutes before you start.
  • For a more pronounced lemon flavor, consider adding a little lemon extract in addition to the zest and juice. Just a half teaspoon can elevate the citrus notes significantly.
  • When measuring your flour, spoon it into the measuring cup and level it off with a knife instead of scooping directly from the bag. This prevents packing and ensures you don’t end up with a dry loaf.
  • Invest in a good quality loaf pan; it makes a difference in heat distribution, which ensures even baking. If your pan is dark-coated, reduce the oven temperature by 25°F to prevent over-browning.

Variations & Serving Ideas

For a delightful twist, consider adding blueberries or raspberries to the batter for a fruity burst of flavor. You can also experiment with different citrus fruits—try lime or grapefruit zest and juice for a refreshing change. For a healthier option, substitute half of the all-purpose flour with whole wheat flour for added fiber without compromising too much on texture.

This Lemon Poppy Seed Loaf pairs beautifully with a light salad, such as a mixed greens salad with a vinaigrette, or a cup of tea for a cozy afternoon treat. It also complements a creamy cheese platter, as the acidity of the loaf balances rich cheeses perfectly. Lastly, a scoop of vanilla ice cream on the side creates a delightful contrast of temperatures and flavors!

Storage, Make-Ahead & Reheating

This Lemon Poppy Seed Loaf can be stored at room temperature for up to 3 days if wrapped tightly in plastic wrap. If you want to keep it longer, it freezes well for up to 3 months. To freeze, wrap the loaf tightly in plastic wrap and then in aluminum foil to prevent freezer burn.

When you’re ready to enjoy it again, simply thaw it in the fridge overnight. Reheat individual slices in the microwave for 15-20 seconds or in a toaster oven until warmed through. Interestingly, many people find that this loaf tastes even better the next day, as the flavors have time to meld!

Frequently Asked Questions

Can I make Lemon Poppy Seed Loaf With Citrus Icing ahead of time?

Yes — in fact, it tastes even better the next day! You can make the loaf a day in advance, allowing the flavors to develop. Just be sure to store it in an airtight container to maintain its moisture.

Can I substitute the poppy seeds?

Absolutely! If you don’t have poppy seeds on hand or prefer an alternative, you can use sesame seeds for a similar crunch or omit them entirely for a smooth loaf.

What can I use instead of buttermilk?

If you don’t have buttermilk, you can easily create a substitute by mixing ½ cup of milk (dairy or plant-based) with 1 tablespoon of vinegar or lemon juice. Let it sit for 5 minutes before using in the recipe.

How can I make this recipe gluten-free?

To make a gluten-free version of this Lemon Poppy Seed Loaf, substitute the all-purpose flour with a gluten-free all-purpose flour blend. Just ensure that the blend contains a binding agent like xanthan gum for the best results.

What is the best way to store leftover loaf?

Leftover Lemon Poppy Seed Loaf should be stored in an airtight container at room temperature for up to 3 days. For longer storage, wrap it tightly and freeze for up to 3 months. Thaw it before serving for the best texture.

Zesty Lemon Poppy Seed Delight

Final Thoughts

The Lemon Poppy Seed Loaf with Citrus Icing is truly a delightful treat that brings a burst of brightness to any occasion. The zesty lemon flavor combined with the subtle crunch of poppy seeds creates a satisfying balance, while the citrus icing adds a touch of sweetness that perfectly complements the loaf’s tanginess.

This is the kind of recipe I come back to again and again, especially when I want to brighten up a gloomy day or celebrate a small victory. The aroma that fills the kitchen as it bakes is absolutely heavenly! I encourage you to give this recipe a try; you might just find it becoming a beloved staple in your home. Don’t forget to share your results or even add your own unique twist—I can’t wait to see what you create!

Print
clock clock iconcutlery cutlery iconflag flag iconfolder folder iconinstagram instagram iconpinterest pinterest iconfacebook facebook iconprint print iconsquares squares iconheart heart iconheart solid heart solid icon

Lemon Poppy Seed Loaf


  • Author: Lily author
  • Total Time: 5 minute
  • Yield: 1 loaf 1x
Pin Recipe
Print Recipe

Description

This Lemon Poppy Seed Loaf is a delightful treat that combines zesty lemon flavor with crunchy poppy seeds. Topped with a citrus icing, it’s perfect for any occasion.


Ingredients

Scale
  • 1 ½ cups (190g) all-purpose flour
  • 1 teaspoon baking powder
  • ½ teaspoon baking soda
  • ½ teaspoon salt
  • 3 tablespoons poppy seeds
  • ½ cup (115g) unsalted butter, softened to room temperature
  • 1 cup (200g) granulated sugar
  • 2 large eggs
  • 1 teaspoon vanilla extract
  • 1 teaspoon lemon zest (from about 1 medium lemon)
  • ½ cup (120ml) buttermilk
  • 2 tablespoons fresh lemon juice
  • 1 cup (120g) powdered sugar
  • 2 tablespoons fresh lemon juice
  • 1 tablespoon orange juice
  • 1 teaspoon lemon zest (for garnish, optional)

Instructions

  1. Preheat your oven to 350°F (175°C). Grease a 9×5-inch loaf pan or line it with parchment paper for easy removal later.
  2. In a medium mixing bowl, whisk together 1 ½ cups of all-purpose flour, 1 teaspoon of baking powder, ½ teaspoon of baking soda, ½ teaspoon of salt, and 3 tablespoons of poppy seeds. This helps to evenly distribute the baking agents and ensures a uniform rise.
  3. In a large mixing bowl, cream together ½ cup of softened unsalted butter and 1 cup of granulated sugar using an electric mixer on medium speed for about 3-4 minutes, until the mixture is light and fluffy. Make sure to scrape down the sides of the bowl occasionally.
  4. Add 2 large eggs, 1 teaspoon of vanilla extract, and 1 teaspoon of lemon zest to the creamed butter and sugar, mixing until fully combined. You want a smooth consistency, so ensure there are no lumps of butter.
  5. In a small bowl, combine ½ cup of buttermilk and 2 tablespoons of fresh lemon juice. Alternately add the dry ingredients and buttermilk mixture to the butter mixture, starting and ending with the dry ingredients. Mix just until combined; do not overmix, as this can lead to a dense loaf.
  6. Pour the batter into the prepared loaf pan. Smooth the top with a spatula, ensuring it’s even. Bake in the preheated oven for 50-60 minutes, or until a toothpick inserted in the center comes out clean. The edges should be lightly golden brown, and the center should feel just set.
  7. Once baked, remove the loaf from the oven and allow it to cool in the pan for about 10 minutes. Then, transfer it to a wire rack to cool completely. Resist the urge to slice too soon, as it will be crumbly if it’s still warm.
  8. While the loaf is cooling, prepare the citrus icing. In a medium bowl, whisk together 1 cup of powdered sugar, 2 tablespoons of fresh lemon juice, and 1 tablespoon of orange juice until smooth. If the icing is too thick, you can add a little more juice to reach your desired consistency.
  9. Once the loaf is completely cool, drizzle the citrus icing over the top. If you like, sprinkle with an additional teaspoon of lemon zest for an extra pop of flavor and color.
  • Prep Time: 15 mins
  • Cook Time: 50-60 mins
  • Category: Dessert
  • Method: Baking
  • Cuisine: American

Nutrition

  • Serving Size: 1 slice
  • Calories: 200
  • Sugar: 15 g
  • Sodium: 150 mg
  • Fat: 8 g
  • Saturated Fat: 5 g
  • Unsaturated Fat: 3 g
  • Trans Fat: 0 g
  • Carbohydrates: 30 g
  • Fiber: 1 g
  • Protein: 3 g
  • Cholesterol: 40 mg

Keywords: Be careful not to overmix your batter; this is a common mistake that can lead to a dense loaf. Use room temperature ingredients for a smoother batter and even baking.

Did you make this recipe?

Share a photo and tag us — we can't wait to see what you've made!

  • Privacy Policy
  • Terms Of Service
  • Contact
  • About
  • GDPR

Copyright © 2025 Homesmad