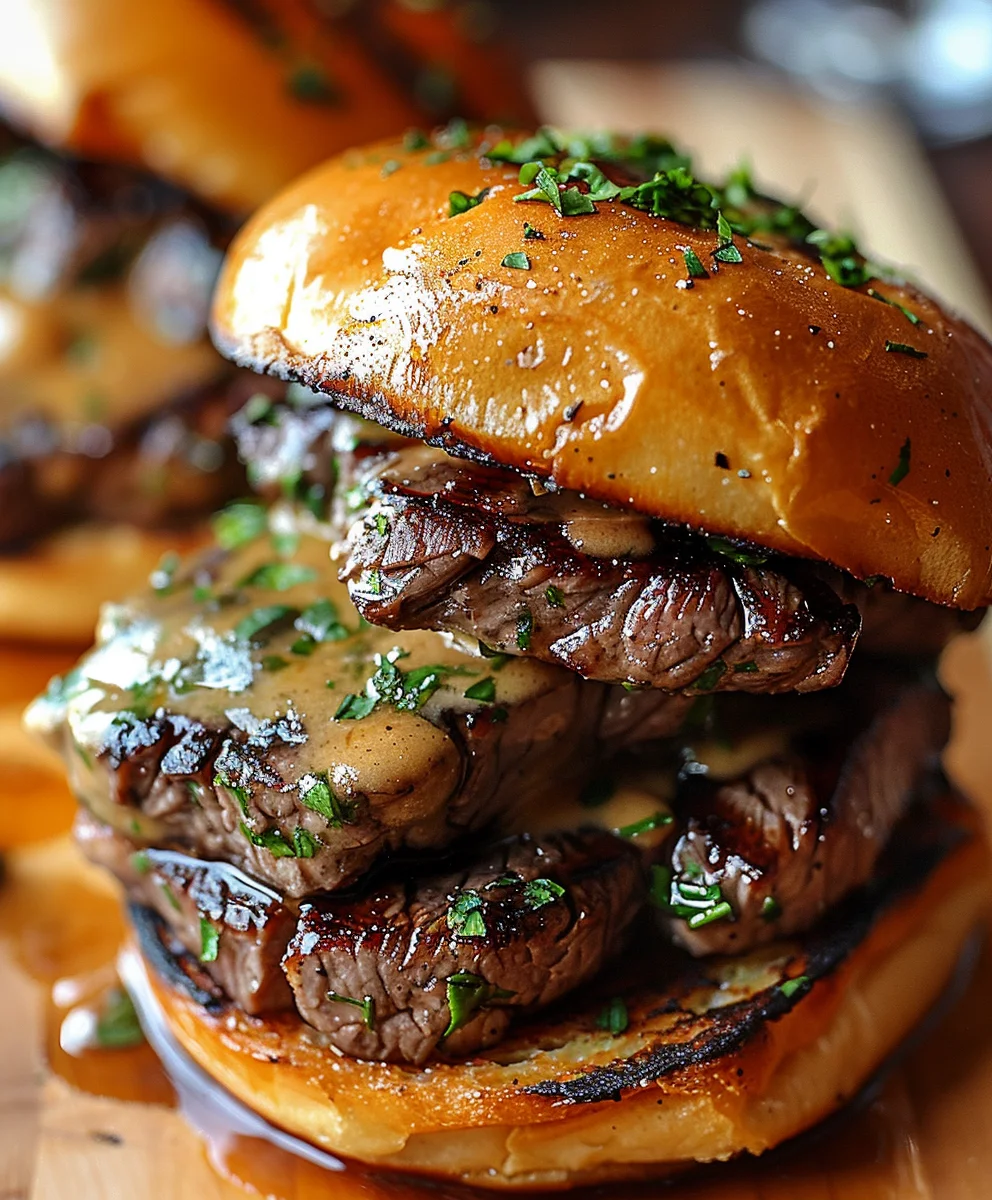
Cowboy Butter Steak Sliders are not just a meal; they are an experience, transforming the humble slider into a culinary masterpiece. Allow me to introduce you to a dish that consistently steals the show, whether you’re hosting a sophisticated dinner party or a casual game night. The very essence of ‘cowboy butter’ evokes images of hearty, robust flavors enjoyed around a campfire, and these sliders beautifully encapsulate that rustic charm, elevating it for modern palates. While sliders themselves have a rich history as quick, satisfying bites perfect for social gatherings, our version brings a gourmet touch that is truly exceptional.
People absolutely adore these Cowboy Butter Steak Sliders for a multitude of reasons. Firstly, the succulent, perfectly seared steak, bathed in a vibrant, herbaceous, and garlicky cowboy butter, delivers an explosion of savory goodness with every bite. The rich, aromatic blend of butter, fresh herbs, and spices penetrates the meat, ensuring maximum flavor and an unforgettable aroma. Secondly, their convenient, bite-sized nature makes them incredibly versatile – easy to serve, easy to eat, and perfect for sharing at any event. I find immense joy in seeing guests delight in the tender texture of the steak, the soft embrace of the slider bun, and that unforgettable, garlicky punch of the cowboy butter. They are, quite simply, irresistible and a guaranteed crowd-pleaser.

Ingredients:
-
For the Steak:
- 1.5 – 2 pounds sirloin steak, flank steak, or flat iron steak: We’re looking for a cut that’s flavorful and tender when cooked quickly. I find these cuts work wonderfully for slicing into smaller pieces for our sliders.
- 1 tablespoon olive oil (plus more for cooking): A little bit to help the seasoning adhere and to ensure a good sear.
- 1 teaspoon smoked paprika: Adds a beautiful color and a subtle smoky depth that complements the beef perfectly.
- 1/2 teaspoon garlic powder: A foundational flavor that enhances almost any savory dish.
- 1/2 teaspoon onion powder: Similar to garlic powder, it provides a mellow, sweet onion essence without the moisture of fresh onion.
- 1/2 teaspoon black pepper, freshly ground: For that essential peppery kick.
- 1 teaspoon kosher salt, or to taste: Crucial for seasoning the meat thoroughly and bringing out its natural flavors.
-
For the Legendary Cowboy Butter:
- 1 cup (2 sticks) unsalted butter, softened to room temperature: The heart of our cowboy butter. Softened butter is key for a smooth, homogenous mixture.
- 3 cloves garlic, minced very fine: Fresh garlic is non-negotiable here, providing a pungent, aromatic base.
- 1/4 cup fresh parsley, finely chopped: Adds a bright, herbaceous note and a lovely green speckle.
- 2 tablespoons fresh chives, finely chopped: A milder oniony flavor than raw onion, offering a delicate freshness.
- 1 tablespoon fresh thyme leaves, finely chopped: Earthy and slightly peppery, it’s a classic pairing with beef.
- 1 teaspoon Dijon mustard: Provides a subtle tang and helps emulsify the butter, adding a touch of complexity.
- 1 teaspoon smoked paprika: Echoes the paprika in the steak seasoning, tying the flavors together beautifully.
- 1/2 teaspoon red pepper flakes (or more, to taste): For that signature cowboy kick! Adjust to your preferred level of spice.
- 1/2 teaspoon onion powder: Enhances the savory depth.
- 1/4 teaspoon cayenne pepper (optional, for extra heat): If you really like things spicy, this is your secret weapon.
- 1/2 teaspoon kosher salt, or to taste: Balances all the flavors.
- 1/4 teaspoon black pepper, freshly ground: Another layer of essential seasoning.
- 1 tablespoon fresh lemon juice: A crucial ingredient that brightens the entire butter, cutting through the richness and adding a vibrant zing.
-
For the Slider Buns & Assembly:
- 12-pack Hawaiian sweet rolls or similar slider buns: Their slight sweetness and soft texture are perfect for soaking up all the delicious juices.
- 2 tablespoons melted butter (for brushing buns): Helps toast the buns to a beautiful golden brown.
- Optional toppings:
- Thinly sliced red onion or pickled red onions: For a sharp, tangy crunch.
- Fresh cilantro or extra parsley for garnish: Adds color and a fresh finish.
- Arugula or baby spinach: For a touch of green and a peppery bite.
- Your favorite cheese, sliced thin (e.g., provolone, cheddar, Swiss): If you want to melt some cheese onto your sliders.
Preparing the Steak for Our Cowboy Butter Steak Sliders
Alright, let’s get down to business with the star of our show: the steak for these incredible Cowboy Butter Steak Sliders! The way we prepare the steak is absolutely crucial for both flavor and tenderness.
- Pat the Steak Dry: First things first, take your sirloin, flank, or flat iron steak out of its packaging. Grab some paper towels and pat it down really well on all sides. This step is often overlooked but it’s vital. Excess moisture on the surface of the meat will prevent a good sear, leading to steaming instead of that beautiful, crispy, browned crust we’re aiming for. Remember, a dry surface equals a better crust, and that crust means more flavor!
- Slice the Steak: Now, let’s talk about slicing. For sliders, we want relatively thin pieces that are easy to bite into. I recommend slicing the steak against the grain into pieces about 1/4 to 1/2 inch thick. Slicing against the grain is incredibly important for tenderness, especially with cuts like flank or flat iron. If you slice with the grain, the meat fibers remain long and tough, making it chewy. Against the grain, you shorten those fibers, resulting in a much more tender bite. Feel free to cut larger slices into smaller, more slider-friendly pieces, roughly 2-3 inches in length.
- Season the Steak Generously: In a medium bowl, combine the sliced steak with 1 tablespoon of olive oil. Toss to coat evenly. Then, sprinkle in the smoked paprika, garlic powder, onion powder, black pepper, and kosher salt. Use your hands to really work the seasoning into every piece of steak. Don’t be shy here; the seasoning is what builds that fantastic base flavor for our Cowboy Butter Steak Sliders. We’re creating a robust, savory profile that will stand up to the rich cowboy butter.
- Let it Marinate (Briefly): Once seasoned, you can either cook the steak immediately or, for even better flavor penetration, let it sit at room temperature for 15-30 minutes. If you’re short on time, cooking it right away is fine, but that short rest allows the salt to start working its magic, tenderizing the meat and drawing those delicious spices deeper into the fibers. While the steak is resting, it’s the perfect time to start on our legendary cowboy butter!
Crafting the Legendary Cowboy Butter
The cowboy butter is truly what elevates these to the next level, transforming them from simple steak sliders into extraordinary Cowboy Butter Steak Sliders. It’s incredibly flavorful, aromatic, and adds an unbeatable richness.
- Soften the Butter: Make sure your 1 cup (2 sticks) of unsalted butter is genuinely softened to room temperature. This isn’t just a suggestion; it’s a requirement for a smooth, lump-free butter mixture. If it’s too cold, it’ll be hard to mix, and if it’s melted, it’ll be oily and difficult to incorporate the herbs. Take it out of the fridge at least an hour before you plan to make this.
- Prepare Your Aromatics and Herbs: While your butter is softening, meticulously mince your garlic cloves. Finely chop your fresh parsley, chives, and thyme. The finer you chop, the more evenly distributed the flavors will be throughout the butter. Fresh herbs are key here; dried herbs just won’t give us the same vibrant, fresh taste.
- Combine All Cowboy Butter Ingredients: In a medium-sized bowl, place your softened butter. Add the minced garlic, chopped parsley, chives, thyme, Dijon mustard, smoked paprika, red pepper flakes, onion powder, cayenne pepper (if using), kosher salt, and freshly ground black pepper.
- Mix Thoroughly: Now, using a spoon or a rubber spatula, thoroughly mix all the ingredients into the butter. Really get in there and ensure everything is evenly distributed. You want to see vibrant flecks of green herbs and red paprika throughout the golden butter. This is where the magic starts to happen, as all these incredible aromas begin to meld together.
- Add the Lemon Brightness: Finally, add the tablespoon of fresh lemon juice. This is a game-changer! The lemon juice brightens the entire mixture, cutting through the richness of the butter and meat, and adding a delightful zing that makes the cowboy butter utterly irresistible. Give it one last good mix until everything is fully incorporated and looks beautiful.
- Set Aside: You can use this cowboy butter immediately, or if you prefer, you can roll it into a log using parchment paper or plastic wrap and chill it for later. For these sliders, we’ll be using a good portion of it for basting the steak and another portion for spreading on the buns.
Cooking the Steak to Perfection
This is where our seasoned steak meets the heat, and we start building those incredible flavors for our Cowboy Butter Steak Sliders. Getting a good sear is paramount!
- Preheat Your Pan or Griddle: Place a large, heavy-bottomed skillet (cast iron works beautifully here) or a flat-top griddle over medium-high heat. Let it heat up for a good 3-5 minutes until it’s screaming hot. You want to see a wisp of smoke or feel intense heat radiating from the surface. This high heat is essential for achieving that desirable crust on our steak.
- Add Oil: Once hot, add a tablespoon or two of olive oil to the pan. Swirl it around to coat the bottom evenly. The oil should shimmer, but not smoke excessively.
- Sear the Steak in Batches: Carefully add your seasoned steak slices to the hot pan in a single layer. Do not overcrowd the pan! If you put too much steak in at once, the temperature of the pan will drop dramatically, and the meat will steam instead of sear, resulting in grey, unappetizing steak. Work in batches if necessary, allowing each piece to have direct contact with the hot surface.
- The Initial Sear: Let the steak sear undisturbed for about 1.5 to 2 minutes per side. You’re looking for a beautiful, deep brown crust to form. Resist the urge to move or flip the steak too early. That crust is pure flavor!
- Introduce the Cowboy Butter for Basting: Once the steak has a good sear on both sides, reduce the heat to medium-low. Add about 2-3 generous tablespoons of your prepared cowboy butter to the pan. As the butter melts, it will release all those incredible aromas of garlic, herbs, and spices.
- Baste for Flavor and Tenderness: Using a spoon, continuously baste the steak with the melted cowboy butter as it cooks for another 1-2 minutes, flipping the pieces occasionally to ensure even coating. The butter will infuse the steak with moisture and an unparalleled richness. For medium-rare to medium, the total cooking time per batch will likely be around 3-5 minutes, depending on the thickness of your slices and the heat of your pan. Remember, thinner slices cook much faster!
- Rest the Steak: As each batch of steak is cooked to your desired doneness, immediately transfer it to a clean cutting board or a plate. Tent it loosely with foil and let it rest for at least 5 minutes. This resting period is crucial! It allows the juices within the meat to redistribute, resulting in a much more tender and moist steak. If you cut it immediately, all those delicious juices will run out onto your board, leaving you with dry meat.
Assembling Our Irresistible Cowboy Butter Steak Sliders
With our perfectly cooked, cowboy butter-basted steak resting, it’s time to bring everything together and create these truly exceptional Cowboy Butter Steak Sliders. This is where all our hard work pays off!
- Prepare the Slider Buns: Preheat your oven to 350°F (175°C) or set your broiler to low. Carefully slice your 12-pack of Hawaiian sweet rolls (or chosen slider buns) horizontally through the middle, keeping the top and bottom halves intact if possible. This makes assembly much easier.
- Butter and Toast the Buns: Melt about 2 tablespoons of regular butter (or, if you’re feeling extra indulgent, use some of the reserved cowboy butter!). Brush the cut sides of both the top and bottom halves of the rolls with the melted butter. Place the buttered sides up on a baking sheet. Toast in the preheated oven for 3-5 minutes, or under the broiler for 1-2 minutes (watch carefully, they can burn quickly!). You’re looking for a light golden-brown color and a slightly crispy edge. This gives the buns a wonderful texture and prevents them from getting soggy when loaded with delicious steak and cowboy butter.
- Slice the Steak for Sliders: While the buns are toasting (or after they’re done), take your rested steak. If you sliced it into larger pieces initially, now is the time to cut it into smaller, bite-sized pieces that will fit perfectly on your slider buns. You want generous but manageable portions for each slider.
- Optional Cheese Melt: If you’re adding cheese, place thin slices of your preferred cheese (provolone, cheddar, Swiss) directly onto the toasted bottom half of the buns. Pop them back into the warm oven or under the broiler for 1-2 minutes, just until the cheese is beautifully melted and gooey. This adds another layer of decadence to our Cowboy Butter Steak Sliders.
- Spread More Cowboy Butter (Optional, but highly recommended!): Take a moment to spread a thin layer of remaining cowboy butter on the top halves of the toasted buns. This infuses every bite with that incredible herby, garlicky goodness. It’s a small step that makes a huge difference in flavor!
- Assemble the Sliders:
- Place the toasted bottom half of the buns (with melted cheese, if using) onto a serving platter or cutting board.
- Generously pile the warm, sliced cowboy butter steak onto the bottom buns. Ensure each slider gets a good amount of that flavorful meat.
- If desired, add any optional toppings like thinly sliced red onion, pickled red onions, or a few leaves of arugula or baby spinach on top of the steak. These add contrasting textures and flavors.
- Finally, place the top half of the buns over the steak and toppings.
- Serve Immediately: These Cowboy Butter Steak Sliders are best served warm, allowing the flavors to truly shine. The juices from the steak, combined with the melted cowboy butter, will make these an instant favorite.
Serving Suggestions and Tips for Your Cowboy Butter Steak Sliders
Congratulations! You’ve just created a batch of the most delicious Cowboy Butter Steak Sliders. Here are a few final thoughts and serving ideas to make your experience even better.
Presentation Matters:
- For a visually appealing presentation, you can skewer a small pickle or an olive through each slider with a decorative toothpick. This also helps hold them together, especially if you’re serving them at a party.
- Garnish the platter with some extra fresh parsley or chives to add a pop of color and freshness.
What to Serve Alongside:
- Crispy Fries or Tater Tots: A classic pairing that complements the richness of the sliders.
- Coleslaw or Potato Salad: A cool, creamy side dish offers a nice contrast to the warm, savory sliders.
- Simple Green Salad: A light, vinaigrette-dressed salad can balance the meal, providing freshness and a bit of crunch.
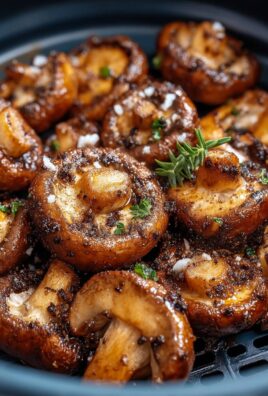
- Grilled Corn on the Cob: For a true “cowboy” feel, grilled corn with a little more cowboy butter would be an excellent choice.
Make-Ahead Tips:
- Cowboy Butter: The cowboy butter can be made several days in advance. Store it in an airtight container in the refrigerator, or roll it into a log in parchment paper. Let it come to room temperature before using for basting or spreading.
- Steak Prep: You can slice and season the steak a few hours ahead of time and keep it refrigerated. Bring it out to room temperature for about 20-30 minutes before cooking for the best results.
- Buns: While best toasted fresh, you can pre-slice the buns to save a bit of time.
Variations to Explore:
- Spicier Sliders: Don’t hesitate to increase the red pepper flakes or cayenne in the cowboy butter for a hotter kick.
- Different Herbs: While the classic herbs are fantastic, feel free to experiment with a tiny bit of fresh oregano or rosemary if you love those flavors with beef. Remember, a little goes a long way with strong herbs.
- Cheese Choices: While I love provolone or sharp cheddar, blue cheese crumbles or a smoked gouda could add an adventurous twist to your Cowboy Butter Steak Sliders.
- Sauce It Up: If you’re a sauce fan, a drizzle of your favorite BBQ sauce, a creamy horseradish sauce, or even a chipotle aioli could be a fun addition, though I find the cowboy butter provides all the sauciness you need!
I genuinely believe these Cowboy Butter Steak Sliders are going to be a huge hit at your next gathering, or even just for a special weeknight meal. The combination of tender, perfectly cooked steak, infused with the rich, aromatic cowboy butter, nestled in a sweet toasted bun, is truly a culinary delight. Enjoy every single bite!
Conclusion:
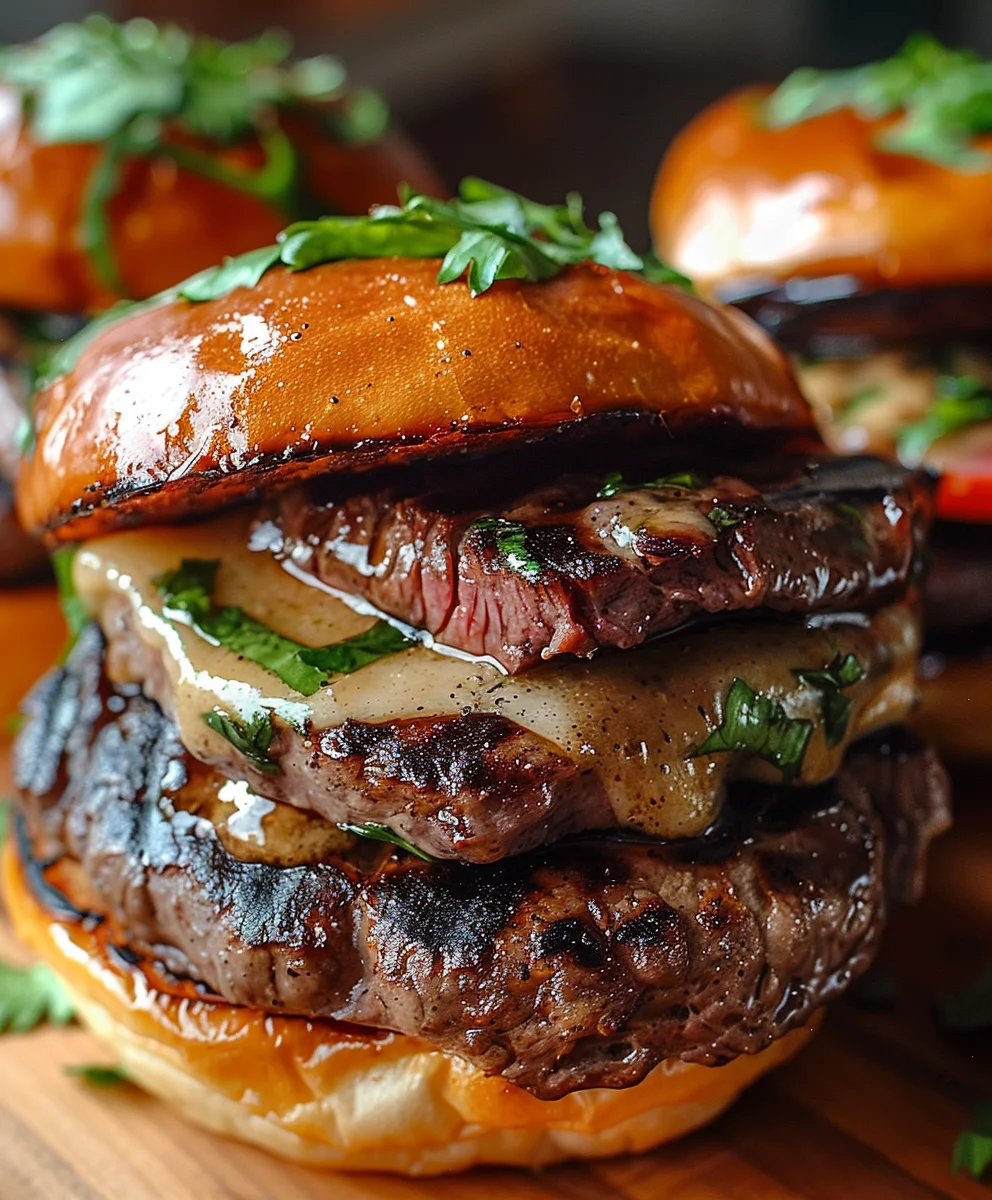
And there you have it, my friends! We’ve journeyed through the simple yet profound steps to create a dish that I genuinely believe will become a staple in your culinary repertoire. This isn’t just another appetizer; it’s a testament to how a few quality ingredients, when brought together with a touch of passion, can create an explosion of flavor that will have everyone reaching for more. The sheer brilliance of this recipe lies in its elegant simplicity coupled with an utterly decadent taste. We’re talking about succulent, perfectly cooked steak, drenched in an aromatic, herb-infused cowboy butter, all nestled within a soft, pillowy slider bun. It’s an experience, not just a meal. I wholeheartedly believe this recipe is a must-try for anyone looking to impress with minimal effort, or simply to treat themselves to something truly extraordinary.
What makes these sliders stand head and shoulders above the rest is undoubtedly that magical Cowboy Butter. It’s not just butter; it’s a symphony of garlic, fresh herbs, a hint of spice, and a rich savory depth that permeates every fiber of the steak, elevating it to new heights. Each bite offers a harmonious blend of tender, juicy meat, the tangy-sweet notes of caramelized onions (if you chose to add them), and the slight crunch of the toasted bun, all tied together by that unforgettable butter. This dish proves that gourmet doesn’t have to mean complicated. It’s robust, comforting, and undeniably delicious – truly a showstopper that always disappears first from any spread.
Now, let’s talk about making these incredible creations even more versatile. While they are perfect as a standalone appetizer for game day, a backyard barbecue, or a casual get-together, don’t limit their potential! For serving suggestions, consider pairing your Cowboy Butter Steak Sliders with a fresh, crisp garden salad dressed with a light vinaigrette to cut through the richness. A side of golden, crispy seasoned fries or sweet potato wedges would also be a fantastic complement, offering that delightful textural contrast. If you’re looking for something a bit heartier, a simple corn on the cob or a fresh coleslaw would round out the meal beautifully.
But the fun doesn’t stop there. This recipe is also wonderfully adaptable, allowing you to unleash your inner chef and experiment with variations. Feel free to play around with different cheeses; while a classic provolone or Swiss melts beautifully, a sharp cheddar, a smoky gouda, or even a crumble of blue cheese could add exciting new dimensions. You could swap out the slider buns for mini pretzel buns for a chewier texture and a slight saltiness, or even make them open-faced on toasted baguette slices for a more crostini-style appetizer. For those who like a little extra kick, a dash of hot sauce or some finely diced jalapeños stirred into the Cowboy Butter would be sensational. And if you’re looking to turn this into a full dinner, simply use larger cuts of steak and serve them as open-faced sandwiches on crusty bread, drizzled generously with extra Cowboy Butter.
I truly hope I’ve convinced you to give this recipe a try. There’s a special kind of joy in creating something so flavorful with such ease, and I promise you, the results will speak for themselves. Imagine the smiles on your guests’ faces, or that moment of pure bliss as you savor each bite yourself. It’s more than just cooking; it’s about making memories and indulging in truly good food. So, fire up your grill or skillet, gather your ingredients, and embark on this delicious adventure. When you do, I would absolutely love to hear about your experience! Did you stick to the script, or did you put your own unique spin on it? What were your favorite serving combinations? Please don’t hesitate to share your thoughts, your successes, and perhaps even your own creative variations in the comments below. Your feedback and culinary journeys inspire me, and I can’t wait to see how you make these irresistible sliders your own. Happy cooking!
Cowboy Butter Steak Sliders: Easy & Flavorful Beef Bites!
Cowboy Butter Steak Sliders are not just a meal; they are an experience, transforming the humble slider into a culinary masterpiece. Allow me to introduce you to a dish that consistently steals the show, whether you’re hosting a sophisticated dinner party or a casual game night. The very essence of ‘cowboy butter’ evokes images of hearty, robust flavors enjoyed around a campfire, and these sliders beautifully encapsulate that rustic charm, elevating it for modern palates. While sliders themselves have a rich history as quick, satisfying bites perfect for social gatherings, our version brings a gourmet touch that is truly exceptional.
Ingredients
-
1½– 2 lbs steak (ribeye, sirloin, or flank)
-
Salt & pepper to taste
-
1 tbsp olive oil
-
Slider buns or mini brioche rolls
-
Optional toppings: cheese slices, sautéed onions, arugula, pickles
-
½ cup unsalted butter, melted
-
2 cloves garlic, minced
-
1 tbsp fresh parsley, chopped
-
1 tsp Dijon mustard
-
½ tsp red pepper flakes
-
1 tsp lemon juice
-
½ tsp paprika
-
¼ tsp salt
Instructions
-
Step 1
Pat steak dry; slice against the grain into 1/4-1/2 inch pieces. Season steak with 1 tbsp olive oil, smoked paprika, garlic powder, onion powder, salt, and pepper. Let rest 15-30 minutes at room temperature. -
Step 2
Combine softened ½ cup unsalted butter with 2 cloves minced garlic, 1 tbsp chopped fresh parsley, 1 tsp Dijon mustard, ½ tsp red pepper flakes, 1 tsp lemon juice, ½ tsp paprika, and ¼ tsp salt. Mix well until fully incorporated. -
Step 3
Heat a large skillet over medium-high heat with 1-2 tbsp olive oil. Sear steak in batches for 1.5-2 minutes per side until a deep brown crust forms. Reduce heat to medium-low, add 2-3 tbsp cowboy butter. Baste steak for 1-2 minutes, flipping. Remove steak, tent with foil, and rest for 5 minutes. -
Step 4
Preheat oven to 350°F (175°C). Slice slider buns horizontally. Brush cut sides with melted butter (or more cowboy butter), toast 3-5 minutes until golden. Cut rested steak into slider-sized pieces. (Optional) Melt cheese on bottom buns. Spread remaining cowboy butter on top buns. Assemble: bottom bun, steak, optional toppings, top bun. Serve warm.
Important Information
Nutrition Facts (Per Serving)
It is important to consider this information as approximate and not to use it as definitive health advice.
Allergy Information
Please check ingredients for potential allergens and consult a health professional if in doubt.