• Skip to primary navigation
  • Skip to main content
  • Skip to primary sidebar
Homesmad

Homesmad

  • Home
  • Breakfast & Brunch
  • Appetizers & Snacks
  • Dinner
  • Dessert
  • About
  • Privacy Policy
  • Contact
Homesmad
  • Home
  • Breakfast & Brunch
  • Appetizers & Snacks
  • Dinner
  • Dessert
  • About
  • Privacy Policy
  • Contact

Raspberry Chocolate Lava Cupcakes: Decadent Dessert!

October 24, 2025 by Lily author

Raspberry Chocolate Lava Cupcakes are more than just a dessert; they are an experience.

Imagine a perfectly baked, tender chocolate cake, gently yielding to reveal a luscious, warm, and utterly irresistible molten chocolate center, beautifully complemented by the bright, zesty tang of fresh raspberries. It’s a symphony of textures and flavors that captivates from the very first spoonful, making it an instant favorite for any occasion.

While the exact origin of the molten chocolate cake is debated, with claims from both French chef Michel Bras (coulant au chocolat) and American chef Jean-Georges Vongerichten in the 1980s, its rise to culinary stardom is undeniable. This sophisticated yet surprisingly simple dessert quickly became a staple on fine dining menus, celebrated for its dramatic presentation and indulgent taste. Adapting it into individual cupcake form makes this elegant treat even more accessible and charming, perfect for personal enjoyment or delightful entertaining.

I find that people absolutely adore these cupcakes because they offer the ultimate blend of gourmet indulgence and comforting familiarity. The rich, bittersweet chocolate paired with the vibrant fruit creates a balanced flavor profile that prevents it from being overly sweet, while the contrast between the firm exterior and the gooey interior is simply magical. These Raspberry Chocolate Lava Cupcakes are an impressive showstopper that promises to delight your guests and satisfy even the most discerning sweet tooth. Get ready to bake a little bit of magic!

Raspberry Chocolate Lava Cupcakes: Decadent Dessert! this RECIPE

Ingredients:

Creating these exquisite Raspberry Chocolate Lava Cupcakes requires a selection of fresh, high-quality ingredients. Trust me, the better your ingredients, the more spectacular your results will be!

  • For the Chocolate Lava Batter:
    • 1 stick (½ cup or 113g) unsalted butter, softened slightly or cut into pieces
    • 6 ounces (170g) high-quality dark chocolate (60-70% cacao), finely chopped or good quality chocolate chips
    • ¾ cup (150g) granulated sugar
    • 3 large eggs, at room temperature
    • 2 large egg yolks, at room temperature
    • 1 teaspoon pure vanilla extract
    • ½ cup (60g) all-purpose flour, sifted
    • ¼ teaspoon salt
    • 1 tablespoon unsweetened cocoa powder (optional, for deeper chocolate flavor)
    • ½ teaspoon instant espresso powder (optional, enhances chocolate flavor without adding coffee taste)
  • For the Raspberry Core:
    • 12-18 fresh raspberries, depending on size, or
    • 2-3 tablespoons good quality raspberry preserves or jam
  • For Garnish (Optional):
    • Powdered sugar, for dusting
    • Extra fresh raspberries
    • Fresh mint sprigs
    • A dusting of cocoa powder
  • Equipment:
    • Standard 12-cup muffin tin
    • Paper cupcake liners
    • Mixing bowls (heat-proof for melting chocolate)
    • Whisk
    • Rubber spatula
    • Measuring cups and spoons
    • Sifter (if sifting flour and cocoa)

Preparing Your Workspace and Ingredients (Mise en Place)

  1. Preheat the Oven and Prepare the Muffin Tin:

    First things first, let’s get our oven ready. Preheat your oven to a steady 400°F (200°C). This slightly higher temperature is crucial for achieving that wonderfully molten center in our Raspberry Chocolate Lava Cupcakes. While the oven is preheating, line a standard 12-cup muffin tin with paper cupcake liners. I find that using liners makes for super easy removal and cleanup, plus they look so much more professional!

    Tip for Perfectly Shaped Cupcakes:

    To prevent the liners from sticking or becoming uneven, you can lightly spray the inside of the paper liners with a non-stick baking spray, though it’s often not strictly necessary with good quality liners. Ensuring your muffin tin is clean and dry before adding the liners is also a small but important step.

  2. Chop the Chocolate and Measure Ingredients:

    Finely chop your high-quality dark chocolate. Smaller pieces will melt more evenly and quickly, which is ideal for a smooth batter. Measure out all your remaining ingredients – the sugar, flour, salt, cocoa powder, and espresso powder. Having everything measured and ready to go before you start mixing is what we call “mise en place” in the culinary world, and it truly makes the baking process so much smoother and more enjoyable. Trust me, you don’t want to be scrambling for flour when your chocolate is cooling down!

    Importance of Room Temperature Eggs:

    For the eggs and egg yolks, it’s really important that they are at room temperature. This helps them emulsify properly with the other ingredients, leading to a much smoother and more homogenous batter. If you forget to take them out ahead of time, a quick trick is to place them in a bowl of warm (not hot!) water for about 5-10 minutes.

Crafting the Rich Chocolate Batter

This is where the magic begins! We’re building the foundation for our delectable Raspberry Chocolate Lava Cupcakes, and the batter needs to be rich, smooth, and full of flavor.

  1. Melt the Chocolate and Butter:

    In a medium, heat-proof bowl, combine the chopped dark chocolate and the unsalted butter. You have a couple of excellent options for melting these together:

    • Double Boiler Method: Place the bowl over a saucepan of simmering water, ensuring the bottom of the bowl does not touch the water. Stir gently and continuously with a rubber spatula until the mixture is completely melted and smooth. This method provides very gentle, even heat, reducing the risk of scorching the chocolate.
    • Microwave Method: Alternatively, you can melt the chocolate and butter in a microwave-safe bowl in 30-second intervals. After each interval, remove the bowl and stir thoroughly. Continue until the mixture is fully melted and beautifully glossy. Be very careful not to overheat, as chocolate can burn quickly and become grainy.

    Once melted, set the chocolate mixture aside to cool slightly while you prepare the wet ingredients. We want it warm, but not scorching hot, to avoid scrambling the eggs later.

    The Importance of Quality Chocolate:

    Using a good quality dark chocolate here truly makes a difference in the final flavor of your Raspberry Chocolate Lava Cupcakes. It provides that deep, intense chocolatey taste that balances so well with the tart raspberries.

  2. Whisk Eggs, Yolks, and Sugar:

    In a separate large mixing bowl, combine the granulated sugar, room temperature large eggs, and egg yolks. Using a whisk, beat these vigorously for about 3-5 minutes, or until the mixture becomes pale yellow, thick, and significantly increased in volume. It should look light and frothy, almost like a thin meringue. This step is crucial because it incorporates air into the batter, which contributes to the cupcake’s light texture and helps create that desirable gooey center. It also ensures the sugar is well dissolved, preventing a grainy texture in the final product.

    Achieving the Perfect Aeration:

    Don’t skip on the whisking time for the eggs and sugar. This aeration process is key to the structure and ultimate success of your Raspberry Chocolate Lava Cupcakes. It’s a bit of an arm workout, but absolutely worth it!

  3. Combine Wet Ingredients:

    Gently pour the slightly cooled melted chocolate and butter mixture into the egg and sugar mixture. Add the pure vanilla extract. Using your whisk or a rubber spatula, gently fold these ingredients together until just combined. Be careful not to overmix; we want to maintain all that lovely air we just whisked into the eggs. The mixture should be smooth, shiny, and beautifully emulsified.

    Visual Cue:

    The mixture will transform into a beautiful, uniform dark brown, exuding a comforting aroma of rich chocolate and vanilla. It’s a very satisfying stage in creating these Raspberry Chocolate Lava Cupcakes.

  4. Fold in Dry Ingredients:

    Now, it’s time for our dry components. Sift the all-purpose flour, salt, unsweetened cocoa powder (if using), and instant espresso powder (if using) directly over the wet chocolate mixture. Sifting helps to break up any lumps and ensures a lighter, more uniform incorporation into the batter.

    Using a rubber spatula, gently fold the dry ingredients into the wet mixture until just combined. Mix only until you no longer see streaks of dry flour. It’s paramount not to overmix the batter at this stage. Overmixing can develop the gluten in the flour, resulting in tough, dry cupcakes instead of the tender, melt-in-your-mouth texture we’re aiming for with these Raspberry Chocolate Lava Cupcakes.

    The Role of Espresso Powder:

    If you’ve opted for espresso powder, you might be wondering why. It’s a secret ingredient many bakers use; it doesn’t make the chocolate taste like coffee, but rather intensifies and deepens the natural chocolate flavor, making it even more robust and irresistible. It’s truly a game-changer for chocolate desserts!

Assembling the Raspberry Lava Core

This is the fun part – where we create the “lava” effect and introduce the bright, tangy burst of raspberry that defines these delicious Raspberry Chocolate Lava Cupcakes!

  1. Fill Cupcake Liners with Batter:

    Spoon about two tablespoons of the rich chocolate batter into each of your prepared cupcake liners. You want to create a nice base layer, covering the bottom of the liner evenly. This initial layer will hold our raspberry surprise in place. Don’t worry about being overly precise with exact measurements, but aim for roughly a third of the liner’s capacity. The batter will be thick and luxurious, a testament to the quality ingredients we’ve used.

  2. Add the Raspberry Core:

    Gently place one or two fresh raspberries (depending on their size and your preference for a stronger raspberry burst) directly in the center of the batter in each cupcake liner. Alternatively, if you’re using raspberry preserves, place a small teaspoonful of preserves in the center. Try to keep the raspberry element from touching the sides of the liner, as this could lead to it sinking or bursting out during baking.

    Choosing Your Raspberry Element:

    Fresh raspberries offer a brighter, more natural tartness and a pleasant texture contrast, while preserves provide a slightly sweeter, jammy consistency and an even more pronounced raspberry flavor that blends beautifully with the chocolate. Both options yield fantastic Raspberry Chocolate Lava Cupcakes!

  3. Cover with Remaining Batter:

    Carefully spoon the remaining chocolate batter over the raspberries, ensuring they are completely covered. Fill each liner to about two-thirds full, or just enough to cover the raspberry entirely. Resist the urge to overfill, as these cupcakes will puff up slightly during baking, and we want to avoid any overflow. Use a small offset spatula or the back of a spoon to gently smooth the tops of the batter if needed.

    The Art of Covering:

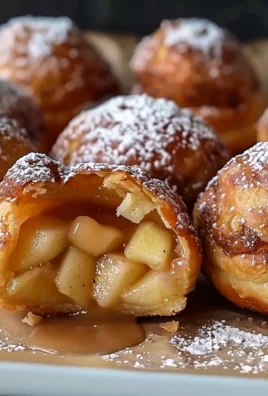
    The goal here is to encapsulate the raspberry fully within the chocolate batter. This way, when you break open the cupcake, you’ll get that delightful molten chocolate and raspberry “lava” eruption. This is the core appeal of our Raspberry Chocolate Lava Cupcakes!

Baking to Perfection

This is the most critical stage for achieving the “lava” effect. Precision in baking time is key for these Raspberry Chocolate Lava Cupcakes.

  1. Bake the Cupcakes:

    Carefully transfer the muffin tin to your preheated 400°F (200°C) oven. Bake for approximately 12-15 minutes. The baking time is crucial for creating the perfect molten center, so keep a close eye on them!

    How to Tell When They’re Done (Without Overbaking!):

    The edges of the cupcakes should appear set and slightly firm to the touch, and they might have a slight crackle on top, but the very center should still be soft and gently jiggly when you lightly tap the muffin tin. If you insert a toothpick into the very edge of a cupcake, it should come out clean, but if you insert it into the center, it should come out with wet batter and chocolate, indicating that perfect gooey lava. Do not bake until a toothpick inserted into the center comes out clean, or you’ll lose your lava!

    Avoid Overbaking: The Nemesis of Lava Cupcakes!

    Overbaking is the single biggest mistake you can make when preparing Raspberry Chocolate Lava Cupcakes. It will result in a fully cooked, dense cake rather than a glorious molten core. It’s better to underbake slightly than overbake. Your oven’s temperature can vary, so the first time you make these, watch them closely.

  2. Cooling and Serving:

    Once baked to perfection, carefully remove the muffin tin from the oven. Let the Raspberry Chocolate Lava Cupcakes cool in the muffin tin for only 5 minutes. They are quite delicate when hot, and this brief cooling period allows them to set just enough to be handled. After 5 minutes, carefully transfer the cupcakes from the muffin tin to a wire rack to cool for another 5-10 minutes. While tempting, resist the urge to eat them immediately – they are best served warm, not piping hot, to ensure the molten center is at its prime gooey consistency.

    Best Served Warm:

    The true magic of Raspberry Chocolate Lava Cupcakes comes to life when they are warm. The chocolate is fluid and rich, and the raspberry center bursts with flavor. If you’re preparing them ahead of time, you can gently reheat them in a microwave for 15-20 seconds before serving.

Finishing Touches and Enjoyment

Now for the grand finale – making our Raspberry Chocolate Lava Cupcakes look as inviting as they taste!

  1. Garnish and Serve:

    Once slightly cooled but still warm, dust the tops of your Raspberry Chocolate Lava Cupcakes generously with powdered sugar. This adds a beautiful visual contrast and a delicate sweetness. For an extra touch of elegance and to highlight the raspberry element, you can crown each cupcake with an additional fresh raspberry or a tiny sprig of fresh mint.

    Presentation Matters:

    A simple dusting of powdered sugar makes these cupcakes look incredibly sophisticated and utterly delicious. It’s a small step that elevates the entire experience of eating a Raspberry Chocolate Lava Cupcake.

  2. Enjoy Immediately!

    The absolute best way to experience these masterpieces is to serve them warm, almost immediately after dusting. Break into one and watch that glorious molten chocolate and raspberry lava ooze out. The contrast of the rich, warm chocolate with the slightly tart raspberry is truly divine. You can pair them with a scoop of vanilla bean ice cream or a dollop of freshly whipped cream for an even more decadent dessert experience.

    Storage Tips:

    While these Raspberry Chocolate Lava Cupcakes are undeniably best enjoyed fresh and warm, you can store any leftovers in an airtight container at room temperature for up to 2 days. To revive the lava, gently reheat them in the microwave for 15-20 seconds before serving. Just remember, the fresher, the more “lava” action you’ll get!

Raspberry Chocolate Lava Cupcakes: Decadent Dessert!

Conclusion:

So there you have it, my friends! We’ve journeyed through the creation of what I truly believe is one of the most delightful and impressive desserts you can possibly make. These aren’t just ordinary cupcakes; they are a decadent symphony of rich, dark chocolate and vibrant, tangy raspberry, all culminating in that show-stopping molten center. It’s a dessert that consistently wows, yet is surprisingly approachable for home bakers. I can’t emphasize enough how much joy these bring, both in the making and the sharing. The moment you gently break into that moist, tender cupcake and witness the warm, gooey chocolate lava flowing out, you’ll understand why this recipe is an absolute game-changer. It’s a sensory experience – the aroma of baking chocolate filling your kitchen, the beautiful contrast of colors, the incredible texture, and of course, the unforgettable taste. This recipe is a must-try because it transforms a simple cupcake into an unforgettable dessert spectacle. It’s the perfect treat for special occasions, a comforting indulgence on a quiet evening, or simply a fantastic way to impress your loved ones with your baking prowess. The combination of intense chocolate with the bright, fruity notes of raspberry creates a sophisticated flavor profile that appeals to nearly everyone, making them an instant favorite.

Serving Suggestions & Creative Twists:

Now that your kitchen is filled with the irresistible aroma of freshly baked treats, let’s talk about how to elevate your creation even further. While these delectable cupcakes are absolutely divine straight from the oven, especially when still warm enough for the lava to gently ooze, a few simple additions can turn them into a truly gourmet experience. I love serving them with a generous dollop of freshly whipped cream, perhaps infused with a hint of vanilla bean, which provides a lovely contrast in texture and temperature. A scoop of premium vanilla bean ice cream or even a raspberry swirl ice cream would also be an incredible accompaniment, creating a warm-cold dynamic that is simply irresistible. For an extra touch of elegance, a dusting of high-quality cocoa powder or powdered sugar adds visual appeal and a subtle extra layer of flavor. Don’t forget a few fresh raspberries or a sprig of mint on the side for a pop of color and freshness!

But why stop there? The beauty of a recipe like this lies in its versatility. While the classic raspberry and chocolate pairing is sublime, feel free to experiment with other fruit purees for your lava. Imagine a luscious strawberry lava for a springtime treat, or perhaps a tart cherry lava during the summer months. For a truly indulgent variation, you could even try a white chocolate lava filling inside a dark chocolate cupcake, offering a striking visual and flavor contrast. Or, if you’re a nut lover, consider adding a sprinkle of finely chopped toasted hazelnuts or almonds to the batter, or even atop the finished cupcakes for added crunch. For those who prefer a less intense chocolate experience, using milk chocolate instead of dark chocolate in the lava can yield a sweeter, creamier center. You could also experiment with different extract flavors in your chocolate batter – a touch of almond or even a hint of espresso can deepen the chocolate notes beautifully. The possibilities for customization are truly endless, allowing you to make these Raspberry Chocolate Lava Cupcakes uniquely yours!

Your Baking Adventure Starts Now!

I truly hope this recipe inspires you to get into the kitchen and create some magic. There’s something incredibly satisfying about baking from scratch, and even more so when the result is as spectacularly delicious as these. Don’t be intimidated by the idea of a lava center; the process is simpler than you might think, and the reward is absolutely worth every moment. Imagine the smiles on your friends’ and family’s faces when they take their first bite and discover that molten surprise! It’s an experience that truly brings people together.

So, I urge you, don’t just dream about these amazing Raspberry Chocolate Lava Cupcakes – make them a reality! Gather your ingredients, put on your favorite apron, and embark on this delightful baking adventure. Once you’ve had a chance to try them, I would absolutely love to hear from you. What variations did you try? Who did you share them with? What was the general consensus? Your feedback, your photos, and your stories mean the world to me and to our entire baking community. Share your experiences in the comments below, or even better, tag me on social media so I can see your magnificent creations! Happy baking, and enjoy every single gooey, chocolatey, raspberry-filled bite!


Raspberry Chocolate Lava Cupcakes

Raspberry Chocolate Lava Cupcakes

Tender chocolate cupcakes with a warm, molten chocolate and raspberry center, offering a symphony of rich flavors and textures.

Prep Time
25 Minutes

Cook Time
15 Minutes

Total Time
40 Minutes

Servings
12 cupcakes

Ingredients

  • 1 cup all-purpose flour
  • 1/2 cup unsweetened cocoa powder
  • 1 tsp baking soda
  • 1/4 tsp salt
  • 1/2 cup unsalted butter
  • 1 cup granulated sugar
  • 2 large eggs
  • 1 tsp pure vanilla extract
  • 1/2 cup buttermilk
  • 1 cup boiling water
  • 1 tbsp raspberry preserves
  • 1/2 cup fresh raspberries
  • 2 cups powdered sugar

Instructions

  1. Step 1
    Preheat oven to 400°F (200°C) and line a standard 12-cup muffin tin with paper liners.
  2. Step 2
    In a medium bowl, whisk together the all-purpose flour, unsweetened cocoa powder, baking soda, and salt.
  3. Step 3
    In a separate large bowl, cream together the unsalted butter and granulated sugar until light and fluffy. Beat in the large eggs one at a time, then stir in the pure vanilla extract and buttermilk until well combined.
  4. Step 4
    Gradually add the dry ingredient mixture to the wet mixture, mixing until just combined. Carefully stir in the boiling water until the batter is smooth.
  5. Step 5
    Spoon about 2 tablespoons of the chocolate batter into each prepared cupcake liner. Place 1 tablespoon of raspberry preserves directly in the center of the batter. Cover with the remaining batter, filling each liner to about two-thirds full.
  6. Step 6
    Bake for 12-15 minutes, or until the edges of the cupcakes are set and slightly firm, but the very center still appears soft and gently jiggly. A toothpick inserted into the center should come out with wet batter, indicating the molten core.
  7. Step 7
    Carefully remove the muffin tin from the oven and let the cupcakes cool in the tin for 5 minutes. Transfer to a wire rack to cool for another 5-10 minutes. Serve warm, dusted generously with powdered sugar and garnished with fresh raspberries.

Important Information

Nutrition Facts (Per Serving)

It is important to consider this information as approximate and not to use it as definitive health advice.

Allergy Information

Please check ingredients for potential allergens and consult a health professional if in doubt.

« Previous Post
Cheesy Chicken Garlic Bread Sandwich: Ultimate Deliciousness
Next Post »
Sweet Jalapeno Beef Recipe: Spicy & Flavorful Dinner!

If you enjoyed this…

Irresistible Apple Pie Bombs: Your New Favorite Baked Treat

Lemon Poppy Seed Protein Bites: The Ultimate Healthy Snack Recipe

Juicy Cinnamon Roll Apple Cake Recipe for a Cozy Treat

Primary Sidebar

Browse by Diet

BreakfastDinnerLunchDessertAppetizer

Sweet Peach Yogurt Parfait Delight

One of my fondest memories is from a lazy summer afternoon spent at my grandmother’s house. The sun filtered through the kitchen window, casting a warm glow over the table where she would create her culinary magic. It was during one of those blissful moments that I first tasted her Peach Yogurt Parfait with Honey and Granola. The sweet aroma of ripe peaches mingling with creamy yogurt and the crunch of granola was nothing short of heavenly. It felt like summer captured in a bowl, and I still remember the joy of diving in with a spoon, each layer revealing a new burst of flavor.

When I think about that parfait, I can almost hear the gentle hum of the bees outside, reminding me of the floral notes that honey brings to every bite. The vibrant yellows and soft oranges of the peaches contrast beautifully with the creamy white yogurt and the golden crunch of granola. It’s a dish that not only looks delightful but also tastes like a celebration of fresh, wholesome ingredients.

What makes my version of this Peach Yogurt Parfait special is the careful balance of flavors and textures. I use ripe, juicy peaches, drizzled with locally sourced honey, and a homemade granola that’s bursting with nuts and seeds for an extra crunch. It’s a simple dish, but every layer is crafted with love and attention.

Let me show you exactly how to make this delightful parfait, so you can bring a bit of that summer magic into your kitchen!

Sweet Peach Yogurt Parfait Delight

Why You’ll Love This Recipe

  • Delightfully creamy texture from the Greek yogurt, paired with the juicy sweetness of fresh peaches.
  • Ready in under 20 minutes, making it a quick and satisfying breakfast or snack option.
  • Budget-friendly, using common ingredients that you may already have in your pantry.
  • Customizable with your favorite granola and nuts, allowing you to tailor each parfait to your taste.
  • Perfectly balanced flavors with the bright acidity of lemon juice and the sweetness of honey enhancing the peaches.

Ingredients

  • For the Parfait:
  • 2 cups plain Greek yogurt (or vanilla yogurt for a sweeter option)
  • 2 large ripe peaches, diced (about 2 cups)
  • 1 tablespoon fresh lemon juice (to prevent browning of peaches)
  • 2 tablespoons honey (plus more for drizzling)
  • 1 teaspoon vanilla extract (optional for extra flavor)
  • For the Granola:
  • 1 cup granola (store-bought or homemade; see notes for a simple granola recipe)
  • 1/4 cup sliced almonds (optional for added crunch)
  • 1/4 cup shredded coconut (optional for added flavor)

Let’s dive into some key ingredients that make this Peach Yogurt Parfait so delightful! First, the Greek yogurt is not only creamy but also packed with protein, making it a satisfying option for breakfast or a snack. If you’re looking for a sweeter option, you can easily substitute it with vanilla yogurt, though it may alter the overall flavor balance. Next, the ripe peaches are the star of the show; their natural sweetness shines through, so I recommend choosing peaches that yield slightly to pressure, indicating they’re perfectly ripe. If peaches aren’t in season, feel free to use nectarines or even frozen peaches—just thaw them before use. Finally, honey adds a lovely floral sweetness that ties everything together. If you prefer, maple syrup can serve as a delicious substitute.

Step-by-Step Instructions

  1. Start by preparing the peaches. Wash them thoroughly, then slice and dice them into bite-sized pieces. In a medium bowl, toss the diced peaches with 1 tablespoon of fresh lemon juice to prevent browning. Set aside for about 5 minutes while the lemon juice works its magic.
  2. In a separate bowl, combine the Greek yogurt, 2 tablespoons of honey, and 1 teaspoon of vanilla extract if using. Stir the mixture until smooth and thoroughly blended. This should take about a minute. Avoid overmixing to maintain the creaminess of the yogurt.
  3. Now it’s time to layer your parfait. Grab a clear glass or bowl to showcase your beautiful creation. Start with a generous spoonful of the yogurt mixture at the bottom—about 1/4 cup will do. Use a spoon to spread it evenly.
  4. Add a layer of the diced peaches over the yogurt, ensuring they cover the yogurt completely. You might want to use about half of what you have prepared—roughly 1 cup. This layer should be visually appealing, so arrange the peaches neatly.
  5. Sprinkle 1/4 cup of granola over the peaches. This adds a delightful crunch. Make sure to distribute it evenly to ensure every bite has that satisfying texture. Avoid packing it down too tightly, as you want it to maintain its crunch.
  6. Repeat the layers: spoon in another 1/4 cup of yogurt, followed by another cup of peaches, and another sprinkle of granola. You should have at least two layers, but feel free to add more depending on your glass size.
  7. Finish off your parfait with a drizzle of honey on top for added sweetness and a touch of elegance. If you’re using sliced almonds or shredded coconut, sprinkle them on top now. It adds a lovely visual contrast and extra flavor.
  8. Serve immediately or refrigerate for up to 30 minutes before serving to allow the flavors to meld together. However, I recommend enjoying it fresh to maintain the granola’s crunch.

Pro Tips for the Best Peach Yogurt Parfait With Honey And Granola

  • Make sure to choose ripe peaches for the best flavor and texture. A common mistake is using unripe fruit, which can lead to a less enjoyable parfait. Look for peaches that are fragrant and slightly soft to the touch.
  • Use a clear glass to assemble your parfait; this not only makes for a beautiful presentation but also allows you to see the colorful layers, which adds to the enjoyment of eating it.
  • For an even creamier texture, consider whipping the Greek yogurt with a hand mixer for a couple of minutes before layering. This small adjustment makes a huge difference in mouthfeel.
  • Be mindful of the granola-to-yogurt ratio. Too much granola can overwhelm the parfait, while too little can make it feel too creamy. Aim for about 1/4 cup of granola per layer for the perfect balance.
  • If you’re making this for a gathering, consider preparing the yogurt and peaches ahead of time and layering them just before serving. This ensures the granola stays crunchy!

Variations & Serving Ideas

There are so many ways to get creative with your Peach Yogurt Parfait! For a tropical twist, swap out the peaches for mangoes or pineapples and top with coconut flakes. If you prefer a berry flavor, mix in some blueberries or strawberries with the peaches for added color and taste. For a nutty version, incorporate chopped walnuts or pecans instead of almonds.

As for serving ideas, this parfait pairs beautifully with a side of scrambled eggs for a hearty breakfast or fresh fruit salad for a light lunch. You might also enjoy it alongside whole grain toast with almond butter for an energizing snack. The contrast of flavors and textures will elevate your meal experience!

Storage, Make-Ahead & Reheating

The Peach Yogurt Parfait is best enjoyed fresh, but you can prepare some components ahead of time. Store the layered parfait in an airtight container in the refrigerator for up to 24 hours. However, be cautious; the granola may lose its crunch if stored too long. You can freeze the yogurt and peach mixture for up to 2 months; just remember to thaw it in the refrigerator overnight before serving.

If you plan to enjoy this dish the next day, it can taste even better as the flavors meld together. Just remember to add the granola right before serving to keep its delightful crunch!

Frequently Asked Questions

Can I make Peach Yogurt Parfait With Honey And Granola ahead of time?

Yes — in fact, it tastes even better the next day as the flavors meld. However, I recommend waiting to add the granola until just before serving to maintain its crunch.

What can I substitute for Greek yogurt?

If you prefer a lighter option, you can substitute Greek yogurt with regular yogurt or a dairy-free alternative like coconut yogurt. Just remember that this may alter the creaminess and flavor profile slightly.

Can I use frozen peaches for this parfait?

Absolutely! Just make sure to thaw the frozen peaches before using them. They will still add great flavor, though the texture may be slightly softer than fresh peaches.

How do I make the parfait vegan?

To make a vegan version, substitute the Greek yogurt with a plant-based yogurt alternative, and replace honey with maple syrup or agave nectar. This keeps the parfait sweet while adhering to a vegan diet.

What other fruits can I use in this recipe?

You can mix and match fruits based on your preference. Try using strawberries, blueberries, raspberries, or even bananas. Just make sure to adjust the lemon juice as needed to prevent browning.

Sweet Peach Yogurt Parfait Delight

Final Thoughts

The Peach Yogurt Parfait with Honey and Granola is a delightful blend of creamy yogurt, sweet peaches, and crunchy granola that creates a satisfying and nourishing treat. Each layer bursts with flavor, making it a perfect choice for breakfast or a light dessert.

This is the kind of recipe I come back to again and again, especially when I want something refreshing and wholesome to start my day. The harmony of sweet and tart flavors, combined with the delightful crunch, never fails to lift my spirits!

I encourage you to give this parfait a try and indulge in its comforting goodness. Feel free to share your results or even add your own twist—perhaps a sprinkle of cinnamon or a handful of nuts. Enjoy creating your perfect parfait!

Print
clock clock iconcutlery cutlery iconflag flag iconfolder folder iconinstagram instagram iconpinterest pinterest iconfacebook facebook iconprint print iconsquares squares iconheart heart iconheart solid heart solid icon

Peach Yogurt Parfait


  • Author: Lily author
  • Total Time: 15 minutes
  • Yield: 4 servings 1x
Pin Recipe
Print Recipe

Description

This Peach Yogurt Parfait combines creamy Greek yogurt, juicy peaches, and crunchy granola for a delightful treat. It’s a perfect breakfast or snack that captures the essence of summer in every bite.


Ingredients

Scale
  • For the Parfait:
  • 2 cups plain Greek yogurt (or vanilla yogurt for a sweeter option)
  • 2 large ripe peaches, diced (about 2 cups)
  • 1 tablespoon fresh lemon juice (to prevent browning of peaches)
  • 2 tablespoons honey (plus more for drizzling)
  • 1 teaspoon vanilla extract (optional for extra flavor)
  • For the Granola:
  • 1 cup granola (store-bought or homemade; see notes for a simple granola recipe)
  • 1/4 cup sliced almonds (optional for added crunch)
  • 1/4 cup shredded coconut (optional for added flavor)

Instructions

  1. Start by preparing the peaches. Wash them thoroughly, then slice and dice them into bite-sized pieces. In a medium bowl, toss the diced peaches with 1 tablespoon of fresh lemon juice to prevent browning. Set aside for about 5 minutes while the lemon juice works its magic.
  2. In a separate bowl, combine the Greek yogurt, 2 tablespoons of honey, and 1 teaspoon of vanilla extract if using. Stir the mixture until smooth and thoroughly blended. This should take about a minute. Avoid overmixing to maintain the creaminess of the yogurt.
  3. Now it’s time to layer your parfait. Grab a clear glass or bowl to showcase your beautiful creation. Start with a generous spoonful of the yogurt mixture at the bottom—about 1/4 cup will do. Use a spoon to spread it evenly.
  4. Add a layer of the diced peaches over the yogurt, ensuring they cover the yogurt completely. You might want to use about half of what you have prepared—roughly 1 cup. This layer should be visually appealing, so arrange the peaches neatly.
  5. Sprinkle 1/4 cup of granola over the peaches. This adds a delightful crunch. Make sure to distribute it evenly to ensure every bite has that satisfying texture. Avoid packing it down too tightly, as you want it to maintain its crunch.
  6. Repeat the layers: spoon in another 1/4 cup of yogurt, followed by another cup of peaches, and another sprinkle of granola. You should have at least two layers, but feel free to add more depending on your glass size.
  7. Finish off your parfait with a drizzle of honey on top for added sweetness and a touch of elegance. If you’re using sliced almonds or shredded coconut, sprinkle them on top now. It adds a lovely visual contrast and extra flavor.
  8. Serve immediately or refrigerate for up to 30 minutes before serving to allow the flavors to meld together. However, I recommend enjoying it fresh to maintain the granola’s crunch.
  • Prep Time: 15 mins
  • Cook Time: 0 mins
  • Category: Breakfast
  • Method: No-cook
  • Cuisine: American

Nutrition

  • Serving Size: 1 parfait
  • Calories: 250
  • Sugar: 20 g
  • Sodium: 50 mg
  • Fat: 5 g
  • Saturated Fat: 2 g
  • Unsaturated Fat: 3 g
  • Trans Fat: 0 g
  • Carbohydrates: 40 g
  • Fiber: 3 g
  • Protein: 10 g
  • Cholesterol: 10 mg

Keywords: Choose ripe peaches for the best flavor and texture. Use a clear glass for a beautiful presentation. For creaminess, consider whipping the yogurt before layering. Be mindful of the granola-to-yogurt ratio. Prepare yogurt and peaches ahead of time for gatherings, layering just before serving.

Did you make this recipe?

Share a photo and tag us — we can't wait to see what you've made!

Sun-Kissed Frozen Orange Cream Slush

As a child, summer days felt like they lasted forever. I remember the sticky heat wrapping around me as I played outside, my laughter mingling with the sounds of the neighborhood. But nothing could cool me down quite like the moment I’d spot my grandmother, laboring over her blender, whipping up her famous Frozen Orange Creamsicle Slush. That vibrant orange treat, with its frosty texture and sweet citrus aroma, was like a burst of sunshine in a cup. Just one sip, and I could feel the coolness wash over me, sparking pure joy.

This Frozen Orange Creamsicle Slush has a way of making you feel like a kid again. Its creamy, dreamy consistency is a delightful balance of bright orange and soft vanilla, inviting you to dive right in. The refreshing tang of orange dances on your tongue, while the smooth creaminess envelops you in a comforting embrace. It’s a nostalgic treat that’s perfect for hot summer afternoons or anytime you need a little pick-me-up.

What makes my version of this slush stand out is the addition of a hint of vanilla bean, which elevates the flavor and adds an extra layer of richness. Plus, it’s super easy to whip up with just a few simple ingredients that you probably already have on hand! So, if you’re ready to relive those sun-soaked memories, let me show you exactly how to make it.

Sun-Kissed Frozen Orange Cream Slush

Why You’ll Love This Recipe

  • Each slush is a perfect blend of creamy vanilla and zesty orange, creating a nostalgic flavor reminiscent of summer days.
  • This refreshing treat is ready in under 15 minutes, making it an ideal quick dessert for unexpected guests or hot afternoons.
  • With just 8 simple ingredients, it’s budget-friendly, ensuring you don’t have to break the bank to enjoy a delicious slush.
  • The slush has a perfectly smooth texture, thanks to the combination of ice and ice cream, providing a delightful contrast to the bright citrus flavors.
  • It’s highly customizable; you can easily adjust the sweetness and add fresh herbs for a unique twist that suits your taste.

Ingredients

  • 2 cups orange juice (freshly squeezed or store-bought)
  • 1 cup vanilla ice cream
  • 1 cup crushed ice
  • 1/2 cup milk (whole or 2%)
  • 1/4 cup granulated sugar (adjust based on sweetness preference)
  • 1 teaspoon vanilla extract
  • Zest of 1 orange (for added flavor)
  • Fresh orange slices and mint leaves (for garnish)

The star of this Frozen Orange Creamsicle Slush is the orange juice, which provides the vibrant, citrusy base. Freshly squeezed juice will yield the brightest flavor, but store-bought options can be just as convenient. If you’re opting for store-bought, choose 100% pure juice with no added sugars for the best results. Another essential ingredient is the vanilla ice cream; it adds creaminess and sweetness. You can substitute it with dairy-free ice cream if you’re looking for a vegan option. Whole or 2% milk complements the ice cream, creating a smooth blend. If you want a lower-calorie version, almond or oat milk can be good alternatives.

Lastly, the granulated sugar can be adjusted based on your sweetness preference. If you prefer a more natural sweetener, consider using honey or agave syrup. The orange zest enhances the flavor profile, providing an aromatic pop that brings the whole slush together. Don’t skip it! It adds an extra layer of brightness that makes this slush truly special.

Step-by-Step Instructions

  1. Start by preparing your ingredients. Gather 2 cups of orange juice, 1 cup of vanilla ice cream, and 1 cup of crushed ice. Make sure the ice is finely crushed, as larger chunks can make blending difficult.
  2. In a blender, combine the orange juice, vanilla ice cream, crushed ice, and 1/2 cup of milk. Add 1/4 cup of granulated sugar and 1 teaspoon of vanilla extract. If you like a sweeter slush, consider adding a bit more sugar at this stage.
  3. Add the zest of 1 orange to the blender. This step is crucial for enhancing the citrus flavor of your slush. Make sure not to include the bitter white pith—only the flavorful zest.
  4. Blend the mixture on medium-high speed for about 30-45 seconds. Stop once the ingredients are fully combined and the slush has a smooth, even consistency. If you notice large chunks of ice, blend for an additional 10-15 seconds. Avoid over-blending, as this can make the slush too liquidy.
  5. Once blended, taste the slush. If it needs more sweetness, add a little more sugar and blend for a few more seconds. If it’s too thick, you can add a splash of milk to reach your desired consistency.
  6. Pour the slush into glasses. This recipe typically serves 4, but you can easily double it for larger gatherings. Use a spoon to help guide the slush into the glasses if needed.
  7. Garnish each serving with fresh orange slices and mint leaves. The mint not only adds a pop of color but also a refreshing aroma that complements the citrus flavors beautifully.
  8. Serve immediately and enjoy! If you’ve made extra, you can refrigerate it for a short time, but it’s best enjoyed fresh.

Pro Tips for the Best Frozen Orange Creamsicle Slush

  • Don’t skip the orange zest! It’s a game-changer for flavor. Always zest before juicing to make it easier.
  • Use a high-powered blender for the best texture. A standard blender may struggle with ice, leading to uneven consistency. If you have a food processor, that can work too, but ensure the ice is finely crushed.
  • Adjust the ice-to-liquid ratio carefully. If your slush is too thick, it won’t blend well. Start with less ice and add more until you reach your preferred texture.
  • Be cautious with the sugar! Always start with the lower amount, as you can easily add more, but it’s hard to fix an overly sweet slush.
  • For a fun twist, consider adding a splash of coconut milk or a handful of fresh fruit like strawberries or pineapple. This not only enhances the flavor but also adds a beautiful color contrast.

Variations & Serving Ideas

There are countless ways to put a spin on your Frozen Orange Creamsicle Slush. Consider making a tropical version by adding in some pineapple juice or coconut milk for a delightful tropical twist. If you’re feeling adventurous, try incorporating a handful of frozen mango or peach slices for added sweetness. For a lighter version, swap out the vanilla ice cream for Greek yogurt for a creamy yet tangy alternative.

As for serving ideas, this refreshing slush pairs wonderfully with light summer dishes like grilled chicken skewers, fish tacos, or a simple salad topped with citrus vinaigrette. The bright, zesty flavors of the slush complement these dishes perfectly, making them an ideal pairing for a sunny day.

Storage, Make-Ahead & Reheating

This Frozen Orange Creamsicle Slush is best enjoyed fresh, but if you have leftovers, you can store them in an airtight container in the fridge for up to 2 days. Just keep in mind that the slush may lose some of its texture over time as the ice melts. It doesn’t freeze well, as the ice will turn into a solid block. If you must freeze it, blend again after thawing to restore the slushy consistency. This treat is best the day you make it, as the flavors meld together beautifully overnight, enhancing its deliciousness.

Frequently Asked Questions

Can I make Frozen Orange Creamsicle Slush ahead of time?

Yes — in fact, it tastes even better the next day as the flavors meld. However, it’s best to enjoy it fresh, as the texture can change if stored for too long. If you need to prepare it ahead, keep it in the fridge and re-blend before serving.

What kind of orange juice should I use?

For the best flavor, use freshly squeezed orange juice. However, if you’re short on time, opt for 100% pure store-bought juice without added sugars. This will ensure that your slush remains flavorful and refreshing.

Can I substitute the vanilla ice cream?

Absolutely! If you’re looking for a dairy-free option, coconut milk ice cream or a non-dairy vanilla ice cream can work wonderfully. They will still provide the creamy texture and sweetness you desire.

How can I adjust the sweetness of my slush?

You can easily adjust the sweetness by modifying the amount of sugar added. Start with 1/4 cup and taste the mixture before blending. If you prefer it sweeter, add more sugar gradually until it reaches your desired level.

What should I do if my slush is too thick?

If your slush is too thick, simply add a splash of milk or orange juice and blend again. This will help achieve a more drinkable consistency while maintaining the slushy texture. Adjust gradually to reach your preferred thickness.

Sun-Kissed Frozen Orange Cream Slush

Final Thoughts

The Frozen Orange Creamsicle Slush is a delightful blend of refreshing citrus and creamy goodness, making it a perfect treat for warm days or any time you crave a taste of nostalgia. The way the bright orange flavor dances with the creamy texture truly elevates this slush, transforming it into a satisfying escape from the everyday.

This is the kind of recipe I come back to again and again, especially when I’m looking to cool down or impress guests at a summer gathering. It’s simple to make and always brings smiles all around! I encourage you to try this recipe for yourself—don’t hesitate to share your results or even put your own spin on it. Happy slushing!

Print
clock clock iconcutlery cutlery iconflag flag iconfolder folder iconinstagram instagram iconpinterest pinterest iconfacebook facebook iconprint print iconsquares squares iconheart heart iconheart solid heart solid icon

Frozen Orange Creamsicle Slush


  • Author: Lily author
  • Total Time: 15 minutes
  • Yield: 4 servings 1x
Pin Recipe
Print Recipe

Description

This Frozen Orange Creamsicle Slush is a refreshing treat that combines creamy vanilla and zesty orange flavors. Perfect for hot summer days, it brings back nostalgic memories with every sip.


Ingredients

Scale
  • 2 cups orange juice (freshly squeezed or store-bought)
  • 1 cup vanilla ice cream
  • 1 cup crushed ice
  • 1/2 cup milk (whole or 2%)
  • 1/4 cup granulated sugar (adjust based on sweetness preference)
  • 1 teaspoon vanilla extract
  • Zest of 1 orange (for added flavor)
  • Fresh orange slices and mint leaves (for garnish)

Instructions

  1. Start by preparing your ingredients. Gather 2 cups of orange juice, 1 cup of vanilla ice cream, and 1 cup of crushed ice. Make sure the ice is finely crushed, as larger chunks can make blending difficult.
  2. In a blender, combine the orange juice, vanilla ice cream, crushed ice, and 1/2 cup of milk. Add 1/4 cup of granulated sugar and 1 teaspoon of vanilla extract. If you like a sweeter slush, consider adding a bit more sugar at this stage.
  3. Add the zest of 1 orange to the blender. This step is crucial for enhancing the citrus flavor of your slush. Make sure not to include the bitter white pith—only the flavorful zest.
  4. Blend the mixture on medium-high speed for about 30-45 seconds. Stop once the ingredients are fully combined and the slush has a smooth, even consistency. If you notice large chunks of ice, blend for an additional 10-15 seconds. Avoid over-blending, as this can make the slush too liquidy.
  5. Once blended, taste the slush. If it needs more sweetness, add a little more sugar and blend for a few more seconds. If it’s too thick, you can add a splash of milk to reach your desired consistency.
  6. Pour the slush into glasses. This recipe typically serves 4, but you can easily double it for larger gatherings. Use a spoon to help guide the slush into the glasses if needed.
  7. Garnish each serving with fresh orange slices and mint leaves. The mint not only adds a pop of color but also a refreshing aroma that complements the citrus flavors beautifully.
  8. Serve immediately and enjoy! If you’ve made extra, you can refrigerate it for a short time, but it's best enjoyed fresh.
  • Prep Time: 15 min
  • Cook Time: 0 min
  • Category: Dessert
  • Method: Blending
  • Cuisine: American

Nutrition

  • Serving Size: 1 serving
  • Calories: 200
  • Sugar: 30 g
  • Sodium: 50 mg
  • Fat: 5 g
  • Saturated Fat: 3 g
  • Unsaturated Fat: 2 g
  • Trans Fat: 0 g
  • Carbohydrates: 40 g
  • Fiber: 1 g
  • Protein: 2 g
  • Cholesterol: 20 mg

Keywords: Don't skip the orange zest! It's a game-changer for flavor. Always zest before juicing to make it easier.

Did you make this recipe?

Share a photo and tag us — we can't wait to see what you've made!

Zesty Lemon Poppy Seed Delight

One rainy afternoon, I found myself in my grandmother’s cozy kitchen, the kind that always smelled like warmth and love. She was whipping up her famous Lemon Poppy Seed Loaf, a recipe that had been passed down through generations. As the batter came together, the zesty aroma of fresh lemons filled the air, mingling perfectly with the nutty fragrance of poppy seeds. I can still picture her, apron-clad, as she expertly drizzled a vibrant citrus icing over the loaf, creating a glossy, sun-kissed finish that beckoned us to dive in. It was a moment that sparked my own passion for baking, and this recipe has become a cherished staple in my home ever since.

When you take a bite of this Lemon Poppy Seed Loaf, it’s like a burst of sunshine on your palate. The loaf is beautifully golden, with a tender crumb that melts in your mouth. Each slice is speckled with tiny poppy seeds, adding a delightful crunch that contrasts beautifully with the tangy sweetness of the lemon. And that citrus icing? It’s the finishing touch that elevates this loaf from ordinary to extraordinary, with its bright, zesty flavor dancing on your taste buds.

This recipe stands out because it embraces simplicity while delivering on flavor. I’ve added a hint of vanilla to the batter, enhancing the overall taste and making it even more indulgent. Trust me, once you make this Lemon Poppy Seed Loaf With Citrus Icing, it’ll become a go-to in your baking repertoire.

So, let me show you exactly how to make it!

Zesty Lemon Poppy Seed Delight

Why You’ll Love This Recipe

  • Moist and tender crumb that melts in your mouth, thanks to the perfect balance of butter and buttermilk.
  • Bright, zesty lemon flavor paired with crunchy poppy seeds, creating a delightful texture and taste experience.
  • Easy to whip up in just about an hour, perfect for last-minute gatherings or a cozy afternoon treat.
  • Budget-friendly with everyday ingredients, making it an accessible option for all home bakers.
  • The citrus icing adds a sweet tang that elevates the loaf, turning a simple recipe into a showstopper!

Ingredients

  • 1 ½ cups (190g) all-purpose flour
  • 1 teaspoon baking powder
  • ½ teaspoon baking soda
  • ½ teaspoon salt
  • 3 tablespoons poppy seeds
  • ½ cup (115g) unsalted butter, softened to room temperature
  • 1 cup (200g) granulated sugar
  • 2 large eggs
  • 1 teaspoon vanilla extract
  • 1 teaspoon lemon zest (from about 1 medium lemon)
  • ½ cup (120ml) buttermilk
  • 2 tablespoons fresh lemon juice

For the Citrus Icing:

  • 1 cup (120g) powdered sugar
  • 2 tablespoons fresh lemon juice
  • 1 tablespoon orange juice
  • 1 teaspoon lemon zest (for garnish, optional)

Let’s dive into the key ingredients that make this Lemon Poppy Seed Loaf so special. The all-purpose flour provides the structure and base for the loaf, while the baking powder and baking soda ensure it rises perfectly, giving the loaf a light texture. For a gluten-free variation, you could substitute the flour with a gluten-free all-purpose blend. Poppy seeds not only add a delightful crunch but also contribute to the unique flavor profile that pairs well with the citrus notes.

Unsalted butter is crucial for achieving the buttery richness that makes this loaf so moist. If you’re looking for a dairy-free option, coconut oil or a vegan butter can be used instead. The buttermilk is another essential component, providing acidity that activates the baking soda for a fluffy texture. If you don’t have buttermilk on hand, you can easily make a substitute by mixing ½ cup of milk with 1 tablespoon of vinegar or lemon juice and letting it sit for about 5 minutes.

Step-by-Step Instructions

  1. Preheat your oven to 350°F (175°C). Grease a 9×5-inch loaf pan or line it with parchment paper for easy removal later.
  2. In a medium mixing bowl, whisk together 1 ½ cups of all-purpose flour, 1 teaspoon of baking powder, ½ teaspoon of baking soda, ½ teaspoon of salt, and 3 tablespoons of poppy seeds. This helps to evenly distribute the baking agents and ensures a uniform rise.
  3. In a large mixing bowl, cream together ½ cup of softened unsalted butter and 1 cup of granulated sugar using an electric mixer on medium speed for about 3-4 minutes, until the mixture is light and fluffy. Make sure to scrape down the sides of the bowl occasionally.
  4. Add 2 large eggs, 1 teaspoon of vanilla extract, and 1 teaspoon of lemon zest to the creamed butter and sugar, mixing until fully combined. You want a smooth consistency, so ensure there are no lumps of butter.
  5. In a small bowl, combine ½ cup of buttermilk and 2 tablespoons of fresh lemon juice. Alternately add the dry ingredients and buttermilk mixture to the butter mixture, starting and ending with the dry ingredients. Mix just until combined; do not overmix, as this can lead to a dense loaf.
  6. Pour the batter into the prepared loaf pan. Smooth the top with a spatula, ensuring it’s even. Bake in the preheated oven for 50-60 minutes, or until a toothpick inserted in the center comes out clean. The edges should be lightly golden brown, and the center should feel just set.
  7. Once baked, remove the loaf from the oven and allow it to cool in the pan for about 10 minutes. Then, transfer it to a wire rack to cool completely. Resist the urge to slice too soon, as it will be crumbly if it’s still warm.
  8. While the loaf is cooling, prepare the citrus icing. In a medium bowl, whisk together 1 cup of powdered sugar, 2 tablespoons of fresh lemon juice, and 1 tablespoon of orange juice until smooth. If the icing is too thick, you can add a little more juice to reach your desired consistency.
  9. Once the loaf is completely cool, drizzle the citrus icing over the top. If you like, sprinkle with an additional teaspoon of lemon zest for an extra pop of flavor and color.

Pro Tips for the Best Lemon Poppy Seed Loaf With Citrus Icing

  • Be careful not to overmix your batter; this is a common mistake that can lead to a dense loaf. Mix just until the dry ingredients are incorporated for a light and fluffy texture.
  • Use room temperature ingredients, especially the butter and eggs. This helps to create a smoother batter and ensures even baking. Take your eggs out of the fridge about 30 minutes before you start.
  • For a more pronounced lemon flavor, consider adding a little lemon extract in addition to the zest and juice. Just a half teaspoon can elevate the citrus notes significantly.
  • When measuring your flour, spoon it into the measuring cup and level it off with a knife instead of scooping directly from the bag. This prevents packing and ensures you don’t end up with a dry loaf.
  • Invest in a good quality loaf pan; it makes a difference in heat distribution, which ensures even baking. If your pan is dark-coated, reduce the oven temperature by 25°F to prevent over-browning.

Variations & Serving Ideas

For a delightful twist, consider adding blueberries or raspberries to the batter for a fruity burst of flavor. You can also experiment with different citrus fruits—try lime or grapefruit zest and juice for a refreshing change. For a healthier option, substitute half of the all-purpose flour with whole wheat flour for added fiber without compromising too much on texture.

This Lemon Poppy Seed Loaf pairs beautifully with a light salad, such as a mixed greens salad with a vinaigrette, or a cup of tea for a cozy afternoon treat. It also complements a creamy cheese platter, as the acidity of the loaf balances rich cheeses perfectly. Lastly, a scoop of vanilla ice cream on the side creates a delightful contrast of temperatures and flavors!

Storage, Make-Ahead & Reheating

This Lemon Poppy Seed Loaf can be stored at room temperature for up to 3 days if wrapped tightly in plastic wrap. If you want to keep it longer, it freezes well for up to 3 months. To freeze, wrap the loaf tightly in plastic wrap and then in aluminum foil to prevent freezer burn.

When you’re ready to enjoy it again, simply thaw it in the fridge overnight. Reheat individual slices in the microwave for 15-20 seconds or in a toaster oven until warmed through. Interestingly, many people find that this loaf tastes even better the next day, as the flavors have time to meld!

Frequently Asked Questions

Can I make Lemon Poppy Seed Loaf With Citrus Icing ahead of time?

Yes — in fact, it tastes even better the next day! You can make the loaf a day in advance, allowing the flavors to develop. Just be sure to store it in an airtight container to maintain its moisture.

Can I substitute the poppy seeds?

Absolutely! If you don’t have poppy seeds on hand or prefer an alternative, you can use sesame seeds for a similar crunch or omit them entirely for a smooth loaf.

What can I use instead of buttermilk?

If you don’t have buttermilk, you can easily create a substitute by mixing ½ cup of milk (dairy or plant-based) with 1 tablespoon of vinegar or lemon juice. Let it sit for 5 minutes before using in the recipe.

How can I make this recipe gluten-free?

To make a gluten-free version of this Lemon Poppy Seed Loaf, substitute the all-purpose flour with a gluten-free all-purpose flour blend. Just ensure that the blend contains a binding agent like xanthan gum for the best results.

What is the best way to store leftover loaf?

Leftover Lemon Poppy Seed Loaf should be stored in an airtight container at room temperature for up to 3 days. For longer storage, wrap it tightly and freeze for up to 3 months. Thaw it before serving for the best texture.

Zesty Lemon Poppy Seed Delight

Final Thoughts

The Lemon Poppy Seed Loaf with Citrus Icing is truly a delightful treat that brings a burst of brightness to any occasion. The zesty lemon flavor combined with the subtle crunch of poppy seeds creates a satisfying balance, while the citrus icing adds a touch of sweetness that perfectly complements the loaf’s tanginess.

This is the kind of recipe I come back to again and again, especially when I want to brighten up a gloomy day or celebrate a small victory. The aroma that fills the kitchen as it bakes is absolutely heavenly! I encourage you to give this recipe a try; you might just find it becoming a beloved staple in your home. Don’t forget to share your results or even add your own unique twist—I can’t wait to see what you create!

Print
clock clock iconcutlery cutlery iconflag flag iconfolder folder iconinstagram instagram iconpinterest pinterest iconfacebook facebook iconprint print iconsquares squares iconheart heart iconheart solid heart solid icon

Lemon Poppy Seed Loaf


  • Author: Lily author
  • Total Time: 39 minute
  • Yield: 1 loaf 1x
Pin Recipe
Print Recipe

Description

This Lemon Poppy Seed Loaf is a delightful treat that combines zesty lemon flavor with crunchy poppy seeds. Topped with a citrus icing, it’s perfect for any occasion.


Ingredients

Scale
  • 1 ½ cups (190g) all-purpose flour
  • 1 teaspoon baking powder
  • ½ teaspoon baking soda
  • ½ teaspoon salt
  • 3 tablespoons poppy seeds
  • ½ cup (115g) unsalted butter, softened to room temperature
  • 1 cup (200g) granulated sugar
  • 2 large eggs
  • 1 teaspoon vanilla extract
  • 1 teaspoon lemon zest (from about 1 medium lemon)
  • ½ cup (120ml) buttermilk
  • 2 tablespoons fresh lemon juice
  • 1 cup (120g) powdered sugar
  • 2 tablespoons fresh lemon juice
  • 1 tablespoon orange juice
  • 1 teaspoon lemon zest (for garnish, optional)

Instructions

  1. Preheat your oven to 350°F (175°C). Grease a 9×5-inch loaf pan or line it with parchment paper for easy removal later.
  2. In a medium mixing bowl, whisk together 1 ½ cups of all-purpose flour, 1 teaspoon of baking powder, ½ teaspoon of baking soda, ½ teaspoon of salt, and 3 tablespoons of poppy seeds. This helps to evenly distribute the baking agents and ensures a uniform rise.
  3. In a large mixing bowl, cream together ½ cup of softened unsalted butter and 1 cup of granulated sugar using an electric mixer on medium speed for about 3-4 minutes, until the mixture is light and fluffy. Make sure to scrape down the sides of the bowl occasionally.
  4. Add 2 large eggs, 1 teaspoon of vanilla extract, and 1 teaspoon of lemon zest to the creamed butter and sugar, mixing until fully combined. You want a smooth consistency, so ensure there are no lumps of butter.
  5. In a small bowl, combine ½ cup of buttermilk and 2 tablespoons of fresh lemon juice. Alternately add the dry ingredients and buttermilk mixture to the butter mixture, starting and ending with the dry ingredients. Mix just until combined; do not overmix, as this can lead to a dense loaf.
  6. Pour the batter into the prepared loaf pan. Smooth the top with a spatula, ensuring it’s even. Bake in the preheated oven for 50-60 minutes, or until a toothpick inserted in the center comes out clean. The edges should be lightly golden brown, and the center should feel just set.
  7. Once baked, remove the loaf from the oven and allow it to cool in the pan for about 10 minutes. Then, transfer it to a wire rack to cool completely. Resist the urge to slice too soon, as it will be crumbly if it’s still warm.
  8. While the loaf is cooling, prepare the citrus icing. In a medium bowl, whisk together 1 cup of powdered sugar, 2 tablespoons of fresh lemon juice, and 1 tablespoon of orange juice until smooth. If the icing is too thick, you can add a little more juice to reach your desired consistency.
  9. Once the loaf is completely cool, drizzle the citrus icing over the top. If you like, sprinkle with an additional teaspoon of lemon zest for an extra pop of flavor and color.
  • Prep Time: 15 mins
  • Cook Time: 50-60 mins
  • Category: Dessert
  • Method: Baking
  • Cuisine: American

Nutrition

  • Serving Size: 1 slice
  • Calories: 200
  • Sugar: 15 g
  • Sodium: 150 mg
  • Fat: 8 g
  • Saturated Fat: 5 g
  • Unsaturated Fat: 3 g
  • Trans Fat: 0 g
  • Carbohydrates: 30 g
  • Fiber: 1 g
  • Protein: 3 g
  • Cholesterol: 40 mg

Keywords: Be careful not to overmix your batter; this is a common mistake that can lead to a dense loaf. Use room temperature ingredients for a smoother batter and even baking.

Did you make this recipe?

Share a photo and tag us — we can't wait to see what you've made!

  • Privacy Policy
  • Terms Of Service
  • Contact
  • About
  • GDPR

Copyright © 2025 Homesmad