• Skip to primary navigation
  • Skip to main content
  • Skip to primary sidebar
Homesmad

Homesmad

  • Home
  • Breakfast & Brunch
  • Appetizers & Snacks
  • Dinner
  • Dessert
  • About
  • Privacy Policy
  • Contact
Homesmad
  • Home
  • Breakfast & Brunch
  • Appetizers & Snacks
  • Dinner
  • Dessert
  • About
  • Privacy Policy
  • Contact

Cheesy Chicken Garlic Bread Sandwich: Ultimate Deliciousness

October 23, 2025 by Lily author

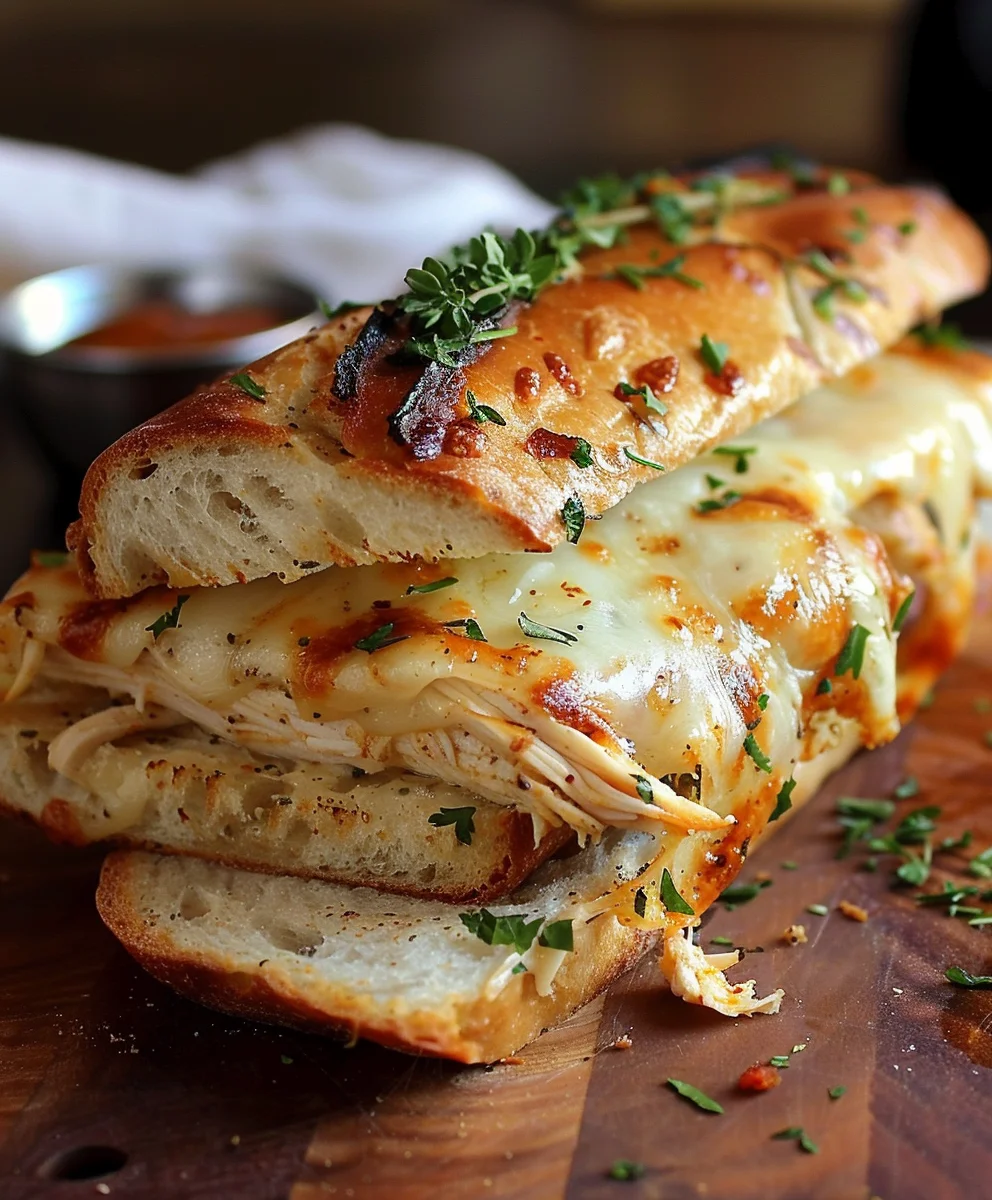
Cheesy Chicken Garlic Bread Sandwich A Deliciously Indulgent Treat – does that phrase alone make your mouth water? It certainly does mine! Imagine biting into the perfect harmony of crispy, golden garlic bread, tender, seasoned chicken, and a generous, gooey layer of melted cheese. This isn’t just a sandwich; it’s an experience designed to elevate your everyday meal into something truly extraordinary. While the individual components—garlic bread, roasted chicken, and cheese—boast their own rich culinary histories and cultural significance across the globe, their masterful combination into this ultimate handheld delight is a testament to modern comfort food innovation. It’s the kind of dish that brings together universally loved flavors in a spectacular new way.

People absolutely adore this dish not only for its incredible flavor profile—the savory chicken perfectly complemented by the aromatic garlic and rich cheese—but also for its satisfying textures. The delightful crunch of the toasted bread contrasting with the juicy chicken and the stretchy, warm cheese creates an irresistible symphony in every bite. It’s the kind of meal that feels both gourmet and incredibly comforting, perfect for a cozy night in, a quick yet hearty lunch, or an impressive crowd-pleaser. I truly believe that once you try making this Cheesy Chicken Garlic Bread Sandwich A Deliciously Indulgent Treat, it will quickly become a cherished staple in your culinary repertoire. Get ready to embark on a flavor journey that will delight your senses!

Cheesy Chicken Garlic Bread Sandwich: Ultimate Deliciousness this RECIPE

Ingredients:

  • For the Chicken:
    • 2 large boneless, skinless chicken breasts (about 1.5 lbs total), or 3-4 boneless, skinless chicken thighs for a juicier result
    • 1 tablespoon olive oil
    • 1 teaspoon smoked paprika
    • 1/2 teaspoon onion powder
    • 1/2 teaspoon garlic powder
    • 1/4 teaspoon black pepper, freshly ground
    • 1/2 teaspoon salt, or to taste
    • 2 tablespoons unsalted butter
  • For the Garlic Bread:
    • 1 large loaf of Italian or French bread (baguette style, about 16-18 inches long), sliced lengthwise through the middle
    • 1/2 cup (1 stick) unsalted butter, softened
    • 4-5 cloves garlic, minced very finely (about 2 tablespoons)
    • 2 tablespoons fresh parsley, finely chopped
    • 1/2 teaspoon dried oregano (optional, but adds a lovely touch)
    • Pinch of salt and black pepper
  • For the Cheesy Filling & Assembly:
    • 1.5 cups shredded mozzarella cheese
    • 1/2 cup shredded sharp cheddar cheese (or your favorite melting cheese like provolone)
    • 1/4 cup grated Parmesan cheese
    • 1/4 cup mayonnaise (optional, but adds creaminess to the chicken mixture)
    • 2 tablespoons cream cheese, softened (optional, for extra creaminess)
    • 1/4 cup marinara or pizza sauce (optional, for dipping or a light spread)
    • Fresh basil leaves for garnish (optional)

Prepping Our Delicious Chicken:

  1. First things first, let’s get our chicken ready! I always start by patting my boneless, skinless chicken breasts (or thighs, if you prefer) completely dry with paper towels. This step is super important because it helps us achieve a beautiful sear and a wonderful golden-brown crust.
  2. Next, I place the chicken on a clean cutting board. If your chicken breasts are particularly thick, I recommend carefully slicing them horizontally to create two thinner cutlets. This ensures even cooking and prevents the edges from drying out while the center cooks through. Aim for about 1/2 to 3/4 inch thickness. Alternatively, you can gently pound them to an even thickness using a meat mallet or a heavy pan, placing plastic wrap over the chicken first to prevent any mess.
  3. In a small bowl, I combine my seasoning blend: the smoked paprika, onion powder, garlic powder, a good pinch of salt, and some freshly ground black pepper. This mix creates a fantastic flavor base for our chicken, providing a lovely savory and slightly smoky note that will complement the rich garlic bread beautifully.
  4. Now, I drizzle the chicken lightly with about 1 tablespoon of olive oil. The oil acts as a binder for our spices and helps them adhere to the chicken, ensuring every bite is seasoned perfectly.
  5. I then generously sprinkle the seasoning mixture all over both sides of the chicken, making sure to rub it in gently with my fingers. You want to make sure the chicken is evenly coated for maximum flavor. Once seasoned, I set the chicken aside while I prepare my skillet.
  6. Heat a large, heavy-bottomed skillet (cast iron or stainless steel works wonderfully here) over medium-high heat. You want it to be nice and hot before adding the butter.
  7. Add 2 tablespoons of unsalted butter to the hot skillet. Let it melt and sizzle until it starts to turn a light golden brown, almost nutty in aroma. This browned butter will infuse our chicken with an extra layer of deliciousness.
  8. Carefully place the seasoned chicken into the hot skillet. Don’t overcrowd the pan; if necessary, cook the chicken in batches. This allows for proper searing and prevents the chicken from steaming instead of browning. You should hear a satisfying sizzle as the chicken hits the pan.
  9. Sear the chicken for about 5-7 minutes per side, depending on the thickness. I’m looking for a gorgeous, deep golden-brown crust to form on each side. The internal temperature should reach 165°F (74°C) to ensure it’s cooked through and safe to eat. Use an instant-read thermometer for accuracy.
  10. Once cooked, transfer the chicken to a clean plate or cutting board. I like to let it rest for about 5-10 minutes. This resting period is crucial as it allows the juices to redistribute throughout the meat, resulting in much more tender and flavorful chicken.
  11. After resting, you have a couple of options: you can either finely dice the chicken into small, bite-sized pieces, or, if you prefer a pulled chicken texture, shred it using two forks. I personally love the shredded texture for a sandwich like this, as it blends wonderfully with the cheese. Set your cooked and prepped chicken aside. This perfectly cooked chicken is the heart of our Cheesy Chicken Garlic Bread Sandwich A Deliciously Indulgent Treat!

Crafting the Ultimate Garlic Bread Base:

  1. Now, let’s turn our attention to the star of the show – the garlic bread! Preheat your oven to 375°F (190°C). This temperature is ideal for toasting our bread to golden perfection without burning it.
  2. While the oven is preheating, it’s time to create our aromatic garlic butter. In a medium-sized bowl, I combine the softened unsalted butter. It’s really important that the butter is genuinely soft, almost spreadable, so it mixes easily with our other ingredients.
  3. To the softened butter, I add the finely minced garlic. And when I say finely minced, I mean it! You want tiny pieces so the garlic flavor is distributed evenly without overwhelming your palate or leaving large chunks. I often use a garlic press for this to get the best texture.
  4. Next, I stir in the fresh, finely chopped parsley. This not only adds a beautiful pop of green color but also a fresh, herbaceous note that balances the richness of the butter and garlic.
  5. If I’m feeling extra fancy (and I usually am when making this indulgent sandwich!), I’ll also add about half a teaspoon of dried oregano. It gives the garlic bread an authentic Italian-inspired aroma that I absolutely adore. A pinch of salt and freshly ground black pepper also goes into the mix to season the butter itself.
  6. Using a fork or a small spatula, thoroughly mix all these ingredients together until they are well combined. You want a consistent, fragrant garlic butter paste. The aroma alone will make your mouth water!
  7. Take your loaf of Italian or French bread. If it’s a longer baguette, I usually slice it lengthwise right through the middle, creating two halves. If you’re using a wider loaf, you might even cut it into four pieces for individual sandwiches later. This provides a generous surface area for our garlic butter and filling.
  8. Generously spread the prepared garlic butter mixture evenly over the cut sides of both bread halves. Don’t be shy here; this is garlic bread, after all! Make sure to get it right to the edges for maximum flavor. I aim for a thick, even layer.
  9. Place the buttered bread halves onto a baking sheet, cut-side up.
  10. Pop the baking sheet into your preheated oven and bake for about 8-10 minutes. What we’re looking for here is for the bread to become beautifully golden brown and lightly crispy around the edges. The garlic butter should be melted and sizzling, and your kitchen will smell absolutely incredible. This step ensures we have a sturdy and flavorful base for our sandwich, preventing it from getting soggy later.
  11. Once toasted, remove the garlic bread from the oven and set it aside momentarily while we prepare our cheesy chicken filling.

Assembling Our Cheesy Chicken Filling:

  1. Now that our chicken is cooked and our garlic bread is perfectly toasted, it’s time to bring them together in a luscious, cheesy filling!
  2. In a large mixing bowl, combine your shredded or diced cooked chicken. This is where the resting period for the chicken really pays off, as it will be incredibly tender and juicy, ready to soak up all the other flavors.
  3. To the chicken, I add a generous amount of shredded mozzarella cheese. Mozzarella is my go-to for its amazing meltability and mild flavor.
  4. Then, I toss in the shredded sharp cheddar cheese (or provolone, if that’s your preference). The cheddar adds a wonderful depth of flavor and a little tang that contrasts beautifully with the milder mozzarella.
  5. And for an extra layer of savory goodness, I sprinkle in the grated Parmesan cheese. This provides that classic umami kick that makes everything taste better.
  6. For an incredibly creamy and spreadable filling, I highly recommend adding the optional mayonnaise and softened cream cheese at this stage. The mayonnaise contributes a subtle tang and moisture, while the cream cheese adds an undeniable richness and binds everything together beautifully when melted. If you’re using them, add them to the bowl now.
  7. Using a spatula or a large spoon, gently mix all the ingredients together until the chicken, cheeses, and any optional creamy binders are thoroughly combined. You want an even distribution of all components so every bite of your Cheesy Chicken Garlic Bread Sandwich A Deliciously Indulgent Treat is a symphony of flavors and textures.
  8. Taste a small bit of the mixture (if you’re brave enough to sample raw cheese!). This is your chance to adjust any seasonings. Sometimes I might add another pinch of salt or pepper here, or even a tiny dash of garlic powder if I want an extra kick.
  9. Once your filling is perfectly mixed, it’s ready for assembly!

Bringing It All Together: The Sandwich Assembly and Final Cook:

  1. Alright, the moment of truth! Retrieve your toasted garlic bread halves. They should be slightly cooled but still warm and inviting.
  2. If you enjoy a little extra flavor and moisture, this is when you can lightly spread a thin layer of marinara or pizza sauce on the cut-side of one or both garlic bread halves. It’s totally optional, but it adds a lovely zesty note and a bit more “pizza” feel to our sandwich. I often do this on one side to create a lovely balance.
  3. Now, spoon the glorious cheesy chicken filling onto one half of the garlic bread, spreading it out evenly from edge to edge. Don’t be shy; load it up! You want a substantial layer of that delicious chicken and cheese mixture. Gently press it down to ensure it’s compact.
  4. Carefully place the other half of the garlic bread on top, cut-side down, creating your ultimate sandwich. Give it a gentle press to make sure everything is secure.
  5. At this point, you have a few options for the final cook. My favorite method for getting that perfect melty cheese and crispy exterior is grilling or baking.
  6. Option 1: Baking for a Crispy Finish (Recommended):
    • Preheat your oven to 400°F (200°C).
    • Carefully transfer the assembled sandwich back onto your baking sheet.
    • Bake for 10-15 minutes, or until the cheese is completely melted, bubbly, and starting to brown ever so slightly around the edges. The bread should also become even crispier. If you like an extra-crispy top, you can finish it under the broiler for 1-2 minutes, but watch it like a hawk to prevent burning!
  7. Option 2: Pan-Frying for a Golden Crust:
    • Heat a large, heavy-bottomed skillet (or a griddle) over medium heat.
    • Add a very small amount of olive oil or butter to the pan.
    • Carefully place the assembled sandwich into the hot skillet.
    • Cook for about 4-6 minutes per side, or until both sides are beautifully golden brown and the cheese inside is fully melted and gooey. You might want to gently press down on the sandwich with another pan or a spatula to ensure even contact and a flatter, more compact sandwich.
  8. Once your Cheesy Chicken Garlic Bread Sandwich A Deliciously Indulgent Treat is perfectly cooked, with the cheese molten and the bread golden and crispy, carefully remove it from the oven or skillet.
  9. Let it rest for just a minute or two. This helps the cheese set slightly, making it easier to cut and preventing all the delicious filling from oozing out immediately.
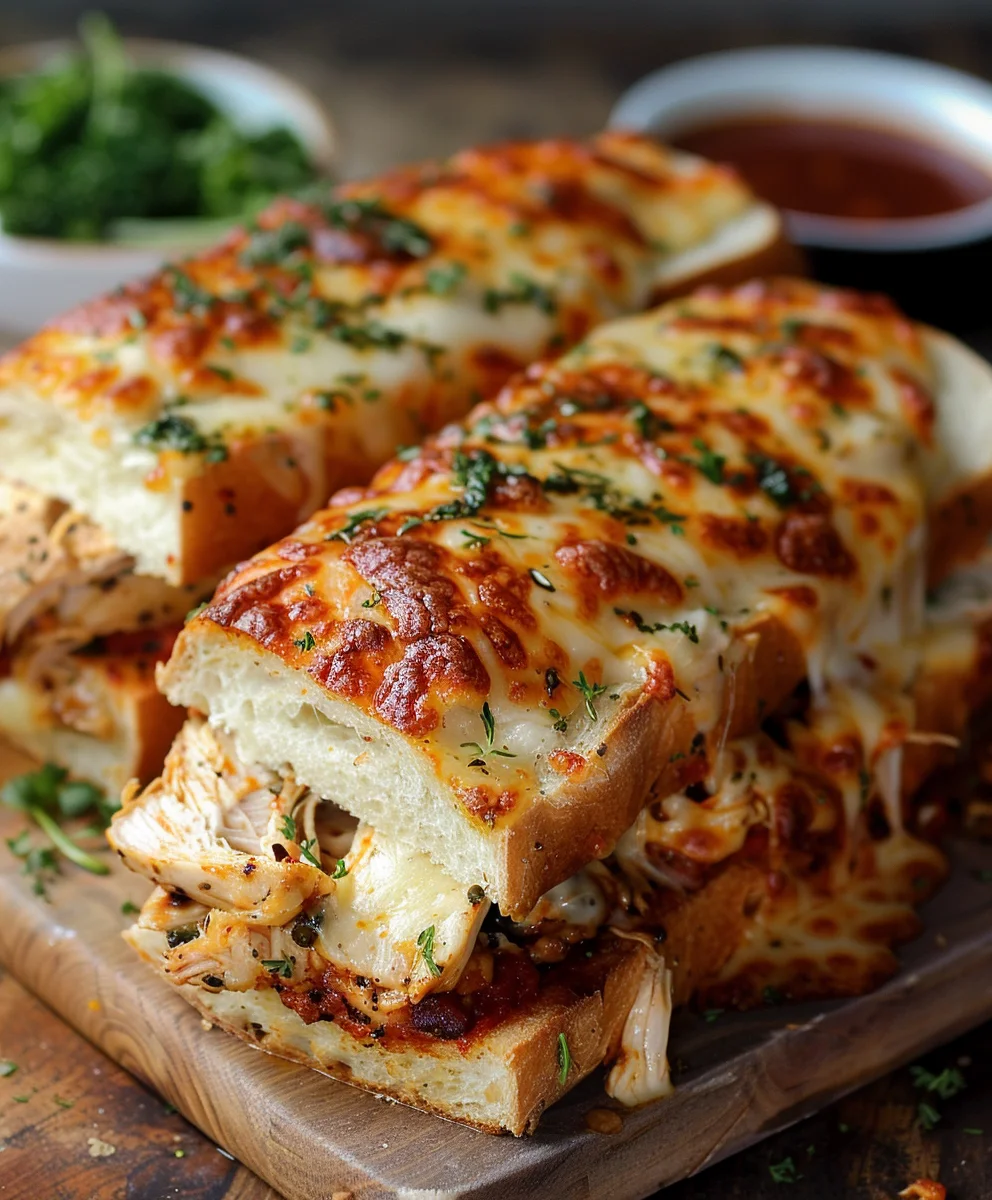
  10. Transfer the sandwich to a clean cutting board. Using a sharp, serrated knife, slice the large sandwich into individual portions. Depending on the size of your original bread, I usually cut it into 2-4 pieces.
  11. Garnish with fresh basil leaves if you like – the green color and fresh aroma are a wonderful complement. Serve immediately, perhaps with a side of extra marinara sauce for dipping. Get ready to enjoy a truly indulgent and satisfying meal!

Cheesy Chicken Garlic Bread Sandwich: Ultimate Deliciousness

Conclusion:

So, there you have it – the blueprint for a dish that’s bound to become a new favorite in your culinary repertoire. I genuinely believe that this isn’t just another sandwich; it’s an experience. Imagine sinking your teeth into perfectly toasted, garlic-infused bread, yielding to a generous layer of gooey, melted cheese that stretches with every bite, all while encountering succulent, seasoned chicken nestled within. It’s a symphony of textures and flavors, an irresistible combination that satisfies deep down. This recipe is designed to bring immense joy, whether you’re whipping it up for a quick weeknight dinner or serving it as the star of your next casual gathering. It’s truly a must-try for anyone who appreciates comfort food taken to an utterly delicious new level. The ease of preparation belies its incredibly impressive outcome, making it accessible even for those busy evenings when you crave something special without a lot of fuss. It’s hearty, it’s flavorful, and it brings smiles to faces.

In my opinion, it truly epitomizes a satisfying meal. It embodies everything you could want in a comforting, indulgent, and yet straightforward dish that leaves a lasting impression. This recipe isn’t just about combining ingredients; it’s about crafting a moment of pure culinary bliss. It’s about experiencing the ultimate comfort food, a dish so inherently satisfying that it elevates a simple meal into a memorable event. I can confidently say that creating and enjoying this Cheesy Chicken Garlic Bread Sandwich A Deliciously Indulgent Treat will be a highlight in your kitchen. It’s an absolute game-changer, promising a delightful explosion of savory, cheesy, and garlicky goodness that will have everyone asking for more. From the first fragrant whiff of garlic butter to the last gooey, cheesy bite, this sandwich delivers on every front. It’s a testament to how simple, quality ingredients, when brought together thoughtfully, can create something truly extraordinary.

Serving Suggestions and Variations:

Now, while this sandwich is perfectly capable of standing on its own as a complete meal, I love to think about how we can enhance the experience even further, or tweak it to suit different tastes and occasions. For a well-rounded meal that balances the richness, I often serve it alongside a crisp, fresh green salad tossed with a zesty vinaigrette. The bright, tangy notes of the dressing and the crunch of the lettuce provide a wonderful contrast to the warm, savory sandwich. Alternatively, a bowl of creamy tomato soup makes for an excellent dipping companion, turning an already comforting meal into an even more luxurious affair. And for those who enjoy a bit of tang, some crunchy dill pickles or a scoop of homemade coleslaw can really cut through the richness beautifully.

But let’s not stop there – the beauty of a recipe like this lies in its incredible versatility! If you’re looking to mix things up, consider some delightful variations. Instead of chicken, why not use leftover pulled pork, shredded turkey, or even thinly sliced, seasoned steak? For a fantastic vegetarian option, sautéed mushrooms with a hint of thyme or roasted bell peppers and zucchini would be absolutely magnificent. When it comes to cheese, feel free to experiment beyond mozzarella and cheddar. Provolone, fontina, or even a little bit of smoked gouda could add intriguing new dimensions of flavor. And for those who like a bit of a kick, a sprinkle of red pepper flakes or some pepper jack cheese can ignite a wonderful heat. You could also introduce fresh herbs like chopped basil or oregano into the chicken mixture or the garlic butter for an added layer of aromatic complexity. Some people even like to add a thin layer of marinara sauce inside or serve it on the side for dipping, giving it a pizza-like twist. Think about adding caramelized onions, sun-dried tomatoes, or even a touch of pesto for a gourmet twist. The possibilities are truly endless, and each modification allows you to make this wonderful recipe uniquely yours.

I’m truly excited for you to bring this recipe into your kitchen. Cooking should always be an adventure, a creative outlet, and above all, a source of immense enjoyment. I wholeheartedly encourage you to roll up your sleeves, gather your ingredients, and embark on the delicious journey of creating your very own Cheesy Chicken Garlic Bread Sandwich. Don’t be afraid to put your own spin on it – after all, the best recipes are often those that evolve with your personal touch. Once you’ve experienced the sheer delight of this sandwich, I would absolutely love to hear about it! Please, share your culinary triumphs with me and our community. Did you add a unique ingredient? Discover a new favorite cheese? Or perhaps you found the perfect side dish that elevates the entire meal? Your insights, tips, and photos are incredibly valuable and inspiring. They not only help others in their cooking endeavors but also foster a wonderful sense of shared passion for food. Snap a picture of your masterpiece, tell us about your experience in the comments below, or share it on your favorite social media platforms. Let’s celebrate the joy of good food together! This isn’t just a recipe; it’s an invitation to create, to savor, and to share. I can’t wait to see what delicious magic you whip up!


Cheesy Chicken Garlic Bread Sandwich: Ultimate Deliciousness

Cheesy Chicken Garlic Bread Sandwich: Ultimate Deliciousness

Imagine biting into the perfect harmony of crispy, golden garlic bread, tender, seasoned chicken, and a generous, gooey layer of melted cheese. This ultimate handheld delight elevates your everyday meal into an extraordinary experience, offering an incredible flavor profile and satisfying textures.

Prep Time
20 Minutes

Cook Time
45 Minutes

Total Time
65 Minutes

Servings
4 servings

Ingredients

  • 1.5 lbs boneless, skinless chicken breasts or thighs
  • 1 tbsp olive oil
  • 1 tsp smoked paprika
  • 1/2 tsp onion powder
  • 1/2 tsp garlic powder
  • 1/4 tsp black pepper
  • 1/2 tsp salt
  • 2 tbsp unsalted butter (for chicken)
  • 1 large loaf Italian or French bread, sliced lengthwise
  • 1/2 cup unsalted butter, softened (for garlic bread)
  • 2 tbsp minced garlic (4-5 cloves)
  • 2 tbsp fresh parsley, chopped
  • 1/2 tsp dried oregano (optional)
  • Pinch salt & black pepper (for garlic butter)
  • 1.5 cups shredded mozzarella cheese
  • 1/2 cup shredded sharp cheddar cheese
  • 1/4 cup grated Parmesan cheese
  • 1/4 cup mayonnaise (optional)
  • 2 tbsp softened cream cheese (optional)
  • 1/4 cup marinara or pizza sauce (optional)
  • Fresh basil leaves (optional, for garnish)

Instructions

  1. Step 1
    Pat chicken dry; slice or pound to 1/2-3/4 inch thick. Combine 1 tsp smoked paprika, 1/2 tsp onion powder, 1/2 tsp garlic powder, 1/4 tsp black pepper, 1/2 tsp salt. Drizzle chicken with 1 tbsp olive oil, rub with seasoning mix.
  2. Step 2
    Heat skillet over medium-high. Melt 2 tbsp unsalted butter. Sear chicken 5-7 mins per side until internal temp is 165°F (74°C) and golden-brown. Cook in batches if needed. Rest chicken 5-10 mins, then dice or shred.
  3. Step 3
    Preheat oven to 375°F (190°C). In a bowl, combine 1/2 cup softened unsalted butter, 2 tbsp minced garlic, 2 tbsp chopped fresh parsley, 1/2 tsp dried oregano (optional), pinch salt & pepper. Mix well.
  4. Step 4
    Spread garlic butter generously over cut sides of sliced bread. Place buttered bread cut-side up on a baking sheet. Bake 8-10 minutes until golden brown and lightly crispy. Remove from oven.
  5. Step 5
    In a large bowl, combine diced/shredded chicken, 1.5 cups shredded mozzarella, 1/2 cup shredded sharp cheddar, 1/4 cup grated Parmesan. Add 1/4 cup mayonnaise (optional) and 2 tbsp softened cream cheese (optional). Mix thoroughly.
  6. Step 6
    Lightly spread 1/4 cup marinara/pizza sauce (optional) on one or both garlic bread halves. Spoon cheesy chicken filling onto one bread half, spreading evenly. Place other bread half on top. Bake in a 400°F (200°C) oven for 10-15 minutes until cheese is melted and bubbly (broil 1-2 mins for extra crispiness if desired). Alternatively, pan-fry over medium heat 4-6 mins per side until golden and cheese is gooey.
  7. Step 7
    Rest sandwich 1-2 minutes. Slice into individual portions with a serrated knife. Garnish with fresh basil (optional). Serve immediately, with extra marinara for dipping if desired.

Important Information

Nutrition Facts (Per Serving)

It is important to consider this information as approximate and not to use it as definitive health advice.

Allergy Information

Please check ingredients for potential allergens and consult a health professional if in doubt.

« Previous Post
Irresistible Boston Cream Pie Cookies – Your New Favorite!
Next Post »
Raspberry Chocolate Lava Cupcakes: Decadent Dessert!

If you enjoyed this…

White Garlic Pizza Sauce: Creamy & Perfect for Homemade Pizza

Savory Roasted Turkey Breast with Garlic Herb Butter Recipe

Delicious Honey Baked Beef Ham Recipe for Perfect Meals

Primary Sidebar

Browse by Diet

BreakfastDinnerLunchDessertAppetizer

Sweet Peach Yogurt Parfait Delight

One of my fondest memories is from a lazy summer afternoon spent at my grandmother’s house. The sun filtered through the kitchen window, casting a warm glow over the table where she would create her culinary magic. It was during one of those blissful moments that I first tasted her Peach Yogurt Parfait with Honey and Granola. The sweet aroma of ripe peaches mingling with creamy yogurt and the crunch of granola was nothing short of heavenly. It felt like summer captured in a bowl, and I still remember the joy of diving in with a spoon, each layer revealing a new burst of flavor.

When I think about that parfait, I can almost hear the gentle hum of the bees outside, reminding me of the floral notes that honey brings to every bite. The vibrant yellows and soft oranges of the peaches contrast beautifully with the creamy white yogurt and the golden crunch of granola. It’s a dish that not only looks delightful but also tastes like a celebration of fresh, wholesome ingredients.

What makes my version of this Peach Yogurt Parfait special is the careful balance of flavors and textures. I use ripe, juicy peaches, drizzled with locally sourced honey, and a homemade granola that’s bursting with nuts and seeds for an extra crunch. It’s a simple dish, but every layer is crafted with love and attention.

Let me show you exactly how to make this delightful parfait, so you can bring a bit of that summer magic into your kitchen!

Sweet Peach Yogurt Parfait Delight

Why You’ll Love This Recipe

  • Delightfully creamy texture from the Greek yogurt, paired with the juicy sweetness of fresh peaches.
  • Ready in under 20 minutes, making it a quick and satisfying breakfast or snack option.
  • Budget-friendly, using common ingredients that you may already have in your pantry.
  • Customizable with your favorite granola and nuts, allowing you to tailor each parfait to your taste.
  • Perfectly balanced flavors with the bright acidity of lemon juice and the sweetness of honey enhancing the peaches.

Ingredients

  • For the Parfait:
  • 2 cups plain Greek yogurt (or vanilla yogurt for a sweeter option)
  • 2 large ripe peaches, diced (about 2 cups)
  • 1 tablespoon fresh lemon juice (to prevent browning of peaches)
  • 2 tablespoons honey (plus more for drizzling)
  • 1 teaspoon vanilla extract (optional for extra flavor)
  • For the Granola:
  • 1 cup granola (store-bought or homemade; see notes for a simple granola recipe)
  • 1/4 cup sliced almonds (optional for added crunch)
  • 1/4 cup shredded coconut (optional for added flavor)

Let’s dive into some key ingredients that make this Peach Yogurt Parfait so delightful! First, the Greek yogurt is not only creamy but also packed with protein, making it a satisfying option for breakfast or a snack. If you’re looking for a sweeter option, you can easily substitute it with vanilla yogurt, though it may alter the overall flavor balance. Next, the ripe peaches are the star of the show; their natural sweetness shines through, so I recommend choosing peaches that yield slightly to pressure, indicating they’re perfectly ripe. If peaches aren’t in season, feel free to use nectarines or even frozen peaches—just thaw them before use. Finally, honey adds a lovely floral sweetness that ties everything together. If you prefer, maple syrup can serve as a delicious substitute.

Step-by-Step Instructions

  1. Start by preparing the peaches. Wash them thoroughly, then slice and dice them into bite-sized pieces. In a medium bowl, toss the diced peaches with 1 tablespoon of fresh lemon juice to prevent browning. Set aside for about 5 minutes while the lemon juice works its magic.
  2. In a separate bowl, combine the Greek yogurt, 2 tablespoons of honey, and 1 teaspoon of vanilla extract if using. Stir the mixture until smooth and thoroughly blended. This should take about a minute. Avoid overmixing to maintain the creaminess of the yogurt.
  3. Now it’s time to layer your parfait. Grab a clear glass or bowl to showcase your beautiful creation. Start with a generous spoonful of the yogurt mixture at the bottom—about 1/4 cup will do. Use a spoon to spread it evenly.
  4. Add a layer of the diced peaches over the yogurt, ensuring they cover the yogurt completely. You might want to use about half of what you have prepared—roughly 1 cup. This layer should be visually appealing, so arrange the peaches neatly.
  5. Sprinkle 1/4 cup of granola over the peaches. This adds a delightful crunch. Make sure to distribute it evenly to ensure every bite has that satisfying texture. Avoid packing it down too tightly, as you want it to maintain its crunch.
  6. Repeat the layers: spoon in another 1/4 cup of yogurt, followed by another cup of peaches, and another sprinkle of granola. You should have at least two layers, but feel free to add more depending on your glass size.
  7. Finish off your parfait with a drizzle of honey on top for added sweetness and a touch of elegance. If you’re using sliced almonds or shredded coconut, sprinkle them on top now. It adds a lovely visual contrast and extra flavor.
  8. Serve immediately or refrigerate for up to 30 minutes before serving to allow the flavors to meld together. However, I recommend enjoying it fresh to maintain the granola’s crunch.

Pro Tips for the Best Peach Yogurt Parfait With Honey And Granola

  • Make sure to choose ripe peaches for the best flavor and texture. A common mistake is using unripe fruit, which can lead to a less enjoyable parfait. Look for peaches that are fragrant and slightly soft to the touch.
  • Use a clear glass to assemble your parfait; this not only makes for a beautiful presentation but also allows you to see the colorful layers, which adds to the enjoyment of eating it.
  • For an even creamier texture, consider whipping the Greek yogurt with a hand mixer for a couple of minutes before layering. This small adjustment makes a huge difference in mouthfeel.
  • Be mindful of the granola-to-yogurt ratio. Too much granola can overwhelm the parfait, while too little can make it feel too creamy. Aim for about 1/4 cup of granola per layer for the perfect balance.
  • If you’re making this for a gathering, consider preparing the yogurt and peaches ahead of time and layering them just before serving. This ensures the granola stays crunchy!

Variations & Serving Ideas

There are so many ways to get creative with your Peach Yogurt Parfait! For a tropical twist, swap out the peaches for mangoes or pineapples and top with coconut flakes. If you prefer a berry flavor, mix in some blueberries or strawberries with the peaches for added color and taste. For a nutty version, incorporate chopped walnuts or pecans instead of almonds.

As for serving ideas, this parfait pairs beautifully with a side of scrambled eggs for a hearty breakfast or fresh fruit salad for a light lunch. You might also enjoy it alongside whole grain toast with almond butter for an energizing snack. The contrast of flavors and textures will elevate your meal experience!

Storage, Make-Ahead & Reheating

The Peach Yogurt Parfait is best enjoyed fresh, but you can prepare some components ahead of time. Store the layered parfait in an airtight container in the refrigerator for up to 24 hours. However, be cautious; the granola may lose its crunch if stored too long. You can freeze the yogurt and peach mixture for up to 2 months; just remember to thaw it in the refrigerator overnight before serving.

If you plan to enjoy this dish the next day, it can taste even better as the flavors meld together. Just remember to add the granola right before serving to keep its delightful crunch!

Frequently Asked Questions

Can I make Peach Yogurt Parfait With Honey And Granola ahead of time?

Yes — in fact, it tastes even better the next day as the flavors meld. However, I recommend waiting to add the granola until just before serving to maintain its crunch.

What can I substitute for Greek yogurt?

If you prefer a lighter option, you can substitute Greek yogurt with regular yogurt or a dairy-free alternative like coconut yogurt. Just remember that this may alter the creaminess and flavor profile slightly.

Can I use frozen peaches for this parfait?

Absolutely! Just make sure to thaw the frozen peaches before using them. They will still add great flavor, though the texture may be slightly softer than fresh peaches.

How do I make the parfait vegan?

To make a vegan version, substitute the Greek yogurt with a plant-based yogurt alternative, and replace honey with maple syrup or agave nectar. This keeps the parfait sweet while adhering to a vegan diet.

What other fruits can I use in this recipe?

You can mix and match fruits based on your preference. Try using strawberries, blueberries, raspberries, or even bananas. Just make sure to adjust the lemon juice as needed to prevent browning.

Sweet Peach Yogurt Parfait Delight

Final Thoughts

The Peach Yogurt Parfait with Honey and Granola is a delightful blend of creamy yogurt, sweet peaches, and crunchy granola that creates a satisfying and nourishing treat. Each layer bursts with flavor, making it a perfect choice for breakfast or a light dessert.

This is the kind of recipe I come back to again and again, especially when I want something refreshing and wholesome to start my day. The harmony of sweet and tart flavors, combined with the delightful crunch, never fails to lift my spirits!

I encourage you to give this parfait a try and indulge in its comforting goodness. Feel free to share your results or even add your own twist—perhaps a sprinkle of cinnamon or a handful of nuts. Enjoy creating your perfect parfait!

Print
clock clock iconcutlery cutlery iconflag flag iconfolder folder iconinstagram instagram iconpinterest pinterest iconfacebook facebook iconprint print iconsquares squares iconheart heart iconheart solid heart solid icon

Peach Yogurt Parfait


  • Author: Lily author
  • Total Time: 15 minutes
  • Yield: 4 servings 1x
Pin Recipe
Print Recipe

Description

This Peach Yogurt Parfait combines creamy Greek yogurt, juicy peaches, and crunchy granola for a delightful treat. It’s a perfect breakfast or snack that captures the essence of summer in every bite.


Ingredients

Scale
  • For the Parfait:
  • 2 cups plain Greek yogurt (or vanilla yogurt for a sweeter option)
  • 2 large ripe peaches, diced (about 2 cups)
  • 1 tablespoon fresh lemon juice (to prevent browning of peaches)
  • 2 tablespoons honey (plus more for drizzling)
  • 1 teaspoon vanilla extract (optional for extra flavor)
  • For the Granola:
  • 1 cup granola (store-bought or homemade; see notes for a simple granola recipe)
  • 1/4 cup sliced almonds (optional for added crunch)
  • 1/4 cup shredded coconut (optional for added flavor)

Instructions

  1. Start by preparing the peaches. Wash them thoroughly, then slice and dice them into bite-sized pieces. In a medium bowl, toss the diced peaches with 1 tablespoon of fresh lemon juice to prevent browning. Set aside for about 5 minutes while the lemon juice works its magic.
  2. In a separate bowl, combine the Greek yogurt, 2 tablespoons of honey, and 1 teaspoon of vanilla extract if using. Stir the mixture until smooth and thoroughly blended. This should take about a minute. Avoid overmixing to maintain the creaminess of the yogurt.
  3. Now it’s time to layer your parfait. Grab a clear glass or bowl to showcase your beautiful creation. Start with a generous spoonful of the yogurt mixture at the bottom—about 1/4 cup will do. Use a spoon to spread it evenly.
  4. Add a layer of the diced peaches over the yogurt, ensuring they cover the yogurt completely. You might want to use about half of what you have prepared—roughly 1 cup. This layer should be visually appealing, so arrange the peaches neatly.
  5. Sprinkle 1/4 cup of granola over the peaches. This adds a delightful crunch. Make sure to distribute it evenly to ensure every bite has that satisfying texture. Avoid packing it down too tightly, as you want it to maintain its crunch.
  6. Repeat the layers: spoon in another 1/4 cup of yogurt, followed by another cup of peaches, and another sprinkle of granola. You should have at least two layers, but feel free to add more depending on your glass size.
  7. Finish off your parfait with a drizzle of honey on top for added sweetness and a touch of elegance. If you’re using sliced almonds or shredded coconut, sprinkle them on top now. It adds a lovely visual contrast and extra flavor.
  8. Serve immediately or refrigerate for up to 30 minutes before serving to allow the flavors to meld together. However, I recommend enjoying it fresh to maintain the granola’s crunch.
  • Prep Time: 15 mins
  • Cook Time: 0 mins
  • Category: Breakfast
  • Method: No-cook
  • Cuisine: American

Nutrition

  • Serving Size: 1 parfait
  • Calories: 250
  • Sugar: 20 g
  • Sodium: 50 mg
  • Fat: 5 g
  • Saturated Fat: 2 g
  • Unsaturated Fat: 3 g
  • Trans Fat: 0 g
  • Carbohydrates: 40 g
  • Fiber: 3 g
  • Protein: 10 g
  • Cholesterol: 10 mg

Keywords: Choose ripe peaches for the best flavor and texture. Use a clear glass for a beautiful presentation. For creaminess, consider whipping the yogurt before layering. Be mindful of the granola-to-yogurt ratio. Prepare yogurt and peaches ahead of time for gatherings, layering just before serving.

Did you make this recipe?

Share a photo and tag us — we can't wait to see what you've made!

Sun-Kissed Frozen Orange Cream Slush

As a child, summer days felt like they lasted forever. I remember the sticky heat wrapping around me as I played outside, my laughter mingling with the sounds of the neighborhood. But nothing could cool me down quite like the moment I’d spot my grandmother, laboring over her blender, whipping up her famous Frozen Orange Creamsicle Slush. That vibrant orange treat, with its frosty texture and sweet citrus aroma, was like a burst of sunshine in a cup. Just one sip, and I could feel the coolness wash over me, sparking pure joy.

This Frozen Orange Creamsicle Slush has a way of making you feel like a kid again. Its creamy, dreamy consistency is a delightful balance of bright orange and soft vanilla, inviting you to dive right in. The refreshing tang of orange dances on your tongue, while the smooth creaminess envelops you in a comforting embrace. It’s a nostalgic treat that’s perfect for hot summer afternoons or anytime you need a little pick-me-up.

What makes my version of this slush stand out is the addition of a hint of vanilla bean, which elevates the flavor and adds an extra layer of richness. Plus, it’s super easy to whip up with just a few simple ingredients that you probably already have on hand! So, if you’re ready to relive those sun-soaked memories, let me show you exactly how to make it.

Sun-Kissed Frozen Orange Cream Slush

Why You’ll Love This Recipe

  • Each slush is a perfect blend of creamy vanilla and zesty orange, creating a nostalgic flavor reminiscent of summer days.
  • This refreshing treat is ready in under 15 minutes, making it an ideal quick dessert for unexpected guests or hot afternoons.
  • With just 8 simple ingredients, it’s budget-friendly, ensuring you don’t have to break the bank to enjoy a delicious slush.
  • The slush has a perfectly smooth texture, thanks to the combination of ice and ice cream, providing a delightful contrast to the bright citrus flavors.
  • It’s highly customizable; you can easily adjust the sweetness and add fresh herbs for a unique twist that suits your taste.

Ingredients

  • 2 cups orange juice (freshly squeezed or store-bought)
  • 1 cup vanilla ice cream
  • 1 cup crushed ice
  • 1/2 cup milk (whole or 2%)
  • 1/4 cup granulated sugar (adjust based on sweetness preference)
  • 1 teaspoon vanilla extract
  • Zest of 1 orange (for added flavor)
  • Fresh orange slices and mint leaves (for garnish)

The star of this Frozen Orange Creamsicle Slush is the orange juice, which provides the vibrant, citrusy base. Freshly squeezed juice will yield the brightest flavor, but store-bought options can be just as convenient. If you’re opting for store-bought, choose 100% pure juice with no added sugars for the best results. Another essential ingredient is the vanilla ice cream; it adds creaminess and sweetness. You can substitute it with dairy-free ice cream if you’re looking for a vegan option. Whole or 2% milk complements the ice cream, creating a smooth blend. If you want a lower-calorie version, almond or oat milk can be good alternatives.

Lastly, the granulated sugar can be adjusted based on your sweetness preference. If you prefer a more natural sweetener, consider using honey or agave syrup. The orange zest enhances the flavor profile, providing an aromatic pop that brings the whole slush together. Don’t skip it! It adds an extra layer of brightness that makes this slush truly special.

Step-by-Step Instructions

  1. Start by preparing your ingredients. Gather 2 cups of orange juice, 1 cup of vanilla ice cream, and 1 cup of crushed ice. Make sure the ice is finely crushed, as larger chunks can make blending difficult.
  2. In a blender, combine the orange juice, vanilla ice cream, crushed ice, and 1/2 cup of milk. Add 1/4 cup of granulated sugar and 1 teaspoon of vanilla extract. If you like a sweeter slush, consider adding a bit more sugar at this stage.
  3. Add the zest of 1 orange to the blender. This step is crucial for enhancing the citrus flavor of your slush. Make sure not to include the bitter white pith—only the flavorful zest.
  4. Blend the mixture on medium-high speed for about 30-45 seconds. Stop once the ingredients are fully combined and the slush has a smooth, even consistency. If you notice large chunks of ice, blend for an additional 10-15 seconds. Avoid over-blending, as this can make the slush too liquidy.
  5. Once blended, taste the slush. If it needs more sweetness, add a little more sugar and blend for a few more seconds. If it’s too thick, you can add a splash of milk to reach your desired consistency.
  6. Pour the slush into glasses. This recipe typically serves 4, but you can easily double it for larger gatherings. Use a spoon to help guide the slush into the glasses if needed.
  7. Garnish each serving with fresh orange slices and mint leaves. The mint not only adds a pop of color but also a refreshing aroma that complements the citrus flavors beautifully.
  8. Serve immediately and enjoy! If you’ve made extra, you can refrigerate it for a short time, but it’s best enjoyed fresh.

Pro Tips for the Best Frozen Orange Creamsicle Slush

  • Don’t skip the orange zest! It’s a game-changer for flavor. Always zest before juicing to make it easier.
  • Use a high-powered blender for the best texture. A standard blender may struggle with ice, leading to uneven consistency. If you have a food processor, that can work too, but ensure the ice is finely crushed.
  • Adjust the ice-to-liquid ratio carefully. If your slush is too thick, it won’t blend well. Start with less ice and add more until you reach your preferred texture.
  • Be cautious with the sugar! Always start with the lower amount, as you can easily add more, but it’s hard to fix an overly sweet slush.
  • For a fun twist, consider adding a splash of coconut milk or a handful of fresh fruit like strawberries or pineapple. This not only enhances the flavor but also adds a beautiful color contrast.

Variations & Serving Ideas

There are countless ways to put a spin on your Frozen Orange Creamsicle Slush. Consider making a tropical version by adding in some pineapple juice or coconut milk for a delightful tropical twist. If you’re feeling adventurous, try incorporating a handful of frozen mango or peach slices for added sweetness. For a lighter version, swap out the vanilla ice cream for Greek yogurt for a creamy yet tangy alternative.

As for serving ideas, this refreshing slush pairs wonderfully with light summer dishes like grilled chicken skewers, fish tacos, or a simple salad topped with citrus vinaigrette. The bright, zesty flavors of the slush complement these dishes perfectly, making them an ideal pairing for a sunny day.

Storage, Make-Ahead & Reheating

This Frozen Orange Creamsicle Slush is best enjoyed fresh, but if you have leftovers, you can store them in an airtight container in the fridge for up to 2 days. Just keep in mind that the slush may lose some of its texture over time as the ice melts. It doesn’t freeze well, as the ice will turn into a solid block. If you must freeze it, blend again after thawing to restore the slushy consistency. This treat is best the day you make it, as the flavors meld together beautifully overnight, enhancing its deliciousness.

Frequently Asked Questions

Can I make Frozen Orange Creamsicle Slush ahead of time?

Yes — in fact, it tastes even better the next day as the flavors meld. However, it’s best to enjoy it fresh, as the texture can change if stored for too long. If you need to prepare it ahead, keep it in the fridge and re-blend before serving.

What kind of orange juice should I use?

For the best flavor, use freshly squeezed orange juice. However, if you’re short on time, opt for 100% pure store-bought juice without added sugars. This will ensure that your slush remains flavorful and refreshing.

Can I substitute the vanilla ice cream?

Absolutely! If you’re looking for a dairy-free option, coconut milk ice cream or a non-dairy vanilla ice cream can work wonderfully. They will still provide the creamy texture and sweetness you desire.

How can I adjust the sweetness of my slush?

You can easily adjust the sweetness by modifying the amount of sugar added. Start with 1/4 cup and taste the mixture before blending. If you prefer it sweeter, add more sugar gradually until it reaches your desired level.

What should I do if my slush is too thick?

If your slush is too thick, simply add a splash of milk or orange juice and blend again. This will help achieve a more drinkable consistency while maintaining the slushy texture. Adjust gradually to reach your preferred thickness.

Sun-Kissed Frozen Orange Cream Slush

Final Thoughts

The Frozen Orange Creamsicle Slush is a delightful blend of refreshing citrus and creamy goodness, making it a perfect treat for warm days or any time you crave a taste of nostalgia. The way the bright orange flavor dances with the creamy texture truly elevates this slush, transforming it into a satisfying escape from the everyday.

This is the kind of recipe I come back to again and again, especially when I’m looking to cool down or impress guests at a summer gathering. It’s simple to make and always brings smiles all around! I encourage you to try this recipe for yourself—don’t hesitate to share your results or even put your own spin on it. Happy slushing!

Print
clock clock iconcutlery cutlery iconflag flag iconfolder folder iconinstagram instagram iconpinterest pinterest iconfacebook facebook iconprint print iconsquares squares iconheart heart iconheart solid heart solid icon

Frozen Orange Creamsicle Slush


  • Author: Lily author
  • Total Time: 15 minutes
  • Yield: 4 servings 1x
Pin Recipe
Print Recipe

Description

This Frozen Orange Creamsicle Slush is a refreshing treat that combines creamy vanilla and zesty orange flavors. Perfect for hot summer days, it brings back nostalgic memories with every sip.


Ingredients

Scale
  • 2 cups orange juice (freshly squeezed or store-bought)
  • 1 cup vanilla ice cream
  • 1 cup crushed ice
  • 1/2 cup milk (whole or 2%)
  • 1/4 cup granulated sugar (adjust based on sweetness preference)
  • 1 teaspoon vanilla extract
  • Zest of 1 orange (for added flavor)
  • Fresh orange slices and mint leaves (for garnish)

Instructions

  1. Start by preparing your ingredients. Gather 2 cups of orange juice, 1 cup of vanilla ice cream, and 1 cup of crushed ice. Make sure the ice is finely crushed, as larger chunks can make blending difficult.
  2. In a blender, combine the orange juice, vanilla ice cream, crushed ice, and 1/2 cup of milk. Add 1/4 cup of granulated sugar and 1 teaspoon of vanilla extract. If you like a sweeter slush, consider adding a bit more sugar at this stage.
  3. Add the zest of 1 orange to the blender. This step is crucial for enhancing the citrus flavor of your slush. Make sure not to include the bitter white pith—only the flavorful zest.
  4. Blend the mixture on medium-high speed for about 30-45 seconds. Stop once the ingredients are fully combined and the slush has a smooth, even consistency. If you notice large chunks of ice, blend for an additional 10-15 seconds. Avoid over-blending, as this can make the slush too liquidy.
  5. Once blended, taste the slush. If it needs more sweetness, add a little more sugar and blend for a few more seconds. If it’s too thick, you can add a splash of milk to reach your desired consistency.
  6. Pour the slush into glasses. This recipe typically serves 4, but you can easily double it for larger gatherings. Use a spoon to help guide the slush into the glasses if needed.
  7. Garnish each serving with fresh orange slices and mint leaves. The mint not only adds a pop of color but also a refreshing aroma that complements the citrus flavors beautifully.
  8. Serve immediately and enjoy! If you’ve made extra, you can refrigerate it for a short time, but it's best enjoyed fresh.
  • Prep Time: 15 min
  • Cook Time: 0 min
  • Category: Dessert
  • Method: Blending
  • Cuisine: American

Nutrition

  • Serving Size: 1 serving
  • Calories: 200
  • Sugar: 30 g
  • Sodium: 50 mg
  • Fat: 5 g
  • Saturated Fat: 3 g
  • Unsaturated Fat: 2 g
  • Trans Fat: 0 g
  • Carbohydrates: 40 g
  • Fiber: 1 g
  • Protein: 2 g
  • Cholesterol: 20 mg

Keywords: Don't skip the orange zest! It's a game-changer for flavor. Always zest before juicing to make it easier.

Did you make this recipe?

Share a photo and tag us — we can't wait to see what you've made!

Zesty Lemon Poppy Seed Delight

One rainy afternoon, I found myself in my grandmother’s cozy kitchen, the kind that always smelled like warmth and love. She was whipping up her famous Lemon Poppy Seed Loaf, a recipe that had been passed down through generations. As the batter came together, the zesty aroma of fresh lemons filled the air, mingling perfectly with the nutty fragrance of poppy seeds. I can still picture her, apron-clad, as she expertly drizzled a vibrant citrus icing over the loaf, creating a glossy, sun-kissed finish that beckoned us to dive in. It was a moment that sparked my own passion for baking, and this recipe has become a cherished staple in my home ever since.

When you take a bite of this Lemon Poppy Seed Loaf, it’s like a burst of sunshine on your palate. The loaf is beautifully golden, with a tender crumb that melts in your mouth. Each slice is speckled with tiny poppy seeds, adding a delightful crunch that contrasts beautifully with the tangy sweetness of the lemon. And that citrus icing? It’s the finishing touch that elevates this loaf from ordinary to extraordinary, with its bright, zesty flavor dancing on your taste buds.

This recipe stands out because it embraces simplicity while delivering on flavor. I’ve added a hint of vanilla to the batter, enhancing the overall taste and making it even more indulgent. Trust me, once you make this Lemon Poppy Seed Loaf With Citrus Icing, it’ll become a go-to in your baking repertoire.

So, let me show you exactly how to make it!

Zesty Lemon Poppy Seed Delight

Why You’ll Love This Recipe

  • Moist and tender crumb that melts in your mouth, thanks to the perfect balance of butter and buttermilk.
  • Bright, zesty lemon flavor paired with crunchy poppy seeds, creating a delightful texture and taste experience.
  • Easy to whip up in just about an hour, perfect for last-minute gatherings or a cozy afternoon treat.
  • Budget-friendly with everyday ingredients, making it an accessible option for all home bakers.
  • The citrus icing adds a sweet tang that elevates the loaf, turning a simple recipe into a showstopper!

Ingredients

  • 1 ½ cups (190g) all-purpose flour
  • 1 teaspoon baking powder
  • ½ teaspoon baking soda
  • ½ teaspoon salt
  • 3 tablespoons poppy seeds
  • ½ cup (115g) unsalted butter, softened to room temperature
  • 1 cup (200g) granulated sugar
  • 2 large eggs
  • 1 teaspoon vanilla extract
  • 1 teaspoon lemon zest (from about 1 medium lemon)
  • ½ cup (120ml) buttermilk
  • 2 tablespoons fresh lemon juice

For the Citrus Icing:

  • 1 cup (120g) powdered sugar
  • 2 tablespoons fresh lemon juice
  • 1 tablespoon orange juice
  • 1 teaspoon lemon zest (for garnish, optional)

Let’s dive into the key ingredients that make this Lemon Poppy Seed Loaf so special. The all-purpose flour provides the structure and base for the loaf, while the baking powder and baking soda ensure it rises perfectly, giving the loaf a light texture. For a gluten-free variation, you could substitute the flour with a gluten-free all-purpose blend. Poppy seeds not only add a delightful crunch but also contribute to the unique flavor profile that pairs well with the citrus notes.

Unsalted butter is crucial for achieving the buttery richness that makes this loaf so moist. If you’re looking for a dairy-free option, coconut oil or a vegan butter can be used instead. The buttermilk is another essential component, providing acidity that activates the baking soda for a fluffy texture. If you don’t have buttermilk on hand, you can easily make a substitute by mixing ½ cup of milk with 1 tablespoon of vinegar or lemon juice and letting it sit for about 5 minutes.

Step-by-Step Instructions

  1. Preheat your oven to 350°F (175°C). Grease a 9×5-inch loaf pan or line it with parchment paper for easy removal later.
  2. In a medium mixing bowl, whisk together 1 ½ cups of all-purpose flour, 1 teaspoon of baking powder, ½ teaspoon of baking soda, ½ teaspoon of salt, and 3 tablespoons of poppy seeds. This helps to evenly distribute the baking agents and ensures a uniform rise.
  3. In a large mixing bowl, cream together ½ cup of softened unsalted butter and 1 cup of granulated sugar using an electric mixer on medium speed for about 3-4 minutes, until the mixture is light and fluffy. Make sure to scrape down the sides of the bowl occasionally.
  4. Add 2 large eggs, 1 teaspoon of vanilla extract, and 1 teaspoon of lemon zest to the creamed butter and sugar, mixing until fully combined. You want a smooth consistency, so ensure there are no lumps of butter.
  5. In a small bowl, combine ½ cup of buttermilk and 2 tablespoons of fresh lemon juice. Alternately add the dry ingredients and buttermilk mixture to the butter mixture, starting and ending with the dry ingredients. Mix just until combined; do not overmix, as this can lead to a dense loaf.
  6. Pour the batter into the prepared loaf pan. Smooth the top with a spatula, ensuring it’s even. Bake in the preheated oven for 50-60 minutes, or until a toothpick inserted in the center comes out clean. The edges should be lightly golden brown, and the center should feel just set.
  7. Once baked, remove the loaf from the oven and allow it to cool in the pan for about 10 minutes. Then, transfer it to a wire rack to cool completely. Resist the urge to slice too soon, as it will be crumbly if it’s still warm.
  8. While the loaf is cooling, prepare the citrus icing. In a medium bowl, whisk together 1 cup of powdered sugar, 2 tablespoons of fresh lemon juice, and 1 tablespoon of orange juice until smooth. If the icing is too thick, you can add a little more juice to reach your desired consistency.
  9. Once the loaf is completely cool, drizzle the citrus icing over the top. If you like, sprinkle with an additional teaspoon of lemon zest for an extra pop of flavor and color.

Pro Tips for the Best Lemon Poppy Seed Loaf With Citrus Icing

  • Be careful not to overmix your batter; this is a common mistake that can lead to a dense loaf. Mix just until the dry ingredients are incorporated for a light and fluffy texture.
  • Use room temperature ingredients, especially the butter and eggs. This helps to create a smoother batter and ensures even baking. Take your eggs out of the fridge about 30 minutes before you start.
  • For a more pronounced lemon flavor, consider adding a little lemon extract in addition to the zest and juice. Just a half teaspoon can elevate the citrus notes significantly.
  • When measuring your flour, spoon it into the measuring cup and level it off with a knife instead of scooping directly from the bag. This prevents packing and ensures you don’t end up with a dry loaf.
  • Invest in a good quality loaf pan; it makes a difference in heat distribution, which ensures even baking. If your pan is dark-coated, reduce the oven temperature by 25°F to prevent over-browning.

Variations & Serving Ideas

For a delightful twist, consider adding blueberries or raspberries to the batter for a fruity burst of flavor. You can also experiment with different citrus fruits—try lime or grapefruit zest and juice for a refreshing change. For a healthier option, substitute half of the all-purpose flour with whole wheat flour for added fiber without compromising too much on texture.

This Lemon Poppy Seed Loaf pairs beautifully with a light salad, such as a mixed greens salad with a vinaigrette, or a cup of tea for a cozy afternoon treat. It also complements a creamy cheese platter, as the acidity of the loaf balances rich cheeses perfectly. Lastly, a scoop of vanilla ice cream on the side creates a delightful contrast of temperatures and flavors!

Storage, Make-Ahead & Reheating

This Lemon Poppy Seed Loaf can be stored at room temperature for up to 3 days if wrapped tightly in plastic wrap. If you want to keep it longer, it freezes well for up to 3 months. To freeze, wrap the loaf tightly in plastic wrap and then in aluminum foil to prevent freezer burn.

When you’re ready to enjoy it again, simply thaw it in the fridge overnight. Reheat individual slices in the microwave for 15-20 seconds or in a toaster oven until warmed through. Interestingly, many people find that this loaf tastes even better the next day, as the flavors have time to meld!

Frequently Asked Questions

Can I make Lemon Poppy Seed Loaf With Citrus Icing ahead of time?

Yes — in fact, it tastes even better the next day! You can make the loaf a day in advance, allowing the flavors to develop. Just be sure to store it in an airtight container to maintain its moisture.

Can I substitute the poppy seeds?

Absolutely! If you don’t have poppy seeds on hand or prefer an alternative, you can use sesame seeds for a similar crunch or omit them entirely for a smooth loaf.

What can I use instead of buttermilk?

If you don’t have buttermilk, you can easily create a substitute by mixing ½ cup of milk (dairy or plant-based) with 1 tablespoon of vinegar or lemon juice. Let it sit for 5 minutes before using in the recipe.

How can I make this recipe gluten-free?

To make a gluten-free version of this Lemon Poppy Seed Loaf, substitute the all-purpose flour with a gluten-free all-purpose flour blend. Just ensure that the blend contains a binding agent like xanthan gum for the best results.

What is the best way to store leftover loaf?

Leftover Lemon Poppy Seed Loaf should be stored in an airtight container at room temperature for up to 3 days. For longer storage, wrap it tightly and freeze for up to 3 months. Thaw it before serving for the best texture.

Zesty Lemon Poppy Seed Delight

Final Thoughts

The Lemon Poppy Seed Loaf with Citrus Icing is truly a delightful treat that brings a burst of brightness to any occasion. The zesty lemon flavor combined with the subtle crunch of poppy seeds creates a satisfying balance, while the citrus icing adds a touch of sweetness that perfectly complements the loaf’s tanginess.

This is the kind of recipe I come back to again and again, especially when I want to brighten up a gloomy day or celebrate a small victory. The aroma that fills the kitchen as it bakes is absolutely heavenly! I encourage you to give this recipe a try; you might just find it becoming a beloved staple in your home. Don’t forget to share your results or even add your own unique twist—I can’t wait to see what you create!

Print
clock clock iconcutlery cutlery iconflag flag iconfolder folder iconinstagram instagram iconpinterest pinterest iconfacebook facebook iconprint print iconsquares squares iconheart heart iconheart solid heart solid icon

Lemon Poppy Seed Loaf


  • Author: Lily author
  • Total Time: 25 minute
  • Yield: 1 loaf 1x
Pin Recipe
Print Recipe

Description

This Lemon Poppy Seed Loaf is a delightful treat that combines zesty lemon flavor with crunchy poppy seeds. Topped with a citrus icing, it’s perfect for any occasion.


Ingredients

Scale
  • 1 ½ cups (190g) all-purpose flour
  • 1 teaspoon baking powder
  • ½ teaspoon baking soda
  • ½ teaspoon salt
  • 3 tablespoons poppy seeds
  • ½ cup (115g) unsalted butter, softened to room temperature
  • 1 cup (200g) granulated sugar
  • 2 large eggs
  • 1 teaspoon vanilla extract
  • 1 teaspoon lemon zest (from about 1 medium lemon)
  • ½ cup (120ml) buttermilk
  • 2 tablespoons fresh lemon juice
  • 1 cup (120g) powdered sugar
  • 2 tablespoons fresh lemon juice
  • 1 tablespoon orange juice
  • 1 teaspoon lemon zest (for garnish, optional)

Instructions

  1. Preheat your oven to 350°F (175°C). Grease a 9×5-inch loaf pan or line it with parchment paper for easy removal later.
  2. In a medium mixing bowl, whisk together 1 ½ cups of all-purpose flour, 1 teaspoon of baking powder, ½ teaspoon of baking soda, ½ teaspoon of salt, and 3 tablespoons of poppy seeds. This helps to evenly distribute the baking agents and ensures a uniform rise.
  3. In a large mixing bowl, cream together ½ cup of softened unsalted butter and 1 cup of granulated sugar using an electric mixer on medium speed for about 3-4 minutes, until the mixture is light and fluffy. Make sure to scrape down the sides of the bowl occasionally.
  4. Add 2 large eggs, 1 teaspoon of vanilla extract, and 1 teaspoon of lemon zest to the creamed butter and sugar, mixing until fully combined. You want a smooth consistency, so ensure there are no lumps of butter.
  5. In a small bowl, combine ½ cup of buttermilk and 2 tablespoons of fresh lemon juice. Alternately add the dry ingredients and buttermilk mixture to the butter mixture, starting and ending with the dry ingredients. Mix just until combined; do not overmix, as this can lead to a dense loaf.
  6. Pour the batter into the prepared loaf pan. Smooth the top with a spatula, ensuring it’s even. Bake in the preheated oven for 50-60 minutes, or until a toothpick inserted in the center comes out clean. The edges should be lightly golden brown, and the center should feel just set.
  7. Once baked, remove the loaf from the oven and allow it to cool in the pan for about 10 minutes. Then, transfer it to a wire rack to cool completely. Resist the urge to slice too soon, as it will be crumbly if it’s still warm.
  8. While the loaf is cooling, prepare the citrus icing. In a medium bowl, whisk together 1 cup of powdered sugar, 2 tablespoons of fresh lemon juice, and 1 tablespoon of orange juice until smooth. If the icing is too thick, you can add a little more juice to reach your desired consistency.
  9. Once the loaf is completely cool, drizzle the citrus icing over the top. If you like, sprinkle with an additional teaspoon of lemon zest for an extra pop of flavor and color.
  • Prep Time: 15 mins
  • Cook Time: 50-60 mins
  • Category: Dessert
  • Method: Baking
  • Cuisine: American

Nutrition

  • Serving Size: 1 slice
  • Calories: 200
  • Sugar: 15 g
  • Sodium: 150 mg
  • Fat: 8 g
  • Saturated Fat: 5 g
  • Unsaturated Fat: 3 g
  • Trans Fat: 0 g
  • Carbohydrates: 30 g
  • Fiber: 1 g
  • Protein: 3 g
  • Cholesterol: 40 mg

Keywords: Be careful not to overmix your batter; this is a common mistake that can lead to a dense loaf. Use room temperature ingredients for a smoother batter and even baking.

Did you make this recipe?

Share a photo and tag us — we can't wait to see what you've made!

  • Privacy Policy
  • Terms Of Service
  • Contact
  • About
  • GDPR

Copyright © 2025 Homesmad