• Skip to primary navigation
  • Skip to main content
  • Skip to primary sidebar
Homesmad

Homesmad

  • Home
  • Breakfast & Brunch
  • Appetizers & Snacks
  • Dinner
  • Dessert
  • About
  • Privacy Policy
  • Contact
Homesmad
  • Home
  • Breakfast & Brunch
  • Appetizers & Snacks
  • Dinner
  • Dessert
  • About
  • Privacy Policy
  • Contact

Air Fryer Apple Fritters: Sweet, Crispy, & Effortless!

October 26, 2025 by Lily author

Air Fryer Apple Fritters offer a truly irresistible experience, transforming a classic indulgence into an accessible delight for any home cook. Imagine biting into a warm, spiced, apple-studded treat – crispy on the outside, wonderfully tender within, and bursting with the sweet, comforting flavors of autumn. Traditionally, fritters often require a deep fryer, but what if I told you there’s a way to achieve that coveted golden-brown crispiness and perfectly cooked interior with significantly less oil and fuss?

Indeed, that’s precisely the magic we’re harnessing today. Apple fritters themselves boast a delightful lineage, enjoyed across various cultures as a comforting dessert or a special breakfast item, particularly popular during autumn harvest seasons when apples are at their peak. They evoke a sense of nostalgic charm and homespun goodness, often passed down through generations.

People absolutely adore apple fritters for their perfect blend of sweet, tangy apples enveloped in a light, subtly spiced batter. The contrast of the golden-brown, crispy exterior yielding to a soft, fluffy center studded with tender apple pieces is simply divine. Now, thanks to the revolutionary air fryer, preparing these beloved treats is more accessible and healthier than ever, offering a guilt-free indulgence without compromising on that cherished taste and texture. I am incredibly excited to share my go-to method for these delightful Air Fryer Apple Fritters, promising all the flavor with a fraction of the usual effort and cleanup.

Air Fryer Apple Fritters: Sweet, Crispy, & Effortless! this RECIPE

Ingredients:

  • For the Apple Fritters:
    • 1 ½ cups (180g) all-purpose flour
    • ½ cup (100g) granulated sugar
    • 2 teaspoons baking powder
    • 1 teaspoon ground cinnamon
    • ¼ teaspoon ground nutmeg
    • ½ teaspoon salt
    • 1 large egg, lightly beaten
    • ½ cup (120ml) milk (any kind works, whole milk gives a richer flavor)
    • 2 tablespoons (30g) unsalted butter, melted and slightly cooled
    • 1 teaspoon pure vanilla extract
    • 2 medium apples (about 1 ½ cups diced), firm varieties like Granny Smith, Honeycrisp, or Fuji are best
    • Cooking spray, for the air fryer basket
  • For the Vanilla Glaze:
    • 1 ½ cups (180g) powdered sugar, sifted
    • 3-4 tablespoons milk or half-and-half
    • ½ teaspoon pure vanilla extract

Preparing the Apples:

First things first, let’s get our stars of the show ready: the apples! I find that choosing a firm, slightly tart apple like a Granny Smith or a Honeycrisp really balances the sweetness of the fritter batter and glaze. You’ll want about two medium apples for this recipe, which typically yields around 1 ½ cups once diced. Begin by washing your apples thoroughly. Then, peel them using a vegetable peeler. While some recipes might suggest leaving the peel on, I personally prefer to peel them for a smoother texture in the finished Air Fryer Apple Fritters. After peeling, carefully core the apples. The easiest way to do this is often to cut the apple into quarters and then slice out the core from each piece.

Once your apples are peeled and cored, it’s time to dice them. For the best fritter experience, I recommend dicing them into small, approximately ¼-inch pieces. This size ensures that the apple pieces cook through nicely in the air fryer without making the fritters soggy or unevenly cooked. Plus, smaller pieces integrate beautifully into the batter, giving you a burst of apple flavor in every bite of your Air Fryer Apple Fritters. As you dice them, you might notice them starting to brown if you’re taking a little extra time. If you’re concerned about browning, you can toss the diced apples with a very light squeeze of lemon juice, but for this recipe, since they’ll be mixed into the batter fairly quickly, it’s usually not a major issue. Set your perfectly diced apples aside, and let’s move on to the next exciting step!

Remember: The uniform size of your apple pieces is crucial for even cooking within the fritter. Don’t rush this step; good things come to those who dice carefully!

Making the Fritter Batter:

Now for the heart of our Air Fryer Apple Fritters – the batter! This is where all the wonderful flavors come together. You’ll need two separate bowls to start. In your first, larger mixing bowl, we’ll combine all the dry ingredients. Measure out your 1 ½ cups of all-purpose flour, ½ cup of granulated sugar, 2 teaspoons of baking powder (this is key for that lovely lift!), 1 teaspoon of ground cinnamon, ¼ teaspoon of ground nutmeg (for a touch of warmth), and ½ teaspoon of salt. I always recommend whisking these dry ingredients together very thoroughly. This isn’t just about mixing; it’s about aerating the flour and ensuring that the baking powder, cinnamon, nutmeg, and salt are evenly distributed throughout. A well-whisked dry mix prevents pockets of unmixed baking powder or salt, which can lead to an unevenly flavored fritter. You want a consistent, pale, aromatic mixture.

In your second, smaller bowl, we’ll prepare the wet ingredients. Crack your large egg and lightly beat it. Then, add ½ cup of milk, 2 tablespoons of melted and slightly cooled unsalted butter, and 1 teaspoon of pure vanilla extract. Give these a good whisk until everything is well combined and uniform in color and texture. It’s important that your melted butter isn’t too hot when you add it, as hot butter can “cook” the egg prematurely. Room temperature or slightly warm is perfect.

The next step is to combine the wet and dry ingredients. Create a well in the center of your dry ingredient mixture and pour in the wet ingredients. Now, here’s a crucial tip for tender Air Fryer Apple Fritters: mix just until combined. Use a spatula or a wooden spoon and stir gently. Lumps are absolutely okay, even desirable! Overmixing the batter develops the gluten in the flour too much, leading to tough, chewy fritters instead of light, fluffy ones. We’re aiming for a shaggy, slightly lumpy batter, where no dry streaks of flour remain, but it’s far from smooth. This typically takes only about 15-20 gentle stirs. Seriously, resist the urge to keep mixing!

Finally, it’s time to gently fold in your diced apples. Add all the prepared apple pieces to the batter and, with a few more gentle turns of your spatula, incorporate them evenly. Make sure the apples are well distributed throughout the batter. At this stage, your batter for these incredible Air Fryer Apple Fritters will look thick and studded generously with those lovely apple bits. It should be quite a thick batter, not a pourable liquid. This thickness is what helps the fritters hold their shape in the air fryer. Now, the batter is ready, and we’re just moments away from air frying!

A quick reminder on mixing: Gentle is the key! Less mixing equals more tender fritters.

Air Frying the Apple Fritters:

This is where the magic happens for our “Air Fryer Apple Fritters”! First, you’ll want to preheat your air fryer to 350°F (175°C). Preheating is an important step often overlooked, but it ensures that your fritters start cooking immediately when they hit the hot basket, leading to a more even cook and that desired crispy exterior. While it’s preheating, lightly spray your air fryer basket with cooking spray. This prevents sticking and helps achieve that lovely golden-brown crust. Even if your basket is non-stick, a little spray is a good insurance policy.

Now, let’s shape our fritters. Since the batter is quite thick, you can’t just pour it. I find that using two spoons works best: one spoon to scoop a generous portion of batter (about 2 tablespoons per fritter, or a small ice cream scoop), and the other spoon to gently push it off into the air fryer basket. Don’t worry too much about perfect shapes; fritters are meant to be rustic and charmingly irregular. The key is to aim for roughly similar sizes so they cook at the same rate. Place the dollops of batter into the preheated and sprayed air fryer basket, making sure to leave ample space between each fritter. Do not overcrowd the basket! Air fryers work by circulating hot air, and if the basket is too full, the air can’t circulate effectively, which means you’ll end up with steamed, rather than crispy, fritters. I usually cook 3-4 fritters at a time, depending on the size of my air fryer basket.

Cook the fritters for 6-8 minutes on one side. After this initial cooking time, carefully open the air fryer basket and, using tongs or a spatula, gently flip each fritter. You should see a lovely golden-brown crust forming. Once flipped, continue to cook for another 5-7 minutes, or until the fritters are deeply golden brown on both sides and cooked through in the center. The total cooking time can vary based on your specific air fryer model and the size of your fritters, so keep an eye on them. If you’re unsure if they’re cooked through, you can gently press one in the middle; it should feel firm but springy. Some people even use a toothpick test – if it comes out clean, they’re done. The internal temperature, if you were to check with an instant-read thermometer, should reach around 200-205°F (93-96°C). As each batch of Air Fryer Apple Fritters finishes cooking, immediately transfer them to a wire rack set over a baking sheet. This allows air to circulate around them, preventing them from getting soggy on the bottom while they cool slightly before glazing. Continue this process until all your delicious batter has been transformed into golden, fragrant apple fritters.

Pro Tip: If you’re making multiple batches, lightly spray the basket again between batches, especially if you notice any residue.

Preparing the Glaze:

While your Air Fryer Apple Fritters are cooling slightly on the wire rack – they should still be warm for optimal glazing – it’s time to whip up the simple yet essential vanilla glaze. This glaze adds that final touch of sweetness and a beautiful sheen that makes these fritters truly irresistible. In a medium bowl, measure out 1 ½ cups of powdered sugar. For the smoothest, lump-free glaze, I highly recommend sifting your powdered sugar first. This step takes just a moment but makes a significant difference in the final texture of your glaze, ensuring it’s silky and easy to apply.

Once your powdered sugar is sifted into the bowl, add ½ teaspoon of pure vanilla extract. Now, slowly start adding your milk or half-and-half, one tablespoon at a time. I usually start with 3 tablespoons and then assess the consistency. Whisk everything together thoroughly with a spoon or a small whisk. You’re aiming for a glaze that is thick enough to coat the back of a spoon but still pourable. It should drizzle off the spoon rather than just fall in a lump. If the glaze is too thick, add a tiny bit more milk (half a teaspoon at a time) until you reach the desired consistency. If, by chance, you add too much liquid and it becomes too thin, simply whisk in another tablespoon or two of sifted powdered sugar until it thickens up again. The perfect glaze consistency is key for evenly coating your Air Fryer Apple Fritters.

A note on consistency: You want a glaze that will cling to the fritters and dry to a slightly firm, shiny coating, not one that just runs right off. This balance is crucial for the perfect bite of your Air Fryer Apple Fritters.

Finishing and Serving:

With your glorious Air Fryer Apple Fritters slightly cooled and your vanilla glaze perfectly mixed, it’s time for the grand finale! The fritters should still be warm, as this allows them to absorb a little bit of that sweet glaze, enhancing their flavor and ensuring a lovely, even coating that sets beautifully. If they’ve cooled down too much, you can pop them back into the air fryer for about a minute at 300°F (150°C) to gently warm them up, but be careful not to overcook them.

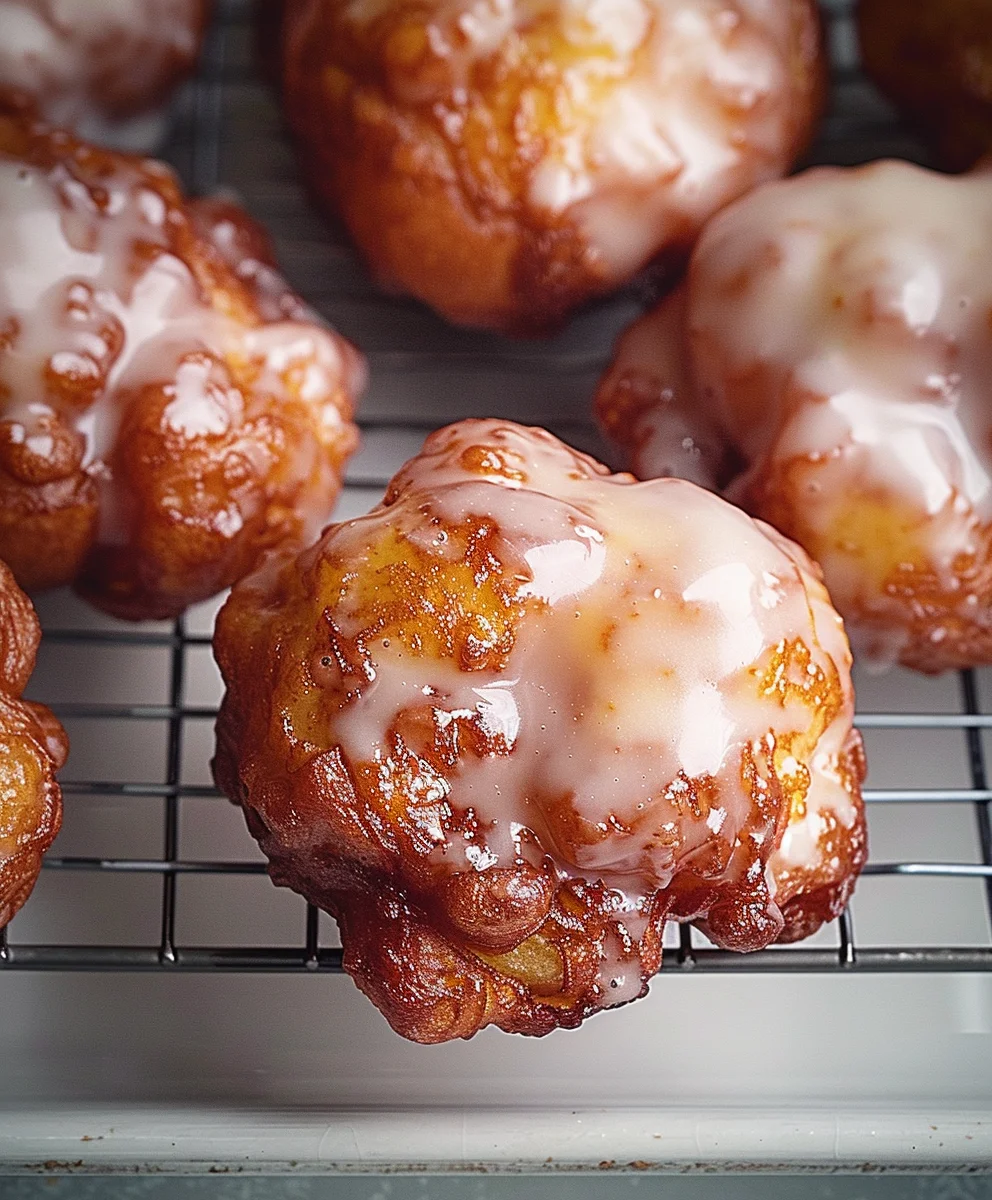
There are a couple of ways to glaze your Air Fryer Apple Fritters. My favorite method for a good, even coating is to gently dip each warm fritter into the bowl of glaze, turning it once or twice to ensure both sides are coated. Lift the fritter out, allowing any excess glaze to drip back into the bowl for a few seconds. Then, place the glazed fritter back onto your wire rack. Alternatively, you can place the fritters on the wire rack and generously spoon or drizzle the glaze over them. This method works well too, especially if you prefer a less heavily coated fritter, but dipping often yields a more complete and uniform layer of glaze, making each of your Air Fryer Apple Fritters an absolute masterpiece.

As you glaze each fritter and place it back on the wire rack, allow the glaze to set for about 10-15 minutes. During this time, the glaze will firm up slightly, creating that classic, slightly crisp sugar shell that we all love on a good fritter. The aroma filling your kitchen right now should be absolutely divine – a testament to your excellent work in crafting these homemade Air Fryer Apple Fritters.

Once the glaze has set, your Air Fryer Apple Fritters are ready to be devoured! They are absolutely best served warm, shortly after they’ve been glazed. I love enjoying them with a freshly brewed cup of coffee or a tall glass of cold milk. They make an incredible breakfast, a delightful brunch item, or a perfect afternoon treat. The combination of the crispy, sweet exterior, the tender, apple-filled interior, and that hint of cinnamon and nutmeg is truly something special. If by some miracle you have any leftovers (which is a rare occurrence in my house!), you can store them in an airtight container at room temperature for up to 2 days. For best results, you can gently reheat them in the air fryer for a minute or two at a low temperature (around 250°F/120°C) to revive their warmth and a bit of their crispness before serving again. Enjoy every single bite of your freshly made, incredibly delicious Air Fryer Apple Fritters!

Final thought: Don’t hesitate to make a double batch of these Air Fryer Apple Fritters, as they disappear quickly!

Air Fryer Apple Fritters: Sweet, Crispy, & Effortless!

Conclusion:

So, there you have it! We’ve journeyed through the simple, yet incredibly rewarding, process of creating a classic treat with a modern twist. If you’ve been searching for that perfect balance of crispy exterior, tender, spiced apple interior, and a sweet, melt-in-your-mouth glaze, then look no further. This recipe for Air Fryer Apple Fritters is truly a game-changer, offering all the delightful decadence of a deep-fried version without the excess oil or the messy cleanup. I genuinely believe that once you try these, you’ll wonder how you ever managed without them.

What makes these fritters an absolute must-try? It’s the sheer genius of the air fryer, transforming simple ingredients into something extraordinary. We’re talking about a golden-brown perfection that crackles ever so slightly when you bite into it, giving way to soft, warm chunks of apple infused with fragrant cinnamon. The aroma alone, as these little beauties cook in your air fryer, is enough to pull anyone into the kitchen. It’s a sensory experience that promises comfort and joy with every single bite. And let’s be honest, the idea of having homemade fritters ready in a fraction of the time, and with significantly less guilt, is incredibly appealing.

This isn’t just a recipe; it’s an invitation to elevate your breakfast, brunch, or dessert game with minimal effort and maximum flavor payoff.

I’ve found that these Air Fryer Apple Fritters quickly become a family favorite, a go-to treat for weekend mornings or a delightful surprise after dinner.

Now that you’re armed with the knowledge to create these irresistible treats, let’s talk about how to make them even more special. While the classic powdered sugar glaze is undeniably perfect, don’t hesitate to get creative with your serving suggestions and variations. For an extra touch of indulgence, I sometimes like to drizzle a little warm caramel sauce over my freshly glazed fritters, perhaps with a sprinkle of toasted pecans. Or, if you’re a chocolate lover, a delicate zig-zag of melted dark chocolate can be a sophisticated addition. Imagine serving these warm fritters alongside a scoop of vanilla bean ice cream; the contrast of warm, crisp fritter and cold, creamy ice cream is simply divine. A dollop of freshly whipped cream or even a spoonful of Greek yogurt for a lighter touch also works wonderfully.

These aren’t just for breakfast; they make a fantastic dessert that will impress any guest!

Thinking about variations for the fritters themselves? The possibilities are surprisingly vast! While apples are the star, consider experimenting with other fruits. During peach season, for instance, a batch of air fryer peach fritters, using the same batter base, would be absolutely glorious. Pears work beautifully too, offering a slightly different texture and sweetness. You could also introduce different spices – a pinch of nutmeg or cardamom alongside the cinnamon can add a lovely depth of flavor. For a textural contrast, try folding in a handful of finely chopped walnuts or pecans into the batter. If you’re feeling particularly adventurous, mini chocolate chips or even a sprinkle of shredded coconut could be interesting additions. The beauty of this recipe is its adaptability. It serves as a fantastic foundation for your own culinary explorations. Just remember to adjust cooking times slightly if you add extra moisture or bulk with different ingredients.

So, what are you waiting for? I wholeheartedly encourage you to roll up your sleeves, gather your ingredients, and give these incredible Air Fryer Apple Fritters a try this week. I promise you, the aroma filling your kitchen and the pure joy of biting into a homemade fritter that’s perfectly crispy on the outside and wonderfully soft on the inside is an experience you won’t soon forget. It’s a simple pleasure that delivers big on flavor and satisfaction, proving that delicious treats don’t have to be complicated or overly indulgent. This recipe is designed to be accessible and enjoyable for everyone, whether you’re a seasoned baker or just starting out with your air fryer.

Once you’ve experienced the magic of these fritters, I would absolutely love to hear about it! Please don’t hesitate to share your experiences, your favorite serving suggestions, or any creative variations you came up with. Did you use a different type of apple? Did you experiment with an alternative glaze?

Your insights and culinary adventures inspire me and countless other home cooks who are always looking for new ways to enjoy their favorite foods.

Sharing your success stories and tips makes our cooking community richer and more vibrant. So, go forth, bake some happiness, and let’s spread the joy of these amazing, healthier apple fritters together! I can’t wait to hear what you think.


Air Fryer Apple Fritters

Air Fryer Apple Fritters

Indulge in these irresistible Air Fryer Apple Fritters, a healthier take on a classic dessert. Crispy on the outside, tender and apple-studded within, these sweet, spiced treats offer all the comforting flavors of autumn with significantly less oil and effort.

Prep Time
25 Minutes

Cook Time
50 Minutes

Total Time
15 Minutes

Servings
12 servings

Ingredients

  • 1½ cups all-purpose flour
  • ¼ cup granulated sugar
  • 2 teaspoons baking powder
  • ¼ teaspoon salt
  • 1½ teaspoons ground cinnamon
  • ⅓ cup milk
  • 2 large eggs
  • 2 teaspoons vanilla extract
  • 2 teaspoons lemon juice
  • 2 tablespoons unsalted butter, melted
  • 2 medium apples, peeled and diced (about 2¾ cups)
  • — For the Vanilla Glaze —
  • 1 cup powdered sugar, sifted
  • 3 tablespoons milk
  • ½ teaspoon vanilla extract

Instructions

  1. Step 1
    Peel, core, and dice 2 medium apples into ¼-inch pieces. Set aside.
  2. Step 2
    In a large bowl, whisk together 1½ cups all-purpose flour, ¼ cup granulated sugar, 2 teaspoons baking powder, ¼ teaspoon salt, and 1½ teaspoons ground cinnamon until well combined.
  3. Step 3
    In a separate bowl, whisk 2 large eggs, ⅓ cup milk, 2 tablespoons melted unsalted butter, 2 teaspoons vanilla extract, and 2 teaspoons lemon juice until uniform.
  4. Step 4
    Pour the wet ingredients into the dry ingredients. Mix gently with a spatula until just combined. Lumps are okay; avoid overmixing. Fold in the diced apples until evenly distributed. The batter will be thick.
  5. Step 5
    Preheat your air fryer to 350°F (175°C). Lightly spray the air fryer basket with cooking spray.
  6. Step 6
    Scoop about 2 tablespoons of batter per fritter and place into the preheated and sprayed air fryer basket. Leave ample space between each fritter to prevent overcrowding.
  7. Step 7
    Air fry for 6-8 minutes, then carefully flip each fritter. Continue to cook for another 5-7 minutes, or until deeply golden brown on both sides and cooked through in the center (total 11-15 minutes per batch).
  8. Step 8
    Transfer cooked fritters to a wire rack set over a baking sheet to cool slightly. Repeat the air frying process with the remaining batter, lightly spraying the basket again between batches as needed.
  9. Step 9
    While the fritters are cooling, prepare the glaze. In a medium bowl, whisk together 1 cup sifted powdered sugar, 3 tablespoons milk, and ½ teaspoon vanilla extract. Adjust milk quantity slightly to achieve a pourable but thick consistency.
  10. Step 10
    Once fritters are slightly warm, gently dip each fritter into the glaze, turning to coat. Allow excess glaze to drip off, then return them to the wire rack to set for 10-15 minutes.
  11. Step 11
    Serve the Air Fryer Apple Fritters warm. Store any leftovers in an airtight container at room temperature for up to 2 days; reheat gently in the air fryer for best results.

Important Information

Nutrition Facts (Per Serving)

It is important to consider this information as approximate and not to use it as definitive health advice.

Allergy Information

Please check ingredients for potential allergens and consult a health professional if in doubt.

« Previous Post
Chicken Enchiladas with Creamy Sour Cream White Sauce
Next Post »
Refreshing Apple Arugula Salad: Quick, Healthy Lunch Idea

If you enjoyed this…

Easy Creme Brulee French Toast Recipe for a Brunch Delight.

Fluffy Pancakes Brunch: The Ultimate Guide to Light and Delicious Pancakes

Cinnamon Roll French Toast Bites: Easy & Delicious Recipe!

Primary Sidebar

Browse by Diet

BreakfastDinnerLunchDessertAppetizer

Sweet Peach Yogurt Parfait Delight

One of my fondest memories is from a lazy summer afternoon spent at my grandmother’s house. The sun filtered through the kitchen window, casting a warm glow over the table where she would create her culinary magic. It was during one of those blissful moments that I first tasted her Peach Yogurt Parfait with Honey and Granola. The sweet aroma of ripe peaches mingling with creamy yogurt and the crunch of granola was nothing short of heavenly. It felt like summer captured in a bowl, and I still remember the joy of diving in with a spoon, each layer revealing a new burst of flavor.

When I think about that parfait, I can almost hear the gentle hum of the bees outside, reminding me of the floral notes that honey brings to every bite. The vibrant yellows and soft oranges of the peaches contrast beautifully with the creamy white yogurt and the golden crunch of granola. It’s a dish that not only looks delightful but also tastes like a celebration of fresh, wholesome ingredients.

What makes my version of this Peach Yogurt Parfait special is the careful balance of flavors and textures. I use ripe, juicy peaches, drizzled with locally sourced honey, and a homemade granola that’s bursting with nuts and seeds for an extra crunch. It’s a simple dish, but every layer is crafted with love and attention.

Let me show you exactly how to make this delightful parfait, so you can bring a bit of that summer magic into your kitchen!

Sweet Peach Yogurt Parfait Delight

Why You’ll Love This Recipe

  • Delightfully creamy texture from the Greek yogurt, paired with the juicy sweetness of fresh peaches.
  • Ready in under 20 minutes, making it a quick and satisfying breakfast or snack option.
  • Budget-friendly, using common ingredients that you may already have in your pantry.
  • Customizable with your favorite granola and nuts, allowing you to tailor each parfait to your taste.
  • Perfectly balanced flavors with the bright acidity of lemon juice and the sweetness of honey enhancing the peaches.

Ingredients

  • For the Parfait:
  • 2 cups plain Greek yogurt (or vanilla yogurt for a sweeter option)
  • 2 large ripe peaches, diced (about 2 cups)
  • 1 tablespoon fresh lemon juice (to prevent browning of peaches)
  • 2 tablespoons honey (plus more for drizzling)
  • 1 teaspoon vanilla extract (optional for extra flavor)
  • For the Granola:
  • 1 cup granola (store-bought or homemade; see notes for a simple granola recipe)
  • 1/4 cup sliced almonds (optional for added crunch)
  • 1/4 cup shredded coconut (optional for added flavor)

Let’s dive into some key ingredients that make this Peach Yogurt Parfait so delightful! First, the Greek yogurt is not only creamy but also packed with protein, making it a satisfying option for breakfast or a snack. If you’re looking for a sweeter option, you can easily substitute it with vanilla yogurt, though it may alter the overall flavor balance. Next, the ripe peaches are the star of the show; their natural sweetness shines through, so I recommend choosing peaches that yield slightly to pressure, indicating they’re perfectly ripe. If peaches aren’t in season, feel free to use nectarines or even frozen peaches—just thaw them before use. Finally, honey adds a lovely floral sweetness that ties everything together. If you prefer, maple syrup can serve as a delicious substitute.

Step-by-Step Instructions

  1. Start by preparing the peaches. Wash them thoroughly, then slice and dice them into bite-sized pieces. In a medium bowl, toss the diced peaches with 1 tablespoon of fresh lemon juice to prevent browning. Set aside for about 5 minutes while the lemon juice works its magic.
  2. In a separate bowl, combine the Greek yogurt, 2 tablespoons of honey, and 1 teaspoon of vanilla extract if using. Stir the mixture until smooth and thoroughly blended. This should take about a minute. Avoid overmixing to maintain the creaminess of the yogurt.
  3. Now it’s time to layer your parfait. Grab a clear glass or bowl to showcase your beautiful creation. Start with a generous spoonful of the yogurt mixture at the bottom—about 1/4 cup will do. Use a spoon to spread it evenly.
  4. Add a layer of the diced peaches over the yogurt, ensuring they cover the yogurt completely. You might want to use about half of what you have prepared—roughly 1 cup. This layer should be visually appealing, so arrange the peaches neatly.
  5. Sprinkle 1/4 cup of granola over the peaches. This adds a delightful crunch. Make sure to distribute it evenly to ensure every bite has that satisfying texture. Avoid packing it down too tightly, as you want it to maintain its crunch.
  6. Repeat the layers: spoon in another 1/4 cup of yogurt, followed by another cup of peaches, and another sprinkle of granola. You should have at least two layers, but feel free to add more depending on your glass size.
  7. Finish off your parfait with a drizzle of honey on top for added sweetness and a touch of elegance. If you’re using sliced almonds or shredded coconut, sprinkle them on top now. It adds a lovely visual contrast and extra flavor.
  8. Serve immediately or refrigerate for up to 30 minutes before serving to allow the flavors to meld together. However, I recommend enjoying it fresh to maintain the granola’s crunch.

Pro Tips for the Best Peach Yogurt Parfait With Honey And Granola

  • Make sure to choose ripe peaches for the best flavor and texture. A common mistake is using unripe fruit, which can lead to a less enjoyable parfait. Look for peaches that are fragrant and slightly soft to the touch.
  • Use a clear glass to assemble your parfait; this not only makes for a beautiful presentation but also allows you to see the colorful layers, which adds to the enjoyment of eating it.
  • For an even creamier texture, consider whipping the Greek yogurt with a hand mixer for a couple of minutes before layering. This small adjustment makes a huge difference in mouthfeel.
  • Be mindful of the granola-to-yogurt ratio. Too much granola can overwhelm the parfait, while too little can make it feel too creamy. Aim for about 1/4 cup of granola per layer for the perfect balance.
  • If you’re making this for a gathering, consider preparing the yogurt and peaches ahead of time and layering them just before serving. This ensures the granola stays crunchy!

Variations & Serving Ideas

There are so many ways to get creative with your Peach Yogurt Parfait! For a tropical twist, swap out the peaches for mangoes or pineapples and top with coconut flakes. If you prefer a berry flavor, mix in some blueberries or strawberries with the peaches for added color and taste. For a nutty version, incorporate chopped walnuts or pecans instead of almonds.

As for serving ideas, this parfait pairs beautifully with a side of scrambled eggs for a hearty breakfast or fresh fruit salad for a light lunch. You might also enjoy it alongside whole grain toast with almond butter for an energizing snack. The contrast of flavors and textures will elevate your meal experience!

Storage, Make-Ahead & Reheating

The Peach Yogurt Parfait is best enjoyed fresh, but you can prepare some components ahead of time. Store the layered parfait in an airtight container in the refrigerator for up to 24 hours. However, be cautious; the granola may lose its crunch if stored too long. You can freeze the yogurt and peach mixture for up to 2 months; just remember to thaw it in the refrigerator overnight before serving.

If you plan to enjoy this dish the next day, it can taste even better as the flavors meld together. Just remember to add the granola right before serving to keep its delightful crunch!

Frequently Asked Questions

Can I make Peach Yogurt Parfait With Honey And Granola ahead of time?

Yes — in fact, it tastes even better the next day as the flavors meld. However, I recommend waiting to add the granola until just before serving to maintain its crunch.

What can I substitute for Greek yogurt?

If you prefer a lighter option, you can substitute Greek yogurt with regular yogurt or a dairy-free alternative like coconut yogurt. Just remember that this may alter the creaminess and flavor profile slightly.

Can I use frozen peaches for this parfait?

Absolutely! Just make sure to thaw the frozen peaches before using them. They will still add great flavor, though the texture may be slightly softer than fresh peaches.

How do I make the parfait vegan?

To make a vegan version, substitute the Greek yogurt with a plant-based yogurt alternative, and replace honey with maple syrup or agave nectar. This keeps the parfait sweet while adhering to a vegan diet.

What other fruits can I use in this recipe?

You can mix and match fruits based on your preference. Try using strawberries, blueberries, raspberries, or even bananas. Just make sure to adjust the lemon juice as needed to prevent browning.

Sweet Peach Yogurt Parfait Delight

Final Thoughts

The Peach Yogurt Parfait with Honey and Granola is a delightful blend of creamy yogurt, sweet peaches, and crunchy granola that creates a satisfying and nourishing treat. Each layer bursts with flavor, making it a perfect choice for breakfast or a light dessert.

This is the kind of recipe I come back to again and again, especially when I want something refreshing and wholesome to start my day. The harmony of sweet and tart flavors, combined with the delightful crunch, never fails to lift my spirits!

I encourage you to give this parfait a try and indulge in its comforting goodness. Feel free to share your results or even add your own twist—perhaps a sprinkle of cinnamon or a handful of nuts. Enjoy creating your perfect parfait!

Print
clock clock iconcutlery cutlery iconflag flag iconfolder folder iconinstagram instagram iconpinterest pinterest iconfacebook facebook iconprint print iconsquares squares iconheart heart iconheart solid heart solid icon

Peach Yogurt Parfait


  • Author: Lily author
  • Total Time: 15 minutes
  • Yield: 4 servings 1x
Pin Recipe
Print Recipe

Description

This Peach Yogurt Parfait combines creamy Greek yogurt, juicy peaches, and crunchy granola for a delightful treat. It’s a perfect breakfast or snack that captures the essence of summer in every bite.


Ingredients

Scale
  • For the Parfait:
  • 2 cups plain Greek yogurt (or vanilla yogurt for a sweeter option)
  • 2 large ripe peaches, diced (about 2 cups)
  • 1 tablespoon fresh lemon juice (to prevent browning of peaches)
  • 2 tablespoons honey (plus more for drizzling)
  • 1 teaspoon vanilla extract (optional for extra flavor)
  • For the Granola:
  • 1 cup granola (store-bought or homemade; see notes for a simple granola recipe)
  • 1/4 cup sliced almonds (optional for added crunch)
  • 1/4 cup shredded coconut (optional for added flavor)

Instructions

  1. Start by preparing the peaches. Wash them thoroughly, then slice and dice them into bite-sized pieces. In a medium bowl, toss the diced peaches with 1 tablespoon of fresh lemon juice to prevent browning. Set aside for about 5 minutes while the lemon juice works its magic.
  2. In a separate bowl, combine the Greek yogurt, 2 tablespoons of honey, and 1 teaspoon of vanilla extract if using. Stir the mixture until smooth and thoroughly blended. This should take about a minute. Avoid overmixing to maintain the creaminess of the yogurt.
  3. Now it’s time to layer your parfait. Grab a clear glass or bowl to showcase your beautiful creation. Start with a generous spoonful of the yogurt mixture at the bottom—about 1/4 cup will do. Use a spoon to spread it evenly.
  4. Add a layer of the diced peaches over the yogurt, ensuring they cover the yogurt completely. You might want to use about half of what you have prepared—roughly 1 cup. This layer should be visually appealing, so arrange the peaches neatly.
  5. Sprinkle 1/4 cup of granola over the peaches. This adds a delightful crunch. Make sure to distribute it evenly to ensure every bite has that satisfying texture. Avoid packing it down too tightly, as you want it to maintain its crunch.
  6. Repeat the layers: spoon in another 1/4 cup of yogurt, followed by another cup of peaches, and another sprinkle of granola. You should have at least two layers, but feel free to add more depending on your glass size.
  7. Finish off your parfait with a drizzle of honey on top for added sweetness and a touch of elegance. If you’re using sliced almonds or shredded coconut, sprinkle them on top now. It adds a lovely visual contrast and extra flavor.
  8. Serve immediately or refrigerate for up to 30 minutes before serving to allow the flavors to meld together. However, I recommend enjoying it fresh to maintain the granola’s crunch.
  • Prep Time: 15 mins
  • Cook Time: 0 mins
  • Category: Breakfast
  • Method: No-cook
  • Cuisine: American

Nutrition

  • Serving Size: 1 parfait
  • Calories: 250
  • Sugar: 20 g
  • Sodium: 50 mg
  • Fat: 5 g
  • Saturated Fat: 2 g
  • Unsaturated Fat: 3 g
  • Trans Fat: 0 g
  • Carbohydrates: 40 g
  • Fiber: 3 g
  • Protein: 10 g
  • Cholesterol: 10 mg

Keywords: Choose ripe peaches for the best flavor and texture. Use a clear glass for a beautiful presentation. For creaminess, consider whipping the yogurt before layering. Be mindful of the granola-to-yogurt ratio. Prepare yogurt and peaches ahead of time for gatherings, layering just before serving.

Did you make this recipe?

Share a photo and tag us — we can't wait to see what you've made!

Sun-Kissed Frozen Orange Cream Slush

As a child, summer days felt like they lasted forever. I remember the sticky heat wrapping around me as I played outside, my laughter mingling with the sounds of the neighborhood. But nothing could cool me down quite like the moment I’d spot my grandmother, laboring over her blender, whipping up her famous Frozen Orange Creamsicle Slush. That vibrant orange treat, with its frosty texture and sweet citrus aroma, was like a burst of sunshine in a cup. Just one sip, and I could feel the coolness wash over me, sparking pure joy.

This Frozen Orange Creamsicle Slush has a way of making you feel like a kid again. Its creamy, dreamy consistency is a delightful balance of bright orange and soft vanilla, inviting you to dive right in. The refreshing tang of orange dances on your tongue, while the smooth creaminess envelops you in a comforting embrace. It’s a nostalgic treat that’s perfect for hot summer afternoons or anytime you need a little pick-me-up.

What makes my version of this slush stand out is the addition of a hint of vanilla bean, which elevates the flavor and adds an extra layer of richness. Plus, it’s super easy to whip up with just a few simple ingredients that you probably already have on hand! So, if you’re ready to relive those sun-soaked memories, let me show you exactly how to make it.

Sun-Kissed Frozen Orange Cream Slush

Why You’ll Love This Recipe

  • Each slush is a perfect blend of creamy vanilla and zesty orange, creating a nostalgic flavor reminiscent of summer days.
  • This refreshing treat is ready in under 15 minutes, making it an ideal quick dessert for unexpected guests or hot afternoons.
  • With just 8 simple ingredients, it’s budget-friendly, ensuring you don’t have to break the bank to enjoy a delicious slush.
  • The slush has a perfectly smooth texture, thanks to the combination of ice and ice cream, providing a delightful contrast to the bright citrus flavors.
  • It’s highly customizable; you can easily adjust the sweetness and add fresh herbs for a unique twist that suits your taste.

Ingredients

  • 2 cups orange juice (freshly squeezed or store-bought)
  • 1 cup vanilla ice cream
  • 1 cup crushed ice
  • 1/2 cup milk (whole or 2%)
  • 1/4 cup granulated sugar (adjust based on sweetness preference)
  • 1 teaspoon vanilla extract
  • Zest of 1 orange (for added flavor)
  • Fresh orange slices and mint leaves (for garnish)

The star of this Frozen Orange Creamsicle Slush is the orange juice, which provides the vibrant, citrusy base. Freshly squeezed juice will yield the brightest flavor, but store-bought options can be just as convenient. If you’re opting for store-bought, choose 100% pure juice with no added sugars for the best results. Another essential ingredient is the vanilla ice cream; it adds creaminess and sweetness. You can substitute it with dairy-free ice cream if you’re looking for a vegan option. Whole or 2% milk complements the ice cream, creating a smooth blend. If you want a lower-calorie version, almond or oat milk can be good alternatives.

Lastly, the granulated sugar can be adjusted based on your sweetness preference. If you prefer a more natural sweetener, consider using honey or agave syrup. The orange zest enhances the flavor profile, providing an aromatic pop that brings the whole slush together. Don’t skip it! It adds an extra layer of brightness that makes this slush truly special.

Step-by-Step Instructions

  1. Start by preparing your ingredients. Gather 2 cups of orange juice, 1 cup of vanilla ice cream, and 1 cup of crushed ice. Make sure the ice is finely crushed, as larger chunks can make blending difficult.
  2. In a blender, combine the orange juice, vanilla ice cream, crushed ice, and 1/2 cup of milk. Add 1/4 cup of granulated sugar and 1 teaspoon of vanilla extract. If you like a sweeter slush, consider adding a bit more sugar at this stage.
  3. Add the zest of 1 orange to the blender. This step is crucial for enhancing the citrus flavor of your slush. Make sure not to include the bitter white pith—only the flavorful zest.
  4. Blend the mixture on medium-high speed for about 30-45 seconds. Stop once the ingredients are fully combined and the slush has a smooth, even consistency. If you notice large chunks of ice, blend for an additional 10-15 seconds. Avoid over-blending, as this can make the slush too liquidy.
  5. Once blended, taste the slush. If it needs more sweetness, add a little more sugar and blend for a few more seconds. If it’s too thick, you can add a splash of milk to reach your desired consistency.
  6. Pour the slush into glasses. This recipe typically serves 4, but you can easily double it for larger gatherings. Use a spoon to help guide the slush into the glasses if needed.
  7. Garnish each serving with fresh orange slices and mint leaves. The mint not only adds a pop of color but also a refreshing aroma that complements the citrus flavors beautifully.
  8. Serve immediately and enjoy! If you’ve made extra, you can refrigerate it for a short time, but it’s best enjoyed fresh.

Pro Tips for the Best Frozen Orange Creamsicle Slush

  • Don’t skip the orange zest! It’s a game-changer for flavor. Always zest before juicing to make it easier.
  • Use a high-powered blender for the best texture. A standard blender may struggle with ice, leading to uneven consistency. If you have a food processor, that can work too, but ensure the ice is finely crushed.
  • Adjust the ice-to-liquid ratio carefully. If your slush is too thick, it won’t blend well. Start with less ice and add more until you reach your preferred texture.
  • Be cautious with the sugar! Always start with the lower amount, as you can easily add more, but it’s hard to fix an overly sweet slush.
  • For a fun twist, consider adding a splash of coconut milk or a handful of fresh fruit like strawberries or pineapple. This not only enhances the flavor but also adds a beautiful color contrast.

Variations & Serving Ideas

There are countless ways to put a spin on your Frozen Orange Creamsicle Slush. Consider making a tropical version by adding in some pineapple juice or coconut milk for a delightful tropical twist. If you’re feeling adventurous, try incorporating a handful of frozen mango or peach slices for added sweetness. For a lighter version, swap out the vanilla ice cream for Greek yogurt for a creamy yet tangy alternative.

As for serving ideas, this refreshing slush pairs wonderfully with light summer dishes like grilled chicken skewers, fish tacos, or a simple salad topped with citrus vinaigrette. The bright, zesty flavors of the slush complement these dishes perfectly, making them an ideal pairing for a sunny day.

Storage, Make-Ahead & Reheating

This Frozen Orange Creamsicle Slush is best enjoyed fresh, but if you have leftovers, you can store them in an airtight container in the fridge for up to 2 days. Just keep in mind that the slush may lose some of its texture over time as the ice melts. It doesn’t freeze well, as the ice will turn into a solid block. If you must freeze it, blend again after thawing to restore the slushy consistency. This treat is best the day you make it, as the flavors meld together beautifully overnight, enhancing its deliciousness.

Frequently Asked Questions

Can I make Frozen Orange Creamsicle Slush ahead of time?

Yes — in fact, it tastes even better the next day as the flavors meld. However, it’s best to enjoy it fresh, as the texture can change if stored for too long. If you need to prepare it ahead, keep it in the fridge and re-blend before serving.

What kind of orange juice should I use?

For the best flavor, use freshly squeezed orange juice. However, if you’re short on time, opt for 100% pure store-bought juice without added sugars. This will ensure that your slush remains flavorful and refreshing.

Can I substitute the vanilla ice cream?

Absolutely! If you’re looking for a dairy-free option, coconut milk ice cream or a non-dairy vanilla ice cream can work wonderfully. They will still provide the creamy texture and sweetness you desire.

How can I adjust the sweetness of my slush?

You can easily adjust the sweetness by modifying the amount of sugar added. Start with 1/4 cup and taste the mixture before blending. If you prefer it sweeter, add more sugar gradually until it reaches your desired level.

What should I do if my slush is too thick?

If your slush is too thick, simply add a splash of milk or orange juice and blend again. This will help achieve a more drinkable consistency while maintaining the slushy texture. Adjust gradually to reach your preferred thickness.

Sun-Kissed Frozen Orange Cream Slush

Final Thoughts

The Frozen Orange Creamsicle Slush is a delightful blend of refreshing citrus and creamy goodness, making it a perfect treat for warm days or any time you crave a taste of nostalgia. The way the bright orange flavor dances with the creamy texture truly elevates this slush, transforming it into a satisfying escape from the everyday.

This is the kind of recipe I come back to again and again, especially when I’m looking to cool down or impress guests at a summer gathering. It’s simple to make and always brings smiles all around! I encourage you to try this recipe for yourself—don’t hesitate to share your results or even put your own spin on it. Happy slushing!

Print
clock clock iconcutlery cutlery iconflag flag iconfolder folder iconinstagram instagram iconpinterest pinterest iconfacebook facebook iconprint print iconsquares squares iconheart heart iconheart solid heart solid icon

Frozen Orange Creamsicle Slush


  • Author: Lily author
  • Total Time: 15 minutes
  • Yield: 4 servings 1x
Pin Recipe
Print Recipe

Description

This Frozen Orange Creamsicle Slush is a refreshing treat that combines creamy vanilla and zesty orange flavors. Perfect for hot summer days, it brings back nostalgic memories with every sip.


Ingredients

Scale
  • 2 cups orange juice (freshly squeezed or store-bought)
  • 1 cup vanilla ice cream
  • 1 cup crushed ice
  • 1/2 cup milk (whole or 2%)
  • 1/4 cup granulated sugar (adjust based on sweetness preference)
  • 1 teaspoon vanilla extract
  • Zest of 1 orange (for added flavor)
  • Fresh orange slices and mint leaves (for garnish)

Instructions

  1. Start by preparing your ingredients. Gather 2 cups of orange juice, 1 cup of vanilla ice cream, and 1 cup of crushed ice. Make sure the ice is finely crushed, as larger chunks can make blending difficult.
  2. In a blender, combine the orange juice, vanilla ice cream, crushed ice, and 1/2 cup of milk. Add 1/4 cup of granulated sugar and 1 teaspoon of vanilla extract. If you like a sweeter slush, consider adding a bit more sugar at this stage.
  3. Add the zest of 1 orange to the blender. This step is crucial for enhancing the citrus flavor of your slush. Make sure not to include the bitter white pith—only the flavorful zest.
  4. Blend the mixture on medium-high speed for about 30-45 seconds. Stop once the ingredients are fully combined and the slush has a smooth, even consistency. If you notice large chunks of ice, blend for an additional 10-15 seconds. Avoid over-blending, as this can make the slush too liquidy.
  5. Once blended, taste the slush. If it needs more sweetness, add a little more sugar and blend for a few more seconds. If it’s too thick, you can add a splash of milk to reach your desired consistency.
  6. Pour the slush into glasses. This recipe typically serves 4, but you can easily double it for larger gatherings. Use a spoon to help guide the slush into the glasses if needed.
  7. Garnish each serving with fresh orange slices and mint leaves. The mint not only adds a pop of color but also a refreshing aroma that complements the citrus flavors beautifully.
  8. Serve immediately and enjoy! If you’ve made extra, you can refrigerate it for a short time, but it's best enjoyed fresh.
  • Prep Time: 15 min
  • Cook Time: 0 min
  • Category: Dessert
  • Method: Blending
  • Cuisine: American

Nutrition

  • Serving Size: 1 serving
  • Calories: 200
  • Sugar: 30 g
  • Sodium: 50 mg
  • Fat: 5 g
  • Saturated Fat: 3 g
  • Unsaturated Fat: 2 g
  • Trans Fat: 0 g
  • Carbohydrates: 40 g
  • Fiber: 1 g
  • Protein: 2 g
  • Cholesterol: 20 mg

Keywords: Don't skip the orange zest! It's a game-changer for flavor. Always zest before juicing to make it easier.

Did you make this recipe?

Share a photo and tag us — we can't wait to see what you've made!

Zesty Lemon Poppy Seed Delight

One rainy afternoon, I found myself in my grandmother’s cozy kitchen, the kind that always smelled like warmth and love. She was whipping up her famous Lemon Poppy Seed Loaf, a recipe that had been passed down through generations. As the batter came together, the zesty aroma of fresh lemons filled the air, mingling perfectly with the nutty fragrance of poppy seeds. I can still picture her, apron-clad, as she expertly drizzled a vibrant citrus icing over the loaf, creating a glossy, sun-kissed finish that beckoned us to dive in. It was a moment that sparked my own passion for baking, and this recipe has become a cherished staple in my home ever since.

When you take a bite of this Lemon Poppy Seed Loaf, it’s like a burst of sunshine on your palate. The loaf is beautifully golden, with a tender crumb that melts in your mouth. Each slice is speckled with tiny poppy seeds, adding a delightful crunch that contrasts beautifully with the tangy sweetness of the lemon. And that citrus icing? It’s the finishing touch that elevates this loaf from ordinary to extraordinary, with its bright, zesty flavor dancing on your taste buds.

This recipe stands out because it embraces simplicity while delivering on flavor. I’ve added a hint of vanilla to the batter, enhancing the overall taste and making it even more indulgent. Trust me, once you make this Lemon Poppy Seed Loaf With Citrus Icing, it’ll become a go-to in your baking repertoire.

So, let me show you exactly how to make it!

Zesty Lemon Poppy Seed Delight

Why You’ll Love This Recipe

  • Moist and tender crumb that melts in your mouth, thanks to the perfect balance of butter and buttermilk.
  • Bright, zesty lemon flavor paired with crunchy poppy seeds, creating a delightful texture and taste experience.
  • Easy to whip up in just about an hour, perfect for last-minute gatherings or a cozy afternoon treat.
  • Budget-friendly with everyday ingredients, making it an accessible option for all home bakers.
  • The citrus icing adds a sweet tang that elevates the loaf, turning a simple recipe into a showstopper!

Ingredients

  • 1 ½ cups (190g) all-purpose flour
  • 1 teaspoon baking powder
  • ½ teaspoon baking soda
  • ½ teaspoon salt
  • 3 tablespoons poppy seeds
  • ½ cup (115g) unsalted butter, softened to room temperature
  • 1 cup (200g) granulated sugar
  • 2 large eggs
  • 1 teaspoon vanilla extract
  • 1 teaspoon lemon zest (from about 1 medium lemon)
  • ½ cup (120ml) buttermilk
  • 2 tablespoons fresh lemon juice

For the Citrus Icing:

  • 1 cup (120g) powdered sugar
  • 2 tablespoons fresh lemon juice
  • 1 tablespoon orange juice
  • 1 teaspoon lemon zest (for garnish, optional)

Let’s dive into the key ingredients that make this Lemon Poppy Seed Loaf so special. The all-purpose flour provides the structure and base for the loaf, while the baking powder and baking soda ensure it rises perfectly, giving the loaf a light texture. For a gluten-free variation, you could substitute the flour with a gluten-free all-purpose blend. Poppy seeds not only add a delightful crunch but also contribute to the unique flavor profile that pairs well with the citrus notes.

Unsalted butter is crucial for achieving the buttery richness that makes this loaf so moist. If you’re looking for a dairy-free option, coconut oil or a vegan butter can be used instead. The buttermilk is another essential component, providing acidity that activates the baking soda for a fluffy texture. If you don’t have buttermilk on hand, you can easily make a substitute by mixing ½ cup of milk with 1 tablespoon of vinegar or lemon juice and letting it sit for about 5 minutes.

Step-by-Step Instructions

  1. Preheat your oven to 350°F (175°C). Grease a 9×5-inch loaf pan or line it with parchment paper for easy removal later.
  2. In a medium mixing bowl, whisk together 1 ½ cups of all-purpose flour, 1 teaspoon of baking powder, ½ teaspoon of baking soda, ½ teaspoon of salt, and 3 tablespoons of poppy seeds. This helps to evenly distribute the baking agents and ensures a uniform rise.
  3. In a large mixing bowl, cream together ½ cup of softened unsalted butter and 1 cup of granulated sugar using an electric mixer on medium speed for about 3-4 minutes, until the mixture is light and fluffy. Make sure to scrape down the sides of the bowl occasionally.
  4. Add 2 large eggs, 1 teaspoon of vanilla extract, and 1 teaspoon of lemon zest to the creamed butter and sugar, mixing until fully combined. You want a smooth consistency, so ensure there are no lumps of butter.
  5. In a small bowl, combine ½ cup of buttermilk and 2 tablespoons of fresh lemon juice. Alternately add the dry ingredients and buttermilk mixture to the butter mixture, starting and ending with the dry ingredients. Mix just until combined; do not overmix, as this can lead to a dense loaf.
  6. Pour the batter into the prepared loaf pan. Smooth the top with a spatula, ensuring it’s even. Bake in the preheated oven for 50-60 minutes, or until a toothpick inserted in the center comes out clean. The edges should be lightly golden brown, and the center should feel just set.
  7. Once baked, remove the loaf from the oven and allow it to cool in the pan for about 10 minutes. Then, transfer it to a wire rack to cool completely. Resist the urge to slice too soon, as it will be crumbly if it’s still warm.
  8. While the loaf is cooling, prepare the citrus icing. In a medium bowl, whisk together 1 cup of powdered sugar, 2 tablespoons of fresh lemon juice, and 1 tablespoon of orange juice until smooth. If the icing is too thick, you can add a little more juice to reach your desired consistency.
  9. Once the loaf is completely cool, drizzle the citrus icing over the top. If you like, sprinkle with an additional teaspoon of lemon zest for an extra pop of flavor and color.

Pro Tips for the Best Lemon Poppy Seed Loaf With Citrus Icing

  • Be careful not to overmix your batter; this is a common mistake that can lead to a dense loaf. Mix just until the dry ingredients are incorporated for a light and fluffy texture.
  • Use room temperature ingredients, especially the butter and eggs. This helps to create a smoother batter and ensures even baking. Take your eggs out of the fridge about 30 minutes before you start.
  • For a more pronounced lemon flavor, consider adding a little lemon extract in addition to the zest and juice. Just a half teaspoon can elevate the citrus notes significantly.
  • When measuring your flour, spoon it into the measuring cup and level it off with a knife instead of scooping directly from the bag. This prevents packing and ensures you don’t end up with a dry loaf.
  • Invest in a good quality loaf pan; it makes a difference in heat distribution, which ensures even baking. If your pan is dark-coated, reduce the oven temperature by 25°F to prevent over-browning.

Variations & Serving Ideas

For a delightful twist, consider adding blueberries or raspberries to the batter for a fruity burst of flavor. You can also experiment with different citrus fruits—try lime or grapefruit zest and juice for a refreshing change. For a healthier option, substitute half of the all-purpose flour with whole wheat flour for added fiber without compromising too much on texture.

This Lemon Poppy Seed Loaf pairs beautifully with a light salad, such as a mixed greens salad with a vinaigrette, or a cup of tea for a cozy afternoon treat. It also complements a creamy cheese platter, as the acidity of the loaf balances rich cheeses perfectly. Lastly, a scoop of vanilla ice cream on the side creates a delightful contrast of temperatures and flavors!

Storage, Make-Ahead & Reheating

This Lemon Poppy Seed Loaf can be stored at room temperature for up to 3 days if wrapped tightly in plastic wrap. If you want to keep it longer, it freezes well for up to 3 months. To freeze, wrap the loaf tightly in plastic wrap and then in aluminum foil to prevent freezer burn.

When you’re ready to enjoy it again, simply thaw it in the fridge overnight. Reheat individual slices in the microwave for 15-20 seconds or in a toaster oven until warmed through. Interestingly, many people find that this loaf tastes even better the next day, as the flavors have time to meld!

Frequently Asked Questions

Can I make Lemon Poppy Seed Loaf With Citrus Icing ahead of time?

Yes — in fact, it tastes even better the next day! You can make the loaf a day in advance, allowing the flavors to develop. Just be sure to store it in an airtight container to maintain its moisture.

Can I substitute the poppy seeds?

Absolutely! If you don’t have poppy seeds on hand or prefer an alternative, you can use sesame seeds for a similar crunch or omit them entirely for a smooth loaf.

What can I use instead of buttermilk?

If you don’t have buttermilk, you can easily create a substitute by mixing ½ cup of milk (dairy or plant-based) with 1 tablespoon of vinegar or lemon juice. Let it sit for 5 minutes before using in the recipe.

How can I make this recipe gluten-free?

To make a gluten-free version of this Lemon Poppy Seed Loaf, substitute the all-purpose flour with a gluten-free all-purpose flour blend. Just ensure that the blend contains a binding agent like xanthan gum for the best results.

What is the best way to store leftover loaf?

Leftover Lemon Poppy Seed Loaf should be stored in an airtight container at room temperature for up to 3 days. For longer storage, wrap it tightly and freeze for up to 3 months. Thaw it before serving for the best texture.

Zesty Lemon Poppy Seed Delight

Final Thoughts

The Lemon Poppy Seed Loaf with Citrus Icing is truly a delightful treat that brings a burst of brightness to any occasion. The zesty lemon flavor combined with the subtle crunch of poppy seeds creates a satisfying balance, while the citrus icing adds a touch of sweetness that perfectly complements the loaf’s tanginess.

This is the kind of recipe I come back to again and again, especially when I want to brighten up a gloomy day or celebrate a small victory. The aroma that fills the kitchen as it bakes is absolutely heavenly! I encourage you to give this recipe a try; you might just find it becoming a beloved staple in your home. Don’t forget to share your results or even add your own unique twist—I can’t wait to see what you create!

Print
clock clock iconcutlery cutlery iconflag flag iconfolder folder iconinstagram instagram iconpinterest pinterest iconfacebook facebook iconprint print iconsquares squares iconheart heart iconheart solid heart solid icon

Lemon Poppy Seed Loaf


  • Author: Lily author
  • Total Time: 25 minute
  • Yield: 1 loaf 1x
Pin Recipe
Print Recipe

Description

This Lemon Poppy Seed Loaf is a delightful treat that combines zesty lemon flavor with crunchy poppy seeds. Topped with a citrus icing, it’s perfect for any occasion.


Ingredients

Scale
  • 1 ½ cups (190g) all-purpose flour
  • 1 teaspoon baking powder
  • ½ teaspoon baking soda
  • ½ teaspoon salt
  • 3 tablespoons poppy seeds
  • ½ cup (115g) unsalted butter, softened to room temperature
  • 1 cup (200g) granulated sugar
  • 2 large eggs
  • 1 teaspoon vanilla extract
  • 1 teaspoon lemon zest (from about 1 medium lemon)
  • ½ cup (120ml) buttermilk
  • 2 tablespoons fresh lemon juice
  • 1 cup (120g) powdered sugar
  • 2 tablespoons fresh lemon juice
  • 1 tablespoon orange juice
  • 1 teaspoon lemon zest (for garnish, optional)

Instructions

  1. Preheat your oven to 350°F (175°C). Grease a 9×5-inch loaf pan or line it with parchment paper for easy removal later.
  2. In a medium mixing bowl, whisk together 1 ½ cups of all-purpose flour, 1 teaspoon of baking powder, ½ teaspoon of baking soda, ½ teaspoon of salt, and 3 tablespoons of poppy seeds. This helps to evenly distribute the baking agents and ensures a uniform rise.
  3. In a large mixing bowl, cream together ½ cup of softened unsalted butter and 1 cup of granulated sugar using an electric mixer on medium speed for about 3-4 minutes, until the mixture is light and fluffy. Make sure to scrape down the sides of the bowl occasionally.
  4. Add 2 large eggs, 1 teaspoon of vanilla extract, and 1 teaspoon of lemon zest to the creamed butter and sugar, mixing until fully combined. You want a smooth consistency, so ensure there are no lumps of butter.
  5. In a small bowl, combine ½ cup of buttermilk and 2 tablespoons of fresh lemon juice. Alternately add the dry ingredients and buttermilk mixture to the butter mixture, starting and ending with the dry ingredients. Mix just until combined; do not overmix, as this can lead to a dense loaf.
  6. Pour the batter into the prepared loaf pan. Smooth the top with a spatula, ensuring it’s even. Bake in the preheated oven for 50-60 minutes, or until a toothpick inserted in the center comes out clean. The edges should be lightly golden brown, and the center should feel just set.
  7. Once baked, remove the loaf from the oven and allow it to cool in the pan for about 10 minutes. Then, transfer it to a wire rack to cool completely. Resist the urge to slice too soon, as it will be crumbly if it’s still warm.
  8. While the loaf is cooling, prepare the citrus icing. In a medium bowl, whisk together 1 cup of powdered sugar, 2 tablespoons of fresh lemon juice, and 1 tablespoon of orange juice until smooth. If the icing is too thick, you can add a little more juice to reach your desired consistency.
  9. Once the loaf is completely cool, drizzle the citrus icing over the top. If you like, sprinkle with an additional teaspoon of lemon zest for an extra pop of flavor and color.
  • Prep Time: 15 mins
  • Cook Time: 50-60 mins
  • Category: Dessert
  • Method: Baking
  • Cuisine: American

Nutrition

  • Serving Size: 1 slice
  • Calories: 200
  • Sugar: 15 g
  • Sodium: 150 mg
  • Fat: 8 g
  • Saturated Fat: 5 g
  • Unsaturated Fat: 3 g
  • Trans Fat: 0 g
  • Carbohydrates: 30 g
  • Fiber: 1 g
  • Protein: 3 g
  • Cholesterol: 40 mg

Keywords: Be careful not to overmix your batter; this is a common mistake that can lead to a dense loaf. Use room temperature ingredients for a smoother batter and even baking.

Did you make this recipe?

Share a photo and tag us — we can't wait to see what you've made!

  • Privacy Policy
  • Terms Of Service
  • Contact
  • About
  • GDPR

Copyright © 2025 Homesmad