• Skip to primary navigation
  • Skip to main content
  • Skip to primary sidebar
Homesmad

Homesmad

  • Home
  • Breakfast & Brunch
  • Appetizers & Snacks
  • Dinner
  • Dessert
  • About
  • Privacy Policy
  • Contact
Homesmad
  • Home
  • Breakfast & Brunch
  • Appetizers & Snacks
  • Dinner
  • Dessert
  • About
  • Privacy Policy
  • Contact

Ultimate Philly Cheesesteak Meatloaf Recipe – Must-Try!

October 27, 2025 by Lily author

Philly Cheesesteak Meatloaf is not just a recipe; it’s a culinary revelation that brilliantly marries two iconic American comfort foods into one irresistible dish. Imagine the beloved, classic flavors of a Philadelphia cheesesteak—tender beef, caramelized onions, and gooey melted cheese—expertly woven into a comforting, juicy meatloaf. This innovative approach elevates the familiar weeknight meal into something truly extraordinary, promising to captivate your taste buds and become an instant family favorite.

A Delicious Twist on Tradition

The original cheesesteak, a culinary legend born in the vibrant streets of Philadelphia, has long been cherished for its simple yet profound deliciousness. Meatloaf, meanwhile, stands as a testament to homemade goodness and hearty satisfaction, a staple in countless kitchens. Our special Philly Cheesesteak Meatloaf masterfully combines these elements, delivering an exciting blend of textures and tastes. You’ll savor the robust, savory essence of the meatloaf perfectly complemented by the signature cheesesteak notes, creating a delightful surprise in every slice. It’s a dish that offers both the nostalgic warmth of home cooking and an exciting, flavorful adventure, making it an absolute must-try for any comfort food enthusiast. I’m incredibly excited for you to experience this delicious fusion!

Ultimate Philly Cheesesteak Meatloaf Recipe – Must-Try! this RECIPE

Ingredients:

For the Irresistible Philly Cheesesteak Meatloaf:

  • 2 pounds lean ground beef (80/20 blend is ideal) – This ratio provides the perfect balance of flavor and moisture without making your meatloaf greasy.
  • 1 cup Panko breadcrumbs – I find Panko provides a lighter, crispier texture compared to traditional breadcrumbs, which is fantastic for our Philly Cheesesteak Meatloaf.
  • ½ cup whole milk – Helps to hydrate the breadcrumbs, keeping the meatloaf incredibly moist and tender.
  • 2 large eggs – The essential binder, holding all those delicious ingredients together in your Philly Cheesesteak Meatloaf.
  • 2 tablespoons Worcestershire sauce – Adds a deep, umami richness that complements the beef beautifully.
  • 1 teaspoon garlic powder – A foundational flavor in many savory dishes, enhancing the overall profile.
  • 1 teaspoon onion powder – Another layer of savory depth, working in harmony with the fresh onions we’ll be adding.
  • 1.5 teaspoons sea salt – Essential for seasoning throughout the entire loaf.
  • ½ teaspoon freshly ground black pepper – For a touch of gentle heat and aromatic spice.
  • 8 ounces provolone cheese, shredded or diced into small cubes – This will be mixed into the meatloaf itself, ensuring cheesy goodness in every bite of your Philly Cheesesteak Meatloaf.

For the Signature Cheesesteak Filling and Topping:

  • 1 large yellow onion – Thinly sliced for that classic caramelized sweetness.
  • 1 large green bell pepper – Thinly sliced; contributes a lovely crunch and a touch of fresh, peppery flavor that’s quintessential to cheesesteaks.
  • 8 ounces cremini mushrooms, thinly sliced (optional, but highly recommended for authentic flavor) – If you love “Philly style” cheesesteaks, don’t skip these! They add an amazing earthy depth.
  • 2 tablespoons olive oil – For sautéing our vegetables to perfection.
  • 1 tablespoon unsalted butter – Adds richness and helps achieve beautiful caramelization on the vegetables.
  • Pinch of salt and pepper – To season our sautéed vegetables.
  • 6-8 slices provolone cheese (for topping) – These will melt into a gloriously gooey blanket over the finished Philly Cheesesteak Meatloaf.
  • ¼ cup beef broth or water (for basting/moisture during baking) – Helps keep the meatloaf moist and can be used to deglaze the pan slightly for extra flavor if baking in a loaf pan.

Optional Garnish:

  • Fresh chopped parsley or chives – For a pop of color and freshness when serving your masterpiece.

Prepping Your Ingredients (Mise en Place):

  1. Preheat Your Oven and Prepare Your Pan: First things first, let’s get that oven ready. Preheat your oven to a steady 375°F (190°C). While it’s heating, decide on your baking vessel. You can use a standard 9×5-inch loaf pan, which will yield a more traditional, compact loaf shape, or you can free-form your meatloaf on a foil-lined baking sheet. If using a loaf pan, I recommend lightly spraying it with non-stick cooking spray to ensure easy removal. If you’re going the free-form route, line a baking sheet with foil for easier cleanup, then place a wire rack on top if you have one. Baking on a rack allows air to circulate around the loaf, promoting even cooking and letting some of the fat drip away, resulting in a less greasy meatloaf.
  2. Hydrate the Breadcrumbs: In a small bowl, combine your 1 cup of Panko breadcrumbs with the ½ cup of whole milk. Give it a gentle stir and then let it sit for about 5-10 minutes. This allows the breadcrumbs to fully absorb the milk, ensuring they become plump and soft, which is a key secret to a wonderfully moist and tender Philly Cheesesteak Meatloaf.
  3. Prepare Your Signature Cheesesteak Vegetables: Now, let’s get those fantastic cheesesteak flavors ready. Thinly slice your large yellow onion. The thinner the slices, the more surface area for caramelization, which translates to more intense sweetness and depth. Next, thinly slice your green bell pepper. If you’re including the optional (but highly recommended!) cremini mushrooms, slice those thinly as well. Aim for uniform thickness so they cook evenly.
  4. Sauté the Aromatics to Perfection: Heat the 2 tablespoons of olive oil and 1 tablespoon of unsalted butter in a large skillet or frying pan over medium heat. Once the butter is melted and the oil is shimmering, add your sliced onions, bell peppers, and mushrooms (if using) to the pan. Season them with a pinch of salt and pepper.

    This step is crucial for building the flavor profile of our Philly Cheesesteak Meatloaf. Sauté these vegetables gently, stirring occasionally, for about 10-15 minutes, or until they are significantly softened and have developed a beautiful golden-brown caramelization. You want them tender and sweet, not just cooked through. The natural sugars in the onions will release and caramelize, adding a tremendous amount of depth to the dish. Once they’ve reached this stage, remove the skillet from the heat and set aside about one-third of the sautéed vegetables. These will be used later as a topping. The remaining two-thirds will be mixed directly into the meatloaf for flavor throughout.
  5. Dice the Provolone for Mixing: If your provolone isn’t already shredded, take your 8 ounces of provolone cheese and dice it into small, ¼-inch cubes or shred it coarsely. Smaller pieces will melt more evenly throughout the meatloaf, giving you pockets of gooey cheese in every slice of your Philly Cheesesteak Meatloaf.

Crafting the Heart of Your Philly Cheesesteak Meatloaf:

  1. Combine Wet Ingredients for the Meatloaf Base: In a very large mixing bowl – you’ll need plenty of space for this – crack your two large eggs. Add the 2 tablespoons of Worcestershire sauce, 1 teaspoon of garlic powder, 1 teaspoon of onion powder, 1.5 teaspoons of sea salt, and ½ teaspoon of freshly ground black pepper. Whisk these ingredients together thoroughly with a fork until well combined. This ensures that all the seasonings are evenly distributed before we add the meat.
  2. Introduce the Hydrated Breadcrumbs: Now, add the milk-soaked Panko breadcrumbs to the wet mixture in the large bowl. Use a spatula to scrape out all the softened breadcrumbs. Give it another gentle stir to combine the breadcrumb mixture with the seasoned eggs and Worcestershire.
  3. Integrate the Ground Beef: Add your 2 pounds of ground beef to the bowl. Here’s a critical tip for a tender meatloaf: do not overmix the beef. Overmixing can lead to a dense, tough meatloaf. We want our Philly Cheesesteak Meatloaf to be succulent and tender!
  4. Incorporate the Cheesesteak Elements into the Meatloaf: Now for the good stuff! Add the two-thirds portion of your reserved sautéed onions, bell peppers, and mushrooms to the bowl with the beef mixture. Next, gently fold in the 8 ounces of shredded or diced provolone cheese that you prepared earlier. This cheese will melt beautifully within the loaf, creating incredible flavor pockets.
  5. Gently Mix All Ingredients: Using clean hands (this is the best tool for the job!), gently begin to mix all the ingredients together. Your goal is to combine everything just until it’s incorporated – no more, no less. Fold the ingredients from the bottom of the bowl upwards, pressing lightly. You’ll know it’s adequately mixed when there are no visible streaks of just beef or isolated piles of vegetables and cheese. It should look like a cohesive, well-blended mixture. Remember, less is more when it comes to mixing meatloaf!

Assembling and Baking Your Masterpiece:

  1. Form Your Philly Cheesesteak Meatloaf: Once your mixture is ready, it’s time to form the loaf.
    • If using a loaf pan: Press the meat mixture evenly into the prepared 9×5-inch loaf pan. Make sure to press it firmly into the corners to eliminate any air pockets, which can cause the loaf to crumble. Smooth the top with the back of a spoon or your hand.
    • If free-forming on a baking sheet: Shape the meat mixture into a uniform loaf shape, roughly 9 inches long by 5 inches wide and about 2.5-3 inches tall, on your foil-lined baking sheet (preferably on a wire rack). Make sure the edges are well-formed and smooth. A well-formed loaf ensures even cooking and prevents it from falling apart when slicing. This classic shape is perfect for showcasing your delicious Philly Cheesesteak Meatloaf.
  2. Initial Bake: Carefully transfer your meatloaf (in its pan or on the baking sheet) to the preheated 375°F (190°C) oven. Bake for an initial 40 minutes. During this time, the meatloaf will start to firm up and some of the internal fat will begin to render, setting the structure.
  3. Add the Cheesy Topping and Remaining Vegetables: After the initial 40 minutes, carefully remove the meatloaf from the oven. You might notice some juices pooling around the base; this is perfectly normal. Now, arrange the 6-8 slices of provolone cheese evenly over the top of the partially baked meatloaf, creating a beautiful, melty blanket. Then, carefully spoon the remaining one-third of your sautéed onions, bell peppers, and mushrooms over the provolone cheese. If using a loaf pan and you see a lot of rendered fat, you can carefully drain some of it before adding the topping, but leave a little for flavor. At this point, you can also pour about ¼ cup of beef broth or water around the base of the loaf (if using a loaf pan) or baste the sides of the free-form loaf to add a little extra moisture and flavor to the pan drippings.
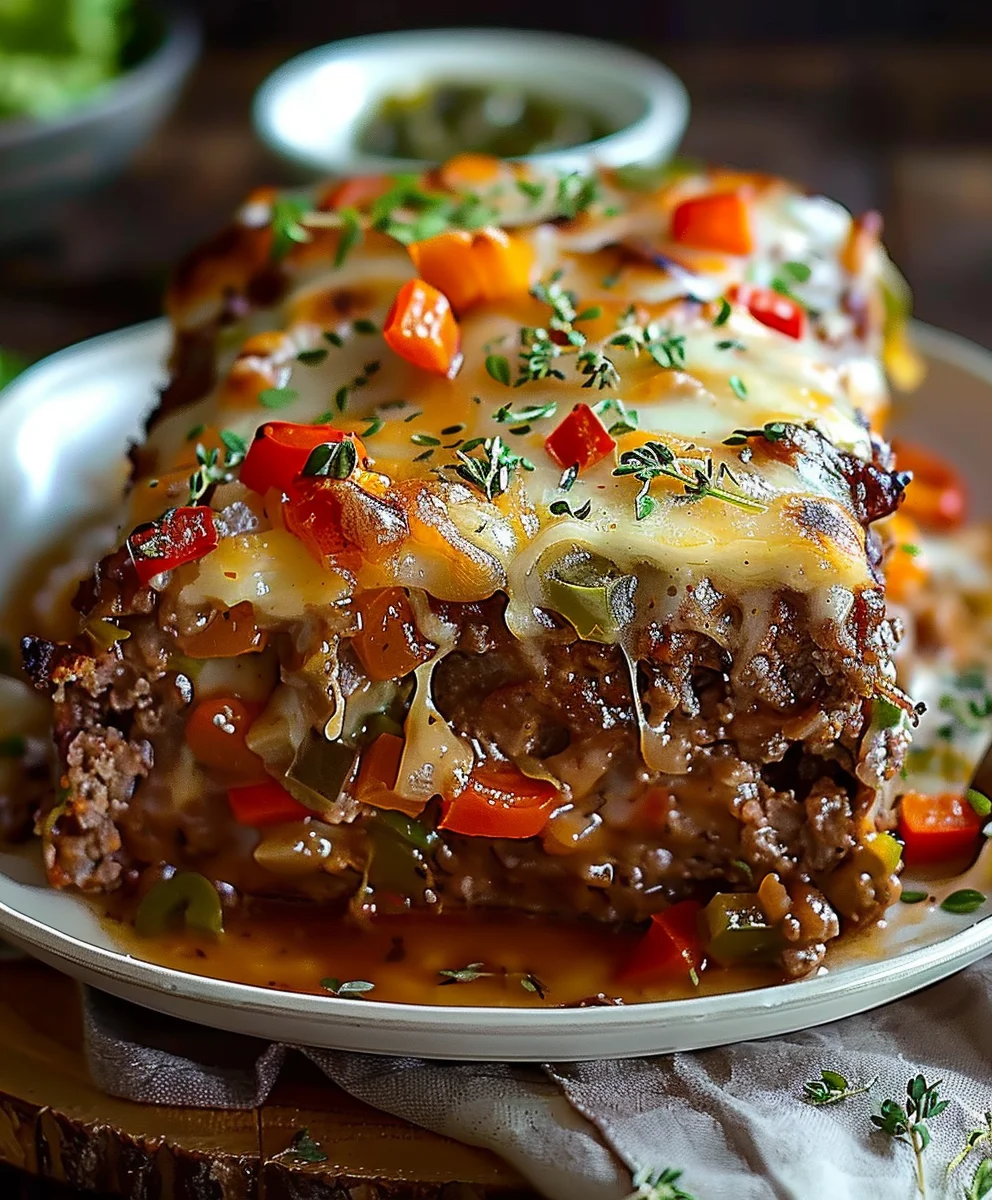
  4. Final Bake and Melt: Return the meatloaf to the oven for an additional 20-25 minutes, or until the internal temperature reaches 160°F (71°C) when measured with an instant-read meat thermometer inserted into the thickest part of the loaf. The provolone cheese should be beautifully melted, bubbly, and slightly golden at the edges, and the topping vegetables should be warmed through and fragrant.
  5. The All-Important Rest: This step is non-negotiable for a perfect Philly Cheesesteak Meatloaf! Once the meatloaf reaches its target temperature, remove it from the oven. If it’s in a loaf pan, you can carefully invert it onto a cutting board, then flip it right-side up. If it’s free-form, simply transfer it to a clean cutting board. Tent the meatloaf loosely with aluminum foil and let it rest for at least 10-15 minutes before slicing.

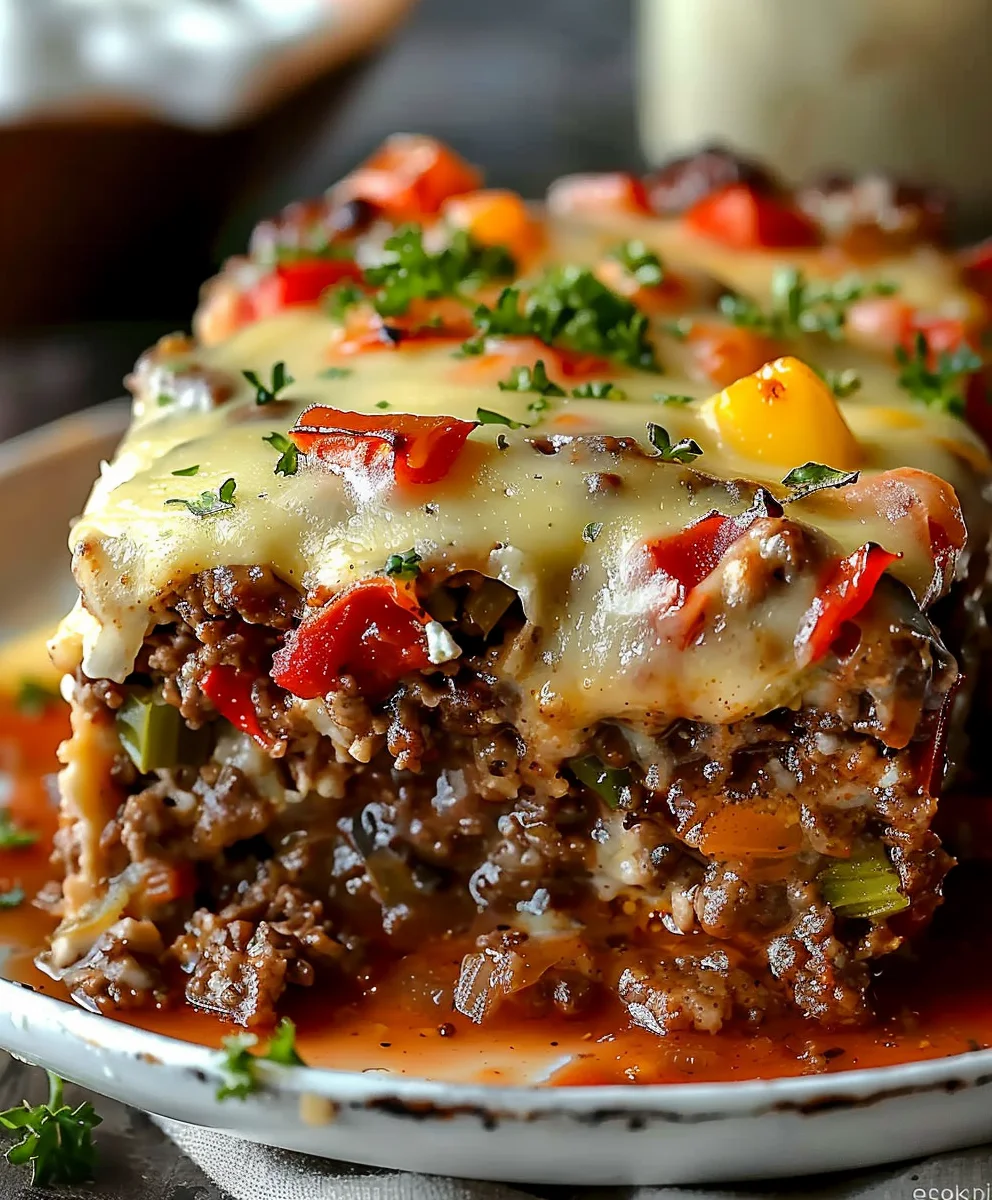
    Why rest? Resting allows the juices within the meatloaf to redistribute evenly throughout the loaf. If you slice it too soon, all those delicious, flavorful juices will run out, leaving you with a drier meatloaf. Resting ensures every slice is moist, tender, and full of flavor. It also helps the meatloaf firm up slightly, making it easier to slice neatly without crumbling.
  6. Slice and Serve Your Delectable Philly Cheesesteak Meatloaf: After the resting period, remove the foil. Using a sharp, serrated knife, slice your Philly Cheesesteak Meatloaf into thick, generous slices. Be mindful of the melted cheese topping, which might be a bit gooey, adding to the authentic cheesesteak experience! If desired, sprinkle with fresh chopped parsley or chives for a touch of color and fresh herbaceousness.

Serving Suggestions for Your Delicious Philly Cheesesteak Meatloaf:

  1. Classic Pairing: This incredible Philly Cheesesteak Meatloaf truly shines as the star of your dinner table. Serve it alongside creamy mashed potatoes or roasted garlic potatoes to soak up all the flavorful pan juices. A simple green salad with a tangy vinaigrette would offer a refreshing contrast to the richness of the meatloaf.
  2. Vegetable Companions: Roasted asparagus, green beans almondine, or even a side of sautéed broccoli rabe would be excellent companions, bringing a delightful balance to the hearty meatloaf. Consider a side of crispy onion rings or sweet potato fries if you’re leaning into a more “diner-style” feel.
  3. The Deconstructed Cheesesteak Experience: For a fun and interactive serving idea, you could even slice the meatloaf and serve it on toasted hoagie rolls or crusty bread, essentially creating a “deconstructed” Philly Cheesesteak Meatloaf sandwich. A dollop of extra provolone cheese sauce or even a drizzle of homemade cheese wiz could elevate this experience further for those who love extra cheesiness.
  4. Make it a Bowl: For a lower-carb option, serve thick slices of the Philly Cheesesteak Meatloaf in a bowl over a bed of cauliflower rice or sautéed spinach, letting the melted cheese and savory meatloaf juices create a complete and satisfying meal.
  5. Leftover Potential: Don’t forget that any leftover Philly Cheesesteak Meatloaf makes for fantastic sandwiches the next day! Simply warm slices in a pan or microwave and pile them onto a soft roll. The flavors only get better with time, truly maximizing your cooking efforts. This recipe is designed to deliver a hearty and satisfying meal that will leave everyone at the table delighted and craving more of those iconic Philly cheesesteak flavors in a comforting meatloaf form. Enjoy every savory, cheesy bite!

Ultimate Philly Cheesesteak Meatloaf Recipe – Must-Try!

Conclusion:

As we wrap up our culinary journey with this incredible recipe, I truly hope you’re feeling inspired to roll up your sleeves and bring this fantastic creation to life in your own kitchen. We’ve explored the layers of flavor, the satisfying textures, and the sheer genius of combining two beloved classics into one harmonious dish.

This isn’t just another dinner; it’s an experience, a delightful fusion that promises to elevate your weeknight meals from ordinary to extraordinary.

Why, you might ask, is this recipe a non-negotiable addition to your cooking repertoire? Well, for starters, it flawlessly delivers on its promise: the robust, savory notes of a classic meatloaf, perfectly intertwined with the unmistakable, cheesy, onion-and-pepper-infused essence of a Philly cheesesteak. Imagine that first slice revealing a tender, juicy interior, studded with caramelized onions and vibrant bell peppers, all bound together with gooey, melted provolone cheese. It’s a symphony of textures and tastes that dance on your palate, offering a comforting warmth that only the best homemade meals can provide. I’ve found that many comfort food recipes can sometimes feel heavy, but this dish strikes a beautiful balance. It’s hearty without being overwhelming, packed with flavor but still incredibly approachable for home cooks of all skill levels.

The ease of preparation, despite its impressive outcome, is another significant selling point. You’ll be amazed at how straightforward it is to achieve such a gourmet-level result with relatively simple steps and readily available ingredients. It truly is a testament to clever cooking, transforming familiar ingredients into something truly special. This isn’t just about making food; it’s about crafting a meal that brings joy, comfort, and a touch of exciting novelty to your dining table. This innovative Philly Cheesesteak Meatloaf is a dish that will undoubtedly become a much-requested favorite, a culinary triumph that will have everyone asking for seconds. I genuinely believe that once you try it, you’ll understand why I’m so enthusiastic about it.

Now, let’s talk about how to truly make this recipe your own and maximize its potential. While it stands proudly as a magnificent centerpiece on its own, pairing it with the right accompaniments can elevate the entire meal. For a truly classic comfort food experience, I love serving generous slices alongside a creamy, buttery mound of mashed potatoes, perhaps even some garlic mashed potatoes for an extra kick. Alternatively, a crisp, fresh green salad with a tangy vinaigrette can provide a lovely counterpoint to the richness of the meatloaf, adding a refreshing element that brightens the plate. Roasted asparagus or green beans, lightly seasoned with garlic and olive oil, also make excellent, nutritious companions. But don’t feel limited to these traditional sides! Think outside the box: what about serving it open-faced on a toasted hoagie roll, essentially creating a meatloaf sandwich? Or perhaps crumbling leftovers over a bed of pasta or even tucking it into a hearty breakfast scramble? The possibilities are truly endless.

When it comes to variations, please feel encouraged to experiment! If provolone isn’t your favorite, feel free to substitute with white cheddar, Monterey Jack, or even a blend of mozzarella for a different cheesy pull. For those who love a bit of heat, a pinch of red pepper flakes mixed into the meatloaf or a dash of hot sauce over the finished product can add a delightful kick. You could also try incorporating different vegetables – finely diced mushrooms or even spinach could be folded in for added nutrition and flavor. For a low-carb option, consider serving it with cauliflower mash instead of potatoes, or simply enjoy it with a double portion of roasted vegetables. Don’t hesitate to adjust the seasonings to your personal preference; a little extra garlic powder or a sprinkle of smoked paprika can work wonders. The beauty of a recipe like this is its inherent flexibility, allowing you to tailor it perfectly to your family’s tastes and dietary needs. I often find myself tweaking things slightly each time I make it, just to keep things exciting and to discover new favorite combinations.

So, there you have it. My heartfelt recommendation for a recipe that I genuinely believe will impress and satisfy. Now, it’s your turn! I implore you, don’t just admire this recipe from afar; make the decision today to conquer your kitchen and whip up this magnificent dish. Gather your ingredients, put on some music, and enjoy the process of creating something truly delicious from scratch.

There’s an immense sense of satisfaction that comes from pulling a homemade meal like this out of the oven, especially one that blends such beloved flavors so perfectly.

Imagine the smiles on your family’s faces, the appreciative murmurs around the dinner table, and the pure joy of savoring each flavorful bite. This isn’t just about following instructions; it’s about making memories, sharing good food, and perhaps even starting a new tradition. Once you’ve had the pleasure of preparing and tasting your very own Philly Cheesesteak Meatloaf, I would absolutely love to hear about your experience. Did you add a special ingredient? Did you find a new favorite side? Share your culinary adventures in the comments below! Your insights, your tips, and even your kitchen triumphs (and learning moments!) are incredibly valuable to me and to other aspiring home cooks. I truly can’t wait to hear how this recipe transformed your dinner table and became a new household favorite. Happy cooking, everyone!


Ultimate Philly Cheesesteak Meatloaf Recipe – Must-Try!

Ultimate Philly Cheesesteak Meatloaf Recipe – Must-Try!

This recipe takes everything great about a Philly cheesesteak sandwich and transforms it into a cozy baked dinner the whole family will love. It’s cheesy, beefy, satisfying, and packed with flavor. Serve it up with a side of roasted veggies, potatoes, or a fresh salad, and you’ve got a meal that’s anything but ordinary.

Prep Time
40 Minutes

Cook Time
5 Minutes

Total Time
2 Hours

Servings
8 servings

Ingredients

  • 2 lbs lean ground beef (80/20 blend)
  • 1 cup Panko breadcrumbs
  • ½ cup whole milk
  • 2 large eggs
  • 2 tbsp Worcestershire sauce
  • 1 tsp garlic powder
  • 1 tsp onion powder
  • 1.5 tsp sea salt
  • ½ tsp freshly ground black pepper
  • 8 oz provolone cheese, shredded or diced (for mixing)
  • 1 large yellow onion, thinly sliced
  • 1 large green bell pepper, thinly sliced
  • 8 oz cremini mushrooms, thinly sliced (optional)
  • 2 tbsp olive oil
  • 1 tbsp unsalted butter
  • Pinch of salt and pepper (for sautéing vegetables)
  • 6-8 slices provolone cheese (for topping)
  • ¼ cup beef broth or water
  • Fresh chopped parsley or chives (optional garnish)

Instructions

  1. Step 1
    Preheat oven to 375°F (190°C). Prepare a 9×5-inch loaf pan or foil-lined baking sheet. In a small bowl, combine Panko breadcrumbs and milk; let sit 5-10 minutes.
  2. Step 2
    Thinly slice onion, bell pepper, and optional mushrooms. Heat olive oil and butter in a skillet over medium heat. Add sliced vegetables, season with salt and pepper, and sauté for 10-15 minutes until softened and caramelized. Set aside 1/3 of the sautéed vegetables for topping; the remaining 2/3 will go into the meatloaf. Dice 8 oz provolone cheese for mixing.
  3. Step 3
    In a large bowl, whisk together eggs, Worcestershire sauce, garlic powder, onion powder, sea salt, and black pepper. Add the hydrated breadcrumbs. Then, add the ground beef, the 2/3 portion of sautéed vegetables, and the 8 oz diced provolone cheese. Gently mix by hand until just combined, being careful not to overmix.
  4. Step 4
    Form the meat mixture into a 9×5-inch loaf in the prepared pan or on the baking sheet. Bake for 40 minutes.
  5. Step 5
    Remove meatloaf from oven. Arrange 6-8 slices of provolone cheese over the top, then spoon the reserved 1/3 sautéed vegetables over the cheese. Pour ¼ cup beef broth or water around the base. Return to oven and bake for an additional 20-25 minutes, or until the internal temperature reaches 160°F (71°C) and the cheese is melted and bubbly.
  6. Step 6
    Remove from oven, tent loosely with foil, and let rest for 10-15 minutes before slicing. Garnish with fresh chopped parsley or chives, if desired, and serve.

Important Information

Nutrition Facts (Per Serving)

It is important to consider this information as approximate and not to use it as definitive health advice.

Allergy Information

Please check ingredients for potential allergens and consult a health professional if in doubt.

« Previous Post
White Garlic Pizza Sauce: Creamy & Perfect for Homemade Pizza
Next Post »
Flavorful Cajun Chicken Sloppy Joes for Quick Weeknights

If you enjoyed this…

Delicious Pineapple Chicken & Rice: A Tropical Delight

Delicious Baked Chicken Thighs Recipe for Juicy Flavor!

Ultimate Crock Pot Crack Potato Soup: You’ll Crave This!

Primary Sidebar

Browse by Diet

BreakfastDinnerLunchDessertAppetizer

Sweet Peach Yogurt Parfait Delight

One of my fondest memories is from a lazy summer afternoon spent at my grandmother’s house. The sun filtered through the kitchen window, casting a warm glow over the table where she would create her culinary magic. It was during one of those blissful moments that I first tasted her Peach Yogurt Parfait with Honey and Granola. The sweet aroma of ripe peaches mingling with creamy yogurt and the crunch of granola was nothing short of heavenly. It felt like summer captured in a bowl, and I still remember the joy of diving in with a spoon, each layer revealing a new burst of flavor.

When I think about that parfait, I can almost hear the gentle hum of the bees outside, reminding me of the floral notes that honey brings to every bite. The vibrant yellows and soft oranges of the peaches contrast beautifully with the creamy white yogurt and the golden crunch of granola. It’s a dish that not only looks delightful but also tastes like a celebration of fresh, wholesome ingredients.

What makes my version of this Peach Yogurt Parfait special is the careful balance of flavors and textures. I use ripe, juicy peaches, drizzled with locally sourced honey, and a homemade granola that’s bursting with nuts and seeds for an extra crunch. It’s a simple dish, but every layer is crafted with love and attention.

Let me show you exactly how to make this delightful parfait, so you can bring a bit of that summer magic into your kitchen!

Sweet Peach Yogurt Parfait Delight

Why You’ll Love This Recipe

  • Delightfully creamy texture from the Greek yogurt, paired with the juicy sweetness of fresh peaches.
  • Ready in under 20 minutes, making it a quick and satisfying breakfast or snack option.
  • Budget-friendly, using common ingredients that you may already have in your pantry.
  • Customizable with your favorite granola and nuts, allowing you to tailor each parfait to your taste.
  • Perfectly balanced flavors with the bright acidity of lemon juice and the sweetness of honey enhancing the peaches.

Ingredients

  • For the Parfait:
  • 2 cups plain Greek yogurt (or vanilla yogurt for a sweeter option)
  • 2 large ripe peaches, diced (about 2 cups)
  • 1 tablespoon fresh lemon juice (to prevent browning of peaches)
  • 2 tablespoons honey (plus more for drizzling)
  • 1 teaspoon vanilla extract (optional for extra flavor)
  • For the Granola:
  • 1 cup granola (store-bought or homemade; see notes for a simple granola recipe)
  • 1/4 cup sliced almonds (optional for added crunch)
  • 1/4 cup shredded coconut (optional for added flavor)

Let’s dive into some key ingredients that make this Peach Yogurt Parfait so delightful! First, the Greek yogurt is not only creamy but also packed with protein, making it a satisfying option for breakfast or a snack. If you’re looking for a sweeter option, you can easily substitute it with vanilla yogurt, though it may alter the overall flavor balance. Next, the ripe peaches are the star of the show; their natural sweetness shines through, so I recommend choosing peaches that yield slightly to pressure, indicating they’re perfectly ripe. If peaches aren’t in season, feel free to use nectarines or even frozen peaches—just thaw them before use. Finally, honey adds a lovely floral sweetness that ties everything together. If you prefer, maple syrup can serve as a delicious substitute.

Step-by-Step Instructions

  1. Start by preparing the peaches. Wash them thoroughly, then slice and dice them into bite-sized pieces. In a medium bowl, toss the diced peaches with 1 tablespoon of fresh lemon juice to prevent browning. Set aside for about 5 minutes while the lemon juice works its magic.
  2. In a separate bowl, combine the Greek yogurt, 2 tablespoons of honey, and 1 teaspoon of vanilla extract if using. Stir the mixture until smooth and thoroughly blended. This should take about a minute. Avoid overmixing to maintain the creaminess of the yogurt.
  3. Now it’s time to layer your parfait. Grab a clear glass or bowl to showcase your beautiful creation. Start with a generous spoonful of the yogurt mixture at the bottom—about 1/4 cup will do. Use a spoon to spread it evenly.
  4. Add a layer of the diced peaches over the yogurt, ensuring they cover the yogurt completely. You might want to use about half of what you have prepared—roughly 1 cup. This layer should be visually appealing, so arrange the peaches neatly.
  5. Sprinkle 1/4 cup of granola over the peaches. This adds a delightful crunch. Make sure to distribute it evenly to ensure every bite has that satisfying texture. Avoid packing it down too tightly, as you want it to maintain its crunch.
  6. Repeat the layers: spoon in another 1/4 cup of yogurt, followed by another cup of peaches, and another sprinkle of granola. You should have at least two layers, but feel free to add more depending on your glass size.
  7. Finish off your parfait with a drizzle of honey on top for added sweetness and a touch of elegance. If you’re using sliced almonds or shredded coconut, sprinkle them on top now. It adds a lovely visual contrast and extra flavor.
  8. Serve immediately or refrigerate for up to 30 minutes before serving to allow the flavors to meld together. However, I recommend enjoying it fresh to maintain the granola’s crunch.

Pro Tips for the Best Peach Yogurt Parfait With Honey And Granola

  • Make sure to choose ripe peaches for the best flavor and texture. A common mistake is using unripe fruit, which can lead to a less enjoyable parfait. Look for peaches that are fragrant and slightly soft to the touch.
  • Use a clear glass to assemble your parfait; this not only makes for a beautiful presentation but also allows you to see the colorful layers, which adds to the enjoyment of eating it.
  • For an even creamier texture, consider whipping the Greek yogurt with a hand mixer for a couple of minutes before layering. This small adjustment makes a huge difference in mouthfeel.
  • Be mindful of the granola-to-yogurt ratio. Too much granola can overwhelm the parfait, while too little can make it feel too creamy. Aim for about 1/4 cup of granola per layer for the perfect balance.
  • If you’re making this for a gathering, consider preparing the yogurt and peaches ahead of time and layering them just before serving. This ensures the granola stays crunchy!

Variations & Serving Ideas

There are so many ways to get creative with your Peach Yogurt Parfait! For a tropical twist, swap out the peaches for mangoes or pineapples and top with coconut flakes. If you prefer a berry flavor, mix in some blueberries or strawberries with the peaches for added color and taste. For a nutty version, incorporate chopped walnuts or pecans instead of almonds.

As for serving ideas, this parfait pairs beautifully with a side of scrambled eggs for a hearty breakfast or fresh fruit salad for a light lunch. You might also enjoy it alongside whole grain toast with almond butter for an energizing snack. The contrast of flavors and textures will elevate your meal experience!

Storage, Make-Ahead & Reheating

The Peach Yogurt Parfait is best enjoyed fresh, but you can prepare some components ahead of time. Store the layered parfait in an airtight container in the refrigerator for up to 24 hours. However, be cautious; the granola may lose its crunch if stored too long. You can freeze the yogurt and peach mixture for up to 2 months; just remember to thaw it in the refrigerator overnight before serving.

If you plan to enjoy this dish the next day, it can taste even better as the flavors meld together. Just remember to add the granola right before serving to keep its delightful crunch!

Frequently Asked Questions

Can I make Peach Yogurt Parfait With Honey And Granola ahead of time?

Yes — in fact, it tastes even better the next day as the flavors meld. However, I recommend waiting to add the granola until just before serving to maintain its crunch.

What can I substitute for Greek yogurt?

If you prefer a lighter option, you can substitute Greek yogurt with regular yogurt or a dairy-free alternative like coconut yogurt. Just remember that this may alter the creaminess and flavor profile slightly.

Can I use frozen peaches for this parfait?

Absolutely! Just make sure to thaw the frozen peaches before using them. They will still add great flavor, though the texture may be slightly softer than fresh peaches.

How do I make the parfait vegan?

To make a vegan version, substitute the Greek yogurt with a plant-based yogurt alternative, and replace honey with maple syrup or agave nectar. This keeps the parfait sweet while adhering to a vegan diet.

What other fruits can I use in this recipe?

You can mix and match fruits based on your preference. Try using strawberries, blueberries, raspberries, or even bananas. Just make sure to adjust the lemon juice as needed to prevent browning.

Sweet Peach Yogurt Parfait Delight

Final Thoughts

The Peach Yogurt Parfait with Honey and Granola is a delightful blend of creamy yogurt, sweet peaches, and crunchy granola that creates a satisfying and nourishing treat. Each layer bursts with flavor, making it a perfect choice for breakfast or a light dessert.

This is the kind of recipe I come back to again and again, especially when I want something refreshing and wholesome to start my day. The harmony of sweet and tart flavors, combined with the delightful crunch, never fails to lift my spirits!

I encourage you to give this parfait a try and indulge in its comforting goodness. Feel free to share your results or even add your own twist—perhaps a sprinkle of cinnamon or a handful of nuts. Enjoy creating your perfect parfait!

Print
clock clock iconcutlery cutlery iconflag flag iconfolder folder iconinstagram instagram iconpinterest pinterest iconfacebook facebook iconprint print iconsquares squares iconheart heart iconheart solid heart solid icon

Peach Yogurt Parfait


  • Author: Lily author
  • Total Time: 15 minutes
  • Yield: 4 servings 1x
Pin Recipe
Print Recipe

Description

This Peach Yogurt Parfait combines creamy Greek yogurt, juicy peaches, and crunchy granola for a delightful treat. It’s a perfect breakfast or snack that captures the essence of summer in every bite.


Ingredients

Scale
  • For the Parfait:
  • 2 cups plain Greek yogurt (or vanilla yogurt for a sweeter option)
  • 2 large ripe peaches, diced (about 2 cups)
  • 1 tablespoon fresh lemon juice (to prevent browning of peaches)
  • 2 tablespoons honey (plus more for drizzling)
  • 1 teaspoon vanilla extract (optional for extra flavor)
  • For the Granola:
  • 1 cup granola (store-bought or homemade; see notes for a simple granola recipe)
  • 1/4 cup sliced almonds (optional for added crunch)
  • 1/4 cup shredded coconut (optional for added flavor)

Instructions

  1. Start by preparing the peaches. Wash them thoroughly, then slice and dice them into bite-sized pieces. In a medium bowl, toss the diced peaches with 1 tablespoon of fresh lemon juice to prevent browning. Set aside for about 5 minutes while the lemon juice works its magic.
  2. In a separate bowl, combine the Greek yogurt, 2 tablespoons of honey, and 1 teaspoon of vanilla extract if using. Stir the mixture until smooth and thoroughly blended. This should take about a minute. Avoid overmixing to maintain the creaminess of the yogurt.
  3. Now it’s time to layer your parfait. Grab a clear glass or bowl to showcase your beautiful creation. Start with a generous spoonful of the yogurt mixture at the bottom—about 1/4 cup will do. Use a spoon to spread it evenly.
  4. Add a layer of the diced peaches over the yogurt, ensuring they cover the yogurt completely. You might want to use about half of what you have prepared—roughly 1 cup. This layer should be visually appealing, so arrange the peaches neatly.
  5. Sprinkle 1/4 cup of granola over the peaches. This adds a delightful crunch. Make sure to distribute it evenly to ensure every bite has that satisfying texture. Avoid packing it down too tightly, as you want it to maintain its crunch.
  6. Repeat the layers: spoon in another 1/4 cup of yogurt, followed by another cup of peaches, and another sprinkle of granola. You should have at least two layers, but feel free to add more depending on your glass size.
  7. Finish off your parfait with a drizzle of honey on top for added sweetness and a touch of elegance. If you’re using sliced almonds or shredded coconut, sprinkle them on top now. It adds a lovely visual contrast and extra flavor.
  8. Serve immediately or refrigerate for up to 30 minutes before serving to allow the flavors to meld together. However, I recommend enjoying it fresh to maintain the granola’s crunch.
  • Prep Time: 15 mins
  • Cook Time: 0 mins
  • Category: Breakfast
  • Method: No-cook
  • Cuisine: American

Nutrition

  • Serving Size: 1 parfait
  • Calories: 250
  • Sugar: 20 g
  • Sodium: 50 mg
  • Fat: 5 g
  • Saturated Fat: 2 g
  • Unsaturated Fat: 3 g
  • Trans Fat: 0 g
  • Carbohydrates: 40 g
  • Fiber: 3 g
  • Protein: 10 g
  • Cholesterol: 10 mg

Keywords: Choose ripe peaches for the best flavor and texture. Use a clear glass for a beautiful presentation. For creaminess, consider whipping the yogurt before layering. Be mindful of the granola-to-yogurt ratio. Prepare yogurt and peaches ahead of time for gatherings, layering just before serving.

Did you make this recipe?

Share a photo and tag us — we can't wait to see what you've made!

Sun-Kissed Frozen Orange Cream Slush

As a child, summer days felt like they lasted forever. I remember the sticky heat wrapping around me as I played outside, my laughter mingling with the sounds of the neighborhood. But nothing could cool me down quite like the moment I’d spot my grandmother, laboring over her blender, whipping up her famous Frozen Orange Creamsicle Slush. That vibrant orange treat, with its frosty texture and sweet citrus aroma, was like a burst of sunshine in a cup. Just one sip, and I could feel the coolness wash over me, sparking pure joy.

This Frozen Orange Creamsicle Slush has a way of making you feel like a kid again. Its creamy, dreamy consistency is a delightful balance of bright orange and soft vanilla, inviting you to dive right in. The refreshing tang of orange dances on your tongue, while the smooth creaminess envelops you in a comforting embrace. It’s a nostalgic treat that’s perfect for hot summer afternoons or anytime you need a little pick-me-up.

What makes my version of this slush stand out is the addition of a hint of vanilla bean, which elevates the flavor and adds an extra layer of richness. Plus, it’s super easy to whip up with just a few simple ingredients that you probably already have on hand! So, if you’re ready to relive those sun-soaked memories, let me show you exactly how to make it.

Sun-Kissed Frozen Orange Cream Slush

Why You’ll Love This Recipe

  • Each slush is a perfect blend of creamy vanilla and zesty orange, creating a nostalgic flavor reminiscent of summer days.
  • This refreshing treat is ready in under 15 minutes, making it an ideal quick dessert for unexpected guests or hot afternoons.
  • With just 8 simple ingredients, it’s budget-friendly, ensuring you don’t have to break the bank to enjoy a delicious slush.
  • The slush has a perfectly smooth texture, thanks to the combination of ice and ice cream, providing a delightful contrast to the bright citrus flavors.
  • It’s highly customizable; you can easily adjust the sweetness and add fresh herbs for a unique twist that suits your taste.

Ingredients

  • 2 cups orange juice (freshly squeezed or store-bought)
  • 1 cup vanilla ice cream
  • 1 cup crushed ice
  • 1/2 cup milk (whole or 2%)
  • 1/4 cup granulated sugar (adjust based on sweetness preference)
  • 1 teaspoon vanilla extract
  • Zest of 1 orange (for added flavor)
  • Fresh orange slices and mint leaves (for garnish)

The star of this Frozen Orange Creamsicle Slush is the orange juice, which provides the vibrant, citrusy base. Freshly squeezed juice will yield the brightest flavor, but store-bought options can be just as convenient. If you’re opting for store-bought, choose 100% pure juice with no added sugars for the best results. Another essential ingredient is the vanilla ice cream; it adds creaminess and sweetness. You can substitute it with dairy-free ice cream if you’re looking for a vegan option. Whole or 2% milk complements the ice cream, creating a smooth blend. If you want a lower-calorie version, almond or oat milk can be good alternatives.

Lastly, the granulated sugar can be adjusted based on your sweetness preference. If you prefer a more natural sweetener, consider using honey or agave syrup. The orange zest enhances the flavor profile, providing an aromatic pop that brings the whole slush together. Don’t skip it! It adds an extra layer of brightness that makes this slush truly special.

Step-by-Step Instructions

  1. Start by preparing your ingredients. Gather 2 cups of orange juice, 1 cup of vanilla ice cream, and 1 cup of crushed ice. Make sure the ice is finely crushed, as larger chunks can make blending difficult.
  2. In a blender, combine the orange juice, vanilla ice cream, crushed ice, and 1/2 cup of milk. Add 1/4 cup of granulated sugar and 1 teaspoon of vanilla extract. If you like a sweeter slush, consider adding a bit more sugar at this stage.
  3. Add the zest of 1 orange to the blender. This step is crucial for enhancing the citrus flavor of your slush. Make sure not to include the bitter white pith—only the flavorful zest.
  4. Blend the mixture on medium-high speed for about 30-45 seconds. Stop once the ingredients are fully combined and the slush has a smooth, even consistency. If you notice large chunks of ice, blend for an additional 10-15 seconds. Avoid over-blending, as this can make the slush too liquidy.
  5. Once blended, taste the slush. If it needs more sweetness, add a little more sugar and blend for a few more seconds. If it’s too thick, you can add a splash of milk to reach your desired consistency.
  6. Pour the slush into glasses. This recipe typically serves 4, but you can easily double it for larger gatherings. Use a spoon to help guide the slush into the glasses if needed.
  7. Garnish each serving with fresh orange slices and mint leaves. The mint not only adds a pop of color but also a refreshing aroma that complements the citrus flavors beautifully.
  8. Serve immediately and enjoy! If you’ve made extra, you can refrigerate it for a short time, but it’s best enjoyed fresh.

Pro Tips for the Best Frozen Orange Creamsicle Slush

  • Don’t skip the orange zest! It’s a game-changer for flavor. Always zest before juicing to make it easier.
  • Use a high-powered blender for the best texture. A standard blender may struggle with ice, leading to uneven consistency. If you have a food processor, that can work too, but ensure the ice is finely crushed.
  • Adjust the ice-to-liquid ratio carefully. If your slush is too thick, it won’t blend well. Start with less ice and add more until you reach your preferred texture.
  • Be cautious with the sugar! Always start with the lower amount, as you can easily add more, but it’s hard to fix an overly sweet slush.
  • For a fun twist, consider adding a splash of coconut milk or a handful of fresh fruit like strawberries or pineapple. This not only enhances the flavor but also adds a beautiful color contrast.

Variations & Serving Ideas

There are countless ways to put a spin on your Frozen Orange Creamsicle Slush. Consider making a tropical version by adding in some pineapple juice or coconut milk for a delightful tropical twist. If you’re feeling adventurous, try incorporating a handful of frozen mango or peach slices for added sweetness. For a lighter version, swap out the vanilla ice cream for Greek yogurt for a creamy yet tangy alternative.

As for serving ideas, this refreshing slush pairs wonderfully with light summer dishes like grilled chicken skewers, fish tacos, or a simple salad topped with citrus vinaigrette. The bright, zesty flavors of the slush complement these dishes perfectly, making them an ideal pairing for a sunny day.

Storage, Make-Ahead & Reheating

This Frozen Orange Creamsicle Slush is best enjoyed fresh, but if you have leftovers, you can store them in an airtight container in the fridge for up to 2 days. Just keep in mind that the slush may lose some of its texture over time as the ice melts. It doesn’t freeze well, as the ice will turn into a solid block. If you must freeze it, blend again after thawing to restore the slushy consistency. This treat is best the day you make it, as the flavors meld together beautifully overnight, enhancing its deliciousness.

Frequently Asked Questions

Can I make Frozen Orange Creamsicle Slush ahead of time?

Yes — in fact, it tastes even better the next day as the flavors meld. However, it’s best to enjoy it fresh, as the texture can change if stored for too long. If you need to prepare it ahead, keep it in the fridge and re-blend before serving.

What kind of orange juice should I use?

For the best flavor, use freshly squeezed orange juice. However, if you’re short on time, opt for 100% pure store-bought juice without added sugars. This will ensure that your slush remains flavorful and refreshing.

Can I substitute the vanilla ice cream?

Absolutely! If you’re looking for a dairy-free option, coconut milk ice cream or a non-dairy vanilla ice cream can work wonderfully. They will still provide the creamy texture and sweetness you desire.

How can I adjust the sweetness of my slush?

You can easily adjust the sweetness by modifying the amount of sugar added. Start with 1/4 cup and taste the mixture before blending. If you prefer it sweeter, add more sugar gradually until it reaches your desired level.

What should I do if my slush is too thick?

If your slush is too thick, simply add a splash of milk or orange juice and blend again. This will help achieve a more drinkable consistency while maintaining the slushy texture. Adjust gradually to reach your preferred thickness.

Sun-Kissed Frozen Orange Cream Slush

Final Thoughts

The Frozen Orange Creamsicle Slush is a delightful blend of refreshing citrus and creamy goodness, making it a perfect treat for warm days or any time you crave a taste of nostalgia. The way the bright orange flavor dances with the creamy texture truly elevates this slush, transforming it into a satisfying escape from the everyday.

This is the kind of recipe I come back to again and again, especially when I’m looking to cool down or impress guests at a summer gathering. It’s simple to make and always brings smiles all around! I encourage you to try this recipe for yourself—don’t hesitate to share your results or even put your own spin on it. Happy slushing!

Print
clock clock iconcutlery cutlery iconflag flag iconfolder folder iconinstagram instagram iconpinterest pinterest iconfacebook facebook iconprint print iconsquares squares iconheart heart iconheart solid heart solid icon

Frozen Orange Creamsicle Slush


  • Author: Lily author
  • Total Time: 15 minutes
  • Yield: 4 servings 1x
Pin Recipe
Print Recipe

Description

This Frozen Orange Creamsicle Slush is a refreshing treat that combines creamy vanilla and zesty orange flavors. Perfect for hot summer days, it brings back nostalgic memories with every sip.


Ingredients

Scale
  • 2 cups orange juice (freshly squeezed or store-bought)
  • 1 cup vanilla ice cream
  • 1 cup crushed ice
  • 1/2 cup milk (whole or 2%)
  • 1/4 cup granulated sugar (adjust based on sweetness preference)
  • 1 teaspoon vanilla extract
  • Zest of 1 orange (for added flavor)
  • Fresh orange slices and mint leaves (for garnish)

Instructions

  1. Start by preparing your ingredients. Gather 2 cups of orange juice, 1 cup of vanilla ice cream, and 1 cup of crushed ice. Make sure the ice is finely crushed, as larger chunks can make blending difficult.
  2. In a blender, combine the orange juice, vanilla ice cream, crushed ice, and 1/2 cup of milk. Add 1/4 cup of granulated sugar and 1 teaspoon of vanilla extract. If you like a sweeter slush, consider adding a bit more sugar at this stage.
  3. Add the zest of 1 orange to the blender. This step is crucial for enhancing the citrus flavor of your slush. Make sure not to include the bitter white pith—only the flavorful zest.
  4. Blend the mixture on medium-high speed for about 30-45 seconds. Stop once the ingredients are fully combined and the slush has a smooth, even consistency. If you notice large chunks of ice, blend for an additional 10-15 seconds. Avoid over-blending, as this can make the slush too liquidy.
  5. Once blended, taste the slush. If it needs more sweetness, add a little more sugar and blend for a few more seconds. If it’s too thick, you can add a splash of milk to reach your desired consistency.
  6. Pour the slush into glasses. This recipe typically serves 4, but you can easily double it for larger gatherings. Use a spoon to help guide the slush into the glasses if needed.
  7. Garnish each serving with fresh orange slices and mint leaves. The mint not only adds a pop of color but also a refreshing aroma that complements the citrus flavors beautifully.
  8. Serve immediately and enjoy! If you’ve made extra, you can refrigerate it for a short time, but it's best enjoyed fresh.
  • Prep Time: 15 min
  • Cook Time: 0 min
  • Category: Dessert
  • Method: Blending
  • Cuisine: American

Nutrition

  • Serving Size: 1 serving
  • Calories: 200
  • Sugar: 30 g
  • Sodium: 50 mg
  • Fat: 5 g
  • Saturated Fat: 3 g
  • Unsaturated Fat: 2 g
  • Trans Fat: 0 g
  • Carbohydrates: 40 g
  • Fiber: 1 g
  • Protein: 2 g
  • Cholesterol: 20 mg

Keywords: Don't skip the orange zest! It's a game-changer for flavor. Always zest before juicing to make it easier.

Did you make this recipe?

Share a photo and tag us — we can't wait to see what you've made!

Zesty Lemon Poppy Seed Delight

One rainy afternoon, I found myself in my grandmother’s cozy kitchen, the kind that always smelled like warmth and love. She was whipping up her famous Lemon Poppy Seed Loaf, a recipe that had been passed down through generations. As the batter came together, the zesty aroma of fresh lemons filled the air, mingling perfectly with the nutty fragrance of poppy seeds. I can still picture her, apron-clad, as she expertly drizzled a vibrant citrus icing over the loaf, creating a glossy, sun-kissed finish that beckoned us to dive in. It was a moment that sparked my own passion for baking, and this recipe has become a cherished staple in my home ever since.

When you take a bite of this Lemon Poppy Seed Loaf, it’s like a burst of sunshine on your palate. The loaf is beautifully golden, with a tender crumb that melts in your mouth. Each slice is speckled with tiny poppy seeds, adding a delightful crunch that contrasts beautifully with the tangy sweetness of the lemon. And that citrus icing? It’s the finishing touch that elevates this loaf from ordinary to extraordinary, with its bright, zesty flavor dancing on your taste buds.

This recipe stands out because it embraces simplicity while delivering on flavor. I’ve added a hint of vanilla to the batter, enhancing the overall taste and making it even more indulgent. Trust me, once you make this Lemon Poppy Seed Loaf With Citrus Icing, it’ll become a go-to in your baking repertoire.

So, let me show you exactly how to make it!

Zesty Lemon Poppy Seed Delight

Why You’ll Love This Recipe

  • Moist and tender crumb that melts in your mouth, thanks to the perfect balance of butter and buttermilk.
  • Bright, zesty lemon flavor paired with crunchy poppy seeds, creating a delightful texture and taste experience.
  • Easy to whip up in just about an hour, perfect for last-minute gatherings or a cozy afternoon treat.
  • Budget-friendly with everyday ingredients, making it an accessible option for all home bakers.
  • The citrus icing adds a sweet tang that elevates the loaf, turning a simple recipe into a showstopper!

Ingredients

  • 1 ½ cups (190g) all-purpose flour
  • 1 teaspoon baking powder
  • ½ teaspoon baking soda
  • ½ teaspoon salt
  • 3 tablespoons poppy seeds
  • ½ cup (115g) unsalted butter, softened to room temperature
  • 1 cup (200g) granulated sugar
  • 2 large eggs
  • 1 teaspoon vanilla extract
  • 1 teaspoon lemon zest (from about 1 medium lemon)
  • ½ cup (120ml) buttermilk
  • 2 tablespoons fresh lemon juice

For the Citrus Icing:

  • 1 cup (120g) powdered sugar
  • 2 tablespoons fresh lemon juice
  • 1 tablespoon orange juice
  • 1 teaspoon lemon zest (for garnish, optional)

Let’s dive into the key ingredients that make this Lemon Poppy Seed Loaf so special. The all-purpose flour provides the structure and base for the loaf, while the baking powder and baking soda ensure it rises perfectly, giving the loaf a light texture. For a gluten-free variation, you could substitute the flour with a gluten-free all-purpose blend. Poppy seeds not only add a delightful crunch but also contribute to the unique flavor profile that pairs well with the citrus notes.

Unsalted butter is crucial for achieving the buttery richness that makes this loaf so moist. If you’re looking for a dairy-free option, coconut oil or a vegan butter can be used instead. The buttermilk is another essential component, providing acidity that activates the baking soda for a fluffy texture. If you don’t have buttermilk on hand, you can easily make a substitute by mixing ½ cup of milk with 1 tablespoon of vinegar or lemon juice and letting it sit for about 5 minutes.

Step-by-Step Instructions

  1. Preheat your oven to 350°F (175°C). Grease a 9×5-inch loaf pan or line it with parchment paper for easy removal later.
  2. In a medium mixing bowl, whisk together 1 ½ cups of all-purpose flour, 1 teaspoon of baking powder, ½ teaspoon of baking soda, ½ teaspoon of salt, and 3 tablespoons of poppy seeds. This helps to evenly distribute the baking agents and ensures a uniform rise.
  3. In a large mixing bowl, cream together ½ cup of softened unsalted butter and 1 cup of granulated sugar using an electric mixer on medium speed for about 3-4 minutes, until the mixture is light and fluffy. Make sure to scrape down the sides of the bowl occasionally.
  4. Add 2 large eggs, 1 teaspoon of vanilla extract, and 1 teaspoon of lemon zest to the creamed butter and sugar, mixing until fully combined. You want a smooth consistency, so ensure there are no lumps of butter.
  5. In a small bowl, combine ½ cup of buttermilk and 2 tablespoons of fresh lemon juice. Alternately add the dry ingredients and buttermilk mixture to the butter mixture, starting and ending with the dry ingredients. Mix just until combined; do not overmix, as this can lead to a dense loaf.
  6. Pour the batter into the prepared loaf pan. Smooth the top with a spatula, ensuring it’s even. Bake in the preheated oven for 50-60 minutes, or until a toothpick inserted in the center comes out clean. The edges should be lightly golden brown, and the center should feel just set.
  7. Once baked, remove the loaf from the oven and allow it to cool in the pan for about 10 minutes. Then, transfer it to a wire rack to cool completely. Resist the urge to slice too soon, as it will be crumbly if it’s still warm.
  8. While the loaf is cooling, prepare the citrus icing. In a medium bowl, whisk together 1 cup of powdered sugar, 2 tablespoons of fresh lemon juice, and 1 tablespoon of orange juice until smooth. If the icing is too thick, you can add a little more juice to reach your desired consistency.
  9. Once the loaf is completely cool, drizzle the citrus icing over the top. If you like, sprinkle with an additional teaspoon of lemon zest for an extra pop of flavor and color.

Pro Tips for the Best Lemon Poppy Seed Loaf With Citrus Icing

  • Be careful not to overmix your batter; this is a common mistake that can lead to a dense loaf. Mix just until the dry ingredients are incorporated for a light and fluffy texture.
  • Use room temperature ingredients, especially the butter and eggs. This helps to create a smoother batter and ensures even baking. Take your eggs out of the fridge about 30 minutes before you start.
  • For a more pronounced lemon flavor, consider adding a little lemon extract in addition to the zest and juice. Just a half teaspoon can elevate the citrus notes significantly.
  • When measuring your flour, spoon it into the measuring cup and level it off with a knife instead of scooping directly from the bag. This prevents packing and ensures you don’t end up with a dry loaf.
  • Invest in a good quality loaf pan; it makes a difference in heat distribution, which ensures even baking. If your pan is dark-coated, reduce the oven temperature by 25°F to prevent over-browning.

Variations & Serving Ideas

For a delightful twist, consider adding blueberries or raspberries to the batter for a fruity burst of flavor. You can also experiment with different citrus fruits—try lime or grapefruit zest and juice for a refreshing change. For a healthier option, substitute half of the all-purpose flour with whole wheat flour for added fiber without compromising too much on texture.

This Lemon Poppy Seed Loaf pairs beautifully with a light salad, such as a mixed greens salad with a vinaigrette, or a cup of tea for a cozy afternoon treat. It also complements a creamy cheese platter, as the acidity of the loaf balances rich cheeses perfectly. Lastly, a scoop of vanilla ice cream on the side creates a delightful contrast of temperatures and flavors!

Storage, Make-Ahead & Reheating

This Lemon Poppy Seed Loaf can be stored at room temperature for up to 3 days if wrapped tightly in plastic wrap. If you want to keep it longer, it freezes well for up to 3 months. To freeze, wrap the loaf tightly in plastic wrap and then in aluminum foil to prevent freezer burn.

When you’re ready to enjoy it again, simply thaw it in the fridge overnight. Reheat individual slices in the microwave for 15-20 seconds or in a toaster oven until warmed through. Interestingly, many people find that this loaf tastes even better the next day, as the flavors have time to meld!

Frequently Asked Questions

Can I make Lemon Poppy Seed Loaf With Citrus Icing ahead of time?

Yes — in fact, it tastes even better the next day! You can make the loaf a day in advance, allowing the flavors to develop. Just be sure to store it in an airtight container to maintain its moisture.

Can I substitute the poppy seeds?

Absolutely! If you don’t have poppy seeds on hand or prefer an alternative, you can use sesame seeds for a similar crunch or omit them entirely for a smooth loaf.

What can I use instead of buttermilk?

If you don’t have buttermilk, you can easily create a substitute by mixing ½ cup of milk (dairy or plant-based) with 1 tablespoon of vinegar or lemon juice. Let it sit for 5 minutes before using in the recipe.

How can I make this recipe gluten-free?

To make a gluten-free version of this Lemon Poppy Seed Loaf, substitute the all-purpose flour with a gluten-free all-purpose flour blend. Just ensure that the blend contains a binding agent like xanthan gum for the best results.

What is the best way to store leftover loaf?

Leftover Lemon Poppy Seed Loaf should be stored in an airtight container at room temperature for up to 3 days. For longer storage, wrap it tightly and freeze for up to 3 months. Thaw it before serving for the best texture.

Zesty Lemon Poppy Seed Delight

Final Thoughts

The Lemon Poppy Seed Loaf with Citrus Icing is truly a delightful treat that brings a burst of brightness to any occasion. The zesty lemon flavor combined with the subtle crunch of poppy seeds creates a satisfying balance, while the citrus icing adds a touch of sweetness that perfectly complements the loaf’s tanginess.

This is the kind of recipe I come back to again and again, especially when I want to brighten up a gloomy day or celebrate a small victory. The aroma that fills the kitchen as it bakes is absolutely heavenly! I encourage you to give this recipe a try; you might just find it becoming a beloved staple in your home. Don’t forget to share your results or even add your own unique twist—I can’t wait to see what you create!

Print
clock clock iconcutlery cutlery iconflag flag iconfolder folder iconinstagram instagram iconpinterest pinterest iconfacebook facebook iconprint print iconsquares squares iconheart heart iconheart solid heart solid icon

Lemon Poppy Seed Loaf


  • Author: Lily author
  • Total Time: 11 minute
  • Yield: 1 loaf 1x
Pin Recipe
Print Recipe

Description

This Lemon Poppy Seed Loaf is a delightful treat that combines zesty lemon flavor with crunchy poppy seeds. Topped with a citrus icing, it’s perfect for any occasion.


Ingredients

Scale
  • 1 ½ cups (190g) all-purpose flour
  • 1 teaspoon baking powder
  • ½ teaspoon baking soda
  • ½ teaspoon salt
  • 3 tablespoons poppy seeds
  • ½ cup (115g) unsalted butter, softened to room temperature
  • 1 cup (200g) granulated sugar
  • 2 large eggs
  • 1 teaspoon vanilla extract
  • 1 teaspoon lemon zest (from about 1 medium lemon)
  • ½ cup (120ml) buttermilk
  • 2 tablespoons fresh lemon juice
  • 1 cup (120g) powdered sugar
  • 2 tablespoons fresh lemon juice
  • 1 tablespoon orange juice
  • 1 teaspoon lemon zest (for garnish, optional)

Instructions

  1. Preheat your oven to 350°F (175°C). Grease a 9×5-inch loaf pan or line it with parchment paper for easy removal later.
  2. In a medium mixing bowl, whisk together 1 ½ cups of all-purpose flour, 1 teaspoon of baking powder, ½ teaspoon of baking soda, ½ teaspoon of salt, and 3 tablespoons of poppy seeds. This helps to evenly distribute the baking agents and ensures a uniform rise.
  3. In a large mixing bowl, cream together ½ cup of softened unsalted butter and 1 cup of granulated sugar using an electric mixer on medium speed for about 3-4 minutes, until the mixture is light and fluffy. Make sure to scrape down the sides of the bowl occasionally.
  4. Add 2 large eggs, 1 teaspoon of vanilla extract, and 1 teaspoon of lemon zest to the creamed butter and sugar, mixing until fully combined. You want a smooth consistency, so ensure there are no lumps of butter.
  5. In a small bowl, combine ½ cup of buttermilk and 2 tablespoons of fresh lemon juice. Alternately add the dry ingredients and buttermilk mixture to the butter mixture, starting and ending with the dry ingredients. Mix just until combined; do not overmix, as this can lead to a dense loaf.
  6. Pour the batter into the prepared loaf pan. Smooth the top with a spatula, ensuring it’s even. Bake in the preheated oven for 50-60 minutes, or until a toothpick inserted in the center comes out clean. The edges should be lightly golden brown, and the center should feel just set.
  7. Once baked, remove the loaf from the oven and allow it to cool in the pan for about 10 minutes. Then, transfer it to a wire rack to cool completely. Resist the urge to slice too soon, as it will be crumbly if it’s still warm.
  8. While the loaf is cooling, prepare the citrus icing. In a medium bowl, whisk together 1 cup of powdered sugar, 2 tablespoons of fresh lemon juice, and 1 tablespoon of orange juice until smooth. If the icing is too thick, you can add a little more juice to reach your desired consistency.
  9. Once the loaf is completely cool, drizzle the citrus icing over the top. If you like, sprinkle with an additional teaspoon of lemon zest for an extra pop of flavor and color.
  • Prep Time: 15 mins
  • Cook Time: 50-60 mins
  • Category: Dessert
  • Method: Baking
  • Cuisine: American

Nutrition

  • Serving Size: 1 slice
  • Calories: 200
  • Sugar: 15 g
  • Sodium: 150 mg
  • Fat: 8 g
  • Saturated Fat: 5 g
  • Unsaturated Fat: 3 g
  • Trans Fat: 0 g
  • Carbohydrates: 30 g
  • Fiber: 1 g
  • Protein: 3 g
  • Cholesterol: 40 mg

Keywords: Be careful not to overmix your batter; this is a common mistake that can lead to a dense loaf. Use room temperature ingredients for a smoother batter and even baking.

Did you make this recipe?

Share a photo and tag us — we can't wait to see what you've made!

  • Privacy Policy
  • Terms Of Service
  • Contact
  • About
  • GDPR

Copyright © 2025 Homesmad