• Skip to primary navigation
  • Skip to main content
  • Skip to primary sidebar
Homesmad

Homesmad

  • Home
  • Breakfast & Brunch
  • Appetizers & Snacks
  • Dinner
  • Dessert
  • About
  • Privacy Policy
  • Contact
Homesmad
  • Home
  • Breakfast & Brunch
  • Appetizers & Snacks
  • Dinner
  • Dessert
  • About
  • Privacy Policy
  • Contact

Best Louisiana Remoulade Sauce Recipe – Easy & Zesty

October 30, 2025 by Lily author

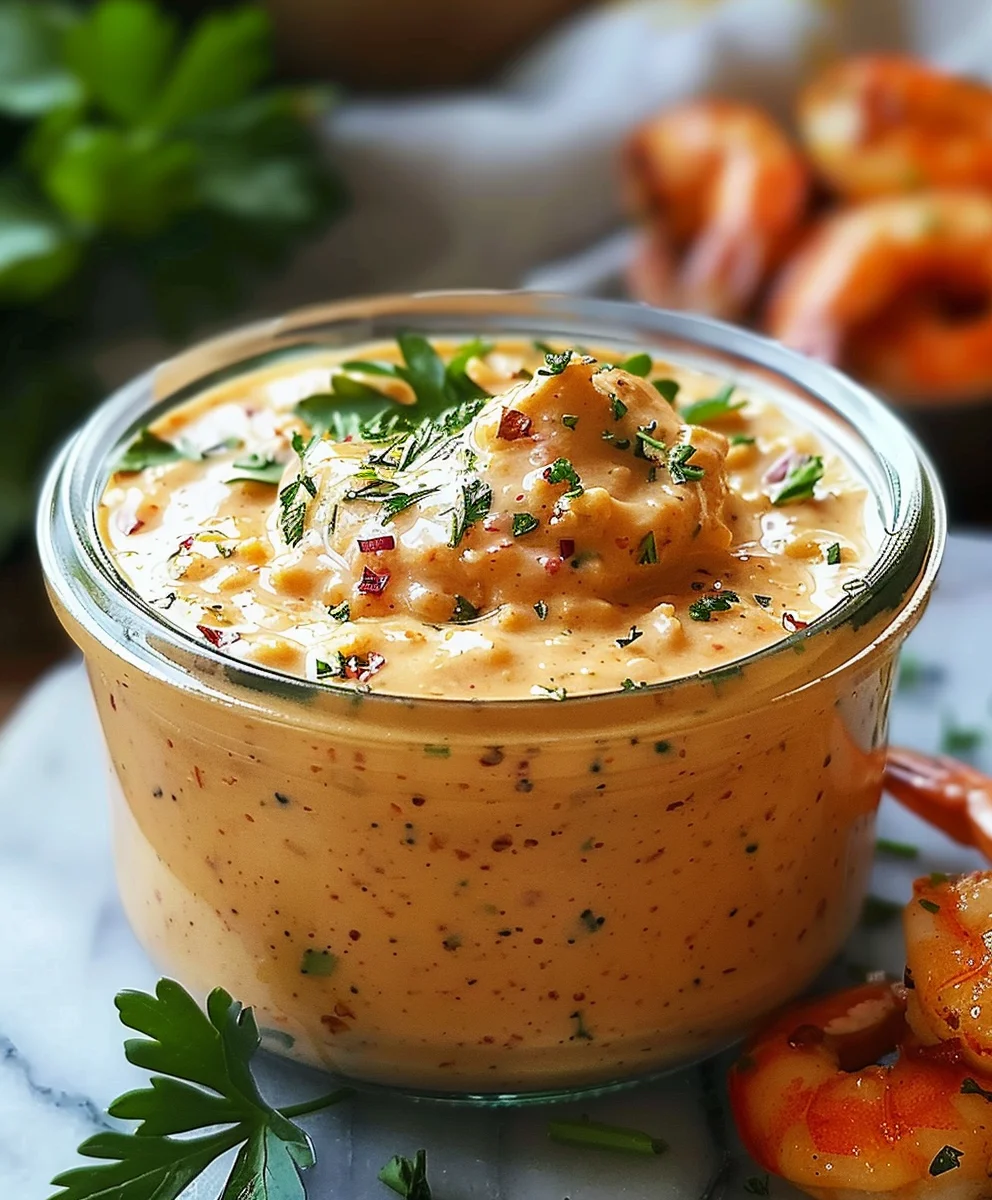
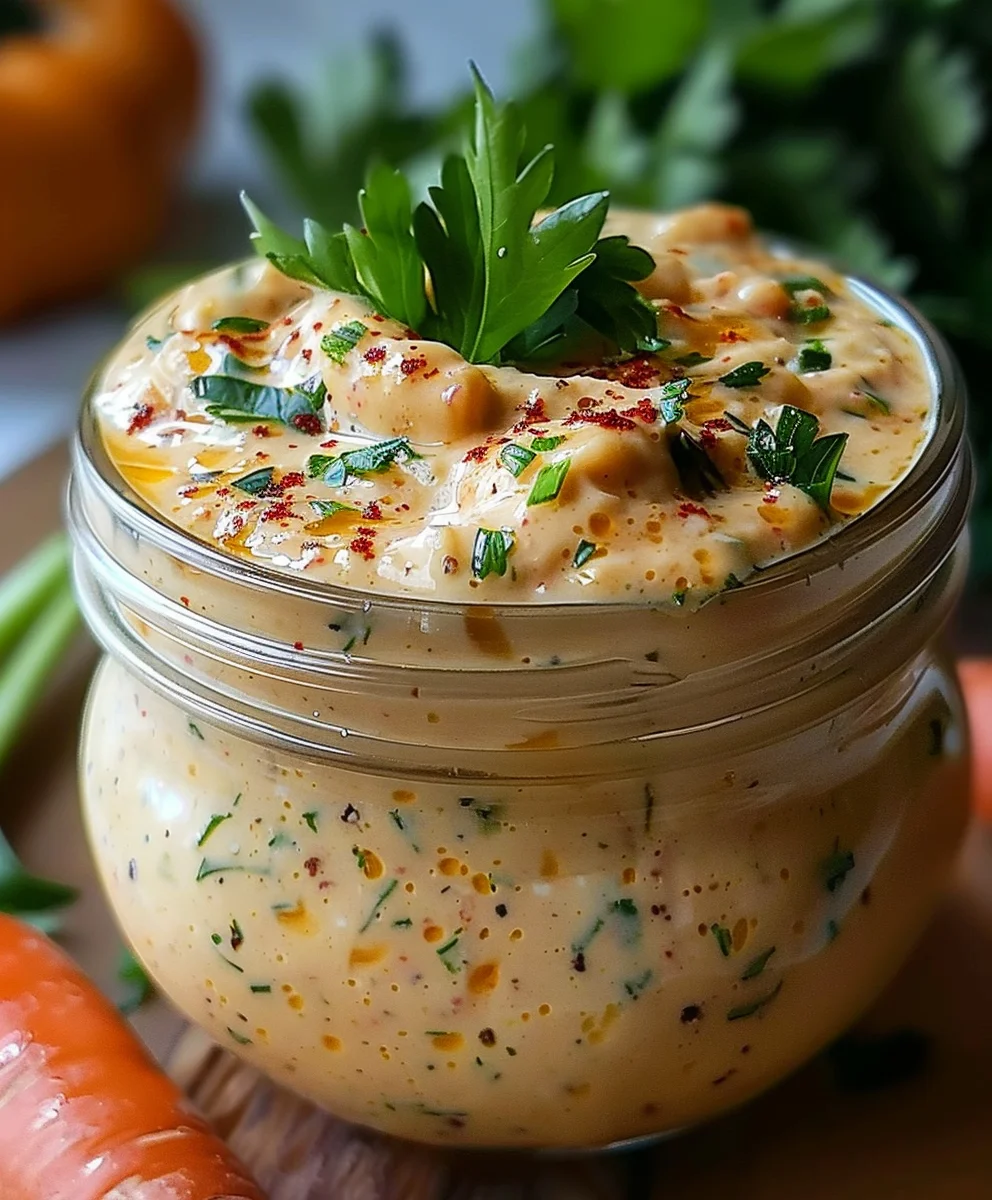
The Best Louisiana Remoulade Sauce is more than just a condiment; it’s a culinary cornerstone, a vibrant symphony of flavors that can transform an ordinary meal into an extraordinary dining experience. I’ve always believed that the right sauce can elevate any dish, and this particular recipe truly proves that point. Imagine a creamy, tangy, and subtly spicy concoction ready to awaken your taste buds with every dip. This is precisely what you’ll achieve with my carefully crafted recipe.

This iconic sauce boasts a rich heritage deeply intertwined with Louisiana’s vibrant culinary landscape. While its roots trace back to classic French cuisine, it’s the Creole and Cajun influences that have truly given Louisiana remoulade its distinctive character. It’s not merely a French mayonnaise-based dressing; it’s an adaptation, a celebration of the region’s diverse ingredients and bold flavors, making it an indispensable part of countless traditional dishes, from shrimp po’boys to crab cakes.

People absolutely adore this dish because of its incredible versatility and the complex flavor profile it brings to the table. It strikes a perfect balance between a bright tang from mustard and lemon, a delightful creaminess, and a nuanced kick from various spices, often including paprika and a hint of cayenne. Whether you’re pairing it with fried green tomatoes, drizzling it over grilled fish, or using it as a vibrant sandwich spread, The Best Louisiana Remoulade Sauce adds that unmistakable, zesty spark that makes every bite memorable. It’s surprisingly simple to make, yet delivers a profound depth of flavor that keeps everyone coming back for more.

Best Louisiana Remoulade Sauce Recipe - Easy & Zesty this RECIPE

Ingredients:

  • For The Best Louisiana Remoulade Sauce:

    • 1 cup good quality full-fat mayonnaise (I always opt for a brand that’s rich and creamy, it makes all the difference!)
    • 2 tablespoons Creole mustard (or a spicy brown mustard if Creole isn’t available, but Creole really gives it that authentic kick!)
    • 1 tablespoon fresh lemon juice
    • 1 tablespoon white vinegar (distilled white vinegar works perfectly for that sharp tang)
    • 1 tablespoon prepared horseradish, drained (use a good quality one, it adds a lovely bite without being overwhelmingly spicy)
    • 1 teaspoon Worcestershire sauce
    • 1 teaspoon hot sauce (Louisiana-style, like Tabasco or Crystal, to taste – I often add a little more because I love the heat!)
    • 1/2 teaspoon smoked paprika (for a beautiful color and a subtle smoky depth)
    • 1/4 teaspoon cayenne pepper (adjust based on your heat preference, I like mine with a little extra warmth)
    • 1/4 teaspoon garlic powder
    • 1/4 teaspoon onion powder
    • 1/4 cup finely chopped celery (about 1 small stalk, adds a crucial crunch and freshness)
    • 2 tablespoons finely chopped green onions (white and light green parts, for mild onion flavor and color)
    • 2 tablespoons finely chopped fresh parsley (flat-leaf is my preference, for bright, herbaceous notes)
    • Salt and freshly ground black pepper to taste (you’ll definitely want to taste and adjust this after everything is mixed!)
  • For the Fried Green Tomatoes:

    • 4 large firm green tomatoes (this is key! They need to be truly green and firm, not even a hint of red)
    • 1 cup all-purpose flour
    • 1 tablespoon cornstarch (my secret for an extra crispy coating!)
    • 1 teaspoon salt, divided
    • 1/2 teaspoon freshly ground black pepper, divided
    • 1/2 teaspoon garlic powder, divided
    • 1/4 teaspoon cayenne pepper, divided (optional, but I love the subtle warmth it adds to the tomatoes)
    • 2 large eggs
    • 1/4 cup milk (any kind will do, whole milk makes it a bit richer)
    • 1 1/2 cups fine ground cornmeal (not coarse, fine ground adheres better and gives a delicate crunch)
    • Vegetable oil, canola oil, or peanut oil for frying (enough to fill your skillet about 1 inch deep, typically 3-4 cups)

Instructions:

Phase 1: Crafting The Best Louisiana Remoulade Sauce

  1. Gather Your Tools and Ingredients: First things first, get all your ingredients for “The Best Louisiana Remoulade Sauce” out and ready. Finely chop your celery, green onions, and parsley. This prep work makes the mixing process so much smoother!
  2. Combine Wet Ingredients: In a medium-sized mixing bowl, combine the mayonnaise, Creole mustard, fresh lemon juice, white vinegar, prepared horseradish, and Worcestershire sauce. Whisk these together until they are well incorporated and smooth. You’ll see the color already starting to come to life.
  3. Add the Spice and Flavor Boosters: Next, add the hot sauce, smoked paprika, cayenne pepper, garlic powder, and onion powder to the wet mixture. Whisk vigorously again, ensuring all the dry spices are fully distributed and there are no clumps. At this point, the sauce should have a beautiful pale orange hue.
  4. Fold in Fresh Herbs and Vegetables: Now, gently fold in the finely chopped celery, green onions, and fresh parsley. I always take a moment here to admire how the fresh green colors contrast with the rich base of the sauce. These fresh elements are absolutely crucial for texture and brightness.
  5. Season to Perfection: This is a critical step! Taste the sauce. Add salt and freshly ground black pepper to your liking. Remember, the flavors will meld and deepen as it chills, so you want it to taste good now, but a little more vibrant than you might expect for the final product. Don’t be shy about adjusting the hot sauce or lemon juice here if you feel it needs more kick or tang. This is where you truly make it “The Best Louisiana Remoulade Sauce” for your palate!
  6. Chill and Allow Flavors to Marry: Cover the bowl tightly with plastic wrap and refrigerate for at least 1 hour. Frankly, I prefer to make it several hours or even a day in advance. This chilling period is non-negotiable; it allows all those wonderful flavors to meld and develop into a truly harmonious, rich, and complex sauce. Patience is a virtue when it comes to remoulade!

Phase 2: Preparing Your Green Tomatoes

  1. Wash and Slice the Tomatoes: Thoroughly wash your firm green tomatoes. Using a sharp knife, carefully slice each tomato into 1/4-inch thick rounds. Aim for even thickness so they cook uniformly. Discard the very end pieces. You’ll notice how firm and dense these green tomatoes are – that’s exactly what we want for frying!
  2. Prepare the Seasoned Flour Dredge: In a shallow dish (a pie plate or a wide, shallow bowl works well), whisk together the all-purpose flour, cornstarch, 1/2 teaspoon of salt, 1/4 teaspoon of black pepper, 1/4 teaspoon of garlic powder, and 1/8 teaspoon of cayenne pepper (if using). This dry mix will be the first layer of your coating.
  3. Prepare the Egg Wash: In a second shallow dish, whisk the two large eggs with the 1/4 cup of milk until thoroughly combined. This egg wash acts as the binder, helping the cornmeal adhere beautifully to the tomatoes.
  4. Prepare the Cornmeal Coating: In a third shallow dish, place the fine ground cornmeal along with the remaining 1/2 teaspoon of salt, 1/4 teaspoon of black pepper, 1/4 teaspoon of garlic powder, and 1/8 teaspoon of cayenne pepper (if using). Stir these together well to ensure the cornmeal itself is also seasoned.
  5. Season the Tomatoes Directly: Before dredging, I like to lightly sprinkle both sides of the tomato slices with a pinch of salt and pepper. This ensures the tomato itself is seasoned from the inside out, not just the coating.
  6. Dredge the Tomatoes: Now for the classic three-step breading process!

    1. Flour First: Take a tomato slice and dredge it in the seasoned flour mixture, ensuring it’s fully coated. Gently shake off any excess flour.
    2. Egg Wash Next: Dip the floured tomato slice into the egg wash, making sure both sides are covered. Let any excess egg wash drip off.
    3. Cornmeal Last: Finally, place the egg-coated tomato slice into the seasoned cornmeal mixture. Press gently to ensure the cornmeal adheres well to both sides. You want a good, even coating here. Shake off any loose cornmeal.

    Place the coated tomato slices on a baking sheet or wire rack as you finish them. I often recommend letting them sit for 5-10 minutes after breading. This little rest allows the coating to set and helps prevent it from falling off during frying. Repeat with all remaining tomato slices.

Phase 3: The Frying Process

  1. Heat the Oil: Pour enough vegetable, canola, or peanut oil into a large, heavy-bottomed skillet (cast iron works wonderfully here!) to reach about 1 inch deep. Place the skillet over medium-high heat. This is where a good thermometer is your best friend! You’re aiming for an oil temperature between 350°F (175°C) and 375°F (190°C). If the oil isn’t hot enough, your tomatoes will be greasy; if it’s too hot, the coating will burn before the tomato softens.
  2. Test the Oil: Once the oil appears shimmering, you can test it by dropping a tiny pinch of cornmeal into the pan. If it sizzles gently and immediately, your oil is ready. If it just sinks or barely bubbles, it’s not hot enough. If it sizzles violently and browns too quickly, it’s too hot. Adjust the heat as needed.
  3. Fry in Batches: Carefully place a few breaded tomato slices into the hot oil. Do not overcrowd the pan! Overcrowding will lower the oil temperature too much, leading to soggy, oily tomatoes. Work in batches, leaving enough space between each slice.
  4. Cook to Golden Perfection: Fry the tomato slices for 2-3 minutes per side, or until they are a beautiful golden brown and crispy. You’ll see the edges crisping up and the coating turning that lovely deep yellow-brown. Use tongs to gently flip them to ensure even cooking on both sides.
  5. Drain Excess Oil: Once golden and crisp, remove the fried green tomatoes from the skillet using tongs. Place them on a wire rack set over a baking sheet lined with paper towels. This setup allows air to circulate, keeping them crispy as the excess oil drains away. Season lightly with a little more salt immediately after they come out of the oil – this enhances their flavor.
  6. Maintain Oil Temperature and Repeat: Allow the oil temperature to come back up to the desired range between batches if it has dropped. Continue frying the remaining tomato slices, ensuring each batch is cooked to perfection. Keep an eye on the oil level as well; you might need to add a little more if it gets too low.

Phase 4: Serving Suggestions and Enjoyment

  1. Serve Immediately: Fried green tomatoes are best enjoyed fresh out of the fryer, while they are still warm and wonderfully crispy. The contrast between the hot, crunchy exterior and the tender, tangy interior is truly delightful.
  2. The Star of the Show: Arrange your golden-brown fried green tomatoes on a serving platter. Now, for the grand finale – generously dollop or drizzle “The Best Louisiana Remoulade Sauce” over the warm tomatoes. Alternatively, serve the sauce on the side for dipping. This combination is pure culinary magic! The creamy, spicy, tangy remoulade cuts through the richness of the fried tomatoes perfectly.
  3. Garnish for Flair: For an extra touch of presentation, you can sprinkle a little more fresh chopped parsley or green onions over the top of the plated dish. A tiny pinch of smoked paprika can also add a pop of color.
  4. Pairing Perfection: These magnificent fried green tomatoes with “The Best Louisiana Remoulade Sauce” make a fantastic appetizer, a delightful side dish to grilled meats or seafood, or even a light lunch on their own. They are a staple of Southern comfort food, and I guarantee they will become a favorite in your home too. I absolutely love serving them alongside a simple salad to balance the richness.
  5. Enjoy Every Bite: Take a moment to appreciate the fruits of your labor. The harmonious blend of flavors and textures in this dish is truly something special. The slight tang of the green tomato, the satisfying crunch of the seasoned cornmeal crust, and the vibrant, complex notes of “The Best Louisiana Remoulade Sauce” all come together to create an unforgettable experience. This is more than just a meal; it’s a taste of Louisiana hospitality right in your kitchen!

Best Louisiana Remoulade Sauce Recipe - Easy & Zesty

Conclusion:

So there you have it, folks! After walking you through every step, I truly hope you’re as excited as I am about this incredible concoction. This isn’t just another sauce; it’s a gateway to a whole new level of flavor that will undoubtedly transform your culinary repertoire. What makes this recipe an absolute must-try, you ask? Well, it’s the perfect symphony of tang, a subtle yet satisfying kick of spice, and that undeniable creamy richness that only a perfectly crafted remoulade can deliver. I’ve poured my heart into perfecting this blend, ensuring that every spoonful offers an authentic, vibrant taste of Louisiana. It’s the kind of sauce that makes you close your eyes and savor each bite, bringing a festive, gourmet feel to any meal you prepare. This isn’t merely a simple condiment; it’s an experience, a potent flavor enhancer that genuinely elevates even the most basic ingredients into something truly extraordinary. Trust me when I say, once you’ve tried this homemade version, store-bought alternatives will simply never compare. You’re truly creating something special, experiencing what I confidently call The Best Louisiana Remoulade Sauce. It’s a labor of love that pays off in spades, delivering a depth of flavor that is remarkably easy to achieve despite its sophisticated profile. This sauce brings an unforgettable zest to the table, making every meal a celebration of authentic Southern taste.

Endless Serving Suggestions:

Now that you’ve got this liquid gold ready, let’s talk about how to unleash its full potential. While it’s the quintessential partner for classic Southern fried seafood – think crispy fried shrimp, succulent crab cakes, or perfectly shucked oysters – its versatility stretches far beyond the fryer. Imagine a generous dollop brightening up a simple grilled fish fillet, turning a weeknight dinner into a gourmet experience worthy of a fancy restaurant. It’s absolutely divine when spread generously on a traditional po’boy sandwich, whether you’re layering it with juicy roast beef or classic fried oysters. But please, don’t limit yourself to just seafood! Try it as a vibrant and tangy spread for your next turkey or ham sandwich, effortlessly replacing your usual mayonnaise or mustard with something far more exciting. It makes an incredible, addictive dip for homemade sweet potato fries, crispy regular fries, or even just a bowl of crunchy potato chips. For a delightful appetizer that will surely impress your guests, mix it generously into your deviled egg filling for an unexpected zing, or drizzle it artfully over roasted asparagus, broccoli, or Brussels sprouts for a flavor explosion that will make vegetable skeptics ask for seconds. I’ve even used it as a fantastic, zesty dressing for a hearty coleslaw or a creamy potato salad, giving those beloved classic sides a fresh, exciting, and uniquely Southern twist. The creamy texture and robust, complex flavor also make it a superb accompaniment to grilled chicken breasts, pan-seared pork chops, or even as a unique base for a burger spread. Don’t be afraid to experiment; you might just discover your new favorite pairing! The possibilities are truly boundless with a sauce this good.

Exciting Variations to Explore:

And for those adventurous souls who love to tweak and personalize their culinary creations, this recipe for The Best Louisiana Remoulade Sauce is wonderfully adaptable to your specific tastes. Want to dial up the heat and really make your taste buds dance? Feel free to add an extra dash or two of cayenne pepper, or incorporate a bit more of your favorite Louisiana-style hot sauce – perhaps even a pinch of smoked paprika for a deeper, more nuanced warmth, or a tiny amount of ghost pepper powder if you’re feeling particularly brave and want a serious kick! If you prefer a milder version, simply reduce the amount of spicy ingredients until it suits your palate perfectly. For a different, perhaps brighter, herbal note, consider folding in some finely chopped fresh dill or chives alongside the traditional parsley, offering a slightly more delicate or herbaceous profile. Some people enjoy a bit more acidity in their remoulade; in that case, a splash more fresh lemon juice or even a hint of white wine vinegar can brighten it up further, cutting through the richness beautifully. For a slightly lighter touch without sacrificing too much creaminess, you could experiment with a mix of mayonnaise and a dollop of full-fat Greek yogurt, though I personally find the pure, high-quality mayonnaise provides that authentic, decadent richness we’re aiming for. And for our plant-based friends, a high-quality vegan mayonnaise works perfectly as a substitute, ensuring everyone can enjoy this incredible sauce without compromise. Remember, your kitchen is your laboratory, so feel empowered to adjust and adapt until it’s absolutely perfect for your unique palate and preferences.

Your Turn to Create and Share!

Now, the moment of truth! I genuinely hope I’ve inspired you to roll up your sleeves, gather your ingredients, and give this incredible recipe for The Best Louisiana Remoulade Sauce a try. There’s an immense satisfaction that comes from creating something so delicious and authentic from scratch, something that truly tastes like it came directly from a renowned New Orleans kitchen, right in the comfort of your own home. Don’t be intimidated by the name or the depth of flavor; the steps are straightforward, and the reward, I promise you, is immeasurable. Once you’ve whipped up your batch and experienced its magic – perhaps drizzled over a perfect crab cake or generously slathered on a shrimp po’boy – I would absolutely love to hear about it! Please, share your culinary adventures with me. What did you pair it with? Did you make any exciting variations that truly wowed your family or friends? Did your loved ones rave about it at your last gathering? Your feedback, your photos, and your unique experiences are incredibly valuable to me, and they inspire me to keep sharing more of these treasured, flavor-packed recipes. So, go forth, create, taste, experiment, and then come back and tell me all about it. Happy cooking, everyone!


The Best Louisiana Remoulade Sauce

The Best Louisiana Remoulade Sauce

The Best Louisiana Remoulade Sauce is a creamy, tangy, and subtly spicy condiment, a culinary cornerstone of Louisiana cuisine. It blends a bright tang from mustard and lemon with a nuanced kick from various spices, perfect for elevating any dish.

Prep Time
20 Minutes

Cook Time
PT0S

Total Time
20 Minutes

Servings
Approximately 1.5 cups

Ingredients

  • 1 cup full-fat mayonnaise
  • 2 tablespoons Creole mustard (or spicy brown mustard)
  • 1 tablespoon fresh lemon juice
  • 1 tablespoon white vinegar
  • 1 tablespoon prepared horseradish, drained
  • 1 teaspoon Worcestershire sauce
  • 1 teaspoon Louisiana-style hot sauce (to taste)
  • 1/2 teaspoon smoked paprika
  • 1/4 teaspoon cayenne pepper (adjust to taste)
  • 1/4 teaspoon garlic powder
  • 1/4 teaspoon onion powder
  • 1/4 cup finely chopped celery
  • 2 tablespoons finely chopped green onions
  • 2 tablespoons finely chopped fresh parsley
  • Salt to taste
  • Freshly ground black pepper to taste

Instructions

  1. Step 1
    In a medium mixing bowl, whisk together mayonnaise, Creole mustard, fresh lemon juice, white vinegar, prepared horseradish, and Worcestershire sauce until smooth.
  2. Step 2
    Stir in hot sauce, smoked paprika, cayenne pepper, garlic powder, and onion powder. Whisk vigorously to ensure all dry spices are fully distributed.
  3. Step 3
    Gently fold in the finely chopped celery, green onions, and fresh parsley.
  4. Step 4
    Taste the sauce and season with salt and freshly ground black pepper to your liking. Adjust hot sauce or lemon juice if more kick or tang is desired.
  5. Step 5
    Cover the bowl tightly and refrigerate for at least 1 hour. Chilling allows the flavors to meld and deepen for a truly harmonious sauce.

Important Information

Nutrition Facts (Per Serving)

It is important to consider this information as approximate and not to use it as definitive health advice.

Allergy Information

Please check ingredients for potential allergens and consult a health professional if in doubt.

« Previous Post
Melt-in-Your-Mouth Cheesy Chicken Crescent Rolls Recipe!
Next Post »
Salted Caramel Pretzel Bark: Sweet & Salty Perfection!

If you enjoyed this…

Honey Garlic Glazed Salmon: The Ultimate Recipe for Deliciousness

Classic Chicken Beef Bacon Lettuce Wraps with Ranch

Garlic Bread Pull Apart: The Ultimate Recipe for a Deliciously Cheesy Treat

Primary Sidebar

Browse by Diet

BreakfastDinnerLunchDessertAppetizer

Sweet Peach Yogurt Parfait Delight

One of my fondest memories is from a lazy summer afternoon spent at my grandmother’s house. The sun filtered through the kitchen window, casting a warm glow over the table where she would create her culinary magic. It was during one of those blissful moments that I first tasted her Peach Yogurt Parfait with Honey and Granola. The sweet aroma of ripe peaches mingling with creamy yogurt and the crunch of granola was nothing short of heavenly. It felt like summer captured in a bowl, and I still remember the joy of diving in with a spoon, each layer revealing a new burst of flavor.

When I think about that parfait, I can almost hear the gentle hum of the bees outside, reminding me of the floral notes that honey brings to every bite. The vibrant yellows and soft oranges of the peaches contrast beautifully with the creamy white yogurt and the golden crunch of granola. It’s a dish that not only looks delightful but also tastes like a celebration of fresh, wholesome ingredients.

What makes my version of this Peach Yogurt Parfait special is the careful balance of flavors and textures. I use ripe, juicy peaches, drizzled with locally sourced honey, and a homemade granola that’s bursting with nuts and seeds for an extra crunch. It’s a simple dish, but every layer is crafted with love and attention.

Let me show you exactly how to make this delightful parfait, so you can bring a bit of that summer magic into your kitchen!

Sweet Peach Yogurt Parfait Delight

Why You’ll Love This Recipe

  • Delightfully creamy texture from the Greek yogurt, paired with the juicy sweetness of fresh peaches.
  • Ready in under 20 minutes, making it a quick and satisfying breakfast or snack option.
  • Budget-friendly, using common ingredients that you may already have in your pantry.
  • Customizable with your favorite granola and nuts, allowing you to tailor each parfait to your taste.
  • Perfectly balanced flavors with the bright acidity of lemon juice and the sweetness of honey enhancing the peaches.

Ingredients

  • For the Parfait:
  • 2 cups plain Greek yogurt (or vanilla yogurt for a sweeter option)
  • 2 large ripe peaches, diced (about 2 cups)
  • 1 tablespoon fresh lemon juice (to prevent browning of peaches)
  • 2 tablespoons honey (plus more for drizzling)
  • 1 teaspoon vanilla extract (optional for extra flavor)
  • For the Granola:
  • 1 cup granola (store-bought or homemade; see notes for a simple granola recipe)
  • 1/4 cup sliced almonds (optional for added crunch)
  • 1/4 cup shredded coconut (optional for added flavor)

Let’s dive into some key ingredients that make this Peach Yogurt Parfait so delightful! First, the Greek yogurt is not only creamy but also packed with protein, making it a satisfying option for breakfast or a snack. If you’re looking for a sweeter option, you can easily substitute it with vanilla yogurt, though it may alter the overall flavor balance. Next, the ripe peaches are the star of the show; their natural sweetness shines through, so I recommend choosing peaches that yield slightly to pressure, indicating they’re perfectly ripe. If peaches aren’t in season, feel free to use nectarines or even frozen peaches—just thaw them before use. Finally, honey adds a lovely floral sweetness that ties everything together. If you prefer, maple syrup can serve as a delicious substitute.

Step-by-Step Instructions

  1. Start by preparing the peaches. Wash them thoroughly, then slice and dice them into bite-sized pieces. In a medium bowl, toss the diced peaches with 1 tablespoon of fresh lemon juice to prevent browning. Set aside for about 5 minutes while the lemon juice works its magic.
  2. In a separate bowl, combine the Greek yogurt, 2 tablespoons of honey, and 1 teaspoon of vanilla extract if using. Stir the mixture until smooth and thoroughly blended. This should take about a minute. Avoid overmixing to maintain the creaminess of the yogurt.
  3. Now it’s time to layer your parfait. Grab a clear glass or bowl to showcase your beautiful creation. Start with a generous spoonful of the yogurt mixture at the bottom—about 1/4 cup will do. Use a spoon to spread it evenly.
  4. Add a layer of the diced peaches over the yogurt, ensuring they cover the yogurt completely. You might want to use about half of what you have prepared—roughly 1 cup. This layer should be visually appealing, so arrange the peaches neatly.
  5. Sprinkle 1/4 cup of granola over the peaches. This adds a delightful crunch. Make sure to distribute it evenly to ensure every bite has that satisfying texture. Avoid packing it down too tightly, as you want it to maintain its crunch.
  6. Repeat the layers: spoon in another 1/4 cup of yogurt, followed by another cup of peaches, and another sprinkle of granola. You should have at least two layers, but feel free to add more depending on your glass size.
  7. Finish off your parfait with a drizzle of honey on top for added sweetness and a touch of elegance. If you’re using sliced almonds or shredded coconut, sprinkle them on top now. It adds a lovely visual contrast and extra flavor.
  8. Serve immediately or refrigerate for up to 30 minutes before serving to allow the flavors to meld together. However, I recommend enjoying it fresh to maintain the granola’s crunch.

Pro Tips for the Best Peach Yogurt Parfait With Honey And Granola

  • Make sure to choose ripe peaches for the best flavor and texture. A common mistake is using unripe fruit, which can lead to a less enjoyable parfait. Look for peaches that are fragrant and slightly soft to the touch.
  • Use a clear glass to assemble your parfait; this not only makes for a beautiful presentation but also allows you to see the colorful layers, which adds to the enjoyment of eating it.
  • For an even creamier texture, consider whipping the Greek yogurt with a hand mixer for a couple of minutes before layering. This small adjustment makes a huge difference in mouthfeel.
  • Be mindful of the granola-to-yogurt ratio. Too much granola can overwhelm the parfait, while too little can make it feel too creamy. Aim for about 1/4 cup of granola per layer for the perfect balance.
  • If you’re making this for a gathering, consider preparing the yogurt and peaches ahead of time and layering them just before serving. This ensures the granola stays crunchy!

Variations & Serving Ideas

There are so many ways to get creative with your Peach Yogurt Parfait! For a tropical twist, swap out the peaches for mangoes or pineapples and top with coconut flakes. If you prefer a berry flavor, mix in some blueberries or strawberries with the peaches for added color and taste. For a nutty version, incorporate chopped walnuts or pecans instead of almonds.

As for serving ideas, this parfait pairs beautifully with a side of scrambled eggs for a hearty breakfast or fresh fruit salad for a light lunch. You might also enjoy it alongside whole grain toast with almond butter for an energizing snack. The contrast of flavors and textures will elevate your meal experience!

Storage, Make-Ahead & Reheating

The Peach Yogurt Parfait is best enjoyed fresh, but you can prepare some components ahead of time. Store the layered parfait in an airtight container in the refrigerator for up to 24 hours. However, be cautious; the granola may lose its crunch if stored too long. You can freeze the yogurt and peach mixture for up to 2 months; just remember to thaw it in the refrigerator overnight before serving.

If you plan to enjoy this dish the next day, it can taste even better as the flavors meld together. Just remember to add the granola right before serving to keep its delightful crunch!

Frequently Asked Questions

Can I make Peach Yogurt Parfait With Honey And Granola ahead of time?

Yes — in fact, it tastes even better the next day as the flavors meld. However, I recommend waiting to add the granola until just before serving to maintain its crunch.

What can I substitute for Greek yogurt?

If you prefer a lighter option, you can substitute Greek yogurt with regular yogurt or a dairy-free alternative like coconut yogurt. Just remember that this may alter the creaminess and flavor profile slightly.

Can I use frozen peaches for this parfait?

Absolutely! Just make sure to thaw the frozen peaches before using them. They will still add great flavor, though the texture may be slightly softer than fresh peaches.

How do I make the parfait vegan?

To make a vegan version, substitute the Greek yogurt with a plant-based yogurt alternative, and replace honey with maple syrup or agave nectar. This keeps the parfait sweet while adhering to a vegan diet.

What other fruits can I use in this recipe?

You can mix and match fruits based on your preference. Try using strawberries, blueberries, raspberries, or even bananas. Just make sure to adjust the lemon juice as needed to prevent browning.

Sweet Peach Yogurt Parfait Delight

Final Thoughts

The Peach Yogurt Parfait with Honey and Granola is a delightful blend of creamy yogurt, sweet peaches, and crunchy granola that creates a satisfying and nourishing treat. Each layer bursts with flavor, making it a perfect choice for breakfast or a light dessert.

This is the kind of recipe I come back to again and again, especially when I want something refreshing and wholesome to start my day. The harmony of sweet and tart flavors, combined with the delightful crunch, never fails to lift my spirits!

I encourage you to give this parfait a try and indulge in its comforting goodness. Feel free to share your results or even add your own twist—perhaps a sprinkle of cinnamon or a handful of nuts. Enjoy creating your perfect parfait!

Print
clock clock iconcutlery cutlery iconflag flag iconfolder folder iconinstagram instagram iconpinterest pinterest iconfacebook facebook iconprint print iconsquares squares iconheart heart iconheart solid heart solid icon

Peach Yogurt Parfait


  • Author: Lily author
  • Total Time: 15 minutes
  • Yield: 4 servings 1x
Pin Recipe
Print Recipe

Description

This Peach Yogurt Parfait combines creamy Greek yogurt, juicy peaches, and crunchy granola for a delightful treat. It’s a perfect breakfast or snack that captures the essence of summer in every bite.


Ingredients

Scale
  • For the Parfait:
  • 2 cups plain Greek yogurt (or vanilla yogurt for a sweeter option)
  • 2 large ripe peaches, diced (about 2 cups)
  • 1 tablespoon fresh lemon juice (to prevent browning of peaches)
  • 2 tablespoons honey (plus more for drizzling)
  • 1 teaspoon vanilla extract (optional for extra flavor)
  • For the Granola:
  • 1 cup granola (store-bought or homemade; see notes for a simple granola recipe)
  • 1/4 cup sliced almonds (optional for added crunch)
  • 1/4 cup shredded coconut (optional for added flavor)

Instructions

  1. Start by preparing the peaches. Wash them thoroughly, then slice and dice them into bite-sized pieces. In a medium bowl, toss the diced peaches with 1 tablespoon of fresh lemon juice to prevent browning. Set aside for about 5 minutes while the lemon juice works its magic.
  2. In a separate bowl, combine the Greek yogurt, 2 tablespoons of honey, and 1 teaspoon of vanilla extract if using. Stir the mixture until smooth and thoroughly blended. This should take about a minute. Avoid overmixing to maintain the creaminess of the yogurt.
  3. Now it’s time to layer your parfait. Grab a clear glass or bowl to showcase your beautiful creation. Start with a generous spoonful of the yogurt mixture at the bottom—about 1/4 cup will do. Use a spoon to spread it evenly.
  4. Add a layer of the diced peaches over the yogurt, ensuring they cover the yogurt completely. You might want to use about half of what you have prepared—roughly 1 cup. This layer should be visually appealing, so arrange the peaches neatly.
  5. Sprinkle 1/4 cup of granola over the peaches. This adds a delightful crunch. Make sure to distribute it evenly to ensure every bite has that satisfying texture. Avoid packing it down too tightly, as you want it to maintain its crunch.
  6. Repeat the layers: spoon in another 1/4 cup of yogurt, followed by another cup of peaches, and another sprinkle of granola. You should have at least two layers, but feel free to add more depending on your glass size.
  7. Finish off your parfait with a drizzle of honey on top for added sweetness and a touch of elegance. If you’re using sliced almonds or shredded coconut, sprinkle them on top now. It adds a lovely visual contrast and extra flavor.
  8. Serve immediately or refrigerate for up to 30 minutes before serving to allow the flavors to meld together. However, I recommend enjoying it fresh to maintain the granola’s crunch.
  • Prep Time: 15 mins
  • Cook Time: 0 mins
  • Category: Breakfast
  • Method: No-cook
  • Cuisine: American

Nutrition

  • Serving Size: 1 parfait
  • Calories: 250
  • Sugar: 20 g
  • Sodium: 50 mg
  • Fat: 5 g
  • Saturated Fat: 2 g
  • Unsaturated Fat: 3 g
  • Trans Fat: 0 g
  • Carbohydrates: 40 g
  • Fiber: 3 g
  • Protein: 10 g
  • Cholesterol: 10 mg

Keywords: Choose ripe peaches for the best flavor and texture. Use a clear glass for a beautiful presentation. For creaminess, consider whipping the yogurt before layering. Be mindful of the granola-to-yogurt ratio. Prepare yogurt and peaches ahead of time for gatherings, layering just before serving.

Did you make this recipe?

Share a photo and tag us — we can't wait to see what you've made!

Sun-Kissed Frozen Orange Cream Slush

As a child, summer days felt like they lasted forever. I remember the sticky heat wrapping around me as I played outside, my laughter mingling with the sounds of the neighborhood. But nothing could cool me down quite like the moment I’d spot my grandmother, laboring over her blender, whipping up her famous Frozen Orange Creamsicle Slush. That vibrant orange treat, with its frosty texture and sweet citrus aroma, was like a burst of sunshine in a cup. Just one sip, and I could feel the coolness wash over me, sparking pure joy.

This Frozen Orange Creamsicle Slush has a way of making you feel like a kid again. Its creamy, dreamy consistency is a delightful balance of bright orange and soft vanilla, inviting you to dive right in. The refreshing tang of orange dances on your tongue, while the smooth creaminess envelops you in a comforting embrace. It’s a nostalgic treat that’s perfect for hot summer afternoons or anytime you need a little pick-me-up.

What makes my version of this slush stand out is the addition of a hint of vanilla bean, which elevates the flavor and adds an extra layer of richness. Plus, it’s super easy to whip up with just a few simple ingredients that you probably already have on hand! So, if you’re ready to relive those sun-soaked memories, let me show you exactly how to make it.

Sun-Kissed Frozen Orange Cream Slush

Why You’ll Love This Recipe

  • Each slush is a perfect blend of creamy vanilla and zesty orange, creating a nostalgic flavor reminiscent of summer days.
  • This refreshing treat is ready in under 15 minutes, making it an ideal quick dessert for unexpected guests or hot afternoons.
  • With just 8 simple ingredients, it’s budget-friendly, ensuring you don’t have to break the bank to enjoy a delicious slush.
  • The slush has a perfectly smooth texture, thanks to the combination of ice and ice cream, providing a delightful contrast to the bright citrus flavors.
  • It’s highly customizable; you can easily adjust the sweetness and add fresh herbs for a unique twist that suits your taste.

Ingredients

  • 2 cups orange juice (freshly squeezed or store-bought)
  • 1 cup vanilla ice cream
  • 1 cup crushed ice
  • 1/2 cup milk (whole or 2%)
  • 1/4 cup granulated sugar (adjust based on sweetness preference)
  • 1 teaspoon vanilla extract
  • Zest of 1 orange (for added flavor)
  • Fresh orange slices and mint leaves (for garnish)

The star of this Frozen Orange Creamsicle Slush is the orange juice, which provides the vibrant, citrusy base. Freshly squeezed juice will yield the brightest flavor, but store-bought options can be just as convenient. If you’re opting for store-bought, choose 100% pure juice with no added sugars for the best results. Another essential ingredient is the vanilla ice cream; it adds creaminess and sweetness. You can substitute it with dairy-free ice cream if you’re looking for a vegan option. Whole or 2% milk complements the ice cream, creating a smooth blend. If you want a lower-calorie version, almond or oat milk can be good alternatives.

Lastly, the granulated sugar can be adjusted based on your sweetness preference. If you prefer a more natural sweetener, consider using honey or agave syrup. The orange zest enhances the flavor profile, providing an aromatic pop that brings the whole slush together. Don’t skip it! It adds an extra layer of brightness that makes this slush truly special.

Step-by-Step Instructions

  1. Start by preparing your ingredients. Gather 2 cups of orange juice, 1 cup of vanilla ice cream, and 1 cup of crushed ice. Make sure the ice is finely crushed, as larger chunks can make blending difficult.
  2. In a blender, combine the orange juice, vanilla ice cream, crushed ice, and 1/2 cup of milk. Add 1/4 cup of granulated sugar and 1 teaspoon of vanilla extract. If you like a sweeter slush, consider adding a bit more sugar at this stage.
  3. Add the zest of 1 orange to the blender. This step is crucial for enhancing the citrus flavor of your slush. Make sure not to include the bitter white pith—only the flavorful zest.
  4. Blend the mixture on medium-high speed for about 30-45 seconds. Stop once the ingredients are fully combined and the slush has a smooth, even consistency. If you notice large chunks of ice, blend for an additional 10-15 seconds. Avoid over-blending, as this can make the slush too liquidy.
  5. Once blended, taste the slush. If it needs more sweetness, add a little more sugar and blend for a few more seconds. If it’s too thick, you can add a splash of milk to reach your desired consistency.
  6. Pour the slush into glasses. This recipe typically serves 4, but you can easily double it for larger gatherings. Use a spoon to help guide the slush into the glasses if needed.
  7. Garnish each serving with fresh orange slices and mint leaves. The mint not only adds a pop of color but also a refreshing aroma that complements the citrus flavors beautifully.
  8. Serve immediately and enjoy! If you’ve made extra, you can refrigerate it for a short time, but it’s best enjoyed fresh.

Pro Tips for the Best Frozen Orange Creamsicle Slush

  • Don’t skip the orange zest! It’s a game-changer for flavor. Always zest before juicing to make it easier.
  • Use a high-powered blender for the best texture. A standard blender may struggle with ice, leading to uneven consistency. If you have a food processor, that can work too, but ensure the ice is finely crushed.
  • Adjust the ice-to-liquid ratio carefully. If your slush is too thick, it won’t blend well. Start with less ice and add more until you reach your preferred texture.
  • Be cautious with the sugar! Always start with the lower amount, as you can easily add more, but it’s hard to fix an overly sweet slush.
  • For a fun twist, consider adding a splash of coconut milk or a handful of fresh fruit like strawberries or pineapple. This not only enhances the flavor but also adds a beautiful color contrast.

Variations & Serving Ideas

There are countless ways to put a spin on your Frozen Orange Creamsicle Slush. Consider making a tropical version by adding in some pineapple juice or coconut milk for a delightful tropical twist. If you’re feeling adventurous, try incorporating a handful of frozen mango or peach slices for added sweetness. For a lighter version, swap out the vanilla ice cream for Greek yogurt for a creamy yet tangy alternative.

As for serving ideas, this refreshing slush pairs wonderfully with light summer dishes like grilled chicken skewers, fish tacos, or a simple salad topped with citrus vinaigrette. The bright, zesty flavors of the slush complement these dishes perfectly, making them an ideal pairing for a sunny day.

Storage, Make-Ahead & Reheating

This Frozen Orange Creamsicle Slush is best enjoyed fresh, but if you have leftovers, you can store them in an airtight container in the fridge for up to 2 days. Just keep in mind that the slush may lose some of its texture over time as the ice melts. It doesn’t freeze well, as the ice will turn into a solid block. If you must freeze it, blend again after thawing to restore the slushy consistency. This treat is best the day you make it, as the flavors meld together beautifully overnight, enhancing its deliciousness.

Frequently Asked Questions

Can I make Frozen Orange Creamsicle Slush ahead of time?

Yes — in fact, it tastes even better the next day as the flavors meld. However, it’s best to enjoy it fresh, as the texture can change if stored for too long. If you need to prepare it ahead, keep it in the fridge and re-blend before serving.

What kind of orange juice should I use?

For the best flavor, use freshly squeezed orange juice. However, if you’re short on time, opt for 100% pure store-bought juice without added sugars. This will ensure that your slush remains flavorful and refreshing.

Can I substitute the vanilla ice cream?

Absolutely! If you’re looking for a dairy-free option, coconut milk ice cream or a non-dairy vanilla ice cream can work wonderfully. They will still provide the creamy texture and sweetness you desire.

How can I adjust the sweetness of my slush?

You can easily adjust the sweetness by modifying the amount of sugar added. Start with 1/4 cup and taste the mixture before blending. If you prefer it sweeter, add more sugar gradually until it reaches your desired level.

What should I do if my slush is too thick?

If your slush is too thick, simply add a splash of milk or orange juice and blend again. This will help achieve a more drinkable consistency while maintaining the slushy texture. Adjust gradually to reach your preferred thickness.

Sun-Kissed Frozen Orange Cream Slush

Final Thoughts

The Frozen Orange Creamsicle Slush is a delightful blend of refreshing citrus and creamy goodness, making it a perfect treat for warm days or any time you crave a taste of nostalgia. The way the bright orange flavor dances with the creamy texture truly elevates this slush, transforming it into a satisfying escape from the everyday.

This is the kind of recipe I come back to again and again, especially when I’m looking to cool down or impress guests at a summer gathering. It’s simple to make and always brings smiles all around! I encourage you to try this recipe for yourself—don’t hesitate to share your results or even put your own spin on it. Happy slushing!

Print
clock clock iconcutlery cutlery iconflag flag iconfolder folder iconinstagram instagram iconpinterest pinterest iconfacebook facebook iconprint print iconsquares squares iconheart heart iconheart solid heart solid icon

Frozen Orange Creamsicle Slush


  • Author: Lily author
  • Total Time: 15 minutes
  • Yield: 4 servings 1x
Pin Recipe
Print Recipe

Description

This Frozen Orange Creamsicle Slush is a refreshing treat that combines creamy vanilla and zesty orange flavors. Perfect for hot summer days, it brings back nostalgic memories with every sip.


Ingredients

Scale
  • 2 cups orange juice (freshly squeezed or store-bought)
  • 1 cup vanilla ice cream
  • 1 cup crushed ice
  • 1/2 cup milk (whole or 2%)
  • 1/4 cup granulated sugar (adjust based on sweetness preference)
  • 1 teaspoon vanilla extract
  • Zest of 1 orange (for added flavor)
  • Fresh orange slices and mint leaves (for garnish)

Instructions

  1. Start by preparing your ingredients. Gather 2 cups of orange juice, 1 cup of vanilla ice cream, and 1 cup of crushed ice. Make sure the ice is finely crushed, as larger chunks can make blending difficult.
  2. In a blender, combine the orange juice, vanilla ice cream, crushed ice, and 1/2 cup of milk. Add 1/4 cup of granulated sugar and 1 teaspoon of vanilla extract. If you like a sweeter slush, consider adding a bit more sugar at this stage.
  3. Add the zest of 1 orange to the blender. This step is crucial for enhancing the citrus flavor of your slush. Make sure not to include the bitter white pith—only the flavorful zest.
  4. Blend the mixture on medium-high speed for about 30-45 seconds. Stop once the ingredients are fully combined and the slush has a smooth, even consistency. If you notice large chunks of ice, blend for an additional 10-15 seconds. Avoid over-blending, as this can make the slush too liquidy.
  5. Once blended, taste the slush. If it needs more sweetness, add a little more sugar and blend for a few more seconds. If it’s too thick, you can add a splash of milk to reach your desired consistency.
  6. Pour the slush into glasses. This recipe typically serves 4, but you can easily double it for larger gatherings. Use a spoon to help guide the slush into the glasses if needed.
  7. Garnish each serving with fresh orange slices and mint leaves. The mint not only adds a pop of color but also a refreshing aroma that complements the citrus flavors beautifully.
  8. Serve immediately and enjoy! If you’ve made extra, you can refrigerate it for a short time, but it's best enjoyed fresh.
  • Prep Time: 15 min
  • Cook Time: 0 min
  • Category: Dessert
  • Method: Blending
  • Cuisine: American

Nutrition

  • Serving Size: 1 serving
  • Calories: 200
  • Sugar: 30 g
  • Sodium: 50 mg
  • Fat: 5 g
  • Saturated Fat: 3 g
  • Unsaturated Fat: 2 g
  • Trans Fat: 0 g
  • Carbohydrates: 40 g
  • Fiber: 1 g
  • Protein: 2 g
  • Cholesterol: 20 mg

Keywords: Don't skip the orange zest! It's a game-changer for flavor. Always zest before juicing to make it easier.

Did you make this recipe?

Share a photo and tag us — we can't wait to see what you've made!

Zesty Lemon Poppy Seed Delight

One rainy afternoon, I found myself in my grandmother’s cozy kitchen, the kind that always smelled like warmth and love. She was whipping up her famous Lemon Poppy Seed Loaf, a recipe that had been passed down through generations. As the batter came together, the zesty aroma of fresh lemons filled the air, mingling perfectly with the nutty fragrance of poppy seeds. I can still picture her, apron-clad, as she expertly drizzled a vibrant citrus icing over the loaf, creating a glossy, sun-kissed finish that beckoned us to dive in. It was a moment that sparked my own passion for baking, and this recipe has become a cherished staple in my home ever since.

When you take a bite of this Lemon Poppy Seed Loaf, it’s like a burst of sunshine on your palate. The loaf is beautifully golden, with a tender crumb that melts in your mouth. Each slice is speckled with tiny poppy seeds, adding a delightful crunch that contrasts beautifully with the tangy sweetness of the lemon. And that citrus icing? It’s the finishing touch that elevates this loaf from ordinary to extraordinary, with its bright, zesty flavor dancing on your taste buds.

This recipe stands out because it embraces simplicity while delivering on flavor. I’ve added a hint of vanilla to the batter, enhancing the overall taste and making it even more indulgent. Trust me, once you make this Lemon Poppy Seed Loaf With Citrus Icing, it’ll become a go-to in your baking repertoire.

So, let me show you exactly how to make it!

Zesty Lemon Poppy Seed Delight

Why You’ll Love This Recipe

  • Moist and tender crumb that melts in your mouth, thanks to the perfect balance of butter and buttermilk.
  • Bright, zesty lemon flavor paired with crunchy poppy seeds, creating a delightful texture and taste experience.
  • Easy to whip up in just about an hour, perfect for last-minute gatherings or a cozy afternoon treat.
  • Budget-friendly with everyday ingredients, making it an accessible option for all home bakers.
  • The citrus icing adds a sweet tang that elevates the loaf, turning a simple recipe into a showstopper!

Ingredients

  • 1 ½ cups (190g) all-purpose flour
  • 1 teaspoon baking powder
  • ½ teaspoon baking soda
  • ½ teaspoon salt
  • 3 tablespoons poppy seeds
  • ½ cup (115g) unsalted butter, softened to room temperature
  • 1 cup (200g) granulated sugar
  • 2 large eggs
  • 1 teaspoon vanilla extract
  • 1 teaspoon lemon zest (from about 1 medium lemon)
  • ½ cup (120ml) buttermilk
  • 2 tablespoons fresh lemon juice

For the Citrus Icing:

  • 1 cup (120g) powdered sugar
  • 2 tablespoons fresh lemon juice
  • 1 tablespoon orange juice
  • 1 teaspoon lemon zest (for garnish, optional)

Let’s dive into the key ingredients that make this Lemon Poppy Seed Loaf so special. The all-purpose flour provides the structure and base for the loaf, while the baking powder and baking soda ensure it rises perfectly, giving the loaf a light texture. For a gluten-free variation, you could substitute the flour with a gluten-free all-purpose blend. Poppy seeds not only add a delightful crunch but also contribute to the unique flavor profile that pairs well with the citrus notes.

Unsalted butter is crucial for achieving the buttery richness that makes this loaf so moist. If you’re looking for a dairy-free option, coconut oil or a vegan butter can be used instead. The buttermilk is another essential component, providing acidity that activates the baking soda for a fluffy texture. If you don’t have buttermilk on hand, you can easily make a substitute by mixing ½ cup of milk with 1 tablespoon of vinegar or lemon juice and letting it sit for about 5 minutes.

Step-by-Step Instructions

  1. Preheat your oven to 350°F (175°C). Grease a 9×5-inch loaf pan or line it with parchment paper for easy removal later.
  2. In a medium mixing bowl, whisk together 1 ½ cups of all-purpose flour, 1 teaspoon of baking powder, ½ teaspoon of baking soda, ½ teaspoon of salt, and 3 tablespoons of poppy seeds. This helps to evenly distribute the baking agents and ensures a uniform rise.
  3. In a large mixing bowl, cream together ½ cup of softened unsalted butter and 1 cup of granulated sugar using an electric mixer on medium speed for about 3-4 minutes, until the mixture is light and fluffy. Make sure to scrape down the sides of the bowl occasionally.
  4. Add 2 large eggs, 1 teaspoon of vanilla extract, and 1 teaspoon of lemon zest to the creamed butter and sugar, mixing until fully combined. You want a smooth consistency, so ensure there are no lumps of butter.
  5. In a small bowl, combine ½ cup of buttermilk and 2 tablespoons of fresh lemon juice. Alternately add the dry ingredients and buttermilk mixture to the butter mixture, starting and ending with the dry ingredients. Mix just until combined; do not overmix, as this can lead to a dense loaf.
  6. Pour the batter into the prepared loaf pan. Smooth the top with a spatula, ensuring it’s even. Bake in the preheated oven for 50-60 minutes, or until a toothpick inserted in the center comes out clean. The edges should be lightly golden brown, and the center should feel just set.
  7. Once baked, remove the loaf from the oven and allow it to cool in the pan for about 10 minutes. Then, transfer it to a wire rack to cool completely. Resist the urge to slice too soon, as it will be crumbly if it’s still warm.
  8. While the loaf is cooling, prepare the citrus icing. In a medium bowl, whisk together 1 cup of powdered sugar, 2 tablespoons of fresh lemon juice, and 1 tablespoon of orange juice until smooth. If the icing is too thick, you can add a little more juice to reach your desired consistency.
  9. Once the loaf is completely cool, drizzle the citrus icing over the top. If you like, sprinkle with an additional teaspoon of lemon zest for an extra pop of flavor and color.

Pro Tips for the Best Lemon Poppy Seed Loaf With Citrus Icing

  • Be careful not to overmix your batter; this is a common mistake that can lead to a dense loaf. Mix just until the dry ingredients are incorporated for a light and fluffy texture.
  • Use room temperature ingredients, especially the butter and eggs. This helps to create a smoother batter and ensures even baking. Take your eggs out of the fridge about 30 minutes before you start.
  • For a more pronounced lemon flavor, consider adding a little lemon extract in addition to the zest and juice. Just a half teaspoon can elevate the citrus notes significantly.
  • When measuring your flour, spoon it into the measuring cup and level it off with a knife instead of scooping directly from the bag. This prevents packing and ensures you don’t end up with a dry loaf.
  • Invest in a good quality loaf pan; it makes a difference in heat distribution, which ensures even baking. If your pan is dark-coated, reduce the oven temperature by 25°F to prevent over-browning.

Variations & Serving Ideas

For a delightful twist, consider adding blueberries or raspberries to the batter for a fruity burst of flavor. You can also experiment with different citrus fruits—try lime or grapefruit zest and juice for a refreshing change. For a healthier option, substitute half of the all-purpose flour with whole wheat flour for added fiber without compromising too much on texture.

This Lemon Poppy Seed Loaf pairs beautifully with a light salad, such as a mixed greens salad with a vinaigrette, or a cup of tea for a cozy afternoon treat. It also complements a creamy cheese platter, as the acidity of the loaf balances rich cheeses perfectly. Lastly, a scoop of vanilla ice cream on the side creates a delightful contrast of temperatures and flavors!

Storage, Make-Ahead & Reheating

This Lemon Poppy Seed Loaf can be stored at room temperature for up to 3 days if wrapped tightly in plastic wrap. If you want to keep it longer, it freezes well for up to 3 months. To freeze, wrap the loaf tightly in plastic wrap and then in aluminum foil to prevent freezer burn.

When you’re ready to enjoy it again, simply thaw it in the fridge overnight. Reheat individual slices in the microwave for 15-20 seconds or in a toaster oven until warmed through. Interestingly, many people find that this loaf tastes even better the next day, as the flavors have time to meld!

Frequently Asked Questions

Can I make Lemon Poppy Seed Loaf With Citrus Icing ahead of time?

Yes — in fact, it tastes even better the next day! You can make the loaf a day in advance, allowing the flavors to develop. Just be sure to store it in an airtight container to maintain its moisture.

Can I substitute the poppy seeds?

Absolutely! If you don’t have poppy seeds on hand or prefer an alternative, you can use sesame seeds for a similar crunch or omit them entirely for a smooth loaf.

What can I use instead of buttermilk?

If you don’t have buttermilk, you can easily create a substitute by mixing ½ cup of milk (dairy or plant-based) with 1 tablespoon of vinegar or lemon juice. Let it sit for 5 minutes before using in the recipe.

How can I make this recipe gluten-free?

To make a gluten-free version of this Lemon Poppy Seed Loaf, substitute the all-purpose flour with a gluten-free all-purpose flour blend. Just ensure that the blend contains a binding agent like xanthan gum for the best results.

What is the best way to store leftover loaf?

Leftover Lemon Poppy Seed Loaf should be stored in an airtight container at room temperature for up to 3 days. For longer storage, wrap it tightly and freeze for up to 3 months. Thaw it before serving for the best texture.

Zesty Lemon Poppy Seed Delight

Final Thoughts

The Lemon Poppy Seed Loaf with Citrus Icing is truly a delightful treat that brings a burst of brightness to any occasion. The zesty lemon flavor combined with the subtle crunch of poppy seeds creates a satisfying balance, while the citrus icing adds a touch of sweetness that perfectly complements the loaf’s tanginess.

This is the kind of recipe I come back to again and again, especially when I want to brighten up a gloomy day or celebrate a small victory. The aroma that fills the kitchen as it bakes is absolutely heavenly! I encourage you to give this recipe a try; you might just find it becoming a beloved staple in your home. Don’t forget to share your results or even add your own unique twist—I can’t wait to see what you create!

Print
clock clock iconcutlery cutlery iconflag flag iconfolder folder iconinstagram instagram iconpinterest pinterest iconfacebook facebook iconprint print iconsquares squares iconheart heart iconheart solid heart solid icon

Lemon Poppy Seed Loaf


  • Author: Lily author
  • Total Time: 27 minute
  • Yield: 1 loaf 1x
Pin Recipe
Print Recipe

Description

This Lemon Poppy Seed Loaf is a delightful treat that combines zesty lemon flavor with crunchy poppy seeds. Topped with a citrus icing, it’s perfect for any occasion.


Ingredients

Scale
  • 1 ½ cups (190g) all-purpose flour
  • 1 teaspoon baking powder
  • ½ teaspoon baking soda
  • ½ teaspoon salt
  • 3 tablespoons poppy seeds
  • ½ cup (115g) unsalted butter, softened to room temperature
  • 1 cup (200g) granulated sugar
  • 2 large eggs
  • 1 teaspoon vanilla extract
  • 1 teaspoon lemon zest (from about 1 medium lemon)
  • ½ cup (120ml) buttermilk
  • 2 tablespoons fresh lemon juice
  • 1 cup (120g) powdered sugar
  • 2 tablespoons fresh lemon juice
  • 1 tablespoon orange juice
  • 1 teaspoon lemon zest (for garnish, optional)

Instructions

  1. Preheat your oven to 350°F (175°C). Grease a 9×5-inch loaf pan or line it with parchment paper for easy removal later.
  2. In a medium mixing bowl, whisk together 1 ½ cups of all-purpose flour, 1 teaspoon of baking powder, ½ teaspoon of baking soda, ½ teaspoon of salt, and 3 tablespoons of poppy seeds. This helps to evenly distribute the baking agents and ensures a uniform rise.
  3. In a large mixing bowl, cream together ½ cup of softened unsalted butter and 1 cup of granulated sugar using an electric mixer on medium speed for about 3-4 minutes, until the mixture is light and fluffy. Make sure to scrape down the sides of the bowl occasionally.
  4. Add 2 large eggs, 1 teaspoon of vanilla extract, and 1 teaspoon of lemon zest to the creamed butter and sugar, mixing until fully combined. You want a smooth consistency, so ensure there are no lumps of butter.
  5. In a small bowl, combine ½ cup of buttermilk and 2 tablespoons of fresh lemon juice. Alternately add the dry ingredients and buttermilk mixture to the butter mixture, starting and ending with the dry ingredients. Mix just until combined; do not overmix, as this can lead to a dense loaf.
  6. Pour the batter into the prepared loaf pan. Smooth the top with a spatula, ensuring it’s even. Bake in the preheated oven for 50-60 minutes, or until a toothpick inserted in the center comes out clean. The edges should be lightly golden brown, and the center should feel just set.
  7. Once baked, remove the loaf from the oven and allow it to cool in the pan for about 10 minutes. Then, transfer it to a wire rack to cool completely. Resist the urge to slice too soon, as it will be crumbly if it’s still warm.
  8. While the loaf is cooling, prepare the citrus icing. In a medium bowl, whisk together 1 cup of powdered sugar, 2 tablespoons of fresh lemon juice, and 1 tablespoon of orange juice until smooth. If the icing is too thick, you can add a little more juice to reach your desired consistency.
  9. Once the loaf is completely cool, drizzle the citrus icing over the top. If you like, sprinkle with an additional teaspoon of lemon zest for an extra pop of flavor and color.
  • Prep Time: 15 mins
  • Cook Time: 50-60 mins
  • Category: Dessert
  • Method: Baking
  • Cuisine: American

Nutrition

  • Serving Size: 1 slice
  • Calories: 200
  • Sugar: 15 g
  • Sodium: 150 mg
  • Fat: 8 g
  • Saturated Fat: 5 g
  • Unsaturated Fat: 3 g
  • Trans Fat: 0 g
  • Carbohydrates: 30 g
  • Fiber: 1 g
  • Protein: 3 g
  • Cholesterol: 40 mg

Keywords: Be careful not to overmix your batter; this is a common mistake that can lead to a dense loaf. Use room temperature ingredients for a smoother batter and even baking.

Did you make this recipe?

Share a photo and tag us — we can't wait to see what you've made!

  • Privacy Policy
  • Terms Of Service
  • Contact
  • About
  • GDPR

Copyright © 2025 Homesmad