• Skip to primary navigation
  • Skip to main content
  • Skip to primary sidebar
Homesmad

Homesmad

  • Home
  • Breakfast & Brunch
  • Appetizers & Snacks
  • Dinner
  • Dessert
  • About
  • Privacy Policy
  • Contact
Homesmad
  • Home
  • Breakfast & Brunch
  • Appetizers & Snacks
  • Dinner
  • Dessert
  • About
  • Privacy Policy
  • Contact

Ultimate Gooey Salted Caramel Chocolate Chip Cookie Bars

November 4, 2025 by Lily author

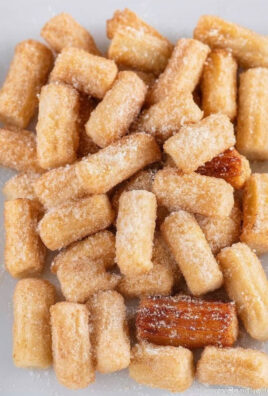
Gooey Salted Caramel Chocolate Chip Cookie Bar – just reading that phrase likely conjures up images of a warm, irresistible dessert, right?

Imagine biting into a soft, chewy cookie bar, where the rich, familiar comfort of chocolate chips meets the sophisticated allure of golden, buttery caramel, all perfectly balanced with a hint of sea salt. If that doesn’t make your mouth water, I don’t know what will!

These magnificent bars are a testament to how simple ingredients can create something truly extraordinary. While the classic chocolate chip cookie has been a beloved American staple for generations, the addition of luscious salted caramel elevates it to a whole new level of decadence. Salted caramel itself has seen a meteoric rise in popularity, captivating dessert lovers with its incredible ability to enhance and balance sweetness, making every bite an adventure for your taste buds. This particular dish brings together all those elements into a convenient, shareable bar format that is perfect for potlucks, parties, or simply an indulgent evening at home.

Why We Absolutely Adore These Bars

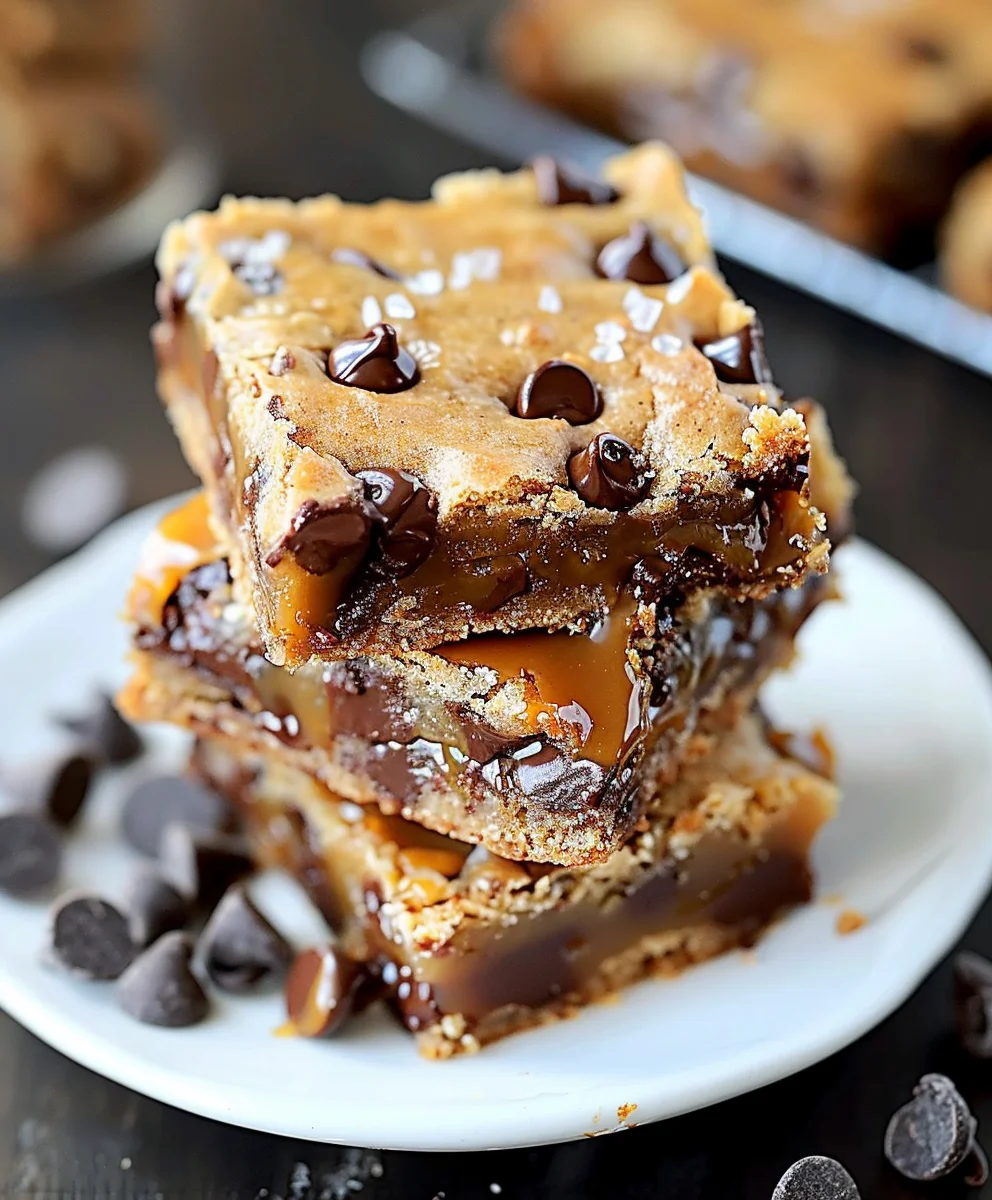
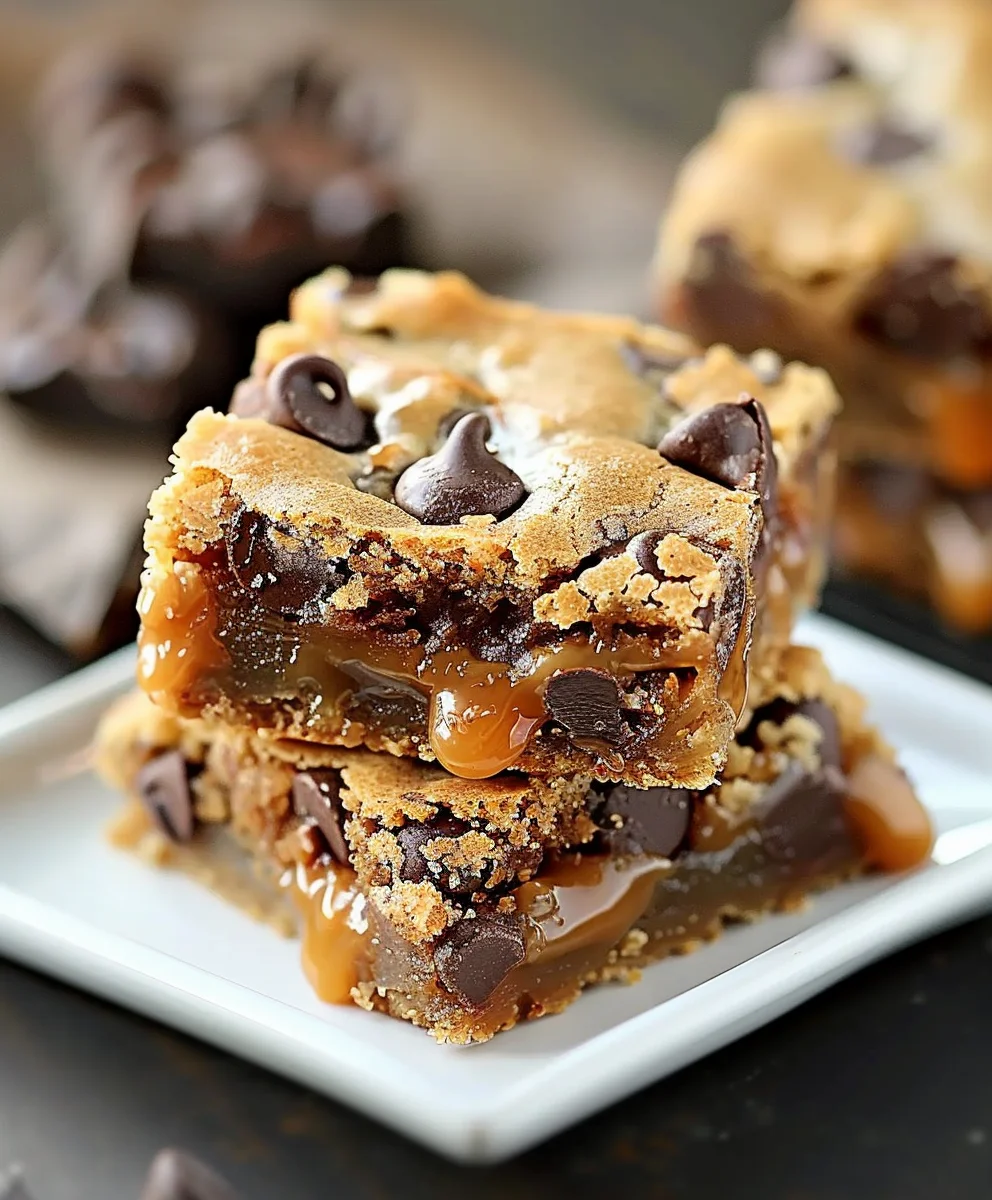
People simply adore the Gooey Salted Caramel Chocolate Chip Cookie Bar for its incredible trifecta of flavors and textures. You get the crisp edge, the soft, chewy center, the delightful melty chocolate, and those pockets of sweet and salty caramel that stretch delightfully with every pull. It’s a comforting classic made even better, offering a sophisticated twist on a nostalgic favorite. Get ready to bake a batch that will have everyone begging for the recipe!

Ultimate Gooey Salted Caramel Chocolate Chip Cookie Bars this RECIPE

Ingredients:

  • For the Gooey Salted Caramel Chocolate Chip Cookie Bar Base:
    • 2 ¼ cups (270g) all-purpose flour
    • 1 teaspoon baking soda
    • ½ teaspoon salt (fine sea salt is preferred for even distribution)
    • 1 cup (226g) unsalted butter, softened to room temperature
    • ¾ cup (150g) granulated sugar
    • ¾ cup (165g) packed light brown sugar
    • 2 large eggs, at room temperature
    • 2 teaspoons pure vanilla extract
    • 1 ½ cups (270g) semi-sweet chocolate chips (or a mix of milk, dark, and semi-sweet for complexity)
  • For the Irresistible Salted Caramel Filling:
    • 1 cup (200g) granulated sugar¼ cup (60ml) water
    • ½ cup (113g) unsalted butter, cut into 1-inch pieces, at room temperature
    • ¾ cup (180ml) heavy cream, warmed slightly (you can microwave it for 30 seconds)
    • 1 teaspoon pure vanilla extract
    • 1 teaspoon flaky sea salt (like Maldon), plus more for sprinkling on top
  • Optional Garnish:
    • Extra flaky sea salt for sprinkling after baking.

Equipment You’ll Need:

  • 9×13 inch baking pan
  • Parchment paper
  • Non-stick cooking spray
  • Large mixing bowls
  • Electric mixer (stand mixer or handheld)
  • Medium saucepan (heavy-bottomed is best for caramel)
  • Rubber spatula or wooden spoon
  • Whisk
  • Measuring cups and spoons
  • Wire cooling rack

Getting Started: Preparing Your Pan

  1. First things first, let’s get our oven preheating to 350°F (175°C). It’s crucial for even baking, so give it plenty of time to come up to temperature. While that’s happening, we’re going to prepare our baking pan. This step is absolutely essential for making sure your Gooey Salted Caramel Chocolate Chip Cookie Bar comes out of the pan cleanly and beautifully.
  2. Take a standard 9×13 inch baking pan. Line it generously with parchment paper, leaving an overhang on the longer sides. Think of these overhangs as handles; they’ll be your best friend when it’s time to lift the entire batch of bars out of the pan. Once the parchment paper is in place, lightly grease it with non-stick cooking spray or a dab of butter. This double-layer of protection ensures absolutely no sticking, making for a perfect presentation every single time. Don’t skip this step! It saves so much heartache later.

Crafting the Irresistible Cookie Dough Base

  1. In a medium-sized bowl, whisk together your dry ingredients: the all-purpose flour, baking soda, and ½ teaspoon of salt. Giving these a good whisk ensures that the baking soda is evenly distributed, which will give your cookie bars that perfect rise and consistent texture. Set this bowl aside for now.
  2. Now, in a large mixing bowl (or the bowl of your stand mixer fitted with the paddle attachment), combine the softened unsalted butter with both the granulated sugar and the packed light brown sugar. Cream these together on medium speed for about 2-3 minutes, until the mixture is wonderfully light, fluffy, and visibly paler in color. This creaming process incorporates air, which contributes to the soft, chewy texture of our cookie bar base. Make sure your butter is truly at room temperature – it makes all the difference!
  3. Next, beat in the two large eggs, one at a time, ensuring each egg is fully incorporated before adding the next. Then, stir in the pure vanilla extract. The mixture might look a little curdled at this point, but don’t worry, that’s completely normal! Just keep mixing until it comes back together into a smooth, cohesive wet mixture.
  4. Gradually add the dry ingredients from step 3 to the wet ingredients, mixing on low speed until just combined. Be careful not to overmix here! Overmixing can develop the gluten in the flour too much, leading to tough cookie bars instead of the tender, melt-in-your-mouth goodness we’re aiming for. A few streaks of flour are perfectly fine; you’ll finish mixing by hand.
  5. Finally, gently fold in 1 ½ cups of semi-sweet chocolate chips using a rubber spatula. We want to distribute them evenly throughout the dough. Reserve a small handful if you’d like to sprinkle some on top later for extra visual appeal. This cookie dough is going to be the foundation of our magnificent Gooey Salted Caramel Chocolate Chip Cookie Bar, so make sure it’s perfect!

Creating the Dreamy Salted Caramel Layer

  1. Now for the star of the show: the salted caramel! In a heavy-bottomed medium saucepan, combine the 1 cup of granulated sugar and ¼ cup of water. Stir briefly just to wet all the sugar, then stop stirring completely. Place the saucepan over medium heat.
  2. Allow the sugar mixture to boil without stirring. You’ll notice it start to bubble, then eventually, the edges will begin to turn a light amber color. Watch it carefully! Swirl the pan occasionally to encourage even coloring, but resist the urge to stir with a spoon. This process typically takes about 8-10 minutes. The key here is patience and vigilance. You’re looking for a beautiful, rich amber color, similar to a copper penny. If it gets too dark, it will taste burnt.
  3. Once your caramel reaches that deep amber color, immediately remove the pan from the heat. Carefully, yet swiftly, add the cubed unsalted butter, stirring continuously with a wooden spoon or heat-proof spatula. The mixture will bubble up furiously, so be prepared! Keep stirring until all the butter has melted and is fully incorporated, creating a smooth, glossy sauce.
  4. Next, slowly and carefully pour in the warmed heavy cream while continuing to stir. Again, the mixture will bubble vigorously and might seize up a bit, but just keep stirring. The warmth of the cream helps prevent the sugar from crystallizing too much. Continue stirring until the caramel is smooth and homogeneous. If any lumps remain, you can return the pan to very low heat for a minute or two, stirring until smooth.
  5. Remove the caramel from the heat and stir in the pure vanilla extract and 1 teaspoon of flaky sea salt. Taste it! It should be sweet, buttery, and have that delightful salty kick. This gorgeous, liquid gold salted caramel is what will make our Gooey Salted Caramel Chocolate Chip Cookie Bar truly unforgettable. Set it aside to cool slightly while you prepare the bars.

Assembling the Gooey Salted Caramel Chocolate Chip Cookie Bar

  1. Take about two-thirds of your prepared cookie dough and press it evenly into the bottom of your parchment-lined 9×13 inch baking pan. Use your fingers or the back of a measuring cup to ensure it’s a nice, even layer right to the edges. This forms the sturdy base for our glorious bars. Don’t worry if it’s a bit sticky; a light dusting of flour on your fingers can help, or you can use a piece of plastic wrap over the dough to press it down.
  2. Now, pour that warm, luscious salted caramel evenly over the pressed cookie dough layer. Spread it gently with a spatula, making sure to cover the entire surface right to the edges. The aroma alone is enough to make your mouth water!
  3. Take the remaining one-third of the cookie dough. This part is fun! Instead of pressing it, you’re going to drop small, irregular clumps of dough over the caramel layer. Don’t try to cover the caramel completely; we want some of that beautiful caramel peeking through. These little dough pockets will melt and spread during baking, creating a wonderfully textured and visually appealing top layer for your Gooey Salted Caramel Chocolate Chip Cookie Bar.
  4. If you reserved some extra chocolate chips, sprinkle them over the top now. This adds another layer of chocolatey goodness and makes the bars look even more enticing. Finally, give the entire surface a light sprinkle of extra flaky sea salt. This finishing touch isn’t just for looks; it intensifies the “salted caramel” experience beautifully.

Baking to Golden Perfection

  1. Carefully transfer your assembled pan to your preheated 350°F (175°C) oven. Bake for 30-35 minutes. The exact baking time can vary depending on your oven, so keep a close eye on them. You’re looking for the edges to be beautifully golden brown and set, while the center should still look a little soft and slightly jiggly. This slight underbaking in the center is key to achieving that signature gooey texture in our Gooey Salted Caramel Chocolate Chip Cookie Bar.
  2. Once they reach that perfect stage, pull them out of the oven. They will look incredible! The caramel might still be bubbling, and the cookie top will be a lovely golden hue with melted chocolate goodness. Resist the urge to dive in immediately.

Cooling and Slicing: The Hardest Part!

  1. This is perhaps the most challenging part of the entire recipe, but arguably the most important for success: you MUST allow your Gooey Salted Caramel Chocolate Chip Cookie Bar to cool completely. Transfer the pan to a wire cooling rack and let it cool down at room temperature for at least 3-4 hours, or ideally, until completely cool and the caramel has fully set. Seriously, do not rush this step.
  2. I know, I know, it’s torture! The aroma filling your kitchen will be intoxicating. But if you try to cut them while warm, the caramel will be too runny, and your bars will fall apart into a delicious, gooey mess (which isn’t bad, but not ideal for neat bars!). Cooling allows the caramel to firm up and the cookie layers to settle, making for clean, beautiful slices.
  3. Once fully cooled, use the parchment paper overhangs as handles to carefully lift the entire slab of cookie bars out of the pan and onto a cutting board. Now for the moment of truth! Use a sharp knife to cut them into squares or rectangles of your desired size. For cleaner cuts, you can wipe your knife blade with a damp cloth between each slice. A slight chill in the refrigerator for 30 minutes before cutting can also help achieve super crisp edges.

Tips for the Best Gooey Salted Caramel Chocolate Chip Cookie Bars

Ingredient Temperature Matters

  • Having your butter and eggs at true room temperature is not just a suggestion; it’s a critical step for a beautifully emulsified and fluffy cookie dough. Room temperature ingredients cream together more smoothly, creating a light and airy texture that will contribute to the overall gooeyness of the bars. For butter, it should be soft enough to indent easily with your finger but not greasy or melted. Eggs should also be brought to room temperature to prevent the butter from seizing when added, ensuring a cohesive batter.

Don’t Overbake!

  • This is perhaps the most important tip for achieving that perfect gooey center. The bars should look slightly underbaked in the middle when you pull them out of the oven. The edges should be golden brown, but the center should still have a bit of a “jiggle.” They will continue to set as they cool on the wire rack due to residual heat, and this is what creates that wonderfully soft, chewy, and gooey texture. Overbaking will result in dry, crumbly bars and a harder caramel layer, losing that irresistible gooey quality we’re aiming for.

Patience with the Caramel

  • Making caramel can seem intimidating, but it’s all about paying attention. When making the caramel, do not stir the sugar and water mixture once it begins to boil. Swirl the pan gently instead to ensure even cooking. Stirring can cause sugar crystals to form, leading to grainy caramel. Watch the color closely; you’re looking for a rich, deep amber, not a pale yellow or a dark brown (which signals burnt!). The deeper the amber, the richer the flavor, but be careful not to take it too far. Remove it from the heat immediately when it reaches your desired color.

Cooling is Crucial

  • As mentioned, allowing these Gooey Salted Caramel Chocolate Chip Cookie Bars to cool completely is non-negotiable for clean slices and a set caramel layer. The caramel needs ample time to firm up. If you try to cut them warm, the caramel will ooze out, and the bars will be a crumbly mess. Patience truly is a virtue here. For best results, let them cool at room temperature for several hours, or even overnight. A brief stint in the refrigerator (30-60 minutes) just before slicing can also make for ultra-clean cuts.

Flaky Sea Salt is a Must

  • Don’t underestimate the power of flaky sea salt. It’s not just a garnish; it balances the sweetness of the caramel and chocolate, elevating the entire flavor profile of your Gooey Salted Caramel Chocolate Chip Cookie Bar. Sprinkle it generously on top before and/or after baking. The little bursts of salt provide a delightful contrast and enhance the depth of flavor significantly.

Storage Instructions

  • Store any leftover Gooey Salted Caramel Chocolate Chip Cookie Bars in an airtight container at room temperature for up to 3-4 days. While they are usually best enjoyed within the first day or two, their gooey nature means they stay delightfully moist for a good while. If you want to extend their life, you can refrigerate them for up to a week, but let them come back to room temperature before serving for the best texture.

Experiment with Chocolate

  • While semi-sweet chocolate chips are classic, feel free to get creative! A mix of different chocolate types – such as dark chocolate chunks, milk chocolate chips, or even white chocolate chips – can add wonderful complexity and visual appeal to your bars. Chocolate wafers (chopped) also melt beautifully, creating pockets of rich, melted chocolate throughout.

Consider the Pan

  • A lighter-colored metal pan will bake the bars more evenly than a darker pan, which can sometimes lead to overly browned edges. If you’re using a darker pan, you might want to reduce the baking time by a couple of minutes to prevent burning the bottom. Always use parchment paper with an overhang for easy removal; it’s a game-changer for bar recipes with sticky fillings.

Ultimate Gooey Salted Caramel Chocolate Chip Cookie Bars

Conclusion:

Well, my friends, we’ve reached the sweet end of our journey with this incredible recipe. If you’re looking for a dessert that truly has it all – unbelievable flavor, a fantastic texture, and an undeniable wow factor – then you simply have to give this one a go. I promise you, this isn’t just another cookie bar recipe; it’s an experience waiting to happen. It’s the kind of treat that silences a room, leaving everyone utterly captivated by its deliciousness. The way the rich chocolate melts, the perfect chewiness of the cookie base, and that glorious, unexpected salty kick – it’s a symphony of tastes that truly elevates a simple dessert into something spectacular. It’s perfect for impressing guests, delighting your family, or simply treating yourself to a moment of pure bliss after a long day. Every single bite is a testament to how truly special this creation is, blending comfort with a touch of gourmet sophistication that will make you feel like a master baker, even if you’re just starting out.

There’s something uniquely comforting yet exciting about pulling a fresh batch of these bars from the oven, filling your home with an aroma that’s nothing short of intoxicating. The anticipation builds as you let them cool just enough to handle, knowing that beneath that slightly crisp exterior lies a treasure trove of gooey, caramel-infused delight. This recipe stands out because it perfectly balances indulgence without being overly complicated. It delivers on every promise: rich, decadent, and utterly satisfying. It truly embodies what a perfect dessert should be, hitting all the right notes with its harmonious blend of sweetness, saltiness, and irresistible chewiness. This Gooey Salted Caramel Chocolate Chip Cookie Bar isn’t just a dessert; it’s a celebration in bar form. The combination of textures—soft, chewy, melting—with the explosion of sweet and salty flavors makes it incredibly addictive. It’s a guaranteed crowd-pleaser that will have everyone asking for the recipe, trust me! You’ll find yourself craving these moments of pure indulgence again and again once you experience them for yourself.

Now, let’s talk about enjoying these masterpieces. While they are absolutely divine eaten straight from the pan, still slightly warm with that caramel still perfectly runny, I have a few suggestions to take them to the next level. Imagine a warm bar, its chocolate molten, served alongside a scoop of high-quality vanilla bean ice cream, perhaps with an extra drizzle of homemade caramel sauce. The contrast of warm and cold, soft and creamy, is simply divine. Or, for a truly decadent breakfast or brunch treat (yes, I said it!), pair a slightly cooled bar with a strong cup of coffee or a cold glass of milk. They also make an incredible addition to any dessert platter, cut into smaller squares, where their distinct layers and inviting presentation are sure to draw attention. Don’t underestimate how beautiful they look when simply arranged on a serving dish, perhaps dusted lightly with a touch of flaky sea salt right before serving to really highlight that key flavor profile and add a touch of gourmet flair. They are remarkably versatile for any occasion, from casual family nights to elegant dinner parties.

But the fun doesn’t stop there! This recipe is incredibly versatile, inviting you to put your own spin on it and truly make it your signature treat. Feel free to experiment with different types of chocolate chips – maybe a mix of dark and milk chocolate for a complex flavor, or even some white chocolate chips for a creamier, sweeter profile. For an added layer of texture and nuttiness, try folding in a handful of chopped pecans or walnuts into the cookie dough; the toasted nuts complement the caramel beautifully. If you’re feeling adventurous, crushed pretzels could add another delightful salty crunch and unexpected texture, or a sprinkle of toffee bits would introduce even more caramel goodness and a pleasant chew. You could even play with the extracts; a hint of almond could provide a sophisticated background note, or a dash of espresso powder could deepen the chocolate flavor dramatically. Think of this recipe as a fantastic canvas, ready for your creative touch and culinary explorations.

Make it truly your own by adding your favorite mix-ins and personal flair!

So, what are you waiting for? I wholeheartedly encourage you to roll up your sleeves, gather your ingredients, and embark on this delicious baking adventure. It’s a remarkably straightforward process, and the reward, I promise, is immense. You’ll be amazed at how easily you can create something so utterly scrumptious, something that tastes like it came from a high-end bakery but was lovingly made right in your own kitchen. Once you’ve experienced the pure joy of these bars, I’d absolutely love to hear about it! Please, share your baking triumphs, your serving ideas, and any creative variations you come up with. Snap a photo, tell us about your experience in the comments, or simply spread the word to your friends and family about this incredible discovery. There’s nothing more rewarding than sharing good food and good experiences. Go on, treat yourself and your loved ones to the unforgettable delight of these cookie bars today! Happy baking, everyone!


Gooey Salted Caramel Chocolate Chip Cookie Bars

Gooey Salted Caramel Chocolate Chip Cookie Bars

Indulge in these irresistible cookie bars, featuring soft and chewy chocolate chip cookie layers filled with a luscious, sweet and salty caramel center, perfectly balanced with a hint of flaky sea salt.

Prep Time
45 Minutes
Cook Time
35 Minutes
Total Time
20 Minutes
Servings
16 bars

Ingredients

  • 1 cup Unsalted Butter, softened
  • 1 cup Light Brown Sugar, packed
  • ½ cup Granulated White Sugar
  • 2 Large Eggs, room temperature
  • 1 teaspoon Pure Vanilla Extract
  • 1 teaspoon Kosher Salt
  • 1 teaspoon Baking Soda
  • 2 ½ cups All-Purpose Flour
  • 1 (14-ounce) can Sweetened Condensed Milk
  • 10 ounces Soft Caramels, unwrapped
  • 2 cups Semi-Sweet Chocolate Chips
  • 1 teaspoon Flaked Sea Salt, plus more for sprinkling

Instructions

  1. Step 1
    Preheat oven to 350°F (175°C). Line a 9×13 inch baking pan with parchment paper, leaving an overhang on the longer sides. Lightly grease the parchment paper with non-stick spray or butter.
  2. Step 2
    In a medium bowl, whisk together 2 ¼ cups all-purpose flour, 1 teaspoon baking soda, and ½ teaspoon salt. Set aside.
  3. Step 3
    In a large mixing bowl, cream softened 1 cup unsalted butter with ¾ cup granulated sugar and ¾ cup packed light brown sugar on medium speed for 2-3 minutes until light and fluffy.
  4. Step 4
    Beat in 2 large eggs, one at a time, then stir in 2 teaspoons pure vanilla extract until smooth.
  5. Step 5
    Gradually add dry ingredients to wet, mixing on low speed until just combined. Do not overmix. Gently fold in 1 ½ cups semi-sweet chocolate chips.
  6. Step 6
    In a heavy-bottomed medium saucepan, combine 1 cup granulated sugar and ¼ cup water. Heat over medium without stirring until it turns a rich amber color (8-10 minutes). Immediately remove from heat. Carefully add ½ cup cubed unsalted butter, stirring until melted. Slowly pour in ¾ cup warmed heavy cream, stirring until smooth. Stir in 1 teaspoon pure vanilla extract and 1 teaspoon flaky sea salt. Set aside to cool slightly.
  7. Step 7
    Press about two-thirds of the cookie dough evenly into the bottom of the prepared pan.
  8. Step 8
    Pour the warm salted caramel evenly over the pressed cookie dough layer, spreading gently to the edges.
  9. Step 9
    Drop small, irregular clumps of the remaining one-third cookie dough over the caramel layer. Sprinkle with any reserved chocolate chips and extra flaky sea salt.
  10. Step 10
    Bake for 30-35 minutes at 350°F (175°C). Edges should be golden brown and set, while the center still looks slightly soft and jiggly. Do not overbake.
  11. Step 11
    Transfer the pan to a wire cooling rack and allow the bars to cool completely at room temperature for at least 3-4 hours, or until the caramel has fully set. Do not cut warm.
  12. Step 12
    Once fully cooled, use the parchment paper overhangs to lift the slab of bars from the pan. Cut into squares or rectangles with a sharp knife.

Important Information

Nutrition Facts (Per Serving)

It is important to consider this information as approximate and not to use it as definitive health advice.

Allergy Information

Please check ingredients for potential allergens and consult a health professional if in doubt.

« Previous Post
Delicious & Healthy Spaghetti Squash Au Gratin Recipe
Next Post »
Comforting Beef Potsticker Soup: A Delicious Hug in a Bowl

If you enjoyed this…

Easy White Chocolate Snowball Truffles with Condensed Milk

Crispy Angel Cake Churro Bites: A Sweet Twist on Dessert

No Bake Orange Creamsicle Truffles

No Bake Orange Creamsicle Truffles

Primary Sidebar

Browse by Diet

BreakfastDinnerLunchDessertAppetizer

Sweet Peach Yogurt Parfait Delight

One of my fondest memories is from a lazy summer afternoon spent at my grandmother’s house. The sun filtered through the kitchen window, casting a warm glow over the table where she would create her culinary magic. It was during one of those blissful moments that I first tasted her Peach Yogurt Parfait with Honey and Granola. The sweet aroma of ripe peaches mingling with creamy yogurt and the crunch of granola was nothing short of heavenly. It felt like summer captured in a bowl, and I still remember the joy of diving in with a spoon, each layer revealing a new burst of flavor.

When I think about that parfait, I can almost hear the gentle hum of the bees outside, reminding me of the floral notes that honey brings to every bite. The vibrant yellows and soft oranges of the peaches contrast beautifully with the creamy white yogurt and the golden crunch of granola. It’s a dish that not only looks delightful but also tastes like a celebration of fresh, wholesome ingredients.

What makes my version of this Peach Yogurt Parfait special is the careful balance of flavors and textures. I use ripe, juicy peaches, drizzled with locally sourced honey, and a homemade granola that’s bursting with nuts and seeds for an extra crunch. It’s a simple dish, but every layer is crafted with love and attention.

Let me show you exactly how to make this delightful parfait, so you can bring a bit of that summer magic into your kitchen!

Sweet Peach Yogurt Parfait Delight

Why You’ll Love This Recipe

  • Delightfully creamy texture from the Greek yogurt, paired with the juicy sweetness of fresh peaches.
  • Ready in under 20 minutes, making it a quick and satisfying breakfast or snack option.
  • Budget-friendly, using common ingredients that you may already have in your pantry.
  • Customizable with your favorite granola and nuts, allowing you to tailor each parfait to your taste.
  • Perfectly balanced flavors with the bright acidity of lemon juice and the sweetness of honey enhancing the peaches.

Ingredients

  • For the Parfait:
  • 2 cups plain Greek yogurt (or vanilla yogurt for a sweeter option)
  • 2 large ripe peaches, diced (about 2 cups)
  • 1 tablespoon fresh lemon juice (to prevent browning of peaches)
  • 2 tablespoons honey (plus more for drizzling)
  • 1 teaspoon vanilla extract (optional for extra flavor)
  • For the Granola:
  • 1 cup granola (store-bought or homemade; see notes for a simple granola recipe)
  • 1/4 cup sliced almonds (optional for added crunch)
  • 1/4 cup shredded coconut (optional for added flavor)

Let’s dive into some key ingredients that make this Peach Yogurt Parfait so delightful! First, the Greek yogurt is not only creamy but also packed with protein, making it a satisfying option for breakfast or a snack. If you’re looking for a sweeter option, you can easily substitute it with vanilla yogurt, though it may alter the overall flavor balance. Next, the ripe peaches are the star of the show; their natural sweetness shines through, so I recommend choosing peaches that yield slightly to pressure, indicating they’re perfectly ripe. If peaches aren’t in season, feel free to use nectarines or even frozen peaches—just thaw them before use. Finally, honey adds a lovely floral sweetness that ties everything together. If you prefer, maple syrup can serve as a delicious substitute.

Step-by-Step Instructions

  1. Start by preparing the peaches. Wash them thoroughly, then slice and dice them into bite-sized pieces. In a medium bowl, toss the diced peaches with 1 tablespoon of fresh lemon juice to prevent browning. Set aside for about 5 minutes while the lemon juice works its magic.
  2. In a separate bowl, combine the Greek yogurt, 2 tablespoons of honey, and 1 teaspoon of vanilla extract if using. Stir the mixture until smooth and thoroughly blended. This should take about a minute. Avoid overmixing to maintain the creaminess of the yogurt.
  3. Now it’s time to layer your parfait. Grab a clear glass or bowl to showcase your beautiful creation. Start with a generous spoonful of the yogurt mixture at the bottom—about 1/4 cup will do. Use a spoon to spread it evenly.
  4. Add a layer of the diced peaches over the yogurt, ensuring they cover the yogurt completely. You might want to use about half of what you have prepared—roughly 1 cup. This layer should be visually appealing, so arrange the peaches neatly.
  5. Sprinkle 1/4 cup of granola over the peaches. This adds a delightful crunch. Make sure to distribute it evenly to ensure every bite has that satisfying texture. Avoid packing it down too tightly, as you want it to maintain its crunch.
  6. Repeat the layers: spoon in another 1/4 cup of yogurt, followed by another cup of peaches, and another sprinkle of granola. You should have at least two layers, but feel free to add more depending on your glass size.
  7. Finish off your parfait with a drizzle of honey on top for added sweetness and a touch of elegance. If you’re using sliced almonds or shredded coconut, sprinkle them on top now. It adds a lovely visual contrast and extra flavor.
  8. Serve immediately or refrigerate for up to 30 minutes before serving to allow the flavors to meld together. However, I recommend enjoying it fresh to maintain the granola’s crunch.

Pro Tips for the Best Peach Yogurt Parfait With Honey And Granola

  • Make sure to choose ripe peaches for the best flavor and texture. A common mistake is using unripe fruit, which can lead to a less enjoyable parfait. Look for peaches that are fragrant and slightly soft to the touch.
  • Use a clear glass to assemble your parfait; this not only makes for a beautiful presentation but also allows you to see the colorful layers, which adds to the enjoyment of eating it.
  • For an even creamier texture, consider whipping the Greek yogurt with a hand mixer for a couple of minutes before layering. This small adjustment makes a huge difference in mouthfeel.
  • Be mindful of the granola-to-yogurt ratio. Too much granola can overwhelm the parfait, while too little can make it feel too creamy. Aim for about 1/4 cup of granola per layer for the perfect balance.
  • If you’re making this for a gathering, consider preparing the yogurt and peaches ahead of time and layering them just before serving. This ensures the granola stays crunchy!

Variations & Serving Ideas

There are so many ways to get creative with your Peach Yogurt Parfait! For a tropical twist, swap out the peaches for mangoes or pineapples and top with coconut flakes. If you prefer a berry flavor, mix in some blueberries or strawberries with the peaches for added color and taste. For a nutty version, incorporate chopped walnuts or pecans instead of almonds.

As for serving ideas, this parfait pairs beautifully with a side of scrambled eggs for a hearty breakfast or fresh fruit salad for a light lunch. You might also enjoy it alongside whole grain toast with almond butter for an energizing snack. The contrast of flavors and textures will elevate your meal experience!

Storage, Make-Ahead & Reheating

The Peach Yogurt Parfait is best enjoyed fresh, but you can prepare some components ahead of time. Store the layered parfait in an airtight container in the refrigerator for up to 24 hours. However, be cautious; the granola may lose its crunch if stored too long. You can freeze the yogurt and peach mixture for up to 2 months; just remember to thaw it in the refrigerator overnight before serving.

If you plan to enjoy this dish the next day, it can taste even better as the flavors meld together. Just remember to add the granola right before serving to keep its delightful crunch!

Frequently Asked Questions

Can I make Peach Yogurt Parfait With Honey And Granola ahead of time?

Yes — in fact, it tastes even better the next day as the flavors meld. However, I recommend waiting to add the granola until just before serving to maintain its crunch.

What can I substitute for Greek yogurt?

If you prefer a lighter option, you can substitute Greek yogurt with regular yogurt or a dairy-free alternative like coconut yogurt. Just remember that this may alter the creaminess and flavor profile slightly.

Can I use frozen peaches for this parfait?

Absolutely! Just make sure to thaw the frozen peaches before using them. They will still add great flavor, though the texture may be slightly softer than fresh peaches.

How do I make the parfait vegan?

To make a vegan version, substitute the Greek yogurt with a plant-based yogurt alternative, and replace honey with maple syrup or agave nectar. This keeps the parfait sweet while adhering to a vegan diet.

What other fruits can I use in this recipe?

You can mix and match fruits based on your preference. Try using strawberries, blueberries, raspberries, or even bananas. Just make sure to adjust the lemon juice as needed to prevent browning.

Sweet Peach Yogurt Parfait Delight

Final Thoughts

The Peach Yogurt Parfait with Honey and Granola is a delightful blend of creamy yogurt, sweet peaches, and crunchy granola that creates a satisfying and nourishing treat. Each layer bursts with flavor, making it a perfect choice for breakfast or a light dessert.

This is the kind of recipe I come back to again and again, especially when I want something refreshing and wholesome to start my day. The harmony of sweet and tart flavors, combined with the delightful crunch, never fails to lift my spirits!

I encourage you to give this parfait a try and indulge in its comforting goodness. Feel free to share your results or even add your own twist—perhaps a sprinkle of cinnamon or a handful of nuts. Enjoy creating your perfect parfait!

Print
clock clock iconcutlery cutlery iconflag flag iconfolder folder iconinstagram instagram iconpinterest pinterest iconfacebook facebook iconprint print iconsquares squares iconheart heart iconheart solid heart solid icon

Peach Yogurt Parfait


  • Author: Lily author
  • Total Time: 15 minutes
  • Yield: 4 servings 1x
Pin Recipe
Print Recipe

Description

This Peach Yogurt Parfait combines creamy Greek yogurt, juicy peaches, and crunchy granola for a delightful treat. It’s a perfect breakfast or snack that captures the essence of summer in every bite.


Ingredients

Scale
  • For the Parfait:
  • 2 cups plain Greek yogurt (or vanilla yogurt for a sweeter option)
  • 2 large ripe peaches, diced (about 2 cups)
  • 1 tablespoon fresh lemon juice (to prevent browning of peaches)
  • 2 tablespoons honey (plus more for drizzling)
  • 1 teaspoon vanilla extract (optional for extra flavor)
  • For the Granola:
  • 1 cup granola (store-bought or homemade; see notes for a simple granola recipe)
  • 1/4 cup sliced almonds (optional for added crunch)
  • 1/4 cup shredded coconut (optional for added flavor)

Instructions

  1. Start by preparing the peaches. Wash them thoroughly, then slice and dice them into bite-sized pieces. In a medium bowl, toss the diced peaches with 1 tablespoon of fresh lemon juice to prevent browning. Set aside for about 5 minutes while the lemon juice works its magic.
  2. In a separate bowl, combine the Greek yogurt, 2 tablespoons of honey, and 1 teaspoon of vanilla extract if using. Stir the mixture until smooth and thoroughly blended. This should take about a minute. Avoid overmixing to maintain the creaminess of the yogurt.
  3. Now it’s time to layer your parfait. Grab a clear glass or bowl to showcase your beautiful creation. Start with a generous spoonful of the yogurt mixture at the bottom—about 1/4 cup will do. Use a spoon to spread it evenly.
  4. Add a layer of the diced peaches over the yogurt, ensuring they cover the yogurt completely. You might want to use about half of what you have prepared—roughly 1 cup. This layer should be visually appealing, so arrange the peaches neatly.
  5. Sprinkle 1/4 cup of granola over the peaches. This adds a delightful crunch. Make sure to distribute it evenly to ensure every bite has that satisfying texture. Avoid packing it down too tightly, as you want it to maintain its crunch.
  6. Repeat the layers: spoon in another 1/4 cup of yogurt, followed by another cup of peaches, and another sprinkle of granola. You should have at least two layers, but feel free to add more depending on your glass size.
  7. Finish off your parfait with a drizzle of honey on top for added sweetness and a touch of elegance. If you’re using sliced almonds or shredded coconut, sprinkle them on top now. It adds a lovely visual contrast and extra flavor.
  8. Serve immediately or refrigerate for up to 30 minutes before serving to allow the flavors to meld together. However, I recommend enjoying it fresh to maintain the granola’s crunch.
  • Prep Time: 15 mins
  • Cook Time: 0 mins
  • Category: Breakfast
  • Method: No-cook
  • Cuisine: American

Nutrition

  • Serving Size: 1 parfait
  • Calories: 250
  • Sugar: 20 g
  • Sodium: 50 mg
  • Fat: 5 g
  • Saturated Fat: 2 g
  • Unsaturated Fat: 3 g
  • Trans Fat: 0 g
  • Carbohydrates: 40 g
  • Fiber: 3 g
  • Protein: 10 g
  • Cholesterol: 10 mg

Keywords: Choose ripe peaches for the best flavor and texture. Use a clear glass for a beautiful presentation. For creaminess, consider whipping the yogurt before layering. Be mindful of the granola-to-yogurt ratio. Prepare yogurt and peaches ahead of time for gatherings, layering just before serving.

Did you make this recipe?

Share a photo and tag us — we can't wait to see what you've made!

Sun-Kissed Frozen Orange Cream Slush

As a child, summer days felt like they lasted forever. I remember the sticky heat wrapping around me as I played outside, my laughter mingling with the sounds of the neighborhood. But nothing could cool me down quite like the moment I’d spot my grandmother, laboring over her blender, whipping up her famous Frozen Orange Creamsicle Slush. That vibrant orange treat, with its frosty texture and sweet citrus aroma, was like a burst of sunshine in a cup. Just one sip, and I could feel the coolness wash over me, sparking pure joy.

This Frozen Orange Creamsicle Slush has a way of making you feel like a kid again. Its creamy, dreamy consistency is a delightful balance of bright orange and soft vanilla, inviting you to dive right in. The refreshing tang of orange dances on your tongue, while the smooth creaminess envelops you in a comforting embrace. It’s a nostalgic treat that’s perfect for hot summer afternoons or anytime you need a little pick-me-up.

What makes my version of this slush stand out is the addition of a hint of vanilla bean, which elevates the flavor and adds an extra layer of richness. Plus, it’s super easy to whip up with just a few simple ingredients that you probably already have on hand! So, if you’re ready to relive those sun-soaked memories, let me show you exactly how to make it.

Sun-Kissed Frozen Orange Cream Slush

Why You’ll Love This Recipe

  • Each slush is a perfect blend of creamy vanilla and zesty orange, creating a nostalgic flavor reminiscent of summer days.
  • This refreshing treat is ready in under 15 minutes, making it an ideal quick dessert for unexpected guests or hot afternoons.
  • With just 8 simple ingredients, it’s budget-friendly, ensuring you don’t have to break the bank to enjoy a delicious slush.
  • The slush has a perfectly smooth texture, thanks to the combination of ice and ice cream, providing a delightful contrast to the bright citrus flavors.
  • It’s highly customizable; you can easily adjust the sweetness and add fresh herbs for a unique twist that suits your taste.

Ingredients

  • 2 cups orange juice (freshly squeezed or store-bought)
  • 1 cup vanilla ice cream
  • 1 cup crushed ice
  • 1/2 cup milk (whole or 2%)
  • 1/4 cup granulated sugar (adjust based on sweetness preference)
  • 1 teaspoon vanilla extract
  • Zest of 1 orange (for added flavor)
  • Fresh orange slices and mint leaves (for garnish)

The star of this Frozen Orange Creamsicle Slush is the orange juice, which provides the vibrant, citrusy base. Freshly squeezed juice will yield the brightest flavor, but store-bought options can be just as convenient. If you’re opting for store-bought, choose 100% pure juice with no added sugars for the best results. Another essential ingredient is the vanilla ice cream; it adds creaminess and sweetness. You can substitute it with dairy-free ice cream if you’re looking for a vegan option. Whole or 2% milk complements the ice cream, creating a smooth blend. If you want a lower-calorie version, almond or oat milk can be good alternatives.

Lastly, the granulated sugar can be adjusted based on your sweetness preference. If you prefer a more natural sweetener, consider using honey or agave syrup. The orange zest enhances the flavor profile, providing an aromatic pop that brings the whole slush together. Don’t skip it! It adds an extra layer of brightness that makes this slush truly special.

Step-by-Step Instructions

  1. Start by preparing your ingredients. Gather 2 cups of orange juice, 1 cup of vanilla ice cream, and 1 cup of crushed ice. Make sure the ice is finely crushed, as larger chunks can make blending difficult.
  2. In a blender, combine the orange juice, vanilla ice cream, crushed ice, and 1/2 cup of milk. Add 1/4 cup of granulated sugar and 1 teaspoon of vanilla extract. If you like a sweeter slush, consider adding a bit more sugar at this stage.
  3. Add the zest of 1 orange to the blender. This step is crucial for enhancing the citrus flavor of your slush. Make sure not to include the bitter white pith—only the flavorful zest.
  4. Blend the mixture on medium-high speed for about 30-45 seconds. Stop once the ingredients are fully combined and the slush has a smooth, even consistency. If you notice large chunks of ice, blend for an additional 10-15 seconds. Avoid over-blending, as this can make the slush too liquidy.
  5. Once blended, taste the slush. If it needs more sweetness, add a little more sugar and blend for a few more seconds. If it’s too thick, you can add a splash of milk to reach your desired consistency.
  6. Pour the slush into glasses. This recipe typically serves 4, but you can easily double it for larger gatherings. Use a spoon to help guide the slush into the glasses if needed.
  7. Garnish each serving with fresh orange slices and mint leaves. The mint not only adds a pop of color but also a refreshing aroma that complements the citrus flavors beautifully.
  8. Serve immediately and enjoy! If you’ve made extra, you can refrigerate it for a short time, but it’s best enjoyed fresh.

Pro Tips for the Best Frozen Orange Creamsicle Slush

  • Don’t skip the orange zest! It’s a game-changer for flavor. Always zest before juicing to make it easier.
  • Use a high-powered blender for the best texture. A standard blender may struggle with ice, leading to uneven consistency. If you have a food processor, that can work too, but ensure the ice is finely crushed.
  • Adjust the ice-to-liquid ratio carefully. If your slush is too thick, it won’t blend well. Start with less ice and add more until you reach your preferred texture.
  • Be cautious with the sugar! Always start with the lower amount, as you can easily add more, but it’s hard to fix an overly sweet slush.
  • For a fun twist, consider adding a splash of coconut milk or a handful of fresh fruit like strawberries or pineapple. This not only enhances the flavor but also adds a beautiful color contrast.

Variations & Serving Ideas

There are countless ways to put a spin on your Frozen Orange Creamsicle Slush. Consider making a tropical version by adding in some pineapple juice or coconut milk for a delightful tropical twist. If you’re feeling adventurous, try incorporating a handful of frozen mango or peach slices for added sweetness. For a lighter version, swap out the vanilla ice cream for Greek yogurt for a creamy yet tangy alternative.

As for serving ideas, this refreshing slush pairs wonderfully with light summer dishes like grilled chicken skewers, fish tacos, or a simple salad topped with citrus vinaigrette. The bright, zesty flavors of the slush complement these dishes perfectly, making them an ideal pairing for a sunny day.

Storage, Make-Ahead & Reheating

This Frozen Orange Creamsicle Slush is best enjoyed fresh, but if you have leftovers, you can store them in an airtight container in the fridge for up to 2 days. Just keep in mind that the slush may lose some of its texture over time as the ice melts. It doesn’t freeze well, as the ice will turn into a solid block. If you must freeze it, blend again after thawing to restore the slushy consistency. This treat is best the day you make it, as the flavors meld together beautifully overnight, enhancing its deliciousness.

Frequently Asked Questions

Can I make Frozen Orange Creamsicle Slush ahead of time?

Yes — in fact, it tastes even better the next day as the flavors meld. However, it’s best to enjoy it fresh, as the texture can change if stored for too long. If you need to prepare it ahead, keep it in the fridge and re-blend before serving.

What kind of orange juice should I use?

For the best flavor, use freshly squeezed orange juice. However, if you’re short on time, opt for 100% pure store-bought juice without added sugars. This will ensure that your slush remains flavorful and refreshing.

Can I substitute the vanilla ice cream?

Absolutely! If you’re looking for a dairy-free option, coconut milk ice cream or a non-dairy vanilla ice cream can work wonderfully. They will still provide the creamy texture and sweetness you desire.

How can I adjust the sweetness of my slush?

You can easily adjust the sweetness by modifying the amount of sugar added. Start with 1/4 cup and taste the mixture before blending. If you prefer it sweeter, add more sugar gradually until it reaches your desired level.

What should I do if my slush is too thick?

If your slush is too thick, simply add a splash of milk or orange juice and blend again. This will help achieve a more drinkable consistency while maintaining the slushy texture. Adjust gradually to reach your preferred thickness.

Sun-Kissed Frozen Orange Cream Slush

Final Thoughts

The Frozen Orange Creamsicle Slush is a delightful blend of refreshing citrus and creamy goodness, making it a perfect treat for warm days or any time you crave a taste of nostalgia. The way the bright orange flavor dances with the creamy texture truly elevates this slush, transforming it into a satisfying escape from the everyday.

This is the kind of recipe I come back to again and again, especially when I’m looking to cool down or impress guests at a summer gathering. It’s simple to make and always brings smiles all around! I encourage you to try this recipe for yourself—don’t hesitate to share your results or even put your own spin on it. Happy slushing!

Print
clock clock iconcutlery cutlery iconflag flag iconfolder folder iconinstagram instagram iconpinterest pinterest iconfacebook facebook iconprint print iconsquares squares iconheart heart iconheart solid heart solid icon

Frozen Orange Creamsicle Slush


  • Author: Lily author
  • Total Time: 15 minutes
  • Yield: 4 servings 1x
Pin Recipe
Print Recipe

Description

This Frozen Orange Creamsicle Slush is a refreshing treat that combines creamy vanilla and zesty orange flavors. Perfect for hot summer days, it brings back nostalgic memories with every sip.


Ingredients

Scale
  • 2 cups orange juice (freshly squeezed or store-bought)
  • 1 cup vanilla ice cream
  • 1 cup crushed ice
  • 1/2 cup milk (whole or 2%)
  • 1/4 cup granulated sugar (adjust based on sweetness preference)
  • 1 teaspoon vanilla extract
  • Zest of 1 orange (for added flavor)
  • Fresh orange slices and mint leaves (for garnish)

Instructions

  1. Start by preparing your ingredients. Gather 2 cups of orange juice, 1 cup of vanilla ice cream, and 1 cup of crushed ice. Make sure the ice is finely crushed, as larger chunks can make blending difficult.
  2. In a blender, combine the orange juice, vanilla ice cream, crushed ice, and 1/2 cup of milk. Add 1/4 cup of granulated sugar and 1 teaspoon of vanilla extract. If you like a sweeter slush, consider adding a bit more sugar at this stage.
  3. Add the zest of 1 orange to the blender. This step is crucial for enhancing the citrus flavor of your slush. Make sure not to include the bitter white pith—only the flavorful zest.
  4. Blend the mixture on medium-high speed for about 30-45 seconds. Stop once the ingredients are fully combined and the slush has a smooth, even consistency. If you notice large chunks of ice, blend for an additional 10-15 seconds. Avoid over-blending, as this can make the slush too liquidy.
  5. Once blended, taste the slush. If it needs more sweetness, add a little more sugar and blend for a few more seconds. If it’s too thick, you can add a splash of milk to reach your desired consistency.
  6. Pour the slush into glasses. This recipe typically serves 4, but you can easily double it for larger gatherings. Use a spoon to help guide the slush into the glasses if needed.
  7. Garnish each serving with fresh orange slices and mint leaves. The mint not only adds a pop of color but also a refreshing aroma that complements the citrus flavors beautifully.
  8. Serve immediately and enjoy! If you’ve made extra, you can refrigerate it for a short time, but it's best enjoyed fresh.
  • Prep Time: 15 min
  • Cook Time: 0 min
  • Category: Dessert
  • Method: Blending
  • Cuisine: American

Nutrition

  • Serving Size: 1 serving
  • Calories: 200
  • Sugar: 30 g
  • Sodium: 50 mg
  • Fat: 5 g
  • Saturated Fat: 3 g
  • Unsaturated Fat: 2 g
  • Trans Fat: 0 g
  • Carbohydrates: 40 g
  • Fiber: 1 g
  • Protein: 2 g
  • Cholesterol: 20 mg

Keywords: Don't skip the orange zest! It's a game-changer for flavor. Always zest before juicing to make it easier.

Did you make this recipe?

Share a photo and tag us — we can't wait to see what you've made!

Zesty Lemon Poppy Seed Delight

One rainy afternoon, I found myself in my grandmother’s cozy kitchen, the kind that always smelled like warmth and love. She was whipping up her famous Lemon Poppy Seed Loaf, a recipe that had been passed down through generations. As the batter came together, the zesty aroma of fresh lemons filled the air, mingling perfectly with the nutty fragrance of poppy seeds. I can still picture her, apron-clad, as she expertly drizzled a vibrant citrus icing over the loaf, creating a glossy, sun-kissed finish that beckoned us to dive in. It was a moment that sparked my own passion for baking, and this recipe has become a cherished staple in my home ever since.

When you take a bite of this Lemon Poppy Seed Loaf, it’s like a burst of sunshine on your palate. The loaf is beautifully golden, with a tender crumb that melts in your mouth. Each slice is speckled with tiny poppy seeds, adding a delightful crunch that contrasts beautifully with the tangy sweetness of the lemon. And that citrus icing? It’s the finishing touch that elevates this loaf from ordinary to extraordinary, with its bright, zesty flavor dancing on your taste buds.

This recipe stands out because it embraces simplicity while delivering on flavor. I’ve added a hint of vanilla to the batter, enhancing the overall taste and making it even more indulgent. Trust me, once you make this Lemon Poppy Seed Loaf With Citrus Icing, it’ll become a go-to in your baking repertoire.

So, let me show you exactly how to make it!

Zesty Lemon Poppy Seed Delight

Why You’ll Love This Recipe

  • Moist and tender crumb that melts in your mouth, thanks to the perfect balance of butter and buttermilk.
  • Bright, zesty lemon flavor paired with crunchy poppy seeds, creating a delightful texture and taste experience.
  • Easy to whip up in just about an hour, perfect for last-minute gatherings or a cozy afternoon treat.
  • Budget-friendly with everyday ingredients, making it an accessible option for all home bakers.
  • The citrus icing adds a sweet tang that elevates the loaf, turning a simple recipe into a showstopper!

Ingredients

  • 1 ½ cups (190g) all-purpose flour
  • 1 teaspoon baking powder
  • ½ teaspoon baking soda
  • ½ teaspoon salt
  • 3 tablespoons poppy seeds
  • ½ cup (115g) unsalted butter, softened to room temperature
  • 1 cup (200g) granulated sugar
  • 2 large eggs
  • 1 teaspoon vanilla extract
  • 1 teaspoon lemon zest (from about 1 medium lemon)
  • ½ cup (120ml) buttermilk
  • 2 tablespoons fresh lemon juice

For the Citrus Icing:

  • 1 cup (120g) powdered sugar
  • 2 tablespoons fresh lemon juice
  • 1 tablespoon orange juice
  • 1 teaspoon lemon zest (for garnish, optional)

Let’s dive into the key ingredients that make this Lemon Poppy Seed Loaf so special. The all-purpose flour provides the structure and base for the loaf, while the baking powder and baking soda ensure it rises perfectly, giving the loaf a light texture. For a gluten-free variation, you could substitute the flour with a gluten-free all-purpose blend. Poppy seeds not only add a delightful crunch but also contribute to the unique flavor profile that pairs well with the citrus notes.

Unsalted butter is crucial for achieving the buttery richness that makes this loaf so moist. If you’re looking for a dairy-free option, coconut oil or a vegan butter can be used instead. The buttermilk is another essential component, providing acidity that activates the baking soda for a fluffy texture. If you don’t have buttermilk on hand, you can easily make a substitute by mixing ½ cup of milk with 1 tablespoon of vinegar or lemon juice and letting it sit for about 5 minutes.

Step-by-Step Instructions

  1. Preheat your oven to 350°F (175°C). Grease a 9×5-inch loaf pan or line it with parchment paper for easy removal later.
  2. In a medium mixing bowl, whisk together 1 ½ cups of all-purpose flour, 1 teaspoon of baking powder, ½ teaspoon of baking soda, ½ teaspoon of salt, and 3 tablespoons of poppy seeds. This helps to evenly distribute the baking agents and ensures a uniform rise.
  3. In a large mixing bowl, cream together ½ cup of softened unsalted butter and 1 cup of granulated sugar using an electric mixer on medium speed for about 3-4 minutes, until the mixture is light and fluffy. Make sure to scrape down the sides of the bowl occasionally.
  4. Add 2 large eggs, 1 teaspoon of vanilla extract, and 1 teaspoon of lemon zest to the creamed butter and sugar, mixing until fully combined. You want a smooth consistency, so ensure there are no lumps of butter.
  5. In a small bowl, combine ½ cup of buttermilk and 2 tablespoons of fresh lemon juice. Alternately add the dry ingredients and buttermilk mixture to the butter mixture, starting and ending with the dry ingredients. Mix just until combined; do not overmix, as this can lead to a dense loaf.
  6. Pour the batter into the prepared loaf pan. Smooth the top with a spatula, ensuring it’s even. Bake in the preheated oven for 50-60 minutes, or until a toothpick inserted in the center comes out clean. The edges should be lightly golden brown, and the center should feel just set.
  7. Once baked, remove the loaf from the oven and allow it to cool in the pan for about 10 minutes. Then, transfer it to a wire rack to cool completely. Resist the urge to slice too soon, as it will be crumbly if it’s still warm.
  8. While the loaf is cooling, prepare the citrus icing. In a medium bowl, whisk together 1 cup of powdered sugar, 2 tablespoons of fresh lemon juice, and 1 tablespoon of orange juice until smooth. If the icing is too thick, you can add a little more juice to reach your desired consistency.
  9. Once the loaf is completely cool, drizzle the citrus icing over the top. If you like, sprinkle with an additional teaspoon of lemon zest for an extra pop of flavor and color.

Pro Tips for the Best Lemon Poppy Seed Loaf With Citrus Icing

  • Be careful not to overmix your batter; this is a common mistake that can lead to a dense loaf. Mix just until the dry ingredients are incorporated for a light and fluffy texture.
  • Use room temperature ingredients, especially the butter and eggs. This helps to create a smoother batter and ensures even baking. Take your eggs out of the fridge about 30 minutes before you start.
  • For a more pronounced lemon flavor, consider adding a little lemon extract in addition to the zest and juice. Just a half teaspoon can elevate the citrus notes significantly.
  • When measuring your flour, spoon it into the measuring cup and level it off with a knife instead of scooping directly from the bag. This prevents packing and ensures you don’t end up with a dry loaf.
  • Invest in a good quality loaf pan; it makes a difference in heat distribution, which ensures even baking. If your pan is dark-coated, reduce the oven temperature by 25°F to prevent over-browning.

Variations & Serving Ideas

For a delightful twist, consider adding blueberries or raspberries to the batter for a fruity burst of flavor. You can also experiment with different citrus fruits—try lime or grapefruit zest and juice for a refreshing change. For a healthier option, substitute half of the all-purpose flour with whole wheat flour for added fiber without compromising too much on texture.

This Lemon Poppy Seed Loaf pairs beautifully with a light salad, such as a mixed greens salad with a vinaigrette, or a cup of tea for a cozy afternoon treat. It also complements a creamy cheese platter, as the acidity of the loaf balances rich cheeses perfectly. Lastly, a scoop of vanilla ice cream on the side creates a delightful contrast of temperatures and flavors!

Storage, Make-Ahead & Reheating

This Lemon Poppy Seed Loaf can be stored at room temperature for up to 3 days if wrapped tightly in plastic wrap. If you want to keep it longer, it freezes well for up to 3 months. To freeze, wrap the loaf tightly in plastic wrap and then in aluminum foil to prevent freezer burn.

When you’re ready to enjoy it again, simply thaw it in the fridge overnight. Reheat individual slices in the microwave for 15-20 seconds or in a toaster oven until warmed through. Interestingly, many people find that this loaf tastes even better the next day, as the flavors have time to meld!

Frequently Asked Questions

Can I make Lemon Poppy Seed Loaf With Citrus Icing ahead of time?

Yes — in fact, it tastes even better the next day! You can make the loaf a day in advance, allowing the flavors to develop. Just be sure to store it in an airtight container to maintain its moisture.

Can I substitute the poppy seeds?

Absolutely! If you don’t have poppy seeds on hand or prefer an alternative, you can use sesame seeds for a similar crunch or omit them entirely for a smooth loaf.

What can I use instead of buttermilk?

If you don’t have buttermilk, you can easily create a substitute by mixing ½ cup of milk (dairy or plant-based) with 1 tablespoon of vinegar or lemon juice. Let it sit for 5 minutes before using in the recipe.

How can I make this recipe gluten-free?

To make a gluten-free version of this Lemon Poppy Seed Loaf, substitute the all-purpose flour with a gluten-free all-purpose flour blend. Just ensure that the blend contains a binding agent like xanthan gum for the best results.

What is the best way to store leftover loaf?

Leftover Lemon Poppy Seed Loaf should be stored in an airtight container at room temperature for up to 3 days. For longer storage, wrap it tightly and freeze for up to 3 months. Thaw it before serving for the best texture.

Zesty Lemon Poppy Seed Delight

Final Thoughts

The Lemon Poppy Seed Loaf with Citrus Icing is truly a delightful treat that brings a burst of brightness to any occasion. The zesty lemon flavor combined with the subtle crunch of poppy seeds creates a satisfying balance, while the citrus icing adds a touch of sweetness that perfectly complements the loaf’s tanginess.

This is the kind of recipe I come back to again and again, especially when I want to brighten up a gloomy day or celebrate a small victory. The aroma that fills the kitchen as it bakes is absolutely heavenly! I encourage you to give this recipe a try; you might just find it becoming a beloved staple in your home. Don’t forget to share your results or even add your own unique twist—I can’t wait to see what you create!

Print
clock clock iconcutlery cutlery iconflag flag iconfolder folder iconinstagram instagram iconpinterest pinterest iconfacebook facebook iconprint print iconsquares squares iconheart heart iconheart solid heart solid icon

Lemon Poppy Seed Loaf


  • Author: Lily author
  • Total Time: 6 minute
  • Yield: 1 loaf 1x
Pin Recipe
Print Recipe

Description

This Lemon Poppy Seed Loaf is a delightful treat that combines zesty lemon flavor with crunchy poppy seeds. Topped with a citrus icing, it’s perfect for any occasion.


Ingredients

Scale
  • 1 ½ cups (190g) all-purpose flour
  • 1 teaspoon baking powder
  • ½ teaspoon baking soda
  • ½ teaspoon salt
  • 3 tablespoons poppy seeds
  • ½ cup (115g) unsalted butter, softened to room temperature
  • 1 cup (200g) granulated sugar
  • 2 large eggs
  • 1 teaspoon vanilla extract
  • 1 teaspoon lemon zest (from about 1 medium lemon)
  • ½ cup (120ml) buttermilk
  • 2 tablespoons fresh lemon juice
  • 1 cup (120g) powdered sugar
  • 2 tablespoons fresh lemon juice
  • 1 tablespoon orange juice
  • 1 teaspoon lemon zest (for garnish, optional)

Instructions

  1. Preheat your oven to 350°F (175°C). Grease a 9×5-inch loaf pan or line it with parchment paper for easy removal later.
  2. In a medium mixing bowl, whisk together 1 ½ cups of all-purpose flour, 1 teaspoon of baking powder, ½ teaspoon of baking soda, ½ teaspoon of salt, and 3 tablespoons of poppy seeds. This helps to evenly distribute the baking agents and ensures a uniform rise.
  3. In a large mixing bowl, cream together ½ cup of softened unsalted butter and 1 cup of granulated sugar using an electric mixer on medium speed for about 3-4 minutes, until the mixture is light and fluffy. Make sure to scrape down the sides of the bowl occasionally.
  4. Add 2 large eggs, 1 teaspoon of vanilla extract, and 1 teaspoon of lemon zest to the creamed butter and sugar, mixing until fully combined. You want a smooth consistency, so ensure there are no lumps of butter.
  5. In a small bowl, combine ½ cup of buttermilk and 2 tablespoons of fresh lemon juice. Alternately add the dry ingredients and buttermilk mixture to the butter mixture, starting and ending with the dry ingredients. Mix just until combined; do not overmix, as this can lead to a dense loaf.
  6. Pour the batter into the prepared loaf pan. Smooth the top with a spatula, ensuring it’s even. Bake in the preheated oven for 50-60 minutes, or until a toothpick inserted in the center comes out clean. The edges should be lightly golden brown, and the center should feel just set.
  7. Once baked, remove the loaf from the oven and allow it to cool in the pan for about 10 minutes. Then, transfer it to a wire rack to cool completely. Resist the urge to slice too soon, as it will be crumbly if it’s still warm.
  8. While the loaf is cooling, prepare the citrus icing. In a medium bowl, whisk together 1 cup of powdered sugar, 2 tablespoons of fresh lemon juice, and 1 tablespoon of orange juice until smooth. If the icing is too thick, you can add a little more juice to reach your desired consistency.
  9. Once the loaf is completely cool, drizzle the citrus icing over the top. If you like, sprinkle with an additional teaspoon of lemon zest for an extra pop of flavor and color.
  • Prep Time: 15 mins
  • Cook Time: 50-60 mins
  • Category: Dessert
  • Method: Baking
  • Cuisine: American

Nutrition

  • Serving Size: 1 slice
  • Calories: 200
  • Sugar: 15 g
  • Sodium: 150 mg
  • Fat: 8 g
  • Saturated Fat: 5 g
  • Unsaturated Fat: 3 g
  • Trans Fat: 0 g
  • Carbohydrates: 30 g
  • Fiber: 1 g
  • Protein: 3 g
  • Cholesterol: 40 mg

Keywords: Be careful not to overmix your batter; this is a common mistake that can lead to a dense loaf. Use room temperature ingredients for a smoother batter and even baking.

Did you make this recipe?

Share a photo and tag us — we can't wait to see what you've made!

  • Privacy Policy
  • Terms Of Service
  • Contact
  • About
  • GDPR

Copyright © 2025 Homesmad