• Skip to primary navigation
  • Skip to main content
  • Skip to primary sidebar
Homesmad

Homesmad

  • Home
  • Breakfast & Brunch
  • Appetizers & Snacks
  • Dinner
  • Dessert
  • About
  • Privacy Policy
  • Contact
Homesmad
  • Home
  • Breakfast & Brunch
  • Appetizers & Snacks
  • Dinner
  • Dessert
  • About
  • Privacy Policy
  • Contact

Delicious & Healthy Spaghetti Squash Au Gratin Recipe

November 4, 2025 by Lily author

Spaghetti Squash Au Gratin A Delicious And Healthy Recipe is more than just a meal; it’s a culinary revelation that beautifully marries comfort food indulgence with wholesome goodness. Have you ever wished for a cheesy, satisfying dish that feels decadent yet is surprisingly light and packed with vegetables? Well, I’m thrilled to tell you that your wish has come true!

The very term ‘au gratin’ itself whispers tales of French kitchens, implying a dish baked to perfection with a delightful golden-brown crust of cheese, breadcrumbs, or both. Traditionally reserved for potatoes or pasta, I’ve discovered that applying this beloved technique to spaghetti squash is nothing short of brilliant. It transforms the humble, stringy squash into something truly spectacular, giving it a sophisticated edge while keeping it remarkably healthy.

What makes this dish so universally adored? For me, it’s the magical combination of textures and flavors. You get the delicate, pasta-like strands of spaghetti squash, enveloped in a creamy, savory cheese sauce, all crowned with an irresistibly crispy, golden topping. It’s a masterful illusion, offering all the comforting richness you crave from a gratin without the heavy calories. This Spaghetti Squash Au Gratin A Delicious And Healthy Recipe is perfect as a show-stopping side dish or a satisfying vegetarian main course, proving that healthy eating can indeed be incredibly delicious and utterly fulfilling. I promise, once you try it, you’ll wonder why you ever waited!

Delicious & Healthy Spaghetti Squash Au Gratin Recipe this RECIPE

Ingredients:

  • 1 medium spaghetti squash (about 2.5-3 pounds): This is the star of our “Spaghetti Squash Au Gratin” recipe, offering a wonderfully unique, noodle-like texture that makes it an excellent, low-carb alternative to traditional pasta. Its mild flavor is perfect for soaking up rich cheese sauce.
  • 1 tablespoon olive oil: For roasting our spaghetti squash, ensuring it gets beautifully tender and slightly caramelized without sticking.
  • 1 small yellow onion, finely diced: Adds a foundational aromatic sweetness and depth to our dish, complementing the richness of the cheese.
  • 2 cloves garlic, minced: The quintessential flavor enhancer, bringing a pungent warmth that’s essential for a savory au gratin.
  • 2 tablespoons unsalted butter: The base for our glorious cheese sauce, contributing richness and a silky texture.
  • 2 tablespoons all-purpose flour: Used to create the roux, which thickens our cheese sauce to a luscious, creamy consistency.
  • 2 cups whole milk, warmed: Whole milk provides the best body and richness for our sauce, but you can use 2% if preferred. Warming it slightly helps prevent lumps in the roux.
  • 1 cup grated Gruyère cheese: A semi-hard, savory cheese with a distinctive nutty and earthy flavor that melts beautifully, creating those iconic stretchy cheese pulls. It’s a classic choice for au gratin dishes.
  • 1 cup grated sharp cheddar cheese: Adds a tangy, robust flavor that pairs perfectly with the milder Gruyère, providing a familiar comfort food taste to our “Spaghetti Squash Au Gratin A Delicious And Healthy Recipe”.
  • ½ cup grated Parmesan cheese, divided: A salty, umami-packed cheese that adds a final layer of complex flavor. We’ll use some in the sauce and some for the top.
  • ½ teaspoon salt, or to taste: Essential for enhancing all the other flavors in the dish.
  • ¼ teaspoon black pepper, freshly ground, or to taste: Adds a subtle kick and aromatic spice.
  • ¼ teaspoon nutmeg, freshly grated (optional but highly recommended): A small pinch of nutmeg elevates cheese sauces, adding a delicate warmth and sophisticated depth that you might not even identify, but would surely miss.
  • Pinch of cayenne pepper (optional): For a very subtle warmth and color, without making the dish spicy.
  • 2 tablespoons fresh parsley, chopped (for garnish): Brings a pop of fresh color and a herbaceous counterpoint to the rich dish when serving.

Preparing the Spaghetti Squash: The Heart of Our Au Gratin

Let’s kick things off by getting our star ingredient, the spaghetti squash, ready. This step is crucial for achieving that perfect al dente, noodle-like texture that makes “Spaghetti Squash Au Gratin A Delicious And Healthy Recipe” so appealing. First, preheat your oven to 400°F (200°C). While the oven heats, carefully prepare your spaghetti squash. Squash can be a bit tricky to cut, so always use a sharp, sturdy knife and be mindful of your fingers. Place the squash on a cutting board and, with a firm hand, slice it lengthwise down the middle. If you find it too hard to cut straight through, you can pierce it a few times with a fork and microwave it for 2-3 minutes to soften the skin slightly before cutting. However, I usually manage just fine with a good knife and a little elbow grease.

Once you have your two squash halves, use a spoon to scoop out all the seeds and stringy bits from the center. Think of it like carving a mini pumpkin. Discard these, or if you’re feeling adventurous, you can roast the seeds separately for a healthy snack! Now, drizzle the cut sides of each squash half with about a tablespoon of olive oil. Use your hands to rub the oil evenly over the flesh. Season generously with a pinch of salt and black pepper. You can also add a tiny sprinkle of garlic powder if you like, to infuse a little extra flavor right from the start. Place the seasoned squash halves, cut-side down, on a baking sheet. I like to line my baking sheet with parchment paper or a silicone mat for easy cleanup, but it’s not strictly necessary.

Roast the squash in your preheated oven for approximately 35-45 minutes. The cooking time can vary depending on the size of your squash. You’ll know it’s done when the skin is easily pierced with a fork and the flesh feels tender. We’re looking for tender but not mushy here; we want those beautiful strands to hold their shape. Once roasted to perfection, remove the baking sheet from the oven and let the squash cool slightly, just until it’s comfortable enough to handle. This cooling period is important because it allows the squash to firm up a bit, making it easier to shred and helping to reduce excess moisture. If you try to shred it while it’s piping hot, it might be too soft.

When it’s cool enough, take a fork and gently scrape the flesh from the inside of each squash half. As you scrape, you’ll see the flesh magically separate into those distinctive spaghetti-like strands. It’s quite satisfying! Transfer these strands to a colander set over a bowl. This is a crucial step to prevent a watery au gratin. Spaghetti squash naturally contains a good amount of water, and if we don’t drain some of it off, our final dish could be soggy. Let the squash drain for at least 10-15 minutes. For even better results, you can gently press down on the squash with the back of a spoon to encourage more moisture release, or even wrap it in a clean kitchen towel and give it a gentle squeeze. You’d be surprised how much liquid comes out! Set the drained squash aside while we prepare the rest of our delicious components for this “Spaghetti Squash Au Gratin A Delicious And Healthy Recipe”.

Building the Flavor Base: Sautéing Aromatics

With our spaghetti squash ready and waiting, it’s time to build a robust flavor foundation for our au gratin. This step involves sautéing our aromatics – the onion and garlic – which will infuse our dish with a beautiful savory depth. Place a large oven-safe skillet or a Dutch oven over medium heat. If you plan to bake the au gratin in the same pan, make sure it’s suitable for both stovetop and oven use. Add a tablespoon of olive oil to the pan. Once the oil is shimmering and hot, add your finely diced yellow onion. Cook the onion, stirring occasionally, for about 5-7 minutes. We want the onion to soften and become translucent, not browned, but certainly sweet and fragrant. This gentle sautéing allows the natural sugars in the onion to release, contributing a wonderful sweetness that balances the richness of the cheese sauce.

Once the onions are soft and glistening, add the minced garlic to the pan. Stir frequently for another 1-2 minutes. Be careful not to burn the garlic, as burnt garlic can turn bitter and ruin the delicate balance of flavors we’re trying to achieve. You’ll know it’s ready when you can smell its intoxicating aroma filling your kitchen. The combination of sweet, softened onions and fragrant garlic is truly the unsung hero of many savory dishes, and it forms an indispensable backbone for our “Spaghetti Squash Au Gratin”. At this point, if you wanted to add extra vegetables like sautéed spinach or mushrooms, this would be the perfect time to do so. Wilt down a handful of fresh spinach, or cook sliced mushrooms until they release their liquid and start to brown slightly. For this classic recipe, however, we’re sticking to the basics to let the squash and cheese truly shine. Remove the skillet from the heat for a moment while we transition to making our incredible cheese sauce.

Crafting the Velvety Cheese Sauce: The “Au Gratin” Magic

Now for the heart of any au gratin: the creamy, dreamy cheese sauce! This béchamel-based sauce is what transforms our humble spaghetti squash into a truly indulgent and comforting meal. Return your skillet (the one with the sautéed onions and garlic) to medium-low heat. Add the 2 tablespoons of unsalted butter to the pan. Allow the butter to melt completely, swirling it around the pan to coat the bottom. Once melted and slightly bubbling, sprinkle in the 2 tablespoons of all-purpose flour. This combination of butter and flour is what we call a roux, and it’s the secret to a thick, smooth sauce. Using a whisk, stir the butter and flour constantly for 1-2 minutes. You’ll notice it forming a paste. This is your roux, and cooking it for a couple of minutes helps cook out the raw flour taste, ensuring your sauce tastes wonderfully savory, not chalky.

Next, gradually whisk in the warm whole milk, about ½ cup at a time. It’s important to add the milk slowly and whisk continuously to prevent lumps from forming. The mixture will look very thick at first, almost like a dough, but as you continue to add more milk and whisk, it will begin to smooth out and thin. Keep whisking until all the milk is incorporated and the sauce is smooth and simmering. Let the sauce gently simmer for about 5-7 minutes, continuing to whisk occasionally, until it thickens to a consistency that coats the back of a spoon. It should be thick enough to cling, but still pourable. Don’t rush this step; proper thickening is key to a luscious sauce.

Once the sauce has reached the desired consistency, remove the skillet from the heat. Now, it’s time for the cheese! Add the grated Gruyère cheese, sharp cheddar cheese, and ¼ cup of the grated Parmesan cheese to the sauce. Stir gently with your whisk or a rubber spatula until all the cheese has melted completely and the sauce is smooth and glossy. This is where the magic truly happens, transforming a simple béchamel into a rich, decadent cheese sauce. Season the sauce with ½ teaspoon of salt, ¼ teaspoon of freshly ground black pepper, and the pinch of freshly grated nutmeg. The nutmeg is optional, but I highly recommend it; it adds an unexpected warmth and sophisticated depth that truly elevates the cheese flavor. If you like a tiny bit of heat, a pinch of cayenne pepper can be added here as well. Taste the sauce and adjust seasonings as needed. Remember, cheese can be salty, so season judiciously.

Assembling and Baking Our “Spaghetti Squash Au Gratin”

We’re almost there! With all our components prepped, it’s time to bring everything together for our delicious “Spaghetti Squash Au Gratin A Delicious And Healthy Recipe”. To begin, if you’re not using an oven-safe skillet, lightly grease a 9×13-inch baking dish with a little butter or cooking spray. Transfer the drained spaghetti squash strands into the prepared baking dish or back into your oven-safe skillet with the cheese sauce. Pour the warm, velvety cheese sauce, which already contains our sautéed onions and garlic, over the spaghetti squash. Using a large spoon or spatula, gently toss everything together until the spaghetti squash is completely coated in the rich, creamy sauce. Ensure that every strand is glistening with cheesy goodness. You want an even distribution of squash and sauce, so take your time with this mixing step. This ensures every bite will be perfectly balanced.

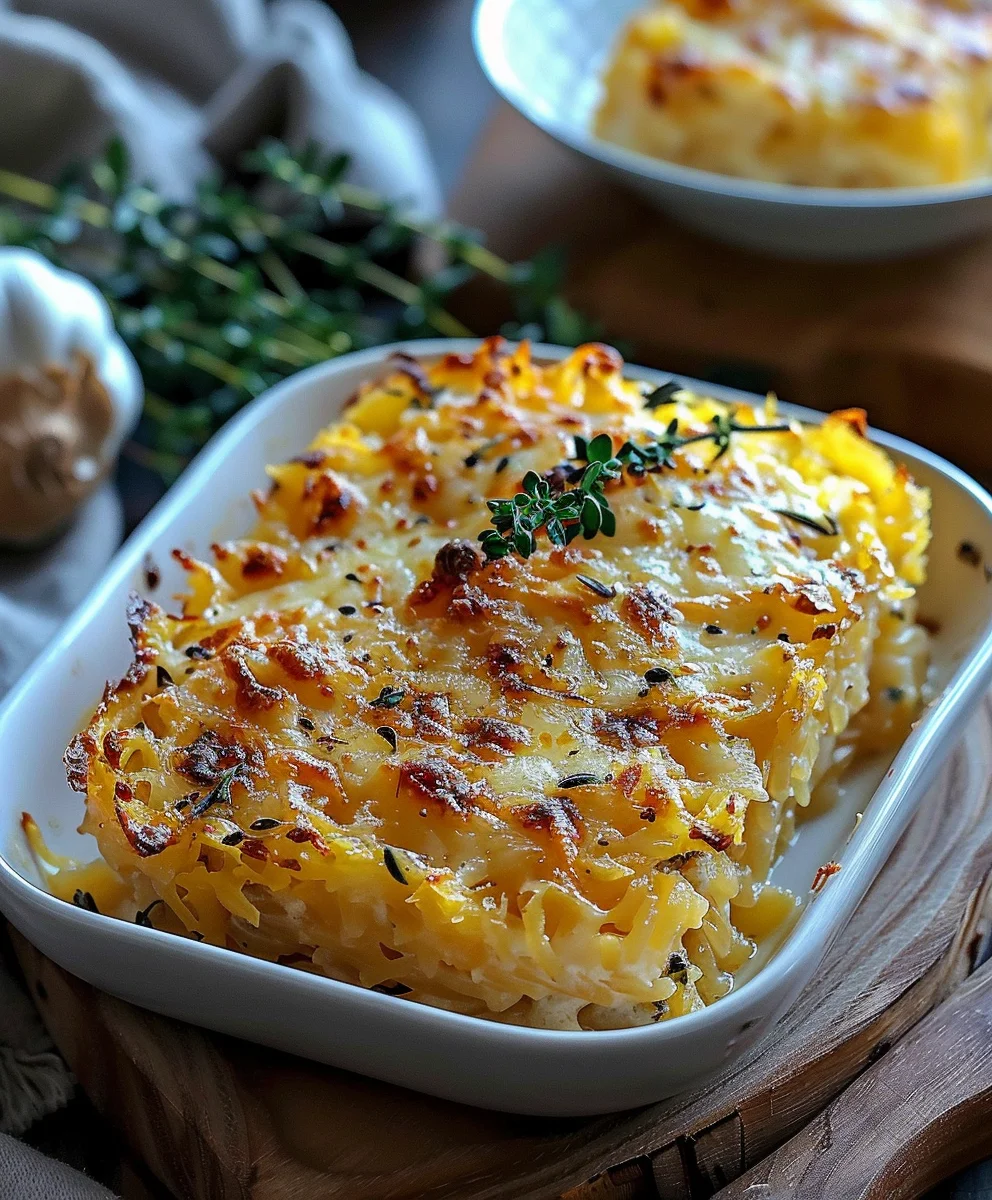
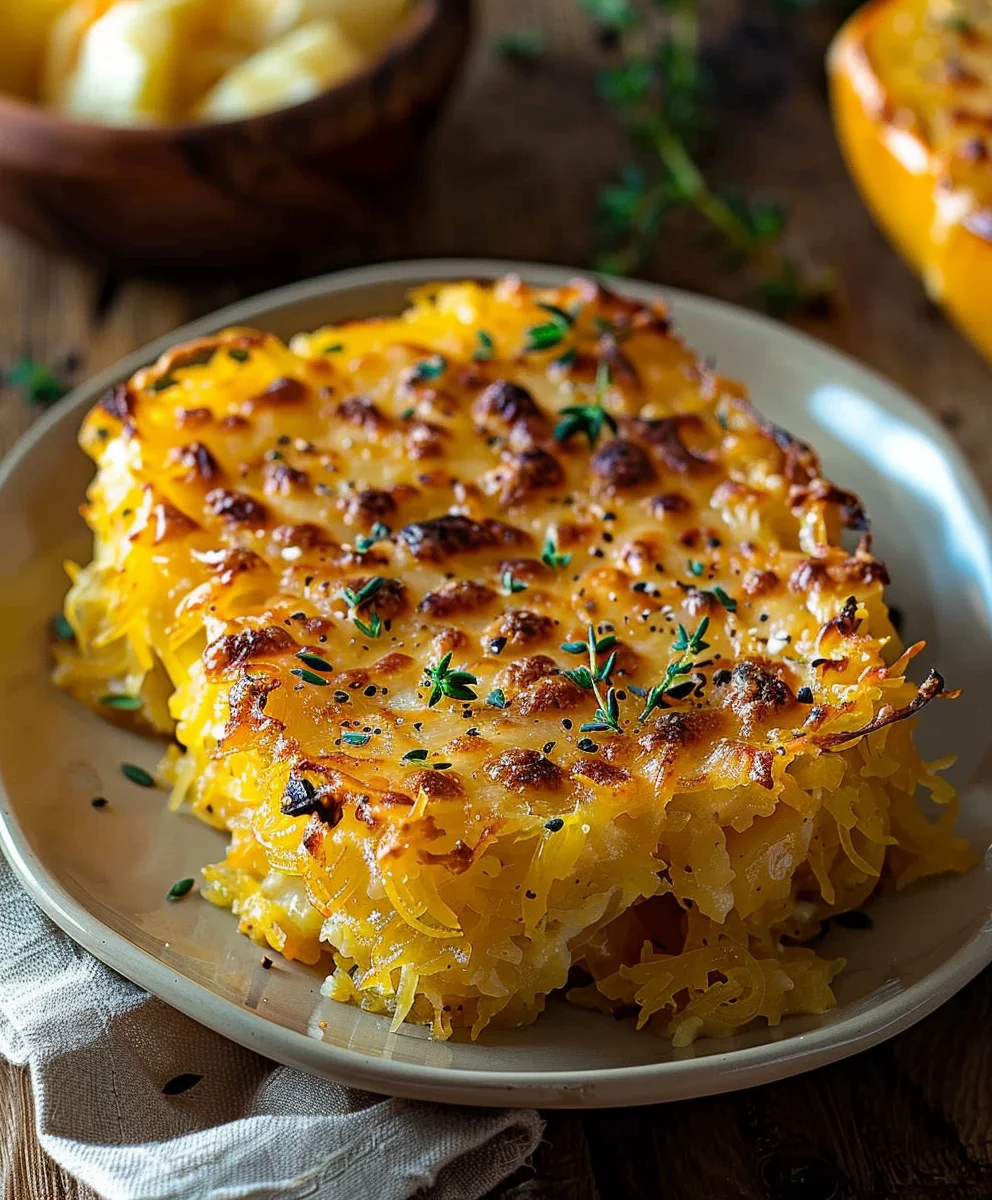
Once thoroughly mixed, spread the mixture evenly in the baking dish or skillet. You can gently press it down to create a relatively flat surface. For that quintessential au gratin finish, sprinkle the remaining ¼ cup of grated Parmesan cheese over the top of the squash mixture. This Parmesan will crisp up beautifully in the oven, creating a golden, savory crust that is incredibly appealing. If you like an extra layer of crunch, you could also sprinkle a few breadcrumbs (panko works great) mixed with a tiny bit of melted butter over the Parmesan, but for a lighter, gluten-free friendly version, just the cheese is perfect. This final layer of cheese is key for the ‘gratin’ aspect of the dish, forming a delightful crunchy, browned top that contrasts wonderfully with the tender, creamy interior.

Place the baking dish or skillet into your preheated 400°F (200°C) oven. Bake for approximately 20-25 minutes, or until the “Spaghetti Squash Au Gratin” is bubbling around the edges and the top is beautifully golden brown and lightly crisp. Keep an eye on it during the last few minutes of baking to ensure the topping doesn’t get too dark. Every oven is a little different, so trust your eyes and nose! The internal temperature should be hot and bubbly, indicating the sauce has thoroughly heated through. You might even see little pockets of melted cheese creating enticing golden bubbles.

Once baked to perfection, carefully remove the dish from the oven. This next step is crucial for the best serving experience: let the au gratin rest! Allow it to sit for 5-10 minutes before serving. This resting period allows the sauce to set slightly, making it easier to serve and ensuring the dish holds its shape better when scooped. If you cut into it immediately, the sauce might be a little too loose. Garnish with the freshly chopped parsley just before serving, which adds a wonderful burst of color and a fresh, herbaceous note that cuts through the richness of the cheese. Serve this magnificent “Spaghetti Squash Au Gratin A Delicious And Healthy Recipe” warm, straight from the oven, as a delicious side dish or a satisfying main course. It pairs wonderfully with a simple green salad or a lean protein. Enjoy the wholesome comfort!

Delicious & Healthy Spaghetti Squash Au Gratin Recipe

Conclusion:

This recipe, my friends, is more than just another dish; it’s an experience waiting to happen. I truly believe that once you dive into this incredibly satisfying creation, you’ll understand why I’m so enthusiastic about it. We’re talking about a culinary masterpiece that brilliantly combines the delicate, pasta-like strands of spaghetti squash with a rich, creamy, and utterly irresistible cheese sauce. It’s the kind of comfort food that warms you from the inside out, yet surprisingly leaves you feeling light and nourished, not heavy and guilty. What makes this recipe an absolute must-try is its unique ability to deliver on both flavor and health. The natural sweetness of the roasted squash perfectly balances the savory depth of the au gratin, creating a symphony of tastes that will dance on your palate. It’s a genius way to enjoy a hearty, cheesy bake without the usual carb overload, making it an ideal choice for anyone looking for a wholesome yet utterly delicious meal. I often find myself craving its golden-brown crust and bubbling interior, knowing that each spoonful is packed with goodness. This truly makes the case for why Spaghetti Squash Au Gratin A Delicious And Healthy Recipe should be a staple in your kitchen, a true testament to how flavorful healthy eating can be.

Now, let’s talk about making this dish your own. While it shines brightly as a standalone main course – trust me, it’s substantial enough to satisfy even the heartiest appetites – it also makes an absolutely phenomenal side dish. Imagine it nestled beside a perfectly pan-seared salmon, a tender roasted chicken, or a juicy grilled steak. It brings a vibrant texture and a burst of cheesy goodness that complements almost any protein. For those busy weeknights, I love preparing a big batch because the leftovers are simply divine, reheating beautifully for a quick and satisfying lunch. It’s truly a gift that keeps on giving!

But don’t stop there! This recipe is incredibly versatile and encourages experimentation. Want to amp up the veggie content? Try folding in some wilted spinach or kale, sautéed mushrooms, or diced bell peppers along with the squash. For an extra layer of flavor and a touch of color, sun-dried tomatoes or caramelized onions can be transformative. If you’re looking to boost the protein, cooked shredded chicken, diced ham, or crispy bacon bits can be stirred in before baking. For a vegetarian protein punch, consider adding a can of drained chickpeas or white beans. These additions not only elevate the nutritional profile but also introduce exciting new textures and flavors.

And let’s not forget the cheese! While my go-to combination is always a winner, feel free to get creative. A sharp cheddar, creamy Gruyère, tangy goat cheese, or even a smoked Gouda can lend entirely new dimensions of flavor. A sprinkle of freshly grated Parmesan on top before baking adds a lovely salty crust and an extra layer of umami. To achieve an even crunchier topping, mix some panko breadcrumbs with melted butter and scatter them over the cheese layer. For a gluten-free option, crushed gluten-free crackers or even finely chopped pecans can provide that delightful textural contrast. I’ve even tried adding a pinch of nutmeg or smoked paprika to the cheese sauce, which provides a subtle warmth and complexity that I adore. Fresh herbs like thyme or rosemary can also be a wonderful aromatic touch.

I genuinely urge you, from the bottom of my culinary heart, to give this recipe a try. It’s not just about following steps; it’s about discovering a new favorite, a dish that will undoubtedly earn a permanent spot in your recipe rotation. There’s an immense satisfaction that comes from pulling a golden, bubbly au gratin out of the oven, filling your kitchen with its irresistible aroma. It’s a dish that impresses without being overly complicated, making it perfect for both seasoned home cooks and those just starting their culinary journey. Trust me, your taste buds will thank you!

Share Your Culinary Adventures!

Once you’ve made it, I would absolutely love to hear about your experience! Did you stick to the original recipe, or did you venture into some exciting variations? What cheeses did you use? What proteins or vegetables did you add? Your insights, successes, and even your culinary experiments are what make our cooking community so vibrant and inspiring. Please share your photos, your tips, and your honest feedback. Let’s celebrate the joy of good food together. I am confident that once you take that first bite, you’ll be just as smitten as I am with this wholesome, comforting, and utterly delicious creation. Go on, embrace the flavors, and make some magic in your kitchen today!


Spaghetti Squash Au Gratin: A Delicious and Healthy Recipe

Spaghetti Squash Au Gratin: A Delicious and Healthy Recipe

This Spaghetti Squash Au Gratin recipe is a culinary revelation, marrying comfort food indulgence with wholesome goodness. Enjoy the delicate, pasta-like strands of spaghetti squash, enveloped in a creamy, savory cheese sauce, all crowned with an irresistibly crispy, golden topping. It’s a masterful illusion, offering all the comforting richness you crave from a gratin without the heavy calories, perfect as a show-stopping side or a satisfying vegetarian main.

Prep Time
30 Minutes

Cook Time
70 Minutes

Total Time
40 Minutes

Servings
4-6 servings

Ingredients

  • 1 large spaghetti squash (about 3-4 pounds)
  • 2 tablespoons olive oil
  • 4 tablespoons unsalted butter, divided
  • 1 medium yellow onion, finely chopped
  • 2 cloves garlic, minced
  • 4 tablespoons all-purpose flour
  • 3 cups whole milk, warmed
  • 1/2 teaspoon salt, plus more to taste
  • 1/4 teaspoon black pepper, plus more to taste
  • 1/4 teaspoon nutmeg
  • 1 cup grated Gruyere cheese
  • 1 cup grated sharp cheddar cheese
  • 1/2 cup grated Parmesan cheese, divided
  • 1/4 cup panko breadcrumbs
  • 2 tablespoons chopped fresh parsley, for garnish (optional)

Instructions

  1. Step 1
    Preheat oven to 400°F (200°C). Carefully cut squash in half lengthwise; scoop out seeds. Drizzle cut sides with 1 tablespoon olive oil, season with salt and pepper. Place cut-side down on a baking sheet. Roast for 35-45 minutes until tender. Let cool slightly, then scrape flesh into spaghetti-like strands. Transfer strands to a colander and drain for 10-15 minutes, pressing gently to release excess moisture.
  2. Step 2
    In a large oven-safe skillet or Dutch oven, heat 1 tablespoon olive oil over medium heat. Add onion and cook for 5-7 minutes until softened and translucent. Add minced garlic and cook for 1-2 minutes until fragrant. Remove skillet from heat momentarily.
  3. Step 3
    Return skillet to medium-low heat. Add 4 tablespoons unsalted butter (from divided amount) and melt. Sprinkle in 4 tablespoons all-purpose flour; whisk constantly for 1-2 minutes to form a roux. Gradually whisk in 3 cups warm whole milk, ½ cup at a time, until smooth and incorporated. Simmer for 5-7 minutes, whisking occasionally, until thickened. Remove from heat. Add Gruyere, sharp cheddar, and 1/4 cup Parmesan cheese (from divided amount). Stir until melted and smooth. Season with 1/2 teaspoon salt, 1/4 teaspoon black pepper, and 1/4 teaspoon nutmeg. Taste and adjust seasonings.
  4. Step 4
    Lightly grease a 9×13-inch baking dish if not using an oven-safe skillet. Add drained spaghetti squash strands to the cheese sauce with aromatics. Gently toss until squash is fully coated. Spread mixture evenly in the dish. Sprinkle the remaining 1/4 cup Parmesan cheese and 1/4 cup panko breadcrumbs over the top.
  5. Step 5
    Bake in the preheated 400°F (200°C) oven for 20-25 minutes, until bubbling and golden brown on top. Let rest for 5-10 minutes before serving. Garnish with chopped fresh parsley, if desired. Serve warm as a side or main dish.

Important Information

Nutrition Facts (Per Serving)

It is important to consider this information as approximate and not to use it as definitive health advice.

Allergy Information

Please check ingredients for potential allergens and consult a health professional if in doubt.

« Previous Post
Irresistible High Protein Honey Garlic Chicken Mac & Cheese
Next Post »
Ultimate Gooey Salted Caramel Chocolate Chip Cookie Bars

If you enjoyed this…

Amazing Crispy Sweet Chili Chicken Recipe – Ultimate Flavor

Spinach & Sun Dried Tomato Pasta Bake – Easy Weeknight Meal

Addictive Crack Chicken Noodle Soup Recipe – Pure Comfort

Primary Sidebar

Browse by Diet

BreakfastDinnerLunchDessertAppetizer

Sweet Peach Yogurt Parfait Delight

One of my fondest memories is from a lazy summer afternoon spent at my grandmother’s house. The sun filtered through the kitchen window, casting a warm glow over the table where she would create her culinary magic. It was during one of those blissful moments that I first tasted her Peach Yogurt Parfait with Honey and Granola. The sweet aroma of ripe peaches mingling with creamy yogurt and the crunch of granola was nothing short of heavenly. It felt like summer captured in a bowl, and I still remember the joy of diving in with a spoon, each layer revealing a new burst of flavor.

When I think about that parfait, I can almost hear the gentle hum of the bees outside, reminding me of the floral notes that honey brings to every bite. The vibrant yellows and soft oranges of the peaches contrast beautifully with the creamy white yogurt and the golden crunch of granola. It’s a dish that not only looks delightful but also tastes like a celebration of fresh, wholesome ingredients.

What makes my version of this Peach Yogurt Parfait special is the careful balance of flavors and textures. I use ripe, juicy peaches, drizzled with locally sourced honey, and a homemade granola that’s bursting with nuts and seeds for an extra crunch. It’s a simple dish, but every layer is crafted with love and attention.

Let me show you exactly how to make this delightful parfait, so you can bring a bit of that summer magic into your kitchen!

Sweet Peach Yogurt Parfait Delight

Why You’ll Love This Recipe

  • Delightfully creamy texture from the Greek yogurt, paired with the juicy sweetness of fresh peaches.
  • Ready in under 20 minutes, making it a quick and satisfying breakfast or snack option.
  • Budget-friendly, using common ingredients that you may already have in your pantry.
  • Customizable with your favorite granola and nuts, allowing you to tailor each parfait to your taste.
  • Perfectly balanced flavors with the bright acidity of lemon juice and the sweetness of honey enhancing the peaches.

Ingredients

  • For the Parfait:
  • 2 cups plain Greek yogurt (or vanilla yogurt for a sweeter option)
  • 2 large ripe peaches, diced (about 2 cups)
  • 1 tablespoon fresh lemon juice (to prevent browning of peaches)
  • 2 tablespoons honey (plus more for drizzling)
  • 1 teaspoon vanilla extract (optional for extra flavor)
  • For the Granola:
  • 1 cup granola (store-bought or homemade; see notes for a simple granola recipe)
  • 1/4 cup sliced almonds (optional for added crunch)
  • 1/4 cup shredded coconut (optional for added flavor)

Let’s dive into some key ingredients that make this Peach Yogurt Parfait so delightful! First, the Greek yogurt is not only creamy but also packed with protein, making it a satisfying option for breakfast or a snack. If you’re looking for a sweeter option, you can easily substitute it with vanilla yogurt, though it may alter the overall flavor balance. Next, the ripe peaches are the star of the show; their natural sweetness shines through, so I recommend choosing peaches that yield slightly to pressure, indicating they’re perfectly ripe. If peaches aren’t in season, feel free to use nectarines or even frozen peaches—just thaw them before use. Finally, honey adds a lovely floral sweetness that ties everything together. If you prefer, maple syrup can serve as a delicious substitute.

Step-by-Step Instructions

  1. Start by preparing the peaches. Wash them thoroughly, then slice and dice them into bite-sized pieces. In a medium bowl, toss the diced peaches with 1 tablespoon of fresh lemon juice to prevent browning. Set aside for about 5 minutes while the lemon juice works its magic.
  2. In a separate bowl, combine the Greek yogurt, 2 tablespoons of honey, and 1 teaspoon of vanilla extract if using. Stir the mixture until smooth and thoroughly blended. This should take about a minute. Avoid overmixing to maintain the creaminess of the yogurt.
  3. Now it’s time to layer your parfait. Grab a clear glass or bowl to showcase your beautiful creation. Start with a generous spoonful of the yogurt mixture at the bottom—about 1/4 cup will do. Use a spoon to spread it evenly.
  4. Add a layer of the diced peaches over the yogurt, ensuring they cover the yogurt completely. You might want to use about half of what you have prepared—roughly 1 cup. This layer should be visually appealing, so arrange the peaches neatly.
  5. Sprinkle 1/4 cup of granola over the peaches. This adds a delightful crunch. Make sure to distribute it evenly to ensure every bite has that satisfying texture. Avoid packing it down too tightly, as you want it to maintain its crunch.
  6. Repeat the layers: spoon in another 1/4 cup of yogurt, followed by another cup of peaches, and another sprinkle of granola. You should have at least two layers, but feel free to add more depending on your glass size.
  7. Finish off your parfait with a drizzle of honey on top for added sweetness and a touch of elegance. If you’re using sliced almonds or shredded coconut, sprinkle them on top now. It adds a lovely visual contrast and extra flavor.
  8. Serve immediately or refrigerate for up to 30 minutes before serving to allow the flavors to meld together. However, I recommend enjoying it fresh to maintain the granola’s crunch.

Pro Tips for the Best Peach Yogurt Parfait With Honey And Granola

  • Make sure to choose ripe peaches for the best flavor and texture. A common mistake is using unripe fruit, which can lead to a less enjoyable parfait. Look for peaches that are fragrant and slightly soft to the touch.
  • Use a clear glass to assemble your parfait; this not only makes for a beautiful presentation but also allows you to see the colorful layers, which adds to the enjoyment of eating it.
  • For an even creamier texture, consider whipping the Greek yogurt with a hand mixer for a couple of minutes before layering. This small adjustment makes a huge difference in mouthfeel.
  • Be mindful of the granola-to-yogurt ratio. Too much granola can overwhelm the parfait, while too little can make it feel too creamy. Aim for about 1/4 cup of granola per layer for the perfect balance.
  • If you’re making this for a gathering, consider preparing the yogurt and peaches ahead of time and layering them just before serving. This ensures the granola stays crunchy!

Variations & Serving Ideas

There are so many ways to get creative with your Peach Yogurt Parfait! For a tropical twist, swap out the peaches for mangoes or pineapples and top with coconut flakes. If you prefer a berry flavor, mix in some blueberries or strawberries with the peaches for added color and taste. For a nutty version, incorporate chopped walnuts or pecans instead of almonds.

As for serving ideas, this parfait pairs beautifully with a side of scrambled eggs for a hearty breakfast or fresh fruit salad for a light lunch. You might also enjoy it alongside whole grain toast with almond butter for an energizing snack. The contrast of flavors and textures will elevate your meal experience!

Storage, Make-Ahead & Reheating

The Peach Yogurt Parfait is best enjoyed fresh, but you can prepare some components ahead of time. Store the layered parfait in an airtight container in the refrigerator for up to 24 hours. However, be cautious; the granola may lose its crunch if stored too long. You can freeze the yogurt and peach mixture for up to 2 months; just remember to thaw it in the refrigerator overnight before serving.

If you plan to enjoy this dish the next day, it can taste even better as the flavors meld together. Just remember to add the granola right before serving to keep its delightful crunch!

Frequently Asked Questions

Can I make Peach Yogurt Parfait With Honey And Granola ahead of time?

Yes — in fact, it tastes even better the next day as the flavors meld. However, I recommend waiting to add the granola until just before serving to maintain its crunch.

What can I substitute for Greek yogurt?

If you prefer a lighter option, you can substitute Greek yogurt with regular yogurt or a dairy-free alternative like coconut yogurt. Just remember that this may alter the creaminess and flavor profile slightly.

Can I use frozen peaches for this parfait?

Absolutely! Just make sure to thaw the frozen peaches before using them. They will still add great flavor, though the texture may be slightly softer than fresh peaches.

How do I make the parfait vegan?

To make a vegan version, substitute the Greek yogurt with a plant-based yogurt alternative, and replace honey with maple syrup or agave nectar. This keeps the parfait sweet while adhering to a vegan diet.

What other fruits can I use in this recipe?

You can mix and match fruits based on your preference. Try using strawberries, blueberries, raspberries, or even bananas. Just make sure to adjust the lemon juice as needed to prevent browning.

Sweet Peach Yogurt Parfait Delight

Final Thoughts

The Peach Yogurt Parfait with Honey and Granola is a delightful blend of creamy yogurt, sweet peaches, and crunchy granola that creates a satisfying and nourishing treat. Each layer bursts with flavor, making it a perfect choice for breakfast or a light dessert.

This is the kind of recipe I come back to again and again, especially when I want something refreshing and wholesome to start my day. The harmony of sweet and tart flavors, combined with the delightful crunch, never fails to lift my spirits!

I encourage you to give this parfait a try and indulge in its comforting goodness. Feel free to share your results or even add your own twist—perhaps a sprinkle of cinnamon or a handful of nuts. Enjoy creating your perfect parfait!

Print
clock clock iconcutlery cutlery iconflag flag iconfolder folder iconinstagram instagram iconpinterest pinterest iconfacebook facebook iconprint print iconsquares squares iconheart heart iconheart solid heart solid icon

Peach Yogurt Parfait


  • Author: Lily author
  • Total Time: 15 minutes
  • Yield: 4 servings 1x
Pin Recipe
Print Recipe

Description

This Peach Yogurt Parfait combines creamy Greek yogurt, juicy peaches, and crunchy granola for a delightful treat. It’s a perfect breakfast or snack that captures the essence of summer in every bite.


Ingredients

Scale
  • For the Parfait:
  • 2 cups plain Greek yogurt (or vanilla yogurt for a sweeter option)
  • 2 large ripe peaches, diced (about 2 cups)
  • 1 tablespoon fresh lemon juice (to prevent browning of peaches)
  • 2 tablespoons honey (plus more for drizzling)
  • 1 teaspoon vanilla extract (optional for extra flavor)
  • For the Granola:
  • 1 cup granola (store-bought or homemade; see notes for a simple granola recipe)
  • 1/4 cup sliced almonds (optional for added crunch)
  • 1/4 cup shredded coconut (optional for added flavor)

Instructions

  1. Start by preparing the peaches. Wash them thoroughly, then slice and dice them into bite-sized pieces. In a medium bowl, toss the diced peaches with 1 tablespoon of fresh lemon juice to prevent browning. Set aside for about 5 minutes while the lemon juice works its magic.
  2. In a separate bowl, combine the Greek yogurt, 2 tablespoons of honey, and 1 teaspoon of vanilla extract if using. Stir the mixture until smooth and thoroughly blended. This should take about a minute. Avoid overmixing to maintain the creaminess of the yogurt.
  3. Now it’s time to layer your parfait. Grab a clear glass or bowl to showcase your beautiful creation. Start with a generous spoonful of the yogurt mixture at the bottom—about 1/4 cup will do. Use a spoon to spread it evenly.
  4. Add a layer of the diced peaches over the yogurt, ensuring they cover the yogurt completely. You might want to use about half of what you have prepared—roughly 1 cup. This layer should be visually appealing, so arrange the peaches neatly.
  5. Sprinkle 1/4 cup of granola over the peaches. This adds a delightful crunch. Make sure to distribute it evenly to ensure every bite has that satisfying texture. Avoid packing it down too tightly, as you want it to maintain its crunch.
  6. Repeat the layers: spoon in another 1/4 cup of yogurt, followed by another cup of peaches, and another sprinkle of granola. You should have at least two layers, but feel free to add more depending on your glass size.
  7. Finish off your parfait with a drizzle of honey on top for added sweetness and a touch of elegance. If you’re using sliced almonds or shredded coconut, sprinkle them on top now. It adds a lovely visual contrast and extra flavor.
  8. Serve immediately or refrigerate for up to 30 minutes before serving to allow the flavors to meld together. However, I recommend enjoying it fresh to maintain the granola’s crunch.
  • Prep Time: 15 mins
  • Cook Time: 0 mins
  • Category: Breakfast
  • Method: No-cook
  • Cuisine: American

Nutrition

  • Serving Size: 1 parfait
  • Calories: 250
  • Sugar: 20 g
  • Sodium: 50 mg
  • Fat: 5 g
  • Saturated Fat: 2 g
  • Unsaturated Fat: 3 g
  • Trans Fat: 0 g
  • Carbohydrates: 40 g
  • Fiber: 3 g
  • Protein: 10 g
  • Cholesterol: 10 mg

Keywords: Choose ripe peaches for the best flavor and texture. Use a clear glass for a beautiful presentation. For creaminess, consider whipping the yogurt before layering. Be mindful of the granola-to-yogurt ratio. Prepare yogurt and peaches ahead of time for gatherings, layering just before serving.

Did you make this recipe?

Share a photo and tag us — we can't wait to see what you've made!

Sun-Kissed Frozen Orange Cream Slush

As a child, summer days felt like they lasted forever. I remember the sticky heat wrapping around me as I played outside, my laughter mingling with the sounds of the neighborhood. But nothing could cool me down quite like the moment I’d spot my grandmother, laboring over her blender, whipping up her famous Frozen Orange Creamsicle Slush. That vibrant orange treat, with its frosty texture and sweet citrus aroma, was like a burst of sunshine in a cup. Just one sip, and I could feel the coolness wash over me, sparking pure joy.

This Frozen Orange Creamsicle Slush has a way of making you feel like a kid again. Its creamy, dreamy consistency is a delightful balance of bright orange and soft vanilla, inviting you to dive right in. The refreshing tang of orange dances on your tongue, while the smooth creaminess envelops you in a comforting embrace. It’s a nostalgic treat that’s perfect for hot summer afternoons or anytime you need a little pick-me-up.

What makes my version of this slush stand out is the addition of a hint of vanilla bean, which elevates the flavor and adds an extra layer of richness. Plus, it’s super easy to whip up with just a few simple ingredients that you probably already have on hand! So, if you’re ready to relive those sun-soaked memories, let me show you exactly how to make it.

Sun-Kissed Frozen Orange Cream Slush

Why You’ll Love This Recipe

  • Each slush is a perfect blend of creamy vanilla and zesty orange, creating a nostalgic flavor reminiscent of summer days.
  • This refreshing treat is ready in under 15 minutes, making it an ideal quick dessert for unexpected guests or hot afternoons.
  • With just 8 simple ingredients, it’s budget-friendly, ensuring you don’t have to break the bank to enjoy a delicious slush.
  • The slush has a perfectly smooth texture, thanks to the combination of ice and ice cream, providing a delightful contrast to the bright citrus flavors.
  • It’s highly customizable; you can easily adjust the sweetness and add fresh herbs for a unique twist that suits your taste.

Ingredients

  • 2 cups orange juice (freshly squeezed or store-bought)
  • 1 cup vanilla ice cream
  • 1 cup crushed ice
  • 1/2 cup milk (whole or 2%)
  • 1/4 cup granulated sugar (adjust based on sweetness preference)
  • 1 teaspoon vanilla extract
  • Zest of 1 orange (for added flavor)
  • Fresh orange slices and mint leaves (for garnish)

The star of this Frozen Orange Creamsicle Slush is the orange juice, which provides the vibrant, citrusy base. Freshly squeezed juice will yield the brightest flavor, but store-bought options can be just as convenient. If you’re opting for store-bought, choose 100% pure juice with no added sugars for the best results. Another essential ingredient is the vanilla ice cream; it adds creaminess and sweetness. You can substitute it with dairy-free ice cream if you’re looking for a vegan option. Whole or 2% milk complements the ice cream, creating a smooth blend. If you want a lower-calorie version, almond or oat milk can be good alternatives.

Lastly, the granulated sugar can be adjusted based on your sweetness preference. If you prefer a more natural sweetener, consider using honey or agave syrup. The orange zest enhances the flavor profile, providing an aromatic pop that brings the whole slush together. Don’t skip it! It adds an extra layer of brightness that makes this slush truly special.

Step-by-Step Instructions

  1. Start by preparing your ingredients. Gather 2 cups of orange juice, 1 cup of vanilla ice cream, and 1 cup of crushed ice. Make sure the ice is finely crushed, as larger chunks can make blending difficult.
  2. In a blender, combine the orange juice, vanilla ice cream, crushed ice, and 1/2 cup of milk. Add 1/4 cup of granulated sugar and 1 teaspoon of vanilla extract. If you like a sweeter slush, consider adding a bit more sugar at this stage.
  3. Add the zest of 1 orange to the blender. This step is crucial for enhancing the citrus flavor of your slush. Make sure not to include the bitter white pith—only the flavorful zest.
  4. Blend the mixture on medium-high speed for about 30-45 seconds. Stop once the ingredients are fully combined and the slush has a smooth, even consistency. If you notice large chunks of ice, blend for an additional 10-15 seconds. Avoid over-blending, as this can make the slush too liquidy.
  5. Once blended, taste the slush. If it needs more sweetness, add a little more sugar and blend for a few more seconds. If it’s too thick, you can add a splash of milk to reach your desired consistency.
  6. Pour the slush into glasses. This recipe typically serves 4, but you can easily double it for larger gatherings. Use a spoon to help guide the slush into the glasses if needed.
  7. Garnish each serving with fresh orange slices and mint leaves. The mint not only adds a pop of color but also a refreshing aroma that complements the citrus flavors beautifully.
  8. Serve immediately and enjoy! If you’ve made extra, you can refrigerate it for a short time, but it’s best enjoyed fresh.

Pro Tips for the Best Frozen Orange Creamsicle Slush

  • Don’t skip the orange zest! It’s a game-changer for flavor. Always zest before juicing to make it easier.
  • Use a high-powered blender for the best texture. A standard blender may struggle with ice, leading to uneven consistency. If you have a food processor, that can work too, but ensure the ice is finely crushed.
  • Adjust the ice-to-liquid ratio carefully. If your slush is too thick, it won’t blend well. Start with less ice and add more until you reach your preferred texture.
  • Be cautious with the sugar! Always start with the lower amount, as you can easily add more, but it’s hard to fix an overly sweet slush.
  • For a fun twist, consider adding a splash of coconut milk or a handful of fresh fruit like strawberries or pineapple. This not only enhances the flavor but also adds a beautiful color contrast.

Variations & Serving Ideas

There are countless ways to put a spin on your Frozen Orange Creamsicle Slush. Consider making a tropical version by adding in some pineapple juice or coconut milk for a delightful tropical twist. If you’re feeling adventurous, try incorporating a handful of frozen mango or peach slices for added sweetness. For a lighter version, swap out the vanilla ice cream for Greek yogurt for a creamy yet tangy alternative.

As for serving ideas, this refreshing slush pairs wonderfully with light summer dishes like grilled chicken skewers, fish tacos, or a simple salad topped with citrus vinaigrette. The bright, zesty flavors of the slush complement these dishes perfectly, making them an ideal pairing for a sunny day.

Storage, Make-Ahead & Reheating

This Frozen Orange Creamsicle Slush is best enjoyed fresh, but if you have leftovers, you can store them in an airtight container in the fridge for up to 2 days. Just keep in mind that the slush may lose some of its texture over time as the ice melts. It doesn’t freeze well, as the ice will turn into a solid block. If you must freeze it, blend again after thawing to restore the slushy consistency. This treat is best the day you make it, as the flavors meld together beautifully overnight, enhancing its deliciousness.

Frequently Asked Questions

Can I make Frozen Orange Creamsicle Slush ahead of time?

Yes — in fact, it tastes even better the next day as the flavors meld. However, it’s best to enjoy it fresh, as the texture can change if stored for too long. If you need to prepare it ahead, keep it in the fridge and re-blend before serving.

What kind of orange juice should I use?

For the best flavor, use freshly squeezed orange juice. However, if you’re short on time, opt for 100% pure store-bought juice without added sugars. This will ensure that your slush remains flavorful and refreshing.

Can I substitute the vanilla ice cream?

Absolutely! If you’re looking for a dairy-free option, coconut milk ice cream or a non-dairy vanilla ice cream can work wonderfully. They will still provide the creamy texture and sweetness you desire.

How can I adjust the sweetness of my slush?

You can easily adjust the sweetness by modifying the amount of sugar added. Start with 1/4 cup and taste the mixture before blending. If you prefer it sweeter, add more sugar gradually until it reaches your desired level.

What should I do if my slush is too thick?

If your slush is too thick, simply add a splash of milk or orange juice and blend again. This will help achieve a more drinkable consistency while maintaining the slushy texture. Adjust gradually to reach your preferred thickness.

Sun-Kissed Frozen Orange Cream Slush

Final Thoughts

The Frozen Orange Creamsicle Slush is a delightful blend of refreshing citrus and creamy goodness, making it a perfect treat for warm days or any time you crave a taste of nostalgia. The way the bright orange flavor dances with the creamy texture truly elevates this slush, transforming it into a satisfying escape from the everyday.

This is the kind of recipe I come back to again and again, especially when I’m looking to cool down or impress guests at a summer gathering. It’s simple to make and always brings smiles all around! I encourage you to try this recipe for yourself—don’t hesitate to share your results or even put your own spin on it. Happy slushing!

Print
clock clock iconcutlery cutlery iconflag flag iconfolder folder iconinstagram instagram iconpinterest pinterest iconfacebook facebook iconprint print iconsquares squares iconheart heart iconheart solid heart solid icon

Frozen Orange Creamsicle Slush


  • Author: Lily author
  • Total Time: 15 minutes
  • Yield: 4 servings 1x
Pin Recipe
Print Recipe

Description

This Frozen Orange Creamsicle Slush is a refreshing treat that combines creamy vanilla and zesty orange flavors. Perfect for hot summer days, it brings back nostalgic memories with every sip.


Ingredients

Scale
  • 2 cups orange juice (freshly squeezed or store-bought)
  • 1 cup vanilla ice cream
  • 1 cup crushed ice
  • 1/2 cup milk (whole or 2%)
  • 1/4 cup granulated sugar (adjust based on sweetness preference)
  • 1 teaspoon vanilla extract
  • Zest of 1 orange (for added flavor)
  • Fresh orange slices and mint leaves (for garnish)

Instructions

  1. Start by preparing your ingredients. Gather 2 cups of orange juice, 1 cup of vanilla ice cream, and 1 cup of crushed ice. Make sure the ice is finely crushed, as larger chunks can make blending difficult.
  2. In a blender, combine the orange juice, vanilla ice cream, crushed ice, and 1/2 cup of milk. Add 1/4 cup of granulated sugar and 1 teaspoon of vanilla extract. If you like a sweeter slush, consider adding a bit more sugar at this stage.
  3. Add the zest of 1 orange to the blender. This step is crucial for enhancing the citrus flavor of your slush. Make sure not to include the bitter white pith—only the flavorful zest.
  4. Blend the mixture on medium-high speed for about 30-45 seconds. Stop once the ingredients are fully combined and the slush has a smooth, even consistency. If you notice large chunks of ice, blend for an additional 10-15 seconds. Avoid over-blending, as this can make the slush too liquidy.
  5. Once blended, taste the slush. If it needs more sweetness, add a little more sugar and blend for a few more seconds. If it’s too thick, you can add a splash of milk to reach your desired consistency.
  6. Pour the slush into glasses. This recipe typically serves 4, but you can easily double it for larger gatherings. Use a spoon to help guide the slush into the glasses if needed.
  7. Garnish each serving with fresh orange slices and mint leaves. The mint not only adds a pop of color but also a refreshing aroma that complements the citrus flavors beautifully.
  8. Serve immediately and enjoy! If you’ve made extra, you can refrigerate it for a short time, but it's best enjoyed fresh.
  • Prep Time: 15 min
  • Cook Time: 0 min
  • Category: Dessert
  • Method: Blending
  • Cuisine: American

Nutrition

  • Serving Size: 1 serving
  • Calories: 200
  • Sugar: 30 g
  • Sodium: 50 mg
  • Fat: 5 g
  • Saturated Fat: 3 g
  • Unsaturated Fat: 2 g
  • Trans Fat: 0 g
  • Carbohydrates: 40 g
  • Fiber: 1 g
  • Protein: 2 g
  • Cholesterol: 20 mg

Keywords: Don't skip the orange zest! It's a game-changer for flavor. Always zest before juicing to make it easier.

Did you make this recipe?

Share a photo and tag us — we can't wait to see what you've made!

Zesty Lemon Poppy Seed Delight

One rainy afternoon, I found myself in my grandmother’s cozy kitchen, the kind that always smelled like warmth and love. She was whipping up her famous Lemon Poppy Seed Loaf, a recipe that had been passed down through generations. As the batter came together, the zesty aroma of fresh lemons filled the air, mingling perfectly with the nutty fragrance of poppy seeds. I can still picture her, apron-clad, as she expertly drizzled a vibrant citrus icing over the loaf, creating a glossy, sun-kissed finish that beckoned us to dive in. It was a moment that sparked my own passion for baking, and this recipe has become a cherished staple in my home ever since.

When you take a bite of this Lemon Poppy Seed Loaf, it’s like a burst of sunshine on your palate. The loaf is beautifully golden, with a tender crumb that melts in your mouth. Each slice is speckled with tiny poppy seeds, adding a delightful crunch that contrasts beautifully with the tangy sweetness of the lemon. And that citrus icing? It’s the finishing touch that elevates this loaf from ordinary to extraordinary, with its bright, zesty flavor dancing on your taste buds.

This recipe stands out because it embraces simplicity while delivering on flavor. I’ve added a hint of vanilla to the batter, enhancing the overall taste and making it even more indulgent. Trust me, once you make this Lemon Poppy Seed Loaf With Citrus Icing, it’ll become a go-to in your baking repertoire.

So, let me show you exactly how to make it!

Zesty Lemon Poppy Seed Delight

Why You’ll Love This Recipe

  • Moist and tender crumb that melts in your mouth, thanks to the perfect balance of butter and buttermilk.
  • Bright, zesty lemon flavor paired with crunchy poppy seeds, creating a delightful texture and taste experience.
  • Easy to whip up in just about an hour, perfect for last-minute gatherings or a cozy afternoon treat.
  • Budget-friendly with everyday ingredients, making it an accessible option for all home bakers.
  • The citrus icing adds a sweet tang that elevates the loaf, turning a simple recipe into a showstopper!

Ingredients

  • 1 ½ cups (190g) all-purpose flour
  • 1 teaspoon baking powder
  • ½ teaspoon baking soda
  • ½ teaspoon salt
  • 3 tablespoons poppy seeds
  • ½ cup (115g) unsalted butter, softened to room temperature
  • 1 cup (200g) granulated sugar
  • 2 large eggs
  • 1 teaspoon vanilla extract
  • 1 teaspoon lemon zest (from about 1 medium lemon)
  • ½ cup (120ml) buttermilk
  • 2 tablespoons fresh lemon juice

For the Citrus Icing:

  • 1 cup (120g) powdered sugar
  • 2 tablespoons fresh lemon juice
  • 1 tablespoon orange juice
  • 1 teaspoon lemon zest (for garnish, optional)

Let’s dive into the key ingredients that make this Lemon Poppy Seed Loaf so special. The all-purpose flour provides the structure and base for the loaf, while the baking powder and baking soda ensure it rises perfectly, giving the loaf a light texture. For a gluten-free variation, you could substitute the flour with a gluten-free all-purpose blend. Poppy seeds not only add a delightful crunch but also contribute to the unique flavor profile that pairs well with the citrus notes.

Unsalted butter is crucial for achieving the buttery richness that makes this loaf so moist. If you’re looking for a dairy-free option, coconut oil or a vegan butter can be used instead. The buttermilk is another essential component, providing acidity that activates the baking soda for a fluffy texture. If you don’t have buttermilk on hand, you can easily make a substitute by mixing ½ cup of milk with 1 tablespoon of vinegar or lemon juice and letting it sit for about 5 minutes.

Step-by-Step Instructions

  1. Preheat your oven to 350°F (175°C). Grease a 9×5-inch loaf pan or line it with parchment paper for easy removal later.
  2. In a medium mixing bowl, whisk together 1 ½ cups of all-purpose flour, 1 teaspoon of baking powder, ½ teaspoon of baking soda, ½ teaspoon of salt, and 3 tablespoons of poppy seeds. This helps to evenly distribute the baking agents and ensures a uniform rise.
  3. In a large mixing bowl, cream together ½ cup of softened unsalted butter and 1 cup of granulated sugar using an electric mixer on medium speed for about 3-4 minutes, until the mixture is light and fluffy. Make sure to scrape down the sides of the bowl occasionally.
  4. Add 2 large eggs, 1 teaspoon of vanilla extract, and 1 teaspoon of lemon zest to the creamed butter and sugar, mixing until fully combined. You want a smooth consistency, so ensure there are no lumps of butter.
  5. In a small bowl, combine ½ cup of buttermilk and 2 tablespoons of fresh lemon juice. Alternately add the dry ingredients and buttermilk mixture to the butter mixture, starting and ending with the dry ingredients. Mix just until combined; do not overmix, as this can lead to a dense loaf.
  6. Pour the batter into the prepared loaf pan. Smooth the top with a spatula, ensuring it’s even. Bake in the preheated oven for 50-60 minutes, or until a toothpick inserted in the center comes out clean. The edges should be lightly golden brown, and the center should feel just set.
  7. Once baked, remove the loaf from the oven and allow it to cool in the pan for about 10 minutes. Then, transfer it to a wire rack to cool completely. Resist the urge to slice too soon, as it will be crumbly if it’s still warm.
  8. While the loaf is cooling, prepare the citrus icing. In a medium bowl, whisk together 1 cup of powdered sugar, 2 tablespoons of fresh lemon juice, and 1 tablespoon of orange juice until smooth. If the icing is too thick, you can add a little more juice to reach your desired consistency.
  9. Once the loaf is completely cool, drizzle the citrus icing over the top. If you like, sprinkle with an additional teaspoon of lemon zest for an extra pop of flavor and color.

Pro Tips for the Best Lemon Poppy Seed Loaf With Citrus Icing

  • Be careful not to overmix your batter; this is a common mistake that can lead to a dense loaf. Mix just until the dry ingredients are incorporated for a light and fluffy texture.
  • Use room temperature ingredients, especially the butter and eggs. This helps to create a smoother batter and ensures even baking. Take your eggs out of the fridge about 30 minutes before you start.
  • For a more pronounced lemon flavor, consider adding a little lemon extract in addition to the zest and juice. Just a half teaspoon can elevate the citrus notes significantly.
  • When measuring your flour, spoon it into the measuring cup and level it off with a knife instead of scooping directly from the bag. This prevents packing and ensures you don’t end up with a dry loaf.
  • Invest in a good quality loaf pan; it makes a difference in heat distribution, which ensures even baking. If your pan is dark-coated, reduce the oven temperature by 25°F to prevent over-browning.

Variations & Serving Ideas

For a delightful twist, consider adding blueberries or raspberries to the batter for a fruity burst of flavor. You can also experiment with different citrus fruits—try lime or grapefruit zest and juice for a refreshing change. For a healthier option, substitute half of the all-purpose flour with whole wheat flour for added fiber without compromising too much on texture.

This Lemon Poppy Seed Loaf pairs beautifully with a light salad, such as a mixed greens salad with a vinaigrette, or a cup of tea for a cozy afternoon treat. It also complements a creamy cheese platter, as the acidity of the loaf balances rich cheeses perfectly. Lastly, a scoop of vanilla ice cream on the side creates a delightful contrast of temperatures and flavors!

Storage, Make-Ahead & Reheating

This Lemon Poppy Seed Loaf can be stored at room temperature for up to 3 days if wrapped tightly in plastic wrap. If you want to keep it longer, it freezes well for up to 3 months. To freeze, wrap the loaf tightly in plastic wrap and then in aluminum foil to prevent freezer burn.

When you’re ready to enjoy it again, simply thaw it in the fridge overnight. Reheat individual slices in the microwave for 15-20 seconds or in a toaster oven until warmed through. Interestingly, many people find that this loaf tastes even better the next day, as the flavors have time to meld!

Frequently Asked Questions

Can I make Lemon Poppy Seed Loaf With Citrus Icing ahead of time?

Yes — in fact, it tastes even better the next day! You can make the loaf a day in advance, allowing the flavors to develop. Just be sure to store it in an airtight container to maintain its moisture.

Can I substitute the poppy seeds?

Absolutely! If you don’t have poppy seeds on hand or prefer an alternative, you can use sesame seeds for a similar crunch or omit them entirely for a smooth loaf.

What can I use instead of buttermilk?

If you don’t have buttermilk, you can easily create a substitute by mixing ½ cup of milk (dairy or plant-based) with 1 tablespoon of vinegar or lemon juice. Let it sit for 5 minutes before using in the recipe.

How can I make this recipe gluten-free?

To make a gluten-free version of this Lemon Poppy Seed Loaf, substitute the all-purpose flour with a gluten-free all-purpose flour blend. Just ensure that the blend contains a binding agent like xanthan gum for the best results.

What is the best way to store leftover loaf?

Leftover Lemon Poppy Seed Loaf should be stored in an airtight container at room temperature for up to 3 days. For longer storage, wrap it tightly and freeze for up to 3 months. Thaw it before serving for the best texture.

Zesty Lemon Poppy Seed Delight

Final Thoughts

The Lemon Poppy Seed Loaf with Citrus Icing is truly a delightful treat that brings a burst of brightness to any occasion. The zesty lemon flavor combined with the subtle crunch of poppy seeds creates a satisfying balance, while the citrus icing adds a touch of sweetness that perfectly complements the loaf’s tanginess.

This is the kind of recipe I come back to again and again, especially when I want to brighten up a gloomy day or celebrate a small victory. The aroma that fills the kitchen as it bakes is absolutely heavenly! I encourage you to give this recipe a try; you might just find it becoming a beloved staple in your home. Don’t forget to share your results or even add your own unique twist—I can’t wait to see what you create!

Print
clock clock iconcutlery cutlery iconflag flag iconfolder folder iconinstagram instagram iconpinterest pinterest iconfacebook facebook iconprint print iconsquares squares iconheart heart iconheart solid heart solid icon

Lemon Poppy Seed Loaf


  • Author: Lily author
  • Total Time: 14 minute
  • Yield: 1 loaf 1x
Pin Recipe
Print Recipe

Description

This Lemon Poppy Seed Loaf is a delightful treat that combines zesty lemon flavor with crunchy poppy seeds. Topped with a citrus icing, it’s perfect for any occasion.


Ingredients

Scale
  • 1 ½ cups (190g) all-purpose flour
  • 1 teaspoon baking powder
  • ½ teaspoon baking soda
  • ½ teaspoon salt
  • 3 tablespoons poppy seeds
  • ½ cup (115g) unsalted butter, softened to room temperature
  • 1 cup (200g) granulated sugar
  • 2 large eggs
  • 1 teaspoon vanilla extract
  • 1 teaspoon lemon zest (from about 1 medium lemon)
  • ½ cup (120ml) buttermilk
  • 2 tablespoons fresh lemon juice
  • 1 cup (120g) powdered sugar
  • 2 tablespoons fresh lemon juice
  • 1 tablespoon orange juice
  • 1 teaspoon lemon zest (for garnish, optional)

Instructions

  1. Preheat your oven to 350°F (175°C). Grease a 9×5-inch loaf pan or line it with parchment paper for easy removal later.
  2. In a medium mixing bowl, whisk together 1 ½ cups of all-purpose flour, 1 teaspoon of baking powder, ½ teaspoon of baking soda, ½ teaspoon of salt, and 3 tablespoons of poppy seeds. This helps to evenly distribute the baking agents and ensures a uniform rise.
  3. In a large mixing bowl, cream together ½ cup of softened unsalted butter and 1 cup of granulated sugar using an electric mixer on medium speed for about 3-4 minutes, until the mixture is light and fluffy. Make sure to scrape down the sides of the bowl occasionally.
  4. Add 2 large eggs, 1 teaspoon of vanilla extract, and 1 teaspoon of lemon zest to the creamed butter and sugar, mixing until fully combined. You want a smooth consistency, so ensure there are no lumps of butter.
  5. In a small bowl, combine ½ cup of buttermilk and 2 tablespoons of fresh lemon juice. Alternately add the dry ingredients and buttermilk mixture to the butter mixture, starting and ending with the dry ingredients. Mix just until combined; do not overmix, as this can lead to a dense loaf.
  6. Pour the batter into the prepared loaf pan. Smooth the top with a spatula, ensuring it’s even. Bake in the preheated oven for 50-60 minutes, or until a toothpick inserted in the center comes out clean. The edges should be lightly golden brown, and the center should feel just set.
  7. Once baked, remove the loaf from the oven and allow it to cool in the pan for about 10 minutes. Then, transfer it to a wire rack to cool completely. Resist the urge to slice too soon, as it will be crumbly if it’s still warm.
  8. While the loaf is cooling, prepare the citrus icing. In a medium bowl, whisk together 1 cup of powdered sugar, 2 tablespoons of fresh lemon juice, and 1 tablespoon of orange juice until smooth. If the icing is too thick, you can add a little more juice to reach your desired consistency.
  9. Once the loaf is completely cool, drizzle the citrus icing over the top. If you like, sprinkle with an additional teaspoon of lemon zest for an extra pop of flavor and color.
  • Prep Time: 15 mins
  • Cook Time: 50-60 mins
  • Category: Dessert
  • Method: Baking
  • Cuisine: American

Nutrition

  • Serving Size: 1 slice
  • Calories: 200
  • Sugar: 15 g
  • Sodium: 150 mg
  • Fat: 8 g
  • Saturated Fat: 5 g
  • Unsaturated Fat: 3 g
  • Trans Fat: 0 g
  • Carbohydrates: 30 g
  • Fiber: 1 g
  • Protein: 3 g
  • Cholesterol: 40 mg

Keywords: Be careful not to overmix your batter; this is a common mistake that can lead to a dense loaf. Use room temperature ingredients for a smoother batter and even baking.

Did you make this recipe?

Share a photo and tag us — we can't wait to see what you've made!

  • Privacy Policy
  • Terms Of Service
  • Contact
  • About
  • GDPR

Copyright © 2025 Homesmad