• Skip to primary navigation
  • Skip to main content
  • Skip to primary sidebar
Homesmad

Homesmad

  • Home
  • Breakfast & Brunch
  • Appetizers & Snacks
  • Dinner
  • Dessert
  • About
  • Privacy Policy
  • Contact
Homesmad
  • Home
  • Breakfast & Brunch
  • Appetizers & Snacks
  • Dinner
  • Dessert
  • About
  • Privacy Policy
  • Contact

Magic Lemon Cobbler Delight: Your New Favorite Zesty Dessert

November 10, 2025 by Lily author

Magic Lemon Cobbler Delight Recipe: Prepare to be utterly enchanted! I am absolutely thrilled to share one of my all-time favorite dessert recipes with you today, a dish that truly lives up to its name. There’s something genuinely special about a recipe that practically creates itself in the oven, transforming simple, humble ingredients into a symphony of zesty flavors and delightful textures. This particular kind of “magic” cobbler draws its inspiration from the comforting traditions of classic American desserts, where easy-to-make, satisfying treats have been a beloved staple for generations, bringing warmth to countless homes.

What makes this dish so universally adored, beyond its incredible ease and minimal fuss, is that exquisite balance of bright, tart lemon zest, a sweet and gooey custardy filling, and a beautifully fluffy, cake-like topping that emerges as if by pure magic. I’ve found that the Magic Lemon Cobbler Delight Recipe is more than just a dessert; it’s an experience, consistently bringing smiles and a touch of sunshine to every table. Whether you are a seasoned baker or just beginning your culinary adventures, you will undoubtedly find immense joy in the simplicity and the spectacular, mouth-watering outcome of this truly delightful treat.

Magic Lemon Cobbler Delight: Your New Favorite Zesty Dessert this RECIPE

Ingredients:

  • For the Magic Cobbler Topping:

    • 1 ½ cups (180g) all-purpose flour, spooned and leveled
    • ¾ cup (150g) granulated sugar
    • 2 teaspoons baking powder
    • ¼ teaspoon salt
    • ½ cup (113g) unsalted butter, softened to room temperature
    • ½ cup (120ml) whole milk, at room temperature
    • 1 teaspoon pure vanilla extract
    • 1 tablespoon fresh lemon zest (from 1-2 medium lemons)
  • For the Enchanting Lemon Sauce Layer:

    • 1 ½ cups (300g) granulated sugar
    • ¼ cup (30g) all-purpose flour, spooned and leveled
    • 1 tablespoon fresh lemon zest (from 1-2 medium lemons)
    • ½ cup (120ml) fresh lemon juice (from 2-3 medium lemons)
    • 2 large eggs, at room temperature
    • 1 ½ cups (360ml) whole milk, at room temperature
  • For Garnish and Serving (Optional, but highly recommended!):

    • Powdered sugar, for dusting
    • Fresh berries (raspberries, blueberries, or sliced strawberries)
    • A dollop of freshly whipped cream or a scoop of vanilla bean ice cream
    • Extra lemon slices or thin lemon curls for flair

Preparing Your Workspace and Oven for the Magic Lemon Cobbler Delight:

  1. Preheat and Prepare: My first step, and a crucial one for any baking endeavor, is to preheat my oven. I set it to 350°F (175°C). While the oven is warming up, I take a moment to lightly grease a 9×13 inch (23×33 cm) baking dish. I usually use butter or a non-stick baking spray for this. This ensures our delightful cobbler won’t stick, making serving much easier later on. You want to make sure the dish is thoroughly coated, especially in the corners.
  2. Gather Your Tools: Before I even think about mixing, I like to lay out all my ingredients and tools. This mise en place approach prevents any last-minute scrambling and ensures a smooth baking process. For this Magic Lemon Cobbler Delight Recipe, you’ll want large mixing bowls, a whisk, a rubber spatula, measuring cups and spoons, and a zester or fine grater for the lemon zest. Having everything ready to go makes the process so much more enjoyable and efficient, allowing you to focus on the magic.

Crafting the Fluffy Cobbler Topping:

This topping will bake into a beautiful, tender cake-like layer that sits atop the luscious lemon sauce. It’s the perfect contrast of texture!

  1. Combine Dry Ingredients: In a large mixing bowl, I start by combining my dry ingredients for the cobbler topping. This includes the 1 ½ cups of all-purpose flour, ¾ cup of granulated sugar, 2 teaspoons of baking powder, and ¼ teaspoon of salt. I like to whisk these together thoroughly for about 30 seconds to a minute. This ensures that the baking powder and salt are evenly distributed throughout the flour, which is essential for a consistent rise and flavor in our Magic Lemon Cobbler Delight Recipe. Skipping this step can lead to uneven texture or pockets of unmixed ingredients, and we certainly don’t want that!
  2. Cream Butter and Sugar: In a separate, medium-sized bowl, or using a stand mixer fitted with the paddle attachment, I cream together the softened ½ cup of unsalted butter and ¾ cup of granulated sugar until the mixture is light and fluffy. This process typically takes about 3-5 minutes at medium speed. It’s important that your butter is truly at room temperature (soft enough to leave an indentation when pressed, but not melted) for optimal creaming. When butter and sugar are properly creamed, air is incorporated, which contributes to the lightness and tenderness of the cobbler topping. You’ll notice the color lighten to a pale yellow, and the texture will become noticeably airy.
  3. Incorporate Wet Ingredients: To the creamed butter and sugar, I then add 1 teaspoon of pure vanilla extract and 1 tablespoon of fresh lemon zest. I mix these in until just combined, about 30 seconds. The aroma of the vanilla and fresh lemon zest at this stage is truly invigorating! The lemon zest provides that extra burst of citrus aroma that really makes this Magic Lemon Cobbler Delight Recipe shine.
  4. Alternating Wet and Dry: Now comes the careful part of combining everything. I gradually add the dry ingredients (from step 3) to the wet ingredients (from step 5), alternating with the ½ cup of whole milk. I begin by adding about a third of the dry ingredients, mixing on low speed until just incorporated. Then I add half of the milk, mix, followed by another third of the dry, the remaining milk, and finally the last third of the dry ingredients. It’s vital not to overmix the batter once the flour is added. Overmixing can develop the gluten too much, leading to a tough cobbler topping, which we definitely want to avoid for that perfect tender texture. I stop mixing as soon as no streaks of flour are visible. A few small lumps are perfectly fine and often preferred.
  5. Spread into Baking Dish: Gently pour and spread the cobbler topping batter evenly into the prepared 9×13 inch baking dish. Use a spatula to ensure an even layer across the bottom of the dish. This forms the base of our magical dessert, ready to receive the enchanting lemon sauce. I make sure it’s as flat and uniform as possible so that the sauce can later work its magic evenly underneath.

Whipping Up the Magic Lemon Sauce:

This is where the true “magic” of the Magic Lemon Cobbler Delight Recipe happens! This sauce bakes underneath the cobbler topping, creating a self-saucing wonder.

  1. Combine Dry Sauce Ingredients: In a separate medium-sized bowl, I whisk together the 1 ½ cups of granulated sugar and ¼ cup of all-purpose flour for the lemon sauce layer. This is an important step because the flour helps to thicken the sauce as it bakes, giving it that delightful custardy consistency. I also add 1 tablespoon of fresh lemon zest at this point. Whisk thoroughly until well combined and lump-free. The zest here infuses the sauce with an even deeper, more vibrant lemon flavor and aroma.
  2. Prepare Wet Sauce Ingredients: In another bowl (or a large measuring cup), I lightly whisk the 2 large eggs. Then, I gradually whisk in the ½ cup of fresh lemon juice and 1 ½ cups of whole milk until everything is smoothly combined. It’s important to use fresh lemon juice for the best flavor; bottled lemon juice just doesn’t compare for a recipe like this. The acidity and brightness of freshly squeezed lemons are key to the “Delight” in our Magic Lemon Cobbler Delight Recipe.
  3. Combine Wet and Dry for Sauce: Slowly pour the wet egg and lemon mixture into the bowl with the dry sugar and flour mixture, whisking continuously until smooth and no lumps remain. Continue whisking for another minute or so to ensure everything is fully incorporated. The mixture will still be quite liquidy, resembling a thin pancake batter, but don’t worry – the magic happens in the oven! This is a simple yet crucial step, ensuring the sauce bakes into that perfect consistency.
  4. Perform the “Magic Pour”: This is the moment where the “magic” begins to unfold! Carefully and slowly pour the prepared lemon sauce mixture directly over the cobbler topping batter that is already in your 9×13 inch baking dish. Do not stir! The sauce will naturally sink and seep around the cobbler batter as it bakes, creating its own distinct layer underneath. It might look a little unusual at first, with a thin layer of liquid on top of your batter, but trust me, this is exactly how it’s supposed to be. The science of baking will take over from here, separating these two layers into a glorious dessert.

Baking the Magic Lemon Cobbler Delight:

Now, let’s watch our creation transform in the oven!

  1. Bake to Perfection: Gently transfer the baking dish to your preheated 350°F (175°C) oven. I like to place it on the middle rack for even baking. Bake for approximately 45-55 minutes. The exact baking time can vary depending on your oven, so keep an eye on it.
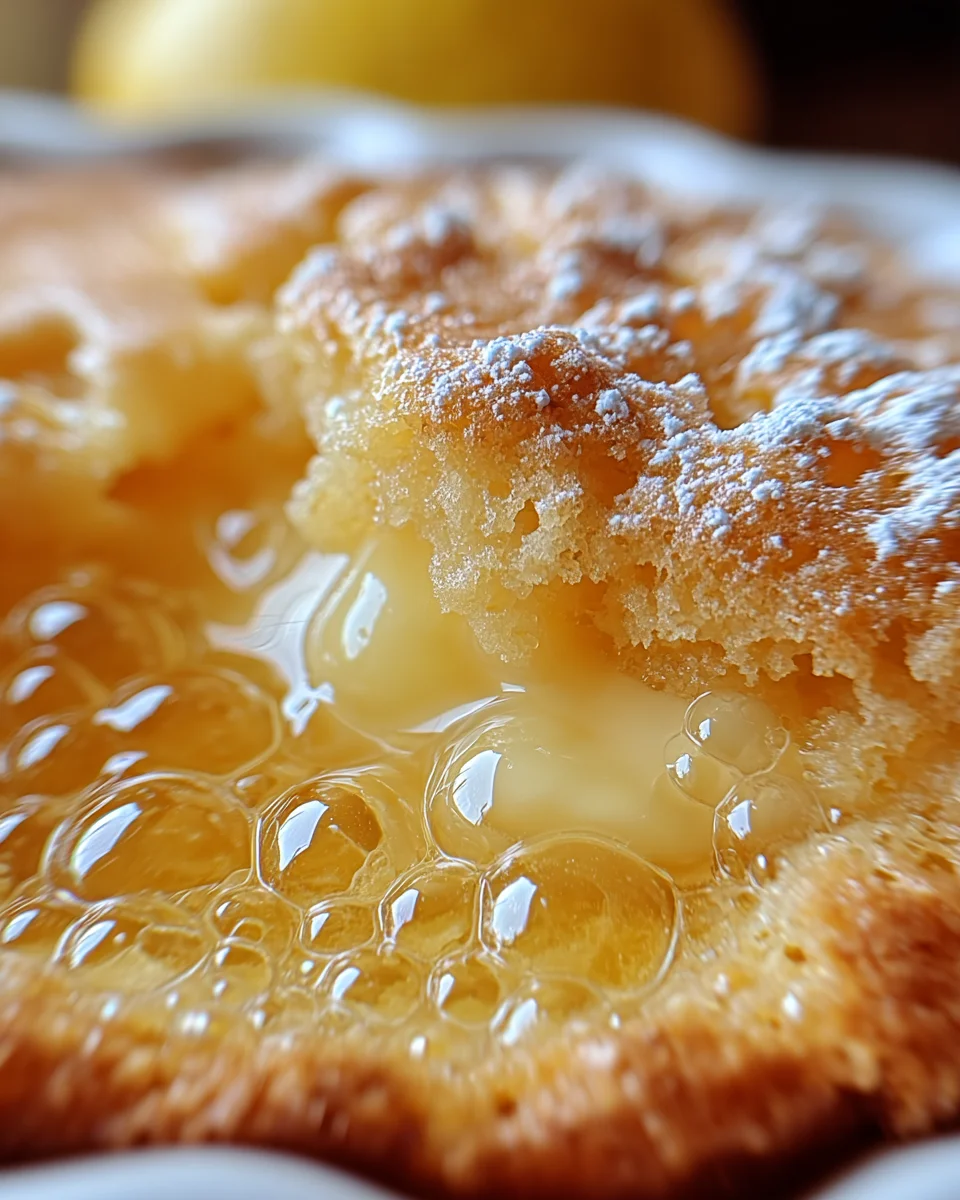
  2. Checking for Doneness: The cobbler is ready when the topping is beautifully golden brown, puffed up, and firm to the touch. If you gently jiggle the dish, the center of the cobbler topping should feel set, with no significant liquid movement from underneath. You might see some of the lemon sauce bubbling up around the edges, which is a good sign! If a toothpick inserted into the cakey topping comes out clean, that’s another indicator of doneness for the cake layer. The magic sauce beneath will be a luscious, gooey lemon curd consistency.
  3. Cooling and Setting: Once baked, carefully remove the Magic Lemon Cobbler Delight Recipe from the oven and place it on a wire rack to cool. This cooling period is important, allowing the sauce to thicken further and the flavors to meld beautifully. I recommend letting it cool for at least 20-30 minutes before serving. It will still be wonderfully warm, but the internal structure will have set enough for easier scooping and maximum enjoyment.

Serving Your Magic Lemon Cobbler Delight:

This is the moment we’ve been waiting for! Get ready to impress.

  1. Garnish and Serve: While still warm (my preferred way to enjoy it!), dust the entire cobbler generously with powdered sugar. This adds a lovely finish and a touch of extra sweetness. Then, spoon individual portions into serving bowls. As you scoop, you’ll discover the incredible magic: a tender, cake-like topping giving way to a warm, tangy, and irresistibly creamy lemon sauce underneath.
  2. Enhance the Experience: For an ultimate treat, I highly recommend garnishing each serving with a handful of fresh berries – raspberries and blueberries are particularly wonderful with lemon. A dollop of freshly whipped cream or a scoop of premium vanilla bean ice cream takes this dessert to an entirely new level, adding a cool, creamy contrast to the warm, zesty cobbler. You can even add a thin lemon curl or a small sprig of mint for an elegant touch. This Magic Lemon Cobbler Delight Recipe is truly a showstopper!
  3. Storage: If by some miracle you have leftovers (it’s rare in my house!), cover the baking dish tightly with plastic wrap or aluminum foil and store it in the refrigerator for up to 3-4 days. While it’s best enjoyed warm, I’ve found that it’s also quite delicious chilled, almost like a lemon pudding cake. To reheat, you can warm individual portions gently in the microwave or place the entire dish (covered with foil) in a 300°F (150°C) oven until just warmed through.

I genuinely hope you enjoy creating and savoring this incredible Magic Lemon Cobbler Delight Recipe as much as I do. It’s a truly special dessert that never fails to bring smiles to faces!

This recipe truly lives up to its name, delivering a delightful surprise with every spoonful. The tender cake and luscious lemon sauce create a harmonious balance of texture and flavor that is simply irresistible. It’s a wonderful dish for any gathering, from a casual family dinner to a more festive occasion.

The beauty of this Magic Lemon Cobbler Delight Recipe lies not only in its taste but also in its captivating transformation during baking. It’s a joy to pull it from the oven, seeing the golden-brown topping sitting proudly above the hidden, bubbling lemon goodness. The aroma alone is enough to draw everyone into the kitchen!

When selecting your lemons, I always advise choosing bright yellow, firm lemons that feel heavy for their size. These typically yield the most juice and zest, which are both crucial for the vibrant flavor of this magical dessert. Organic lemons are often preferred since you’ll be using a significant amount of zest directly in the recipe.

Don’t be afraid to experiment with the garnish! While berries and whipped cream are classic pairings, a light sprinkle of toasted coconut flakes could also add an interesting textural and flavor dimension. Or, for a truly decadent twist, a drizzle of white chocolate ganache could elevate the experience even further. The versatility of this Magic Lemon Cobbler Delight Recipe allows for many creative interpretations.

Remember, the key to the ‘magic’ of this cobbler is resisting the urge to stir the lemon sauce into the batter. That distinct separation is what makes this dessert so unique and delightful. Trust the process, and you’ll be rewarded with a dessert that truly shines.

So, gather your ingredients, follow these steps, and prepare to be enchanted by the flavors and textures of this remarkable Magic Lemon Cobbler Delight Recipe. It’s a dessert that not only tastes incredible but also offers a little bit of baking wonder!

Whether you’re an experienced baker or just starting out, this recipe is incredibly forgiving and yields consistently delicious results. The friendly first-person narrative ensures that you feel like I’m right there with you, guiding you through each stage. Embrace the simplicity and the joy of creating something truly magical in your kitchen.

I often find that the best part of making this Magic Lemon Cobbler Delight Recipe is the moment it comes out of the oven. The house fills with the most incredible, comforting scent of sweet baked goods and bright citrus. It’s a sensory experience that signals pure delight. I hope it brings that same joy to your home.

Enjoy every single bite of this extraordinary creation. It’s more than just a dessert; it’s an experience.

Magic Lemon Cobbler Delight: Your New Favorite Zesty Dessert

Conclusion:

As we reach the sweet culmination of our culinary journey, I sincerely hope you’re feeling as excited as I am about trying this incredible dessert. This isn’t just another recipe; it’s an invitation to experience pure, unadulterated joy in every single bite. I truly believe that once you taste the delightful balance of tart lemon and sweet, tender cobbler, you’ll understand why this dish holds such a special place in my heart, and why it’s destined to become a beloved staple in your home too. It’s truly a celebration of simple, wholesome ingredients coming together to create something extraordinarily comforting and utterly unforgettable.

What makes this particular cobbler a resounding must-try, you ask? Well, it’s the symphony of textures and flavors that dance on your palate. Imagine the golden-brown topping, crisp at the edges and wonderfully tender within, yielding to a bubbling, luscious lemon filling that’s bright, zesty, and perfectly sweet. It’s that perfect marriage of a warm, comforting hug and a refreshing burst of sunshine. It’s incredibly forgiving for even novice bakers, yet impressive enough to wow at any gathering. The simplicity of its preparation belies the sophisticated, vibrant flavor it delivers. Every spoonful offers a perfect blend of the soft, cake-like topping infused with that incredible lemon essence, and the rich, syrupy fruit layer beneath. It’s the kind of dessert that instantly brightens a cloudy day or adds a touch of pure magic to any celebration, big or small. This Magic Lemon Cobbler Delight Recipe truly lives up to its name, transforming humble ingredients into something truly extraordinary and profoundly satisfying. It’s the perfect end to a hearty meal, a delightful treat for an afternoon pick-me-up, or even a comforting breakfast indulgence (I won’t tell anyone!).

Now, let’s talk about maximizing your enjoyment of this incredible creation. While it’s absolutely sublime on its own, served warm straight from the oven, there are a few ways I love to elevate the experience. My absolute favorite pairing is a generous scoop of good quality vanilla bean ice cream, allowing its cool, creamy richness to melt slightly into the warm, zesty cobbler. The contrast in temperatures and flavors is simply divine! If you prefer something lighter, a dollop of freshly whipped cream, perhaps lightly sweetened with a touch of powdered sugar and a hint of vanilla extract, provides an airy counterpoint. For those who enjoy a little extra crunch, a sprinkle of toasted slivered almonds or shredded coconut over the top just before serving can add another delightful dimension. And don’t shy away from serving it chilled the next day; it takes on an almost custardy texture that is equally delicious, perfect for a refreshing treat. If you’re feeling adventurous, consider variations: perhaps folding in a handful of fresh blueberries or raspberries with the lemon zest for an added berry burst, or swapping out a portion of the lemon juice for lime juice to create a vibrant lemon-lime sensation. You could even infuse your whipped cream with a tiny bit of lavender for a sophisticated floral note. The possibilities are truly endless, limited only by your imagination!

I genuinely hope you’re feeling inspired to roll up your sleeves and give this wonderful recipe a try. Baking is such a therapeutic and rewarding experience, and sharing the fruits of your labor is an even greater joy. So, please, gather your ingredients, preheat your oven, and prepare to fill your kitchen with the most enchanting aroma of baking lemon. Once you’ve pulled that golden, bubbling beauty from the oven and savored your first bite, I would absolutely love to hear all about your experience! Did you stick to the classic, or did you venture into exciting variations? Did you share it with loved ones, or perhaps enjoy a quiet moment of blissful indulgence all to yourself? Please feel free to share your photos, your triumphs, and any clever twists you discovered along the way. Your feedback and creativity inspire me, and I can’t wait to see how you make this delightful dessert your own. Happy baking, my friends!


Magic Lemon Cobbler Delight

Prepare to be utterly enchanted by this Magic Lemon Cobbler Delight! This recipe transforms simple ingredients into a symphony of zesty flavors and delightful textures, featuring a self-saucing lemon layer and a fluffy, cake-like topping that emerges as if by pure magic. Easy to make and a beloved staple, it consistently brings smiles and a touch of sunshine to every table.

Prep Time
25 Minutes
Cook Time
50 Minutes
Total Time
40 Minutes
Servings
8-12 servings

Ingredients


Instructions


Important Information

Nutrition Facts (Per Serving)

It is important to consider this information as approximate and not to use it as definitive health advice.

Allergy Information

Please check ingredients for potential allergens and consult a health professional if in doubt.

« Previous Post
Creamy Southern Spaghetti Bake: Irresistible Comfort Food
Next Post »
Quick Chicken Pot Pie Pasta – Easy Weeknight Meal!

If you enjoyed this…

Delicious Easy Caramel Cookie Bars Recipe You Can’t Resist!

Raspberry Chocolate Lava Cupcakes: Decadent Dessert!

Virgin Island Breeze Mocktail: A Refreshing Taste of Paradise

Primary Sidebar

Browse by Diet

BreakfastDinnerLunchDessertAppetizer

Sweet Peach Yogurt Parfait Delight

One of my fondest memories is from a lazy summer afternoon spent at my grandmother’s house. The sun filtered through the kitchen window, casting a warm glow over the table where she would create her culinary magic. It was during one of those blissful moments that I first tasted her Peach Yogurt Parfait with Honey and Granola. The sweet aroma of ripe peaches mingling with creamy yogurt and the crunch of granola was nothing short of heavenly. It felt like summer captured in a bowl, and I still remember the joy of diving in with a spoon, each layer revealing a new burst of flavor.

When I think about that parfait, I can almost hear the gentle hum of the bees outside, reminding me of the floral notes that honey brings to every bite. The vibrant yellows and soft oranges of the peaches contrast beautifully with the creamy white yogurt and the golden crunch of granola. It’s a dish that not only looks delightful but also tastes like a celebration of fresh, wholesome ingredients.

What makes my version of this Peach Yogurt Parfait special is the careful balance of flavors and textures. I use ripe, juicy peaches, drizzled with locally sourced honey, and a homemade granola that’s bursting with nuts and seeds for an extra crunch. It’s a simple dish, but every layer is crafted with love and attention.

Let me show you exactly how to make this delightful parfait, so you can bring a bit of that summer magic into your kitchen!

Sweet Peach Yogurt Parfait Delight

Why You’ll Love This Recipe

  • Delightfully creamy texture from the Greek yogurt, paired with the juicy sweetness of fresh peaches.
  • Ready in under 20 minutes, making it a quick and satisfying breakfast or snack option.
  • Budget-friendly, using common ingredients that you may already have in your pantry.
  • Customizable with your favorite granola and nuts, allowing you to tailor each parfait to your taste.
  • Perfectly balanced flavors with the bright acidity of lemon juice and the sweetness of honey enhancing the peaches.

Ingredients

  • For the Parfait:
  • 2 cups plain Greek yogurt (or vanilla yogurt for a sweeter option)
  • 2 large ripe peaches, diced (about 2 cups)
  • 1 tablespoon fresh lemon juice (to prevent browning of peaches)
  • 2 tablespoons honey (plus more for drizzling)
  • 1 teaspoon vanilla extract (optional for extra flavor)
  • For the Granola:
  • 1 cup granola (store-bought or homemade; see notes for a simple granola recipe)
  • 1/4 cup sliced almonds (optional for added crunch)
  • 1/4 cup shredded coconut (optional for added flavor)

Let’s dive into some key ingredients that make this Peach Yogurt Parfait so delightful! First, the Greek yogurt is not only creamy but also packed with protein, making it a satisfying option for breakfast or a snack. If you’re looking for a sweeter option, you can easily substitute it with vanilla yogurt, though it may alter the overall flavor balance. Next, the ripe peaches are the star of the show; their natural sweetness shines through, so I recommend choosing peaches that yield slightly to pressure, indicating they’re perfectly ripe. If peaches aren’t in season, feel free to use nectarines or even frozen peaches—just thaw them before use. Finally, honey adds a lovely floral sweetness that ties everything together. If you prefer, maple syrup can serve as a delicious substitute.

Step-by-Step Instructions

  1. Start by preparing the peaches. Wash them thoroughly, then slice and dice them into bite-sized pieces. In a medium bowl, toss the diced peaches with 1 tablespoon of fresh lemon juice to prevent browning. Set aside for about 5 minutes while the lemon juice works its magic.
  2. In a separate bowl, combine the Greek yogurt, 2 tablespoons of honey, and 1 teaspoon of vanilla extract if using. Stir the mixture until smooth and thoroughly blended. This should take about a minute. Avoid overmixing to maintain the creaminess of the yogurt.
  3. Now it’s time to layer your parfait. Grab a clear glass or bowl to showcase your beautiful creation. Start with a generous spoonful of the yogurt mixture at the bottom—about 1/4 cup will do. Use a spoon to spread it evenly.
  4. Add a layer of the diced peaches over the yogurt, ensuring they cover the yogurt completely. You might want to use about half of what you have prepared—roughly 1 cup. This layer should be visually appealing, so arrange the peaches neatly.
  5. Sprinkle 1/4 cup of granola over the peaches. This adds a delightful crunch. Make sure to distribute it evenly to ensure every bite has that satisfying texture. Avoid packing it down too tightly, as you want it to maintain its crunch.
  6. Repeat the layers: spoon in another 1/4 cup of yogurt, followed by another cup of peaches, and another sprinkle of granola. You should have at least two layers, but feel free to add more depending on your glass size.
  7. Finish off your parfait with a drizzle of honey on top for added sweetness and a touch of elegance. If you’re using sliced almonds or shredded coconut, sprinkle them on top now. It adds a lovely visual contrast and extra flavor.
  8. Serve immediately or refrigerate for up to 30 minutes before serving to allow the flavors to meld together. However, I recommend enjoying it fresh to maintain the granola’s crunch.

Pro Tips for the Best Peach Yogurt Parfait With Honey And Granola

  • Make sure to choose ripe peaches for the best flavor and texture. A common mistake is using unripe fruit, which can lead to a less enjoyable parfait. Look for peaches that are fragrant and slightly soft to the touch.
  • Use a clear glass to assemble your parfait; this not only makes for a beautiful presentation but also allows you to see the colorful layers, which adds to the enjoyment of eating it.
  • For an even creamier texture, consider whipping the Greek yogurt with a hand mixer for a couple of minutes before layering. This small adjustment makes a huge difference in mouthfeel.
  • Be mindful of the granola-to-yogurt ratio. Too much granola can overwhelm the parfait, while too little can make it feel too creamy. Aim for about 1/4 cup of granola per layer for the perfect balance.
  • If you’re making this for a gathering, consider preparing the yogurt and peaches ahead of time and layering them just before serving. This ensures the granola stays crunchy!

Variations & Serving Ideas

There are so many ways to get creative with your Peach Yogurt Parfait! For a tropical twist, swap out the peaches for mangoes or pineapples and top with coconut flakes. If you prefer a berry flavor, mix in some blueberries or strawberries with the peaches for added color and taste. For a nutty version, incorporate chopped walnuts or pecans instead of almonds.

As for serving ideas, this parfait pairs beautifully with a side of scrambled eggs for a hearty breakfast or fresh fruit salad for a light lunch. You might also enjoy it alongside whole grain toast with almond butter for an energizing snack. The contrast of flavors and textures will elevate your meal experience!

Storage, Make-Ahead & Reheating

The Peach Yogurt Parfait is best enjoyed fresh, but you can prepare some components ahead of time. Store the layered parfait in an airtight container in the refrigerator for up to 24 hours. However, be cautious; the granola may lose its crunch if stored too long. You can freeze the yogurt and peach mixture for up to 2 months; just remember to thaw it in the refrigerator overnight before serving.

If you plan to enjoy this dish the next day, it can taste even better as the flavors meld together. Just remember to add the granola right before serving to keep its delightful crunch!

Frequently Asked Questions

Can I make Peach Yogurt Parfait With Honey And Granola ahead of time?

Yes — in fact, it tastes even better the next day as the flavors meld. However, I recommend waiting to add the granola until just before serving to maintain its crunch.

What can I substitute for Greek yogurt?

If you prefer a lighter option, you can substitute Greek yogurt with regular yogurt or a dairy-free alternative like coconut yogurt. Just remember that this may alter the creaminess and flavor profile slightly.

Can I use frozen peaches for this parfait?

Absolutely! Just make sure to thaw the frozen peaches before using them. They will still add great flavor, though the texture may be slightly softer than fresh peaches.

How do I make the parfait vegan?

To make a vegan version, substitute the Greek yogurt with a plant-based yogurt alternative, and replace honey with maple syrup or agave nectar. This keeps the parfait sweet while adhering to a vegan diet.

What other fruits can I use in this recipe?

You can mix and match fruits based on your preference. Try using strawberries, blueberries, raspberries, or even bananas. Just make sure to adjust the lemon juice as needed to prevent browning.

Sweet Peach Yogurt Parfait Delight

Final Thoughts

The Peach Yogurt Parfait with Honey and Granola is a delightful blend of creamy yogurt, sweet peaches, and crunchy granola that creates a satisfying and nourishing treat. Each layer bursts with flavor, making it a perfect choice for breakfast or a light dessert.

This is the kind of recipe I come back to again and again, especially when I want something refreshing and wholesome to start my day. The harmony of sweet and tart flavors, combined with the delightful crunch, never fails to lift my spirits!

I encourage you to give this parfait a try and indulge in its comforting goodness. Feel free to share your results or even add your own twist—perhaps a sprinkle of cinnamon or a handful of nuts. Enjoy creating your perfect parfait!

Print
clock clock iconcutlery cutlery iconflag flag iconfolder folder iconinstagram instagram iconpinterest pinterest iconfacebook facebook iconprint print iconsquares squares iconheart heart iconheart solid heart solid icon

Peach Yogurt Parfait


  • Author: Lily author
  • Total Time: 15 minutes
  • Yield: 4 servings 1x
Pin Recipe
Print Recipe

Description

This Peach Yogurt Parfait combines creamy Greek yogurt, juicy peaches, and crunchy granola for a delightful treat. It’s a perfect breakfast or snack that captures the essence of summer in every bite.


Ingredients

Scale
  • For the Parfait:
  • 2 cups plain Greek yogurt (or vanilla yogurt for a sweeter option)
  • 2 large ripe peaches, diced (about 2 cups)
  • 1 tablespoon fresh lemon juice (to prevent browning of peaches)
  • 2 tablespoons honey (plus more for drizzling)
  • 1 teaspoon vanilla extract (optional for extra flavor)
  • For the Granola:
  • 1 cup granola (store-bought or homemade; see notes for a simple granola recipe)
  • 1/4 cup sliced almonds (optional for added crunch)
  • 1/4 cup shredded coconut (optional for added flavor)

Instructions

  1. Start by preparing the peaches. Wash them thoroughly, then slice and dice them into bite-sized pieces. In a medium bowl, toss the diced peaches with 1 tablespoon of fresh lemon juice to prevent browning. Set aside for about 5 minutes while the lemon juice works its magic.
  2. In a separate bowl, combine the Greek yogurt, 2 tablespoons of honey, and 1 teaspoon of vanilla extract if using. Stir the mixture until smooth and thoroughly blended. This should take about a minute. Avoid overmixing to maintain the creaminess of the yogurt.
  3. Now it’s time to layer your parfait. Grab a clear glass or bowl to showcase your beautiful creation. Start with a generous spoonful of the yogurt mixture at the bottom—about 1/4 cup will do. Use a spoon to spread it evenly.
  4. Add a layer of the diced peaches over the yogurt, ensuring they cover the yogurt completely. You might want to use about half of what you have prepared—roughly 1 cup. This layer should be visually appealing, so arrange the peaches neatly.
  5. Sprinkle 1/4 cup of granola over the peaches. This adds a delightful crunch. Make sure to distribute it evenly to ensure every bite has that satisfying texture. Avoid packing it down too tightly, as you want it to maintain its crunch.
  6. Repeat the layers: spoon in another 1/4 cup of yogurt, followed by another cup of peaches, and another sprinkle of granola. You should have at least two layers, but feel free to add more depending on your glass size.
  7. Finish off your parfait with a drizzle of honey on top for added sweetness and a touch of elegance. If you’re using sliced almonds or shredded coconut, sprinkle them on top now. It adds a lovely visual contrast and extra flavor.
  8. Serve immediately or refrigerate for up to 30 minutes before serving to allow the flavors to meld together. However, I recommend enjoying it fresh to maintain the granola’s crunch.
  • Prep Time: 15 mins
  • Cook Time: 0 mins
  • Category: Breakfast
  • Method: No-cook
  • Cuisine: American

Nutrition

  • Serving Size: 1 parfait
  • Calories: 250
  • Sugar: 20 g
  • Sodium: 50 mg
  • Fat: 5 g
  • Saturated Fat: 2 g
  • Unsaturated Fat: 3 g
  • Trans Fat: 0 g
  • Carbohydrates: 40 g
  • Fiber: 3 g
  • Protein: 10 g
  • Cholesterol: 10 mg

Keywords: Choose ripe peaches for the best flavor and texture. Use a clear glass for a beautiful presentation. For creaminess, consider whipping the yogurt before layering. Be mindful of the granola-to-yogurt ratio. Prepare yogurt and peaches ahead of time for gatherings, layering just before serving.

Did you make this recipe?

Share a photo and tag us — we can't wait to see what you've made!

Sun-Kissed Frozen Orange Cream Slush

As a child, summer days felt like they lasted forever. I remember the sticky heat wrapping around me as I played outside, my laughter mingling with the sounds of the neighborhood. But nothing could cool me down quite like the moment I’d spot my grandmother, laboring over her blender, whipping up her famous Frozen Orange Creamsicle Slush. That vibrant orange treat, with its frosty texture and sweet citrus aroma, was like a burst of sunshine in a cup. Just one sip, and I could feel the coolness wash over me, sparking pure joy.

This Frozen Orange Creamsicle Slush has a way of making you feel like a kid again. Its creamy, dreamy consistency is a delightful balance of bright orange and soft vanilla, inviting you to dive right in. The refreshing tang of orange dances on your tongue, while the smooth creaminess envelops you in a comforting embrace. It’s a nostalgic treat that’s perfect for hot summer afternoons or anytime you need a little pick-me-up.

What makes my version of this slush stand out is the addition of a hint of vanilla bean, which elevates the flavor and adds an extra layer of richness. Plus, it’s super easy to whip up with just a few simple ingredients that you probably already have on hand! So, if you’re ready to relive those sun-soaked memories, let me show you exactly how to make it.

Sun-Kissed Frozen Orange Cream Slush

Why You’ll Love This Recipe

  • Each slush is a perfect blend of creamy vanilla and zesty orange, creating a nostalgic flavor reminiscent of summer days.
  • This refreshing treat is ready in under 15 minutes, making it an ideal quick dessert for unexpected guests or hot afternoons.
  • With just 8 simple ingredients, it’s budget-friendly, ensuring you don’t have to break the bank to enjoy a delicious slush.
  • The slush has a perfectly smooth texture, thanks to the combination of ice and ice cream, providing a delightful contrast to the bright citrus flavors.
  • It’s highly customizable; you can easily adjust the sweetness and add fresh herbs for a unique twist that suits your taste.

Ingredients

  • 2 cups orange juice (freshly squeezed or store-bought)
  • 1 cup vanilla ice cream
  • 1 cup crushed ice
  • 1/2 cup milk (whole or 2%)
  • 1/4 cup granulated sugar (adjust based on sweetness preference)
  • 1 teaspoon vanilla extract
  • Zest of 1 orange (for added flavor)
  • Fresh orange slices and mint leaves (for garnish)

The star of this Frozen Orange Creamsicle Slush is the orange juice, which provides the vibrant, citrusy base. Freshly squeezed juice will yield the brightest flavor, but store-bought options can be just as convenient. If you’re opting for store-bought, choose 100% pure juice with no added sugars for the best results. Another essential ingredient is the vanilla ice cream; it adds creaminess and sweetness. You can substitute it with dairy-free ice cream if you’re looking for a vegan option. Whole or 2% milk complements the ice cream, creating a smooth blend. If you want a lower-calorie version, almond or oat milk can be good alternatives.

Lastly, the granulated sugar can be adjusted based on your sweetness preference. If you prefer a more natural sweetener, consider using honey or agave syrup. The orange zest enhances the flavor profile, providing an aromatic pop that brings the whole slush together. Don’t skip it! It adds an extra layer of brightness that makes this slush truly special.

Step-by-Step Instructions

  1. Start by preparing your ingredients. Gather 2 cups of orange juice, 1 cup of vanilla ice cream, and 1 cup of crushed ice. Make sure the ice is finely crushed, as larger chunks can make blending difficult.
  2. In a blender, combine the orange juice, vanilla ice cream, crushed ice, and 1/2 cup of milk. Add 1/4 cup of granulated sugar and 1 teaspoon of vanilla extract. If you like a sweeter slush, consider adding a bit more sugar at this stage.
  3. Add the zest of 1 orange to the blender. This step is crucial for enhancing the citrus flavor of your slush. Make sure not to include the bitter white pith—only the flavorful zest.
  4. Blend the mixture on medium-high speed for about 30-45 seconds. Stop once the ingredients are fully combined and the slush has a smooth, even consistency. If you notice large chunks of ice, blend for an additional 10-15 seconds. Avoid over-blending, as this can make the slush too liquidy.
  5. Once blended, taste the slush. If it needs more sweetness, add a little more sugar and blend for a few more seconds. If it’s too thick, you can add a splash of milk to reach your desired consistency.
  6. Pour the slush into glasses. This recipe typically serves 4, but you can easily double it for larger gatherings. Use a spoon to help guide the slush into the glasses if needed.
  7. Garnish each serving with fresh orange slices and mint leaves. The mint not only adds a pop of color but also a refreshing aroma that complements the citrus flavors beautifully.
  8. Serve immediately and enjoy! If you’ve made extra, you can refrigerate it for a short time, but it’s best enjoyed fresh.

Pro Tips for the Best Frozen Orange Creamsicle Slush

  • Don’t skip the orange zest! It’s a game-changer for flavor. Always zest before juicing to make it easier.
  • Use a high-powered blender for the best texture. A standard blender may struggle with ice, leading to uneven consistency. If you have a food processor, that can work too, but ensure the ice is finely crushed.
  • Adjust the ice-to-liquid ratio carefully. If your slush is too thick, it won’t blend well. Start with less ice and add more until you reach your preferred texture.
  • Be cautious with the sugar! Always start with the lower amount, as you can easily add more, but it’s hard to fix an overly sweet slush.
  • For a fun twist, consider adding a splash of coconut milk or a handful of fresh fruit like strawberries or pineapple. This not only enhances the flavor but also adds a beautiful color contrast.

Variations & Serving Ideas

There are countless ways to put a spin on your Frozen Orange Creamsicle Slush. Consider making a tropical version by adding in some pineapple juice or coconut milk for a delightful tropical twist. If you’re feeling adventurous, try incorporating a handful of frozen mango or peach slices for added sweetness. For a lighter version, swap out the vanilla ice cream for Greek yogurt for a creamy yet tangy alternative.

As for serving ideas, this refreshing slush pairs wonderfully with light summer dishes like grilled chicken skewers, fish tacos, or a simple salad topped with citrus vinaigrette. The bright, zesty flavors of the slush complement these dishes perfectly, making them an ideal pairing for a sunny day.

Storage, Make-Ahead & Reheating

This Frozen Orange Creamsicle Slush is best enjoyed fresh, but if you have leftovers, you can store them in an airtight container in the fridge for up to 2 days. Just keep in mind that the slush may lose some of its texture over time as the ice melts. It doesn’t freeze well, as the ice will turn into a solid block. If you must freeze it, blend again after thawing to restore the slushy consistency. This treat is best the day you make it, as the flavors meld together beautifully overnight, enhancing its deliciousness.

Frequently Asked Questions

Can I make Frozen Orange Creamsicle Slush ahead of time?

Yes — in fact, it tastes even better the next day as the flavors meld. However, it’s best to enjoy it fresh, as the texture can change if stored for too long. If you need to prepare it ahead, keep it in the fridge and re-blend before serving.

What kind of orange juice should I use?

For the best flavor, use freshly squeezed orange juice. However, if you’re short on time, opt for 100% pure store-bought juice without added sugars. This will ensure that your slush remains flavorful and refreshing.

Can I substitute the vanilla ice cream?

Absolutely! If you’re looking for a dairy-free option, coconut milk ice cream or a non-dairy vanilla ice cream can work wonderfully. They will still provide the creamy texture and sweetness you desire.

How can I adjust the sweetness of my slush?

You can easily adjust the sweetness by modifying the amount of sugar added. Start with 1/4 cup and taste the mixture before blending. If you prefer it sweeter, add more sugar gradually until it reaches your desired level.

What should I do if my slush is too thick?

If your slush is too thick, simply add a splash of milk or orange juice and blend again. This will help achieve a more drinkable consistency while maintaining the slushy texture. Adjust gradually to reach your preferred thickness.

Sun-Kissed Frozen Orange Cream Slush

Final Thoughts

The Frozen Orange Creamsicle Slush is a delightful blend of refreshing citrus and creamy goodness, making it a perfect treat for warm days or any time you crave a taste of nostalgia. The way the bright orange flavor dances with the creamy texture truly elevates this slush, transforming it into a satisfying escape from the everyday.

This is the kind of recipe I come back to again and again, especially when I’m looking to cool down or impress guests at a summer gathering. It’s simple to make and always brings smiles all around! I encourage you to try this recipe for yourself—don’t hesitate to share your results or even put your own spin on it. Happy slushing!

Print
clock clock iconcutlery cutlery iconflag flag iconfolder folder iconinstagram instagram iconpinterest pinterest iconfacebook facebook iconprint print iconsquares squares iconheart heart iconheart solid heart solid icon

Frozen Orange Creamsicle Slush


  • Author: Lily author
  • Total Time: 15 minutes
  • Yield: 4 servings 1x
Pin Recipe
Print Recipe

Description

This Frozen Orange Creamsicle Slush is a refreshing treat that combines creamy vanilla and zesty orange flavors. Perfect for hot summer days, it brings back nostalgic memories with every sip.


Ingredients

Scale
  • 2 cups orange juice (freshly squeezed or store-bought)
  • 1 cup vanilla ice cream
  • 1 cup crushed ice
  • 1/2 cup milk (whole or 2%)
  • 1/4 cup granulated sugar (adjust based on sweetness preference)
  • 1 teaspoon vanilla extract
  • Zest of 1 orange (for added flavor)
  • Fresh orange slices and mint leaves (for garnish)

Instructions

  1. Start by preparing your ingredients. Gather 2 cups of orange juice, 1 cup of vanilla ice cream, and 1 cup of crushed ice. Make sure the ice is finely crushed, as larger chunks can make blending difficult.
  2. In a blender, combine the orange juice, vanilla ice cream, crushed ice, and 1/2 cup of milk. Add 1/4 cup of granulated sugar and 1 teaspoon of vanilla extract. If you like a sweeter slush, consider adding a bit more sugar at this stage.
  3. Add the zest of 1 orange to the blender. This step is crucial for enhancing the citrus flavor of your slush. Make sure not to include the bitter white pith—only the flavorful zest.
  4. Blend the mixture on medium-high speed for about 30-45 seconds. Stop once the ingredients are fully combined and the slush has a smooth, even consistency. If you notice large chunks of ice, blend for an additional 10-15 seconds. Avoid over-blending, as this can make the slush too liquidy.
  5. Once blended, taste the slush. If it needs more sweetness, add a little more sugar and blend for a few more seconds. If it’s too thick, you can add a splash of milk to reach your desired consistency.
  6. Pour the slush into glasses. This recipe typically serves 4, but you can easily double it for larger gatherings. Use a spoon to help guide the slush into the glasses if needed.
  7. Garnish each serving with fresh orange slices and mint leaves. The mint not only adds a pop of color but also a refreshing aroma that complements the citrus flavors beautifully.
  8. Serve immediately and enjoy! If you’ve made extra, you can refrigerate it for a short time, but it's best enjoyed fresh.
  • Prep Time: 15 min
  • Cook Time: 0 min
  • Category: Dessert
  • Method: Blending
  • Cuisine: American

Nutrition

  • Serving Size: 1 serving
  • Calories: 200
  • Sugar: 30 g
  • Sodium: 50 mg
  • Fat: 5 g
  • Saturated Fat: 3 g
  • Unsaturated Fat: 2 g
  • Trans Fat: 0 g
  • Carbohydrates: 40 g
  • Fiber: 1 g
  • Protein: 2 g
  • Cholesterol: 20 mg

Keywords: Don't skip the orange zest! It's a game-changer for flavor. Always zest before juicing to make it easier.

Did you make this recipe?

Share a photo and tag us — we can't wait to see what you've made!

Zesty Lemon Poppy Seed Delight

One rainy afternoon, I found myself in my grandmother’s cozy kitchen, the kind that always smelled like warmth and love. She was whipping up her famous Lemon Poppy Seed Loaf, a recipe that had been passed down through generations. As the batter came together, the zesty aroma of fresh lemons filled the air, mingling perfectly with the nutty fragrance of poppy seeds. I can still picture her, apron-clad, as she expertly drizzled a vibrant citrus icing over the loaf, creating a glossy, sun-kissed finish that beckoned us to dive in. It was a moment that sparked my own passion for baking, and this recipe has become a cherished staple in my home ever since.

When you take a bite of this Lemon Poppy Seed Loaf, it’s like a burst of sunshine on your palate. The loaf is beautifully golden, with a tender crumb that melts in your mouth. Each slice is speckled with tiny poppy seeds, adding a delightful crunch that contrasts beautifully with the tangy sweetness of the lemon. And that citrus icing? It’s the finishing touch that elevates this loaf from ordinary to extraordinary, with its bright, zesty flavor dancing on your taste buds.

This recipe stands out because it embraces simplicity while delivering on flavor. I’ve added a hint of vanilla to the batter, enhancing the overall taste and making it even more indulgent. Trust me, once you make this Lemon Poppy Seed Loaf With Citrus Icing, it’ll become a go-to in your baking repertoire.

So, let me show you exactly how to make it!

Zesty Lemon Poppy Seed Delight

Why You’ll Love This Recipe

  • Moist and tender crumb that melts in your mouth, thanks to the perfect balance of butter and buttermilk.
  • Bright, zesty lemon flavor paired with crunchy poppy seeds, creating a delightful texture and taste experience.
  • Easy to whip up in just about an hour, perfect for last-minute gatherings or a cozy afternoon treat.
  • Budget-friendly with everyday ingredients, making it an accessible option for all home bakers.
  • The citrus icing adds a sweet tang that elevates the loaf, turning a simple recipe into a showstopper!

Ingredients

  • 1 ½ cups (190g) all-purpose flour
  • 1 teaspoon baking powder
  • ½ teaspoon baking soda
  • ½ teaspoon salt
  • 3 tablespoons poppy seeds
  • ½ cup (115g) unsalted butter, softened to room temperature
  • 1 cup (200g) granulated sugar
  • 2 large eggs
  • 1 teaspoon vanilla extract
  • 1 teaspoon lemon zest (from about 1 medium lemon)
  • ½ cup (120ml) buttermilk
  • 2 tablespoons fresh lemon juice

For the Citrus Icing:

  • 1 cup (120g) powdered sugar
  • 2 tablespoons fresh lemon juice
  • 1 tablespoon orange juice
  • 1 teaspoon lemon zest (for garnish, optional)

Let’s dive into the key ingredients that make this Lemon Poppy Seed Loaf so special. The all-purpose flour provides the structure and base for the loaf, while the baking powder and baking soda ensure it rises perfectly, giving the loaf a light texture. For a gluten-free variation, you could substitute the flour with a gluten-free all-purpose blend. Poppy seeds not only add a delightful crunch but also contribute to the unique flavor profile that pairs well with the citrus notes.

Unsalted butter is crucial for achieving the buttery richness that makes this loaf so moist. If you’re looking for a dairy-free option, coconut oil or a vegan butter can be used instead. The buttermilk is another essential component, providing acidity that activates the baking soda for a fluffy texture. If you don’t have buttermilk on hand, you can easily make a substitute by mixing ½ cup of milk with 1 tablespoon of vinegar or lemon juice and letting it sit for about 5 minutes.

Step-by-Step Instructions

  1. Preheat your oven to 350°F (175°C). Grease a 9×5-inch loaf pan or line it with parchment paper for easy removal later.
  2. In a medium mixing bowl, whisk together 1 ½ cups of all-purpose flour, 1 teaspoon of baking powder, ½ teaspoon of baking soda, ½ teaspoon of salt, and 3 tablespoons of poppy seeds. This helps to evenly distribute the baking agents and ensures a uniform rise.
  3. In a large mixing bowl, cream together ½ cup of softened unsalted butter and 1 cup of granulated sugar using an electric mixer on medium speed for about 3-4 minutes, until the mixture is light and fluffy. Make sure to scrape down the sides of the bowl occasionally.
  4. Add 2 large eggs, 1 teaspoon of vanilla extract, and 1 teaspoon of lemon zest to the creamed butter and sugar, mixing until fully combined. You want a smooth consistency, so ensure there are no lumps of butter.
  5. In a small bowl, combine ½ cup of buttermilk and 2 tablespoons of fresh lemon juice. Alternately add the dry ingredients and buttermilk mixture to the butter mixture, starting and ending with the dry ingredients. Mix just until combined; do not overmix, as this can lead to a dense loaf.
  6. Pour the batter into the prepared loaf pan. Smooth the top with a spatula, ensuring it’s even. Bake in the preheated oven for 50-60 minutes, or until a toothpick inserted in the center comes out clean. The edges should be lightly golden brown, and the center should feel just set.
  7. Once baked, remove the loaf from the oven and allow it to cool in the pan for about 10 minutes. Then, transfer it to a wire rack to cool completely. Resist the urge to slice too soon, as it will be crumbly if it’s still warm.
  8. While the loaf is cooling, prepare the citrus icing. In a medium bowl, whisk together 1 cup of powdered sugar, 2 tablespoons of fresh lemon juice, and 1 tablespoon of orange juice until smooth. If the icing is too thick, you can add a little more juice to reach your desired consistency.
  9. Once the loaf is completely cool, drizzle the citrus icing over the top. If you like, sprinkle with an additional teaspoon of lemon zest for an extra pop of flavor and color.

Pro Tips for the Best Lemon Poppy Seed Loaf With Citrus Icing

  • Be careful not to overmix your batter; this is a common mistake that can lead to a dense loaf. Mix just until the dry ingredients are incorporated for a light and fluffy texture.
  • Use room temperature ingredients, especially the butter and eggs. This helps to create a smoother batter and ensures even baking. Take your eggs out of the fridge about 30 minutes before you start.
  • For a more pronounced lemon flavor, consider adding a little lemon extract in addition to the zest and juice. Just a half teaspoon can elevate the citrus notes significantly.
  • When measuring your flour, spoon it into the measuring cup and level it off with a knife instead of scooping directly from the bag. This prevents packing and ensures you don’t end up with a dry loaf.
  • Invest in a good quality loaf pan; it makes a difference in heat distribution, which ensures even baking. If your pan is dark-coated, reduce the oven temperature by 25°F to prevent over-browning.

Variations & Serving Ideas

For a delightful twist, consider adding blueberries or raspberries to the batter for a fruity burst of flavor. You can also experiment with different citrus fruits—try lime or grapefruit zest and juice for a refreshing change. For a healthier option, substitute half of the all-purpose flour with whole wheat flour for added fiber without compromising too much on texture.

This Lemon Poppy Seed Loaf pairs beautifully with a light salad, such as a mixed greens salad with a vinaigrette, or a cup of tea for a cozy afternoon treat. It also complements a creamy cheese platter, as the acidity of the loaf balances rich cheeses perfectly. Lastly, a scoop of vanilla ice cream on the side creates a delightful contrast of temperatures and flavors!

Storage, Make-Ahead & Reheating

This Lemon Poppy Seed Loaf can be stored at room temperature for up to 3 days if wrapped tightly in plastic wrap. If you want to keep it longer, it freezes well for up to 3 months. To freeze, wrap the loaf tightly in plastic wrap and then in aluminum foil to prevent freezer burn.

When you’re ready to enjoy it again, simply thaw it in the fridge overnight. Reheat individual slices in the microwave for 15-20 seconds or in a toaster oven until warmed through. Interestingly, many people find that this loaf tastes even better the next day, as the flavors have time to meld!

Frequently Asked Questions

Can I make Lemon Poppy Seed Loaf With Citrus Icing ahead of time?

Yes — in fact, it tastes even better the next day! You can make the loaf a day in advance, allowing the flavors to develop. Just be sure to store it in an airtight container to maintain its moisture.

Can I substitute the poppy seeds?

Absolutely! If you don’t have poppy seeds on hand or prefer an alternative, you can use sesame seeds for a similar crunch or omit them entirely for a smooth loaf.

What can I use instead of buttermilk?

If you don’t have buttermilk, you can easily create a substitute by mixing ½ cup of milk (dairy or plant-based) with 1 tablespoon of vinegar or lemon juice. Let it sit for 5 minutes before using in the recipe.

How can I make this recipe gluten-free?

To make a gluten-free version of this Lemon Poppy Seed Loaf, substitute the all-purpose flour with a gluten-free all-purpose flour blend. Just ensure that the blend contains a binding agent like xanthan gum for the best results.

What is the best way to store leftover loaf?

Leftover Lemon Poppy Seed Loaf should be stored in an airtight container at room temperature for up to 3 days. For longer storage, wrap it tightly and freeze for up to 3 months. Thaw it before serving for the best texture.

Zesty Lemon Poppy Seed Delight

Final Thoughts

The Lemon Poppy Seed Loaf with Citrus Icing is truly a delightful treat that brings a burst of brightness to any occasion. The zesty lemon flavor combined with the subtle crunch of poppy seeds creates a satisfying balance, while the citrus icing adds a touch of sweetness that perfectly complements the loaf’s tanginess.

This is the kind of recipe I come back to again and again, especially when I want to brighten up a gloomy day or celebrate a small victory. The aroma that fills the kitchen as it bakes is absolutely heavenly! I encourage you to give this recipe a try; you might just find it becoming a beloved staple in your home. Don’t forget to share your results or even add your own unique twist—I can’t wait to see what you create!

Print
clock clock iconcutlery cutlery iconflag flag iconfolder folder iconinstagram instagram iconpinterest pinterest iconfacebook facebook iconprint print iconsquares squares iconheart heart iconheart solid heart solid icon

Lemon Poppy Seed Loaf


  • Author: Lily author
  • Total Time: 15 minute
  • Yield: 1 loaf 1x
Pin Recipe
Print Recipe

Description

This Lemon Poppy Seed Loaf is a delightful treat that combines zesty lemon flavor with crunchy poppy seeds. Topped with a citrus icing, it’s perfect for any occasion.


Ingredients

Scale
  • 1 ½ cups (190g) all-purpose flour
  • 1 teaspoon baking powder
  • ½ teaspoon baking soda
  • ½ teaspoon salt
  • 3 tablespoons poppy seeds
  • ½ cup (115g) unsalted butter, softened to room temperature
  • 1 cup (200g) granulated sugar
  • 2 large eggs
  • 1 teaspoon vanilla extract
  • 1 teaspoon lemon zest (from about 1 medium lemon)
  • ½ cup (120ml) buttermilk
  • 2 tablespoons fresh lemon juice
  • 1 cup (120g) powdered sugar
  • 2 tablespoons fresh lemon juice
  • 1 tablespoon orange juice
  • 1 teaspoon lemon zest (for garnish, optional)

Instructions

  1. Preheat your oven to 350°F (175°C). Grease a 9×5-inch loaf pan or line it with parchment paper for easy removal later.
  2. In a medium mixing bowl, whisk together 1 ½ cups of all-purpose flour, 1 teaspoon of baking powder, ½ teaspoon of baking soda, ½ teaspoon of salt, and 3 tablespoons of poppy seeds. This helps to evenly distribute the baking agents and ensures a uniform rise.
  3. In a large mixing bowl, cream together ½ cup of softened unsalted butter and 1 cup of granulated sugar using an electric mixer on medium speed for about 3-4 minutes, until the mixture is light and fluffy. Make sure to scrape down the sides of the bowl occasionally.
  4. Add 2 large eggs, 1 teaspoon of vanilla extract, and 1 teaspoon of lemon zest to the creamed butter and sugar, mixing until fully combined. You want a smooth consistency, so ensure there are no lumps of butter.
  5. In a small bowl, combine ½ cup of buttermilk and 2 tablespoons of fresh lemon juice. Alternately add the dry ingredients and buttermilk mixture to the butter mixture, starting and ending with the dry ingredients. Mix just until combined; do not overmix, as this can lead to a dense loaf.
  6. Pour the batter into the prepared loaf pan. Smooth the top with a spatula, ensuring it’s even. Bake in the preheated oven for 50-60 minutes, or until a toothpick inserted in the center comes out clean. The edges should be lightly golden brown, and the center should feel just set.
  7. Once baked, remove the loaf from the oven and allow it to cool in the pan for about 10 minutes. Then, transfer it to a wire rack to cool completely. Resist the urge to slice too soon, as it will be crumbly if it’s still warm.
  8. While the loaf is cooling, prepare the citrus icing. In a medium bowl, whisk together 1 cup of powdered sugar, 2 tablespoons of fresh lemon juice, and 1 tablespoon of orange juice until smooth. If the icing is too thick, you can add a little more juice to reach your desired consistency.
  9. Once the loaf is completely cool, drizzle the citrus icing over the top. If you like, sprinkle with an additional teaspoon of lemon zest for an extra pop of flavor and color.
  • Prep Time: 15 mins
  • Cook Time: 50-60 mins
  • Category: Dessert
  • Method: Baking
  • Cuisine: American

Nutrition

  • Serving Size: 1 slice
  • Calories: 200
  • Sugar: 15 g
  • Sodium: 150 mg
  • Fat: 8 g
  • Saturated Fat: 5 g
  • Unsaturated Fat: 3 g
  • Trans Fat: 0 g
  • Carbohydrates: 30 g
  • Fiber: 1 g
  • Protein: 3 g
  • Cholesterol: 40 mg

Keywords: Be careful not to overmix your batter; this is a common mistake that can lead to a dense loaf. Use room temperature ingredients for a smoother batter and even baking.

Did you make this recipe?

Share a photo and tag us — we can't wait to see what you've made!

  • Privacy Policy
  • Terms Of Service
  • Contact
  • About
  • GDPR

Copyright © 2025 Homesmad