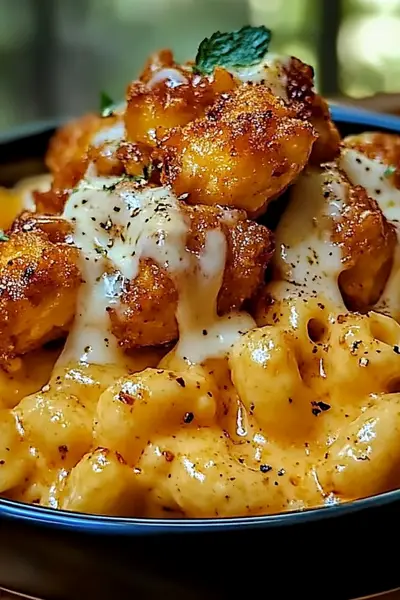
High Protein Creamy Cajun Chicken Rice is more than just a meal; it’s an experience that transports your taste buds straight to the heart of Louisiana, delivering comfort and a delightful kick in every spoonful. Imagine tender, juicy chicken pieces, generously coated in a rich, velvety cream sauce, infused with the iconic smoky and spicy notes of authentic Cajun spices, all nestled amongst perfectly cooked rice. It’s a dish that promises to satisfy not only your craving for something incredibly flavorful but also your need for a wholesome, protein-packed dinner.
The culinary world has long celebrated Cajun cuisine for its bold flavors and hearty appeal, originating from the French Acadian settlers in Louisiana. While traditionally known for its rustic charm, our rendition elevates this classic by focusing on both indulgence and nutrition. People absolutely adore this dish because it masterfully balances the vibrant, aromatic spices with a luxurious creaminess, creating a symphony of textures and tastes. The tender chicken provides a substantial bite, the rice soaks up all the incredible sauce, and the overall profile is both deeply satisfying and wonderfully comforting – a true crowd-pleaser that never disappoints.
Fuel Your Body with Flavor: High Protein Creamy Cajun Chicken Rice
What truly sets our recipe apart is its commitment to being a powerhouse of nutrition without compromising on flavor. This dish is specifically designed to fuel your body, making it an ideal choice for active individuals, busy families, or anyone looking for a delicious way to boost their protein intake. Forget bland diet food; this recipe for High Protein Creamy Cajun Chicken Rice proves that healthy eating can be utterly delicious and incredibly exciting. Get ready to dive into a bowl of pure, flavorful goodness!

Ingredients:
Creating this truly delightful and satisfying High Protein Creamy Cajun Chicken Rice dish starts with having all your wonderful ingredients ready to go. I always find that a good mise en place makes the cooking process so much more enjoyable and efficient. Here’s what you’ll need to gather:
-
For the High Protein Chicken:
- 2 lbs boneless, skinless chicken breasts or thighs, cut into bite-sized 1-inch pieces. I prefer a mix of breasts and thighs for both leanness and flavor, but either works beautifully.
- 2 tablespoons olive oil, for searing. This helps us get that gorgeous golden-brown crust on our chicken.
- 2 tablespoons high-quality Cajun seasoning. If you’re sensitive to salt, opt for a low-sodium blend. I love how this seasoning infuses the chicken with its signature spicy, earthy notes.
- 1 teaspoon garlic powder.
- 1/2 teaspoon onion powder.
- Salt and freshly ground black pepper, to taste. Even with Cajun seasoning, a little extra salt and pepper can really make the chicken pop.
-
For the Aromatic Vegetables (The Holy Trinity and More):
- 1 large yellow onion, finely diced. This is the sweet base of our dish.
- 1 green bell pepper, finely diced. For that classic Cajun color and mild bitterness.
- 1 red bell pepper, finely diced. Adding sweetness and another vibrant hue.
- 2 stalks celery, finely diced. Essential for the true Cajun flavor profile.
- 4-5 cloves garlic, minced. Because, can you ever have too much garlic in a savory dish? I think not!
-
For the Creamy Sauce & Rice:
- 2 tablespoons unsalted butter. This is for our glorious roux, which will provide richness and thickening.
- 2 tablespoons all-purpose flour. The other half of our roux equation.
- 4 cups low-sodium chicken broth. This forms the liquid base of our creamy sauce and cooks our rice to perfection.
- 1 cup heavy cream. This is where the “creamy” in High Protein Creamy Cajun Chicken Rice truly comes into play! If you want a slightly lighter version, half-and-half can be substituted.
- 1 cup uncooked long-grain white rice, rinsed thoroughly. Rinsing helps remove excess starch, preventing your rice from becoming too sticky.
- 1 tablespoon Worcestershire sauce. A secret weapon for adding a deep, umami richness.
- 1 teaspoon dried thyme. Another classic herb for Cajun cuisine.
- 1/2 teaspoon smoked paprika. Adds a beautiful smoky depth that complements the Cajun seasoning.
- 1/4 teaspoon cayenne pepper. Adjust this to your personal spice preference. I like a little kick, but you can add more or less!
-
For Garnish & Finishing:
- 1/2 cup fresh parsley, chopped. For brightness and a touch of freshness at the end.
- 1/4 cup green onions, sliced. Adds a mild oniony bite and visual appeal.
- Optional: 1/2 cup shredded Monterey Jack or sharp cheddar cheese. If you want to lean into even more creaminess and cheesy goodness, this is a fantastic addition.
Preparing Your Ingredients (Mise en Place)
Before we even think about turning on the stove, let’s get organized. This step, often called “mise en place” by professional chefs, is about having everything prepped and ready to go. It makes the entire cooking process smoother and more enjoyable, especially for a dish with as many layers of flavor as this High Protein Creamy Cajun Chicken Rice.
- First, I like to take out my boneless, skinless chicken breasts or thighs. Using a sharp knife, carefully cut them into uniform 1-inch bite-sized pieces. Uniformity is key here because it ensures that all the chicken cooks evenly. Once cut, transfer the chicken to a medium bowl.
- Now, let’s season that chicken! To the bowl with the chicken, add the 2 tablespoons of Cajun seasoning, 1 teaspoon of garlic powder, 1/2 teaspoon of onion powder, and a generous pinch of salt and freshly ground black pepper. Use your hands (I always wear gloves for this part!) to really massage the seasoning into every piece of chicken. You want each piece to be thoroughly coated and vibrant with those beautiful spices. Set this aside to marinate slightly while you prep the vegetables. Even 10-15 minutes makes a difference in flavor penetration.
- Next up, the “Holy Trinity” of Cajun cooking: onion, bell peppers, and celery. Finely dice your large yellow onion. Then, move on to the green and red bell peppers, removing the seeds and membranes before dicing them to a similar size as the onion. Finally, finely dice your two stalks of celery. Having these cut evenly ensures they cook down at the same rate, building a harmonious flavor base.
- Mince your 4-5 cloves of garlic. I like to use a garlic press for speed, but a good knife and some patience work perfectly well. Keep the minced garlic separate, as it gets added a little later in the cooking process to prevent it from burning.
- Measure out your 4 cups of low-sodium chicken broth and 1 cup of heavy cream. Having these liquids ready to pour prevents scrambling when the pan is hot.
- Rinse your 1 cup of long-grain white rice. I usually put the rice in a fine-mesh sieve and rinse it under cold running water until the water runs clear. This removes excess starch, which helps ensure our final dish isn’t gummy.
- Finally, chop your fresh parsley and slice your green onions for garnish. If you’re using cheese, shred that too. Having these vibrant finishing touches ready will make plating a breeze.
- With everything prepped and organized, you’re now ready to embark on the delicious journey of creating your spectacular High Protein Creamy Cajun Chicken Rice! This meticulous preparation sets you up for success, allowing you to focus on the cooking without interruption.
Searing the High Protein Chicken
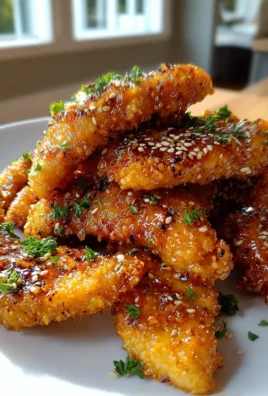
This is where we start building those incredible layers of flavor for our High Protein Creamy Cajun Chicken Rice. Searing the chicken not only cooks it but also develops a rich, browned crust that adds depth and texture to the entire dish. Don’t rush this step!
- Place a large, heavy-bottomed skillet or Dutch oven over medium-high heat. I always prefer a heavy pan because it distributes heat more evenly, which is crucial for a good sear.
- Add 2 tablespoons of olive oil to the hot pan. You want the oil to be shimmering but not smoking. If it’s smoking vigorously, your pan is too hot, and you’ll burn the chicken rather than sear it.
- Carefully add the seasoned chicken pieces to the hot pan in a single layer. This is important: Do not overcrowd the pan. If you put too many pieces in at once, the temperature of the pan will drop, and the chicken will steam instead of sear, resulting in grey, sad chicken instead of beautifully browned, flavorful chicken. You’ll likely need to do this in two or three batches. I find that leaving a little space between each piece of chicken allows for better browning.
- Let the chicken sear undisturbed for about 3-4 minutes per side. You’re looking for a beautiful, golden-brown crust to form on the outside. Resist the urge to poke or move the chicken too soon! That crust needs time to develop.
- Once beautifully browned on all sides, use tongs to transfer the seared chicken pieces to a clean plate or bowl. Don’t worry if the chicken isn’t cooked through at this point; it will finish cooking later in the creamy sauce.
- Repeat this process with any remaining chicken, adding a little more olive oil if necessary, until all your chicken is perfectly seared and waiting patiently on the side. The fond (those delicious browned bits) left at the bottom of the pan is pure gold – we’ll use that to build our sauce!
Building the Flavor Base: Sautéing Vegetables
With our chicken perfectly seared and resting, it’s time to build the aromatic foundation for our High Protein Creamy Cajun Chicken Rice. This stage is all about softening the vegetables and coaxing out their sweet, savory flavors, creating a rich backdrop for the entire dish.
- Reduce the heat in the same skillet or Dutch oven to medium. There should be some delicious browned bits (fond) stuck to the bottom of the pan – these are packed with flavor! If the pan looks a little dry, you can add about a tablespoon more olive oil or butter, but often there’s enough residual fat from the chicken.
- Add the diced onion, green bell pepper, red bell pepper, and celery (our Cajun “Holy Trinity”) to the pan. Stir them well, scraping up those flavorful fond bits from the bottom of the pan as you go. This process, called deglazing by the vegetables’ moisture, is crucial for incorporating all that beautiful flavor into our dish.
- Sauté the vegetables, stirring occasionally, for about 8-10 minutes. You want them to soften considerably and become translucent, especially the onions. They should start to smell incredibly fragrant, filling your kitchen with a wonderful aroma. Don’t rush this step; properly softened vegetables contribute immensely to the final texture and taste of the High Protein Creamy Cajun Chicken Rice.
- Once the vegetables are nice and tender, add the minced garlic to the pan. Stir it in and cook for just about 1 minute more, until the garlic is fragrant. Be careful not to burn the garlic, as burnt garlic can turn bitter and ruin the flavor profile. It cooks very quickly!
Crafting the Creamy Cajun Sauce and Cooking the Rice
This is arguably the heart of our High Protein Creamy Cajun Chicken Rice – where the rich, spicy Cajun flavors come together with the creamy texture and the rice cooks to perfection, soaking up all that goodness.
- Push the softened vegetables to one side of the pan. To the cleared side, add 2 tablespoons of unsalted butter. Let it melt completely.
- Once the butter is melted and bubbling gently, sprinkle in 2 tablespoons of all-purpose flour. Using a whisk, stir the flour into the melted butter, creating a smooth paste known as a roux.
- Cook the roux, whisking constantly, for 2-3 minutes. You’re looking for it to turn a light golden-brown color, smelling faintly nutty. This cooking process removes the raw flour taste and helps to thicken our sauce beautifully.
- Gradually whisk in the 4 cups of low-sodium chicken broth, a little at a time, incorporating each addition fully before adding more. This slow addition and constant whisking are vital for preventing lumps and ensuring a silky-smooth sauce. Keep whisking until the sauce starts to thicken slightly.
- Stir in the 1 tablespoon of Worcestershire sauce, 1 teaspoon of dried thyme, 1/2 teaspoon of smoked paprika, and 1/4 teaspoon of cayenne pepper (adjust to your heat preference). Give everything a good stir to combine all these fantastic flavors.
- Bring the sauce to a gentle simmer. Once simmering, add the rinsed 1 cup of long-grain white rice to the pan. Stir it well to ensure the rice is fully submerged and coated in the flavorful sauce.
- Reduce the heat to low, cover the pan with a tight-fitting lid, and let it simmer for 15-20 minutes. Do not lift the lid during this time! This allows the rice to steam properly and absorb all the liquid. The magic happens under that lid.
- After 15-20 minutes, remove the pan from the heat, but keep the lid on for another 5-10 minutes. This resting period allows the rice to finish absorbing any remaining liquid and ensures it’s perfectly tender and fluffy.
Bringing It All Together for Your High Protein Creamy Cajun Chicken Rice
The grand finale! Now we’ll combine all the components, infuse them with that glorious cream, and finish cooking our chicken to make the ultimate High Protein Creamy Cajun Chicken Rice.
- After the rice has rested, lift the lid. You’ll see the rice is tender and has absorbed most of the liquid. Fluff the rice gently with a fork.
- Pour in the 1 cup of heavy cream. Stir it gently into the rice and sauce mixture until everything is wonderfully combined and the sauce takes on that beautiful creamy consistency we’re aiming for. This is where the dish truly earns its “creamy” title!
- Return the seared chicken pieces to the pan. Stir them in, ensuring they are well-coated by the creamy Cajun sauce. The chicken will finish cooking through as it warms up in the sauce, soaking up even more flavor.
- Let the entire dish gently simmer on low heat for another 5-7 minutes, stirring occasionally. This allows the flavors to meld beautifully and the chicken to heat through thoroughly. Taste the dish at this point and adjust any seasonings as needed. You might want a pinch more salt, pepper, or even a dash more cayenne if you like it spicier.
- If you’re adding the optional cheese for extra decadence, now is the time! Stir in the 1/2 cup of shredded Monterey Jack or cheddar cheese until it’s fully melted and incorporated, making the dish even richer and creamier. This addition makes the High Protein Creamy Cajun Chicken Rice truly irresistible.
Finishing Touches and Serving
The dish is almost complete! Just a few final flourishes to bring everything to perfection and make your High Protein Creamy Cajun Chicken Rice restaurant-worthy.
- Remove the pan from the heat.
- Stir in most of the fresh chopped parsley and sliced green onions, reserving a small amount for garnish. The fresh herbs add a lovely pop of color and a bright, herbaceous note that cuts through the richness of the cream.
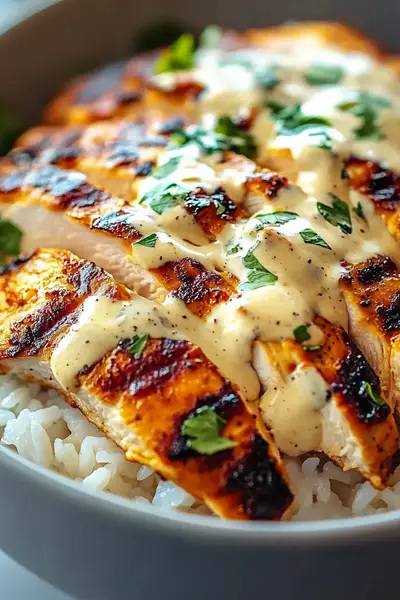
- Serve your magnificent High Protein Creamy Cajun Chicken Rice immediately. Ladle generous portions into bowls.
- Garnish each serving with the reserved fresh parsley and green onions. I sometimes like a little extra sprinkle of Cajun seasoning on top for a final flourish.
- Enjoy! This dish is hearty, flavorful, and incredibly satisfying. It’s perfect as a complete meal on its own, providing a fantastic balance of protein, carbs, and delicious vegetables. I often serve it with a simple side salad or some crusty bread to soak up any extra creamy sauce. This recipe truly delivers on its promise of a comforting and high-protein meal that will become a regular in your rotation.
Tips for the Best High Protein Creamy Cajun Chicken Rice:
- Don’t Skip the Roux: The butter and flour roux is crucial for thickening the sauce and giving it a professional, silky texture. Don’t rush its cooking; a properly cooked roux is essential for flavor.
- Rinse Your Rice: Rinsing the rice prevents excess starch from making your dish gummy, ensuring each grain is separate and perfectly cooked.
- Taste and Adjust: Always taste your dish before serving. Seasoning is personal, and you might find you want more salt, a little extra heat from cayenne, or a touch more thyme.
- Spice Level: If you love a lot of heat, feel free to increase the amount of cayenne pepper or even add a dash of your favorite hot sauce at the end.
- Leftovers: This High Protein Creamy Cajun Chicken Rice reheats beautifully! Store any leftovers in an airtight container in the refrigerator for up to 3-4 days. You might need to add a splash of broth or water when reheating to restore its creaminess.
Variations to Explore:
While this recipe for High Protein Creamy Cajun Chicken Rice is perfect as is, you can always experiment:
- Protein Swap: Instead of chicken, you could use shrimp (add them at the very end, cooking for only 2-3 minutes until pink) or even slices of smoked sausage for a different flavor profile.
- Veggie Boost: Feel free to add other vegetables like corn, diced tomatoes, or spinach during the last few minutes of simmering.
- Cheese Choices: While Monterey Jack or cheddar are fantastic, smoked Gouda or even Parmesan could offer interesting variations in flavor.
I genuinely believe you’ll adore this recipe. It’s comforting, packed with flavor, and really delivers on that promise of a delicious, high-protein meal. Enjoy making and savoring every single bite of this incredible High Protein Creamy Cajun Chicken Rice!
Conclusion:
Well, my friends, we’ve reached the grand finale of our culinary journey, and I genuinely hope you’re as excited as I am about what we’ve created here. If you’ve been searching for that perfect weeknight hero, a dish that effortlessly blends comforting warmth with an exciting flavor profile, then look no further. This isn’t just another chicken and rice recipe; it’s a vibrant explosion of taste that promises to become an instant classic in your home. I’ve poured my heart into perfecting this dish, and the result is a truly remarkable meal that’s both incredibly satisfying and wonderfully convenient.
What makes this recipe a must-try, you ask? It’s the ingenious marriage of hearty chicken and fluffy rice, enveloped in a rich, velvety sauce brimming with the complex, aromatic spices of Cajun country. Every spoonful delivers a harmonious balance of savory depth, a touch of gentle heat, and that irresistible creaminess that makes you want to close your eyes and savor the moment. Beyond its incredible flavor, it’s a powerhouse of nutrition. This High Protein Creamy Cajun Chicken Rice is meticulously designed to be a complete, balanced meal, offering substantial protein to keep you full and energized, alongside wholesome carbohydrates and delicious vegetables. It’s the kind of dish that nourishes your body while delighting your palate, making healthy eating an absolute pleasure rather than a chore. It truly stands out from other recipes because it manages to deliver gourmet-level taste with surprising ease of preparation, proving that you don’t need hours in the kitchen to create something spectacular.
When it comes to serving, this dish is incredibly versatile. While it’s utterly perfect on its own, a simple accompaniment can elevate the experience even further. I love to serve it with a crisp, refreshing green salad tossed in a light vinaigrette; the coolness and tang provide a beautiful contrast to the rich, spicy chicken and rice. Another fantastic option is a side of steamed green beans or asparagus, perhaps with a squeeze of lemon, which adds a touch of fresh brightness and extra greens to your plate. If you’re a fan of a little extra texture, a sprinkle of fresh chopped parsley or cilantro over the top just before serving adds a lovely pop of color and herbaceous freshness. For those who enjoy a heartier meal, a slice of crusty baguette or cornbread is wonderful for soaking up every last bit of that delectable creamy sauce.
Now, for the fun part: Variations to Make it Your Own!
One of the things I adore most about cooking is the freedom to experiment and customize, and this recipe is incredibly forgiving and adaptable. Don’t be afraid to put your own spin on it! If you prefer a bolder kick, feel free to increase the amount of cayenne pepper or add a dash of your favorite hot sauce. For a milder version, simply reduce the cayenne or omit it altogether. Thinking about other proteins? Shrimp makes a fantastic substitute or addition, cooked quickly at the end until just pink. Smoked sausage, like Andouille, would also be phenomenal, adding another layer of smoky, savory goodness. For my vegetarian friends, firm tofu or tempeh, properly pressed and seasoned, can stand in beautifully for the chicken. Want more veggies? Sauté some extra bell peppers (red, green, and yellow for a vibrant mix!), sliced mushrooms, or even a handful of fresh spinach into the pan during the cooking process. A sprinkle of sharp cheddar cheese or Monterey Jack on top during the last few minutes of cooking, allowing it to melt into gooey perfection, is also a decadent addition that I highly recommend if you’re feeling extra indulgent. You could even transform this into a baked casserole by transferring it to a baking dish, topping with more cheese or breadcrumbs, and baking until golden and bubbly for a fantastic potluck dish.
I truly can’t wait for you to experience the magic of this recipe in your own kitchen. It’s more than just a meal; it’s an invitation to gather around the table, share laughter, and create wonderful memories over truly delicious food. Please, give this recipe a try! I promise you won’t be disappointed. Once you’ve whipped up your own batch of this incredible chicken and rice, I would absolutely love to hear about your experience. Did you add your own unique twist? What did your family think? Snap a photo and share your culinary adventure with me and fellow food enthusiasts. Your feedback and creativity inspire me, and I cherish hearing how these recipes become a part of your lives.
So, go forth and cook, my friends! Embrace the flavors, enjoy the process, and most importantly, savor every single bite of this amazing dish. It’s a recipe that truly delivers on all fronts: flavor, comfort, health, and sheer enjoyment. Get ready to add a new favorite to your weekly rotation!
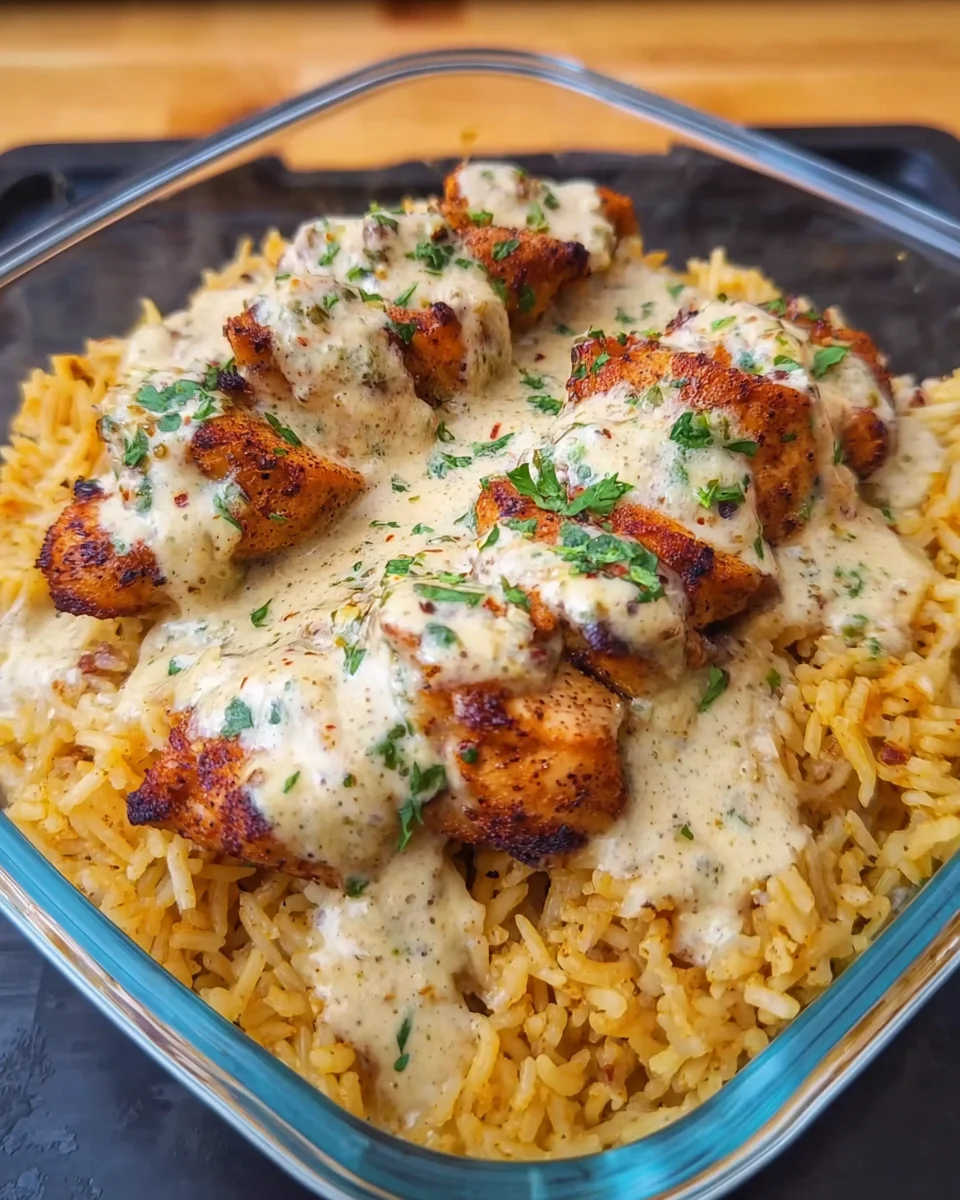
High Protein Creamy Cajun Chicken Rice
Experience the heart of Louisiana with this High Protein Creamy Cajun Chicken Rice! Tender chicken coated in a rich, velvety cream sauce infused with smoky and spicy Cajun flavors, all nestled with perfectly cooked rice. A satisfying, protein-packed meal for the whole family.
Ingredients
Instructions
Important Information
Nutrition Facts (Per Serving)
It is important to consider this information as approximate and not to use it as definitive health advice.
Allergy Information
Please check ingredients for potential allergens and consult a health professional if in doubt.