• Skip to primary navigation
  • Skip to main content
  • Skip to primary sidebar
Homesmad

Homesmad

  • Home
  • Breakfast & Brunch
  • Appetizers & Snacks
  • Dinner
  • Dessert
  • About
  • Privacy Policy
  • Contact
Homesmad
  • Home
  • Breakfast & Brunch
  • Appetizers & Snacks
  • Dinner
  • Dessert
  • About
  • Privacy Policy
  • Contact

Vanilla French Beignets Recipe – Sweet, Fluffy, Melt-in-Mouth

November 20, 2025 by Lily author

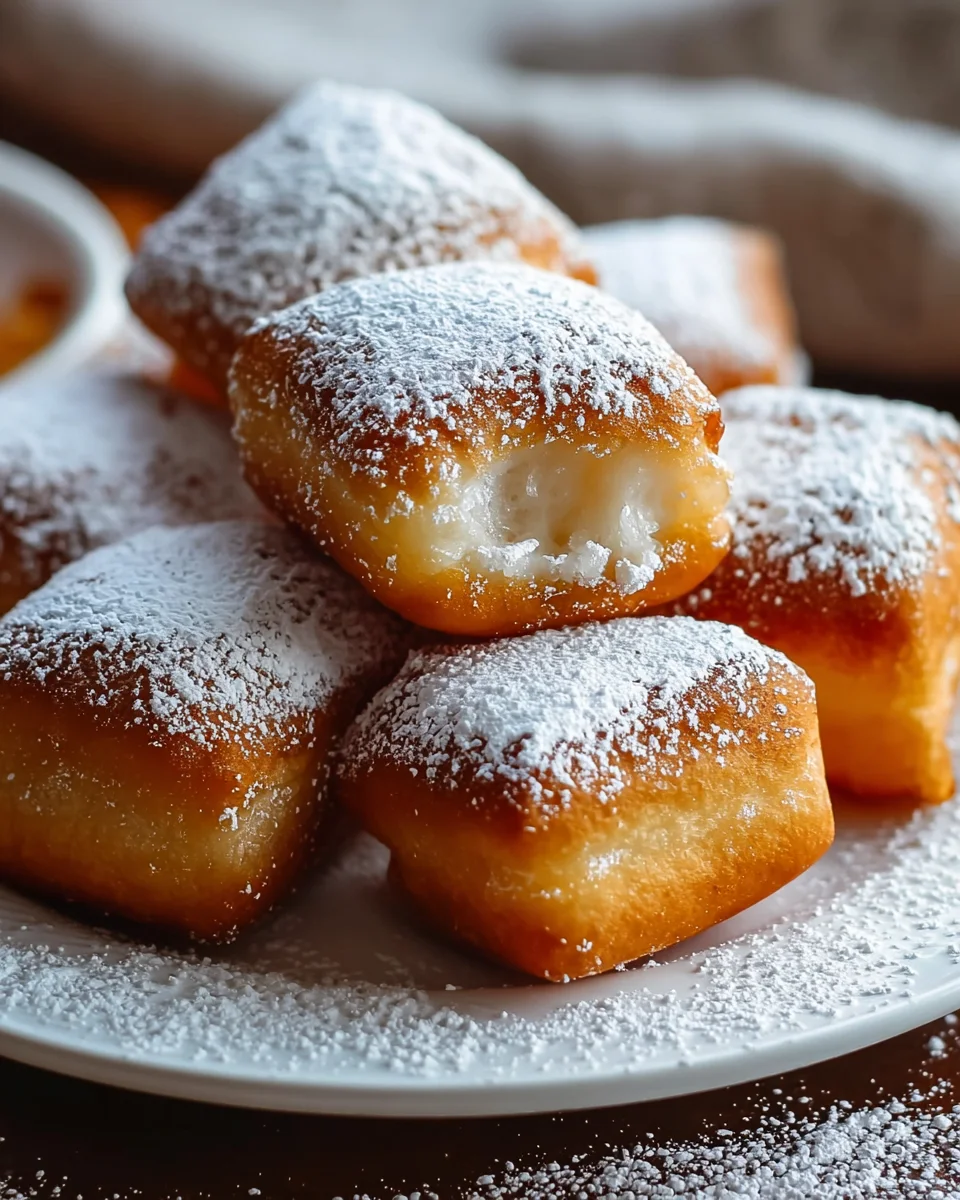
Vanilla French Beignets Recipe is more than just a dish; it’s an invitation to pure culinary bliss. Imagine biting into a warm, pillowy cloud, dusted with a generous blanket of powdered sugar, melting effortlessly in your mouth with a delicate whisper of vanilla. That’s the irresistible magic we’re about to create together.

These iconic fried dough pastries boast a rich history, tracing their origins back to France before finding their quintessential home in the vibrant heart of New Orleans. There, they became an inseparable part of Creole cuisine and a beloved, celebratory staple, especially during Mardi Gras. The mere aroma of freshly fried beignets can transport you to a bustling French Quarter cafe, evoking a sense of nostalgic comfort and joy.

People adore this treat for its unparalleled lightness, the subtle crunch of its golden exterior giving way to an incredibly soft, airy interior. My particular take, this Vanilla French Beignets Recipe, enhances that classic experience by infusing every bite with a delightful, aromatic vanilla essence that perfectly complements the rich, warm dough. This Vanilla French Beignets Recipe is designed to bring that authentic, café-quality indulgence right into your kitchen. Get ready to fill your home with an exquisite aroma and your table with an unforgettable taste experience.

Vanilla French Beignets Recipe – Sweet, Fluffy, Melt-in-Mouth this RECIPE

Ingredients:

  • For the Dough:
    • 1 cup (240ml) whole milk, warmed to 105-115°F (40-46°C)
    • 2 ¼ teaspoons (1 packet) active dry yeast
    • ½ cup (100g) granulated sugar, plus 1 teaspoon for yeast activation
    • ½ teaspoon salt
    • 4 large eggs, at room temperature, lightly beaten
    • ½ cup (113g) unsalted butter, melted and cooled slightly
    • 1 tablespoon pure vanilla extract
    • 4 ½ to 5 cups (540-600g) all-purpose flour, plus more for dusting your work surface
  • For Frying:
    • 6-8 cups (approx. 1.5-2 liters) vegetable oil, canola oil, or peanut oil, specifically for deep frying
  • For Dusting:
    • 1-2 cups (120-240g) powdered sugar (also known as confectioners’ sugar)

Preparing the Dough:

  1. Activate the Yeast: In a generously sized mixing bowl (or the bowl of your stand mixer if you’re using one, fitted with the dough hook attachment), combine the warm milk with 1 teaspoon of granulated sugar. The warmth of the milk is key here – it needs to be just right, not too hot to kill the yeast, and not too cold to inhibit its activity. Sprinkle the active dry yeast evenly over the surface of this warm milk and sugar mixture. Give it a gentle stir, just once or twice, to ensure all the yeast granules are moistened. Now, simply let it sit undisturbed for a peaceful 5-10 minutes. During this time, you’re looking for visible signs of life: the mixture should become delightfully foamy and bubbly on top, indicating that your yeast is indeed active, thriving, and ready to get to work. If you don’t see this characteristic foam, it means your yeast might be expired, or your milk’s temperature was off, and you’ll need to discard this batch and begin this step anew to ensure your beignets rise beautifully.
  2. Combine Wet Ingredients: To your now actively foamy yeast mixture, carefully add the remaining ½ cup of granulated sugar, the ½ teaspoon of salt, the lightly beaten room-temperature eggs, the unsalted butter which you’ve melted and allowed to cool slightly (we don’t want to cook the eggs or shock the yeast with hot butter!), and the fragrant 1 tablespoon of pure vanilla extract. Whisk these ingredients together thoroughly until they are all well combined and homogenous. At this stage, the mixture will have a wonderfully inviting, subtly sweet aroma, giving you a sneak peek into the delicious vanilla French beignets you’re about to create.
  3. Incorporate Flour: Now it’s time to bring in the main structural component: the flour! Gradually add the all-purpose flour to your wet mixture, one cup at a time. After each addition, make sure to mix thoroughly until the flour is mostly incorporated before adding the next cup. If you’re utilizing a stand mixer, begin on a low speed to prevent a flour cloud from forming, then once the flour is mixed in, you can increase to a medium-low speed. If you’re mixing by hand, grab a sturdy wooden spoon or a robust spatula; this dough will get quite thick! Start with 4 ½ cups of flour and only add the remaining ½ cup if the dough still appears excessively sticky and wet. Your ultimate goal is to achieve a dough that is soft and slightly sticky to the touch. It should largely pull away from the sides of your mixing bowl, but it’s perfectly normal for it to cling just a little bit to the very bottom, indicating it has enough moisture for a tender result.
  4. Knead the Dough: This step is vital for developing the gluten, which gives beignets their signature chewiness and airy structure.

    • Using a Stand Mixer: Once you’ve incorporated most of the flour, increase your mixer’s speed to medium-low. Allow the dough hook to knead the dough for a dedicated 7-10 minutes. Over this period, you’ll observe a remarkable transformation: the dough will evolve from a shaggy mass into a smooth, elastic, and noticeably less sticky ball. When properly kneaded, it should feel wonderfully pliable and bouncy, stretching without tearing easily.
    • Kneading by Hand: If you’re going old-school and kneading by hand, turn the dough out onto a lightly floured clean work surface. Knead the dough vigorously for 10-15 minutes. The technique involves pushing the dough away from you with the heel of your hand, then folding it back over itself, and rotating it slightly. Continue this rhythmic motion until the dough takes on that desirable smooth, elastic texture and springs back when you gently poke it with your finger. While it’s certainly a bit of a workout for your arms, the satisfaction of feeling the dough develop under your hands is an incredibly rewarding part of the baking process.
  5. First Proofing (Rising): Lightly grease a large, clean mixing bowl with a tiny bit of neutral vegetable oil or a quick spray of cooking spray. Transfer your beautifully kneaded dough into this bowl, and then give the dough one turn to ensure its entire surface is coated with a thin film of oil. This simple step is crucial as it prevents a dry, crusty skin from forming on your dough as it rises. Now, cover the bowl securely with plastic wrap or a clean, damp kitchen towel. Place the covered bowl in a warm, draft-free environment. Excellent spots often include a slightly warm oven (you can preheat it to its lowest setting for just a minute or two, then turn it off completely before placing the dough in), or simply on top of your refrigerator, where it’s usually a bit warmer. Allow the dough to rise for a generous 1 ½ to 2 hours, or until you can clearly see that it has gloriously doubled in size. This initial, primary rise is absolutely critical for both developing the rich flavor and achieving the wonderful light texture of your vanilla French beignets.

Shaping and Second Proofing:

  1. Punch Down the Dough: After the dough has completed its impressive first rise and doubled in size, gently but firmly punch it down. This action releases the accumulated gases, helping to relax the gluten structure and redistribute the yeast cells, which ultimately leads to a finer, more even crumb texture in your finished beignets.
  2. Roll Out the Dough: Lightly flour a clean and spacious work surface. Turn the dough out onto this floured area. Using a rolling pin, gently and evenly roll the dough into a large rectangular shape. Aim for a consistent thickness of approximately ½ inch (1.25 cm) across the entire surface of the rectangle. Maintaining an even thickness is key to ensuring that all your beignets cook uniformly when they hit the hot oil. Try to resist the urge to over-flour your surface, as excessive flour can be absorbed by the dough, potentially leading to tougher beignets.
  3. Cut the Beignets: Now for the fun part! Using a sharp knife, a pizza cutter, or a pastry wheel, carefully cut the rolled-out dough into individual 2-inch (5 cm) squares. While this is the traditional size, you can certainly opt for slightly larger or smaller squares based on your personal preference. However, remember that consistency in size is truly important for achieving even frying results. If you prefer a round shape, a cookie cutter can be used, though the classic French beignet is almost always square. Don’t waste those precious scraps! Gently gather any leftover dough, lightly press them together, and re-roll them once more to cut additional beignets, minimizing any waste.
  4. Second Proofing: Line one or two large baking sheets with a sheet of parchment paper. Carefully transfer the freshly cut dough squares to your prepared baking sheets, making sure to leave about an inch of space between each beignet to allow for their inevitable expansion during this final rise. Loosely cover the baking sheets with plastic wrap or a clean, light kitchen towel. Place them once again in a warm, draft-free spot for their second and final proofing. Let them rise for another 30-45 minutes, or until they look noticeably puffy, lighter, and feel quite airy. This crucial final rise is what gives the beignets that magnificent, cloud-like, delicate texture once they are fried.

Frying the Beignets:

  1. Prepare for Frying: While your beignets are enjoying their second proof, it’s the perfect time to set up your frying station for a smooth and safe process. In a large, heavy-bottomed pot or a sturdy Dutch oven, pour enough vegetable oil, canola oil, or peanut oil to reach a depth of 3-4 inches (7.5-10 cm). Securely attach a deep-fry thermometer to the side of the pot, ensuring that the tip is fully submerged in the oil but not touching the bottom of the pot. You’ll also want to have a slotted spoon or a spider utensil readily available for turning and removing the beignets. Finally, prepare a landing zone: line a large baking sheet with several layers of paper towels, or set up a wire rack over a baking sheet, to allow the fried beignets to drain thoroughly.
  2. Heat the Oil: Place your pot with the oil over a medium-high heat. Slowly and carefully heat the oil to a precise and consistent temperature of 350°F (175°C). Maintaining the correct oil temperature is absolutely paramount for crafting perfect, non-greasy beignets. If your oil is too cool, the beignets will greedily absorb too much oil, resulting in a heavy and greasy texture. Conversely, if the oil is too hot, they will brown excessively quickly on the outside, creating a crisp shell while remaining disappointingly raw and doughy in the center. Continuously monitor your thermometer and adjust the heat as needed to keep that temperature stable and spot-on.
  3. Fry the Beignets in Batches: Once your oil has reached the ideal 350°F (175°C), carefully and gently drop 3-4 beignets into the hot oil. It’s incredibly important not to overcrowd the pot, as doing so will cause the oil temperature to drop significantly, leading to uneven cooking and greasy beignets. The moment they hit the oil, your beignets should almost immediately begin to puff up dramatically and float to the surface, a truly magical sight!
  4. Cook and Turn: Allow the beignets to fry for approximately 1-2 minutes per side, or until they achieve a gorgeous, even golden brown color. Use your slotted spoon or spider to gently flip them over, ensuring they cook evenly on both sides. As they fry, you’ll marvel at how they continue to puff up, creating that characteristic hollow center and wonderfully light, airy texture. The delightful aroma filling your kitchen will be an unmistakable sign that something truly delicious is underway!
  5. Drain Excess Oil: Once your beignets are beautifully golden brown on both sides, carefully remove them from the hot oil using your slotted spoon. Pause for a moment, allowing any excess oil to drip back into the pot. Then, transfer the freshly fried beignets to your prepared paper towel-lined baking sheet or wire rack to drain further. This step is essential for absorbing any remaining surface oil, ensuring your beignets are light and not overly greasy. Continue this process with the remaining beignets, always remembering to keep a close eye on your oil temperature and adjusting the heat as necessary between batches to maintain that perfect 350°F.

Finishing and Serving:

  1. Dust with Powdered Sugar: As soon as the beignets have drained for a minute or two and are still wonderfully warm (but not so piping hot that the sugar melts instantly), it’s time for their iconic finish! Generously dust them with powdered sugar. There are a couple of excellent ways to do this: you can place a few beignets at a time into a large bowl with the powdered sugar and gently toss them until evenly coated. Alternatively, you can arrange them on a wire rack and use a fine-mesh sieve to sprinkle the sugar lavishly over the tops. The residual warmth of the beignets is key here, as it helps the powdered sugar to adhere beautifully, creating that unmistakable, sweet, and powdery coating that is synonymous with vanilla French beignets.
  2. Serve Immediately: For the ultimate experience, beignets are undeniably best enjoyed warm and absolutely fresh from the fryer. That delicate crispness on the outside, the ethereal soft and airy interior, perfectly complemented by the generous dusting of powdered sugar, creates a truly incomparable delight that, sadly, diminishes with time. So, gather your loved ones without delay and share these delectable treats right away! They make a perfect accompaniment to a robust cup of coffee, a creamy cafe au lait, or simply a refreshing glass of cold milk.
  3. Storage (Optional): If by some miracle you happen to have any leftovers – which, let’s be honest, is a rare occurrence when beignets are involved! – they can be stored in an airtight container at room temperature for up to one day. However, do be aware that they will inevitably lose their fresh crispness and become softer. A quick warm-up in a toaster oven or even a brief spell in a conventional oven can somewhat revive them, but it’s important to remember that truly nothing quite compares to the magic of a beignet served fresh and warm.

Vanilla French Beignets Recipe – Sweet, Fluffy, Melt-in-Mouth

Conclusion:

And so, we arrive at the sweet conclusion of our culinary adventure! If there’s one treat I could wholeheartedly recommend you whisk up in your own kitchen this weekend, it would undoubtedly be these divine beignets. I promise you, the effort is incredibly rewarding, and the memories you’ll create with loved ones over a platter of these warm, sugar-dusted beauties are simply priceless. What makes this particular offering a true must-try isn’t just its elegant simplicity, but the sheer joy it brings from the very first bite. Imagine the delicate crunch as you break through the golden-brown exterior, giving way to an incredibly soft, airy interior that practically melts in your mouth. The subtle, yet profoundly comforting, aroma of vanilla fills the air as they fry, a scent that promises warmth, comfort, and a touch of indulgence. There’s something truly magical about a freshly fried beignet, straight from the pan, still warm and pillowy soft, with just the right dusting of confectioners’ sugar. It’s an experience that transcends a simple dessert; it’s a moment of pure, unadulterated bliss that transports you straight to a quaint Parisian café, even if you’re just in your own kitchen.

Elevate Your Beignet Experience: Serving & Variation Suggestions

While a generous dusting of powdered sugar is the quintessential way to enjoy these exquisite pastries, don’t be afraid to get creative with your serving! For a classic pairing, serve your beignets alongside a strong cup of coffee, a frothy latte, or a chicory-infused café au lait. The slight bitterness of the coffee beautifully complements the sweetness of the pastry. If you’re feeling a little more adventurous, consider a side of fresh berries – raspberries, blueberries, or sliced strawberries add a vibrant burst of color and a lovely tart counterpoint. A warm fruit compote, perhaps apple cinnamon or mixed berry, can also be a delightful accompaniment, offering a saucy texture that soaks beautifully into the tender dough. For those with an insatiable sweet tooth, a rich chocolate dipping sauce or a decadent caramel drizzle can turn your beignets into an even more luxurious dessert. And why stop there? While the Vanilla French Beignets Recipe shines brightly on its own, you can subtly vary the flavor profile. Try adding a hint of orange or lemon zest to the dough for a bright, citrusy lift, or a pinch of cinnamon or nutmeg for a cozy, autumnal twist. You could even experiment with a light cream cheese filling or a fruit jam injected after frying, though purists will argue the simple, airy void is part of their charm. Whichever way you choose to serve them, these beignets are guaranteed to impress and delight.

Your Culinary Adventure Awaits!

Now that you have all the tips and encouragement you need, I genuinely hope this has inspired you to roll up your sleeves and try this truly rewarding recipe. There’s a unique satisfaction that comes from creating something so delicious from scratch, and I promise you, the aroma alone is worth the journey. Don’t be intimidated; this recipe is designed to be approachable, and the steps are straightforward. Imagine the smiles you’ll bring to the faces of your family and friends when you present them with a plate piled high with these delectable treats. Life is about savoring the sweet moments, and making these beignets is definitely one of them. So, go on, embrace your inner baker, and bring a touch of French café magic into your home. I would absolutely love to hear about your experience! Please share your triumphs, your tips, and your serving ideas with me. Happy baking, and happy eating!


Vanilla French Beignets Recipe – Sweet, Fluffy, Melt-in-Mouth

Imagine biting into a warm, pillowy cloud, dusted with powdered sugar, melting effortlessly in your mouth with a delicate whisper of vanilla. These iconic fried dough pastries boast a rich history from France to New Orleans, adored for their unparalleled lightness and soft, airy interior. This recipe enhances that classic experience with aromatic vanilla essence.

Prep Time
P0DT0H40M
Cook Time
P0DT0H30M
Total Time
P0DT4H15M
Servings
2-3 dozen beignets

Ingredients


Instructions


Important Information

Nutrition Facts (Per Serving)

It is important to consider this information as approximate and not to use it as definitive health advice.

Allergy Information

Please check ingredients for potential allergens and consult a health professional if in doubt.

« Previous Post
Smashburger Quesadillas: Juicy Beef & Melty Cheese Delight!
Next Post »
Air Fryer Pizza Rolls: Crispy, Golden & Delicious Delight!

If you enjoyed this…

Perfect Pumpkin Waffles: Easy, Fluffy & Family-Friendly

Gin-Flavored Gingerbread Pancakes: Warm & Spicy

Homemade Apple Butter: Cinnamon & Clove Perfection

Primary Sidebar

Browse by Diet

BreakfastDinnerLunchDessertAppetizer

Sweet Peach Yogurt Parfait Delight

One of my fondest memories is from a lazy summer afternoon spent at my grandmother’s house. The sun filtered through the kitchen window, casting a warm glow over the table where she would create her culinary magic. It was during one of those blissful moments that I first tasted her Peach Yogurt Parfait with Honey and Granola. The sweet aroma of ripe peaches mingling with creamy yogurt and the crunch of granola was nothing short of heavenly. It felt like summer captured in a bowl, and I still remember the joy of diving in with a spoon, each layer revealing a new burst of flavor.

When I think about that parfait, I can almost hear the gentle hum of the bees outside, reminding me of the floral notes that honey brings to every bite. The vibrant yellows and soft oranges of the peaches contrast beautifully with the creamy white yogurt and the golden crunch of granola. It’s a dish that not only looks delightful but also tastes like a celebration of fresh, wholesome ingredients.

What makes my version of this Peach Yogurt Parfait special is the careful balance of flavors and textures. I use ripe, juicy peaches, drizzled with locally sourced honey, and a homemade granola that’s bursting with nuts and seeds for an extra crunch. It’s a simple dish, but every layer is crafted with love and attention.

Let me show you exactly how to make this delightful parfait, so you can bring a bit of that summer magic into your kitchen!

Sweet Peach Yogurt Parfait Delight

Why You’ll Love This Recipe

  • Delightfully creamy texture from the Greek yogurt, paired with the juicy sweetness of fresh peaches.
  • Ready in under 20 minutes, making it a quick and satisfying breakfast or snack option.
  • Budget-friendly, using common ingredients that you may already have in your pantry.
  • Customizable with your favorite granola and nuts, allowing you to tailor each parfait to your taste.
  • Perfectly balanced flavors with the bright acidity of lemon juice and the sweetness of honey enhancing the peaches.

Ingredients

  • For the Parfait:
  • 2 cups plain Greek yogurt (or vanilla yogurt for a sweeter option)
  • 2 large ripe peaches, diced (about 2 cups)
  • 1 tablespoon fresh lemon juice (to prevent browning of peaches)
  • 2 tablespoons honey (plus more for drizzling)
  • 1 teaspoon vanilla extract (optional for extra flavor)
  • For the Granola:
  • 1 cup granola (store-bought or homemade; see notes for a simple granola recipe)
  • 1/4 cup sliced almonds (optional for added crunch)
  • 1/4 cup shredded coconut (optional for added flavor)

Let’s dive into some key ingredients that make this Peach Yogurt Parfait so delightful! First, the Greek yogurt is not only creamy but also packed with protein, making it a satisfying option for breakfast or a snack. If you’re looking for a sweeter option, you can easily substitute it with vanilla yogurt, though it may alter the overall flavor balance. Next, the ripe peaches are the star of the show; their natural sweetness shines through, so I recommend choosing peaches that yield slightly to pressure, indicating they’re perfectly ripe. If peaches aren’t in season, feel free to use nectarines or even frozen peaches—just thaw them before use. Finally, honey adds a lovely floral sweetness that ties everything together. If you prefer, maple syrup can serve as a delicious substitute.

Step-by-Step Instructions

  1. Start by preparing the peaches. Wash them thoroughly, then slice and dice them into bite-sized pieces. In a medium bowl, toss the diced peaches with 1 tablespoon of fresh lemon juice to prevent browning. Set aside for about 5 minutes while the lemon juice works its magic.
  2. In a separate bowl, combine the Greek yogurt, 2 tablespoons of honey, and 1 teaspoon of vanilla extract if using. Stir the mixture until smooth and thoroughly blended. This should take about a minute. Avoid overmixing to maintain the creaminess of the yogurt.
  3. Now it’s time to layer your parfait. Grab a clear glass or bowl to showcase your beautiful creation. Start with a generous spoonful of the yogurt mixture at the bottom—about 1/4 cup will do. Use a spoon to spread it evenly.
  4. Add a layer of the diced peaches over the yogurt, ensuring they cover the yogurt completely. You might want to use about half of what you have prepared—roughly 1 cup. This layer should be visually appealing, so arrange the peaches neatly.
  5. Sprinkle 1/4 cup of granola over the peaches. This adds a delightful crunch. Make sure to distribute it evenly to ensure every bite has that satisfying texture. Avoid packing it down too tightly, as you want it to maintain its crunch.
  6. Repeat the layers: spoon in another 1/4 cup of yogurt, followed by another cup of peaches, and another sprinkle of granola. You should have at least two layers, but feel free to add more depending on your glass size.
  7. Finish off your parfait with a drizzle of honey on top for added sweetness and a touch of elegance. If you’re using sliced almonds or shredded coconut, sprinkle them on top now. It adds a lovely visual contrast and extra flavor.
  8. Serve immediately or refrigerate for up to 30 minutes before serving to allow the flavors to meld together. However, I recommend enjoying it fresh to maintain the granola’s crunch.

Pro Tips for the Best Peach Yogurt Parfait With Honey And Granola

  • Make sure to choose ripe peaches for the best flavor and texture. A common mistake is using unripe fruit, which can lead to a less enjoyable parfait. Look for peaches that are fragrant and slightly soft to the touch.
  • Use a clear glass to assemble your parfait; this not only makes for a beautiful presentation but also allows you to see the colorful layers, which adds to the enjoyment of eating it.
  • For an even creamier texture, consider whipping the Greek yogurt with a hand mixer for a couple of minutes before layering. This small adjustment makes a huge difference in mouthfeel.
  • Be mindful of the granola-to-yogurt ratio. Too much granola can overwhelm the parfait, while too little can make it feel too creamy. Aim for about 1/4 cup of granola per layer for the perfect balance.
  • If you’re making this for a gathering, consider preparing the yogurt and peaches ahead of time and layering them just before serving. This ensures the granola stays crunchy!

Variations & Serving Ideas

There are so many ways to get creative with your Peach Yogurt Parfait! For a tropical twist, swap out the peaches for mangoes or pineapples and top with coconut flakes. If you prefer a berry flavor, mix in some blueberries or strawberries with the peaches for added color and taste. For a nutty version, incorporate chopped walnuts or pecans instead of almonds.

As for serving ideas, this parfait pairs beautifully with a side of scrambled eggs for a hearty breakfast or fresh fruit salad for a light lunch. You might also enjoy it alongside whole grain toast with almond butter for an energizing snack. The contrast of flavors and textures will elevate your meal experience!

Storage, Make-Ahead & Reheating

The Peach Yogurt Parfait is best enjoyed fresh, but you can prepare some components ahead of time. Store the layered parfait in an airtight container in the refrigerator for up to 24 hours. However, be cautious; the granola may lose its crunch if stored too long. You can freeze the yogurt and peach mixture for up to 2 months; just remember to thaw it in the refrigerator overnight before serving.

If you plan to enjoy this dish the next day, it can taste even better as the flavors meld together. Just remember to add the granola right before serving to keep its delightful crunch!

Frequently Asked Questions

Can I make Peach Yogurt Parfait With Honey And Granola ahead of time?

Yes — in fact, it tastes even better the next day as the flavors meld. However, I recommend waiting to add the granola until just before serving to maintain its crunch.

What can I substitute for Greek yogurt?

If you prefer a lighter option, you can substitute Greek yogurt with regular yogurt or a dairy-free alternative like coconut yogurt. Just remember that this may alter the creaminess and flavor profile slightly.

Can I use frozen peaches for this parfait?

Absolutely! Just make sure to thaw the frozen peaches before using them. They will still add great flavor, though the texture may be slightly softer than fresh peaches.

How do I make the parfait vegan?

To make a vegan version, substitute the Greek yogurt with a plant-based yogurt alternative, and replace honey with maple syrup or agave nectar. This keeps the parfait sweet while adhering to a vegan diet.

What other fruits can I use in this recipe?

You can mix and match fruits based on your preference. Try using strawberries, blueberries, raspberries, or even bananas. Just make sure to adjust the lemon juice as needed to prevent browning.

Sweet Peach Yogurt Parfait Delight

Final Thoughts

The Peach Yogurt Parfait with Honey and Granola is a delightful blend of creamy yogurt, sweet peaches, and crunchy granola that creates a satisfying and nourishing treat. Each layer bursts with flavor, making it a perfect choice for breakfast or a light dessert.

This is the kind of recipe I come back to again and again, especially when I want something refreshing and wholesome to start my day. The harmony of sweet and tart flavors, combined with the delightful crunch, never fails to lift my spirits!

I encourage you to give this parfait a try and indulge in its comforting goodness. Feel free to share your results or even add your own twist—perhaps a sprinkle of cinnamon or a handful of nuts. Enjoy creating your perfect parfait!

Print
clock clock iconcutlery cutlery iconflag flag iconfolder folder iconinstagram instagram iconpinterest pinterest iconfacebook facebook iconprint print iconsquares squares iconheart heart iconheart solid heart solid icon

Peach Yogurt Parfait


  • Author: Lily author
  • Total Time: 15 minutes
  • Yield: 4 servings 1x
Pin Recipe
Print Recipe

Description

This Peach Yogurt Parfait combines creamy Greek yogurt, juicy peaches, and crunchy granola for a delightful treat. It’s a perfect breakfast or snack that captures the essence of summer in every bite.


Ingredients

Scale
  • For the Parfait:
  • 2 cups plain Greek yogurt (or vanilla yogurt for a sweeter option)
  • 2 large ripe peaches, diced (about 2 cups)
  • 1 tablespoon fresh lemon juice (to prevent browning of peaches)
  • 2 tablespoons honey (plus more for drizzling)
  • 1 teaspoon vanilla extract (optional for extra flavor)
  • For the Granola:
  • 1 cup granola (store-bought or homemade; see notes for a simple granola recipe)
  • 1/4 cup sliced almonds (optional for added crunch)
  • 1/4 cup shredded coconut (optional for added flavor)

Instructions

  1. Start by preparing the peaches. Wash them thoroughly, then slice and dice them into bite-sized pieces. In a medium bowl, toss the diced peaches with 1 tablespoon of fresh lemon juice to prevent browning. Set aside for about 5 minutes while the lemon juice works its magic.
  2. In a separate bowl, combine the Greek yogurt, 2 tablespoons of honey, and 1 teaspoon of vanilla extract if using. Stir the mixture until smooth and thoroughly blended. This should take about a minute. Avoid overmixing to maintain the creaminess of the yogurt.
  3. Now it’s time to layer your parfait. Grab a clear glass or bowl to showcase your beautiful creation. Start with a generous spoonful of the yogurt mixture at the bottom—about 1/4 cup will do. Use a spoon to spread it evenly.
  4. Add a layer of the diced peaches over the yogurt, ensuring they cover the yogurt completely. You might want to use about half of what you have prepared—roughly 1 cup. This layer should be visually appealing, so arrange the peaches neatly.
  5. Sprinkle 1/4 cup of granola over the peaches. This adds a delightful crunch. Make sure to distribute it evenly to ensure every bite has that satisfying texture. Avoid packing it down too tightly, as you want it to maintain its crunch.
  6. Repeat the layers: spoon in another 1/4 cup of yogurt, followed by another cup of peaches, and another sprinkle of granola. You should have at least two layers, but feel free to add more depending on your glass size.
  7. Finish off your parfait with a drizzle of honey on top for added sweetness and a touch of elegance. If you’re using sliced almonds or shredded coconut, sprinkle them on top now. It adds a lovely visual contrast and extra flavor.
  8. Serve immediately or refrigerate for up to 30 minutes before serving to allow the flavors to meld together. However, I recommend enjoying it fresh to maintain the granola’s crunch.
  • Prep Time: 15 mins
  • Cook Time: 0 mins
  • Category: Breakfast
  • Method: No-cook
  • Cuisine: American

Nutrition

  • Serving Size: 1 parfait
  • Calories: 250
  • Sugar: 20 g
  • Sodium: 50 mg
  • Fat: 5 g
  • Saturated Fat: 2 g
  • Unsaturated Fat: 3 g
  • Trans Fat: 0 g
  • Carbohydrates: 40 g
  • Fiber: 3 g
  • Protein: 10 g
  • Cholesterol: 10 mg

Keywords: Choose ripe peaches for the best flavor and texture. Use a clear glass for a beautiful presentation. For creaminess, consider whipping the yogurt before layering. Be mindful of the granola-to-yogurt ratio. Prepare yogurt and peaches ahead of time for gatherings, layering just before serving.

Did you make this recipe?

Share a photo and tag us — we can't wait to see what you've made!

Sun-Kissed Frozen Orange Cream Slush

As a child, summer days felt like they lasted forever. I remember the sticky heat wrapping around me as I played outside, my laughter mingling with the sounds of the neighborhood. But nothing could cool me down quite like the moment I’d spot my grandmother, laboring over her blender, whipping up her famous Frozen Orange Creamsicle Slush. That vibrant orange treat, with its frosty texture and sweet citrus aroma, was like a burst of sunshine in a cup. Just one sip, and I could feel the coolness wash over me, sparking pure joy.

This Frozen Orange Creamsicle Slush has a way of making you feel like a kid again. Its creamy, dreamy consistency is a delightful balance of bright orange and soft vanilla, inviting you to dive right in. The refreshing tang of orange dances on your tongue, while the smooth creaminess envelops you in a comforting embrace. It’s a nostalgic treat that’s perfect for hot summer afternoons or anytime you need a little pick-me-up.

What makes my version of this slush stand out is the addition of a hint of vanilla bean, which elevates the flavor and adds an extra layer of richness. Plus, it’s super easy to whip up with just a few simple ingredients that you probably already have on hand! So, if you’re ready to relive those sun-soaked memories, let me show you exactly how to make it.

Sun-Kissed Frozen Orange Cream Slush

Why You’ll Love This Recipe

  • Each slush is a perfect blend of creamy vanilla and zesty orange, creating a nostalgic flavor reminiscent of summer days.
  • This refreshing treat is ready in under 15 minutes, making it an ideal quick dessert for unexpected guests or hot afternoons.
  • With just 8 simple ingredients, it’s budget-friendly, ensuring you don’t have to break the bank to enjoy a delicious slush.
  • The slush has a perfectly smooth texture, thanks to the combination of ice and ice cream, providing a delightful contrast to the bright citrus flavors.
  • It’s highly customizable; you can easily adjust the sweetness and add fresh herbs for a unique twist that suits your taste.

Ingredients

  • 2 cups orange juice (freshly squeezed or store-bought)
  • 1 cup vanilla ice cream
  • 1 cup crushed ice
  • 1/2 cup milk (whole or 2%)
  • 1/4 cup granulated sugar (adjust based on sweetness preference)
  • 1 teaspoon vanilla extract
  • Zest of 1 orange (for added flavor)
  • Fresh orange slices and mint leaves (for garnish)

The star of this Frozen Orange Creamsicle Slush is the orange juice, which provides the vibrant, citrusy base. Freshly squeezed juice will yield the brightest flavor, but store-bought options can be just as convenient. If you’re opting for store-bought, choose 100% pure juice with no added sugars for the best results. Another essential ingredient is the vanilla ice cream; it adds creaminess and sweetness. You can substitute it with dairy-free ice cream if you’re looking for a vegan option. Whole or 2% milk complements the ice cream, creating a smooth blend. If you want a lower-calorie version, almond or oat milk can be good alternatives.

Lastly, the granulated sugar can be adjusted based on your sweetness preference. If you prefer a more natural sweetener, consider using honey or agave syrup. The orange zest enhances the flavor profile, providing an aromatic pop that brings the whole slush together. Don’t skip it! It adds an extra layer of brightness that makes this slush truly special.

Step-by-Step Instructions

  1. Start by preparing your ingredients. Gather 2 cups of orange juice, 1 cup of vanilla ice cream, and 1 cup of crushed ice. Make sure the ice is finely crushed, as larger chunks can make blending difficult.
  2. In a blender, combine the orange juice, vanilla ice cream, crushed ice, and 1/2 cup of milk. Add 1/4 cup of granulated sugar and 1 teaspoon of vanilla extract. If you like a sweeter slush, consider adding a bit more sugar at this stage.
  3. Add the zest of 1 orange to the blender. This step is crucial for enhancing the citrus flavor of your slush. Make sure not to include the bitter white pith—only the flavorful zest.
  4. Blend the mixture on medium-high speed for about 30-45 seconds. Stop once the ingredients are fully combined and the slush has a smooth, even consistency. If you notice large chunks of ice, blend for an additional 10-15 seconds. Avoid over-blending, as this can make the slush too liquidy.
  5. Once blended, taste the slush. If it needs more sweetness, add a little more sugar and blend for a few more seconds. If it’s too thick, you can add a splash of milk to reach your desired consistency.
  6. Pour the slush into glasses. This recipe typically serves 4, but you can easily double it for larger gatherings. Use a spoon to help guide the slush into the glasses if needed.
  7. Garnish each serving with fresh orange slices and mint leaves. The mint not only adds a pop of color but also a refreshing aroma that complements the citrus flavors beautifully.
  8. Serve immediately and enjoy! If you’ve made extra, you can refrigerate it for a short time, but it’s best enjoyed fresh.

Pro Tips for the Best Frozen Orange Creamsicle Slush

  • Don’t skip the orange zest! It’s a game-changer for flavor. Always zest before juicing to make it easier.
  • Use a high-powered blender for the best texture. A standard blender may struggle with ice, leading to uneven consistency. If you have a food processor, that can work too, but ensure the ice is finely crushed.
  • Adjust the ice-to-liquid ratio carefully. If your slush is too thick, it won’t blend well. Start with less ice and add more until you reach your preferred texture.
  • Be cautious with the sugar! Always start with the lower amount, as you can easily add more, but it’s hard to fix an overly sweet slush.
  • For a fun twist, consider adding a splash of coconut milk or a handful of fresh fruit like strawberries or pineapple. This not only enhances the flavor but also adds a beautiful color contrast.

Variations & Serving Ideas

There are countless ways to put a spin on your Frozen Orange Creamsicle Slush. Consider making a tropical version by adding in some pineapple juice or coconut milk for a delightful tropical twist. If you’re feeling adventurous, try incorporating a handful of frozen mango or peach slices for added sweetness. For a lighter version, swap out the vanilla ice cream for Greek yogurt for a creamy yet tangy alternative.

As for serving ideas, this refreshing slush pairs wonderfully with light summer dishes like grilled chicken skewers, fish tacos, or a simple salad topped with citrus vinaigrette. The bright, zesty flavors of the slush complement these dishes perfectly, making them an ideal pairing for a sunny day.

Storage, Make-Ahead & Reheating

This Frozen Orange Creamsicle Slush is best enjoyed fresh, but if you have leftovers, you can store them in an airtight container in the fridge for up to 2 days. Just keep in mind that the slush may lose some of its texture over time as the ice melts. It doesn’t freeze well, as the ice will turn into a solid block. If you must freeze it, blend again after thawing to restore the slushy consistency. This treat is best the day you make it, as the flavors meld together beautifully overnight, enhancing its deliciousness.

Frequently Asked Questions

Can I make Frozen Orange Creamsicle Slush ahead of time?

Yes — in fact, it tastes even better the next day as the flavors meld. However, it’s best to enjoy it fresh, as the texture can change if stored for too long. If you need to prepare it ahead, keep it in the fridge and re-blend before serving.

What kind of orange juice should I use?

For the best flavor, use freshly squeezed orange juice. However, if you’re short on time, opt for 100% pure store-bought juice without added sugars. This will ensure that your slush remains flavorful and refreshing.

Can I substitute the vanilla ice cream?

Absolutely! If you’re looking for a dairy-free option, coconut milk ice cream or a non-dairy vanilla ice cream can work wonderfully. They will still provide the creamy texture and sweetness you desire.

How can I adjust the sweetness of my slush?

You can easily adjust the sweetness by modifying the amount of sugar added. Start with 1/4 cup and taste the mixture before blending. If you prefer it sweeter, add more sugar gradually until it reaches your desired level.

What should I do if my slush is too thick?

If your slush is too thick, simply add a splash of milk or orange juice and blend again. This will help achieve a more drinkable consistency while maintaining the slushy texture. Adjust gradually to reach your preferred thickness.

Sun-Kissed Frozen Orange Cream Slush

Final Thoughts

The Frozen Orange Creamsicle Slush is a delightful blend of refreshing citrus and creamy goodness, making it a perfect treat for warm days or any time you crave a taste of nostalgia. The way the bright orange flavor dances with the creamy texture truly elevates this slush, transforming it into a satisfying escape from the everyday.

This is the kind of recipe I come back to again and again, especially when I’m looking to cool down or impress guests at a summer gathering. It’s simple to make and always brings smiles all around! I encourage you to try this recipe for yourself—don’t hesitate to share your results or even put your own spin on it. Happy slushing!

Print
clock clock iconcutlery cutlery iconflag flag iconfolder folder iconinstagram instagram iconpinterest pinterest iconfacebook facebook iconprint print iconsquares squares iconheart heart iconheart solid heart solid icon

Frozen Orange Creamsicle Slush


  • Author: Lily author
  • Total Time: 15 minutes
  • Yield: 4 servings 1x
Pin Recipe
Print Recipe

Description

This Frozen Orange Creamsicle Slush is a refreshing treat that combines creamy vanilla and zesty orange flavors. Perfect for hot summer days, it brings back nostalgic memories with every sip.


Ingredients

Scale
  • 2 cups orange juice (freshly squeezed or store-bought)
  • 1 cup vanilla ice cream
  • 1 cup crushed ice
  • 1/2 cup milk (whole or 2%)
  • 1/4 cup granulated sugar (adjust based on sweetness preference)
  • 1 teaspoon vanilla extract
  • Zest of 1 orange (for added flavor)
  • Fresh orange slices and mint leaves (for garnish)

Instructions

  1. Start by preparing your ingredients. Gather 2 cups of orange juice, 1 cup of vanilla ice cream, and 1 cup of crushed ice. Make sure the ice is finely crushed, as larger chunks can make blending difficult.
  2. In a blender, combine the orange juice, vanilla ice cream, crushed ice, and 1/2 cup of milk. Add 1/4 cup of granulated sugar and 1 teaspoon of vanilla extract. If you like a sweeter slush, consider adding a bit more sugar at this stage.
  3. Add the zest of 1 orange to the blender. This step is crucial for enhancing the citrus flavor of your slush. Make sure not to include the bitter white pith—only the flavorful zest.
  4. Blend the mixture on medium-high speed for about 30-45 seconds. Stop once the ingredients are fully combined and the slush has a smooth, even consistency. If you notice large chunks of ice, blend for an additional 10-15 seconds. Avoid over-blending, as this can make the slush too liquidy.
  5. Once blended, taste the slush. If it needs more sweetness, add a little more sugar and blend for a few more seconds. If it’s too thick, you can add a splash of milk to reach your desired consistency.
  6. Pour the slush into glasses. This recipe typically serves 4, but you can easily double it for larger gatherings. Use a spoon to help guide the slush into the glasses if needed.
  7. Garnish each serving with fresh orange slices and mint leaves. The mint not only adds a pop of color but also a refreshing aroma that complements the citrus flavors beautifully.
  8. Serve immediately and enjoy! If you’ve made extra, you can refrigerate it for a short time, but it's best enjoyed fresh.
  • Prep Time: 15 min
  • Cook Time: 0 min
  • Category: Dessert
  • Method: Blending
  • Cuisine: American

Nutrition

  • Serving Size: 1 serving
  • Calories: 200
  • Sugar: 30 g
  • Sodium: 50 mg
  • Fat: 5 g
  • Saturated Fat: 3 g
  • Unsaturated Fat: 2 g
  • Trans Fat: 0 g
  • Carbohydrates: 40 g
  • Fiber: 1 g
  • Protein: 2 g
  • Cholesterol: 20 mg

Keywords: Don't skip the orange zest! It's a game-changer for flavor. Always zest before juicing to make it easier.

Did you make this recipe?

Share a photo and tag us — we can't wait to see what you've made!

Zesty Lemon Poppy Seed Delight

One rainy afternoon, I found myself in my grandmother’s cozy kitchen, the kind that always smelled like warmth and love. She was whipping up her famous Lemon Poppy Seed Loaf, a recipe that had been passed down through generations. As the batter came together, the zesty aroma of fresh lemons filled the air, mingling perfectly with the nutty fragrance of poppy seeds. I can still picture her, apron-clad, as she expertly drizzled a vibrant citrus icing over the loaf, creating a glossy, sun-kissed finish that beckoned us to dive in. It was a moment that sparked my own passion for baking, and this recipe has become a cherished staple in my home ever since.

When you take a bite of this Lemon Poppy Seed Loaf, it’s like a burst of sunshine on your palate. The loaf is beautifully golden, with a tender crumb that melts in your mouth. Each slice is speckled with tiny poppy seeds, adding a delightful crunch that contrasts beautifully with the tangy sweetness of the lemon. And that citrus icing? It’s the finishing touch that elevates this loaf from ordinary to extraordinary, with its bright, zesty flavor dancing on your taste buds.

This recipe stands out because it embraces simplicity while delivering on flavor. I’ve added a hint of vanilla to the batter, enhancing the overall taste and making it even more indulgent. Trust me, once you make this Lemon Poppy Seed Loaf With Citrus Icing, it’ll become a go-to in your baking repertoire.

So, let me show you exactly how to make it!

Zesty Lemon Poppy Seed Delight

Why You’ll Love This Recipe

  • Moist and tender crumb that melts in your mouth, thanks to the perfect balance of butter and buttermilk.
  • Bright, zesty lemon flavor paired with crunchy poppy seeds, creating a delightful texture and taste experience.
  • Easy to whip up in just about an hour, perfect for last-minute gatherings or a cozy afternoon treat.
  • Budget-friendly with everyday ingredients, making it an accessible option for all home bakers.
  • The citrus icing adds a sweet tang that elevates the loaf, turning a simple recipe into a showstopper!

Ingredients

  • 1 ½ cups (190g) all-purpose flour
  • 1 teaspoon baking powder
  • ½ teaspoon baking soda
  • ½ teaspoon salt
  • 3 tablespoons poppy seeds
  • ½ cup (115g) unsalted butter, softened to room temperature
  • 1 cup (200g) granulated sugar
  • 2 large eggs
  • 1 teaspoon vanilla extract
  • 1 teaspoon lemon zest (from about 1 medium lemon)
  • ½ cup (120ml) buttermilk
  • 2 tablespoons fresh lemon juice

For the Citrus Icing:

  • 1 cup (120g) powdered sugar
  • 2 tablespoons fresh lemon juice
  • 1 tablespoon orange juice
  • 1 teaspoon lemon zest (for garnish, optional)

Let’s dive into the key ingredients that make this Lemon Poppy Seed Loaf so special. The all-purpose flour provides the structure and base for the loaf, while the baking powder and baking soda ensure it rises perfectly, giving the loaf a light texture. For a gluten-free variation, you could substitute the flour with a gluten-free all-purpose blend. Poppy seeds not only add a delightful crunch but also contribute to the unique flavor profile that pairs well with the citrus notes.

Unsalted butter is crucial for achieving the buttery richness that makes this loaf so moist. If you’re looking for a dairy-free option, coconut oil or a vegan butter can be used instead. The buttermilk is another essential component, providing acidity that activates the baking soda for a fluffy texture. If you don’t have buttermilk on hand, you can easily make a substitute by mixing ½ cup of milk with 1 tablespoon of vinegar or lemon juice and letting it sit for about 5 minutes.

Step-by-Step Instructions

  1. Preheat your oven to 350°F (175°C). Grease a 9×5-inch loaf pan or line it with parchment paper for easy removal later.
  2. In a medium mixing bowl, whisk together 1 ½ cups of all-purpose flour, 1 teaspoon of baking powder, ½ teaspoon of baking soda, ½ teaspoon of salt, and 3 tablespoons of poppy seeds. This helps to evenly distribute the baking agents and ensures a uniform rise.
  3. In a large mixing bowl, cream together ½ cup of softened unsalted butter and 1 cup of granulated sugar using an electric mixer on medium speed for about 3-4 minutes, until the mixture is light and fluffy. Make sure to scrape down the sides of the bowl occasionally.
  4. Add 2 large eggs, 1 teaspoon of vanilla extract, and 1 teaspoon of lemon zest to the creamed butter and sugar, mixing until fully combined. You want a smooth consistency, so ensure there are no lumps of butter.
  5. In a small bowl, combine ½ cup of buttermilk and 2 tablespoons of fresh lemon juice. Alternately add the dry ingredients and buttermilk mixture to the butter mixture, starting and ending with the dry ingredients. Mix just until combined; do not overmix, as this can lead to a dense loaf.
  6. Pour the batter into the prepared loaf pan. Smooth the top with a spatula, ensuring it’s even. Bake in the preheated oven for 50-60 minutes, or until a toothpick inserted in the center comes out clean. The edges should be lightly golden brown, and the center should feel just set.
  7. Once baked, remove the loaf from the oven and allow it to cool in the pan for about 10 minutes. Then, transfer it to a wire rack to cool completely. Resist the urge to slice too soon, as it will be crumbly if it’s still warm.
  8. While the loaf is cooling, prepare the citrus icing. In a medium bowl, whisk together 1 cup of powdered sugar, 2 tablespoons of fresh lemon juice, and 1 tablespoon of orange juice until smooth. If the icing is too thick, you can add a little more juice to reach your desired consistency.
  9. Once the loaf is completely cool, drizzle the citrus icing over the top. If you like, sprinkle with an additional teaspoon of lemon zest for an extra pop of flavor and color.

Pro Tips for the Best Lemon Poppy Seed Loaf With Citrus Icing

  • Be careful not to overmix your batter; this is a common mistake that can lead to a dense loaf. Mix just until the dry ingredients are incorporated for a light and fluffy texture.
  • Use room temperature ingredients, especially the butter and eggs. This helps to create a smoother batter and ensures even baking. Take your eggs out of the fridge about 30 minutes before you start.
  • For a more pronounced lemon flavor, consider adding a little lemon extract in addition to the zest and juice. Just a half teaspoon can elevate the citrus notes significantly.
  • When measuring your flour, spoon it into the measuring cup and level it off with a knife instead of scooping directly from the bag. This prevents packing and ensures you don’t end up with a dry loaf.
  • Invest in a good quality loaf pan; it makes a difference in heat distribution, which ensures even baking. If your pan is dark-coated, reduce the oven temperature by 25°F to prevent over-browning.

Variations & Serving Ideas

For a delightful twist, consider adding blueberries or raspberries to the batter for a fruity burst of flavor. You can also experiment with different citrus fruits—try lime or grapefruit zest and juice for a refreshing change. For a healthier option, substitute half of the all-purpose flour with whole wheat flour for added fiber without compromising too much on texture.

This Lemon Poppy Seed Loaf pairs beautifully with a light salad, such as a mixed greens salad with a vinaigrette, or a cup of tea for a cozy afternoon treat. It also complements a creamy cheese platter, as the acidity of the loaf balances rich cheeses perfectly. Lastly, a scoop of vanilla ice cream on the side creates a delightful contrast of temperatures and flavors!

Storage, Make-Ahead & Reheating

This Lemon Poppy Seed Loaf can be stored at room temperature for up to 3 days if wrapped tightly in plastic wrap. If you want to keep it longer, it freezes well for up to 3 months. To freeze, wrap the loaf tightly in plastic wrap and then in aluminum foil to prevent freezer burn.

When you’re ready to enjoy it again, simply thaw it in the fridge overnight. Reheat individual slices in the microwave for 15-20 seconds or in a toaster oven until warmed through. Interestingly, many people find that this loaf tastes even better the next day, as the flavors have time to meld!

Frequently Asked Questions

Can I make Lemon Poppy Seed Loaf With Citrus Icing ahead of time?

Yes — in fact, it tastes even better the next day! You can make the loaf a day in advance, allowing the flavors to develop. Just be sure to store it in an airtight container to maintain its moisture.

Can I substitute the poppy seeds?

Absolutely! If you don’t have poppy seeds on hand or prefer an alternative, you can use sesame seeds for a similar crunch or omit them entirely for a smooth loaf.

What can I use instead of buttermilk?

If you don’t have buttermilk, you can easily create a substitute by mixing ½ cup of milk (dairy or plant-based) with 1 tablespoon of vinegar or lemon juice. Let it sit for 5 minutes before using in the recipe.

How can I make this recipe gluten-free?

To make a gluten-free version of this Lemon Poppy Seed Loaf, substitute the all-purpose flour with a gluten-free all-purpose flour blend. Just ensure that the blend contains a binding agent like xanthan gum for the best results.

What is the best way to store leftover loaf?

Leftover Lemon Poppy Seed Loaf should be stored in an airtight container at room temperature for up to 3 days. For longer storage, wrap it tightly and freeze for up to 3 months. Thaw it before serving for the best texture.

Zesty Lemon Poppy Seed Delight

Final Thoughts

The Lemon Poppy Seed Loaf with Citrus Icing is truly a delightful treat that brings a burst of brightness to any occasion. The zesty lemon flavor combined with the subtle crunch of poppy seeds creates a satisfying balance, while the citrus icing adds a touch of sweetness that perfectly complements the loaf’s tanginess.

This is the kind of recipe I come back to again and again, especially when I want to brighten up a gloomy day or celebrate a small victory. The aroma that fills the kitchen as it bakes is absolutely heavenly! I encourage you to give this recipe a try; you might just find it becoming a beloved staple in your home. Don’t forget to share your results or even add your own unique twist—I can’t wait to see what you create!

Print
clock clock iconcutlery cutlery iconflag flag iconfolder folder iconinstagram instagram iconpinterest pinterest iconfacebook facebook iconprint print iconsquares squares iconheart heart iconheart solid heart solid icon

Lemon Poppy Seed Loaf


  • Author: Lily author
  • Total Time: 13 minute
  • Yield: 1 loaf 1x
Pin Recipe
Print Recipe

Description

This Lemon Poppy Seed Loaf is a delightful treat that combines zesty lemon flavor with crunchy poppy seeds. Topped with a citrus icing, it’s perfect for any occasion.


Ingredients

Scale
  • 1 ½ cups (190g) all-purpose flour
  • 1 teaspoon baking powder
  • ½ teaspoon baking soda
  • ½ teaspoon salt
  • 3 tablespoons poppy seeds
  • ½ cup (115g) unsalted butter, softened to room temperature
  • 1 cup (200g) granulated sugar
  • 2 large eggs
  • 1 teaspoon vanilla extract
  • 1 teaspoon lemon zest (from about 1 medium lemon)
  • ½ cup (120ml) buttermilk
  • 2 tablespoons fresh lemon juice
  • 1 cup (120g) powdered sugar
  • 2 tablespoons fresh lemon juice
  • 1 tablespoon orange juice
  • 1 teaspoon lemon zest (for garnish, optional)

Instructions

  1. Preheat your oven to 350°F (175°C). Grease a 9×5-inch loaf pan or line it with parchment paper for easy removal later.
  2. In a medium mixing bowl, whisk together 1 ½ cups of all-purpose flour, 1 teaspoon of baking powder, ½ teaspoon of baking soda, ½ teaspoon of salt, and 3 tablespoons of poppy seeds. This helps to evenly distribute the baking agents and ensures a uniform rise.
  3. In a large mixing bowl, cream together ½ cup of softened unsalted butter and 1 cup of granulated sugar using an electric mixer on medium speed for about 3-4 minutes, until the mixture is light and fluffy. Make sure to scrape down the sides of the bowl occasionally.
  4. Add 2 large eggs, 1 teaspoon of vanilla extract, and 1 teaspoon of lemon zest to the creamed butter and sugar, mixing until fully combined. You want a smooth consistency, so ensure there are no lumps of butter.
  5. In a small bowl, combine ½ cup of buttermilk and 2 tablespoons of fresh lemon juice. Alternately add the dry ingredients and buttermilk mixture to the butter mixture, starting and ending with the dry ingredients. Mix just until combined; do not overmix, as this can lead to a dense loaf.
  6. Pour the batter into the prepared loaf pan. Smooth the top with a spatula, ensuring it’s even. Bake in the preheated oven for 50-60 minutes, or until a toothpick inserted in the center comes out clean. The edges should be lightly golden brown, and the center should feel just set.
  7. Once baked, remove the loaf from the oven and allow it to cool in the pan for about 10 minutes. Then, transfer it to a wire rack to cool completely. Resist the urge to slice too soon, as it will be crumbly if it’s still warm.
  8. While the loaf is cooling, prepare the citrus icing. In a medium bowl, whisk together 1 cup of powdered sugar, 2 tablespoons of fresh lemon juice, and 1 tablespoon of orange juice until smooth. If the icing is too thick, you can add a little more juice to reach your desired consistency.
  9. Once the loaf is completely cool, drizzle the citrus icing over the top. If you like, sprinkle with an additional teaspoon of lemon zest for an extra pop of flavor and color.
  • Prep Time: 15 mins
  • Cook Time: 50-60 mins
  • Category: Dessert
  • Method: Baking
  • Cuisine: American

Nutrition

  • Serving Size: 1 slice
  • Calories: 200
  • Sugar: 15 g
  • Sodium: 150 mg
  • Fat: 8 g
  • Saturated Fat: 5 g
  • Unsaturated Fat: 3 g
  • Trans Fat: 0 g
  • Carbohydrates: 30 g
  • Fiber: 1 g
  • Protein: 3 g
  • Cholesterol: 40 mg

Keywords: Be careful not to overmix your batter; this is a common mistake that can lead to a dense loaf. Use room temperature ingredients for a smoother batter and even baking.

Did you make this recipe?

Share a photo and tag us — we can't wait to see what you've made!

  • Privacy Policy
  • Terms Of Service
  • Contact
  • About
  • GDPR

Copyright © 2025 Homesmad