• Skip to primary navigation
  • Skip to main content
  • Skip to primary sidebar
Homesmad

Homesmad

  • Home
  • Breakfast & Brunch
  • Appetizers & Snacks
  • Dinner
  • Dessert
  • About
  • Privacy Policy
  • Contact
Homesmad
  • Home
  • Breakfast & Brunch
  • Appetizers & Snacks
  • Dinner
  • Dessert
  • About
  • Privacy Policy
  • Contact

Air Fryer Pizza Rolls: Crispy, Golden & Delicious Delight!

November 20, 2025 by Lily author

Air Fryer Pizza Rolls Discover The Crispy Delight, and prepare to elevate your snack game to an entirely new level! Remember those classic, comforting pizza rolls we all loved as kids? While undeniably delicious, they often fell short on achieving that perfect golden crispiness when prepared in the oven or microwave. Well, I’m here to tell you that the air fryer changes everything, transforming these beloved bites into an irresistible treat with an unparalleled crunch that will truly amaze your taste buds.

The enduring appeal of pizza, in its countless forms, holds a special place in global cuisine, symbolizing comfort, shared joy, and simple deliciousness. Pizza rolls themselves, a staple in many households, especially for quick snacks or appetizers, carry a delightful wave of nostalgia for countless individuals. They are the go-to solution for those sudden cravings, offering a convenient, bite-sized package bursting with savory tomato sauce, gooey cheese, and flavorful pepperoni.

What truly makes the air fryer method a game-changer for this beloved snack is the incredible texture it imparts. Gone are the days of soggy bottoms or unevenly cooked edges. With the air fryer, you effortlessly achieve a beautifully golden-brown exterior that shatters perfectly with each bite, revealing a steaming, molten core of cheesy, saucy goodness. This optimal texture, combined with their inherent convenience and delicious taste, is precisely why people absolutely adore the Air Fryer Pizza Rolls Discover The Crispy Delight experience. It’s quick, it’s easy, and it consistently delivers on every single delicious promise!

Air Fryer Pizza Rolls: Crispy, Golden & Delicious Delight! this RECIPE

Ingredients:

  • 1 tube (13.8 ounces) refrigerated pizza dough: I find the pre-made dough in a can is super convenient for these rolls. You can also use fresh dough from your local pizzeria or grocery store, just make sure it’s at room temperature for easier handling.
  • ½ cup pizza sauce: Your favorite brand works perfectly. I often opt for a rich, flavorful marinara, but a spicier sauce can add a fun kick!
  • 1 ½ cups shredded mozzarella cheese: Low-moisture, part-skim mozzarella is ideal here. It melts beautifully without making the rolls too watery. You could also experiment with a blend of mozzarella and provolone for extra flavor.
  • ½ cup mini pepperoni slices: Mini pepperonis are fantastic because they distribute more evenly throughout the rolls. If you only have regular-sized ones, just give them a quick chop!
  • 2 tablespoons olive oil: A light olive oil is perfect for brushing on the rolls, helping them get that gorgeous golden-brown and extra crispy exterior that defines Air Fryer Pizza Rolls Discover The Crispy Delight.
  • Optional additions: A sprinkle of dried Italian seasoning, garlic powder, or red pepper flakes for an extra flavor boost. Grated Parmesan cheese for serving is also a delightful touch.
  • Dipping sauces: Marinara, ranch dressing, or garlic butter for serving.

Preparing Your Ingredients for Air Fryer Pizza Rolls:

Before we even think about assembling these delightful treats, a little preparation goes a long way to ensure a smooth and enjoyable cooking experience. I always like to have everything laid out and ready to go; it makes the process feel much more like a fun culinary adventure and less like a chore. First, let’s talk about that pizza dough. If you’re using refrigerated dough in a tube, gently unroll it onto a lightly floured surface. I find that allowing the dough to sit at room temperature for about 10-15 minutes before unrolling makes it much more pliable and less prone to tearing. If your dough feels a little stiff, just be patient with it; a warm kitchen helps immensely. Gently stretch it out a bit if needed, aiming for a roughly rectangular shape, about 10×15 inches, but don’t obsess over perfect dimensions. The beauty of homemade-style rolls is their rustic charm.

Next, get your cheeses ready. While pre-shredded mozzarella is convenient, I often recommend shredding your own cheese from a block if you have the time. Freshly shredded cheese melts more smoothly and can prevent a slightly greasy texture that sometimes comes with pre-packaged varieties. For the pepperoni, if you’re using full-sized slices, take a moment to chop them into smaller, more manageable pieces. This ensures every bite of your Air Fryer Pizza Rolls Discover The Crispy Delight gets a good distribution of that savory pepperoni flavor. Having your pizza sauce measured out and ready, along with your olive oil and any chosen seasonings, will make the assembly process a breeze. A little bit of foresight now will pay off with perfectly prepared ingredients, setting the stage for truly spectacular Air Fryer Pizza Rolls.

Assembling Your Delicious Air Fryer Pizza Rolls:

This is where the magic really starts to happen! Don’t be intimidated; assembling these rolls is incredibly satisfying, and the end result – those crispy, cheesy, savory pockets – will be well worth your effort.

  1. Prepare Your Work Surface: First things first, lightly flour a clean, dry surface. This prevents the dough from sticking and makes handling much easier. Carefully unroll your refrigerated pizza dough onto this surface. If your dough springs back a bit, give it a minute or two to relax, then gently stretch it out to form an even rectangle, approximately 10×15 inches. I try to make sure the thickness is as uniform as possible across the entire sheet, as this helps with even baking.
  2. Spread the Sauce with Care: Now for the delicious pizza sauce! Pour your ½ cup of pizza sauce onto the dough. Using the back of a spoon or an offset spatula, spread the sauce evenly over the entire surface of the dough, leaving about a ½-inch border clear around all edges. This clear border is crucial for properly sealing the rolls later, ensuring all that cheesy goodness stays inside. Be mindful not to overload the sauce; too much will make the rolls soggy and difficult to seal, detracting from the crispiness we’re aiming for in our Air Fryer Pizza Rolls Discover The Crispy Delight.
  3. Layer on the Cheese: Next, generously sprinkle your 1 ½ cups of shredded mozzarella cheese over the sauce-covered dough. Distribute it as evenly as possible right up to the edge of the sauce. Don’t be shy with the cheese; it’s what gives these pizza rolls their gooey, stretchy interior! If you’re adding any other cheeses, like provolone or Parmesan, this is the time to add them on top of the mozzarella.
  4. Add Your Favorite Toppings: Now for the star toppings! Scatter your ½ cup of mini pepperoni slices evenly over the cheese. This is also the perfect moment to add any other small toppings you might be using, such as finely diced peppers, mushrooms, or cooked sausage crumbles. Remember, keeping the toppings relatively small and not overly abundant helps maintain the integrity of the roll and ensures even cooking. Overstuffing can lead to rolls that burst open during air frying.
  5. The Art of Rolling: This step is key to compact, well-structured pizza rolls. Starting from one of the longer sides of the rectangle, carefully but firmly begin to roll the dough up tightly, like you would a jelly roll. As you roll, try to keep the log as taut as possible without tearing the dough. This tightness is essential for creating those beautiful swirls of filling and preventing the rolls from unraveling during cooking. Continue rolling until you reach the opposite long edge.
  6. Sealing the Deal: Once you’ve rolled the dough into a log, you’ll have a seam where the dough meets. Take a moment to pinch this seam closed along the entire length of the log. I usually use my fingertips to gently press and seal it shut. If it feels a little dry, you can lightly moisten your fingers with a tiny bit of water or olive oil to help the dough adhere. This seal is very important to keep all the delicious fillings contained within.
  7. Cutting Your Rolls: With your seam-sealed dough log in front of you, it’s time to cut it into individual pizza rolls. Using a sharp knife or a serrated knife (which I find works wonders for cutting through dough cleanly without squishing), carefully slice the log into 1-inch thick rounds. You should get approximately 15-18 rolls, depending on the length of your dough and how consistently you cut them. Try to make the cuts clean and straight to ensure each roll cooks evenly. Place the cut rolls seam-side down on your floured surface or a parchment-lined baking sheet as you go. They’ll look like adorable little spirals of pizza goodness, ready to become the most amazing Air Fryer Pizza Rolls Discover The Crispy Delight you’ve ever tasted!

Cooking Your Air Fryer Pizza Rolls to Golden Perfection:

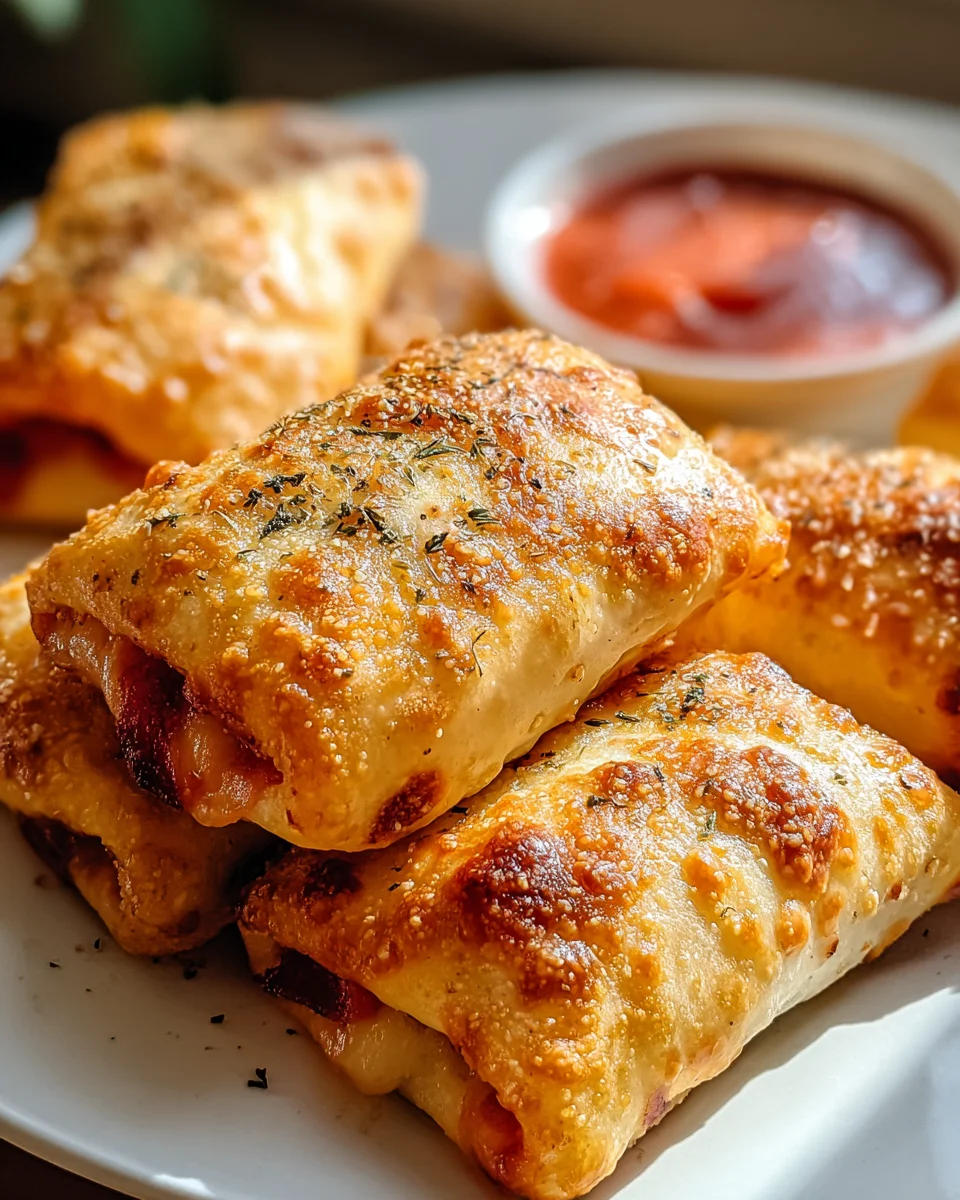
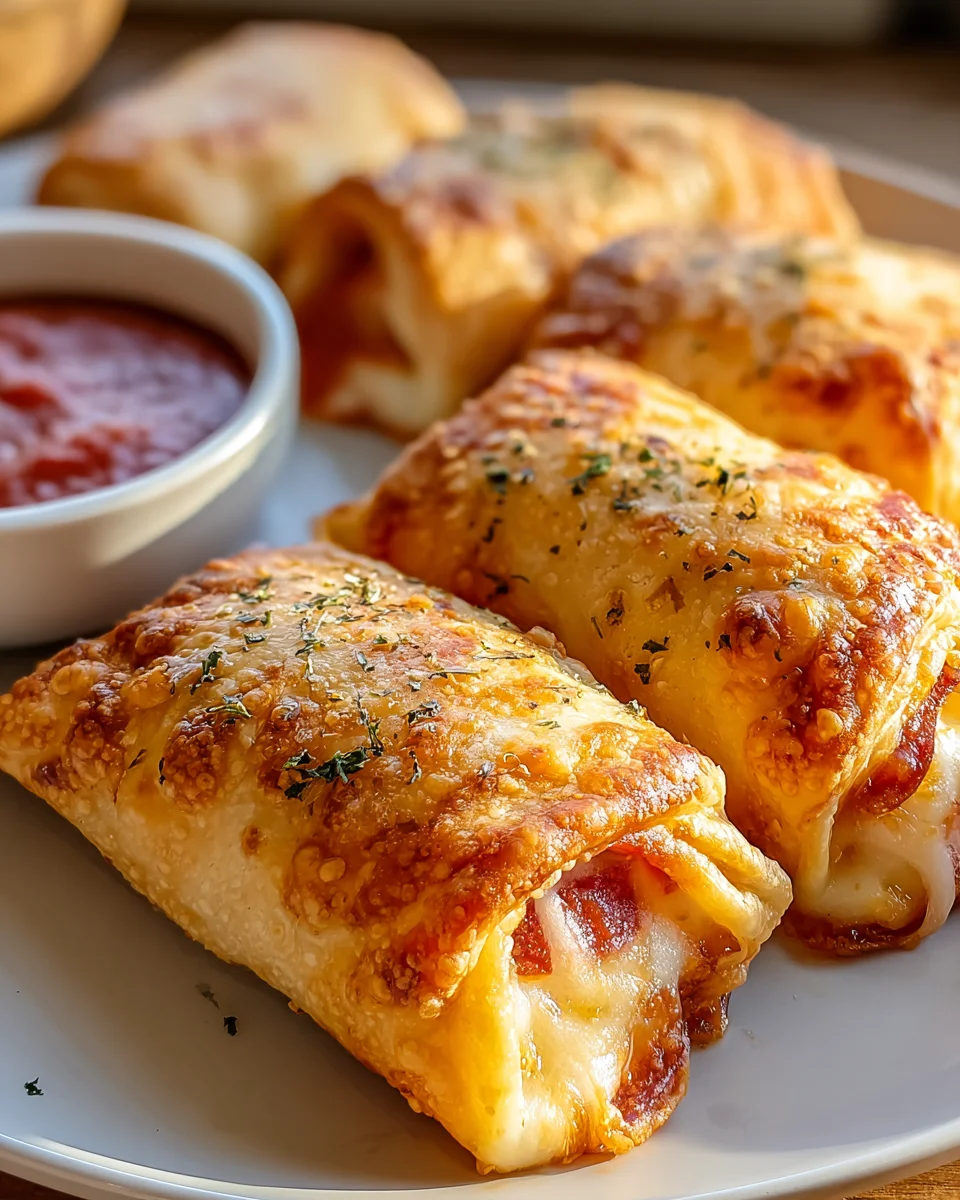
The air fryer is truly a game-changer for these pizza rolls, transforming them into golden, crispy pockets of flavor with a perfectly melted interior. It’s what gives them that signature “crispy delight” that makes them so addictive!

  1. Preheat Your Air Fryer: This step is non-negotiable for achieving that coveted crispiness. Just like a conventional oven, preheating your air fryer ensures that the food starts cooking immediately at the right temperature, leading to a much more even cook and a superior texture. Set your air fryer to 375°F (190°C) and let it preheat for 3-5 minutes. While it’s preheating, lightly brush the tops and sides of your assembled pizza rolls with the 2 tablespoons of olive oil. This not only enhances the flavor but also helps in achieving that beautiful golden-brown color and incredible crispiness.
  2. Arrange in the Air Fryer Basket: Once preheated, carefully open your air fryer basket. Arrange the olive oil-brushed pizza rolls in a single layer in the air fryer basket. It is crucial not to overcrowd the basket. Air fryers work by circulating hot air, and if the rolls are overlapping or too close together, the air won’t be able to reach all surfaces, resulting in uneven cooking and soggy spots. Depending on the size of your air fryer, you will likely need to cook these in batches. Give each roll a little breathing room; I aim for about a ½-inch space between them.
  3. Initial Air Frying: Close the air fryer basket and cook the pizza rolls at 375°F (190°C) for 6-8 minutes. During this initial phase, the dough will start to puff up, and the cheese will begin to melt and get gooey. You might see some bubbling, which is a good sign! The olive oil will start to do its job, initiating the browning process.
  4. Flip and Finish: After the initial 6-8 minutes, carefully open the air fryer basket. Using tongs or a spatula, gently flip each pizza roll over. This ensures that both sides get equally golden and crispy. Return the basket to the air fryer and continue cooking for another 5-7 minutes, or until the rolls are deeply golden brown, puffed up, and the cheese is thoroughly melted and bubbly, perhaps even slightly caramelized around the edges. This is where you truly start to see the Air Fryer Pizza Rolls Discover The Crispy Delight! Keep a close eye on them during these last few minutes, as air fryers can vary, and you don’t want them to burn. The internal temperature should be hot and gooey, with the dough cooked through.
  5. Achieving “The Crispy Delight”: For maximum crispiness, especially if you notice some rolls are less brown than others, you can cook them for an additional 1-2 minutes, checking frequently. The key is to get that exterior crust perfectly crisp while maintaining a molten, cheesy interior. The sound of the crisp crust as you remove them from the basket is music to my ears!

Serving and Customization for Your Air Fryer Pizza Rolls:

You’ve done it! You’ve cooked up a batch of incredibly delicious and crispy Air Fryer Pizza Rolls Discover The Crispy Delight. Now, let’s talk about how to enjoy them and how you can truly make them your own.

  1. Rest and Serve: Once your pizza rolls are cooked to perfection, carefully remove them from the air fryer basket using tongs. Transfer them to a wire rack set over a baking sheet or a serving platter. It’s important to let them rest for just 2-3 minutes before diving in. This brief resting period allows the cheese to set slightly, preventing it from oozing out excessively, and the exterior to firm up even more, enhancing that irresistible crispness. Be warned, they will be extremely hot inside! Serve them immediately with your favorite dipping sauces. I love a classic warm marinara, but a cool ranch dressing or a homemade garlic butter sauce can elevate the experience beautifully. For an extra touch, you can sprinkle a little dried Italian seasoning or grated Parmesan cheese over them just before serving.
  2. Storage and Reheating: If by some miracle you have any leftovers (which rarely happens in my house!), store them in an airtight container in the refrigerator for up to 3 days. To reheat and bring back that “crispy delight,” I highly recommend using your air fryer again! Simply arrange the cold pizza rolls in a single layer in the preheated air fryer at 350°F (175°C) for 3-5 minutes, or until they are heated through and the crust is crisp once more. Microwaving them will make them soft and chewy, losing all that wonderful texture we worked so hard to achieve.

Amazing Variations to Discover:

One of the best things about these pizza rolls is how incredibly versatile they are. Once you’ve mastered the basic Air Fryer Pizza Rolls Discover The Crispy Delight recipe, you can let your imagination run wild with different fillings!

  • Meat Lover’s Delight: In addition to pepperoni, try adding finely cooked and crumbled sausage, diced cooked ham, or even pre-cooked bacon bits. Just remember to keep the total amount of meat toppings balanced to prevent overstuffing.
  • Veggie Power: For a fresh take, swap out some of the pepperoni for finely diced bell peppers (any color!), sautéed mushrooms, thinly sliced black olives, or even a sprinkle of spinach (make sure to squeeze out excess moisture from spinach before adding). A combination of veggies makes for a colorful and flavorful roll!
  • Spicy Kick: If you love a bit of heat, mix some red pepper flakes into your pizza sauce or sprinkle them over the cheese before rolling. You could also add finely diced jalapeños for a bolder flavor.
  • Cheese Please: Experiment with different cheese blends! Provolone, Monterey Jack, cheddar, or even a touch of smoked gouda can add incredible depth and unique flavor profiles to your rolls. A sprinkle of Parmesan or Pecorino Romano inside can also be delightful.
  • Sauce Savvy: Don’t limit yourself to just marinara! Try a pesto sauce for a herbaceous twist, a white garlic sauce for a creamy version, or even a BBQ sauce for a BBQ chicken pizza roll variation (just add cooked chicken!).
  • Herbal Infusion: Add a pinch of dried oregano, basil, or Italian seasoning directly into the cheese layer or mixed with the olive oil you brush on top for an extra aromatic kick.

Troubleshooting Tips for Perfect Pizza Rolls:

Even experienced cooks can encounter a hiccup or two. Here are some solutions to common issues:

  • Soggy Bottoms: This usually happens from overcrowding the air fryer basket or too much sauce. Ensure rolls are in a single layer with space between them and don’t overload with sauce. A slightly higher temperature for the last couple of minutes can also help crisp the bottom.
  • Burnt Spots: Air fryers can cook unevenly. Flip the rolls more frequently or reduce the temperature slightly if you notice burning before the center is cooked. Some air fryers have hot spots, so rotating the rolls or the basket mid-cook can help.
  • Rolls Unraveling: This is often due to not sealing the seam properly or not rolling tightly enough. Ensure you pinch the seam firmly along the entire length of the log before cutting.
  • Cheese Oozing Out: A little cheese ooze is part of the charm! However, excessive oozing can indicate too much cheese, an unsealed roll, or rolls that are cut too thin.

Why an Air Fryer for Pizza Rolls?

The air fryer is truly the star here, making it possible for Air Fryer Pizza Rolls Discover The Crispy Delight to live up to their name. Unlike a traditional oven, which bakes them, or a microwave, which makes them soft, the air fryer’s powerful convection mechanism circulates super-heated air around the rolls. This process mimics deep-frying by rapidly heating the exterior and creating a crispy, golden-brown crust without all the excess oil. This results in a consistently crispy texture that’s almost impossible to achieve any other way at home, ensuring every bite is a delightful combination of crunchy exterior and gooey, cheesy interior. It’s quicker, healthier, and delivers a superior texture, truly making it the ideal appliance for perfecting these irresistible pizza rolls. Enjoy your perfectly crispy, homemade Air Fryer Pizza Rolls!

Air Fryer Pizza Rolls: Crispy, Golden & Delicious Delight!

Conclusion:

Well, friends, we’ve reached the delicious finale of our culinary journey, and I genuinely hope you’re feeling as inspired as I am to whip up a batch of these incredible morsels. If you’ve been searching for that perfect snack that hits all the right notes – crispy, gooey, savory, and utterly satisfying – then you can officially end your quest here. This recipe isn’t just about making pizza rolls; it’s about elevating a classic comfort food to an entirely new level of perfection, with minimal fuss and maximum flavor. I’ve found that the sheer ease and speed with which you can achieve such a delightful result is truly unparalleled, making this a staple in my own kitchen for everything from a quick afternoon pick-me-up to an impromptu gathering with friends.

The magic really lies in the method we’ve explored. Forget soggy, microwave-steamed disappointments or greasy, oven-baked versions that take too long to crisp up. What we’ve perfected here is a technique that guarantees golden-brown crispiness on the outside, giving way to a molten, cheesy, pepperoni-infused center that is simply irresistible. This isn’t just another recipe; it’s your definitive guide to experiencing true pizza roll nirvana. And believe me when I say, once you try them this way, there’s no going back. It’s an absolute game-changer, and for anyone looking to truly make their Air Fryer Pizza Rolls Discover The Crispy Delight they deserve, this method is paramount.

But the fun doesn’t stop once they’re perfectly cooked! Part of the joy of any great snack is personalizing it, and these pizza rolls are incredibly versatile. For serving, I highly recommend having a variety of dipping sauces on hand. Classic warm marinara is always a winner, of course, but don’t shy away from experimenting. A creamy ranch dressing offers a cool counterpoint to the hot, savory rolls, while a zesty garlic aioli can add a gourmet touch. If you’re a fan of heat, a spicy sriracha mayo or even just a dash of your favorite hot sauce can really kick things up a notch. For a smoky twist, try a sweet and tangy BBQ sauce. And remember, a sprinkle of freshly grated Parmesan cheese or a dash of red pepper flakes right after they come out of the air fryer adds another layer of flavor and visual appeal.

Beyond the dips, think about variations! If you’re feeling adventurous or have a little extra time, consider adding some finely chopped fresh herbs like basil or oregano to the rolls before cooking, or even a tiny pinch of garlic powder to the filling if you’re making them from scratch or enhancing store-bought ones. For those who love a bit of extra protein, very finely diced cooked bacon bits or crumbled sausage can be incorporated. Veggie lovers can experiment with tiny pieces of sautéed mushrooms, bell peppers, or onions. These aren’t just for snacking either; they make fantastic appetizers for game day, a perfect accompaniment to a movie night, or even a quick, fun lunch served alongside a simple green salad to balance things out. Imagine a spread for your next party featuring these golden nuggets, maybe alongside some crispy chicken wings or homemade mozzarella sticks. The possibilities are truly endless!

Don’t Just Read, Relish!

Now, it’s your turn. My biggest encouragement to you is to not let this recipe just live on your screen or in your recipe binder. Take the leap, preheat that air fryer, and experience the magic for yourself. I promise you, the smiles these crispy, cheesy bites will bring to your face, and to the faces of anyone you share them with, will be absolutely worth it. It’s an incredibly rewarding experience, transforming simple ingredients into something truly spectacular. Once you’ve mastered this technique, you’ll wonder how you ever lived without it. So, go on, give it a try!

And when you do, please, please share your experience! I love hearing about your culinary adventures. Did you try a new dipping sauce? Did you add a unique ingredient? Did you serve them in a surprising way? Your feedback, your photos, and your creative twists inspire me and our entire community of food lovers. Let’s celebrate the joy of perfectly cooked pizza rolls together. Happy cooking, and even happier eating!


Air Fryer Pizza Rolls: Crispy, Golden & Delicious Delight!

Transform classic pizza rolls into an irresistible snack with an unparalleled crunch using your air fryer. These beloved bites feature golden-brown exteriors and molten cheesy, beef pepperoni interiors, perfect for a quick snack or appetizer. The air fryer ensures a consistently crispy texture, making these a convenient and delicious favorite.

Prep Time
20 Minutes
Cook Time
15 Minutes
Total Time
35 Minutes
Servings
16 rolls

Ingredients


Instructions


Important Information

Nutrition Facts (Per Serving)

It is important to consider this information as approximate and not to use it as definitive health advice.

Allergy Information

Please check ingredients for potential allergens and consult a health professional if in doubt.

« Previous Post
Vanilla French Beignets Recipe – Sweet, Fluffy, Melt-in-Mouth
Next Post »
Oven Baked Cheesy Tacos: Crispy Loaded Perfection!

If you enjoyed this…

Delicious Kase Puff Snacks: Quick Cold Finger Food Recipe

Million Dollar Beef Bacon Goat Cheese Appetizer Log Recipe

Potato Cheese Sticks: Crispy, Tasty Homemade Snack!

Primary Sidebar

Browse by Diet

BreakfastDinnerLunchDessertAppetizer

Sweet Peach Yogurt Parfait Delight

One of my fondest memories is from a lazy summer afternoon spent at my grandmother’s house. The sun filtered through the kitchen window, casting a warm glow over the table where she would create her culinary magic. It was during one of those blissful moments that I first tasted her Peach Yogurt Parfait with Honey and Granola. The sweet aroma of ripe peaches mingling with creamy yogurt and the crunch of granola was nothing short of heavenly. It felt like summer captured in a bowl, and I still remember the joy of diving in with a spoon, each layer revealing a new burst of flavor.

When I think about that parfait, I can almost hear the gentle hum of the bees outside, reminding me of the floral notes that honey brings to every bite. The vibrant yellows and soft oranges of the peaches contrast beautifully with the creamy white yogurt and the golden crunch of granola. It’s a dish that not only looks delightful but also tastes like a celebration of fresh, wholesome ingredients.

What makes my version of this Peach Yogurt Parfait special is the careful balance of flavors and textures. I use ripe, juicy peaches, drizzled with locally sourced honey, and a homemade granola that’s bursting with nuts and seeds for an extra crunch. It’s a simple dish, but every layer is crafted with love and attention.

Let me show you exactly how to make this delightful parfait, so you can bring a bit of that summer magic into your kitchen!

Sweet Peach Yogurt Parfait Delight

Why You’ll Love This Recipe

  • Delightfully creamy texture from the Greek yogurt, paired with the juicy sweetness of fresh peaches.
  • Ready in under 20 minutes, making it a quick and satisfying breakfast or snack option.
  • Budget-friendly, using common ingredients that you may already have in your pantry.
  • Customizable with your favorite granola and nuts, allowing you to tailor each parfait to your taste.
  • Perfectly balanced flavors with the bright acidity of lemon juice and the sweetness of honey enhancing the peaches.

Ingredients

  • For the Parfait:
  • 2 cups plain Greek yogurt (or vanilla yogurt for a sweeter option)
  • 2 large ripe peaches, diced (about 2 cups)
  • 1 tablespoon fresh lemon juice (to prevent browning of peaches)
  • 2 tablespoons honey (plus more for drizzling)
  • 1 teaspoon vanilla extract (optional for extra flavor)
  • For the Granola:
  • 1 cup granola (store-bought or homemade; see notes for a simple granola recipe)
  • 1/4 cup sliced almonds (optional for added crunch)
  • 1/4 cup shredded coconut (optional for added flavor)

Let’s dive into some key ingredients that make this Peach Yogurt Parfait so delightful! First, the Greek yogurt is not only creamy but also packed with protein, making it a satisfying option for breakfast or a snack. If you’re looking for a sweeter option, you can easily substitute it with vanilla yogurt, though it may alter the overall flavor balance. Next, the ripe peaches are the star of the show; their natural sweetness shines through, so I recommend choosing peaches that yield slightly to pressure, indicating they’re perfectly ripe. If peaches aren’t in season, feel free to use nectarines or even frozen peaches—just thaw them before use. Finally, honey adds a lovely floral sweetness that ties everything together. If you prefer, maple syrup can serve as a delicious substitute.

Step-by-Step Instructions

  1. Start by preparing the peaches. Wash them thoroughly, then slice and dice them into bite-sized pieces. In a medium bowl, toss the diced peaches with 1 tablespoon of fresh lemon juice to prevent browning. Set aside for about 5 minutes while the lemon juice works its magic.
  2. In a separate bowl, combine the Greek yogurt, 2 tablespoons of honey, and 1 teaspoon of vanilla extract if using. Stir the mixture until smooth and thoroughly blended. This should take about a minute. Avoid overmixing to maintain the creaminess of the yogurt.
  3. Now it’s time to layer your parfait. Grab a clear glass or bowl to showcase your beautiful creation. Start with a generous spoonful of the yogurt mixture at the bottom—about 1/4 cup will do. Use a spoon to spread it evenly.
  4. Add a layer of the diced peaches over the yogurt, ensuring they cover the yogurt completely. You might want to use about half of what you have prepared—roughly 1 cup. This layer should be visually appealing, so arrange the peaches neatly.
  5. Sprinkle 1/4 cup of granola over the peaches. This adds a delightful crunch. Make sure to distribute it evenly to ensure every bite has that satisfying texture. Avoid packing it down too tightly, as you want it to maintain its crunch.
  6. Repeat the layers: spoon in another 1/4 cup of yogurt, followed by another cup of peaches, and another sprinkle of granola. You should have at least two layers, but feel free to add more depending on your glass size.
  7. Finish off your parfait with a drizzle of honey on top for added sweetness and a touch of elegance. If you’re using sliced almonds or shredded coconut, sprinkle them on top now. It adds a lovely visual contrast and extra flavor.
  8. Serve immediately or refrigerate for up to 30 minutes before serving to allow the flavors to meld together. However, I recommend enjoying it fresh to maintain the granola’s crunch.

Pro Tips for the Best Peach Yogurt Parfait With Honey And Granola

  • Make sure to choose ripe peaches for the best flavor and texture. A common mistake is using unripe fruit, which can lead to a less enjoyable parfait. Look for peaches that are fragrant and slightly soft to the touch.
  • Use a clear glass to assemble your parfait; this not only makes for a beautiful presentation but also allows you to see the colorful layers, which adds to the enjoyment of eating it.
  • For an even creamier texture, consider whipping the Greek yogurt with a hand mixer for a couple of minutes before layering. This small adjustment makes a huge difference in mouthfeel.
  • Be mindful of the granola-to-yogurt ratio. Too much granola can overwhelm the parfait, while too little can make it feel too creamy. Aim for about 1/4 cup of granola per layer for the perfect balance.
  • If you’re making this for a gathering, consider preparing the yogurt and peaches ahead of time and layering them just before serving. This ensures the granola stays crunchy!

Variations & Serving Ideas

There are so many ways to get creative with your Peach Yogurt Parfait! For a tropical twist, swap out the peaches for mangoes or pineapples and top with coconut flakes. If you prefer a berry flavor, mix in some blueberries or strawberries with the peaches for added color and taste. For a nutty version, incorporate chopped walnuts or pecans instead of almonds.

As for serving ideas, this parfait pairs beautifully with a side of scrambled eggs for a hearty breakfast or fresh fruit salad for a light lunch. You might also enjoy it alongside whole grain toast with almond butter for an energizing snack. The contrast of flavors and textures will elevate your meal experience!

Storage, Make-Ahead & Reheating

The Peach Yogurt Parfait is best enjoyed fresh, but you can prepare some components ahead of time. Store the layered parfait in an airtight container in the refrigerator for up to 24 hours. However, be cautious; the granola may lose its crunch if stored too long. You can freeze the yogurt and peach mixture for up to 2 months; just remember to thaw it in the refrigerator overnight before serving.

If you plan to enjoy this dish the next day, it can taste even better as the flavors meld together. Just remember to add the granola right before serving to keep its delightful crunch!

Frequently Asked Questions

Can I make Peach Yogurt Parfait With Honey And Granola ahead of time?

Yes — in fact, it tastes even better the next day as the flavors meld. However, I recommend waiting to add the granola until just before serving to maintain its crunch.

What can I substitute for Greek yogurt?

If you prefer a lighter option, you can substitute Greek yogurt with regular yogurt or a dairy-free alternative like coconut yogurt. Just remember that this may alter the creaminess and flavor profile slightly.

Can I use frozen peaches for this parfait?

Absolutely! Just make sure to thaw the frozen peaches before using them. They will still add great flavor, though the texture may be slightly softer than fresh peaches.

How do I make the parfait vegan?

To make a vegan version, substitute the Greek yogurt with a plant-based yogurt alternative, and replace honey with maple syrup or agave nectar. This keeps the parfait sweet while adhering to a vegan diet.

What other fruits can I use in this recipe?

You can mix and match fruits based on your preference. Try using strawberries, blueberries, raspberries, or even bananas. Just make sure to adjust the lemon juice as needed to prevent browning.

Sweet Peach Yogurt Parfait Delight

Final Thoughts

The Peach Yogurt Parfait with Honey and Granola is a delightful blend of creamy yogurt, sweet peaches, and crunchy granola that creates a satisfying and nourishing treat. Each layer bursts with flavor, making it a perfect choice for breakfast or a light dessert.

This is the kind of recipe I come back to again and again, especially when I want something refreshing and wholesome to start my day. The harmony of sweet and tart flavors, combined with the delightful crunch, never fails to lift my spirits!

I encourage you to give this parfait a try and indulge in its comforting goodness. Feel free to share your results or even add your own twist—perhaps a sprinkle of cinnamon or a handful of nuts. Enjoy creating your perfect parfait!

Print
clock clock iconcutlery cutlery iconflag flag iconfolder folder iconinstagram instagram iconpinterest pinterest iconfacebook facebook iconprint print iconsquares squares iconheart heart iconheart solid heart solid icon

Peach Yogurt Parfait


  • Author: Lily author
  • Total Time: 15 minutes
  • Yield: 4 servings 1x
Pin Recipe
Print Recipe

Description

This Peach Yogurt Parfait combines creamy Greek yogurt, juicy peaches, and crunchy granola for a delightful treat. It’s a perfect breakfast or snack that captures the essence of summer in every bite.


Ingredients

Scale
  • For the Parfait:
  • 2 cups plain Greek yogurt (or vanilla yogurt for a sweeter option)
  • 2 large ripe peaches, diced (about 2 cups)
  • 1 tablespoon fresh lemon juice (to prevent browning of peaches)
  • 2 tablespoons honey (plus more for drizzling)
  • 1 teaspoon vanilla extract (optional for extra flavor)
  • For the Granola:
  • 1 cup granola (store-bought or homemade; see notes for a simple granola recipe)
  • 1/4 cup sliced almonds (optional for added crunch)
  • 1/4 cup shredded coconut (optional for added flavor)

Instructions

  1. Start by preparing the peaches. Wash them thoroughly, then slice and dice them into bite-sized pieces. In a medium bowl, toss the diced peaches with 1 tablespoon of fresh lemon juice to prevent browning. Set aside for about 5 minutes while the lemon juice works its magic.
  2. In a separate bowl, combine the Greek yogurt, 2 tablespoons of honey, and 1 teaspoon of vanilla extract if using. Stir the mixture until smooth and thoroughly blended. This should take about a minute. Avoid overmixing to maintain the creaminess of the yogurt.
  3. Now it’s time to layer your parfait. Grab a clear glass or bowl to showcase your beautiful creation. Start with a generous spoonful of the yogurt mixture at the bottom—about 1/4 cup will do. Use a spoon to spread it evenly.
  4. Add a layer of the diced peaches over the yogurt, ensuring they cover the yogurt completely. You might want to use about half of what you have prepared—roughly 1 cup. This layer should be visually appealing, so arrange the peaches neatly.
  5. Sprinkle 1/4 cup of granola over the peaches. This adds a delightful crunch. Make sure to distribute it evenly to ensure every bite has that satisfying texture. Avoid packing it down too tightly, as you want it to maintain its crunch.
  6. Repeat the layers: spoon in another 1/4 cup of yogurt, followed by another cup of peaches, and another sprinkle of granola. You should have at least two layers, but feel free to add more depending on your glass size.
  7. Finish off your parfait with a drizzle of honey on top for added sweetness and a touch of elegance. If you’re using sliced almonds or shredded coconut, sprinkle them on top now. It adds a lovely visual contrast and extra flavor.
  8. Serve immediately or refrigerate for up to 30 minutes before serving to allow the flavors to meld together. However, I recommend enjoying it fresh to maintain the granola’s crunch.
  • Prep Time: 15 mins
  • Cook Time: 0 mins
  • Category: Breakfast
  • Method: No-cook
  • Cuisine: American

Nutrition

  • Serving Size: 1 parfait
  • Calories: 250
  • Sugar: 20 g
  • Sodium: 50 mg
  • Fat: 5 g
  • Saturated Fat: 2 g
  • Unsaturated Fat: 3 g
  • Trans Fat: 0 g
  • Carbohydrates: 40 g
  • Fiber: 3 g
  • Protein: 10 g
  • Cholesterol: 10 mg

Keywords: Choose ripe peaches for the best flavor and texture. Use a clear glass for a beautiful presentation. For creaminess, consider whipping the yogurt before layering. Be mindful of the granola-to-yogurt ratio. Prepare yogurt and peaches ahead of time for gatherings, layering just before serving.

Did you make this recipe?

Share a photo and tag us — we can't wait to see what you've made!

Sun-Kissed Frozen Orange Cream Slush

As a child, summer days felt like they lasted forever. I remember the sticky heat wrapping around me as I played outside, my laughter mingling with the sounds of the neighborhood. But nothing could cool me down quite like the moment I’d spot my grandmother, laboring over her blender, whipping up her famous Frozen Orange Creamsicle Slush. That vibrant orange treat, with its frosty texture and sweet citrus aroma, was like a burst of sunshine in a cup. Just one sip, and I could feel the coolness wash over me, sparking pure joy.

This Frozen Orange Creamsicle Slush has a way of making you feel like a kid again. Its creamy, dreamy consistency is a delightful balance of bright orange and soft vanilla, inviting you to dive right in. The refreshing tang of orange dances on your tongue, while the smooth creaminess envelops you in a comforting embrace. It’s a nostalgic treat that’s perfect for hot summer afternoons or anytime you need a little pick-me-up.

What makes my version of this slush stand out is the addition of a hint of vanilla bean, which elevates the flavor and adds an extra layer of richness. Plus, it’s super easy to whip up with just a few simple ingredients that you probably already have on hand! So, if you’re ready to relive those sun-soaked memories, let me show you exactly how to make it.

Sun-Kissed Frozen Orange Cream Slush

Why You’ll Love This Recipe

  • Each slush is a perfect blend of creamy vanilla and zesty orange, creating a nostalgic flavor reminiscent of summer days.
  • This refreshing treat is ready in under 15 minutes, making it an ideal quick dessert for unexpected guests or hot afternoons.
  • With just 8 simple ingredients, it’s budget-friendly, ensuring you don’t have to break the bank to enjoy a delicious slush.
  • The slush has a perfectly smooth texture, thanks to the combination of ice and ice cream, providing a delightful contrast to the bright citrus flavors.
  • It’s highly customizable; you can easily adjust the sweetness and add fresh herbs for a unique twist that suits your taste.

Ingredients

  • 2 cups orange juice (freshly squeezed or store-bought)
  • 1 cup vanilla ice cream
  • 1 cup crushed ice
  • 1/2 cup milk (whole or 2%)
  • 1/4 cup granulated sugar (adjust based on sweetness preference)
  • 1 teaspoon vanilla extract
  • Zest of 1 orange (for added flavor)
  • Fresh orange slices and mint leaves (for garnish)

The star of this Frozen Orange Creamsicle Slush is the orange juice, which provides the vibrant, citrusy base. Freshly squeezed juice will yield the brightest flavor, but store-bought options can be just as convenient. If you’re opting for store-bought, choose 100% pure juice with no added sugars for the best results. Another essential ingredient is the vanilla ice cream; it adds creaminess and sweetness. You can substitute it with dairy-free ice cream if you’re looking for a vegan option. Whole or 2% milk complements the ice cream, creating a smooth blend. If you want a lower-calorie version, almond or oat milk can be good alternatives.

Lastly, the granulated sugar can be adjusted based on your sweetness preference. If you prefer a more natural sweetener, consider using honey or agave syrup. The orange zest enhances the flavor profile, providing an aromatic pop that brings the whole slush together. Don’t skip it! It adds an extra layer of brightness that makes this slush truly special.

Step-by-Step Instructions

  1. Start by preparing your ingredients. Gather 2 cups of orange juice, 1 cup of vanilla ice cream, and 1 cup of crushed ice. Make sure the ice is finely crushed, as larger chunks can make blending difficult.
  2. In a blender, combine the orange juice, vanilla ice cream, crushed ice, and 1/2 cup of milk. Add 1/4 cup of granulated sugar and 1 teaspoon of vanilla extract. If you like a sweeter slush, consider adding a bit more sugar at this stage.
  3. Add the zest of 1 orange to the blender. This step is crucial for enhancing the citrus flavor of your slush. Make sure not to include the bitter white pith—only the flavorful zest.
  4. Blend the mixture on medium-high speed for about 30-45 seconds. Stop once the ingredients are fully combined and the slush has a smooth, even consistency. If you notice large chunks of ice, blend for an additional 10-15 seconds. Avoid over-blending, as this can make the slush too liquidy.
  5. Once blended, taste the slush. If it needs more sweetness, add a little more sugar and blend for a few more seconds. If it’s too thick, you can add a splash of milk to reach your desired consistency.
  6. Pour the slush into glasses. This recipe typically serves 4, but you can easily double it for larger gatherings. Use a spoon to help guide the slush into the glasses if needed.
  7. Garnish each serving with fresh orange slices and mint leaves. The mint not only adds a pop of color but also a refreshing aroma that complements the citrus flavors beautifully.
  8. Serve immediately and enjoy! If you’ve made extra, you can refrigerate it for a short time, but it’s best enjoyed fresh.

Pro Tips for the Best Frozen Orange Creamsicle Slush

  • Don’t skip the orange zest! It’s a game-changer for flavor. Always zest before juicing to make it easier.
  • Use a high-powered blender for the best texture. A standard blender may struggle with ice, leading to uneven consistency. If you have a food processor, that can work too, but ensure the ice is finely crushed.
  • Adjust the ice-to-liquid ratio carefully. If your slush is too thick, it won’t blend well. Start with less ice and add more until you reach your preferred texture.
  • Be cautious with the sugar! Always start with the lower amount, as you can easily add more, but it’s hard to fix an overly sweet slush.
  • For a fun twist, consider adding a splash of coconut milk or a handful of fresh fruit like strawberries or pineapple. This not only enhances the flavor but also adds a beautiful color contrast.

Variations & Serving Ideas

There are countless ways to put a spin on your Frozen Orange Creamsicle Slush. Consider making a tropical version by adding in some pineapple juice or coconut milk for a delightful tropical twist. If you’re feeling adventurous, try incorporating a handful of frozen mango or peach slices for added sweetness. For a lighter version, swap out the vanilla ice cream for Greek yogurt for a creamy yet tangy alternative.

As for serving ideas, this refreshing slush pairs wonderfully with light summer dishes like grilled chicken skewers, fish tacos, or a simple salad topped with citrus vinaigrette. The bright, zesty flavors of the slush complement these dishes perfectly, making them an ideal pairing for a sunny day.

Storage, Make-Ahead & Reheating

This Frozen Orange Creamsicle Slush is best enjoyed fresh, but if you have leftovers, you can store them in an airtight container in the fridge for up to 2 days. Just keep in mind that the slush may lose some of its texture over time as the ice melts. It doesn’t freeze well, as the ice will turn into a solid block. If you must freeze it, blend again after thawing to restore the slushy consistency. This treat is best the day you make it, as the flavors meld together beautifully overnight, enhancing its deliciousness.

Frequently Asked Questions

Can I make Frozen Orange Creamsicle Slush ahead of time?

Yes — in fact, it tastes even better the next day as the flavors meld. However, it’s best to enjoy it fresh, as the texture can change if stored for too long. If you need to prepare it ahead, keep it in the fridge and re-blend before serving.

What kind of orange juice should I use?

For the best flavor, use freshly squeezed orange juice. However, if you’re short on time, opt for 100% pure store-bought juice without added sugars. This will ensure that your slush remains flavorful and refreshing.

Can I substitute the vanilla ice cream?

Absolutely! If you’re looking for a dairy-free option, coconut milk ice cream or a non-dairy vanilla ice cream can work wonderfully. They will still provide the creamy texture and sweetness you desire.

How can I adjust the sweetness of my slush?

You can easily adjust the sweetness by modifying the amount of sugar added. Start with 1/4 cup and taste the mixture before blending. If you prefer it sweeter, add more sugar gradually until it reaches your desired level.

What should I do if my slush is too thick?

If your slush is too thick, simply add a splash of milk or orange juice and blend again. This will help achieve a more drinkable consistency while maintaining the slushy texture. Adjust gradually to reach your preferred thickness.

Sun-Kissed Frozen Orange Cream Slush

Final Thoughts

The Frozen Orange Creamsicle Slush is a delightful blend of refreshing citrus and creamy goodness, making it a perfect treat for warm days or any time you crave a taste of nostalgia. The way the bright orange flavor dances with the creamy texture truly elevates this slush, transforming it into a satisfying escape from the everyday.

This is the kind of recipe I come back to again and again, especially when I’m looking to cool down or impress guests at a summer gathering. It’s simple to make and always brings smiles all around! I encourage you to try this recipe for yourself—don’t hesitate to share your results or even put your own spin on it. Happy slushing!

Print
clock clock iconcutlery cutlery iconflag flag iconfolder folder iconinstagram instagram iconpinterest pinterest iconfacebook facebook iconprint print iconsquares squares iconheart heart iconheart solid heart solid icon

Frozen Orange Creamsicle Slush


  • Author: Lily author
  • Total Time: 15 minutes
  • Yield: 4 servings 1x
Pin Recipe
Print Recipe

Description

This Frozen Orange Creamsicle Slush is a refreshing treat that combines creamy vanilla and zesty orange flavors. Perfect for hot summer days, it brings back nostalgic memories with every sip.


Ingredients

Scale
  • 2 cups orange juice (freshly squeezed or store-bought)
  • 1 cup vanilla ice cream
  • 1 cup crushed ice
  • 1/2 cup milk (whole or 2%)
  • 1/4 cup granulated sugar (adjust based on sweetness preference)
  • 1 teaspoon vanilla extract
  • Zest of 1 orange (for added flavor)
  • Fresh orange slices and mint leaves (for garnish)

Instructions

  1. Start by preparing your ingredients. Gather 2 cups of orange juice, 1 cup of vanilla ice cream, and 1 cup of crushed ice. Make sure the ice is finely crushed, as larger chunks can make blending difficult.
  2. In a blender, combine the orange juice, vanilla ice cream, crushed ice, and 1/2 cup of milk. Add 1/4 cup of granulated sugar and 1 teaspoon of vanilla extract. If you like a sweeter slush, consider adding a bit more sugar at this stage.
  3. Add the zest of 1 orange to the blender. This step is crucial for enhancing the citrus flavor of your slush. Make sure not to include the bitter white pith—only the flavorful zest.
  4. Blend the mixture on medium-high speed for about 30-45 seconds. Stop once the ingredients are fully combined and the slush has a smooth, even consistency. If you notice large chunks of ice, blend for an additional 10-15 seconds. Avoid over-blending, as this can make the slush too liquidy.
  5. Once blended, taste the slush. If it needs more sweetness, add a little more sugar and blend for a few more seconds. If it’s too thick, you can add a splash of milk to reach your desired consistency.
  6. Pour the slush into glasses. This recipe typically serves 4, but you can easily double it for larger gatherings. Use a spoon to help guide the slush into the glasses if needed.
  7. Garnish each serving with fresh orange slices and mint leaves. The mint not only adds a pop of color but also a refreshing aroma that complements the citrus flavors beautifully.
  8. Serve immediately and enjoy! If you’ve made extra, you can refrigerate it for a short time, but it's best enjoyed fresh.
  • Prep Time: 15 min
  • Cook Time: 0 min
  • Category: Dessert
  • Method: Blending
  • Cuisine: American

Nutrition

  • Serving Size: 1 serving
  • Calories: 200
  • Sugar: 30 g
  • Sodium: 50 mg
  • Fat: 5 g
  • Saturated Fat: 3 g
  • Unsaturated Fat: 2 g
  • Trans Fat: 0 g
  • Carbohydrates: 40 g
  • Fiber: 1 g
  • Protein: 2 g
  • Cholesterol: 20 mg

Keywords: Don't skip the orange zest! It's a game-changer for flavor. Always zest before juicing to make it easier.

Did you make this recipe?

Share a photo and tag us — we can't wait to see what you've made!

Zesty Lemon Poppy Seed Delight

One rainy afternoon, I found myself in my grandmother’s cozy kitchen, the kind that always smelled like warmth and love. She was whipping up her famous Lemon Poppy Seed Loaf, a recipe that had been passed down through generations. As the batter came together, the zesty aroma of fresh lemons filled the air, mingling perfectly with the nutty fragrance of poppy seeds. I can still picture her, apron-clad, as she expertly drizzled a vibrant citrus icing over the loaf, creating a glossy, sun-kissed finish that beckoned us to dive in. It was a moment that sparked my own passion for baking, and this recipe has become a cherished staple in my home ever since.

When you take a bite of this Lemon Poppy Seed Loaf, it’s like a burst of sunshine on your palate. The loaf is beautifully golden, with a tender crumb that melts in your mouth. Each slice is speckled with tiny poppy seeds, adding a delightful crunch that contrasts beautifully with the tangy sweetness of the lemon. And that citrus icing? It’s the finishing touch that elevates this loaf from ordinary to extraordinary, with its bright, zesty flavor dancing on your taste buds.

This recipe stands out because it embraces simplicity while delivering on flavor. I’ve added a hint of vanilla to the batter, enhancing the overall taste and making it even more indulgent. Trust me, once you make this Lemon Poppy Seed Loaf With Citrus Icing, it’ll become a go-to in your baking repertoire.

So, let me show you exactly how to make it!

Zesty Lemon Poppy Seed Delight

Why You’ll Love This Recipe

  • Moist and tender crumb that melts in your mouth, thanks to the perfect balance of butter and buttermilk.
  • Bright, zesty lemon flavor paired with crunchy poppy seeds, creating a delightful texture and taste experience.
  • Easy to whip up in just about an hour, perfect for last-minute gatherings or a cozy afternoon treat.
  • Budget-friendly with everyday ingredients, making it an accessible option for all home bakers.
  • The citrus icing adds a sweet tang that elevates the loaf, turning a simple recipe into a showstopper!

Ingredients

  • 1 ½ cups (190g) all-purpose flour
  • 1 teaspoon baking powder
  • ½ teaspoon baking soda
  • ½ teaspoon salt
  • 3 tablespoons poppy seeds
  • ½ cup (115g) unsalted butter, softened to room temperature
  • 1 cup (200g) granulated sugar
  • 2 large eggs
  • 1 teaspoon vanilla extract
  • 1 teaspoon lemon zest (from about 1 medium lemon)
  • ½ cup (120ml) buttermilk
  • 2 tablespoons fresh lemon juice

For the Citrus Icing:

  • 1 cup (120g) powdered sugar
  • 2 tablespoons fresh lemon juice
  • 1 tablespoon orange juice
  • 1 teaspoon lemon zest (for garnish, optional)

Let’s dive into the key ingredients that make this Lemon Poppy Seed Loaf so special. The all-purpose flour provides the structure and base for the loaf, while the baking powder and baking soda ensure it rises perfectly, giving the loaf a light texture. For a gluten-free variation, you could substitute the flour with a gluten-free all-purpose blend. Poppy seeds not only add a delightful crunch but also contribute to the unique flavor profile that pairs well with the citrus notes.

Unsalted butter is crucial for achieving the buttery richness that makes this loaf so moist. If you’re looking for a dairy-free option, coconut oil or a vegan butter can be used instead. The buttermilk is another essential component, providing acidity that activates the baking soda for a fluffy texture. If you don’t have buttermilk on hand, you can easily make a substitute by mixing ½ cup of milk with 1 tablespoon of vinegar or lemon juice and letting it sit for about 5 minutes.

Step-by-Step Instructions

  1. Preheat your oven to 350°F (175°C). Grease a 9×5-inch loaf pan or line it with parchment paper for easy removal later.
  2. In a medium mixing bowl, whisk together 1 ½ cups of all-purpose flour, 1 teaspoon of baking powder, ½ teaspoon of baking soda, ½ teaspoon of salt, and 3 tablespoons of poppy seeds. This helps to evenly distribute the baking agents and ensures a uniform rise.
  3. In a large mixing bowl, cream together ½ cup of softened unsalted butter and 1 cup of granulated sugar using an electric mixer on medium speed for about 3-4 minutes, until the mixture is light and fluffy. Make sure to scrape down the sides of the bowl occasionally.
  4. Add 2 large eggs, 1 teaspoon of vanilla extract, and 1 teaspoon of lemon zest to the creamed butter and sugar, mixing until fully combined. You want a smooth consistency, so ensure there are no lumps of butter.
  5. In a small bowl, combine ½ cup of buttermilk and 2 tablespoons of fresh lemon juice. Alternately add the dry ingredients and buttermilk mixture to the butter mixture, starting and ending with the dry ingredients. Mix just until combined; do not overmix, as this can lead to a dense loaf.
  6. Pour the batter into the prepared loaf pan. Smooth the top with a spatula, ensuring it’s even. Bake in the preheated oven for 50-60 minutes, or until a toothpick inserted in the center comes out clean. The edges should be lightly golden brown, and the center should feel just set.
  7. Once baked, remove the loaf from the oven and allow it to cool in the pan for about 10 minutes. Then, transfer it to a wire rack to cool completely. Resist the urge to slice too soon, as it will be crumbly if it’s still warm.
  8. While the loaf is cooling, prepare the citrus icing. In a medium bowl, whisk together 1 cup of powdered sugar, 2 tablespoons of fresh lemon juice, and 1 tablespoon of orange juice until smooth. If the icing is too thick, you can add a little more juice to reach your desired consistency.
  9. Once the loaf is completely cool, drizzle the citrus icing over the top. If you like, sprinkle with an additional teaspoon of lemon zest for an extra pop of flavor and color.

Pro Tips for the Best Lemon Poppy Seed Loaf With Citrus Icing

  • Be careful not to overmix your batter; this is a common mistake that can lead to a dense loaf. Mix just until the dry ingredients are incorporated for a light and fluffy texture.
  • Use room temperature ingredients, especially the butter and eggs. This helps to create a smoother batter and ensures even baking. Take your eggs out of the fridge about 30 minutes before you start.
  • For a more pronounced lemon flavor, consider adding a little lemon extract in addition to the zest and juice. Just a half teaspoon can elevate the citrus notes significantly.
  • When measuring your flour, spoon it into the measuring cup and level it off with a knife instead of scooping directly from the bag. This prevents packing and ensures you don’t end up with a dry loaf.
  • Invest in a good quality loaf pan; it makes a difference in heat distribution, which ensures even baking. If your pan is dark-coated, reduce the oven temperature by 25°F to prevent over-browning.

Variations & Serving Ideas

For a delightful twist, consider adding blueberries or raspberries to the batter for a fruity burst of flavor. You can also experiment with different citrus fruits—try lime or grapefruit zest and juice for a refreshing change. For a healthier option, substitute half of the all-purpose flour with whole wheat flour for added fiber without compromising too much on texture.

This Lemon Poppy Seed Loaf pairs beautifully with a light salad, such as a mixed greens salad with a vinaigrette, or a cup of tea for a cozy afternoon treat. It also complements a creamy cheese platter, as the acidity of the loaf balances rich cheeses perfectly. Lastly, a scoop of vanilla ice cream on the side creates a delightful contrast of temperatures and flavors!

Storage, Make-Ahead & Reheating

This Lemon Poppy Seed Loaf can be stored at room temperature for up to 3 days if wrapped tightly in plastic wrap. If you want to keep it longer, it freezes well for up to 3 months. To freeze, wrap the loaf tightly in plastic wrap and then in aluminum foil to prevent freezer burn.

When you’re ready to enjoy it again, simply thaw it in the fridge overnight. Reheat individual slices in the microwave for 15-20 seconds or in a toaster oven until warmed through. Interestingly, many people find that this loaf tastes even better the next day, as the flavors have time to meld!

Frequently Asked Questions

Can I make Lemon Poppy Seed Loaf With Citrus Icing ahead of time?

Yes — in fact, it tastes even better the next day! You can make the loaf a day in advance, allowing the flavors to develop. Just be sure to store it in an airtight container to maintain its moisture.

Can I substitute the poppy seeds?

Absolutely! If you don’t have poppy seeds on hand or prefer an alternative, you can use sesame seeds for a similar crunch or omit them entirely for a smooth loaf.

What can I use instead of buttermilk?

If you don’t have buttermilk, you can easily create a substitute by mixing ½ cup of milk (dairy or plant-based) with 1 tablespoon of vinegar or lemon juice. Let it sit for 5 minutes before using in the recipe.

How can I make this recipe gluten-free?

To make a gluten-free version of this Lemon Poppy Seed Loaf, substitute the all-purpose flour with a gluten-free all-purpose flour blend. Just ensure that the blend contains a binding agent like xanthan gum for the best results.

What is the best way to store leftover loaf?

Leftover Lemon Poppy Seed Loaf should be stored in an airtight container at room temperature for up to 3 days. For longer storage, wrap it tightly and freeze for up to 3 months. Thaw it before serving for the best texture.

Zesty Lemon Poppy Seed Delight

Final Thoughts

The Lemon Poppy Seed Loaf with Citrus Icing is truly a delightful treat that brings a burst of brightness to any occasion. The zesty lemon flavor combined with the subtle crunch of poppy seeds creates a satisfying balance, while the citrus icing adds a touch of sweetness that perfectly complements the loaf’s tanginess.

This is the kind of recipe I come back to again and again, especially when I want to brighten up a gloomy day or celebrate a small victory. The aroma that fills the kitchen as it bakes is absolutely heavenly! I encourage you to give this recipe a try; you might just find it becoming a beloved staple in your home. Don’t forget to share your results or even add your own unique twist—I can’t wait to see what you create!

Print
clock clock iconcutlery cutlery iconflag flag iconfolder folder iconinstagram instagram iconpinterest pinterest iconfacebook facebook iconprint print iconsquares squares iconheart heart iconheart solid heart solid icon

Lemon Poppy Seed Loaf


  • Author: Lily author
  • Total Time: 15 minute
  • Yield: 1 loaf 1x
Pin Recipe
Print Recipe

Description

This Lemon Poppy Seed Loaf is a delightful treat that combines zesty lemon flavor with crunchy poppy seeds. Topped with a citrus icing, it’s perfect for any occasion.


Ingredients

Scale
  • 1 ½ cups (190g) all-purpose flour
  • 1 teaspoon baking powder
  • ½ teaspoon baking soda
  • ½ teaspoon salt
  • 3 tablespoons poppy seeds
  • ½ cup (115g) unsalted butter, softened to room temperature
  • 1 cup (200g) granulated sugar
  • 2 large eggs
  • 1 teaspoon vanilla extract
  • 1 teaspoon lemon zest (from about 1 medium lemon)
  • ½ cup (120ml) buttermilk
  • 2 tablespoons fresh lemon juice
  • 1 cup (120g) powdered sugar
  • 2 tablespoons fresh lemon juice
  • 1 tablespoon orange juice
  • 1 teaspoon lemon zest (for garnish, optional)

Instructions

  1. Preheat your oven to 350°F (175°C). Grease a 9×5-inch loaf pan or line it with parchment paper for easy removal later.
  2. In a medium mixing bowl, whisk together 1 ½ cups of all-purpose flour, 1 teaspoon of baking powder, ½ teaspoon of baking soda, ½ teaspoon of salt, and 3 tablespoons of poppy seeds. This helps to evenly distribute the baking agents and ensures a uniform rise.
  3. In a large mixing bowl, cream together ½ cup of softened unsalted butter and 1 cup of granulated sugar using an electric mixer on medium speed for about 3-4 minutes, until the mixture is light and fluffy. Make sure to scrape down the sides of the bowl occasionally.
  4. Add 2 large eggs, 1 teaspoon of vanilla extract, and 1 teaspoon of lemon zest to the creamed butter and sugar, mixing until fully combined. You want a smooth consistency, so ensure there are no lumps of butter.
  5. In a small bowl, combine ½ cup of buttermilk and 2 tablespoons of fresh lemon juice. Alternately add the dry ingredients and buttermilk mixture to the butter mixture, starting and ending with the dry ingredients. Mix just until combined; do not overmix, as this can lead to a dense loaf.
  6. Pour the batter into the prepared loaf pan. Smooth the top with a spatula, ensuring it’s even. Bake in the preheated oven for 50-60 minutes, or until a toothpick inserted in the center comes out clean. The edges should be lightly golden brown, and the center should feel just set.
  7. Once baked, remove the loaf from the oven and allow it to cool in the pan for about 10 minutes. Then, transfer it to a wire rack to cool completely. Resist the urge to slice too soon, as it will be crumbly if it’s still warm.
  8. While the loaf is cooling, prepare the citrus icing. In a medium bowl, whisk together 1 cup of powdered sugar, 2 tablespoons of fresh lemon juice, and 1 tablespoon of orange juice until smooth. If the icing is too thick, you can add a little more juice to reach your desired consistency.
  9. Once the loaf is completely cool, drizzle the citrus icing over the top. If you like, sprinkle with an additional teaspoon of lemon zest for an extra pop of flavor and color.
  • Prep Time: 15 mins
  • Cook Time: 50-60 mins
  • Category: Dessert
  • Method: Baking
  • Cuisine: American

Nutrition

  • Serving Size: 1 slice
  • Calories: 200
  • Sugar: 15 g
  • Sodium: 150 mg
  • Fat: 8 g
  • Saturated Fat: 5 g
  • Unsaturated Fat: 3 g
  • Trans Fat: 0 g
  • Carbohydrates: 30 g
  • Fiber: 1 g
  • Protein: 3 g
  • Cholesterol: 40 mg

Keywords: Be careful not to overmix your batter; this is a common mistake that can lead to a dense loaf. Use room temperature ingredients for a smoother batter and even baking.

Did you make this recipe?

Share a photo and tag us — we can't wait to see what you've made!

  • Privacy Policy
  • Terms Of Service
  • Contact
  • About
  • GDPR

Copyright © 2025 Homesmad