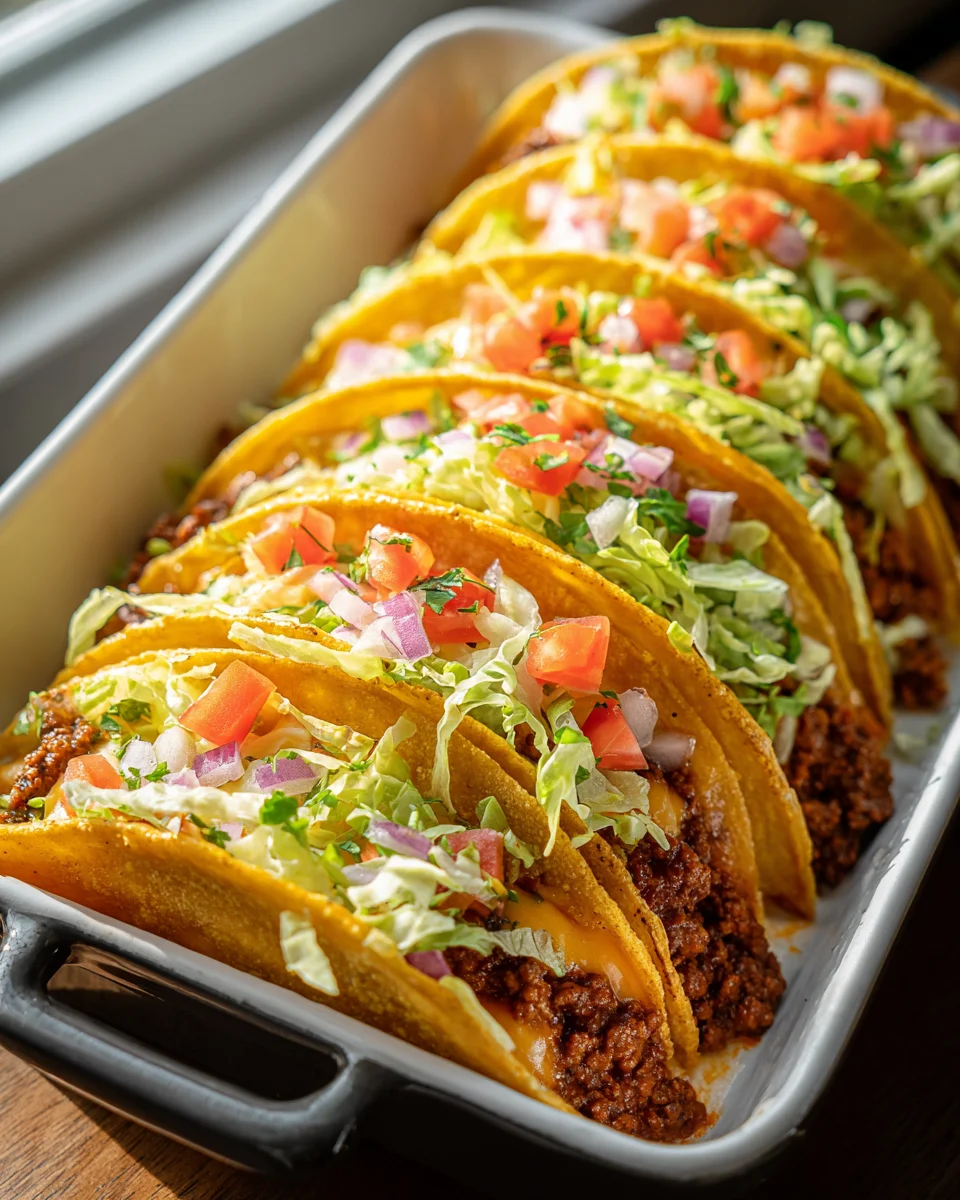
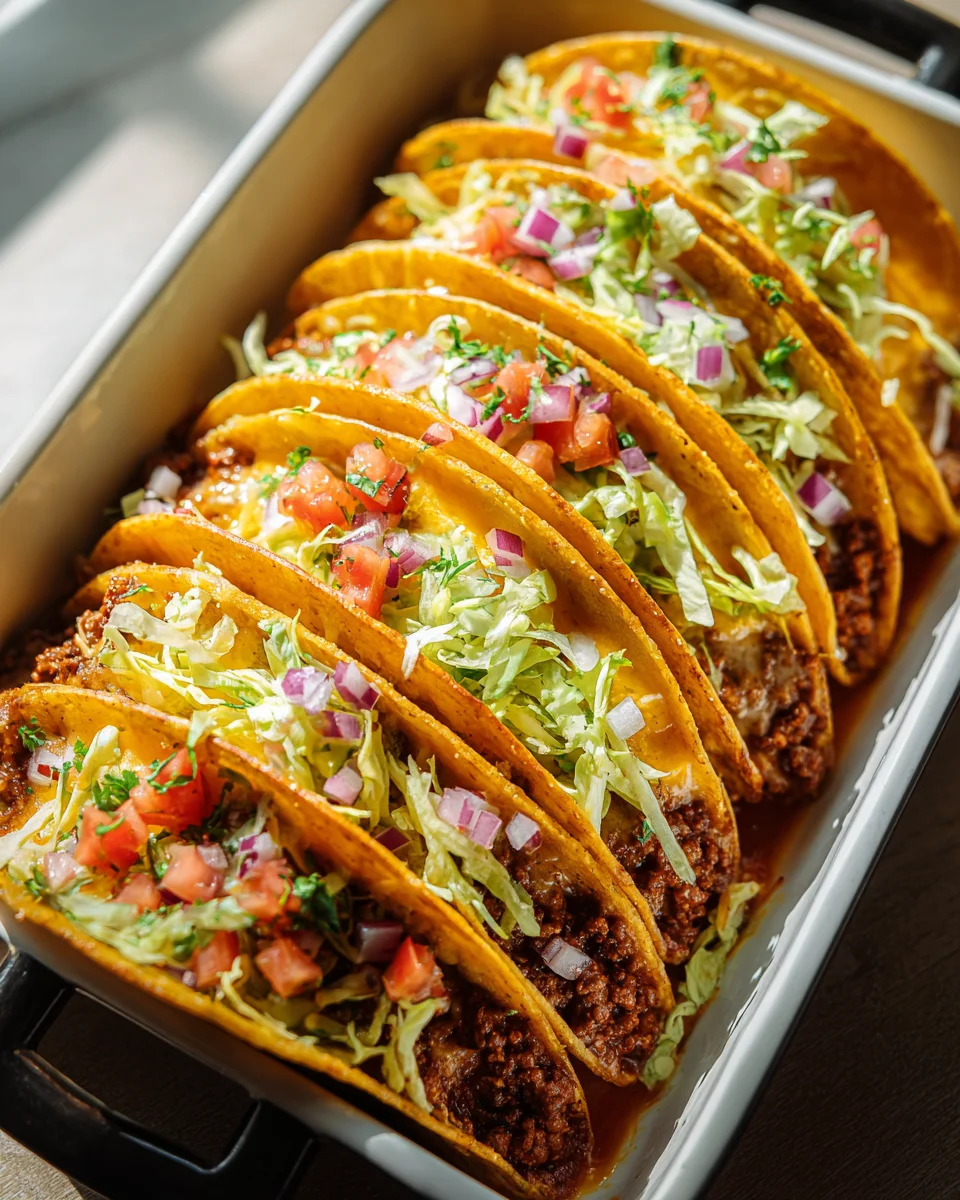
Oven Baked Cheesy Tacos Crispy Loaded Recipe – doesn’t that just roll off the tongue and promise a culinary adventure? I know what you’re thinking: another taco recipe? But trust me, this isn’t just any taco night. This is the taco night that will redefine your weeknight dinners, bringing an irresistible crunch and ooey-gooey cheesiness directly from your oven, effortlessly.
Tacos themselves boast a rich history, a vibrant staple of Mexican cuisine for centuries, celebrated globally for their incredible versatility and the communal joy they bring. While traditional tacos often involve the sizzle of frying or griddling, my modern take honors that beloved heritage by offering a less messy, yet equally delicious and undeniably crispy, preparation method right in your home oven.
Why You’ll Love This Crispy, Cheesy Delight
What truly sets this Oven Baked Cheesy Tacos Crispy Loaded Recipe apart is the pure magic that happens when those shells meet the heat. Imagine golden-brown taco shells, perfectly crisped to perfection without the hassle of individual frying, cradling a succulent, seasoned filling, all blanketed under a glorious layer of melted, bubbly cheese. It’s the ultimate harmony of textures and flavors – the savory crunch of the shell, the tender seasoned meat, and the creamy, rich goodness of the cheese. Plus, the unparalleled convenience of baking a whole tray at once means more precious time spent enjoying the meal with loved ones and less time slaving over a hot stove. It’s a guaranteed crowd-pleaser, incredibly easy to customize with your favorite toppings, and absolutely bursting with flavor in every single bite.
Ingredients:
- 1 ½ pounds Ground Beef (80/20 lean-to-fat ratio): I find this ratio offers the perfect balance of flavor and juiciness without being overly greasy. It’s absolutely essential for a rich and robust filling for our Oven Baked Cheesy Tacos Crispy Loaded Recipe.
- 1 tablespoon Olive Oil: Just a touch to get our aromatics going and prevent sticking. Any good quality olive oil will do the trick.
- 1 large Yellow Onion: Finely diced. The sweetness of the cooked onion will add incredible depth to our taco meat.
- 3 cloves Garlic: Minced. Fresh garlic is key here; it brings a pungent warmth that complements the beef beautifully.
- 2 tablespoons Taco Seasoning: You can use your favorite store-bought blend, or if you’re feeling ambitious, a homemade mix of chili powder, cumin, paprika, oregano, and a pinch of cayenne. This is the flavor backbone of our Oven Baked Cheesy Tacos Crispy Loaded Recipe.
- 1 teaspoon Smoked Paprika: While optional, I highly recommend it! It adds a lovely smoky depth that really elevates the taco filling.
- ½ teaspoon Salt: Adjust to your taste, but this is a good starting point to bring out all the flavors.
- ¼ teaspoon Black Pepper: Freshly ground, always.
- 2 tablespoons Tomato Paste: This concentrated tomato flavor adds a wonderful umami boost and a slight tang, thickening our sauce slightly.
- ¾ cup Beef Broth (low sodium): Using low sodium allows us to control the salt content precisely. It helps to simmer the meat filling to perfection, ensuring it’s juicy and flavorful.
- 12-16 Soft Flour Tortillas (6-inch or 8-inch): These are crucial for creating those wonderfully crispy, yet pliable, taco shells that are the star of our Oven Baked Cheesy Tacos Crispy Loaded Recipe. Choose a size that fits comfortably in your baking dish.
- 2 cups Shredded Sharp Cheddar Cheese: Freshly grated from a block is always superior for melt and flavor compared to pre-shredded. This is one of the “cheesy” components!
- 1 cup Shredded Monterey Jack Cheese: Its fantastic melting qualities will give us that gooey, stretchy cheese pull we all crave in a truly loaded taco.
- Optional Toppings (highly recommended for a truly Loaded experience!):
- Shredded Iceberg Lettuce: For that classic taco crunch and refreshing contrast.
- Diced Roma Tomatoes: Fresh, juicy burst of acidity.
- Diced Red Onion: Adds a sharp, vibrant bite.
- Fresh Cilantro: Chopped, for a bright, herbaceous note.
- Sour Cream or Greek Yogurt: A cool, creamy counterpoint to the rich filling.
- Salsa (your favorite): Mild, medium, or hot – choose what you love!
- Guacamole or Sliced Avocado: Creamy, healthy fat that tastes amazing.
- Pickled Jalapeños: For a tangy, spicy kick if you like heat.
- Hot Sauce: A dash for those who like extra zing.
1. Preparing the Irresistible Taco Filling
-
Browning the Beef for Maximum Flavor:
I always start by placing a large, heavy-bottomed skillet or a Dutch oven over medium-high heat. Add the tablespoon of olive oil. Once shimmering, add your 1 ½ pounds of ground beef. Now, this is a crucial step for our Oven Baked Cheesy Tacos Crispy Loaded Recipe: using a wooden spoon or a spatula, break up the ground beef into small, uniform crumbles. We want to ensure it browns evenly. Cook, stirring occasionally, for about 8-10 minutes, or until the beef is deeply browned and no pink remains. A good browning job here develops a rich, savory base that will infuse every bite of your tacos.Draining the Excess Fat:
Once the beef is beautifully browned, carefully tilt the skillet and spoon out any excess fat. You can also use a colander set over a heatproof bowl. I usually prefer to leave just a tiny bit of fat behind, as it carries flavor, but removing the majority prevents our tacos from becoming greasy. If you’re using very lean beef, you might not have much fat to drain, which is perfectly fine! -
Sautéing the Aromatics:
With most of the fat removed, return the skillet to medium heat. Add your finely diced yellow onion to the pan. Cook, stirring frequently, for about 5-7 minutes, until the onion has softened and turned translucent. Make sure to scrape up any browned bits from the bottom of the pan – those are flavor bombs! Once the onion is tender, add your 3 cloves of minced garlic. Cook for just 1 minute more, stirring constantly, until fragrant. Be careful not to burn the garlic, as it can turn bitter very quickly. The combination of sweet onion and pungent garlic is truly the aromatic foundation of our delicious filling for these Oven Baked Cheesy Tacos Crispy Loaded Recipe. -
Seasoning the Meat to Perfection:
Now it’s time to bring in the big flavors! Return the browned beef to the skillet with the softened onions and garlic. Sprinkle in the 2 tablespoons of taco seasoning, 1 teaspoon of smoked paprika (if using, and I really hope you do!), ½ teaspoon of salt, and ¼ teaspoon of black pepper. Stir everything together thoroughly, ensuring the beef is well-coated with all those wonderful spices. Let it cook for another minute, stirring, to toast the spices lightly – this really helps to deepen their flavor profile. Then, stir in the 2 tablespoons of tomato paste. The tomato paste will add a fantastic depth of umami and a slight tang, which is a secret weapon for a truly rich taco filling. Cook for another minute, stirring it into the beef mixture. -
Simmering to Juicy Tenderness:
Finally, pour in the ¾ cup of beef broth. Give everything a good stir, making sure all the ingredients are well combined and any bits stuck to the bottom of the pan are scraped up. Bring the mixture to a gentle simmer, then reduce the heat to low, cover the skillet, and let it cook for about 10-15 minutes. This simmering time allows all the flavors to meld together beautifully, and the beef absorbs the liquid, becoming incredibly juicy and tender. You’ll notice the sauce will thicken slightly as it simmers. Once done, remove the lid and if the mixture seems too liquidy, you can uncover it and let it simmer for a few more minutes until it reaches your desired consistency – I prefer it slightly saucy, but not watery, as it will continue to cook a bit in the oven. This rich and savory filling is now ready for our Oven Baked Cheesy Tacos Crispy Loaded Recipe!
2. Crafting the Crispy Baked Taco Shells
-
Preheating Your Oven and Preparing Your Baking Dish:
Before we start assembling, let’s get our oven ready. Preheat your oven to a good hot temperature, around 400°F (200°C). This high heat is essential for achieving that glorious crispy texture on our tortillas. While the oven preheats, lightly grease a 9×13-inch baking dish (or two, depending on how many tacos you’re making and the size of your tortillas) with cooking spray or a thin layer of olive oil. I sometimes line it with parchment paper for easier cleanup, but it’s not strictly necessary. -
Preparing and Softening Your Tortillas:
This is where the magic begins for creating perfectly pliable, yet ultimately crispy, shells for our Oven Baked Cheesy Tacos Crispy Loaded Recipe. Soft flour tortillas can sometimes be a little stiff, so I like to briefly warm them up. You can do this by wrapping a stack of 6-8 tortillas in a damp paper towel and microwaving them for 30 seconds, or by heating them briefly on a dry skillet over medium heat for about 10-15 seconds per side until they are warm and flexible. This makes them much easier to fold without cracking. -
The Initial Cheese Layer – A Secret to Non-Soggy Tacos:
Lay out a tortilla flat on your work surface. Take a small handful of the shredded sharp cheddar cheese (about 1-2 tablespoons) and sprinkle it lightly over one half of the tortilla. This might seem counter-intuitive to put cheese before the meat, but trust me on this! This layer of cheese acts as a barrier, preventing the delicious meat filling from making the tortilla soggy, and it also helps to “glue” the taco shut as it bakes. It’s a genius little trick for a truly crispy taco. -
Filling the Tortillas with Our Irresistible Mixture:
Now, generously spoon about ¼ to ⅓ cup of your warm, seasoned ground beef filling over the cheese layer on one half of the tortilla. Don’t overfill, or they’ll be difficult to close and might burst during baking. We want them loaded, but structurally sound! Spread the meat evenly over the cheese. -
Adding More Cheesy Goodness on Top:
Sprinkle another layer of both shredded sharp cheddar and Monterey Jack cheese over the meat filling. This is where we ensure our tacos are truly cheesy! Use about 2-3 tablespoons per taco, ensuring a good amount of both cheeses. The Monterey Jack will provide that incredible melt, while the sharp cheddar adds robust flavor. -
Folding and Arranging Your Tacos for Baking:
Carefully fold the empty half of the tortilla over the filling, creating a crescent shape. Gently press down to seal the edges as best you can. Arrange the folded tacos snugly in your prepared baking dish, seam-side down. Placing them close together helps them maintain their folded shape during baking. You might need to overlap them slightly, or use a second baking dish if you have a lot of tacos or larger tortillas. This strategic placement is key to getting them perfectly Oven Baked Cheesy Tacos Crispy Loaded Recipe.
3. Baking Our Cheesy Tacos to Golden Perfection
-
The First Bake – Achieving Initial Crispness:
Place your baking dish filled with the folded tacos into your preheated 400°F (200°C) oven. Let them bake for 15-20 minutes. During this initial baking period, the tortillas will start to turn golden brown and develop a delightful crispness, especially along the edges. The cheese inside will melt beautifully, helping to seal the tacos and infuse the filling with even more flavor. Keep an eye on them to ensure they’re browning nicely but not burning. You’ll begin to smell that incredible aroma of seasoned beef and melting cheese filling your kitchen. -
Adding the Final Cheese Layer for a Glorious Melt:
After 15-20 minutes, carefully remove the baking dish from the oven. This is the moment to really make these Oven Baked Cheesy Tacos Crispy Loaded Recipe! Generously sprinkle any remaining shredded cheddar and Monterey Jack cheese over the tops of all the tacos. We want a truly loaded cheese experience here, so don’t be shy! This top layer of cheese will melt and get wonderfully golden and bubbly, adding another fantastic textural and flavor component. -
The Second Bake – Melting, Bubbling, and Golden Brown Edges:
Return the baking dish to the oven. Continue to bake for another 5-10 minutes, or until the cheese on top is completely melted, bubbly, and has turned a lovely golden-brown. If you like extra crispy edges and a slightly browned cheese crust, you can even switch your oven to broil for the last minute or two, but watch it very closely as it can go from perfect to burnt in seconds! This step ensures every bite of our Oven Baked Cheesy Tacos Crispy Loaded Recipe is incredibly cheesy and utterly satisfying. -
Resting for Structural Integrity and Easier Handling:
Once your tacos are perfectly baked with golden, bubbling cheese, remove the baking dish from the oven. It’s tempting to dive right in, but I urge you to resist for just a few minutes! Let the tacos rest in the baking dish for 5-10 minutes. This resting period allows the cheese to set slightly, which makes the tacos much easier to handle and prevents the hot filling from spilling out. It also lets the internal temperatures equalize a bit, making for a more enjoyable eating experience. Trust me, it’s worth the short wait for these glorious Oven Baked Cheesy Tacos Crispy Loaded Recipe!
4. Loading Up and Serving Your Oven Baked Cheesy Tacos
-
Preparing Your Fresh Toppings:
While your tacos are resting, now is the perfect time to finalize all your delicious toppings. Shred your iceberg lettuce thinly – that classic crunch is unbeatable! Dice your Roma tomatoes into small, even pieces. Finely dice your red onion for a sharp, fresh bite. Chop your fresh cilantro. Spoon out your sour cream, salsa, and guacamole into separate small bowls. Slice those pickled jalapeños if you’re using them. Having all your toppings prepped and ready will make the assembly process smooth and enjoyable, ensuring your Oven Baked Cheesy Tacos Crispy Loaded Recipe are truly loaded. -
The Grand Assembly – Customizing Your Crispy, Cheesy Taco:
Carefully remove each baked taco from the dish using a spatula. Transfer them to individual serving plates. Now comes the fun part: loading them up with all your favorite fresh toppings! I usually start with a generous spoonful of shredded lettuce, followed by diced tomatoes and red onion. Then, a dollop of sour cream or a spoonful of guacamole. A sprinkle of fresh cilantro adds a bright finish. Don’t forget a drizzle of your favorite salsa or a few slices of pickled jalapeños for an extra kick! Each bite of these Oven Baked Cheesy Tacos Crispy Loaded Recipe should be a symphony of textures and flavors. -
Serving Suggestions and Enjoying Your Culinary Creation:
These Oven Baked Cheesy Tacos Crispy Loaded Recipe are fantastic on their own, but if you’re looking to make it a full meal, they pair wonderfully with a side of Mexican rice, black beans, or a simple corn salad. A refreshing margarita or a cold cerveza makes for a perfect beverage pairing. Gather your friends and family, set out all the toppings buffet-style, and let everyone customize their own crispy, cheesy, and utterly delicious tacos. Get ready to enjoy a taco night that’s truly a step above the rest!
Conclusion:
If you’ve followed along with us, you know that this isn’t just another taco recipe; it’s a game-changer, a weeknight hero, and a guaranteed crowd-pleaser that will quickly become a cherished staple in your culinary repertoire. We’ve journeyed through the simple steps of transforming humble ingredients into something truly extraordinary, and I genuinely believe this recipe offers an unbeatable combination of flavor, texture, and convenience that is hard to resist. The magic truly happens in the oven, where the shells become perfectly crisp, the cheese melts into a gooey, savory blanket, and all the fillings coalesce into a harmonious symphony of taste. The ease of preparation, especially when cooking for a group, means you spend less time fussing in the kitchen and more time enjoying the company of your loved ones, or simply savoring a well-deserved, incredibly delicious meal after a long day.
Why This Recipe is an Absolute Must-Try:
This isn’t merely about assembling tacos; it’s about crafting an experience. The genius lies in the baking process, which not only ensures every bite delivers that satisfying crunch but also thoroughly heats the fillings and perfectly melts the cheese, binding everything together in a way that frying simply can’t achieve. You get that delightful contrast between the outer crispness and the tender, juicy interior, loaded with savory seasoned meat (or your preferred protein) and vibrant toppings. It’s hearty without being heavy, incredibly flavorful, and surprisingly adaptable. For families, it’s a brilliant way to get everyone excited about dinner, and for individuals, it offers fantastic batch-cooking potential for delicious leftovers. This particular Oven Baked Cheesy Tacos Crispy Loaded Recipe truly elevates the classic taco to new, irresistible heights, promising a culinary delight that consistently delivers on taste and satisfaction.
Elevate Your Tacos: Serving Suggestions and Creative Variations:
Once you’ve mastered the core recipe, the real fun begins with customization! These tacos are incredibly versatile, inviting endless possibilities for personalization. For serving, I always recommend a fresh and vibrant spread of toppings. Think a classic pico de gallo, chunky homemade guacamole, a dollop of cool sour cream or plain Greek yogurt, finely shredded lettuce, and a sprinkle of fresh cilantro and diced red onion. Don’t forget a squeeze of fresh lime juice to brighten all those rich flavors! For those who love a bit of heat, sliced pickled or fresh jalapeños, a drizzle of your favorite hot sauce, or a creamy chipotle aioli will add an exciting kick.
As for variations, feel free to experiment with the fillings. While ground beef is traditional and delicious, shredded chicken (even rotisserie chicken for a super speedy meal!), ground turkey, or a plant-based crumble can be fantastic alternatives. For a vegetarian twist, sautéed bell peppers, onions, zucchini, and mushrooms, seasoned with taco spices, make an incredible filling. You could also try different cheese blends – a fiery pepper jack, a smoky gouda, or even a mix of Monterey Jack and cotija can introduce new dimensions of flavor. Consider turning these into “taco boats” using larger, softer flour tortillas that are baked until crispy at the edges, or even a taco casserole for a crowd. Don’t limit yourself to just the standard toppings; try a corn and black bean salsa, a spicy mango salsa, or even a quick pickled red onion for an added zing. Pairing them with sides like Mexican rice, refried beans, or a simple green salad dressed with a zesty vinaigrette completes the meal beautifully.
So, please, don’t just read about this culinary marvel; experience it for yourself! I truly encourage you to head into your kitchen, gather your ingredients, and give this incredible recipe a try. It’s such a rewarding dish to make, and I promise you’ll be delighted with the results. Once you’ve savored your own batch of perfectly baked tacos, I would absolutely love for you to share your experience with me and our community! Did you add a unique twist? Discover a new favorite topping? Snap a photo and let us know your thoughts. Your feedback and creative ideas inspire us all, and I can’t wait to hear how this recipe becomes a star in your home. Happy cooking, and even happier eating!
Oven Baked Cheesy Tacos: Crispy Loaded Perfection!
Oven Baked Cheesy Tacos Crispy Loaded Recipe – doesn’t that just roll off the tongue and promise a culinary adventure? I know what you’re thinking: another taco recipe? But trust me, this isn’t just any taco night. This is the taco night that will redefine your weeknight dinners, bringing an irresistible crunch and ooey-gooey cheesiness directly from your oven, effortlessly.
Ingredients
Instructions
Important Information
Nutrition Facts (Per Serving)
It is important to consider this information as approximate and not to use it as definitive health advice.
Allergy Information
Please check ingredients for potential allergens and consult a health professional if in doubt.