• Skip to primary navigation
  • Skip to main content
  • Skip to primary sidebar
Homesmad

Homesmad

  • Home
  • Breakfast & Brunch
  • Appetizers & Snacks
  • Dinner
  • Dessert
  • About
  • Privacy Policy
  • Contact
Homesmad
  • Home
  • Breakfast & Brunch
  • Appetizers & Snacks
  • Dinner
  • Dessert
  • About
  • Privacy Policy
  • Contact

Spanish Churro Pancakes: A Sweet Breakfast Treat!

November 25, 2025 by Lily author

Spanish Churro Pancakes Breakfast Treat – now doesn’t that just sound like the most delightful way to start your day? Imagine waking up to the irresistible aroma of cinnamon sugar, a scent traditionally associated with the crispy, golden goodness of a Spanish churro, now married perfectly with the fluffy comfort of your favorite breakfast pancake. I’m incredibly excited to guide you through creating this truly unique culinary marvel, transforming your morning routine into something extraordinary.

Churros, those iconic fried dough pastries, have a rich history originating from Spain, where they are often enjoyed for breakfast or as a late-night snack, typically dipped in thick hot chocolate. Their delightful ridged texture and sweet, crunchy exterior have made them a global sensation. On the other hand, pancakes are a universal symbol of breakfast comfort, loved for their soft texture and versatility. This recipe bridges these two beloved traditions, offering a fresh perspective on morning indulgence that honors both culinary worlds.

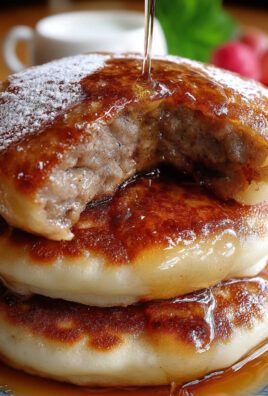
People absolutely adore this dish because it masterfully combines the nostalgic warmth and spice of churros with the familiar, satisfying ease of pancakes. You get the best of both worlds: the beloved cinnamon-sugar crust of a churro, imparting a slight crispness and incredible flavor, all on a tender, fluffy pancake base. It’s a game-changer for anyone looking to elevate their breakfast routine beyond the ordinary, providing a texture and taste experience that is both novel and comforting. Get ready to experience a truly special morning with this extraordinary Spanish Churro Pancakes Breakfast Treat.

Spanish Churro Pancakes: A Sweet Breakfast Treat! this RECIPE

Ingredients:

  • For the Spanish Churro Pancake Batter:
    • 1 ½ cups (180g) all-purpose flour: I find that a good quality unbleached flour works best for a tender crumb.
    • 2 tablespoons granulated sugar: Just enough to give our pancakes a hint of sweetness, complementing the churro coating.
    • 2 teaspoons baking powder: This is our leavening agent, ensuring our pancakes are light and fluffy, not dense.
    • ½ teaspoon baking soda: Working alongside the baking powder, it helps create that beautiful rise and a delicate texture.
    • ½ teaspoon fine sea salt: Essential for balancing the flavors and enhancing the sweetness. Don’t skip it!
    • 1 ½ cups (360ml) buttermilk: My secret for incredibly tender and moist pancakes. The acidity reacts with the baking soda for extra lift. If you don’t have buttermilk, you can make your own by adding 1 tablespoon of white vinegar or lemon juice to regular milk and letting it sit for 5-10 minutes.
    • ¼ cup (60ml) whole milk: I like to use whole milk for richness, but 2% or even almond milk can work in a pinch.
    • 2 large eggs: These bind everything together and add richness to the batter. Make sure they’re at room temperature for better emulsion.
    • ¼ cup (60g) unsalted butter, melted and slightly cooled: This adds wonderful flavor and moisture to our pancakes. Unsalted butter gives me control over the salt content.
    • 1 teaspoon pure vanilla extract: A must for any great pancake, enhancing all the other flavors.
  • For the Cinnamon-Sugar Coating:
    • ½ cup (100g) granulated sugar: The base for our iconic churro coating.
    • 2 tablespoons ground cinnamon: This is where the classic churro flavor truly shines. I always recommend using fresh, fragrant cinnamon for the best results.
  • For Serving (Optional but Highly Recommended):
    • Maple syrup or honey: A classic pancake topping, always welcome.
    • Dulce de leche or chocolate sauce: For an extra decadent touch, truly embracing the churro spirit.
    • Fresh berries: A burst of freshness to cut through the richness.
    • Whipped cream: Because, why not?

Equipment You’ll Need:

  • Large mixing bowl
  • Medium mixing bowl
  • Whisk
  • Rubber spatula
  • Measuring cups and spoons
  • Non-stick griddle or large frying pan
  • Ladle or ¼ cup measuring cup for portioning batter
  • Wire cooling rack
  • Baking sheet (to keep pancakes warm)
  • Shallow dish or pie plate for the cinnamon-sugar mixture
  • Pastry brush (optional, for buttering the griddle)

Preparing the Churro Pancake Batter:

  1. Combine Dry Ingredients: In a large mixing bowl, I start by whisking together my all-purpose flour, granulated sugar, baking powder, baking soda, and fine sea salt. I make sure to whisk them really well for about 30 seconds to ensure all the leavening agents and salt are evenly distributed throughout the flour. This is a crucial step for achieving consistently fluffy pancakes. You want to see no lumps and a uniform color in your dry mix.
  2. Whisk Wet Ingredients: In a separate medium mixing bowl, I crack my two large eggs and give them a good whisk until they’re light and frothy. Then, I pour in the buttermilk, whole milk, and pure vanilla extract, whisking until everything is just combined. Finally, I add the melted butter, ensuring it’s slightly cooled so it doesn’t scramble the eggs when added. Whisk until this mixture is smooth and emulsified.
  3. Combine Wet and Dry Mixtures: Now for the magic! I pour the wet ingredients into the dry ingredients. With a rubber spatula, I gently fold the mixture together. This is where you need to be careful not to overmix! I mix just until the flour streaks have disappeared. It’s perfectly fine, and even desirable, to have a few small lumps in the batter. Overmixing develops the gluten in the flour, which leads to tough, chewy pancakes – and we’re aiming for light and tender.
  4. Rest the Batter: This is a step I never skip! I let the pancake batter rest at room temperature for at least 10-15 minutes, or even up to 30 minutes. During this time, the gluten relaxes, the flour fully hydrates, and the baking powder and baking soda begin to activate, resulting in an even fluffier and more tender pancake. You’ll notice the batter thickens slightly and might even see tiny bubbles forming on the surface. This rest period is key to achieving that perfect light texture for your Spanish Churro Pancakes Breakfast Treat.

Cooking Your Spanish Churro Pancakes:

  1. Preheat the Griddle: While the batter is resting, I place a large non-stick griddle or a heavy-bottomed frying pan over medium-low heat. It’s important to start with a lower heat setting to ensure even cooking without burning the exterior. A perfectly heated griddle is key to beautiful, golden pancakes. I like to test the heat by flicking a few drops of water onto the surface; they should sizzle and evaporate within a couple of seconds.
  2. Grease the Griddle (if needed): Once the griddle is hot, I lightly brush it with a tiny amount of butter or oil. If your non-stick pan is truly non-stick, you might not need much, but a little fat helps with browning and prevents sticking. I make sure not to use too much, as excess fat can make the pancakes greasy.
  3. Portion and Cook the Pancakes: Using a ¼ cup measuring cup or a ladle, I pour the batter onto the hot griddle, forming pancakes that are about 3-4 inches in diameter. I make sure not to overcrowd the pan, leaving enough space between each pancake for easy flipping. Typically, I cook 3-4 pancakes at a time, depending on the size of my griddle.
  4. Watch for Bubbles and Golden Edges: Cook the pancakes for about 2-3 minutes on the first side. You’ll know they’re ready to flip when you see bubbles forming on the surface and around the edges, and the edges themselves start to look set and slightly dry. The bottom should be a beautiful golden-brown color.
  5. Flip and Finish Cooking: With a thin spatula, I carefully slide it under each pancake and flip it over. Cook for another 1-2 minutes on the second side, or until it’s also golden brown and cooked through. To check for doneness, you can gently press the center of a pancake; if it springs back, it’s likely done.
  6. Keep Warm: As I cook the pancakes, I transfer the finished ones to a baking sheet and keep them warm in a preheated oven set to its lowest temperature (around 200°F or 90°C). This ensures all my Spanish Churro Pancakes Breakfast Treat are warm and ready to be coated and served simultaneously.

Crafting the Cinnamon-Sugar Coating:

  1. Combine Cinnamon and Sugar: While the pancakes are cooking or immediately after they are done, I prepare the classic churro coating. In a shallow dish or pie plate, I combine the granulated sugar and ground cinnamon. I use a fork or a small whisk to mix them thoroughly until the cinnamon is evenly distributed throughout the sugar and there are no clumps. This aromatic mixture is what truly transforms these into a Spanish Churro Pancakes Breakfast Treat!
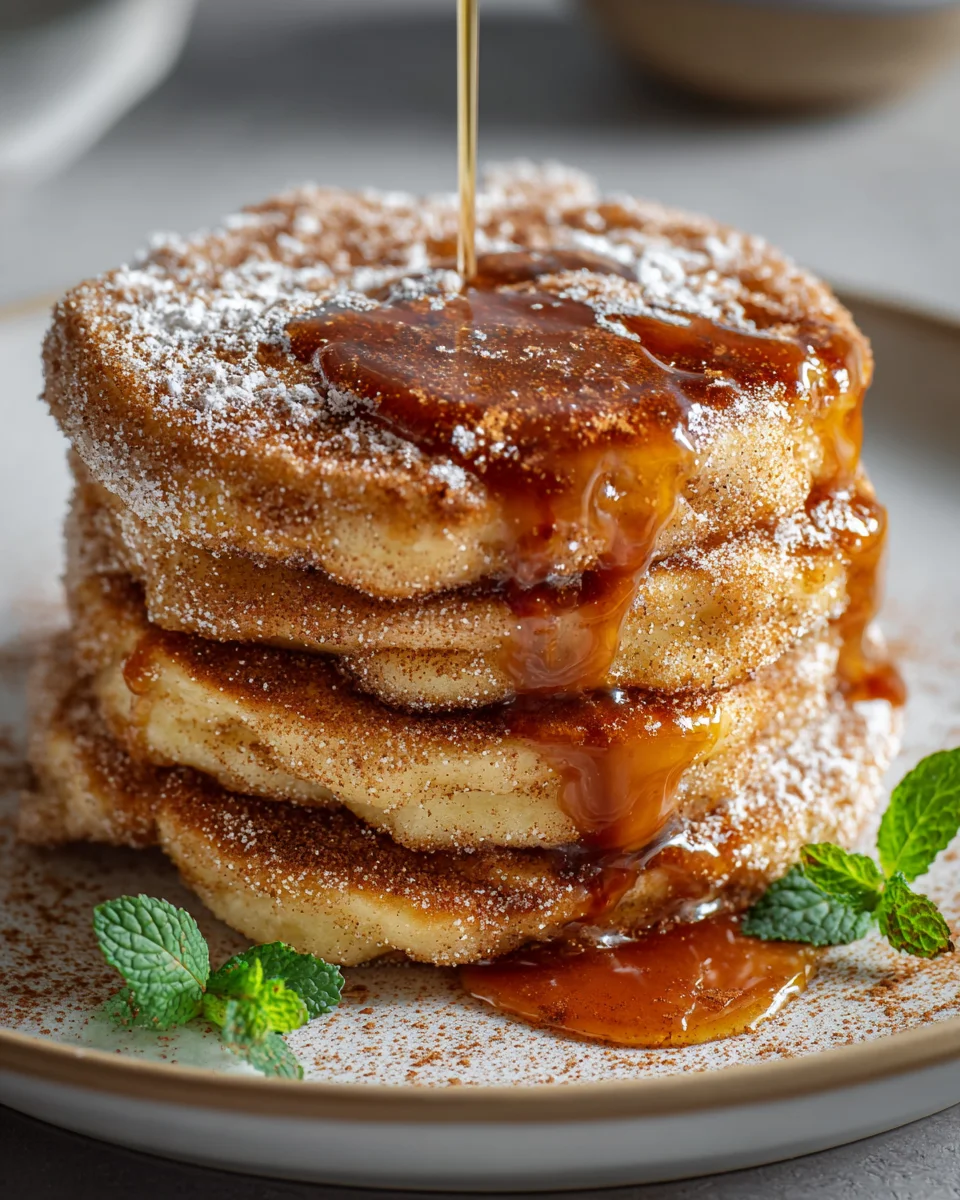
  2. Coat the Warm Pancakes: As soon as a pancake comes off the griddle and while it’s still warm (ideally hot), I carefully place it into the cinnamon-sugar mixture. I gently press it down and flip it over to ensure both sides are generously coated. The warmth of the pancake helps the sugar adhere beautifully. I make sure to do this with each pancake individually, immediately after cooking, for the best result.

Assembling and Serving Your Spanish Churro Pancakes Breakfast Treat:

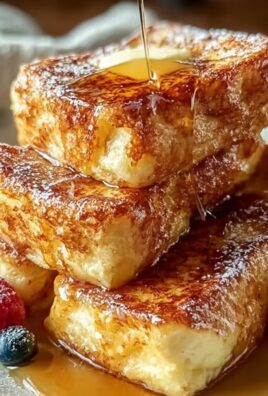
  1. Stack and Serve: Once all your churro pancakes are coated, I like to stack a few on a plate, creating an inviting visual. These pancakes are delightful on their own, allowing the churro flavor to shine through.
  2. Add Your Favorite Toppings: For an extra special touch, I often drizzle them with warm maple syrup, a rich chocolate sauce, or decadent dulce de leche. A dollop of whipped cream and a sprinkle of fresh berries can also elevate this breakfast treat to new heights. Serve immediately and enjoy the warm, sweet, and spiced goodness of your homemade Spanish Churro Pancakes Breakfast Treat!

Chef’s Notes and Tips for the Perfect Spanish Churro Pancakes:

  1. Don’t Overmix the Batter: I cannot stress this enough! Overmixing is the most common mistake when making pancakes. It develops the gluten, making your pancakes tough and chewy instead of light and fluffy. A few lumps are perfectly acceptable and actually desirable. Mix only until the dry ingredients are just moistened.
  2. The Importance of Buttermilk: Buttermilk is truly my secret weapon for tender pancakes. Its acidity reacts with the baking soda to create more air bubbles, leading to a lighter, softer texture. If you don’t have buttermilk, don’t fret! You can easily make a substitute by adding 1 tablespoon of white vinegar or lemon juice to a measuring cup, then filling the rest with regular milk (whole milk works best) to make 1 ½ cups. Let it sit for 5-10 minutes until it slightly curdles.
  3. Griddle Temperature is Key: Achieving the perfect golden-brown exterior and a fully cooked interior relies heavily on the correct griddle temperature. If it’s too hot, the pancakes will burn on the outside before cooking through. If it’s too cool, they’ll turn out pale and possibly dry. Medium-low heat is usually ideal. I always recommend doing a test pancake first to adjust the heat as needed.
  4. Resting the Batter Makes a Difference: This short resting period (10-15 minutes) allows the flour to fully hydrate, the gluten to relax, and the leavening agents to begin their work. You’ll notice the batter thickens slightly, and this translates to more tender, airy pancakes. Don’t rush this step!
  5. Quality of Ingredients: For a truly exceptional Spanish Churro Pancakes Breakfast Treat, I always suggest using high-quality ingredients. Fresh eggs, good butter, pure vanilla extract, and fragrant ground cinnamon will make a noticeable difference in the final taste and aroma.
  6. Keeping Pancakes Warm: If you’re cooking for a crowd, keeping cooked pancakes warm is essential. I use a baking sheet placed in a preheated oven set to its lowest temperature (around 200°F or 90°C). Arrange the pancakes in a single layer or slightly overlapping, and cover loosely with foil. This prevents them from getting cold or soggy while you finish the batch.
  7. Get Creative with Toppings: While the cinnamon-sugar coating is iconic, feel free to get creative with additional toppings. A drizzle of homemade caramel sauce, a dollop of cream cheese frosting (like a churro cheesecake!), or even some toasted nuts could add another layer of flavor and texture to your Spanish Churro Pancakes Breakfast Treat. My personal favorite is a rich chocolate ganache or a simple melted dark chocolate drizzle.
  8. Batch Freezing for Later: These pancakes freeze wonderfully! Once completely cooled, I place them in a single layer on a baking sheet and freeze until solid. Then, I transfer them to an airtight freezer bag, separating layers with parchment paper. To reheat, I simply pop them in the toaster, microwave, or oven until warm and soft. This makes for a quick and easy breakfast on busy mornings!
  9. Consistency of the Batter: The batter should be thick enough to hold its shape when poured but still pourable. If it seems too thick after resting, you can add a tablespoon or two of milk to thin it slightly. If it’s too thin, a tablespoon of flour can help, but avoid adding too much extra flour to prevent toughness.
  10. Don’t Forget the Salt: A common mistake is to reduce or omit salt in sweet recipes. Salt is a flavor enhancer, and in these churro pancakes, it balances the sweetness of the sugar and cinnamon, making all the other flavors pop. A good quality fine sea salt is my choice.

Spanish Churro Pancakes: A Sweet Breakfast Treat!

Conclusion:

Well, there you have it! We’ve journeyed through the steps to create what I truly believe will become a new staple in your breakfast repertoire. This isn’t just another pancake recipe; it’s an experience, a delightful culinary crossover that promises to elevate any morning from mundane to magnificent. I can confidently say that if you’re looking for a dish that combines the comforting fluffiness of your favorite pancakes with the irresistible, cinnamon-sugar-coated crunch of a classic churro, then this recipe is an absolute must-try. It truly delivers on all fronts: flavor, texture, and an undeniable touch of joy. The ease of preparation, coupled with the impressive outcome, makes it perfect for a leisurely weekend brunch or even a special weekday indulgence. You’re not just making pancakes; you’re crafting a memory, a moment of pure, unadulterated breakfast bliss that will have everyone asking for seconds, maybe even thirds!

What makes this particular recipe stand out is its incredible versatility and the sheer delight it brings. Imagine waking up to the incredible aroma of cinnamon and vanilla filling your kitchen, knowing that in just a short while, you’ll be enjoying a plate of these extraordinary creations. The subtle crisp edges, the tender interior, and that glorious dusting of cinnamon sugar truly make for an unforgettable bite. This isn’t just food; it’s a celebration, a little taste of happiness to kickstart your day. I’ve found that even the most reluctant morning eaters can’t resist the charm of these beauties. The effort-to-reward ratio here is off the charts, making it accessible for bakers of all skill levels to achieve a truly spectacular result. Trust me when I say, once you try this recipe, your breakfast game will never be the same again. It’s a testament to how simple ingredients can come together to create something truly magical and memorable.

Elevate Your Experience: Serving Suggestions & Creative Variations

While our Spanish Churro Pancakes Breakfast Treat is utterly divine on its own, hot off the griddle and generously coated with cinnamon sugar, I always encourage you to get creative and make them uniquely yours! For a truly decadent experience, consider serving them alongside a warm bowl of rich, melted dark chocolate for dipping – just like traditional churros. A drizzle of homemade salted caramel sauce or a generous dollop of whipped cream would also be absolutely spectacular. Fresh berries like raspberries or strawberries add a lovely tart contrast to the sweetness, both in flavor and vibrant color. And for those who love an extra layer of texture, a sprinkle of toasted chopped almonds or pecans could be a fantastic addition.

But why stop there? Let’s talk variations! You could infuse the pancake batter with a hint of orange zest for a brighter, more citrusy note, or perhaps a touch of almond extract to complement the cinnamon. For a truly indulgent brunch, transform them into a dessert by adding a scoop of vanilla bean ice cream on top, letting it slowly melt into the warm pancakes – a definite crowd-pleaser! If you’re feeling adventurous, try experimenting with different sugar coatings; a brown sugar and cinnamon mix, or even a spiced sugar with a pinch of nutmeg or cardamom, could offer fascinating new dimensions of flavor. Remember, the kitchen is your playground, and these pancakes are a wonderful canvas for your culinary imagination. Don’t be afraid to experiment with syrups beyond the classic maple; a spiced pear syrup or a berry compote would also be incredibly delightful, adding another layer of homemade goodness to your breakfast table. The possibilities are truly endless, limited only by your creativity and what delicious ingredients you have on hand.

Your Turn: Try, Share, and Inspire!

Now that you have all the tools and inspiration, I sincerely hope you feel excited and empowered to dive into your kitchen and whip up a batch of these incredible Spanish Churro Pancakes. There’s nothing quite like the satisfaction of creating something truly special from scratch, and I promise you, the smiles these pancakes will bring to your family and friends’ faces will be worth every single step. Don’t be intimidated; the process is straightforward, and the results are consistently fantastic. I truly believe that cooking is about sharing joy, and this recipe is designed to do exactly that.

Once you’ve experienced the magic of this breakfast treat, I absolutely cannot wait to hear about your culinary adventures! Did you stick to the classic serving suggestions, or did you come up with an ingenious variation of your own? What did your family think? Did you enjoy them for breakfast, brunch, or perhaps even a cheeky dessert? Your experiences and creative twists are what truly bring these recipes to life for everyone else in our community. Please don’t hesitate to share your thoughts, photos, and any brilliant ideas you might have in the comments below or by tagging us on your favorite social media platforms. Your feedback not only inspires me but also encourages other home cooks to try new things and find their own love for cooking. Let’s create a vibrant community of pancake enthusiasts, sharing our love for delicious food and making every meal a little more extraordinary. Happy cooking, and I can’t wait to see what you create!


Spanish Churro Pancakes: A Sweet Breakfast Treat!

Transform your morning routine with these extraordinary Spanish Churro Pancakes. Fluffy pancakes coated in a warm cinnamon-sugar crust, bringing the beloved flavors of churros to a comforting breakfast staple. Perfect for a special morning indulgence.

Prep Time
25 Minutes
Cook Time
20 Minutes
Total Time
45 Minutes
Servings
6 servings

Ingredients


Instructions


Important Information

Nutrition Facts (Per Serving)

It is important to consider this information as approximate and not to use it as definitive health advice.

Allergy Information

Please check ingredients for potential allergens and consult a health professional if in doubt.

« Previous Post
Festive Peppermint Espresso Mocktail - Refreshing Drink
Next Post »
Million Dollar Beef Bacon Goat Cheese Log: Party Favorite!

If you enjoyed this…

Sausage Pancakes: The Ultimate Breakfast Recipe

Hawaiian Roll French Toast: The Sweetest Breakfast Recipe Ever

Strawberry Cheesecake Baked Oatmeal: A Delicious and Healthy Breakfast Recipe

Primary Sidebar

Browse by Diet

BreakfastDinnerLunchDessertAppetizer

Sweet Peach Yogurt Parfait Delight

One of my fondest memories is from a lazy summer afternoon spent at my grandmother’s house. The sun filtered through the kitchen window, casting a warm glow over the table where she would create her culinary magic. It was during one of those blissful moments that I first tasted her Peach Yogurt Parfait with Honey and Granola. The sweet aroma of ripe peaches mingling with creamy yogurt and the crunch of granola was nothing short of heavenly. It felt like summer captured in a bowl, and I still remember the joy of diving in with a spoon, each layer revealing a new burst of flavor.

When I think about that parfait, I can almost hear the gentle hum of the bees outside, reminding me of the floral notes that honey brings to every bite. The vibrant yellows and soft oranges of the peaches contrast beautifully with the creamy white yogurt and the golden crunch of granola. It’s a dish that not only looks delightful but also tastes like a celebration of fresh, wholesome ingredients.

What makes my version of this Peach Yogurt Parfait special is the careful balance of flavors and textures. I use ripe, juicy peaches, drizzled with locally sourced honey, and a homemade granola that’s bursting with nuts and seeds for an extra crunch. It’s a simple dish, but every layer is crafted with love and attention.

Let me show you exactly how to make this delightful parfait, so you can bring a bit of that summer magic into your kitchen!

Sweet Peach Yogurt Parfait Delight

Why You’ll Love This Recipe

  • Delightfully creamy texture from the Greek yogurt, paired with the juicy sweetness of fresh peaches.
  • Ready in under 20 minutes, making it a quick and satisfying breakfast or snack option.
  • Budget-friendly, using common ingredients that you may already have in your pantry.
  • Customizable with your favorite granola and nuts, allowing you to tailor each parfait to your taste.
  • Perfectly balanced flavors with the bright acidity of lemon juice and the sweetness of honey enhancing the peaches.

Ingredients

  • For the Parfait:
  • 2 cups plain Greek yogurt (or vanilla yogurt for a sweeter option)
  • 2 large ripe peaches, diced (about 2 cups)
  • 1 tablespoon fresh lemon juice (to prevent browning of peaches)
  • 2 tablespoons honey (plus more for drizzling)
  • 1 teaspoon vanilla extract (optional for extra flavor)
  • For the Granola:
  • 1 cup granola (store-bought or homemade; see notes for a simple granola recipe)
  • 1/4 cup sliced almonds (optional for added crunch)
  • 1/4 cup shredded coconut (optional for added flavor)

Let’s dive into some key ingredients that make this Peach Yogurt Parfait so delightful! First, the Greek yogurt is not only creamy but also packed with protein, making it a satisfying option for breakfast or a snack. If you’re looking for a sweeter option, you can easily substitute it with vanilla yogurt, though it may alter the overall flavor balance. Next, the ripe peaches are the star of the show; their natural sweetness shines through, so I recommend choosing peaches that yield slightly to pressure, indicating they’re perfectly ripe. If peaches aren’t in season, feel free to use nectarines or even frozen peaches—just thaw them before use. Finally, honey adds a lovely floral sweetness that ties everything together. If you prefer, maple syrup can serve as a delicious substitute.

Step-by-Step Instructions

  1. Start by preparing the peaches. Wash them thoroughly, then slice and dice them into bite-sized pieces. In a medium bowl, toss the diced peaches with 1 tablespoon of fresh lemon juice to prevent browning. Set aside for about 5 minutes while the lemon juice works its magic.
  2. In a separate bowl, combine the Greek yogurt, 2 tablespoons of honey, and 1 teaspoon of vanilla extract if using. Stir the mixture until smooth and thoroughly blended. This should take about a minute. Avoid overmixing to maintain the creaminess of the yogurt.
  3. Now it’s time to layer your parfait. Grab a clear glass or bowl to showcase your beautiful creation. Start with a generous spoonful of the yogurt mixture at the bottom—about 1/4 cup will do. Use a spoon to spread it evenly.
  4. Add a layer of the diced peaches over the yogurt, ensuring they cover the yogurt completely. You might want to use about half of what you have prepared—roughly 1 cup. This layer should be visually appealing, so arrange the peaches neatly.
  5. Sprinkle 1/4 cup of granola over the peaches. This adds a delightful crunch. Make sure to distribute it evenly to ensure every bite has that satisfying texture. Avoid packing it down too tightly, as you want it to maintain its crunch.
  6. Repeat the layers: spoon in another 1/4 cup of yogurt, followed by another cup of peaches, and another sprinkle of granola. You should have at least two layers, but feel free to add more depending on your glass size.
  7. Finish off your parfait with a drizzle of honey on top for added sweetness and a touch of elegance. If you’re using sliced almonds or shredded coconut, sprinkle them on top now. It adds a lovely visual contrast and extra flavor.
  8. Serve immediately or refrigerate for up to 30 minutes before serving to allow the flavors to meld together. However, I recommend enjoying it fresh to maintain the granola’s crunch.

Pro Tips for the Best Peach Yogurt Parfait With Honey And Granola

  • Make sure to choose ripe peaches for the best flavor and texture. A common mistake is using unripe fruit, which can lead to a less enjoyable parfait. Look for peaches that are fragrant and slightly soft to the touch.
  • Use a clear glass to assemble your parfait; this not only makes for a beautiful presentation but also allows you to see the colorful layers, which adds to the enjoyment of eating it.
  • For an even creamier texture, consider whipping the Greek yogurt with a hand mixer for a couple of minutes before layering. This small adjustment makes a huge difference in mouthfeel.
  • Be mindful of the granola-to-yogurt ratio. Too much granola can overwhelm the parfait, while too little can make it feel too creamy. Aim for about 1/4 cup of granola per layer for the perfect balance.
  • If you’re making this for a gathering, consider preparing the yogurt and peaches ahead of time and layering them just before serving. This ensures the granola stays crunchy!

Variations & Serving Ideas

There are so many ways to get creative with your Peach Yogurt Parfait! For a tropical twist, swap out the peaches for mangoes or pineapples and top with coconut flakes. If you prefer a berry flavor, mix in some blueberries or strawberries with the peaches for added color and taste. For a nutty version, incorporate chopped walnuts or pecans instead of almonds.

As for serving ideas, this parfait pairs beautifully with a side of scrambled eggs for a hearty breakfast or fresh fruit salad for a light lunch. You might also enjoy it alongside whole grain toast with almond butter for an energizing snack. The contrast of flavors and textures will elevate your meal experience!

Storage, Make-Ahead & Reheating

The Peach Yogurt Parfait is best enjoyed fresh, but you can prepare some components ahead of time. Store the layered parfait in an airtight container in the refrigerator for up to 24 hours. However, be cautious; the granola may lose its crunch if stored too long. You can freeze the yogurt and peach mixture for up to 2 months; just remember to thaw it in the refrigerator overnight before serving.

If you plan to enjoy this dish the next day, it can taste even better as the flavors meld together. Just remember to add the granola right before serving to keep its delightful crunch!

Frequently Asked Questions

Can I make Peach Yogurt Parfait With Honey And Granola ahead of time?

Yes — in fact, it tastes even better the next day as the flavors meld. However, I recommend waiting to add the granola until just before serving to maintain its crunch.

What can I substitute for Greek yogurt?

If you prefer a lighter option, you can substitute Greek yogurt with regular yogurt or a dairy-free alternative like coconut yogurt. Just remember that this may alter the creaminess and flavor profile slightly.

Can I use frozen peaches for this parfait?

Absolutely! Just make sure to thaw the frozen peaches before using them. They will still add great flavor, though the texture may be slightly softer than fresh peaches.

How do I make the parfait vegan?

To make a vegan version, substitute the Greek yogurt with a plant-based yogurt alternative, and replace honey with maple syrup or agave nectar. This keeps the parfait sweet while adhering to a vegan diet.

What other fruits can I use in this recipe?

You can mix and match fruits based on your preference. Try using strawberries, blueberries, raspberries, or even bananas. Just make sure to adjust the lemon juice as needed to prevent browning.

Sweet Peach Yogurt Parfait Delight

Final Thoughts

The Peach Yogurt Parfait with Honey and Granola is a delightful blend of creamy yogurt, sweet peaches, and crunchy granola that creates a satisfying and nourishing treat. Each layer bursts with flavor, making it a perfect choice for breakfast or a light dessert.

This is the kind of recipe I come back to again and again, especially when I want something refreshing and wholesome to start my day. The harmony of sweet and tart flavors, combined with the delightful crunch, never fails to lift my spirits!

I encourage you to give this parfait a try and indulge in its comforting goodness. Feel free to share your results or even add your own twist—perhaps a sprinkle of cinnamon or a handful of nuts. Enjoy creating your perfect parfait!

Print
clock clock iconcutlery cutlery iconflag flag iconfolder folder iconinstagram instagram iconpinterest pinterest iconfacebook facebook iconprint print iconsquares squares iconheart heart iconheart solid heart solid icon

Peach Yogurt Parfait


  • Author: Lily author
  • Total Time: 15 minutes
  • Yield: 4 servings 1x
Pin Recipe
Print Recipe

Description

This Peach Yogurt Parfait combines creamy Greek yogurt, juicy peaches, and crunchy granola for a delightful treat. It’s a perfect breakfast or snack that captures the essence of summer in every bite.


Ingredients

Scale
  • For the Parfait:
  • 2 cups plain Greek yogurt (or vanilla yogurt for a sweeter option)
  • 2 large ripe peaches, diced (about 2 cups)
  • 1 tablespoon fresh lemon juice (to prevent browning of peaches)
  • 2 tablespoons honey (plus more for drizzling)
  • 1 teaspoon vanilla extract (optional for extra flavor)
  • For the Granola:
  • 1 cup granola (store-bought or homemade; see notes for a simple granola recipe)
  • 1/4 cup sliced almonds (optional for added crunch)
  • 1/4 cup shredded coconut (optional for added flavor)

Instructions

  1. Start by preparing the peaches. Wash them thoroughly, then slice and dice them into bite-sized pieces. In a medium bowl, toss the diced peaches with 1 tablespoon of fresh lemon juice to prevent browning. Set aside for about 5 minutes while the lemon juice works its magic.
  2. In a separate bowl, combine the Greek yogurt, 2 tablespoons of honey, and 1 teaspoon of vanilla extract if using. Stir the mixture until smooth and thoroughly blended. This should take about a minute. Avoid overmixing to maintain the creaminess of the yogurt.
  3. Now it’s time to layer your parfait. Grab a clear glass or bowl to showcase your beautiful creation. Start with a generous spoonful of the yogurt mixture at the bottom—about 1/4 cup will do. Use a spoon to spread it evenly.
  4. Add a layer of the diced peaches over the yogurt, ensuring they cover the yogurt completely. You might want to use about half of what you have prepared—roughly 1 cup. This layer should be visually appealing, so arrange the peaches neatly.
  5. Sprinkle 1/4 cup of granola over the peaches. This adds a delightful crunch. Make sure to distribute it evenly to ensure every bite has that satisfying texture. Avoid packing it down too tightly, as you want it to maintain its crunch.
  6. Repeat the layers: spoon in another 1/4 cup of yogurt, followed by another cup of peaches, and another sprinkle of granola. You should have at least two layers, but feel free to add more depending on your glass size.
  7. Finish off your parfait with a drizzle of honey on top for added sweetness and a touch of elegance. If you’re using sliced almonds or shredded coconut, sprinkle them on top now. It adds a lovely visual contrast and extra flavor.
  8. Serve immediately or refrigerate for up to 30 minutes before serving to allow the flavors to meld together. However, I recommend enjoying it fresh to maintain the granola’s crunch.
  • Prep Time: 15 mins
  • Cook Time: 0 mins
  • Category: Breakfast
  • Method: No-cook
  • Cuisine: American

Nutrition

  • Serving Size: 1 parfait
  • Calories: 250
  • Sugar: 20 g
  • Sodium: 50 mg
  • Fat: 5 g
  • Saturated Fat: 2 g
  • Unsaturated Fat: 3 g
  • Trans Fat: 0 g
  • Carbohydrates: 40 g
  • Fiber: 3 g
  • Protein: 10 g
  • Cholesterol: 10 mg

Keywords: Choose ripe peaches for the best flavor and texture. Use a clear glass for a beautiful presentation. For creaminess, consider whipping the yogurt before layering. Be mindful of the granola-to-yogurt ratio. Prepare yogurt and peaches ahead of time for gatherings, layering just before serving.

Did you make this recipe?

Share a photo and tag us — we can't wait to see what you've made!

Sun-Kissed Frozen Orange Cream Slush

As a child, summer days felt like they lasted forever. I remember the sticky heat wrapping around me as I played outside, my laughter mingling with the sounds of the neighborhood. But nothing could cool me down quite like the moment I’d spot my grandmother, laboring over her blender, whipping up her famous Frozen Orange Creamsicle Slush. That vibrant orange treat, with its frosty texture and sweet citrus aroma, was like a burst of sunshine in a cup. Just one sip, and I could feel the coolness wash over me, sparking pure joy.

This Frozen Orange Creamsicle Slush has a way of making you feel like a kid again. Its creamy, dreamy consistency is a delightful balance of bright orange and soft vanilla, inviting you to dive right in. The refreshing tang of orange dances on your tongue, while the smooth creaminess envelops you in a comforting embrace. It’s a nostalgic treat that’s perfect for hot summer afternoons or anytime you need a little pick-me-up.

What makes my version of this slush stand out is the addition of a hint of vanilla bean, which elevates the flavor and adds an extra layer of richness. Plus, it’s super easy to whip up with just a few simple ingredients that you probably already have on hand! So, if you’re ready to relive those sun-soaked memories, let me show you exactly how to make it.

Sun-Kissed Frozen Orange Cream Slush

Why You’ll Love This Recipe

  • Each slush is a perfect blend of creamy vanilla and zesty orange, creating a nostalgic flavor reminiscent of summer days.
  • This refreshing treat is ready in under 15 minutes, making it an ideal quick dessert for unexpected guests or hot afternoons.
  • With just 8 simple ingredients, it’s budget-friendly, ensuring you don’t have to break the bank to enjoy a delicious slush.
  • The slush has a perfectly smooth texture, thanks to the combination of ice and ice cream, providing a delightful contrast to the bright citrus flavors.
  • It’s highly customizable; you can easily adjust the sweetness and add fresh herbs for a unique twist that suits your taste.

Ingredients

  • 2 cups orange juice (freshly squeezed or store-bought)
  • 1 cup vanilla ice cream
  • 1 cup crushed ice
  • 1/2 cup milk (whole or 2%)
  • 1/4 cup granulated sugar (adjust based on sweetness preference)
  • 1 teaspoon vanilla extract
  • Zest of 1 orange (for added flavor)
  • Fresh orange slices and mint leaves (for garnish)

The star of this Frozen Orange Creamsicle Slush is the orange juice, which provides the vibrant, citrusy base. Freshly squeezed juice will yield the brightest flavor, but store-bought options can be just as convenient. If you’re opting for store-bought, choose 100% pure juice with no added sugars for the best results. Another essential ingredient is the vanilla ice cream; it adds creaminess and sweetness. You can substitute it with dairy-free ice cream if you’re looking for a vegan option. Whole or 2% milk complements the ice cream, creating a smooth blend. If you want a lower-calorie version, almond or oat milk can be good alternatives.

Lastly, the granulated sugar can be adjusted based on your sweetness preference. If you prefer a more natural sweetener, consider using honey or agave syrup. The orange zest enhances the flavor profile, providing an aromatic pop that brings the whole slush together. Don’t skip it! It adds an extra layer of brightness that makes this slush truly special.

Step-by-Step Instructions

  1. Start by preparing your ingredients. Gather 2 cups of orange juice, 1 cup of vanilla ice cream, and 1 cup of crushed ice. Make sure the ice is finely crushed, as larger chunks can make blending difficult.
  2. In a blender, combine the orange juice, vanilla ice cream, crushed ice, and 1/2 cup of milk. Add 1/4 cup of granulated sugar and 1 teaspoon of vanilla extract. If you like a sweeter slush, consider adding a bit more sugar at this stage.
  3. Add the zest of 1 orange to the blender. This step is crucial for enhancing the citrus flavor of your slush. Make sure not to include the bitter white pith—only the flavorful zest.
  4. Blend the mixture on medium-high speed for about 30-45 seconds. Stop once the ingredients are fully combined and the slush has a smooth, even consistency. If you notice large chunks of ice, blend for an additional 10-15 seconds. Avoid over-blending, as this can make the slush too liquidy.
  5. Once blended, taste the slush. If it needs more sweetness, add a little more sugar and blend for a few more seconds. If it’s too thick, you can add a splash of milk to reach your desired consistency.
  6. Pour the slush into glasses. This recipe typically serves 4, but you can easily double it for larger gatherings. Use a spoon to help guide the slush into the glasses if needed.
  7. Garnish each serving with fresh orange slices and mint leaves. The mint not only adds a pop of color but also a refreshing aroma that complements the citrus flavors beautifully.
  8. Serve immediately and enjoy! If you’ve made extra, you can refrigerate it for a short time, but it’s best enjoyed fresh.

Pro Tips for the Best Frozen Orange Creamsicle Slush

  • Don’t skip the orange zest! It’s a game-changer for flavor. Always zest before juicing to make it easier.
  • Use a high-powered blender for the best texture. A standard blender may struggle with ice, leading to uneven consistency. If you have a food processor, that can work too, but ensure the ice is finely crushed.
  • Adjust the ice-to-liquid ratio carefully. If your slush is too thick, it won’t blend well. Start with less ice and add more until you reach your preferred texture.
  • Be cautious with the sugar! Always start with the lower amount, as you can easily add more, but it’s hard to fix an overly sweet slush.
  • For a fun twist, consider adding a splash of coconut milk or a handful of fresh fruit like strawberries or pineapple. This not only enhances the flavor but also adds a beautiful color contrast.

Variations & Serving Ideas

There are countless ways to put a spin on your Frozen Orange Creamsicle Slush. Consider making a tropical version by adding in some pineapple juice or coconut milk for a delightful tropical twist. If you’re feeling adventurous, try incorporating a handful of frozen mango or peach slices for added sweetness. For a lighter version, swap out the vanilla ice cream for Greek yogurt for a creamy yet tangy alternative.

As for serving ideas, this refreshing slush pairs wonderfully with light summer dishes like grilled chicken skewers, fish tacos, or a simple salad topped with citrus vinaigrette. The bright, zesty flavors of the slush complement these dishes perfectly, making them an ideal pairing for a sunny day.

Storage, Make-Ahead & Reheating

This Frozen Orange Creamsicle Slush is best enjoyed fresh, but if you have leftovers, you can store them in an airtight container in the fridge for up to 2 days. Just keep in mind that the slush may lose some of its texture over time as the ice melts. It doesn’t freeze well, as the ice will turn into a solid block. If you must freeze it, blend again after thawing to restore the slushy consistency. This treat is best the day you make it, as the flavors meld together beautifully overnight, enhancing its deliciousness.

Frequently Asked Questions

Can I make Frozen Orange Creamsicle Slush ahead of time?

Yes — in fact, it tastes even better the next day as the flavors meld. However, it’s best to enjoy it fresh, as the texture can change if stored for too long. If you need to prepare it ahead, keep it in the fridge and re-blend before serving.

What kind of orange juice should I use?

For the best flavor, use freshly squeezed orange juice. However, if you’re short on time, opt for 100% pure store-bought juice without added sugars. This will ensure that your slush remains flavorful and refreshing.

Can I substitute the vanilla ice cream?

Absolutely! If you’re looking for a dairy-free option, coconut milk ice cream or a non-dairy vanilla ice cream can work wonderfully. They will still provide the creamy texture and sweetness you desire.

How can I adjust the sweetness of my slush?

You can easily adjust the sweetness by modifying the amount of sugar added. Start with 1/4 cup and taste the mixture before blending. If you prefer it sweeter, add more sugar gradually until it reaches your desired level.

What should I do if my slush is too thick?

If your slush is too thick, simply add a splash of milk or orange juice and blend again. This will help achieve a more drinkable consistency while maintaining the slushy texture. Adjust gradually to reach your preferred thickness.

Sun-Kissed Frozen Orange Cream Slush

Final Thoughts

The Frozen Orange Creamsicle Slush is a delightful blend of refreshing citrus and creamy goodness, making it a perfect treat for warm days or any time you crave a taste of nostalgia. The way the bright orange flavor dances with the creamy texture truly elevates this slush, transforming it into a satisfying escape from the everyday.

This is the kind of recipe I come back to again and again, especially when I’m looking to cool down or impress guests at a summer gathering. It’s simple to make and always brings smiles all around! I encourage you to try this recipe for yourself—don’t hesitate to share your results or even put your own spin on it. Happy slushing!

Print
clock clock iconcutlery cutlery iconflag flag iconfolder folder iconinstagram instagram iconpinterest pinterest iconfacebook facebook iconprint print iconsquares squares iconheart heart iconheart solid heart solid icon

Frozen Orange Creamsicle Slush


  • Author: Lily author
  • Total Time: 15 minutes
  • Yield: 4 servings 1x
Pin Recipe
Print Recipe

Description

This Frozen Orange Creamsicle Slush is a refreshing treat that combines creamy vanilla and zesty orange flavors. Perfect for hot summer days, it brings back nostalgic memories with every sip.


Ingredients

Scale
  • 2 cups orange juice (freshly squeezed or store-bought)
  • 1 cup vanilla ice cream
  • 1 cup crushed ice
  • 1/2 cup milk (whole or 2%)
  • 1/4 cup granulated sugar (adjust based on sweetness preference)
  • 1 teaspoon vanilla extract
  • Zest of 1 orange (for added flavor)
  • Fresh orange slices and mint leaves (for garnish)

Instructions

  1. Start by preparing your ingredients. Gather 2 cups of orange juice, 1 cup of vanilla ice cream, and 1 cup of crushed ice. Make sure the ice is finely crushed, as larger chunks can make blending difficult.
  2. In a blender, combine the orange juice, vanilla ice cream, crushed ice, and 1/2 cup of milk. Add 1/4 cup of granulated sugar and 1 teaspoon of vanilla extract. If you like a sweeter slush, consider adding a bit more sugar at this stage.
  3. Add the zest of 1 orange to the blender. This step is crucial for enhancing the citrus flavor of your slush. Make sure not to include the bitter white pith—only the flavorful zest.
  4. Blend the mixture on medium-high speed for about 30-45 seconds. Stop once the ingredients are fully combined and the slush has a smooth, even consistency. If you notice large chunks of ice, blend for an additional 10-15 seconds. Avoid over-blending, as this can make the slush too liquidy.
  5. Once blended, taste the slush. If it needs more sweetness, add a little more sugar and blend for a few more seconds. If it’s too thick, you can add a splash of milk to reach your desired consistency.
  6. Pour the slush into glasses. This recipe typically serves 4, but you can easily double it for larger gatherings. Use a spoon to help guide the slush into the glasses if needed.
  7. Garnish each serving with fresh orange slices and mint leaves. The mint not only adds a pop of color but also a refreshing aroma that complements the citrus flavors beautifully.
  8. Serve immediately and enjoy! If you’ve made extra, you can refrigerate it for a short time, but it's best enjoyed fresh.
  • Prep Time: 15 min
  • Cook Time: 0 min
  • Category: Dessert
  • Method: Blending
  • Cuisine: American

Nutrition

  • Serving Size: 1 serving
  • Calories: 200
  • Sugar: 30 g
  • Sodium: 50 mg
  • Fat: 5 g
  • Saturated Fat: 3 g
  • Unsaturated Fat: 2 g
  • Trans Fat: 0 g
  • Carbohydrates: 40 g
  • Fiber: 1 g
  • Protein: 2 g
  • Cholesterol: 20 mg

Keywords: Don't skip the orange zest! It's a game-changer for flavor. Always zest before juicing to make it easier.

Did you make this recipe?

Share a photo and tag us — we can't wait to see what you've made!

Zesty Lemon Poppy Seed Delight

One rainy afternoon, I found myself in my grandmother’s cozy kitchen, the kind that always smelled like warmth and love. She was whipping up her famous Lemon Poppy Seed Loaf, a recipe that had been passed down through generations. As the batter came together, the zesty aroma of fresh lemons filled the air, mingling perfectly with the nutty fragrance of poppy seeds. I can still picture her, apron-clad, as she expertly drizzled a vibrant citrus icing over the loaf, creating a glossy, sun-kissed finish that beckoned us to dive in. It was a moment that sparked my own passion for baking, and this recipe has become a cherished staple in my home ever since.

When you take a bite of this Lemon Poppy Seed Loaf, it’s like a burst of sunshine on your palate. The loaf is beautifully golden, with a tender crumb that melts in your mouth. Each slice is speckled with tiny poppy seeds, adding a delightful crunch that contrasts beautifully with the tangy sweetness of the lemon. And that citrus icing? It’s the finishing touch that elevates this loaf from ordinary to extraordinary, with its bright, zesty flavor dancing on your taste buds.

This recipe stands out because it embraces simplicity while delivering on flavor. I’ve added a hint of vanilla to the batter, enhancing the overall taste and making it even more indulgent. Trust me, once you make this Lemon Poppy Seed Loaf With Citrus Icing, it’ll become a go-to in your baking repertoire.

So, let me show you exactly how to make it!

Zesty Lemon Poppy Seed Delight

Why You’ll Love This Recipe

  • Moist and tender crumb that melts in your mouth, thanks to the perfect balance of butter and buttermilk.
  • Bright, zesty lemon flavor paired with crunchy poppy seeds, creating a delightful texture and taste experience.
  • Easy to whip up in just about an hour, perfect for last-minute gatherings or a cozy afternoon treat.
  • Budget-friendly with everyday ingredients, making it an accessible option for all home bakers.
  • The citrus icing adds a sweet tang that elevates the loaf, turning a simple recipe into a showstopper!

Ingredients

  • 1 ½ cups (190g) all-purpose flour
  • 1 teaspoon baking powder
  • ½ teaspoon baking soda
  • ½ teaspoon salt
  • 3 tablespoons poppy seeds
  • ½ cup (115g) unsalted butter, softened to room temperature
  • 1 cup (200g) granulated sugar
  • 2 large eggs
  • 1 teaspoon vanilla extract
  • 1 teaspoon lemon zest (from about 1 medium lemon)
  • ½ cup (120ml) buttermilk
  • 2 tablespoons fresh lemon juice

For the Citrus Icing:

  • 1 cup (120g) powdered sugar
  • 2 tablespoons fresh lemon juice
  • 1 tablespoon orange juice
  • 1 teaspoon lemon zest (for garnish, optional)

Let’s dive into the key ingredients that make this Lemon Poppy Seed Loaf so special. The all-purpose flour provides the structure and base for the loaf, while the baking powder and baking soda ensure it rises perfectly, giving the loaf a light texture. For a gluten-free variation, you could substitute the flour with a gluten-free all-purpose blend. Poppy seeds not only add a delightful crunch but also contribute to the unique flavor profile that pairs well with the citrus notes.

Unsalted butter is crucial for achieving the buttery richness that makes this loaf so moist. If you’re looking for a dairy-free option, coconut oil or a vegan butter can be used instead. The buttermilk is another essential component, providing acidity that activates the baking soda for a fluffy texture. If you don’t have buttermilk on hand, you can easily make a substitute by mixing ½ cup of milk with 1 tablespoon of vinegar or lemon juice and letting it sit for about 5 minutes.

Step-by-Step Instructions

  1. Preheat your oven to 350°F (175°C). Grease a 9×5-inch loaf pan or line it with parchment paper for easy removal later.
  2. In a medium mixing bowl, whisk together 1 ½ cups of all-purpose flour, 1 teaspoon of baking powder, ½ teaspoon of baking soda, ½ teaspoon of salt, and 3 tablespoons of poppy seeds. This helps to evenly distribute the baking agents and ensures a uniform rise.
  3. In a large mixing bowl, cream together ½ cup of softened unsalted butter and 1 cup of granulated sugar using an electric mixer on medium speed for about 3-4 minutes, until the mixture is light and fluffy. Make sure to scrape down the sides of the bowl occasionally.
  4. Add 2 large eggs, 1 teaspoon of vanilla extract, and 1 teaspoon of lemon zest to the creamed butter and sugar, mixing until fully combined. You want a smooth consistency, so ensure there are no lumps of butter.
  5. In a small bowl, combine ½ cup of buttermilk and 2 tablespoons of fresh lemon juice. Alternately add the dry ingredients and buttermilk mixture to the butter mixture, starting and ending with the dry ingredients. Mix just until combined; do not overmix, as this can lead to a dense loaf.
  6. Pour the batter into the prepared loaf pan. Smooth the top with a spatula, ensuring it’s even. Bake in the preheated oven for 50-60 minutes, or until a toothpick inserted in the center comes out clean. The edges should be lightly golden brown, and the center should feel just set.
  7. Once baked, remove the loaf from the oven and allow it to cool in the pan for about 10 minutes. Then, transfer it to a wire rack to cool completely. Resist the urge to slice too soon, as it will be crumbly if it’s still warm.
  8. While the loaf is cooling, prepare the citrus icing. In a medium bowl, whisk together 1 cup of powdered sugar, 2 tablespoons of fresh lemon juice, and 1 tablespoon of orange juice until smooth. If the icing is too thick, you can add a little more juice to reach your desired consistency.
  9. Once the loaf is completely cool, drizzle the citrus icing over the top. If you like, sprinkle with an additional teaspoon of lemon zest for an extra pop of flavor and color.

Pro Tips for the Best Lemon Poppy Seed Loaf With Citrus Icing

  • Be careful not to overmix your batter; this is a common mistake that can lead to a dense loaf. Mix just until the dry ingredients are incorporated for a light and fluffy texture.
  • Use room temperature ingredients, especially the butter and eggs. This helps to create a smoother batter and ensures even baking. Take your eggs out of the fridge about 30 minutes before you start.
  • For a more pronounced lemon flavor, consider adding a little lemon extract in addition to the zest and juice. Just a half teaspoon can elevate the citrus notes significantly.
  • When measuring your flour, spoon it into the measuring cup and level it off with a knife instead of scooping directly from the bag. This prevents packing and ensures you don’t end up with a dry loaf.
  • Invest in a good quality loaf pan; it makes a difference in heat distribution, which ensures even baking. If your pan is dark-coated, reduce the oven temperature by 25°F to prevent over-browning.

Variations & Serving Ideas

For a delightful twist, consider adding blueberries or raspberries to the batter for a fruity burst of flavor. You can also experiment with different citrus fruits—try lime or grapefruit zest and juice for a refreshing change. For a healthier option, substitute half of the all-purpose flour with whole wheat flour for added fiber without compromising too much on texture.

This Lemon Poppy Seed Loaf pairs beautifully with a light salad, such as a mixed greens salad with a vinaigrette, or a cup of tea for a cozy afternoon treat. It also complements a creamy cheese platter, as the acidity of the loaf balances rich cheeses perfectly. Lastly, a scoop of vanilla ice cream on the side creates a delightful contrast of temperatures and flavors!

Storage, Make-Ahead & Reheating

This Lemon Poppy Seed Loaf can be stored at room temperature for up to 3 days if wrapped tightly in plastic wrap. If you want to keep it longer, it freezes well for up to 3 months. To freeze, wrap the loaf tightly in plastic wrap and then in aluminum foil to prevent freezer burn.

When you’re ready to enjoy it again, simply thaw it in the fridge overnight. Reheat individual slices in the microwave for 15-20 seconds or in a toaster oven until warmed through. Interestingly, many people find that this loaf tastes even better the next day, as the flavors have time to meld!

Frequently Asked Questions

Can I make Lemon Poppy Seed Loaf With Citrus Icing ahead of time?

Yes — in fact, it tastes even better the next day! You can make the loaf a day in advance, allowing the flavors to develop. Just be sure to store it in an airtight container to maintain its moisture.

Can I substitute the poppy seeds?

Absolutely! If you don’t have poppy seeds on hand or prefer an alternative, you can use sesame seeds for a similar crunch or omit them entirely for a smooth loaf.

What can I use instead of buttermilk?

If you don’t have buttermilk, you can easily create a substitute by mixing ½ cup of milk (dairy or plant-based) with 1 tablespoon of vinegar or lemon juice. Let it sit for 5 minutes before using in the recipe.

How can I make this recipe gluten-free?

To make a gluten-free version of this Lemon Poppy Seed Loaf, substitute the all-purpose flour with a gluten-free all-purpose flour blend. Just ensure that the blend contains a binding agent like xanthan gum for the best results.

What is the best way to store leftover loaf?

Leftover Lemon Poppy Seed Loaf should be stored in an airtight container at room temperature for up to 3 days. For longer storage, wrap it tightly and freeze for up to 3 months. Thaw it before serving for the best texture.

Zesty Lemon Poppy Seed Delight

Final Thoughts

The Lemon Poppy Seed Loaf with Citrus Icing is truly a delightful treat that brings a burst of brightness to any occasion. The zesty lemon flavor combined with the subtle crunch of poppy seeds creates a satisfying balance, while the citrus icing adds a touch of sweetness that perfectly complements the loaf’s tanginess.

This is the kind of recipe I come back to again and again, especially when I want to brighten up a gloomy day or celebrate a small victory. The aroma that fills the kitchen as it bakes is absolutely heavenly! I encourage you to give this recipe a try; you might just find it becoming a beloved staple in your home. Don’t forget to share your results or even add your own unique twist—I can’t wait to see what you create!

Print
clock clock iconcutlery cutlery iconflag flag iconfolder folder iconinstagram instagram iconpinterest pinterest iconfacebook facebook iconprint print iconsquares squares iconheart heart iconheart solid heart solid icon

Lemon Poppy Seed Loaf


  • Author: Lily author
  • Total Time: 25 minute
  • Yield: 1 loaf 1x
Pin Recipe
Print Recipe

Description

This Lemon Poppy Seed Loaf is a delightful treat that combines zesty lemon flavor with crunchy poppy seeds. Topped with a citrus icing, it’s perfect for any occasion.


Ingredients

Scale
  • 1 ½ cups (190g) all-purpose flour
  • 1 teaspoon baking powder
  • ½ teaspoon baking soda
  • ½ teaspoon salt
  • 3 tablespoons poppy seeds
  • ½ cup (115g) unsalted butter, softened to room temperature
  • 1 cup (200g) granulated sugar
  • 2 large eggs
  • 1 teaspoon vanilla extract
  • 1 teaspoon lemon zest (from about 1 medium lemon)
  • ½ cup (120ml) buttermilk
  • 2 tablespoons fresh lemon juice
  • 1 cup (120g) powdered sugar
  • 2 tablespoons fresh lemon juice
  • 1 tablespoon orange juice
  • 1 teaspoon lemon zest (for garnish, optional)

Instructions

  1. Preheat your oven to 350°F (175°C). Grease a 9×5-inch loaf pan or line it with parchment paper for easy removal later.
  2. In a medium mixing bowl, whisk together 1 ½ cups of all-purpose flour, 1 teaspoon of baking powder, ½ teaspoon of baking soda, ½ teaspoon of salt, and 3 tablespoons of poppy seeds. This helps to evenly distribute the baking agents and ensures a uniform rise.
  3. In a large mixing bowl, cream together ½ cup of softened unsalted butter and 1 cup of granulated sugar using an electric mixer on medium speed for about 3-4 minutes, until the mixture is light and fluffy. Make sure to scrape down the sides of the bowl occasionally.
  4. Add 2 large eggs, 1 teaspoon of vanilla extract, and 1 teaspoon of lemon zest to the creamed butter and sugar, mixing until fully combined. You want a smooth consistency, so ensure there are no lumps of butter.
  5. In a small bowl, combine ½ cup of buttermilk and 2 tablespoons of fresh lemon juice. Alternately add the dry ingredients and buttermilk mixture to the butter mixture, starting and ending with the dry ingredients. Mix just until combined; do not overmix, as this can lead to a dense loaf.
  6. Pour the batter into the prepared loaf pan. Smooth the top with a spatula, ensuring it’s even. Bake in the preheated oven for 50-60 minutes, or until a toothpick inserted in the center comes out clean. The edges should be lightly golden brown, and the center should feel just set.
  7. Once baked, remove the loaf from the oven and allow it to cool in the pan for about 10 minutes. Then, transfer it to a wire rack to cool completely. Resist the urge to slice too soon, as it will be crumbly if it’s still warm.
  8. While the loaf is cooling, prepare the citrus icing. In a medium bowl, whisk together 1 cup of powdered sugar, 2 tablespoons of fresh lemon juice, and 1 tablespoon of orange juice until smooth. If the icing is too thick, you can add a little more juice to reach your desired consistency.
  9. Once the loaf is completely cool, drizzle the citrus icing over the top. If you like, sprinkle with an additional teaspoon of lemon zest for an extra pop of flavor and color.
  • Prep Time: 15 mins
  • Cook Time: 50-60 mins
  • Category: Dessert
  • Method: Baking
  • Cuisine: American

Nutrition

  • Serving Size: 1 slice
  • Calories: 200
  • Sugar: 15 g
  • Sodium: 150 mg
  • Fat: 8 g
  • Saturated Fat: 5 g
  • Unsaturated Fat: 3 g
  • Trans Fat: 0 g
  • Carbohydrates: 30 g
  • Fiber: 1 g
  • Protein: 3 g
  • Cholesterol: 40 mg

Keywords: Be careful not to overmix your batter; this is a common mistake that can lead to a dense loaf. Use room temperature ingredients for a smoother batter and even baking.

Did you make this recipe?

Share a photo and tag us — we can't wait to see what you've made!

  • Privacy Policy
  • Terms Of Service
  • Contact
  • About
  • GDPR

Copyright © 2025 Homesmad