• Skip to primary navigation
  • Skip to main content
  • Skip to primary sidebar
Homesmad

Homesmad

  • Home
  • Breakfast & Brunch
  • Appetizers & Snacks
  • Dinner
  • Dessert
  • About
  • Privacy Policy
  • Contact
Homesmad
  • Home
  • Breakfast & Brunch
  • Appetizers & Snacks
  • Dinner
  • Dessert
  • About
  • Privacy Policy
  • Contact

Sugar Cookie Cheesecake: Easy No-Bake Dessert Recipe!

November 30, 2025 by Lily author

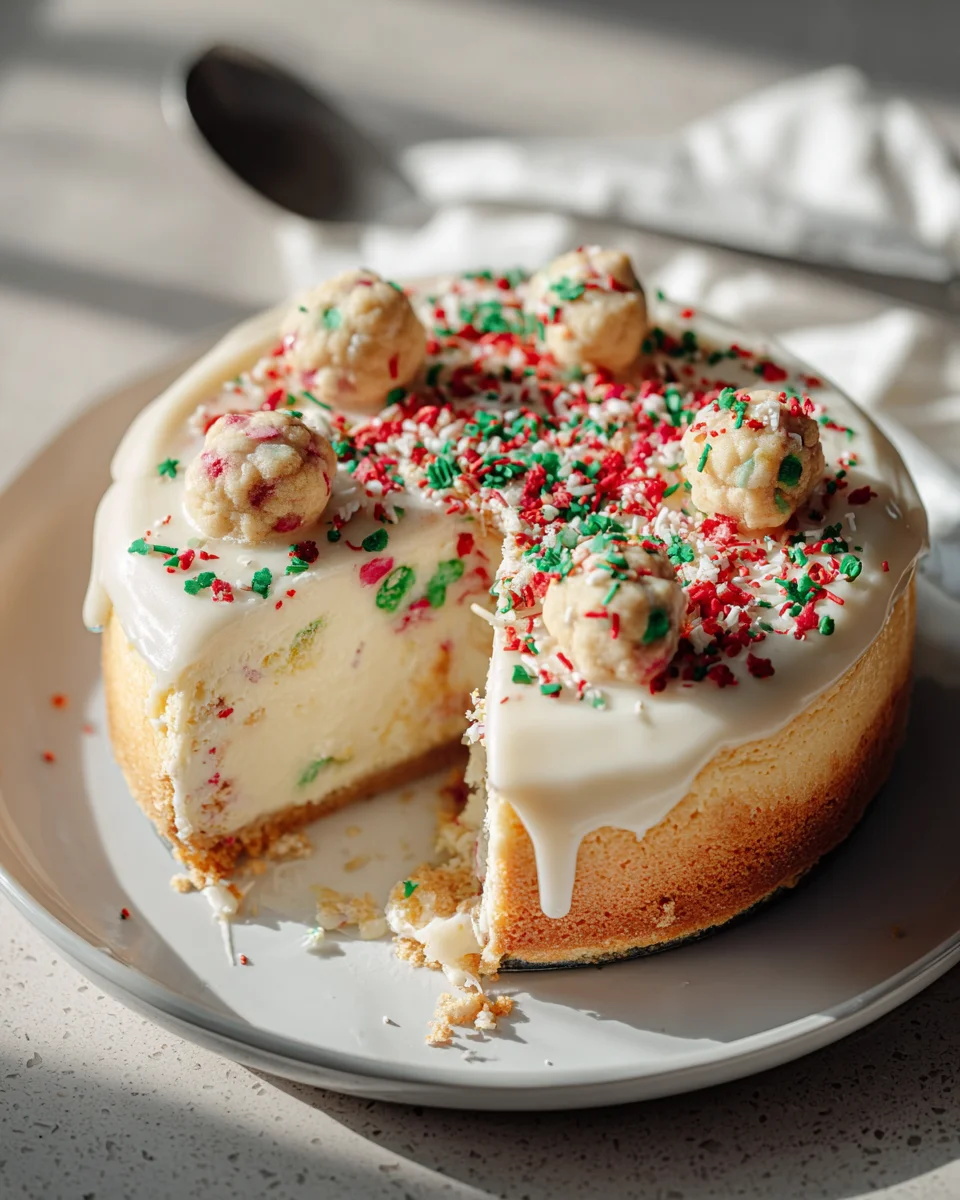
Sugar Cookie Cheesecake is a revelation for anyone who cherishes the simple, nostalgic sweetness of a classic sugar cookie and the opulent creaminess of a perfectly baked cheesecake. I’m absolutely thrilled to share with you a recipe that promises to be a showstopper at any gathering, a delightful surprise for your taste buds, and an instant classic in your dessert repertoire. Imagine the joyous union of two beloved desserts, culminating in a single, irresistible treat that offers the best of both worlds.

For generations, sugar cookies have evoked memories of childhood, holidays, and comforting home baking, while cheesecake, with its ancient origins and modern sophistication, has been the epitome of luxurious indulgence. When these two worlds collide, the result is truly magical. Sugar Cookie Cheesecake masterfully combines the comforting familiarity of a buttery, tender sugar cookie crust with a rich, velvety cheesecake filling, often crowned with a delicate, sweet frosting reminiscent of a perfectly decorated cookie. It’s the harmonious blend of textures—the slight chewiness of the cookie base against the smooth, melt-in-your-mouth cheesecake—that truly captivates. People adore this dish not just for its incredible flavor profile but also for its unique twist on traditional favorites, making it a guaranteed crowd-pleaser that looks as spectacular as it tastes.

This isn’t just another dessert; it’s an experience, transforming familiar flavors into something extraordinary.

Sugar Cookie Cheesecake: Easy No-Bake Dessert Recipe! this RECIPE

Ingredients:

  • For the Sugar Cookie Crust:

    • 1 ½ cups (3 sticks or 340g) unsalted butter, softened to room temperature
    • 1 ½ cups (300g) granulated sugar
    • 2 large eggs, at room temperature
    • 1 teaspoon pure vanilla extract
    • 3 ¾ cups (450g) all-purpose flour
    • 1 teaspoon baking powder
    • ½ teaspoon salt
  • For the Cheesecake Filling:

    • 4 (8-ounce) blocks (904g) full-fat cream cheese, softened to room temperature
    • 1 ½ cups (300g) granulated sugar
    • 3 tablespoons all-purpose flour
    • 1 cup (240g) full-fat sour cream, at room temperature
    • 1 tablespoon pure vanilla extract
    • 4 large eggs, at room temperature
  • For the Sugar Cookie Crumble Topping:

    • ½ cup (113g) unsalted butter, cold and cubed
    • ½ cup (100g) granulated sugar
    • ¼ cup (50g) packed light brown sugar
    • 1 teaspoon pure vanilla extract
    • 1 ¼ cups (150g) all-purpose flour
    • ½ teaspoon baking powder
    • ¼ teaspoon salt
  • For the Cream Cheese Frosting:

    • 8 ounces (226g) full-fat cream cheese, softened to room temperature
    • ½ cup (113g) unsalted butter, softened to room temperature
    • 4 cups (480g) powdered sugar, sifted
    • 1 teaspoon pure vanilla extract
    • 1-2 tablespoons milk or heavy cream, as needed

Prepping and Baking the Sugar Cookie Crust

  1. Prepare Your Pan: My first step when making any cheesecake, especially this glorious Sugar Cookie Cheesecake, is to get my pan ready. I always start by preheating my oven to 350°F (175°C). Then, I grab a 9-inch springform pan. To prevent any sticking and to make removal super easy, I like to spray the bottom and sides of the pan with baking spray, or you can grease it with butter. For an extra layer of security and neatness, I often line the bottom of the pan with a circle of parchment paper. This helps tremendously with transferring the cheesecake later.
  2. Cream Butter and Sugar: In the bowl of my stand mixer fitted with the paddle attachment, or using a large bowl with a hand mixer, I combine the softened unsalted butter and granulated sugar. It’s important that the butter is truly at room temperature for this step; it makes all the difference for a smooth, airy mixture. I beat these two together on medium speed until the mixture is light and fluffy, usually about 2-3 minutes. This creaming process incorporates air, which contributes to the tender texture of our crust.
  3. Add Wet Ingredients: Next, I crack in the two large eggs, one at a time, beating well after each addition to ensure they are fully incorporated. Then, I pour in the pure vanilla extract. Vanilla is key here, deepening that classic sugar cookie flavor we’re aiming for. I scrape down the sides of the bowl with a rubber spatula to make sure everything is evenly mixed.
  4. Combine Dry Ingredients: In a separate medium bowl, I whisk together the all-purpose flour, baking powder, and salt. This ensures these dry ingredients are well distributed before adding them to the wet mixture, preventing any pockets of unmixed leavening agents.
  5. Mix Wet and Dry: With the mixer on low speed, I gradually add the dry ingredients to the wet ingredients, mixing just until everything is combined and a soft dough forms. Be careful not to overmix at this stage; overmixing can develop the gluten too much, leading to a tough crust, and we want a tender, melt-in-your-mouth sugar cookie crust for our Sugar Cookie Cheesecake.
  6. Press into Pan: Now for the fun part! I press about two-thirds of this delicious sugar cookie dough evenly into the bottom of the prepared springform pan. I use the back of a spoon or my clean fingers, making sure it’s a uniform layer. Then, I take the remaining one-third of the dough and press it up the sides of the pan, about 1 ½ to 2 inches high. This creates a beautiful, sturdy border for our cheesecake filling. If the dough seems a little sticky, lightly flour your hands or the back of your spoon.
  7. Chill the Crust: To prevent the crust from shrinking too much during baking and to help it hold its shape, I pop the pan into the refrigerator to chill for at least 30 minutes. This little break makes a big difference!
  8. Blind Bake the Crust: Once chilled, I remove the pan from the fridge. I lightly prick the bottom of the dough with a fork a few times. This helps steam escape and prevents the crust from puffing up excessively. I bake the crust in the preheated oven for 12-15 minutes, or until it’s lightly golden brown around the edges. This partial baking, or “blind baking,” ensures our crust is fully cooked and has that perfect sugar cookie texture even after the cheesecake filling is added. After baking, I remove the pan from the oven and let the crust cool completely on a wire rack while I prepare the filling.

Crafting the Velvety Sugar Cookie Cheesecake Filling

  1. Prepare for Water Bath: While the crust cools, I prepare my water bath setup, which is absolutely essential for a smooth, crack-free Sugar Cookie Cheesecake. I wrap the outside of my cooled springform pan (with the baked crust inside) tightly with two layers of heavy-duty aluminum foil. Make sure the foil goes up high enough to cover the sides of the pan, preventing any water from seeping in. Then, I bring a kettle of water to a boil, which I’ll use later for the water bath. I also reduce the oven temperature to 325°F (160°C).
  2. Cream Cream Cheese: In the clean bowl of my stand mixer fitted with the paddle attachment, or a large bowl with a hand mixer, I place the softened full-fat cream cheese. It’s absolutely crucial that the cream cheese is at room temperature – truly soft, not just slightly cool. If it’s too cold, your filling will be lumpy, and nobody wants a lumpy cheesecake! I beat the cream cheese on medium speed for about 3-4 minutes until it’s incredibly smooth, creamy, and completely lump-free. I make sure to stop and scrape down the sides and bottom of the bowl frequently with a rubber spatula to ensure even mixing. This initial creaming sets the foundation for a perfect cheesecake texture.
  3. Add Sugar and Flour: With the mixer still on medium-low speed, I gradually add the granulated sugar to the cream cheese, beating until it’s fully incorporated and the mixture is smooth, about 2 minutes. Then, I sprinkle in the all-purpose flour. The flour acts as a stabilizer, helping to prevent cracks in the cheesecake as it bakes and cools. I beat for another minute until the flour is just combined. Again, I pause to scrape down the bowl.
  4. Incorporate Sour Cream and Vanilla: Next, I add the full-fat sour cream and the pure vanilla extract. The sour cream not only adds a lovely tangy complexity but also contributes to the cheesecake’s incredibly moist and silky texture. It’s important that the sour cream is also at room temperature to blend seamlessly. I mix on low speed until just combined, being careful not to overmix. A good scrape down of the bowl is in order once more!
  5. Add Eggs Carefully: This is a critical step for preventing cracks and achieving that signature creamy texture. I add the large eggs, one at a time, mixing on the absolute lowest speed possible. I beat just until each egg yolk disappears into the mixture before adding the next. Overmixing the eggs can incorporate too much air, which can cause the cheesecake to puff up excessively in the oven and then fall dramatically, leading to cracks. Gentle mixing is key here. After the last egg is just incorporated, I give the bowl one final, gentle scrape with my spatula to ensure everything is evenly blended without beating out all that precious air. Your filling should be wonderfully smooth and luscious.

Baking the Cheesecake to Perfection

  1. Pour Filling into Crust: Carefully pour the prepared cheesecake filling into the cooled, foil-wrapped sugar cookie crust. Gently tap the pan on the counter a few times to release any large air bubbles that might be trapped within the filling.
  2. Create the Water Bath: Place the foil-wrapped springform pan inside a larger roasting pan. Carefully pour the hot (but not boiling vigorously) water into the roasting pan, ensuring it comes about halfway up the sides of the springform pan. The water bath provides a moist, even heat environment, which is the secret to baking a cheesecake without cracks and achieving that delicate, creamy texture.
  3. Bake the Cheesecake: Carefully transfer the roasting pan with the cheesecake to the preheated 325°F (160°C) oven. Bake for 60-75 minutes. The cheesecake is done when the edges are set, but the center (a circle about 2-3 inches in diameter) still has a slight jiggle to it when you gently nudge the pan. It will continue to set as it cools.
  4. Cool Slowly in Oven: This slow cooling process is vital for preventing cracks. Once the baking time is up, turn off the oven, but leave the cheesecake inside. Prop the oven door open slightly with a wooden spoon or oven mitt. Let the cheesecake cool in the oven for 1 hour.
  5. Cool on Countertop: After the hour in the oven, carefully remove the roasting pan from the oven. Take the springform pan out of the water bath (be cautious, as the water will still be warm). Remove the foil wrapping from the springform pan. Let the cheesecake cool completely on a wire rack at room temperature for another 1-2 hours.
  6. Chill Thoroughly: Once cooled to room temperature, cover the cheesecake loosely with plastic wrap and transfer it to the refrigerator to chill for at least 6 hours, but ideally overnight. This chilling step is non-negotiable for the perfect slice of Sugar Cookie Cheesecake. It allows the cheesecake to fully set and firm up, ensuring clean slices and maximum flavor development.

Whipping Up the Delightful Sugar Cookie Crumble Topping

  1. Preheat and Prep: Preheat your oven to 350°F (175°C). Line a baking sheet with parchment paper.
  2. Combine Dry Ingredients: In a medium bowl, whisk together the all-purpose flour, granulated sugar, light brown sugar, baking powder, and salt. The mix of sugars adds a lovely depth to the crumble.
  3. Add Butter and Vanilla: Cut the cold unsalted butter into small cubes and add it to the dry ingredients. Drizzle in the pure vanilla extract.
  4. Form the Crumble: Using a pastry blender, your fingertips, or a food processor, work the butter into the flour mixture until coarse crumbs form. If using your fingertips, quickly rub the butter into the flour mixture until it resembles coarse sand with some pea-sized pieces. If using a food processor, pulse until the mixture comes together in crumbles. Be careful not to overmix, as we want distinct crumbles, not a dough.
  5. Bake the Crumble: Spread the crumble mixture evenly onto the prepared baking sheet. Bake for 10-12 minutes, or until the crumble is lightly golden brown and fragrant.
  6. Cool Completely: Remove the crumble from the oven and let it cool completely on the baking sheet. As it cools, it will crisp up beautifully. Once cool, break any larger clumps apart. This crunchy sugar cookie crumble is going to add an incredible textural contrast to our creamy Sugar Cookie Cheesecake.

Making the Dreamy Cream Cheese Frosting

  1. Cream Cream Cheese and Butter: In the bowl of your stand mixer with the paddle attachment, or using a large bowl with a hand mixer, beat the softened full-fat cream cheese and softened unsalted butter together on medium speed for 2-3 minutes. It’s crucial they are both truly at room temperature to avoid lumps. Beat until the mixture is incredibly smooth and creamy, scraping down the sides of the bowl frequently to ensure everything is well incorporated. This forms the luscious base for our frosting.
  2. Add Powdered Sugar: With the mixer on low speed, gradually add the sifted powdered sugar, one cup at a time, mixing until fully incorporated after each addition. Sifting the powdered sugar beforehand is a small but mighty step that guarantees a lump-free, silky smooth frosting. If you don’t sift, you might end up with little sugar lumps, which can detract from the frosting’s texture.
  3. Add Vanilla and Adjust Consistency: Once all the powdered sugar is incorporated, pour in the pure vanilla extract. Increase the mixer speed to medium-high and beat for another 1-2 minutes until the frosting is light, fluffy, and perfectly spreadable. If the frosting seems too thick, add milk or heavy cream, one tablespoon at a time, mixing until you reach your desired consistency. If it’s too thin, you can add a little more sifted powdered sugar. The goal is a frosting that is easy to spread but holds its shape beautifully on our magnificent Sugar Cookie Cheesecake.

Assembling and Finishing Your Sugar Cookie Cheesecake

  1. Unmold the Cheesecake: Once the cheesecake is thoroughly chilled (at least 6 hours, but overnight is best), carefully run a thin knife around the edge of the pan before releasing the springform sides. This helps ensure a clean release without tearing the crust or edges of the cheesecake. Gently remove the sides of the pan. If you used parchment paper on the bottom, you can slide the cheesecake onto a serving plate or leave it on the pan base.
  2. Frost the Cheesecake: Spoon the prepared cream cheese frosting onto the top of the chilled cheesecake. Using an offset spatula or the back of a spoon, spread the frosting evenly over the entire top surface. You can create a smooth finish or make decorative swirls, depending on your preference.
  3. Add the Sugar Cookie Crumble: Generously sprinkle the cooled sugar cookie crumble topping over the frosted cheesecake. I love to make sure every slice gets a good amount of that delightful crunch! You can also press some of the crumble gently around the sides if you wish for an even more decadent look.
  4. Garnish (Optional): For an extra festive touch, I sometimes add a sprinkle of colorful rainbow sprinkles over the crumble, especially if I’m serving this Sugar Cookie Cheesecake for a celebration. It just screams “party time” and enhances the sugar cookie aesthetic.
  5. Final Chill and Serve: For best results, return the assembled cheesecake to the refrigerator for at least 30 minutes to allow the frosting to set slightly and everything to meld together perfectly. When you’re ready to serve, use a sharp knife dipped in hot water and wiped clean between each slice for the cleanest cuts. Each slice of this Sugar Cookie Cheesecake is a true masterpiece of texture and flavor!

Sugar Cookie Cheesecake: Easy No-Bake Dessert Recipe!

Conclusion:

After all the anticipation and careful crafting, we arrive at the culmination of our dessert journey. This isn’t just any sweet treat; it’s a testament to the fact that some of life’s greatest pleasures come from combining two already beloved things into something utterly spectacular. Our Sugar Cookie Cheesecake is truly a recipe that deserves a permanent spot in your culinary repertoire, and I genuinely believe it’s going to become one of your absolute favorite desserts to bake and share. Why is it a must-try, you ask? Because it effortlessly marries the nostalgic, comforting chewiness and familiar warmth of a classic sugar cookie with the luxurious, velvety, and undeniably sophisticated richness of a perfectly baked cheesecake. It’s a dessert that speaks to everyone, evoking childhood memories while simultaneously impressing even the most discerning palates with its elegant presentation and perfectly balanced flavors. It’s an undeniable showstopper that looks incredibly impressive, yet, as you’ve seen, is surprisingly straightforward to achieve in your own kitchen. You’re not just baking a dessert; you’re creating an experience, a centerpiece, and a conversation starter, all wrapped up in one magnificent, creamy, and delightful package.

Serving Suggestions to Elevate Your Experience

Once your beautiful creation has emerged from the oven, cooled to perfection, and spent its necessary time chilling to achieve that ideal firm yet creamy consistency, the moment of truth arrives: serving. While a simple slice on a plate is always a delight, there are countless ways to elevate the experience and truly make this Sugar Cookie Cheesecake shine. For a touch of vibrant freshness and contrasting texture, I adore serving it with a handful of fresh berries – think bright red raspberries, juicy blueberries, or sliced strawberries. Their slight tartness cuts through the richness beautifully. A dollop of freshly whipped cream, perhaps infused with a hint of vanilla or almond extract, adds an ethereal lightness that complements the dense cheesecake perfectly. For a more decadent presentation, consider drizzling each slice with a warm caramel sauce, a rich chocolate ganache, or even a tangy lemon curd for an unexpected citrusy twist. If you’re serving it for a special occasion or during the holidays, embrace the theme! A sprinkle of festive nonpareils, edible glitter, or even miniature candy canes crushed and sprinkled over the top can transform it instantly. Pair a slice with a strong cup of coffee or espresso for a delightful after-dinner treat, or for a lighter option, a fragrant herbal tea can be equally charming. For the little ones, or simply for those who appreciate classic pairings, a cold glass of milk is always a winning combination. Remember, the presentation is part of the joy, so take a moment to make each plate look as inviting as it tastes.

Unleash Your Inner Baker: Creative Variations

One of the most exciting aspects of any truly great recipe is its versatility, and this Sugar Cookie Cheesecake is no exception. While the original recipe is undoubtedly perfect as written, I absolutely encourage you to let your culinary creativity flow and explore various modifications to make it uniquely yours. For the crust, imagine swapping out the classic sugar cookie dough for a ginger snap base during the autumn months, adding a warm, spicy note. Or perhaps a rich shortbread crust for an even butterier foundation. The cheesecake filling itself offers a blank canvas for experimentation. Try folding in mini chocolate chips for a chocolate chip cookie cheesecake hybrid, or swirl in a vibrant raspberry or cherry compote before baking for pockets of fruity delight. A touch of lemon or orange zest grated into the batter can add a lovely brightness, especially when paired with a corresponding fruit topping. You could even experiment with different extracts – almond for a more marzipan-like flavor, or a hint of peppermint during the winter season. If you’re hosting a party, consider making individual cheesecakes in cupcake liners or mini springform pans. This not only makes serving a breeze but also looks incredibly elegant. Another fantastic idea is to add a thin layer of a different flavored cookie dough on top of the cheesecake layer before baking for an extra textural surprise. Don’t be afraid to think seasonally; pumpkin spice for fall, or a light coconut extract with toasted coconut flakes for summer, can truly transform this dessert. The possibilities are genuinely endless, limited only by your imagination!

So, there you have it! My sincere hope is that you feel inspired, confident, and utterly excited to tackle this incredible recipe. I genuinely believe that once you taste the delightful fusion of flavors and textures in this Sugar Cookie Cheesecake, you’ll understand why it holds such a special place in my heart – and soon, hopefully, in yours too. Baking should be a joyful, rewarding experience, and I promise you, the smiles and compliments you’ll receive after serving this dessert will make every moment worthwhile. Please, please give this recipe a try. Dive into your kitchen, gather your ingredients, and embark on this delicious adventure. And when you do, I would absolutely love to hear about your experience! Share your successes, your favorite variations, and even any little tweaks you made to personalize it. Seeing your creations truly makes my day. Happy baking, my friends, and get ready to fall in love with your new favorite dessert!


Sugar Cookie Cheesecake

A delightful layered dessert featuring a tender sugar cookie base topped with a soft, creamy layer and festive sprinkles, offering a unique twist on classic sugar cookie flavors. This recipe adapts a traditional sugar cookie concept into a multi-layered, celebratory treat.

Prep Time
30 Minutes
Cook Time
55 Minutes
Total Time
9 Hours
Servings
12-16 slices

Ingredients


Instructions


Important Information

Nutrition Facts (Per Serving)

It is important to consider this information as approximate and not to use it as definitive health advice.

Allergy Information

Please check ingredients for potential allergens and consult a health professional if in doubt.

« Previous Post
Drunk Ghost Beef Recipe: A Hauntingly Good Non-Alcoholic Dish!
Next Post »
Raspberry Brownies: The Ultimate Fudgy & Fruity Dessert!

If you enjoyed this…

Delicious Easy Sugar Cookie Christmas Fudge Recipe to Try!

Pumpkin Chocolate Chip Oatmeal Cookies: The Ultimate Fall Treat

Raspberry Lemon Bars: The Ultimate Recipe for Tangy Sweetness

Primary Sidebar

Browse by Diet

BreakfastDinnerLunchDessertAppetizer

Sweet Peach Yogurt Parfait Delight

One of my fondest memories is from a lazy summer afternoon spent at my grandmother’s house. The sun filtered through the kitchen window, casting a warm glow over the table where she would create her culinary magic. It was during one of those blissful moments that I first tasted her Peach Yogurt Parfait with Honey and Granola. The sweet aroma of ripe peaches mingling with creamy yogurt and the crunch of granola was nothing short of heavenly. It felt like summer captured in a bowl, and I still remember the joy of diving in with a spoon, each layer revealing a new burst of flavor.

When I think about that parfait, I can almost hear the gentle hum of the bees outside, reminding me of the floral notes that honey brings to every bite. The vibrant yellows and soft oranges of the peaches contrast beautifully with the creamy white yogurt and the golden crunch of granola. It’s a dish that not only looks delightful but also tastes like a celebration of fresh, wholesome ingredients.

What makes my version of this Peach Yogurt Parfait special is the careful balance of flavors and textures. I use ripe, juicy peaches, drizzled with locally sourced honey, and a homemade granola that’s bursting with nuts and seeds for an extra crunch. It’s a simple dish, but every layer is crafted with love and attention.

Let me show you exactly how to make this delightful parfait, so you can bring a bit of that summer magic into your kitchen!

Sweet Peach Yogurt Parfait Delight

Why You’ll Love This Recipe

  • Delightfully creamy texture from the Greek yogurt, paired with the juicy sweetness of fresh peaches.
  • Ready in under 20 minutes, making it a quick and satisfying breakfast or snack option.
  • Budget-friendly, using common ingredients that you may already have in your pantry.
  • Customizable with your favorite granola and nuts, allowing you to tailor each parfait to your taste.
  • Perfectly balanced flavors with the bright acidity of lemon juice and the sweetness of honey enhancing the peaches.

Ingredients

  • For the Parfait:
  • 2 cups plain Greek yogurt (or vanilla yogurt for a sweeter option)
  • 2 large ripe peaches, diced (about 2 cups)
  • 1 tablespoon fresh lemon juice (to prevent browning of peaches)
  • 2 tablespoons honey (plus more for drizzling)
  • 1 teaspoon vanilla extract (optional for extra flavor)
  • For the Granola:
  • 1 cup granola (store-bought or homemade; see notes for a simple granola recipe)
  • 1/4 cup sliced almonds (optional for added crunch)
  • 1/4 cup shredded coconut (optional for added flavor)

Let’s dive into some key ingredients that make this Peach Yogurt Parfait so delightful! First, the Greek yogurt is not only creamy but also packed with protein, making it a satisfying option for breakfast or a snack. If you’re looking for a sweeter option, you can easily substitute it with vanilla yogurt, though it may alter the overall flavor balance. Next, the ripe peaches are the star of the show; their natural sweetness shines through, so I recommend choosing peaches that yield slightly to pressure, indicating they’re perfectly ripe. If peaches aren’t in season, feel free to use nectarines or even frozen peaches—just thaw them before use. Finally, honey adds a lovely floral sweetness that ties everything together. If you prefer, maple syrup can serve as a delicious substitute.

Step-by-Step Instructions

  1. Start by preparing the peaches. Wash them thoroughly, then slice and dice them into bite-sized pieces. In a medium bowl, toss the diced peaches with 1 tablespoon of fresh lemon juice to prevent browning. Set aside for about 5 minutes while the lemon juice works its magic.
  2. In a separate bowl, combine the Greek yogurt, 2 tablespoons of honey, and 1 teaspoon of vanilla extract if using. Stir the mixture until smooth and thoroughly blended. This should take about a minute. Avoid overmixing to maintain the creaminess of the yogurt.
  3. Now it’s time to layer your parfait. Grab a clear glass or bowl to showcase your beautiful creation. Start with a generous spoonful of the yogurt mixture at the bottom—about 1/4 cup will do. Use a spoon to spread it evenly.
  4. Add a layer of the diced peaches over the yogurt, ensuring they cover the yogurt completely. You might want to use about half of what you have prepared—roughly 1 cup. This layer should be visually appealing, so arrange the peaches neatly.
  5. Sprinkle 1/4 cup of granola over the peaches. This adds a delightful crunch. Make sure to distribute it evenly to ensure every bite has that satisfying texture. Avoid packing it down too tightly, as you want it to maintain its crunch.
  6. Repeat the layers: spoon in another 1/4 cup of yogurt, followed by another cup of peaches, and another sprinkle of granola. You should have at least two layers, but feel free to add more depending on your glass size.
  7. Finish off your parfait with a drizzle of honey on top for added sweetness and a touch of elegance. If you’re using sliced almonds or shredded coconut, sprinkle them on top now. It adds a lovely visual contrast and extra flavor.
  8. Serve immediately or refrigerate for up to 30 minutes before serving to allow the flavors to meld together. However, I recommend enjoying it fresh to maintain the granola’s crunch.

Pro Tips for the Best Peach Yogurt Parfait With Honey And Granola

  • Make sure to choose ripe peaches for the best flavor and texture. A common mistake is using unripe fruit, which can lead to a less enjoyable parfait. Look for peaches that are fragrant and slightly soft to the touch.
  • Use a clear glass to assemble your parfait; this not only makes for a beautiful presentation but also allows you to see the colorful layers, which adds to the enjoyment of eating it.
  • For an even creamier texture, consider whipping the Greek yogurt with a hand mixer for a couple of minutes before layering. This small adjustment makes a huge difference in mouthfeel.
  • Be mindful of the granola-to-yogurt ratio. Too much granola can overwhelm the parfait, while too little can make it feel too creamy. Aim for about 1/4 cup of granola per layer for the perfect balance.
  • If you’re making this for a gathering, consider preparing the yogurt and peaches ahead of time and layering them just before serving. This ensures the granola stays crunchy!

Variations & Serving Ideas

There are so many ways to get creative with your Peach Yogurt Parfait! For a tropical twist, swap out the peaches for mangoes or pineapples and top with coconut flakes. If you prefer a berry flavor, mix in some blueberries or strawberries with the peaches for added color and taste. For a nutty version, incorporate chopped walnuts or pecans instead of almonds.

As for serving ideas, this parfait pairs beautifully with a side of scrambled eggs for a hearty breakfast or fresh fruit salad for a light lunch. You might also enjoy it alongside whole grain toast with almond butter for an energizing snack. The contrast of flavors and textures will elevate your meal experience!

Storage, Make-Ahead & Reheating

The Peach Yogurt Parfait is best enjoyed fresh, but you can prepare some components ahead of time. Store the layered parfait in an airtight container in the refrigerator for up to 24 hours. However, be cautious; the granola may lose its crunch if stored too long. You can freeze the yogurt and peach mixture for up to 2 months; just remember to thaw it in the refrigerator overnight before serving.

If you plan to enjoy this dish the next day, it can taste even better as the flavors meld together. Just remember to add the granola right before serving to keep its delightful crunch!

Frequently Asked Questions

Can I make Peach Yogurt Parfait With Honey And Granola ahead of time?

Yes — in fact, it tastes even better the next day as the flavors meld. However, I recommend waiting to add the granola until just before serving to maintain its crunch.

What can I substitute for Greek yogurt?

If you prefer a lighter option, you can substitute Greek yogurt with regular yogurt or a dairy-free alternative like coconut yogurt. Just remember that this may alter the creaminess and flavor profile slightly.

Can I use frozen peaches for this parfait?

Absolutely! Just make sure to thaw the frozen peaches before using them. They will still add great flavor, though the texture may be slightly softer than fresh peaches.

How do I make the parfait vegan?

To make a vegan version, substitute the Greek yogurt with a plant-based yogurt alternative, and replace honey with maple syrup or agave nectar. This keeps the parfait sweet while adhering to a vegan diet.

What other fruits can I use in this recipe?

You can mix and match fruits based on your preference. Try using strawberries, blueberries, raspberries, or even bananas. Just make sure to adjust the lemon juice as needed to prevent browning.

Sweet Peach Yogurt Parfait Delight

Final Thoughts

The Peach Yogurt Parfait with Honey and Granola is a delightful blend of creamy yogurt, sweet peaches, and crunchy granola that creates a satisfying and nourishing treat. Each layer bursts with flavor, making it a perfect choice for breakfast or a light dessert.

This is the kind of recipe I come back to again and again, especially when I want something refreshing and wholesome to start my day. The harmony of sweet and tart flavors, combined with the delightful crunch, never fails to lift my spirits!

I encourage you to give this parfait a try and indulge in its comforting goodness. Feel free to share your results or even add your own twist—perhaps a sprinkle of cinnamon or a handful of nuts. Enjoy creating your perfect parfait!

Print
clock clock iconcutlery cutlery iconflag flag iconfolder folder iconinstagram instagram iconpinterest pinterest iconfacebook facebook iconprint print iconsquares squares iconheart heart iconheart solid heart solid icon

Peach Yogurt Parfait


  • Author: Lily author
  • Total Time: 15 minutes
  • Yield: 4 servings 1x
Pin Recipe
Print Recipe

Description

This Peach Yogurt Parfait combines creamy Greek yogurt, juicy peaches, and crunchy granola for a delightful treat. It’s a perfect breakfast or snack that captures the essence of summer in every bite.


Ingredients

Scale
  • For the Parfait:
  • 2 cups plain Greek yogurt (or vanilla yogurt for a sweeter option)
  • 2 large ripe peaches, diced (about 2 cups)
  • 1 tablespoon fresh lemon juice (to prevent browning of peaches)
  • 2 tablespoons honey (plus more for drizzling)
  • 1 teaspoon vanilla extract (optional for extra flavor)
  • For the Granola:
  • 1 cup granola (store-bought or homemade; see notes for a simple granola recipe)
  • 1/4 cup sliced almonds (optional for added crunch)
  • 1/4 cup shredded coconut (optional for added flavor)

Instructions

  1. Start by preparing the peaches. Wash them thoroughly, then slice and dice them into bite-sized pieces. In a medium bowl, toss the diced peaches with 1 tablespoon of fresh lemon juice to prevent browning. Set aside for about 5 minutes while the lemon juice works its magic.
  2. In a separate bowl, combine the Greek yogurt, 2 tablespoons of honey, and 1 teaspoon of vanilla extract if using. Stir the mixture until smooth and thoroughly blended. This should take about a minute. Avoid overmixing to maintain the creaminess of the yogurt.
  3. Now it’s time to layer your parfait. Grab a clear glass or bowl to showcase your beautiful creation. Start with a generous spoonful of the yogurt mixture at the bottom—about 1/4 cup will do. Use a spoon to spread it evenly.
  4. Add a layer of the diced peaches over the yogurt, ensuring they cover the yogurt completely. You might want to use about half of what you have prepared—roughly 1 cup. This layer should be visually appealing, so arrange the peaches neatly.
  5. Sprinkle 1/4 cup of granola over the peaches. This adds a delightful crunch. Make sure to distribute it evenly to ensure every bite has that satisfying texture. Avoid packing it down too tightly, as you want it to maintain its crunch.
  6. Repeat the layers: spoon in another 1/4 cup of yogurt, followed by another cup of peaches, and another sprinkle of granola. You should have at least two layers, but feel free to add more depending on your glass size.
  7. Finish off your parfait with a drizzle of honey on top for added sweetness and a touch of elegance. If you’re using sliced almonds or shredded coconut, sprinkle them on top now. It adds a lovely visual contrast and extra flavor.
  8. Serve immediately or refrigerate for up to 30 minutes before serving to allow the flavors to meld together. However, I recommend enjoying it fresh to maintain the granola’s crunch.
  • Prep Time: 15 mins
  • Cook Time: 0 mins
  • Category: Breakfast
  • Method: No-cook
  • Cuisine: American

Nutrition

  • Serving Size: 1 parfait
  • Calories: 250
  • Sugar: 20 g
  • Sodium: 50 mg
  • Fat: 5 g
  • Saturated Fat: 2 g
  • Unsaturated Fat: 3 g
  • Trans Fat: 0 g
  • Carbohydrates: 40 g
  • Fiber: 3 g
  • Protein: 10 g
  • Cholesterol: 10 mg

Keywords: Choose ripe peaches for the best flavor and texture. Use a clear glass for a beautiful presentation. For creaminess, consider whipping the yogurt before layering. Be mindful of the granola-to-yogurt ratio. Prepare yogurt and peaches ahead of time for gatherings, layering just before serving.

Did you make this recipe?

Share a photo and tag us — we can't wait to see what you've made!

Sun-Kissed Frozen Orange Cream Slush

As a child, summer days felt like they lasted forever. I remember the sticky heat wrapping around me as I played outside, my laughter mingling with the sounds of the neighborhood. But nothing could cool me down quite like the moment I’d spot my grandmother, laboring over her blender, whipping up her famous Frozen Orange Creamsicle Slush. That vibrant orange treat, with its frosty texture and sweet citrus aroma, was like a burst of sunshine in a cup. Just one sip, and I could feel the coolness wash over me, sparking pure joy.

This Frozen Orange Creamsicle Slush has a way of making you feel like a kid again. Its creamy, dreamy consistency is a delightful balance of bright orange and soft vanilla, inviting you to dive right in. The refreshing tang of orange dances on your tongue, while the smooth creaminess envelops you in a comforting embrace. It’s a nostalgic treat that’s perfect for hot summer afternoons or anytime you need a little pick-me-up.

What makes my version of this slush stand out is the addition of a hint of vanilla bean, which elevates the flavor and adds an extra layer of richness. Plus, it’s super easy to whip up with just a few simple ingredients that you probably already have on hand! So, if you’re ready to relive those sun-soaked memories, let me show you exactly how to make it.

Sun-Kissed Frozen Orange Cream Slush

Why You’ll Love This Recipe

  • Each slush is a perfect blend of creamy vanilla and zesty orange, creating a nostalgic flavor reminiscent of summer days.
  • This refreshing treat is ready in under 15 minutes, making it an ideal quick dessert for unexpected guests or hot afternoons.
  • With just 8 simple ingredients, it’s budget-friendly, ensuring you don’t have to break the bank to enjoy a delicious slush.
  • The slush has a perfectly smooth texture, thanks to the combination of ice and ice cream, providing a delightful contrast to the bright citrus flavors.
  • It’s highly customizable; you can easily adjust the sweetness and add fresh herbs for a unique twist that suits your taste.

Ingredients

  • 2 cups orange juice (freshly squeezed or store-bought)
  • 1 cup vanilla ice cream
  • 1 cup crushed ice
  • 1/2 cup milk (whole or 2%)
  • 1/4 cup granulated sugar (adjust based on sweetness preference)
  • 1 teaspoon vanilla extract
  • Zest of 1 orange (for added flavor)
  • Fresh orange slices and mint leaves (for garnish)

The star of this Frozen Orange Creamsicle Slush is the orange juice, which provides the vibrant, citrusy base. Freshly squeezed juice will yield the brightest flavor, but store-bought options can be just as convenient. If you’re opting for store-bought, choose 100% pure juice with no added sugars for the best results. Another essential ingredient is the vanilla ice cream; it adds creaminess and sweetness. You can substitute it with dairy-free ice cream if you’re looking for a vegan option. Whole or 2% milk complements the ice cream, creating a smooth blend. If you want a lower-calorie version, almond or oat milk can be good alternatives.

Lastly, the granulated sugar can be adjusted based on your sweetness preference. If you prefer a more natural sweetener, consider using honey or agave syrup. The orange zest enhances the flavor profile, providing an aromatic pop that brings the whole slush together. Don’t skip it! It adds an extra layer of brightness that makes this slush truly special.

Step-by-Step Instructions

  1. Start by preparing your ingredients. Gather 2 cups of orange juice, 1 cup of vanilla ice cream, and 1 cup of crushed ice. Make sure the ice is finely crushed, as larger chunks can make blending difficult.
  2. In a blender, combine the orange juice, vanilla ice cream, crushed ice, and 1/2 cup of milk. Add 1/4 cup of granulated sugar and 1 teaspoon of vanilla extract. If you like a sweeter slush, consider adding a bit more sugar at this stage.
  3. Add the zest of 1 orange to the blender. This step is crucial for enhancing the citrus flavor of your slush. Make sure not to include the bitter white pith—only the flavorful zest.
  4. Blend the mixture on medium-high speed for about 30-45 seconds. Stop once the ingredients are fully combined and the slush has a smooth, even consistency. If you notice large chunks of ice, blend for an additional 10-15 seconds. Avoid over-blending, as this can make the slush too liquidy.
  5. Once blended, taste the slush. If it needs more sweetness, add a little more sugar and blend for a few more seconds. If it’s too thick, you can add a splash of milk to reach your desired consistency.
  6. Pour the slush into glasses. This recipe typically serves 4, but you can easily double it for larger gatherings. Use a spoon to help guide the slush into the glasses if needed.
  7. Garnish each serving with fresh orange slices and mint leaves. The mint not only adds a pop of color but also a refreshing aroma that complements the citrus flavors beautifully.
  8. Serve immediately and enjoy! If you’ve made extra, you can refrigerate it for a short time, but it’s best enjoyed fresh.

Pro Tips for the Best Frozen Orange Creamsicle Slush

  • Don’t skip the orange zest! It’s a game-changer for flavor. Always zest before juicing to make it easier.
  • Use a high-powered blender for the best texture. A standard blender may struggle with ice, leading to uneven consistency. If you have a food processor, that can work too, but ensure the ice is finely crushed.
  • Adjust the ice-to-liquid ratio carefully. If your slush is too thick, it won’t blend well. Start with less ice and add more until you reach your preferred texture.
  • Be cautious with the sugar! Always start with the lower amount, as you can easily add more, but it’s hard to fix an overly sweet slush.
  • For a fun twist, consider adding a splash of coconut milk or a handful of fresh fruit like strawberries or pineapple. This not only enhances the flavor but also adds a beautiful color contrast.

Variations & Serving Ideas

There are countless ways to put a spin on your Frozen Orange Creamsicle Slush. Consider making a tropical version by adding in some pineapple juice or coconut milk for a delightful tropical twist. If you’re feeling adventurous, try incorporating a handful of frozen mango or peach slices for added sweetness. For a lighter version, swap out the vanilla ice cream for Greek yogurt for a creamy yet tangy alternative.

As for serving ideas, this refreshing slush pairs wonderfully with light summer dishes like grilled chicken skewers, fish tacos, or a simple salad topped with citrus vinaigrette. The bright, zesty flavors of the slush complement these dishes perfectly, making them an ideal pairing for a sunny day.

Storage, Make-Ahead & Reheating

This Frozen Orange Creamsicle Slush is best enjoyed fresh, but if you have leftovers, you can store them in an airtight container in the fridge for up to 2 days. Just keep in mind that the slush may lose some of its texture over time as the ice melts. It doesn’t freeze well, as the ice will turn into a solid block. If you must freeze it, blend again after thawing to restore the slushy consistency. This treat is best the day you make it, as the flavors meld together beautifully overnight, enhancing its deliciousness.

Frequently Asked Questions

Can I make Frozen Orange Creamsicle Slush ahead of time?

Yes — in fact, it tastes even better the next day as the flavors meld. However, it’s best to enjoy it fresh, as the texture can change if stored for too long. If you need to prepare it ahead, keep it in the fridge and re-blend before serving.

What kind of orange juice should I use?

For the best flavor, use freshly squeezed orange juice. However, if you’re short on time, opt for 100% pure store-bought juice without added sugars. This will ensure that your slush remains flavorful and refreshing.

Can I substitute the vanilla ice cream?

Absolutely! If you’re looking for a dairy-free option, coconut milk ice cream or a non-dairy vanilla ice cream can work wonderfully. They will still provide the creamy texture and sweetness you desire.

How can I adjust the sweetness of my slush?

You can easily adjust the sweetness by modifying the amount of sugar added. Start with 1/4 cup and taste the mixture before blending. If you prefer it sweeter, add more sugar gradually until it reaches your desired level.

What should I do if my slush is too thick?

If your slush is too thick, simply add a splash of milk or orange juice and blend again. This will help achieve a more drinkable consistency while maintaining the slushy texture. Adjust gradually to reach your preferred thickness.

Sun-Kissed Frozen Orange Cream Slush

Final Thoughts

The Frozen Orange Creamsicle Slush is a delightful blend of refreshing citrus and creamy goodness, making it a perfect treat for warm days or any time you crave a taste of nostalgia. The way the bright orange flavor dances with the creamy texture truly elevates this slush, transforming it into a satisfying escape from the everyday.

This is the kind of recipe I come back to again and again, especially when I’m looking to cool down or impress guests at a summer gathering. It’s simple to make and always brings smiles all around! I encourage you to try this recipe for yourself—don’t hesitate to share your results or even put your own spin on it. Happy slushing!

Print
clock clock iconcutlery cutlery iconflag flag iconfolder folder iconinstagram instagram iconpinterest pinterest iconfacebook facebook iconprint print iconsquares squares iconheart heart iconheart solid heart solid icon

Frozen Orange Creamsicle Slush


  • Author: Lily author
  • Total Time: 15 minutes
  • Yield: 4 servings 1x
Pin Recipe
Print Recipe

Description

This Frozen Orange Creamsicle Slush is a refreshing treat that combines creamy vanilla and zesty orange flavors. Perfect for hot summer days, it brings back nostalgic memories with every sip.


Ingredients

Scale
  • 2 cups orange juice (freshly squeezed or store-bought)
  • 1 cup vanilla ice cream
  • 1 cup crushed ice
  • 1/2 cup milk (whole or 2%)
  • 1/4 cup granulated sugar (adjust based on sweetness preference)
  • 1 teaspoon vanilla extract
  • Zest of 1 orange (for added flavor)
  • Fresh orange slices and mint leaves (for garnish)

Instructions

  1. Start by preparing your ingredients. Gather 2 cups of orange juice, 1 cup of vanilla ice cream, and 1 cup of crushed ice. Make sure the ice is finely crushed, as larger chunks can make blending difficult.
  2. In a blender, combine the orange juice, vanilla ice cream, crushed ice, and 1/2 cup of milk. Add 1/4 cup of granulated sugar and 1 teaspoon of vanilla extract. If you like a sweeter slush, consider adding a bit more sugar at this stage.
  3. Add the zest of 1 orange to the blender. This step is crucial for enhancing the citrus flavor of your slush. Make sure not to include the bitter white pith—only the flavorful zest.
  4. Blend the mixture on medium-high speed for about 30-45 seconds. Stop once the ingredients are fully combined and the slush has a smooth, even consistency. If you notice large chunks of ice, blend for an additional 10-15 seconds. Avoid over-blending, as this can make the slush too liquidy.
  5. Once blended, taste the slush. If it needs more sweetness, add a little more sugar and blend for a few more seconds. If it’s too thick, you can add a splash of milk to reach your desired consistency.
  6. Pour the slush into glasses. This recipe typically serves 4, but you can easily double it for larger gatherings. Use a spoon to help guide the slush into the glasses if needed.
  7. Garnish each serving with fresh orange slices and mint leaves. The mint not only adds a pop of color but also a refreshing aroma that complements the citrus flavors beautifully.
  8. Serve immediately and enjoy! If you’ve made extra, you can refrigerate it for a short time, but it's best enjoyed fresh.
  • Prep Time: 15 min
  • Cook Time: 0 min
  • Category: Dessert
  • Method: Blending
  • Cuisine: American

Nutrition

  • Serving Size: 1 serving
  • Calories: 200
  • Sugar: 30 g
  • Sodium: 50 mg
  • Fat: 5 g
  • Saturated Fat: 3 g
  • Unsaturated Fat: 2 g
  • Trans Fat: 0 g
  • Carbohydrates: 40 g
  • Fiber: 1 g
  • Protein: 2 g
  • Cholesterol: 20 mg

Keywords: Don't skip the orange zest! It's a game-changer for flavor. Always zest before juicing to make it easier.

Did you make this recipe?

Share a photo and tag us — we can't wait to see what you've made!

Zesty Lemon Poppy Seed Delight

One rainy afternoon, I found myself in my grandmother’s cozy kitchen, the kind that always smelled like warmth and love. She was whipping up her famous Lemon Poppy Seed Loaf, a recipe that had been passed down through generations. As the batter came together, the zesty aroma of fresh lemons filled the air, mingling perfectly with the nutty fragrance of poppy seeds. I can still picture her, apron-clad, as she expertly drizzled a vibrant citrus icing over the loaf, creating a glossy, sun-kissed finish that beckoned us to dive in. It was a moment that sparked my own passion for baking, and this recipe has become a cherished staple in my home ever since.

When you take a bite of this Lemon Poppy Seed Loaf, it’s like a burst of sunshine on your palate. The loaf is beautifully golden, with a tender crumb that melts in your mouth. Each slice is speckled with tiny poppy seeds, adding a delightful crunch that contrasts beautifully with the tangy sweetness of the lemon. And that citrus icing? It’s the finishing touch that elevates this loaf from ordinary to extraordinary, with its bright, zesty flavor dancing on your taste buds.

This recipe stands out because it embraces simplicity while delivering on flavor. I’ve added a hint of vanilla to the batter, enhancing the overall taste and making it even more indulgent. Trust me, once you make this Lemon Poppy Seed Loaf With Citrus Icing, it’ll become a go-to in your baking repertoire.

So, let me show you exactly how to make it!

Zesty Lemon Poppy Seed Delight

Why You’ll Love This Recipe

  • Moist and tender crumb that melts in your mouth, thanks to the perfect balance of butter and buttermilk.
  • Bright, zesty lemon flavor paired with crunchy poppy seeds, creating a delightful texture and taste experience.
  • Easy to whip up in just about an hour, perfect for last-minute gatherings or a cozy afternoon treat.
  • Budget-friendly with everyday ingredients, making it an accessible option for all home bakers.
  • The citrus icing adds a sweet tang that elevates the loaf, turning a simple recipe into a showstopper!

Ingredients

  • 1 ½ cups (190g) all-purpose flour
  • 1 teaspoon baking powder
  • ½ teaspoon baking soda
  • ½ teaspoon salt
  • 3 tablespoons poppy seeds
  • ½ cup (115g) unsalted butter, softened to room temperature
  • 1 cup (200g) granulated sugar
  • 2 large eggs
  • 1 teaspoon vanilla extract
  • 1 teaspoon lemon zest (from about 1 medium lemon)
  • ½ cup (120ml) buttermilk
  • 2 tablespoons fresh lemon juice

For the Citrus Icing:

  • 1 cup (120g) powdered sugar
  • 2 tablespoons fresh lemon juice
  • 1 tablespoon orange juice
  • 1 teaspoon lemon zest (for garnish, optional)

Let’s dive into the key ingredients that make this Lemon Poppy Seed Loaf so special. The all-purpose flour provides the structure and base for the loaf, while the baking powder and baking soda ensure it rises perfectly, giving the loaf a light texture. For a gluten-free variation, you could substitute the flour with a gluten-free all-purpose blend. Poppy seeds not only add a delightful crunch but also contribute to the unique flavor profile that pairs well with the citrus notes.

Unsalted butter is crucial for achieving the buttery richness that makes this loaf so moist. If you’re looking for a dairy-free option, coconut oil or a vegan butter can be used instead. The buttermilk is another essential component, providing acidity that activates the baking soda for a fluffy texture. If you don’t have buttermilk on hand, you can easily make a substitute by mixing ½ cup of milk with 1 tablespoon of vinegar or lemon juice and letting it sit for about 5 minutes.

Step-by-Step Instructions

  1. Preheat your oven to 350°F (175°C). Grease a 9×5-inch loaf pan or line it with parchment paper for easy removal later.
  2. In a medium mixing bowl, whisk together 1 ½ cups of all-purpose flour, 1 teaspoon of baking powder, ½ teaspoon of baking soda, ½ teaspoon of salt, and 3 tablespoons of poppy seeds. This helps to evenly distribute the baking agents and ensures a uniform rise.
  3. In a large mixing bowl, cream together ½ cup of softened unsalted butter and 1 cup of granulated sugar using an electric mixer on medium speed for about 3-4 minutes, until the mixture is light and fluffy. Make sure to scrape down the sides of the bowl occasionally.
  4. Add 2 large eggs, 1 teaspoon of vanilla extract, and 1 teaspoon of lemon zest to the creamed butter and sugar, mixing until fully combined. You want a smooth consistency, so ensure there are no lumps of butter.
  5. In a small bowl, combine ½ cup of buttermilk and 2 tablespoons of fresh lemon juice. Alternately add the dry ingredients and buttermilk mixture to the butter mixture, starting and ending with the dry ingredients. Mix just until combined; do not overmix, as this can lead to a dense loaf.
  6. Pour the batter into the prepared loaf pan. Smooth the top with a spatula, ensuring it’s even. Bake in the preheated oven for 50-60 minutes, or until a toothpick inserted in the center comes out clean. The edges should be lightly golden brown, and the center should feel just set.
  7. Once baked, remove the loaf from the oven and allow it to cool in the pan for about 10 minutes. Then, transfer it to a wire rack to cool completely. Resist the urge to slice too soon, as it will be crumbly if it’s still warm.
  8. While the loaf is cooling, prepare the citrus icing. In a medium bowl, whisk together 1 cup of powdered sugar, 2 tablespoons of fresh lemon juice, and 1 tablespoon of orange juice until smooth. If the icing is too thick, you can add a little more juice to reach your desired consistency.
  9. Once the loaf is completely cool, drizzle the citrus icing over the top. If you like, sprinkle with an additional teaspoon of lemon zest for an extra pop of flavor and color.

Pro Tips for the Best Lemon Poppy Seed Loaf With Citrus Icing

  • Be careful not to overmix your batter; this is a common mistake that can lead to a dense loaf. Mix just until the dry ingredients are incorporated for a light and fluffy texture.
  • Use room temperature ingredients, especially the butter and eggs. This helps to create a smoother batter and ensures even baking. Take your eggs out of the fridge about 30 minutes before you start.
  • For a more pronounced lemon flavor, consider adding a little lemon extract in addition to the zest and juice. Just a half teaspoon can elevate the citrus notes significantly.
  • When measuring your flour, spoon it into the measuring cup and level it off with a knife instead of scooping directly from the bag. This prevents packing and ensures you don’t end up with a dry loaf.
  • Invest in a good quality loaf pan; it makes a difference in heat distribution, which ensures even baking. If your pan is dark-coated, reduce the oven temperature by 25°F to prevent over-browning.

Variations & Serving Ideas

For a delightful twist, consider adding blueberries or raspberries to the batter for a fruity burst of flavor. You can also experiment with different citrus fruits—try lime or grapefruit zest and juice for a refreshing change. For a healthier option, substitute half of the all-purpose flour with whole wheat flour for added fiber without compromising too much on texture.

This Lemon Poppy Seed Loaf pairs beautifully with a light salad, such as a mixed greens salad with a vinaigrette, or a cup of tea for a cozy afternoon treat. It also complements a creamy cheese platter, as the acidity of the loaf balances rich cheeses perfectly. Lastly, a scoop of vanilla ice cream on the side creates a delightful contrast of temperatures and flavors!

Storage, Make-Ahead & Reheating

This Lemon Poppy Seed Loaf can be stored at room temperature for up to 3 days if wrapped tightly in plastic wrap. If you want to keep it longer, it freezes well for up to 3 months. To freeze, wrap the loaf tightly in plastic wrap and then in aluminum foil to prevent freezer burn.

When you’re ready to enjoy it again, simply thaw it in the fridge overnight. Reheat individual slices in the microwave for 15-20 seconds or in a toaster oven until warmed through. Interestingly, many people find that this loaf tastes even better the next day, as the flavors have time to meld!

Frequently Asked Questions

Can I make Lemon Poppy Seed Loaf With Citrus Icing ahead of time?

Yes — in fact, it tastes even better the next day! You can make the loaf a day in advance, allowing the flavors to develop. Just be sure to store it in an airtight container to maintain its moisture.

Can I substitute the poppy seeds?

Absolutely! If you don’t have poppy seeds on hand or prefer an alternative, you can use sesame seeds for a similar crunch or omit them entirely for a smooth loaf.

What can I use instead of buttermilk?

If you don’t have buttermilk, you can easily create a substitute by mixing ½ cup of milk (dairy or plant-based) with 1 tablespoon of vinegar or lemon juice. Let it sit for 5 minutes before using in the recipe.

How can I make this recipe gluten-free?

To make a gluten-free version of this Lemon Poppy Seed Loaf, substitute the all-purpose flour with a gluten-free all-purpose flour blend. Just ensure that the blend contains a binding agent like xanthan gum for the best results.

What is the best way to store leftover loaf?

Leftover Lemon Poppy Seed Loaf should be stored in an airtight container at room temperature for up to 3 days. For longer storage, wrap it tightly and freeze for up to 3 months. Thaw it before serving for the best texture.

Zesty Lemon Poppy Seed Delight

Final Thoughts

The Lemon Poppy Seed Loaf with Citrus Icing is truly a delightful treat that brings a burst of brightness to any occasion. The zesty lemon flavor combined with the subtle crunch of poppy seeds creates a satisfying balance, while the citrus icing adds a touch of sweetness that perfectly complements the loaf’s tanginess.

This is the kind of recipe I come back to again and again, especially when I want to brighten up a gloomy day or celebrate a small victory. The aroma that fills the kitchen as it bakes is absolutely heavenly! I encourage you to give this recipe a try; you might just find it becoming a beloved staple in your home. Don’t forget to share your results or even add your own unique twist—I can’t wait to see what you create!

Print
clock clock iconcutlery cutlery iconflag flag iconfolder folder iconinstagram instagram iconpinterest pinterest iconfacebook facebook iconprint print iconsquares squares iconheart heart iconheart solid heart solid icon

Lemon Poppy Seed Loaf


  • Author: Lily author
  • Total Time: 25 minute
  • Yield: 1 loaf 1x
Pin Recipe
Print Recipe

Description

This Lemon Poppy Seed Loaf is a delightful treat that combines zesty lemon flavor with crunchy poppy seeds. Topped with a citrus icing, it’s perfect for any occasion.


Ingredients

Scale
  • 1 ½ cups (190g) all-purpose flour
  • 1 teaspoon baking powder
  • ½ teaspoon baking soda
  • ½ teaspoon salt
  • 3 tablespoons poppy seeds
  • ½ cup (115g) unsalted butter, softened to room temperature
  • 1 cup (200g) granulated sugar
  • 2 large eggs
  • 1 teaspoon vanilla extract
  • 1 teaspoon lemon zest (from about 1 medium lemon)
  • ½ cup (120ml) buttermilk
  • 2 tablespoons fresh lemon juice
  • 1 cup (120g) powdered sugar
  • 2 tablespoons fresh lemon juice
  • 1 tablespoon orange juice
  • 1 teaspoon lemon zest (for garnish, optional)

Instructions

  1. Preheat your oven to 350°F (175°C). Grease a 9×5-inch loaf pan or line it with parchment paper for easy removal later.
  2. In a medium mixing bowl, whisk together 1 ½ cups of all-purpose flour, 1 teaspoon of baking powder, ½ teaspoon of baking soda, ½ teaspoon of salt, and 3 tablespoons of poppy seeds. This helps to evenly distribute the baking agents and ensures a uniform rise.
  3. In a large mixing bowl, cream together ½ cup of softened unsalted butter and 1 cup of granulated sugar using an electric mixer on medium speed for about 3-4 minutes, until the mixture is light and fluffy. Make sure to scrape down the sides of the bowl occasionally.
  4. Add 2 large eggs, 1 teaspoon of vanilla extract, and 1 teaspoon of lemon zest to the creamed butter and sugar, mixing until fully combined. You want a smooth consistency, so ensure there are no lumps of butter.
  5. In a small bowl, combine ½ cup of buttermilk and 2 tablespoons of fresh lemon juice. Alternately add the dry ingredients and buttermilk mixture to the butter mixture, starting and ending with the dry ingredients. Mix just until combined; do not overmix, as this can lead to a dense loaf.
  6. Pour the batter into the prepared loaf pan. Smooth the top with a spatula, ensuring it’s even. Bake in the preheated oven for 50-60 minutes, or until a toothpick inserted in the center comes out clean. The edges should be lightly golden brown, and the center should feel just set.
  7. Once baked, remove the loaf from the oven and allow it to cool in the pan for about 10 minutes. Then, transfer it to a wire rack to cool completely. Resist the urge to slice too soon, as it will be crumbly if it’s still warm.
  8. While the loaf is cooling, prepare the citrus icing. In a medium bowl, whisk together 1 cup of powdered sugar, 2 tablespoons of fresh lemon juice, and 1 tablespoon of orange juice until smooth. If the icing is too thick, you can add a little more juice to reach your desired consistency.
  9. Once the loaf is completely cool, drizzle the citrus icing over the top. If you like, sprinkle with an additional teaspoon of lemon zest for an extra pop of flavor and color.
  • Prep Time: 15 mins
  • Cook Time: 50-60 mins
  • Category: Dessert
  • Method: Baking
  • Cuisine: American

Nutrition

  • Serving Size: 1 slice
  • Calories: 200
  • Sugar: 15 g
  • Sodium: 150 mg
  • Fat: 8 g
  • Saturated Fat: 5 g
  • Unsaturated Fat: 3 g
  • Trans Fat: 0 g
  • Carbohydrates: 30 g
  • Fiber: 1 g
  • Protein: 3 g
  • Cholesterol: 40 mg

Keywords: Be careful not to overmix your batter; this is a common mistake that can lead to a dense loaf. Use room temperature ingredients for a smoother batter and even baking.

Did you make this recipe?

Share a photo and tag us — we can't wait to see what you've made!

  • Privacy Policy
  • Terms Of Service
  • Contact
  • About
  • GDPR

Copyright © 2025 Homesmad