• Skip to primary navigation
  • Skip to main content
  • Skip to primary sidebar
Homesmad

Homesmad

  • Home
  • Breakfast & Brunch
  • Appetizers & Snacks
  • Dinner
  • Dessert
  • About
  • Privacy Policy
  • Contact
Homesmad
  • Home
  • Breakfast & Brunch
  • Appetizers & Snacks
  • Dinner
  • Dessert
  • About
  • Privacy Policy
  • Contact

Ultimate Cucumber Ranch Crack Salad: So Fresh & Addictive!

December 2, 2025 by Lily author

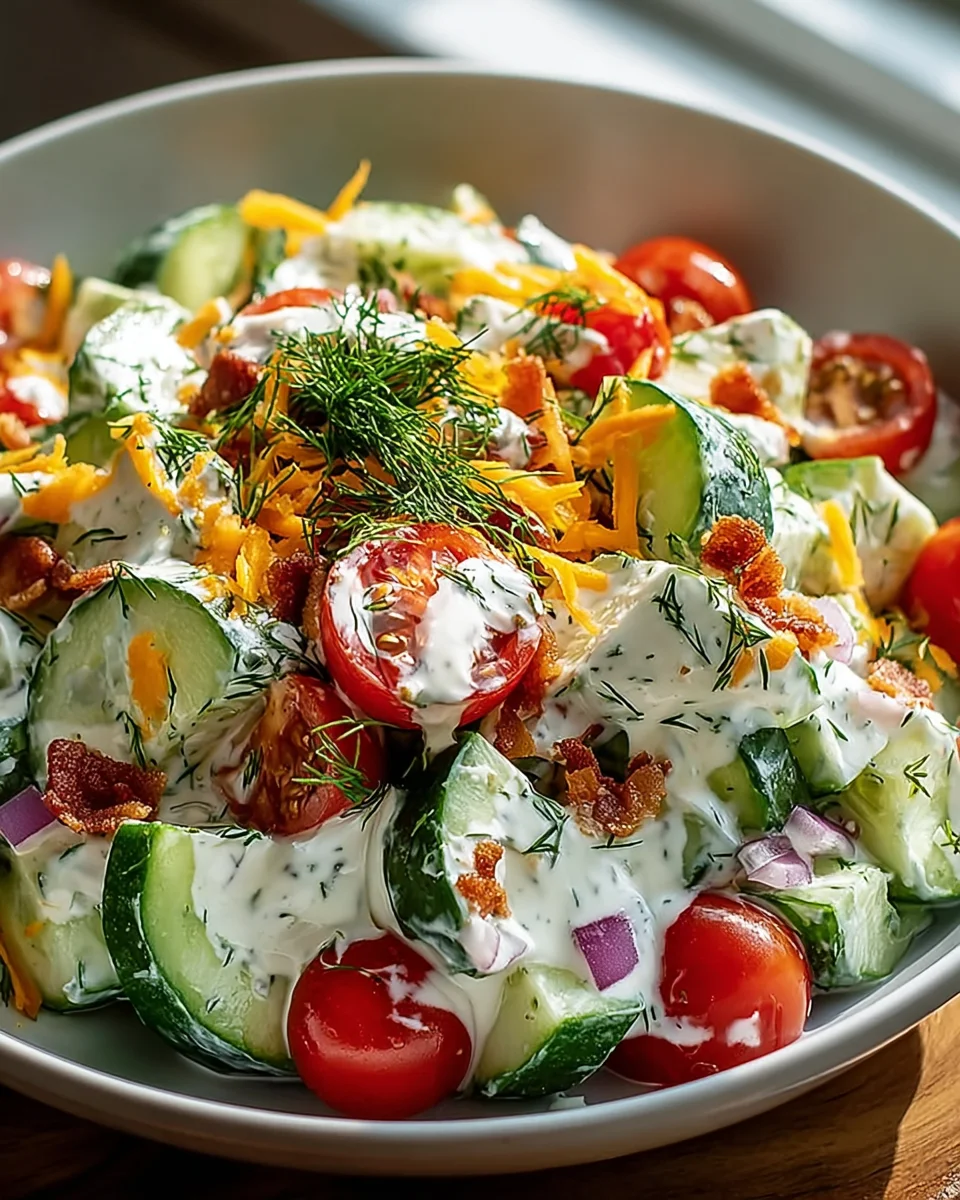
Cucumber Ranch Crack Salad An Incredible Ultimate Recipe is more than just a salad; it’s a culinary revelation that has captivated taste buds everywhere. Have you ever encountered a dish so utterly addictive, so perfectly balanced, that you simply can’t stop reaching for another bite? That, my friends, is the magic behind this delightful creation. While it might not boast ancient origins like some classic dishes, the “crack salad” phenomenon is a modern testament to how simple, fresh ingredients can come together to create something truly extraordinary and incredibly satisfying.

People absolutely adore this salad for its irresistible combination of crisp, cool cucumber, generously coated in a tangy, creamy ranch dressing, often punctuated by savory additions like bacon bits or cheese. The textural contrast is divine, offering a refreshing crunch with every spoonful. It’s the perfect side dish for any meal, a fantastic potluck contribution, or even a light, satisfying lunch all on its own. I’ve found that preparing this Cucumber Ranch Crack Salad An Incredible Ultimate Recipe is not only incredibly quick and easy but consistently receives rave reviews, making it an absolute go-to in my kitchen. Get ready to understand why everyone is raving about this fresh and flavorful sensation!

Ultimate Cucumber Ranch Crack Salad: So Fresh & Addictive! this RECIPE

Ingredients:

  • For the Main Salad:
    • 6 medium-sized English cucumbers (about 2.5-3 pounds total), or 4 large regular cucumbers
    • 1/2 cup finely diced red onion (from about 1 small red onion)
    • 1 pint (about 2 cups) cherry or grape tomatoes, halved
    • 1 cup shredded sharp cheddar cheese
    • 8 slices thick-cut bacon, cooked until crispy and crumbled
    • 1/4 cup fresh dill, finely chopped
    • 2 tablespoons fresh chives, finely chopped
    • 1 teaspoon sea salt (for salting cucumbers, adjust as needed)
    • 1/2 teaspoon freshly ground black pepper
  • For the Homemade Ultimate Ranch Dressing (Highly Recommended):
    • 1 cup mayonnaise (full-fat for the best richness)
    • 1/2 cup sour cream (full-fat is best here too)
    • 1/4 cup buttermilk (or regular milk with a teaspoon of lemon juice or white vinegar, let sit 5 minutes)
    • 1 tablespoon fresh lemon juice
    • 2 cloves garlic, minced very finely or grated
    • 1 tablespoon fresh dill, finely chopped
    • 1 tablespoon fresh chives, finely chopped
    • 1 tablespoon fresh parsley, finely chopped
    • 1/2 teaspoon onion powder
    • 1/4 teaspoon garlic powder
    • 1/4 teaspoon sea salt (or to taste)
    • 1/8 teaspoon freshly ground black pepper (or to taste)
    • Pinch of cayenne pepper (optional, for a little kick)
  • Optional “Crack” Additions for Extra Crunch and Flavor:
    • 1/2 cup crushed butter crackers (like Ritz) or seasoned croutons
    • 1/4 cup toasted pecans or walnuts, roughly chopped

Preparing Your Cucumbers for the Ultimate Crispness

  1. Selecting Your Cucumbers: To achieve the truly incredible texture that defines this Cucumber Ranch Crack Salad, I highly recommend using English cucumbers. They have fewer seeds, thinner skins, and a milder flavor, making them ideal for salads. If regular cucumbers are all you have, that’s perfectly fine, but you’ll want to be a bit more thorough with the seeding process. Look for firm, bright green cucumbers without any soft spots or blemishes.
  2. Washing and Peeling: First things first, give your cucumbers a good rinse under cool running water to remove any dirt. For English cucumbers, I often skip peeling entirely because their skin is so thin and adds a lovely vibrant green color and a touch of extra fiber. However, if you prefer a smoother texture or are using regular cucumbers with thicker, sometimes waxy skins, go ahead and peel them using a vegetable peeler. For the best visual appeal and to remove any bitterness, I like to do alternating stripes when peeling regular cucumbers, leaving some of the green skin on.
  3. Slicing or Dicing the Cucumbers: Now, let’s get to the main event for our cucumbers. For this particular salad, I find that a half-moon slice or a medium dice works wonderfully.

    • For Half-Moons: If your cucumbers are on the larger side, I suggest cutting them in half lengthwise first. Then, use a spoon to scoop out the seedy center. This step is crucial, especially for regular cucumbers, as removing the seeds prevents the salad from becoming watery later. Once seeded, lay the cucumber halves flat on your cutting board and slice them into approximately 1/4-inch thick half-moons. This size ensures a good bite and surface area for the dressing to cling to.
    • For Diced: If you prefer a smaller, more uniform texture, you can dice the cucumbers. Again, cut them in half lengthwise and scoop out the seeds. Then, slice each half into 1/4-inch wide strips, and then rotate and cut across those strips to create 1/4-inch dice. This creates a very cohesive salad where every spoonful offers a mix of all ingredients.

    Safety Tip: Always use a sharp knife and a stable cutting board. Curl your fingertips inward, holding the food firmly with your knuckles guiding the blade to prevent any accidents.

  4. The Essential Salting Step: This is arguably the most important step for a truly incredible cucumber salad, often overlooked but absolutely vital for preventing a soggy salad. After slicing or dicing your cucumbers, place them in a colander. Sprinkle them generously with 1 teaspoon of sea salt, tossing gently to ensure even distribution. The salt will draw out excess moisture from the cucumbers, concentrating their flavor and keeping them crisp.
  5. Draining and Rinsing: Let the salted cucumbers sit in the colander for at least 30 minutes, or even up to an hour. You’ll be amazed at how much water collects in the bowl beneath! After draining, I highly recommend giving the cucumbers a quick, gentle rinse under cold water to remove any excess salt. Then, and this is key, use a clean kitchen towel or paper towels to pat them thoroughly dry. Do not skip this drying step! Any remaining moisture will dilute your beautiful dressing and make your salad less appealing. Trust me on this, a well-drained and dried cucumber is the foundation of the best Cucumber Ranch Crack Salad.

Preparing Your Supporting Cast of Vegetables

  1. Prepping the Red Onion: Take your small red onion, peel away the outer papery layers, and then finely dice it. Red onion adds a fantastic pungent bite and a beautiful color contrast to our salad. If you find raw red onion too strong, you can soak the diced onion in a bowl of ice water for about 10-15 minutes, then drain and pat dry before adding it to the salad. This mellows its flavor significantly.
  2. Halving the Tomatoes: Rinse your cherry or grape tomatoes and simply slice them in half. Their burst of juicy sweetness and bright acidity is a wonderful counterpoint to the creamy dressing and crisp cucumbers.
  3. Chopping the Fresh Herbs: Gather your fresh dill and chives. Wash them gently and pat them completely dry. Finely chop both herbs. These fresh herbs are not just a garnish; they are foundational flavor elements that infuse the salad with aromatic freshness, especially enhancing the ranch profile.

Crafting the Ultimate Ranch Dressing (Homemade Option for Unbeatable Flavor)

  1. Why Homemade is Best: While a good quality store-bought ranch dressing can work in a pinch, making your own ranch dressing from scratch truly elevates this “Cucumber Ranch Crack Salad An Incredible Ultimate Recipe” to another level. The freshness of the herbs and the balanced creaminess are unparalleled. It’s surprisingly simple!
  2. Mixing the Wet Ingredients: In a medium-sized bowl, combine the full-fat mayonnaise, sour cream, buttermilk, and fresh lemon juice. Whisk these ingredients together until they are completely smooth and well-combined. The buttermilk adds a lovely tang and thins the dressing to the perfect pourable consistency without making it watery.
  3. Adding the Aromatics and Dry Seasonings: Mince your garlic cloves very, very finely. You can also use a microplane grater for an even smoother garlic distribution. Add the minced garlic to the wet ingredients. Then, stir in the onion powder, garlic powder, sea salt, freshly ground black pepper, and the optional pinch of cayenne pepper.
  4. Incorporating the Fresh Herbs: Now, gently fold in the finely chopped fresh dill, chives, and parsley (if using). These fresh herbs are what truly give homemade ranch its vibrant, fresh taste. Using fresh herbs is a non-negotiable step if you want to experience the full potential of this incredible ultimate recipe.
  5. Adjusting Consistency and Flavor: Give the dressing a taste. This is your moment to shine!

    • For Thicker Dressing: If you prefer a thicker dressing, you can add another tablespoon of mayonnaise or sour cream.
    • For Thinner Dressing: If it’s too thick for your liking, slowly whisk in a little more buttermilk (1 teaspoon at a time) until it reaches your desired consistency.
    • Seasoning: Adjust the salt and pepper to your preference. Do you want more tang? Add a tiny bit more lemon juice. A little more zing? A touch more garlic powder or fresh garlic.

    Once mixed, cover the dressing and refrigerate it for at least 30 minutes. This chilling time allows the flavors to meld beautifully and thicken slightly. Believe me, this step makes a huge difference.

  6. Enhancing Store-Bought Ranch (If Using): If you’re opting for a store-bought ranch, you can still elevate it! Whisk in some fresh minced garlic, a squeeze of fresh lemon juice, and a generous amount of fresh chopped dill, chives, and parsley. A tablespoon or two of sour cream can also add a homemade creaminess.

Assembling Your “Cucumber Ranch Crack Salad An Incredible Ultimate Recipe”

  1. Crispy Bacon Preparation: Cook your thick-cut bacon until it is wonderfully crispy. I like to cook it in a skillet over medium heat, slowly rendering out the fat until it’s golden brown and crunchy. Alternatively, you can bake it in the oven on a foil-lined baking sheet at 400°F (200°C) for 15-20 minutes. Once cooked, transfer the bacon to a plate lined with paper towels to drain excess grease. Once cooled, crumble it into small, bite-sized pieces. These crispy bacon bits are a cornerstone of the “crack” element!
  2. Combining the Salad Components: In a large mixing bowl, gently add your thoroughly drained and dried cucumbers, diced red onion, and halved cherry tomatoes. Add the shredded sharp cheddar cheese and the crumbled crispy bacon. These are the core textures and flavors that make this salad so incredibly satisfying.
  3. Dressing the Salad: Retrieve your chilled homemade ranch dressing from the refrigerator. Pour about two-thirds of the dressing over the salad ingredients. Now, using a large spoon or salad tongs, gently toss everything together. The goal is to coat all the ingredients evenly without mashing the cucumbers or tomatoes. Add more dressing if needed, until the salad is generously coated to your liking. I find that a slightly lighter coating is better initially, as you can always add more later.
  4. Adding the Final Fresh Herbs: Stir in the remaining fresh dill and chives that you reserved for the salad. These fresh herbs add a final burst of color and aroma, making the salad visually appealing and enhancing its fresh taste.
  5. Optional “Crack” Texture Boosters: If you’re opting for extra crunch, gently fold in your crushed butter crackers or seasoned croutons and/or toasted pecans or walnuts now. Add these just before serving to maintain their maximum crispness. They are truly an optional but highly recommended addition for that ultimate “crack” factor.

Chilling and Serving for Maximum Flavor

  1. The Importance of Chilling: Once assembled, cover the bowl tightly with plastic wrap and refrigerate the “Cucumber Ranch Crack Salad An Incredible Ultimate Recipe” for at least 1 hour. Even better, let it chill for 2-3 hours. This chilling time is essential. It allows the flavors to fully meld together, the dressing to penetrate the vegetables, and the salad to become wonderfully refreshing. The anticipation will only make it taste better!
  2. Final Adjustments Before Serving: Before serving, give the salad one last gentle stir. Taste it again and make any final adjustments to seasoning – perhaps a little more salt, pepper, or a tiny splash of lemon juice if you feel it needs a brighter note. If it seems a little dry after chilling (cucumbers can absorb some dressing), you can add a little more ranch dressing if you have extra.
  3. Serving Suggestions: This Cucumber Ranch Crack Salad is truly versatile. It makes an amazing side dish for almost any meal – grilled chicken, steak, hamburgers, hot dogs, or pulled pork. It’s also substantial enough to be a light lunch on its own, especially if you add some grilled shrimp or diced cooked chicken. It’s perfect for potlucks, barbecues, and summer gatherings, always disappearing quickly!
  4. Storage: Store any leftover salad in an airtight container in the refrigerator for up to 2-3 days. While it’s best enjoyed fresh the day it’s made due to the crispness of the cucumbers, it still tastes delicious the next day. However, be aware that the crackers or croutons, if added, will soften over time. For best results, if you’re making a large batch, consider adding the crackers right before serving each portion.

Ultimate Cucumber Ranch Crack Salad: So Fresh & Addictive!

Conclusion:

Well, my friends, we’ve reached the end of our delicious journey, and I genuinely hope you’re feeling inspired to whip up what I consider to be one of the most delightful and undeniably addictive dishes you’ll ever encounter. This isn’t just a salad; it’s a revelation, a vibrant explosion of cool, creamy, and crunchy textures that truly lives up to its “crack” moniker. It’s the kind of dish that disappears from the bowl almost as fast as you can make it, leaving everyone craving just one more bite. The magic lies in its deceptive simplicity, combining humble ingredients to create something far greater than the sum of its parts. It’s incredibly refreshing on a warm day, yet satisfying enough to curb those afternoon munchies or complement a hearty meal. I truly believe that once you experience the perfect balance of crisp cucumber, savory ranch, and those delightful little surprises, you’ll find yourself adding this recipe to your regular rotation without a second thought. It’s truly a game-changer for anyone looking for a quick, impactful dish that consistently delivers on flavor and satisfaction.

Elevate Your Meal with This Incredible Ultimate Recipe

The beauty of this particular creation, the Cucumber Ranch Crack Salad An Incredible Ultimate Recipe, extends far beyond its initial wow-factor. Its versatility is genuinely astounding. While it shines as a standalone light lunch or a refreshing snack, don’t underestimate its power as an accompanying dish. Imagine it alongside grilled chicken or flaky white fish, cutting through the richness with its zesty, cool profile. It’s an absolute superstar at barbecues and potlucks, guaranteed to be the first dish emptied. I love serving it with juicy burgers, delicate pulled pork sandwiches, or even a robust vegetarian lasagna, as its crispness provides a much-needed textural contrast. For a truly unforgettable pairing, try it with spicy tacos or a hearty chili; the cool, creamy salad offers a wonderful counterpoint to the heat. You can also scoop it into lettuce cups for a low-carb, high-flavor appetizer, or even pile it high on toasted artisanal bread for a unique open-faced sandwich experience. Its adaptability means it fits seamlessly into almost any meal plan, making it not just a treat, but a reliable staple.

But why stop there? This recipe is a fantastic canvas for your culinary creativity. To transform it into a more substantial meal, consider stirring in some grilled chicken breast, diced and chilled, or a handful of plump, pan-seared shrimp. For my plant-based friends, roasted chickpeas or cannellini beans add a delightful protein boost and a different kind of creaminess. I’ve also had incredible success adding crumbled feta cheese for a salty tang, or a sprinkle of toasted sunflower seeds for extra crunch and a nutty flavor. Cherry tomatoes, halved and colorful bell peppers, or thinly sliced red onion can also introduce more vibrant hues and subtle flavor layers. And don’t shy away from experimenting with herbs! A little fresh dill or chives chopped finely into the dressing can truly elevate the freshness even further. If you’re feeling adventurous, a touch of smoked paprika or a dash of your favorite hot sauce can give the dressing an intriguing kick, personalizing it to your exact taste preferences. Even swapping out regular cucumbers for Persian cucumbers can offer a slightly different texture, while a squeeze of fresh lemon juice at the end can brighten all the flavors beautifully. Don’t be afraid to make it truly your own!

Your Turn to Create and Share!

Now, it’s your turn to experience the sheer delight of this recipe. I implore you to set aside a few minutes, gather your ingredients, and give this wonderful salad a try. You’ll be amazed at how quickly it comes together and how effortlessly it impresses. Whether you follow my recipe to the letter or put your own unique spin on it with some of the suggested variations, I promise you won’t be disappointed. It’s a foolproof path to a genuinely satisfying and memorable dish that caters to almost any occasion. This is more than just another recipe; it’s an invitation to discover a new favorite that’s destined to become a go-to in your kitchen repertoire. It’s perfect for meal prep, too, as it holds up beautifully in the fridge, meaning you can enjoy its irresistible crunch and flavor for days!

Don’t keep this delicious secret to yourself! Once you’ve made it and fallen in love, please come back and share your experience with me. What additions did you try? Did you serve it with anything unexpected? I absolutely adore hearing about your kitchen adventures and seeing your creations come to life. Snap a photo, tell me your favorite part, or just let me know if it became your new go-to. Your feedback and stories are what make this community so special, and I’m genuinely excited to hear how this incredibly ultimate recipe makes its way into your culinary repertoire. Happy cooking, and prepare to be utterly charmed!


Ultimate Cucumber Ranch Crack Salad: So Fresh & Addictive!

This Cucumber Ranch Crack Salad is an incredibly addictive and perfectly balanced dish, combining crisp, cool cucumber generously coated in a tangy, creamy ranch dressing with savory additions like beef bacon and cheese. It’s quick, easy, and receives rave reviews, making it a go-to for any meal or gathering.

Prep Time
15 Minutes
Cook Time
20 Minutes
Total Time
2 Hours
Servings
8 servings

Ingredients


Instructions


Important Information

Nutrition Facts (Per Serving)

It is important to consider this information as approximate and not to use it as definitive health advice.

Allergy Information

Please check ingredients for potential allergens and consult a health professional if in doubt.

« Previous Post
Raspberry Brownies: The Ultimate Fudgy & Fruity Dessert!
Next Post »
Turkey Cranberry Sliders: Easy Holiday Appetizer Recipe!

If you enjoyed this…

Mozzarella Stuffed Pretzels: The Ultimate Recipe for Cheesy Snack Lovers

Festive Non-Alcoholic Christmas Punch Recipe for Everyone

Air Fryer Mushrooms: The Crispiest, Easiest Recipe

Primary Sidebar

Browse by Diet

BreakfastDinnerLunchDessertAppetizer

Sweet Peach Yogurt Parfait Delight

One of my fondest memories is from a lazy summer afternoon spent at my grandmother’s house. The sun filtered through the kitchen window, casting a warm glow over the table where she would create her culinary magic. It was during one of those blissful moments that I first tasted her Peach Yogurt Parfait with Honey and Granola. The sweet aroma of ripe peaches mingling with creamy yogurt and the crunch of granola was nothing short of heavenly. It felt like summer captured in a bowl, and I still remember the joy of diving in with a spoon, each layer revealing a new burst of flavor.

When I think about that parfait, I can almost hear the gentle hum of the bees outside, reminding me of the floral notes that honey brings to every bite. The vibrant yellows and soft oranges of the peaches contrast beautifully with the creamy white yogurt and the golden crunch of granola. It’s a dish that not only looks delightful but also tastes like a celebration of fresh, wholesome ingredients.

What makes my version of this Peach Yogurt Parfait special is the careful balance of flavors and textures. I use ripe, juicy peaches, drizzled with locally sourced honey, and a homemade granola that’s bursting with nuts and seeds for an extra crunch. It’s a simple dish, but every layer is crafted with love and attention.

Let me show you exactly how to make this delightful parfait, so you can bring a bit of that summer magic into your kitchen!

Sweet Peach Yogurt Parfait Delight

Why You’ll Love This Recipe

  • Delightfully creamy texture from the Greek yogurt, paired with the juicy sweetness of fresh peaches.
  • Ready in under 20 minutes, making it a quick and satisfying breakfast or snack option.
  • Budget-friendly, using common ingredients that you may already have in your pantry.
  • Customizable with your favorite granola and nuts, allowing you to tailor each parfait to your taste.
  • Perfectly balanced flavors with the bright acidity of lemon juice and the sweetness of honey enhancing the peaches.

Ingredients

  • For the Parfait:
  • 2 cups plain Greek yogurt (or vanilla yogurt for a sweeter option)
  • 2 large ripe peaches, diced (about 2 cups)
  • 1 tablespoon fresh lemon juice (to prevent browning of peaches)
  • 2 tablespoons honey (plus more for drizzling)
  • 1 teaspoon vanilla extract (optional for extra flavor)
  • For the Granola:
  • 1 cup granola (store-bought or homemade; see notes for a simple granola recipe)
  • 1/4 cup sliced almonds (optional for added crunch)
  • 1/4 cup shredded coconut (optional for added flavor)

Let’s dive into some key ingredients that make this Peach Yogurt Parfait so delightful! First, the Greek yogurt is not only creamy but also packed with protein, making it a satisfying option for breakfast or a snack. If you’re looking for a sweeter option, you can easily substitute it with vanilla yogurt, though it may alter the overall flavor balance. Next, the ripe peaches are the star of the show; their natural sweetness shines through, so I recommend choosing peaches that yield slightly to pressure, indicating they’re perfectly ripe. If peaches aren’t in season, feel free to use nectarines or even frozen peaches—just thaw them before use. Finally, honey adds a lovely floral sweetness that ties everything together. If you prefer, maple syrup can serve as a delicious substitute.

Step-by-Step Instructions

  1. Start by preparing the peaches. Wash them thoroughly, then slice and dice them into bite-sized pieces. In a medium bowl, toss the diced peaches with 1 tablespoon of fresh lemon juice to prevent browning. Set aside for about 5 minutes while the lemon juice works its magic.
  2. In a separate bowl, combine the Greek yogurt, 2 tablespoons of honey, and 1 teaspoon of vanilla extract if using. Stir the mixture until smooth and thoroughly blended. This should take about a minute. Avoid overmixing to maintain the creaminess of the yogurt.
  3. Now it’s time to layer your parfait. Grab a clear glass or bowl to showcase your beautiful creation. Start with a generous spoonful of the yogurt mixture at the bottom—about 1/4 cup will do. Use a spoon to spread it evenly.
  4. Add a layer of the diced peaches over the yogurt, ensuring they cover the yogurt completely. You might want to use about half of what you have prepared—roughly 1 cup. This layer should be visually appealing, so arrange the peaches neatly.
  5. Sprinkle 1/4 cup of granola over the peaches. This adds a delightful crunch. Make sure to distribute it evenly to ensure every bite has that satisfying texture. Avoid packing it down too tightly, as you want it to maintain its crunch.
  6. Repeat the layers: spoon in another 1/4 cup of yogurt, followed by another cup of peaches, and another sprinkle of granola. You should have at least two layers, but feel free to add more depending on your glass size.
  7. Finish off your parfait with a drizzle of honey on top for added sweetness and a touch of elegance. If you’re using sliced almonds or shredded coconut, sprinkle them on top now. It adds a lovely visual contrast and extra flavor.
  8. Serve immediately or refrigerate for up to 30 minutes before serving to allow the flavors to meld together. However, I recommend enjoying it fresh to maintain the granola’s crunch.

Pro Tips for the Best Peach Yogurt Parfait With Honey And Granola

  • Make sure to choose ripe peaches for the best flavor and texture. A common mistake is using unripe fruit, which can lead to a less enjoyable parfait. Look for peaches that are fragrant and slightly soft to the touch.
  • Use a clear glass to assemble your parfait; this not only makes for a beautiful presentation but also allows you to see the colorful layers, which adds to the enjoyment of eating it.
  • For an even creamier texture, consider whipping the Greek yogurt with a hand mixer for a couple of minutes before layering. This small adjustment makes a huge difference in mouthfeel.
  • Be mindful of the granola-to-yogurt ratio. Too much granola can overwhelm the parfait, while too little can make it feel too creamy. Aim for about 1/4 cup of granola per layer for the perfect balance.
  • If you’re making this for a gathering, consider preparing the yogurt and peaches ahead of time and layering them just before serving. This ensures the granola stays crunchy!

Variations & Serving Ideas

There are so many ways to get creative with your Peach Yogurt Parfait! For a tropical twist, swap out the peaches for mangoes or pineapples and top with coconut flakes. If you prefer a berry flavor, mix in some blueberries or strawberries with the peaches for added color and taste. For a nutty version, incorporate chopped walnuts or pecans instead of almonds.

As for serving ideas, this parfait pairs beautifully with a side of scrambled eggs for a hearty breakfast or fresh fruit salad for a light lunch. You might also enjoy it alongside whole grain toast with almond butter for an energizing snack. The contrast of flavors and textures will elevate your meal experience!

Storage, Make-Ahead & Reheating

The Peach Yogurt Parfait is best enjoyed fresh, but you can prepare some components ahead of time. Store the layered parfait in an airtight container in the refrigerator for up to 24 hours. However, be cautious; the granola may lose its crunch if stored too long. You can freeze the yogurt and peach mixture for up to 2 months; just remember to thaw it in the refrigerator overnight before serving.

If you plan to enjoy this dish the next day, it can taste even better as the flavors meld together. Just remember to add the granola right before serving to keep its delightful crunch!

Frequently Asked Questions

Can I make Peach Yogurt Parfait With Honey And Granola ahead of time?

Yes — in fact, it tastes even better the next day as the flavors meld. However, I recommend waiting to add the granola until just before serving to maintain its crunch.

What can I substitute for Greek yogurt?

If you prefer a lighter option, you can substitute Greek yogurt with regular yogurt or a dairy-free alternative like coconut yogurt. Just remember that this may alter the creaminess and flavor profile slightly.

Can I use frozen peaches for this parfait?

Absolutely! Just make sure to thaw the frozen peaches before using them. They will still add great flavor, though the texture may be slightly softer than fresh peaches.

How do I make the parfait vegan?

To make a vegan version, substitute the Greek yogurt with a plant-based yogurt alternative, and replace honey with maple syrup or agave nectar. This keeps the parfait sweet while adhering to a vegan diet.

What other fruits can I use in this recipe?

You can mix and match fruits based on your preference. Try using strawberries, blueberries, raspberries, or even bananas. Just make sure to adjust the lemon juice as needed to prevent browning.

Sweet Peach Yogurt Parfait Delight

Final Thoughts

The Peach Yogurt Parfait with Honey and Granola is a delightful blend of creamy yogurt, sweet peaches, and crunchy granola that creates a satisfying and nourishing treat. Each layer bursts with flavor, making it a perfect choice for breakfast or a light dessert.

This is the kind of recipe I come back to again and again, especially when I want something refreshing and wholesome to start my day. The harmony of sweet and tart flavors, combined with the delightful crunch, never fails to lift my spirits!

I encourage you to give this parfait a try and indulge in its comforting goodness. Feel free to share your results or even add your own twist—perhaps a sprinkle of cinnamon or a handful of nuts. Enjoy creating your perfect parfait!

Print
clock clock iconcutlery cutlery iconflag flag iconfolder folder iconinstagram instagram iconpinterest pinterest iconfacebook facebook iconprint print iconsquares squares iconheart heart iconheart solid heart solid icon

Peach Yogurt Parfait


  • Author: Lily author
  • Total Time: 15 minutes
  • Yield: 4 servings 1x
Pin Recipe
Print Recipe

Description

This Peach Yogurt Parfait combines creamy Greek yogurt, juicy peaches, and crunchy granola for a delightful treat. It’s a perfect breakfast or snack that captures the essence of summer in every bite.


Ingredients

Scale
  • For the Parfait:
  • 2 cups plain Greek yogurt (or vanilla yogurt for a sweeter option)
  • 2 large ripe peaches, diced (about 2 cups)
  • 1 tablespoon fresh lemon juice (to prevent browning of peaches)
  • 2 tablespoons honey (plus more for drizzling)
  • 1 teaspoon vanilla extract (optional for extra flavor)
  • For the Granola:
  • 1 cup granola (store-bought or homemade; see notes for a simple granola recipe)
  • 1/4 cup sliced almonds (optional for added crunch)
  • 1/4 cup shredded coconut (optional for added flavor)

Instructions

  1. Start by preparing the peaches. Wash them thoroughly, then slice and dice them into bite-sized pieces. In a medium bowl, toss the diced peaches with 1 tablespoon of fresh lemon juice to prevent browning. Set aside for about 5 minutes while the lemon juice works its magic.
  2. In a separate bowl, combine the Greek yogurt, 2 tablespoons of honey, and 1 teaspoon of vanilla extract if using. Stir the mixture until smooth and thoroughly blended. This should take about a minute. Avoid overmixing to maintain the creaminess of the yogurt.
  3. Now it’s time to layer your parfait. Grab a clear glass or bowl to showcase your beautiful creation. Start with a generous spoonful of the yogurt mixture at the bottom—about 1/4 cup will do. Use a spoon to spread it evenly.
  4. Add a layer of the diced peaches over the yogurt, ensuring they cover the yogurt completely. You might want to use about half of what you have prepared—roughly 1 cup. This layer should be visually appealing, so arrange the peaches neatly.
  5. Sprinkle 1/4 cup of granola over the peaches. This adds a delightful crunch. Make sure to distribute it evenly to ensure every bite has that satisfying texture. Avoid packing it down too tightly, as you want it to maintain its crunch.
  6. Repeat the layers: spoon in another 1/4 cup of yogurt, followed by another cup of peaches, and another sprinkle of granola. You should have at least two layers, but feel free to add more depending on your glass size.
  7. Finish off your parfait with a drizzle of honey on top for added sweetness and a touch of elegance. If you’re using sliced almonds or shredded coconut, sprinkle them on top now. It adds a lovely visual contrast and extra flavor.
  8. Serve immediately or refrigerate for up to 30 minutes before serving to allow the flavors to meld together. However, I recommend enjoying it fresh to maintain the granola’s crunch.
  • Prep Time: 15 mins
  • Cook Time: 0 mins
  • Category: Breakfast
  • Method: No-cook
  • Cuisine: American

Nutrition

  • Serving Size: 1 parfait
  • Calories: 250
  • Sugar: 20 g
  • Sodium: 50 mg
  • Fat: 5 g
  • Saturated Fat: 2 g
  • Unsaturated Fat: 3 g
  • Trans Fat: 0 g
  • Carbohydrates: 40 g
  • Fiber: 3 g
  • Protein: 10 g
  • Cholesterol: 10 mg

Keywords: Choose ripe peaches for the best flavor and texture. Use a clear glass for a beautiful presentation. For creaminess, consider whipping the yogurt before layering. Be mindful of the granola-to-yogurt ratio. Prepare yogurt and peaches ahead of time for gatherings, layering just before serving.

Did you make this recipe?

Share a photo and tag us — we can't wait to see what you've made!

Sun-Kissed Frozen Orange Cream Slush

As a child, summer days felt like they lasted forever. I remember the sticky heat wrapping around me as I played outside, my laughter mingling with the sounds of the neighborhood. But nothing could cool me down quite like the moment I’d spot my grandmother, laboring over her blender, whipping up her famous Frozen Orange Creamsicle Slush. That vibrant orange treat, with its frosty texture and sweet citrus aroma, was like a burst of sunshine in a cup. Just one sip, and I could feel the coolness wash over me, sparking pure joy.

This Frozen Orange Creamsicle Slush has a way of making you feel like a kid again. Its creamy, dreamy consistency is a delightful balance of bright orange and soft vanilla, inviting you to dive right in. The refreshing tang of orange dances on your tongue, while the smooth creaminess envelops you in a comforting embrace. It’s a nostalgic treat that’s perfect for hot summer afternoons or anytime you need a little pick-me-up.

What makes my version of this slush stand out is the addition of a hint of vanilla bean, which elevates the flavor and adds an extra layer of richness. Plus, it’s super easy to whip up with just a few simple ingredients that you probably already have on hand! So, if you’re ready to relive those sun-soaked memories, let me show you exactly how to make it.

Sun-Kissed Frozen Orange Cream Slush

Why You’ll Love This Recipe

  • Each slush is a perfect blend of creamy vanilla and zesty orange, creating a nostalgic flavor reminiscent of summer days.
  • This refreshing treat is ready in under 15 minutes, making it an ideal quick dessert for unexpected guests or hot afternoons.
  • With just 8 simple ingredients, it’s budget-friendly, ensuring you don’t have to break the bank to enjoy a delicious slush.
  • The slush has a perfectly smooth texture, thanks to the combination of ice and ice cream, providing a delightful contrast to the bright citrus flavors.
  • It’s highly customizable; you can easily adjust the sweetness and add fresh herbs for a unique twist that suits your taste.

Ingredients

  • 2 cups orange juice (freshly squeezed or store-bought)
  • 1 cup vanilla ice cream
  • 1 cup crushed ice
  • 1/2 cup milk (whole or 2%)
  • 1/4 cup granulated sugar (adjust based on sweetness preference)
  • 1 teaspoon vanilla extract
  • Zest of 1 orange (for added flavor)
  • Fresh orange slices and mint leaves (for garnish)

The star of this Frozen Orange Creamsicle Slush is the orange juice, which provides the vibrant, citrusy base. Freshly squeezed juice will yield the brightest flavor, but store-bought options can be just as convenient. If you’re opting for store-bought, choose 100% pure juice with no added sugars for the best results. Another essential ingredient is the vanilla ice cream; it adds creaminess and sweetness. You can substitute it with dairy-free ice cream if you’re looking for a vegan option. Whole or 2% milk complements the ice cream, creating a smooth blend. If you want a lower-calorie version, almond or oat milk can be good alternatives.

Lastly, the granulated sugar can be adjusted based on your sweetness preference. If you prefer a more natural sweetener, consider using honey or agave syrup. The orange zest enhances the flavor profile, providing an aromatic pop that brings the whole slush together. Don’t skip it! It adds an extra layer of brightness that makes this slush truly special.

Step-by-Step Instructions

  1. Start by preparing your ingredients. Gather 2 cups of orange juice, 1 cup of vanilla ice cream, and 1 cup of crushed ice. Make sure the ice is finely crushed, as larger chunks can make blending difficult.
  2. In a blender, combine the orange juice, vanilla ice cream, crushed ice, and 1/2 cup of milk. Add 1/4 cup of granulated sugar and 1 teaspoon of vanilla extract. If you like a sweeter slush, consider adding a bit more sugar at this stage.
  3. Add the zest of 1 orange to the blender. This step is crucial for enhancing the citrus flavor of your slush. Make sure not to include the bitter white pith—only the flavorful zest.
  4. Blend the mixture on medium-high speed for about 30-45 seconds. Stop once the ingredients are fully combined and the slush has a smooth, even consistency. If you notice large chunks of ice, blend for an additional 10-15 seconds. Avoid over-blending, as this can make the slush too liquidy.
  5. Once blended, taste the slush. If it needs more sweetness, add a little more sugar and blend for a few more seconds. If it’s too thick, you can add a splash of milk to reach your desired consistency.
  6. Pour the slush into glasses. This recipe typically serves 4, but you can easily double it for larger gatherings. Use a spoon to help guide the slush into the glasses if needed.
  7. Garnish each serving with fresh orange slices and mint leaves. The mint not only adds a pop of color but also a refreshing aroma that complements the citrus flavors beautifully.
  8. Serve immediately and enjoy! If you’ve made extra, you can refrigerate it for a short time, but it’s best enjoyed fresh.

Pro Tips for the Best Frozen Orange Creamsicle Slush

  • Don’t skip the orange zest! It’s a game-changer for flavor. Always zest before juicing to make it easier.
  • Use a high-powered blender for the best texture. A standard blender may struggle with ice, leading to uneven consistency. If you have a food processor, that can work too, but ensure the ice is finely crushed.
  • Adjust the ice-to-liquid ratio carefully. If your slush is too thick, it won’t blend well. Start with less ice and add more until you reach your preferred texture.
  • Be cautious with the sugar! Always start with the lower amount, as you can easily add more, but it’s hard to fix an overly sweet slush.
  • For a fun twist, consider adding a splash of coconut milk or a handful of fresh fruit like strawberries or pineapple. This not only enhances the flavor but also adds a beautiful color contrast.

Variations & Serving Ideas

There are countless ways to put a spin on your Frozen Orange Creamsicle Slush. Consider making a tropical version by adding in some pineapple juice or coconut milk for a delightful tropical twist. If you’re feeling adventurous, try incorporating a handful of frozen mango or peach slices for added sweetness. For a lighter version, swap out the vanilla ice cream for Greek yogurt for a creamy yet tangy alternative.

As for serving ideas, this refreshing slush pairs wonderfully with light summer dishes like grilled chicken skewers, fish tacos, or a simple salad topped with citrus vinaigrette. The bright, zesty flavors of the slush complement these dishes perfectly, making them an ideal pairing for a sunny day.

Storage, Make-Ahead & Reheating

This Frozen Orange Creamsicle Slush is best enjoyed fresh, but if you have leftovers, you can store them in an airtight container in the fridge for up to 2 days. Just keep in mind that the slush may lose some of its texture over time as the ice melts. It doesn’t freeze well, as the ice will turn into a solid block. If you must freeze it, blend again after thawing to restore the slushy consistency. This treat is best the day you make it, as the flavors meld together beautifully overnight, enhancing its deliciousness.

Frequently Asked Questions

Can I make Frozen Orange Creamsicle Slush ahead of time?

Yes — in fact, it tastes even better the next day as the flavors meld. However, it’s best to enjoy it fresh, as the texture can change if stored for too long. If you need to prepare it ahead, keep it in the fridge and re-blend before serving.

What kind of orange juice should I use?

For the best flavor, use freshly squeezed orange juice. However, if you’re short on time, opt for 100% pure store-bought juice without added sugars. This will ensure that your slush remains flavorful and refreshing.

Can I substitute the vanilla ice cream?

Absolutely! If you’re looking for a dairy-free option, coconut milk ice cream or a non-dairy vanilla ice cream can work wonderfully. They will still provide the creamy texture and sweetness you desire.

How can I adjust the sweetness of my slush?

You can easily adjust the sweetness by modifying the amount of sugar added. Start with 1/4 cup and taste the mixture before blending. If you prefer it sweeter, add more sugar gradually until it reaches your desired level.

What should I do if my slush is too thick?

If your slush is too thick, simply add a splash of milk or orange juice and blend again. This will help achieve a more drinkable consistency while maintaining the slushy texture. Adjust gradually to reach your preferred thickness.

Sun-Kissed Frozen Orange Cream Slush

Final Thoughts

The Frozen Orange Creamsicle Slush is a delightful blend of refreshing citrus and creamy goodness, making it a perfect treat for warm days or any time you crave a taste of nostalgia. The way the bright orange flavor dances with the creamy texture truly elevates this slush, transforming it into a satisfying escape from the everyday.

This is the kind of recipe I come back to again and again, especially when I’m looking to cool down or impress guests at a summer gathering. It’s simple to make and always brings smiles all around! I encourage you to try this recipe for yourself—don’t hesitate to share your results or even put your own spin on it. Happy slushing!

Print
clock clock iconcutlery cutlery iconflag flag iconfolder folder iconinstagram instagram iconpinterest pinterest iconfacebook facebook iconprint print iconsquares squares iconheart heart iconheart solid heart solid icon

Frozen Orange Creamsicle Slush


  • Author: Lily author
  • Total Time: 15 minutes
  • Yield: 4 servings 1x
Pin Recipe
Print Recipe

Description

This Frozen Orange Creamsicle Slush is a refreshing treat that combines creamy vanilla and zesty orange flavors. Perfect for hot summer days, it brings back nostalgic memories with every sip.


Ingredients

Scale
  • 2 cups orange juice (freshly squeezed or store-bought)
  • 1 cup vanilla ice cream
  • 1 cup crushed ice
  • 1/2 cup milk (whole or 2%)
  • 1/4 cup granulated sugar (adjust based on sweetness preference)
  • 1 teaspoon vanilla extract
  • Zest of 1 orange (for added flavor)
  • Fresh orange slices and mint leaves (for garnish)

Instructions

  1. Start by preparing your ingredients. Gather 2 cups of orange juice, 1 cup of vanilla ice cream, and 1 cup of crushed ice. Make sure the ice is finely crushed, as larger chunks can make blending difficult.
  2. In a blender, combine the orange juice, vanilla ice cream, crushed ice, and 1/2 cup of milk. Add 1/4 cup of granulated sugar and 1 teaspoon of vanilla extract. If you like a sweeter slush, consider adding a bit more sugar at this stage.
  3. Add the zest of 1 orange to the blender. This step is crucial for enhancing the citrus flavor of your slush. Make sure not to include the bitter white pith—only the flavorful zest.
  4. Blend the mixture on medium-high speed for about 30-45 seconds. Stop once the ingredients are fully combined and the slush has a smooth, even consistency. If you notice large chunks of ice, blend for an additional 10-15 seconds. Avoid over-blending, as this can make the slush too liquidy.
  5. Once blended, taste the slush. If it needs more sweetness, add a little more sugar and blend for a few more seconds. If it’s too thick, you can add a splash of milk to reach your desired consistency.
  6. Pour the slush into glasses. This recipe typically serves 4, but you can easily double it for larger gatherings. Use a spoon to help guide the slush into the glasses if needed.
  7. Garnish each serving with fresh orange slices and mint leaves. The mint not only adds a pop of color but also a refreshing aroma that complements the citrus flavors beautifully.
  8. Serve immediately and enjoy! If you’ve made extra, you can refrigerate it for a short time, but it's best enjoyed fresh.
  • Prep Time: 15 min
  • Cook Time: 0 min
  • Category: Dessert
  • Method: Blending
  • Cuisine: American

Nutrition

  • Serving Size: 1 serving
  • Calories: 200
  • Sugar: 30 g
  • Sodium: 50 mg
  • Fat: 5 g
  • Saturated Fat: 3 g
  • Unsaturated Fat: 2 g
  • Trans Fat: 0 g
  • Carbohydrates: 40 g
  • Fiber: 1 g
  • Protein: 2 g
  • Cholesterol: 20 mg

Keywords: Don't skip the orange zest! It's a game-changer for flavor. Always zest before juicing to make it easier.

Did you make this recipe?

Share a photo and tag us — we can't wait to see what you've made!

Zesty Lemon Poppy Seed Delight

One rainy afternoon, I found myself in my grandmother’s cozy kitchen, the kind that always smelled like warmth and love. She was whipping up her famous Lemon Poppy Seed Loaf, a recipe that had been passed down through generations. As the batter came together, the zesty aroma of fresh lemons filled the air, mingling perfectly with the nutty fragrance of poppy seeds. I can still picture her, apron-clad, as she expertly drizzled a vibrant citrus icing over the loaf, creating a glossy, sun-kissed finish that beckoned us to dive in. It was a moment that sparked my own passion for baking, and this recipe has become a cherished staple in my home ever since.

When you take a bite of this Lemon Poppy Seed Loaf, it’s like a burst of sunshine on your palate. The loaf is beautifully golden, with a tender crumb that melts in your mouth. Each slice is speckled with tiny poppy seeds, adding a delightful crunch that contrasts beautifully with the tangy sweetness of the lemon. And that citrus icing? It’s the finishing touch that elevates this loaf from ordinary to extraordinary, with its bright, zesty flavor dancing on your taste buds.

This recipe stands out because it embraces simplicity while delivering on flavor. I’ve added a hint of vanilla to the batter, enhancing the overall taste and making it even more indulgent. Trust me, once you make this Lemon Poppy Seed Loaf With Citrus Icing, it’ll become a go-to in your baking repertoire.

So, let me show you exactly how to make it!

Zesty Lemon Poppy Seed Delight

Why You’ll Love This Recipe

  • Moist and tender crumb that melts in your mouth, thanks to the perfect balance of butter and buttermilk.
  • Bright, zesty lemon flavor paired with crunchy poppy seeds, creating a delightful texture and taste experience.
  • Easy to whip up in just about an hour, perfect for last-minute gatherings or a cozy afternoon treat.
  • Budget-friendly with everyday ingredients, making it an accessible option for all home bakers.
  • The citrus icing adds a sweet tang that elevates the loaf, turning a simple recipe into a showstopper!

Ingredients

  • 1 ½ cups (190g) all-purpose flour
  • 1 teaspoon baking powder
  • ½ teaspoon baking soda
  • ½ teaspoon salt
  • 3 tablespoons poppy seeds
  • ½ cup (115g) unsalted butter, softened to room temperature
  • 1 cup (200g) granulated sugar
  • 2 large eggs
  • 1 teaspoon vanilla extract
  • 1 teaspoon lemon zest (from about 1 medium lemon)
  • ½ cup (120ml) buttermilk
  • 2 tablespoons fresh lemon juice

For the Citrus Icing:

  • 1 cup (120g) powdered sugar
  • 2 tablespoons fresh lemon juice
  • 1 tablespoon orange juice
  • 1 teaspoon lemon zest (for garnish, optional)

Let’s dive into the key ingredients that make this Lemon Poppy Seed Loaf so special. The all-purpose flour provides the structure and base for the loaf, while the baking powder and baking soda ensure it rises perfectly, giving the loaf a light texture. For a gluten-free variation, you could substitute the flour with a gluten-free all-purpose blend. Poppy seeds not only add a delightful crunch but also contribute to the unique flavor profile that pairs well with the citrus notes.

Unsalted butter is crucial for achieving the buttery richness that makes this loaf so moist. If you’re looking for a dairy-free option, coconut oil or a vegan butter can be used instead. The buttermilk is another essential component, providing acidity that activates the baking soda for a fluffy texture. If you don’t have buttermilk on hand, you can easily make a substitute by mixing ½ cup of milk with 1 tablespoon of vinegar or lemon juice and letting it sit for about 5 minutes.

Step-by-Step Instructions

  1. Preheat your oven to 350°F (175°C). Grease a 9×5-inch loaf pan or line it with parchment paper for easy removal later.
  2. In a medium mixing bowl, whisk together 1 ½ cups of all-purpose flour, 1 teaspoon of baking powder, ½ teaspoon of baking soda, ½ teaspoon of salt, and 3 tablespoons of poppy seeds. This helps to evenly distribute the baking agents and ensures a uniform rise.
  3. In a large mixing bowl, cream together ½ cup of softened unsalted butter and 1 cup of granulated sugar using an electric mixer on medium speed for about 3-4 minutes, until the mixture is light and fluffy. Make sure to scrape down the sides of the bowl occasionally.
  4. Add 2 large eggs, 1 teaspoon of vanilla extract, and 1 teaspoon of lemon zest to the creamed butter and sugar, mixing until fully combined. You want a smooth consistency, so ensure there are no lumps of butter.
  5. In a small bowl, combine ½ cup of buttermilk and 2 tablespoons of fresh lemon juice. Alternately add the dry ingredients and buttermilk mixture to the butter mixture, starting and ending with the dry ingredients. Mix just until combined; do not overmix, as this can lead to a dense loaf.
  6. Pour the batter into the prepared loaf pan. Smooth the top with a spatula, ensuring it’s even. Bake in the preheated oven for 50-60 minutes, or until a toothpick inserted in the center comes out clean. The edges should be lightly golden brown, and the center should feel just set.
  7. Once baked, remove the loaf from the oven and allow it to cool in the pan for about 10 minutes. Then, transfer it to a wire rack to cool completely. Resist the urge to slice too soon, as it will be crumbly if it’s still warm.
  8. While the loaf is cooling, prepare the citrus icing. In a medium bowl, whisk together 1 cup of powdered sugar, 2 tablespoons of fresh lemon juice, and 1 tablespoon of orange juice until smooth. If the icing is too thick, you can add a little more juice to reach your desired consistency.
  9. Once the loaf is completely cool, drizzle the citrus icing over the top. If you like, sprinkle with an additional teaspoon of lemon zest for an extra pop of flavor and color.

Pro Tips for the Best Lemon Poppy Seed Loaf With Citrus Icing

  • Be careful not to overmix your batter; this is a common mistake that can lead to a dense loaf. Mix just until the dry ingredients are incorporated for a light and fluffy texture.
  • Use room temperature ingredients, especially the butter and eggs. This helps to create a smoother batter and ensures even baking. Take your eggs out of the fridge about 30 minutes before you start.
  • For a more pronounced lemon flavor, consider adding a little lemon extract in addition to the zest and juice. Just a half teaspoon can elevate the citrus notes significantly.
  • When measuring your flour, spoon it into the measuring cup and level it off with a knife instead of scooping directly from the bag. This prevents packing and ensures you don’t end up with a dry loaf.
  • Invest in a good quality loaf pan; it makes a difference in heat distribution, which ensures even baking. If your pan is dark-coated, reduce the oven temperature by 25°F to prevent over-browning.

Variations & Serving Ideas

For a delightful twist, consider adding blueberries or raspberries to the batter for a fruity burst of flavor. You can also experiment with different citrus fruits—try lime or grapefruit zest and juice for a refreshing change. For a healthier option, substitute half of the all-purpose flour with whole wheat flour for added fiber without compromising too much on texture.

This Lemon Poppy Seed Loaf pairs beautifully with a light salad, such as a mixed greens salad with a vinaigrette, or a cup of tea for a cozy afternoon treat. It also complements a creamy cheese platter, as the acidity of the loaf balances rich cheeses perfectly. Lastly, a scoop of vanilla ice cream on the side creates a delightful contrast of temperatures and flavors!

Storage, Make-Ahead & Reheating

This Lemon Poppy Seed Loaf can be stored at room temperature for up to 3 days if wrapped tightly in plastic wrap. If you want to keep it longer, it freezes well for up to 3 months. To freeze, wrap the loaf tightly in plastic wrap and then in aluminum foil to prevent freezer burn.

When you’re ready to enjoy it again, simply thaw it in the fridge overnight. Reheat individual slices in the microwave for 15-20 seconds or in a toaster oven until warmed through. Interestingly, many people find that this loaf tastes even better the next day, as the flavors have time to meld!

Frequently Asked Questions

Can I make Lemon Poppy Seed Loaf With Citrus Icing ahead of time?

Yes — in fact, it tastes even better the next day! You can make the loaf a day in advance, allowing the flavors to develop. Just be sure to store it in an airtight container to maintain its moisture.

Can I substitute the poppy seeds?

Absolutely! If you don’t have poppy seeds on hand or prefer an alternative, you can use sesame seeds for a similar crunch or omit them entirely for a smooth loaf.

What can I use instead of buttermilk?

If you don’t have buttermilk, you can easily create a substitute by mixing ½ cup of milk (dairy or plant-based) with 1 tablespoon of vinegar or lemon juice. Let it sit for 5 minutes before using in the recipe.

How can I make this recipe gluten-free?

To make a gluten-free version of this Lemon Poppy Seed Loaf, substitute the all-purpose flour with a gluten-free all-purpose flour blend. Just ensure that the blend contains a binding agent like xanthan gum for the best results.

What is the best way to store leftover loaf?

Leftover Lemon Poppy Seed Loaf should be stored in an airtight container at room temperature for up to 3 days. For longer storage, wrap it tightly and freeze for up to 3 months. Thaw it before serving for the best texture.

Zesty Lemon Poppy Seed Delight

Final Thoughts

The Lemon Poppy Seed Loaf with Citrus Icing is truly a delightful treat that brings a burst of brightness to any occasion. The zesty lemon flavor combined with the subtle crunch of poppy seeds creates a satisfying balance, while the citrus icing adds a touch of sweetness that perfectly complements the loaf’s tanginess.

This is the kind of recipe I come back to again and again, especially when I want to brighten up a gloomy day or celebrate a small victory. The aroma that fills the kitchen as it bakes is absolutely heavenly! I encourage you to give this recipe a try; you might just find it becoming a beloved staple in your home. Don’t forget to share your results or even add your own unique twist—I can’t wait to see what you create!

Print
clock clock iconcutlery cutlery iconflag flag iconfolder folder iconinstagram instagram iconpinterest pinterest iconfacebook facebook iconprint print iconsquares squares iconheart heart iconheart solid heart solid icon

Lemon Poppy Seed Loaf


  • Author: Lily author
  • Total Time: 52 minute
  • Yield: 1 loaf 1x
Pin Recipe
Print Recipe

Description

This Lemon Poppy Seed Loaf is a delightful treat that combines zesty lemon flavor with crunchy poppy seeds. Topped with a citrus icing, it’s perfect for any occasion.


Ingredients

Scale
  • 1 ½ cups (190g) all-purpose flour
  • 1 teaspoon baking powder
  • ½ teaspoon baking soda
  • ½ teaspoon salt
  • 3 tablespoons poppy seeds
  • ½ cup (115g) unsalted butter, softened to room temperature
  • 1 cup (200g) granulated sugar
  • 2 large eggs
  • 1 teaspoon vanilla extract
  • 1 teaspoon lemon zest (from about 1 medium lemon)
  • ½ cup (120ml) buttermilk
  • 2 tablespoons fresh lemon juice
  • 1 cup (120g) powdered sugar
  • 2 tablespoons fresh lemon juice
  • 1 tablespoon orange juice
  • 1 teaspoon lemon zest (for garnish, optional)

Instructions

  1. Preheat your oven to 350°F (175°C). Grease a 9×5-inch loaf pan or line it with parchment paper for easy removal later.
  2. In a medium mixing bowl, whisk together 1 ½ cups of all-purpose flour, 1 teaspoon of baking powder, ½ teaspoon of baking soda, ½ teaspoon of salt, and 3 tablespoons of poppy seeds. This helps to evenly distribute the baking agents and ensures a uniform rise.
  3. In a large mixing bowl, cream together ½ cup of softened unsalted butter and 1 cup of granulated sugar using an electric mixer on medium speed for about 3-4 minutes, until the mixture is light and fluffy. Make sure to scrape down the sides of the bowl occasionally.
  4. Add 2 large eggs, 1 teaspoon of vanilla extract, and 1 teaspoon of lemon zest to the creamed butter and sugar, mixing until fully combined. You want a smooth consistency, so ensure there are no lumps of butter.
  5. In a small bowl, combine ½ cup of buttermilk and 2 tablespoons of fresh lemon juice. Alternately add the dry ingredients and buttermilk mixture to the butter mixture, starting and ending with the dry ingredients. Mix just until combined; do not overmix, as this can lead to a dense loaf.
  6. Pour the batter into the prepared loaf pan. Smooth the top with a spatula, ensuring it’s even. Bake in the preheated oven for 50-60 minutes, or until a toothpick inserted in the center comes out clean. The edges should be lightly golden brown, and the center should feel just set.
  7. Once baked, remove the loaf from the oven and allow it to cool in the pan for about 10 minutes. Then, transfer it to a wire rack to cool completely. Resist the urge to slice too soon, as it will be crumbly if it’s still warm.
  8. While the loaf is cooling, prepare the citrus icing. In a medium bowl, whisk together 1 cup of powdered sugar, 2 tablespoons of fresh lemon juice, and 1 tablespoon of orange juice until smooth. If the icing is too thick, you can add a little more juice to reach your desired consistency.
  9. Once the loaf is completely cool, drizzle the citrus icing over the top. If you like, sprinkle with an additional teaspoon of lemon zest for an extra pop of flavor and color.
  • Prep Time: 15 mins
  • Cook Time: 50-60 mins
  • Category: Dessert
  • Method: Baking
  • Cuisine: American

Nutrition

  • Serving Size: 1 slice
  • Calories: 200
  • Sugar: 15 g
  • Sodium: 150 mg
  • Fat: 8 g
  • Saturated Fat: 5 g
  • Unsaturated Fat: 3 g
  • Trans Fat: 0 g
  • Carbohydrates: 30 g
  • Fiber: 1 g
  • Protein: 3 g
  • Cholesterol: 40 mg

Keywords: Be careful not to overmix your batter; this is a common mistake that can lead to a dense loaf. Use room temperature ingredients for a smoother batter and even baking.

Did you make this recipe?

Share a photo and tag us — we can't wait to see what you've made!

  • Privacy Policy
  • Terms Of Service
  • Contact
  • About
  • GDPR

Copyright © 2025 Homesmad