
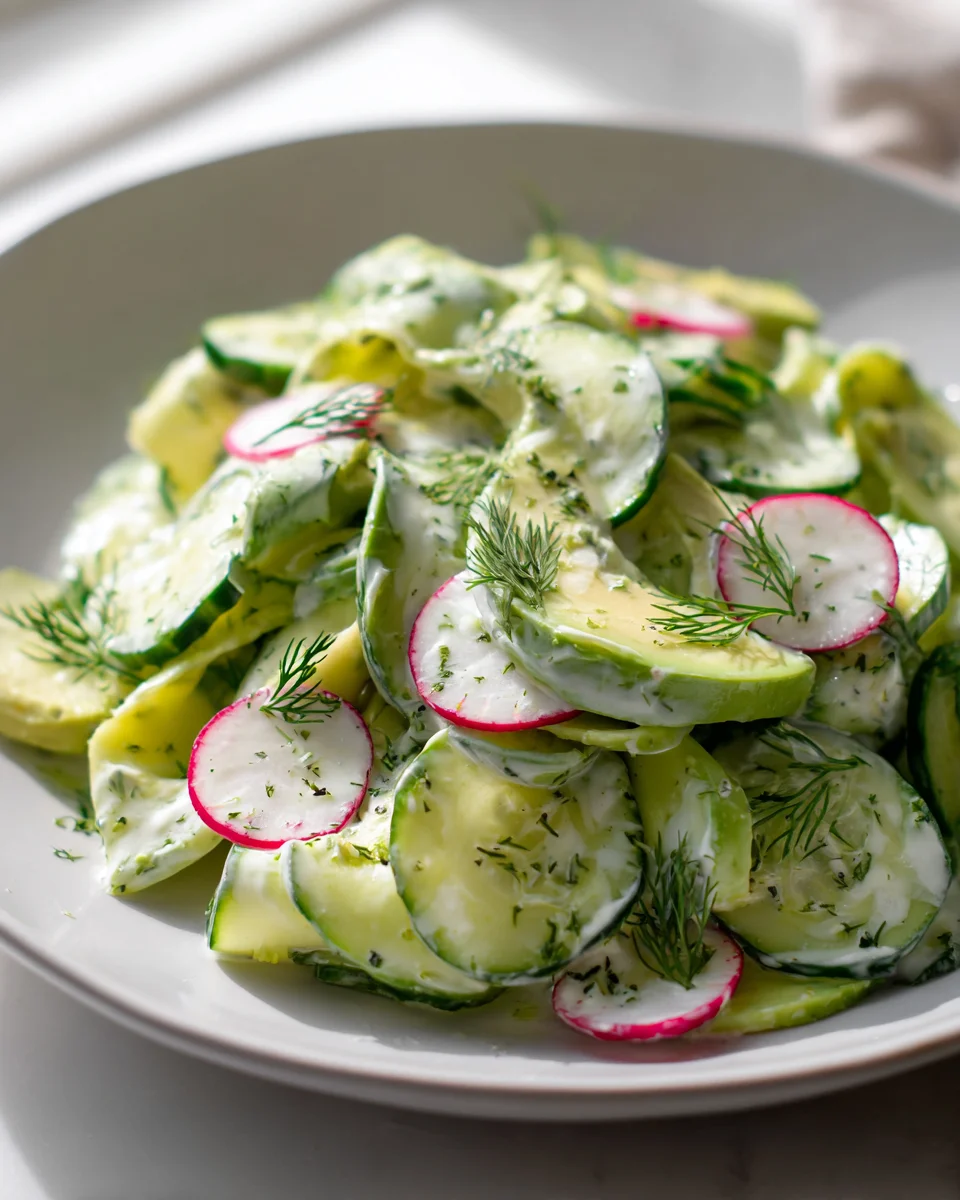
Cucumber And Avocado Salad (creamy + Fresh)
Oh, prepare yourselves for a truly delightful experience with my Cucumber And Avocado Salad (creamy + Fresh)! I’m so excited to share this recipe with you because it’s everything I crave on a warm day, or really, any day I’m looking for something that just hits the spot. What makes this salad incredibly special is the magical marriage of two perfect partners: the cool, crisp crunch of fresh cucumber and the luscious, velvety smoothness of ripe avocado. It’s a symphony of textures that’s both satisfying and incredibly light, truly embodying that “creamy + Fresh” promise in every single bite.
You’re going to absolutely adore this salad for its sheer simplicity and vibrant flavors. It’s incredibly quick to whip up, making it ideal for a last-minute side dish, a refreshing lunch, or even a light dinner. Every forkful offers that delightful contrast – the refreshing bite of cucumber followed by the rich, creamy goodness of avocado, all brought together with a bright, zesty dressing that awakens your taste buds. It’s naturally healthy, packed with good fats and hydration, and just bursting with fresh taste, guaranteeing a moment of pure bliss with minimal effort.
So, what exactly are we diving into? Imagine perfectly diced, crisp cucumber mingling with generous chunks of creamy avocado, creating a dish that’s both utterly refreshing and surprisingly substantial. We toss it all in a light, tangy dressing – think a squeeze of fresh lime or lemon, a touch of fragrant herbs – that enhances the natural flavors without ever overpowering them. It’s the kind of salad that makes you feel good inside and out, leaving you feeling energized and completely satisfied. Trust me, this one’s going to be a new favorite on your table!
Ingredient Notes
Oh, this Cucumber and Avocado Salad is such a dream – it’s the perfect harmony of creamy indulgence and bright, refreshing zest! To truly capture that “creamy + fresh” essence, the quality and preparation of our main ingredients are key. Let’s dive into what makes this salad sing.
- Cucumbers: For that wonderful crisp freshness, cucumbers are our star! I love using English cucumbers because their thinner skin means less peeling, and they have fewer seeds, making them less watery in your salad. Persian cucumbers are another fantastic option, offering a similar crunch and mild flavor. If you’re using a standard garden cucumber, I recommend peeling it and scooping out some of the larger seeds before dicing to ensure your salad stays vibrant and doesn’t become soggy. We’re aiming for small, bite-sized pieces here, so a nice dice works perfectly to integrate with the creamy avocado.
- Avocados: This is where the “creamy” magic happens! You’ll want perfectly ripe avocados – they should yield gently to pressure when squeezed, but not feel mushy. Haas avocados are my go-to for their rich, buttery texture. Make sure they are firm enough to dice cleanly but soft enough to provide that luscious creaminess. The avocado not only adds incredible flavor and texture but also a healthy dose of good fats to keep you feeling satisfied.
- Red Onion: For a delightful pop of color and a subtle pungent kick that perfectly complements the other flavors, I always add a bit of finely diced red onion. Its mild sharpness cuts through the creaminess of the avocado beautifully. If you find raw red onion too strong, you can soak the diced onion in a bowl of cold water for about 10 minutes, then drain and pat dry. This simple trick mellows its flavor considerably.
- Fresh Herbs: This is where you can truly personalize your salad! I adore fresh dill for its bright, grassy notes that just scream “fresh,” especially with cucumber. Fresh parsley or cilantro are also fantastic choices and lend a different, equally delicious profile. Feel free to use a single herb or a combination of two – just make sure they’re fresh and finely chopped to release their aromatic oils into the salad.
- Olive Oil: A good quality extra virgin olive oil is essential for our simple, elegant dressing. It helps emulsify the lemon juice and carries all those wonderful flavors. Choose one with a flavor you genuinely enjoy, as it will shine through in this fresh salad.
- Lemon Juice: The “fresh” element gets another boost here! Freshly squeezed lemon juice is non-negotiable for me. It adds brightness, prevents the avocado from browning too quickly, and ties all the flavors together with its tangy zing. Lime juice would also be a wonderful alternative if that’s what you have on hand, offering a slightly different citrusy note.
- Salt and Pepper: Simple but mighty! Flaky sea salt and freshly ground black pepper are all you need to season this salad perfectly. Always taste and adjust to your preference – a little extra salt can truly make the flavors pop.
Step-by-Step Instructions
Making this creamy and fresh cucumber and avocado salad is incredibly straightforward, which is one of the many reasons I love it! The key is in the gentle handling and proper timing. Let’s get started!
- Prepare Your Cucumbers: First things first, let’s get those cucumbers ready. Wash them thoroughly. If you’re using English or Persian cucumbers, you can often leave the skin on for extra fiber and color – just give them a good scrub. For regular garden cucumbers, I usually peel them and might even scoop out some of the larger, watery seeds with a spoon. Dice the cucumbers into small, uniform pieces, about ½-inch cubes. Transfer them to a large mixing bowl.
- Dice the Red Onion: Take your red onion and finely dice about a quarter or a half of it, depending on your preference for oniony kick. Remember, finely diced pieces ensure that the flavor is evenly distributed without overwhelming any single bite. Add the diced red onion to the bowl with the cucumbers.
- Chop Your Herbs: Now, let’s bring in those gorgeous fresh herbs. Wash your chosen herbs (dill, parsley, or cilantro) and pat them very dry. Finely chop them – you want about 2-3 tablespoons, but feel free to add more if you’re an herb lover like me! Add the chopped herbs to the cucumber and onion mixture.
- Make the Simple Dressing: In a small bowl or a jar with a lid, combine your extra virgin olive oil, freshly squeezed lemon juice, a good pinch of salt (about ½ teaspoon to start), and a few grinds of fresh black pepper. Whisk these ingredients together vigorously until they are well combined and slightly emulsified. If you’re using a jar, just put on the lid and give it a good shake! Taste the dressing and adjust the seasoning if needed – sometimes a little more lemon or salt makes all the difference.
- Combine and Dress: Pour about two-thirds of the dressing over the cucumber, onion, and herb mixture in the large bowl. Toss gently to coat everything evenly. I hold back a little dressing because we’ll be adding the avocado next, and I like to ensure it’s dressed adequately without drowning the salad.
- Prepare and Add the Avocado: This is the last step before serving, as avocados can brown quickly! Carefully halve your ripe avocados, remove the pit, and scoop out the flesh. Dice the avocado into pieces similar in size to your cucumbers. Gently add the diced avocado to the bowl with the other ingredients.
- Gentle Toss and Serve: Pour the remaining dressing over the avocado and the rest of the salad. Using a gentle hand, carefully fold everything together. You want to mix just enough to incorporate the avocado and coat it with the dressing, which helps prevent browning. Be careful not to mash the avocado – we want distinct, creamy cubes! Taste one last time and adjust salt, pepper, or lemon juice as needed. Serve immediately and enjoy that perfect creamy + fresh balance!
Tips & Suggestions
This Cucumber and Avocado Salad is wonderful in its simplicity, but a few little tricks and variations can elevate it even further or make your life easier. Here are some of my favorite tips:
- Chill for Best Flavor: While this salad is best served immediately after adding the avocado, I find that a quick 15-20 minute chill in the refrigerator before serving can really help the flavors meld and make it even more refreshing. Just make sure to add the avocado right before that chilling period to minimize browning.
- Preventing Avocado Browning: The nemesis of any avocado salad! The lemon juice in the dressing is your first line of defense. Ensuring all avocado pieces are coated with the dressing helps significantly. If you’re making this for a gathering and want it to look pristine for longer, you can prepare the cucumbers, onions, and dressing ahead of time and keep them separate. Then, slice and add the avocado just 5-10 minutes before serving. You can also press a piece of plastic wrap directly onto the surface of the salad in the serving bowl to reduce air exposure.
- Make it a Meal: This salad makes a fantastic light lunch or a vibrant side dish. To turn it into a more substantial meal, consider adding some grilled protein. Grilled chicken or shrimp are excellent choices. For a vegetarian option, cooked chickpeas or white beans would be delicious, adding extra fiber and plant-based protein. You could even crumble some feta cheese or goat cheese on top for an extra layer of creamy, tangy flavor.
- Add a Spicy Kick: If you love a little heat, a tiny pinch of red pepper flakes or a finely minced jalapeño (deseeded for less heat) can add a wonderful zing. Introduce it sparingly and taste as you go!
- Experiment with Other Veggies: Feel free to toss in other complementary vegetables. Halved cherry tomatoes add a lovely burst of color and sweetness. Thinly sliced radishes can contribute an extra peppery crunch. Just remember to keep the ingredient list balanced to maintain the “creamy + fresh” essence.
- Serving Suggestions: Beyond being a standalone salad, I love serving this as a fresh topping for fish tacos, grilled salmon, or even scooped onto a crisp piece of toasted sourdough bread for a delightful appetizer or snack. It’s also a fantastic, refreshing side for any summer BBQ or picnic!
Storage
As much as I adore this Cucumber and Avocado Salad, it’s truly a dish that shines brightest when enjoyed fresh. The “fresh” part of its name really is key!
- Immediate Enjoyment is Best: I strongly recommend serving this salad immediately after you’ve mixed in the avocado. This is when the cucumbers are at their crispiest, the herbs are at their most aromatic, and the avocado is at its most vibrant green and creamy.
- Refrigeration: If you do have leftovers, you can absolutely store them in the refrigerator. Transfer the salad to an airtight container. The less air exposure, the better for the avocado.
- Avocado Browning: Be prepared that the avocado will likely start to brown over time, even with the lemon juice in the dressing. This is a natural oxidation process. While the color may change to a slightly grayish-brown, the salad is generally still safe to eat for up to 1-2 days, provided it has been properly refrigerated. The texture of the cucumbers might also soften slightly, losing some of their initial crispness.
- Maximizing Freshness: To get the most out of any stored leftovers, I recommend pressing a piece of plastic wrap directly onto the surface of the salad before sealing the container. This further minimizes air exposure, which helps slow down the browning process.
- Reviving Leftovers: While you can’t bring back the original vibrant green of the avocado, you can sometimes refresh the flavors of a day-old salad by adding a tiny squeeze of fresh lemon juice and a sprinkle of fresh herbs just before serving. It helps to brighten things up a bit! However, for the ultimate creamy + fresh experience, make only as much as you expect to consume.
Final Thoughts
And there you have it! I truly hope you give this incredible Cucumber And Avocado Salad (creamy + Fresh) a try. It’s more than just a salad; it’s a testament to how simple ingredients can come together to create something truly spectacular. The smooth, rich avocado combined with the crisp, refreshing cucumber creates a symphony of textures and flavors that is both satisfying and incredibly light. It’s perfect for a quick, healthy lunch, a delightful side dish to your favorite beef main, or simply when you’re craving something vibrant and fresh.
I find myself coming back to this Cucumber And Avocado Salad (creamy + Fresh) again and again, especially on warmer days or when I need a healthy reset. It’s proof that eating well can be utterly delicious and effortless. So go ahead, whip up a batch, and let me know how much you love its creamy freshness. I’m confident it will become a new favorite in your kitchen!

Creamy Fresh Cucumber Avocado Salad – Quick & Delicious
- Total Time: 15 minutes
- Yield: 4 servings 1x
Description
This Creamy Fresh Cucumber Avocado Salad is a delightful blend of crisp cucumbers and creamy avocados, perfect for any occasion. It’s quick to prepare and bursting with fresh flavors that will leave you feeling satisfied and energized.
Ingredients
- 2 English cucumbers
- 2 ripe avocados
- 1/4 to 1/2 red onion
- 2–3 tablespoons fresh dill, parsley, or cilantro
- 3 tablespoons extra virgin olive oil
- 2 tablespoons freshly squeezed lemon juice
- Flaky sea salt, to taste
- Freshly ground black pepper, to taste
Instructions
- Wash the cucumbers thoroughly. If using English or Persian cucumbers, leave the skin on. For garden cucumbers, peel and scoop out larger seeds. Dice the cucumbers into small, uniform pieces, about ½-inch cubes, and transfer to a large mixing bowl.
- Finely dice about a quarter or half of the red onion and add it to the bowl with the cucumbers.
- Wash and pat dry the chosen fresh herbs. Finely chop them and add to the cucumber and onion mixture.
- In a small bowl or jar, combine the extra virgin olive oil, freshly squeezed lemon juice, a good pinch of salt, and freshly ground black pepper. Whisk or shake until well combined and slightly emulsified. Taste and adjust seasoning if needed.
- Pour about two-thirds of the dressing over the cucumber, onion, and herb mixture. Toss gently to coat everything evenly.
- Halve the ripe avocados, remove the pit, and scoop out the flesh. Dice the avocado into pieces similar in size to the cucumbers and gently add to the bowl.
- Pour the remaining dressing over the avocado and the rest of the salad. Carefully fold everything together, ensuring not to mash the avocado. Taste and adjust salt, pepper, or lemon juice as needed. Serve immediately.
- Prep Time: 15 mins
- Cook Time: 0 mins
- Category: Salad
- Method: Mixing
- Cuisine: American
Nutrition
- Serving Size: 1 bowl
- Calories: 220
- Sugar: 2 g
- Sodium: 150 mg
- Fat: 20 g
- Saturated Fat: 3 g
- Unsaturated Fat: 15 g
- Trans Fat: 0 g
- Carbohydrates: 12 g
- Fiber: 7 g
- Protein: 3 g
- Cholesterol: 0 mg
Keywords: For the best flavor, chill the salad for 15-20 minutes before serving, but add the avocado just before chilling to minimize browning. To prevent avocado browning, ensure all pieces are coated with dressing and consider preparing cucumbers and dressing ahead of time, adding avocado just before serving.