Easy One Pot Smoked Sausage And Rice Recipe Delight is more than just a meal; it’s a promise of culinary simplicity and sensational flavor after a long day. I know we all cherish those moments when a delicious, hearty dinner practically cooks itself, and this dish absolutely delivers on that front. Imagine sinking into a bowl of perfectly cooked rice, infused with the rich, smoky essence of sausage, all intertwined with tender vegetables – and only one pot to clean at the end! It’s truly a game-changer for busy evenings.
This particular combination of smoked sausage and rice holds a special place in culinary traditions around the globe, often celebrated for its comforting appeal and ability to feed a crowd without fuss. From the bayous of Louisiana to rustic European kitchens, the concept of a savory meat and rice dish prepared in a single vessel has always been a beloved staple. People truly adore this kind of meal because it brings together incredible taste – the savory depth of the sausage, the satisfying texture of the rice – with unparalleled convenience. It’s the ultimate weeknight hero, promising a nourishing, flavorful dinner without the usual mountain of pots and pans. I am so excited for you to experience the sheer joy of preparing and savoring this Easy One Pot Smoked Sausage And Rice Recipe Delight. Let’s dive into making your next favorite go-to meal!

Ingredients:
- 1 tablespoon olive oil: Just a touch to get things started and prevent sticking. Any neutral cooking oil will do if you don’t have olive oil on hand.
- 1 pound smoked sausage: I always reach for a good quality smoked sausage, like kielbasa, andouille, or even a smoked chicken sausage. Slice it into ½-inch thick rounds. This is truly the star of our Easy One Pot Smoked Sausage And Rice Recipe Delight! The smoky flavor it imparts is simply irresistible.
- 1 large yellow onion: Diced. Onions are essential for laying down a foundational sweetness and aromatic base that truly elevate the entire dish.
- 2 bell peppers: I love using one red and one green bell pepper for a vibrant splash of color and a nuanced flavor profile. The red bell pepper offers a sweeter note, while the green provides a slight bitterness. Chop them into ½-inch pieces.
- 2 stalks celery: Diced. Celery is part of the “holy trinity” of aromatics in many savory dishes, adding a subtle peppery crunch and an earthy, fresh note.
- 3 cloves garlic: Minced. Don’t skimp on the garlic; it brings incredible depth and a pungent warmth that complements the sausage perfectly.
- 1 (14.5 ounce) can diced tomatoes: Undrained. These tomatoes are fantastic for adding moisture, a pleasant acidity, and a rich tomato base that the rice will soak up beautifully.
- 2 cups long-grain white rice: Rinsed thoroughly under cold water until the water runs clear. This step is absolutely crucial for preventing gummy, sticky rice and ensuring fluffy, separate grains!
- 4 cups chicken broth: Or vegetable broth for a lighter flavor, if you prefer. This is the liquid gold that cooks our rice to perfection and infuses every grain with savory goodness.
- 1 teaspoon dried thyme: Earthy and wonderfully aromatic, dried thyme pairs exceptionally well with smoked meats and rice dishes.
- 1 teaspoon smoked paprika: For that extra layer of smoky flavor that perfectly complements the smoked sausage, deepening the overall character of the dish.
- ½ teaspoon dried oregano : A classic herb that adds a touch of Mediterranean flair and a lovely herbaceous backbone to the recipe.
- ¼ teaspoon cayenne pepper: Optional, but highly recommended for a gentle warmth and a subtle kick. Feel free to adjust this amount to your personal spice preference, or omit if you’re sensitive to heat.
- 1 bay leaf: A humble but powerful enhancer that adds a subtle, complex herbal note to the broth as it simmers, rounding out the flavors.
- Salt and freshly ground black pepper: To taste. Remember to always season as you go, tasting and adjusting until it’s just right for you.
- Fresh parsley or green onions: Chopped, for garnish. A sprinkle of fresh herbs at the very end brightens everything up with a pop of color and fresh flavor.
Preparation Phase: Gathering and Chopping for Our “Easy One Pot Smoked Sausage And Rice Recipe Delight”
- First things first, let’s get organized! While this is an Easy One Pot Smoked Sausage And Rice Recipe Delight, a little preparation, or “mise en place,” makes the cooking process smooth, enjoyable, and stress-free. Trust me, having everything prepped before you even turn on the heat will make a world of difference.
- Slice the smoked sausage: Take your pound of smoked sausage and carefully slice it into uniform ½-inch thick rounds. If your sausage is particularly thick, you might even consider halving the rounds for easier eating and to ensure they integrate well with the rice. Place the sliced sausage on a plate and set it aside; it will be added back into the pot later.
- Chop the vegetables: Now, turn your attention to the vegetables. Dice your large yellow onion into small, consistent pieces. Next, prepare the bell peppers: remove the stems, seeds, and any white membranes, then chop them into ½-inch pieces. Proceed to dice your celery stalks to a similar size. The key here is consistency; uniform chopping ensures that all your vegetables cook evenly and integrate seamlessly into the dish. Finally, mince your garlic cloves finely. I usually do this last to maximize its freshness before it hits the hot pot. Keep all chopped vegetables separate or in a bowl together, ready for their turn in the pot.
- Rinse the rice: This is a critical step that I cannot emphasize enough for achieving the perfect texture in your Easy One Pot Smoked Sausage And Rice Recipe Delight. Place your 2 cups of long-grain white rice into a fine-mesh sieve. Rinse it thoroughly under cold running water, gently tossing or stirring the rice with your fingers, until the water running off is completely clear. You’ll notice milky water at first; keep rinsing until it’s crystal clear. This process removes excess starch that would otherwise make your cooked rice gummy and clumpy. Once rinsed, allow the rice to drain well in the sieve for a few minutes.
- Measure and prepare seasonings and liquids: Gather all your dried herbs and spices: the dried thyme, smoked paprika, dried oregano, and cayenne pepper (if you’re including it). Have them measured out and ready to go. Also, ensure your 4 cups of chicken broth and the can of diced tomatoes (undrained) are within easy reach of your stovetop. Having everything prepped and ready to go will make the cooking phase a true breeze and ensure you don’t miss a beat.
Cooking Phase: Building Flavors in One Pot – The Heart of Our “Easy One Pot Smoked Sausage And Rice Recipe Delight”
- Brown the sausage: Place a large, heavy-bottomed pot or a Dutch oven over medium-high heat. Add your tablespoon of olive oil. Once the oil is hot and shimmering, add the sliced smoked sausage rounds. Arrange them in a single layer to ensure proper browning. If your pot isn’t large enough to accommodate all the sausage in one layer, it’s best to cook it in two batches to avoid overcrowding. The goal here is to get a beautiful, golden-brown sear on both sides of the sausage. This caramelization isn’t just for looks; it adds an incredible depth of flavor and a pleasing texture to your Easy One Pot Smoked Sausage And Rice Recipe Delight. Cook for about 3-4 minutes per side, until nicely browned and slightly crispy. Once cooked, remove the sausage from the pot with a slotted spoon and set it aside on a clean plate. Crucially, leave any rendered fat and those delicious browned bits (the “fond”) in the pot – that’s pure, concentrated flavor that will become the foundation of our dish.
- Sauté the aromatics: Reduce the heat to medium. Add your diced onion, bell peppers, and celery to the same pot, utilizing the flavorful sausage drippings. If there doesn’t seem to be enough fat left to sauté the vegetables, feel free to add another small drizzle of olive oil. Sauté these vegetables for about 7-10 minutes, stirring occasionally, until they soften significantly and the onion becomes translucent. You’ll notice the vegetables actively start to scrape up those delicious browned bits from the bottom of the pot, incorporating them into the mixture and adding an incredible layer of flavor. This process is called deglazing (even without adding liquid yet) and it’s absolutely crucial for building a flavorful base. The kitchen will start to fill with the most inviting aromas at this point – a true preview of the delightful meal to come!
- Add the garlic and spices: Now, add your minced garlic to the pot with the softened vegetables. Stir it in well and cook for just about 1 minute, until it becomes wonderfully fragrant. Be very careful not to burn the garlic, as burnt garlic can impart a bitter taste to your dish. Immediately after the garlic becomes fragrant, stir in the dried thyme, smoked paprika, dried oregano, and cayenne pepper (if you’re using it). Continue to cook for another minute, stirring constantly. This brief cooking period allows the spices to “bloom” in the hot oil, enhancing their flavors and aromas significantly and infusing the entire dish with a wonderful warmth and complexity. You’re really building layers upon layers of flavor that will make this Easy One Pot Smoked Sausage And Rice Recipe Delight truly shine.
- Introduce the tomatoes and rice: Pour in the entire can of diced tomatoes, including all their juices. Stir everything well to combine the tomatoes with the vegetables and spices. Next, add your thoroughly rinsed and well-drained long-grain white rice to the pot. Stir the rice gently for about 2-3 minutes, ensuring every single grain is coated with the flavorful vegetable and spice mixture. This gentle toasting of the rice helps it absorb flavors more effectively and contributes significantly to a beautiful, non-sticky, and perfectly textured outcome. It’s a small step that makes a very big difference in the final quality of your cooked rice.
Simmering and Finishing Phase: The “Easy One Pot Smoked Sausage And Rice Recipe Delight” Comes Alive
- Add broth and bay leaf, then simmer: It’s time to add the liquid that will cook our rice. Pour in the 4 cups of chicken broth. Give everything a good, thorough stir to ensure nothing is sticking to the bottom of the pot and all ingredients are evenly distributed. Add the bay leaf, submerging it in the liquid. Increase the heat to medium-high and bring the mixture to a rolling boil. Once it reaches a vigorous boil, immediately reduce the heat to the lowest setting, cover the pot tightly with a well-fitting lid, and let it simmer undisturbed for 18-20 minutes. This is a critical moment for any one-pot rice dish: resist the urge to lift the lid during this time! Lifting the lid releases precious steam, which is absolutely crucial for the rice to cook properly, evenly, and to achieve that desired fluffy texture. This is truly where the magic happens for your Easy One Pot Smoked Sausage And Rice Recipe Delight.
- Return the sausage and rest: After the 18-20 minutes of simmering, turn off the heat completely, but do not lift the lid yet. Carefully remove the lid just long enough to gently place the reserved cooked smoked sausage rounds back into the pot, nestling them among the cooked rice. Quickly replace the lid tightly. Allow the pot to rest, still covered and off the heat, for another 5-10 minutes. This essential resting period allows the rice to finish absorbing any remaining liquid and steam, resulting in perfectly plump and separate grains. It also ensures the sausage is thoroughly warmed through without any risk of overcooking or drying out. Patience is a virtue here, and it will be abundantly rewarded with perfectly cooked rice!
- Fluff and season: Finally, the moment has arrived! Remove the lid. Carefully locate and remove the bay leaf, discarding it. Use a fork to gently fluff the rice from the bottom of the pot upwards. This action separates the grains, releases any lingering steam, and evenly distributes all those wonderful flavors throughout the dish. Taste the rice and adjust the seasoning with salt and freshly ground black pepper as needed. You might find you don’t need much salt thanks to the savory broth and smoked sausage, but always taste and adjust to your personal preference. The incredible aroma filling your kitchen right now will be all the confirmation you need that you’ve created an absolutely fantastic Easy One Pot Smoked Sausage And Rice Recipe Delight!
Serving Suggestions and Pro Tips: Maximizing Your Enjoyment of This Easy One Pot Smoked Sausage And Rice Recipe Delight
- Garnish and Serve Immediately: Just before serving, sprinkle generously with freshly chopped parsley or thinly sliced green onions. The vibrant green of the fresh herbs adds a beautiful burst of color and a lovely herbaceous note that cuts through the richness of the sausage and rice, brightening the entire dish. Ladle generous portions into bowls and serve piping hot. This Easy One Pot Smoked Sausage And Rice Recipe Delight is truly a complete and satisfying meal all by itself!
- Perfect Pairings: While this dish is incredibly satisfying and hearty on its own, it pairs beautifully with a simple side salad dressed with a light vinaigrette. The crisp freshness of the salad provides a delightful contrast to the warm, savory main course. Alternatively, a side of lightly steamed green beans, asparagus, or broccoli can round out the meal perfectly, adding extra vegetables and texture. A crusty piece of artisanal bread is also an excellent addition, perfect for soaking up any remaining flavorful juices from the bottom of the bowl.
- Make it Your Own – Exciting Variations: One of the best things about an Easy One Pot Smoked Sausage And Rice Recipe Delight is how adaptable it is!
- Spice Level: If you’re a heat seeker, feel free to amplify the spice by adding an extra pinch (or two!) of cayenne pepper, a dash of your favorite hot sauce at the table, or even by sautéing a few thinly sliced fresh jalapeños or serrano peppers along with the bell peppers.
- Vegetable Boost: For added nutrition and a pop of color, consider stirring in about a cup of frozen peas or corn during the last 5 minutes of the rice’s resting period. Spinach or kale can also be wilted in at the very end; simply add them to the hot rice, cover, and let them steam for a couple of minutes until tender.
- Different Sausages: Don’t hesitate to experiment with other types of smoked sausage! Chicken apple sausage, turkey sausage, or even a spicier Spanish chorizo can offer delightful new twists and flavor profiles to this Easy One Pot Smoked Sausage And Rice Recipe Delight. Just ensure it’s a pre-cooked smoked sausage for consistency in cooking times.
- Broth Choice: While chicken broth is my personal go-to for its balanced flavor, vegetable broth works perfectly if you prefer a vegetarian base, or even beef broth for a deeper, richer, and more robust flavor profile.
- Storage and Reheating: Leftovers of this Easy One Pot Smoked Sausage And Rice Recipe Delight are absolutely fantastic and often taste even better the next day as the flavors meld further! Store any remaining portions in an airtight container in the refrigerator for up to 3-4 days. To reheat, simply microwave individual servings until hot, adding a splash of extra broth or water if the rice seems a bit dry to prevent it from drying out. Alternatively, you can reheat it gently in a saucepan on the stovetop over low heat, stirring occasionally, until warmed through. This dish also freezes exceptionally well for up to 3 months, making it perfect for convenient meal prepping. Just thaw overnight in the fridge before reheating.
- The Secret to Perfect One-Pot Rice Every Time: To ensure your Easy One Pot Smoked Sausage And Rice Recipe Delight yields perfectly cooked, fluffy rice consistently, remember these golden rules: always rinse your rice thoroughly to remove excess starch; use the correct liquid-to-rice ratio (2 cups rice to 4 cups broth is spot on for this recipe); do not lift the lid during the simmering period to trap all that essential steam; and allow a proper resting period off the heat once cooking is complete. Following these simple yet critical steps will ensure you achieve perfectly cooked, separate grains of rice every single time.
- Why I Love This Recipe: Beyond its incredible flavor, comforting nature, and the sheer delight it brings to the dinner table, what truly makes this an Easy One Pot Smoked Sausage And Rice Recipe Delight is the minimal cleanup. Everything comes together beautifully in just one pot, saving you precious time at the end of a busy day, which is always a win in my book! It’s hearty, incredibly satisfying, and packed with layers of rich, smoky flavor, making it a reliable and much-loved go-to weeknight meal for my family. Give it a try – I promise you, you won’t be disappointed!

Conclusion:
Well, friends, we’ve reached the delicious culmination of our culinary journey! I genuinely hope you’re as excited as I am about what we’ve uncovered together. If there’s one recipe I could implore you to try this week, it would absolutely be this one. Why, you ask? Because it truly embodies everything we crave in a home-cooked meal: incredible flavor, minimal fuss, and a deeply satisfying experience that warms you from the inside out. Forget endless pots and pans cluttering your sink after dinner; this masterpiece delivers maximum taste with astonishingly little cleanup, making it a true weeknight hero in any kitchen. It’s the kind of dish that smells amazing while it’s cooking, brings everyone to the table with anticipation, and leaves them fully content. The smoky notes of the sausage, perfectly infused into every grain of tender rice, create a symphony of flavors that feels both rustic and refined, all without requiring advanced cooking skills or exotic ingredients. It’s a testament to the power of simple, wholesome components coming together to create something truly extraordinary.
This isn’t just another meal; it’s a ticket to stress-free dining and delightful satisfaction. Imagine coming home after a long day, knowing that a hearty, flavorful dinner is just a single pot away. That’s the magic we’re talking about! The Easy One Pot Smoked Sausage And Rice Recipe Delight is more than just convenient; it’s genuinely delicious. It’s packed with savory goodness, with the rice perfectly absorbing all those rich, smoky juices, creating a texture that’s comforting and deeply flavorful. It’s a complete meal in itself, offering a wonderful balance of protein, carbohydrates, and often a touch of vegetables depending on your additions. This recipe is designed to give you back your precious time, allowing you to focus on enjoying the meal and the company, rather than being stuck in the kitchen. It’s a foolproof option that consistently delivers fantastic results, whether you’re a seasoned chef or just starting your cooking adventure.
Serving Suggestions & Creative Variations to Make it Your Own
While this dish is absolutely perfect as is, straight from the pot, I always encourage you to get creative and personalize it! For a simple yet effective garnish, a sprinkle of fresh chopped parsley or green onions adds a vibrant pop of color and freshness. A simple side salad with a tangy vinaigrette would cut through the richness beautifully, offering a lovely textural contrast. And honestly, a good piece of crusty bread for soaking up any leftover savory juices is always a winner in my book! But don’t stop there. The beauty of a one-pot meal lies in its adaptability. Feel free to adjust the spice level to your liking; a pinch of red pepper flakes stirred in with the rice will give it a pleasant kick. For those who love their veggies, consider stirring in a cup of frozen peas or corn during the last five minutes of cooking, or adding diced bell peppers and onions along with the sausage to sauté. You could even swap out the type of smoked sausage; chorizo would lend a Spanish-inspired flair and a richer color, while chicken or turkey sausage offers a lighter option without sacrificing flavor. For an extra creamy texture, a sprinkle of shredded cheddar or Monterey Jack cheese stirred in at the very end, just before serving, would be absolutely divine. The possibilities are truly endless, limited only by your imagination and what you have on hand in your pantry!
Your Culinary Adventure Awaits!
So, what are you waiting for? I’m genuinely excited for you to experience the sheer delight that this recipe brings. Take the plunge, gather your ingredients, and whip up this fantastic one-pot meal. I promise you won’t regret it. It’s more than just feeding yourself; it’s about creating a moment of comfort, sharing good food with loved ones, and enjoying the simple pleasure of a home-cooked dish that requires minimal effort but delivers maximum impact. I truly believe that cooking should be an enjoyable, approachable experience, and this recipe encapsulates that philosophy perfectly. Once you’ve had a chance to try it, please come back and share your experience! Did you add extra veggies? Did you use a different kind of sausage? Your tips, tricks, and feedback are invaluable and inspire all of us in this wonderful community. I can’t wait to hear how this Easy One Pot Smoked Sausage And Rice Recipe Delight became a new favorite in your home. Happy cooking, and even happier eating!
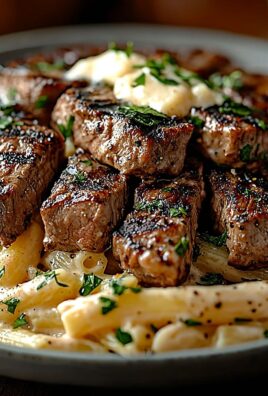
Easy One Pot Smoked Sausage & Rice Dinner Delight
A promise of culinary simplicity and sensational flavor after a long day. This one-pot dish delivers a delicious, hearty dinner of perfectly cooked rice infused with the rich, smoky essence of beef sausage, all intertwined with tender vegetables, making it a game-changer for busy evenings with minimal cleanup.
Ingredients
Instructions
Important Information
Nutrition Facts (Per Serving)
It is important to consider this information as approximate and not to use it as definitive health advice.
Allergy Information
Please check ingredients for potential allergens and consult a health professional if in doubt.