• Skip to primary navigation
  • Skip to main content
  • Skip to primary sidebar
Homesmad

Homesmad

  • Home
  • Breakfast & Brunch
  • Appetizers & Snacks
  • Dinner
  • Dessert
  • About
  • Privacy Policy
  • Contact
Homesmad
  • Home
  • Breakfast & Brunch
  • Appetizers & Snacks
  • Dinner
  • Dessert
  • About
  • Privacy Policy
  • Contact

Caramel Apple Cheesecake Bars Recipe – Easy & Delicious!

December 8, 2025 by Lily author

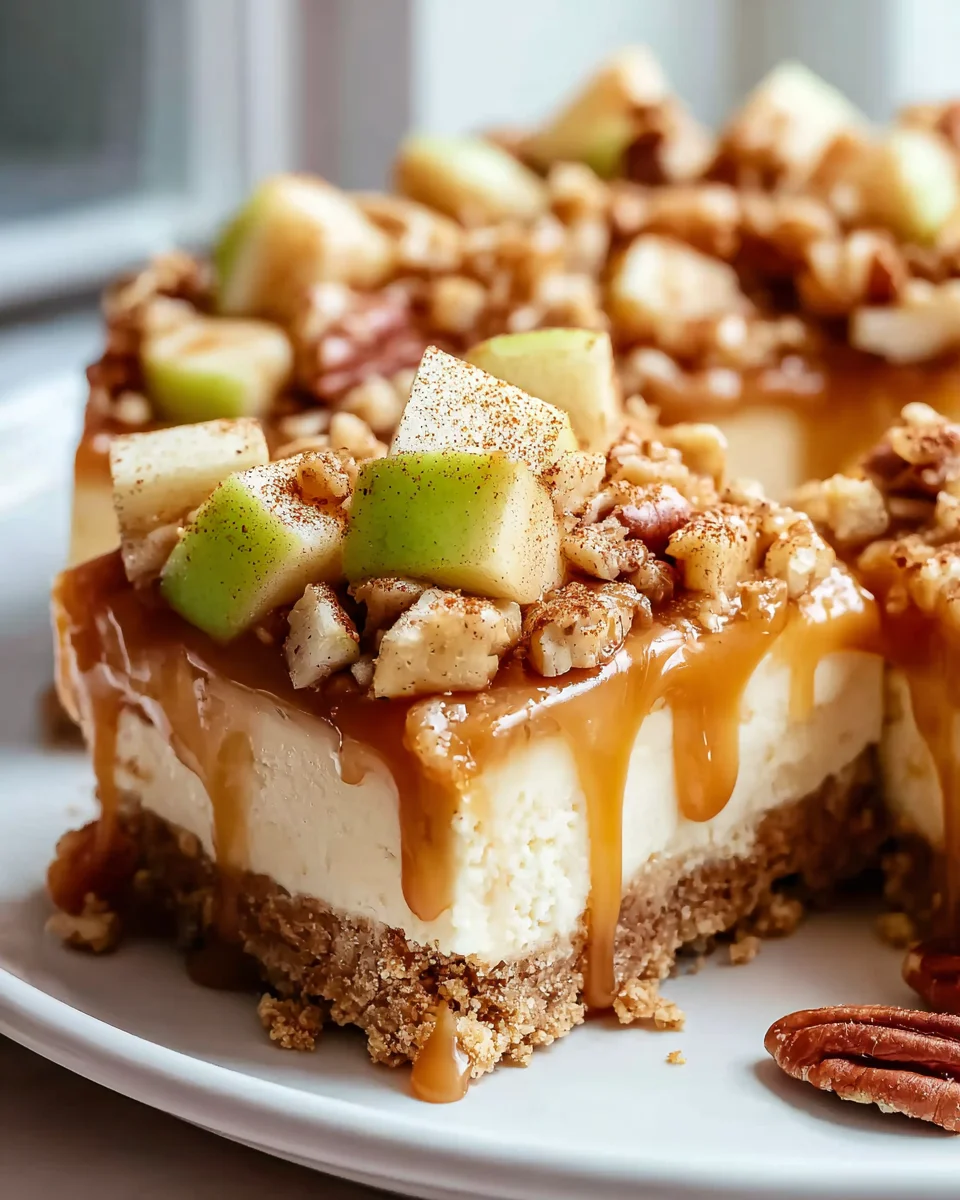
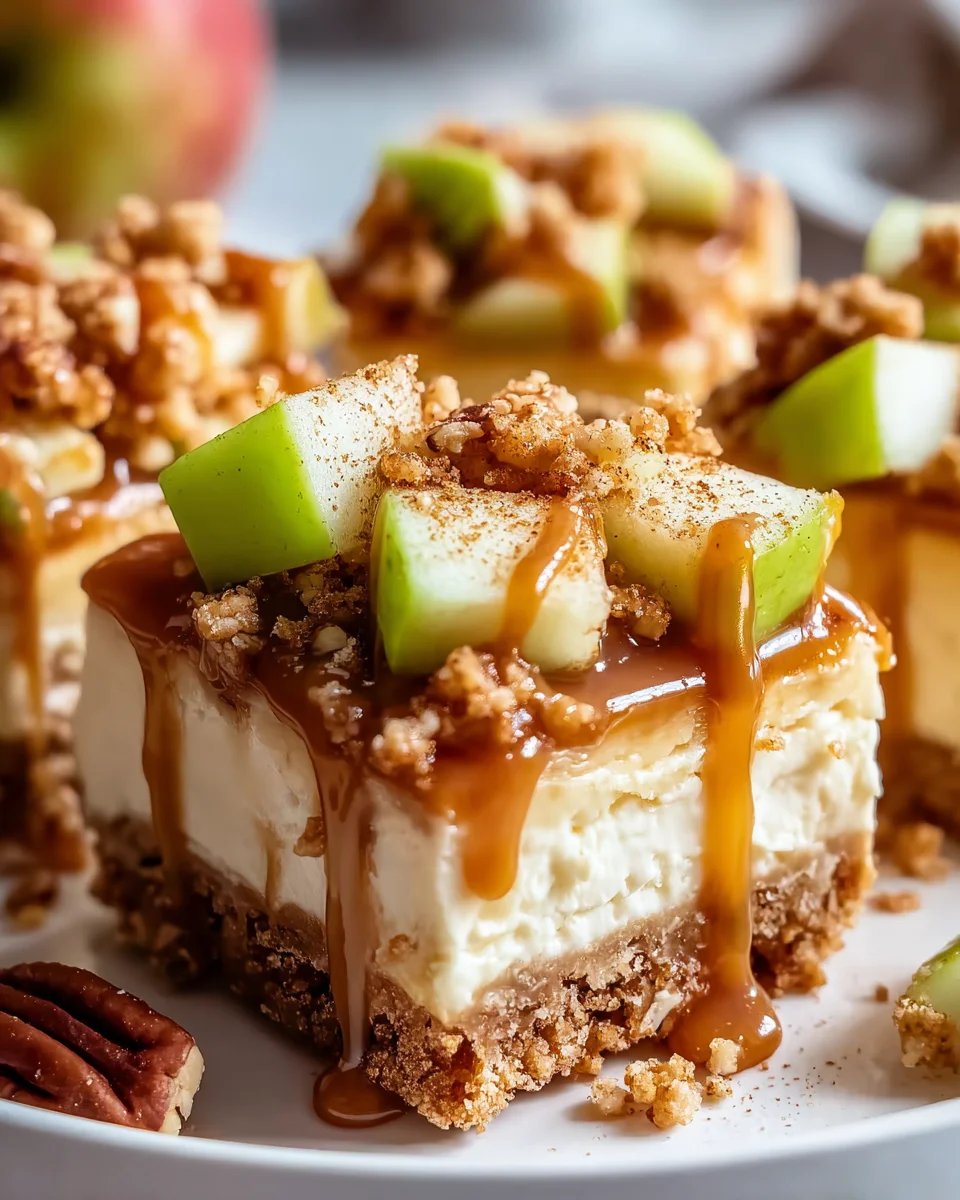
Caramel Apple Cheesecake Bars are more than just a dessert; they are an experience, a symphony of autumn’s finest flavors harmoniously blended into one irresistible bite. As the leaves begin to turn and the air grows crisp, our palates often crave the comforting embrace of seasonal delights. This dish perfectly captures the essence of fall, marrying the timeless appeal of crisp apples with the luxurious sweetness of caramel, all elevated by the creamy decadence of cheesecake. I find that people adore these bars not just for their stunning visual appeal but for the incredible interplay of textures and tastes. Imagine a buttery, graham cracker crust providing the perfect foundation for a rich, tangy cream cheese filling, generously studded with tender, spiced apple pieces. Then, a luscious swirl of golden caramel crowns each bar, creating a truly unforgettable dessert that is both sophisticated and wonderfully nostalgic. The bar format makes them incredibly convenient for gatherings, potlucks, or simply a delightful treat at home, offering all the gourmet pleasure of a full cheesecake with effortless serving. Each bite of these Caramel Apple Cheesecake Bars delivers a perfect balance of sweet, tart, and creamy, making them an absolute showstopper that truly embodies the spirit of harvest season.

Caramel Apple Cheesecake Bars Recipe - Easy & Delicious! this RECIPE

Ingredients:

  • For the Graham Cracker Crust:

    • 1 ½ cups (about 180g) graham cracker crumbs (from approximately 10-12 full graham cracker sheets)
    • ¼ cup (50g) granulated sugar
    • ½ teaspoon ground cinnamon
    • ½ cup (113g) unsalted butter, melted
  • For the Cheesecake Filling:

    • 24 ounces (680g) cream cheese, full-fat, softened to room temperature
    • ¾ cup (150g) granulated sugar
    • 2 large eggs, at room temperature
    • 1 teaspoon pure vanilla extract
    • ½ teaspoon ground cinnamon
    • ¼ teaspoon ground nutmeg
    • Pinch of salt
  • For the Caramel Apple Topping:

    • 3 medium-sized apples (I love using a mix of Granny Smith for tartness and Honeycrisp for sweetness and texture), peeled, cored, and diced into ½-inch pieces
    • 2 tablespoons (28g) unsalted butter
    • ¼ cup (50g) light brown sugar, packed
    • ½ teaspoon ground cinnamon
    • ¼ teaspoon ground nutmeg
    • Pinch of salt
    • ½ cup (120ml) prepared caramel sauce (store-bought or homemade, just make sure it’s a good quality, pourable sauce)
  • Optional Garnish:

    • Extra drizzle of caramel sauce
    • A sprinkle of flaky sea salt
    • Chopped pecans or walnuts

Equipment You’ll Need:

Before we dive into creating these delightful Caramel Apple Cheesecake Bars, let’s ensure you have the right tools on hand. You’ll need a 9×13-inch baking pan, preferably a light-colored metal one for even baking. Parchment paper is absolutely essential for easy removal, so make sure you have a roll ready. A large mixing bowl, a stand mixer with a paddle attachment (or a hand mixer), a rubber spatula, and a whisk will be your best friends for the cheesecake filling. For the apple topping, a medium-sized saucepan or skillet will work perfectly. Having all your equipment laid out and ready will make the baking process smooth and enjoyable, allowing you to focus on the delicious task at hand.

Getting Started: Prepare the Crust

  1. Preheat and Prep Your Pan: First things first, let’s get our oven ready. Preheat your oven to a comfortable 350°F (175°C). While the oven is warming up, take your 9×13-inch baking pan and line it with parchment paper. This step is incredibly important for making sure your Caramel Apple Cheesecake Bars come out of the pan beautifully and without any fuss. I like to leave an overhang of parchment paper on the two longer sides; this creates little “handles” that will be a lifesaver when it’s time to lift the entire batch of bars out of the pan. Trust me on this one, it makes cutting and serving so much easier!
  2. Combine Dry Ingredients for the Crust: In a medium-sized mixing bowl, measure out your graham cracker crumbs. You can buy pre-crushed crumbs, or if you’re like me and enjoy a little hands-on work, you can crush full graham cracker sheets yourself using a food processor or by placing them in a Ziploc bag and crushing them with a rolling pin. Add the granulated sugar and the ground cinnamon to the crumbs. Give these dry ingredients a good whisk or stir until they are thoroughly combined. The cinnamon here adds a wonderful warmth that complements the apple and caramel flavors we’ll be adding later.
  3. Add Melted Butter: Now, pour the melted unsalted butter over the graham cracker mixture. Using a fork or your clean hands, mix everything together until the crumbs are evenly moistened. The mixture should resemble wet sand – it should hold together when you squeeze a handful. If it seems too dry, you can add another tablespoon of melted butter, but usually, ½ cup is just the right amount to create a sturdy, flavorful base for our Caramel Apple Cheesecake Bars.
  4. Press into Pan: Transfer the buttered crumb mixture into your prepared 9×13-inch baking pan. Using the bottom of a flat-bottomed glass, a measuring cup, or your fingers, press the crumbs firmly and evenly into the bottom of the pan. Make sure to get into all the corners and create a compact, uniform layer. A well-compacted crust is key to preventing crumbling when you slice the bars later. I always make sure it’s as flat and even as possible to ensure consistent baking.
  5. Par-Bake the Crust: Pop the pan with the pressed crust into your preheated oven. Bake for 8-10 minutes, or until the edges are lightly golden and the crust smells wonderfully fragrant. This par-baking step helps to set the crust, giving it a crisper texture and preventing it from becoming soggy once the cheesecake filling is added. Once baked, remove the pan from the oven and set it aside to cool completely while we prepare the cheesecake filling. You can even place it in the refrigerator to speed up the cooling process if you’re in a hurry. A cool crust is important before adding the filling.

Crafting the Velvety Cheesecake Filling

Now for the star of the show, the rich and creamy cheesecake layer that will make these Caramel Apple Cheesecake Bars truly irresistible. The key here is to have all your ingredients at room temperature, especially the cream cheese and eggs. This ensures a silky-smooth, lump-free filling.

  1. Soften the Cream Cheese: If you haven’t already, make sure your cream cheese is at room temperature. This is absolutely critical for a smooth cheesecake. I usually take mine out of the fridge at least an hour or two before I plan to bake. If you’re short on time, you can unwrap the cream cheese and microwave it in a safe bowl for 15-20 second intervals, checking and flipping until it’s softened but not melted.
  2. Beat Cream Cheese and Sugar: In a large mixing bowl, preferably with a stand mixer fitted with the paddle attachment, or using a hand mixer, beat the softened cream cheese on medium speed until it’s incredibly smooth and creamy, about 2-3 minutes. Make sure there are absolutely no lumps. Then, gradually add the granulated sugar, continuing to beat on medium speed. Scrape down the sides and bottom of the bowl frequently to ensure everything is thoroughly incorporated. Beat for another 2-3 minutes until the mixture is light and fluffy. This step is crucial for incorporating air and dissolving the sugar, leading to a wonderfully smooth texture.
  3. Incorporate Eggs, Vanilla, and Spices: Once your cream cheese and sugar mixture is perfectly smooth, add the eggs, one at a time. Beat each egg just until it is incorporated into the batter, then add the next. Be careful not to overmix at this stage once the eggs are in, as overmixing can introduce too much air, which can cause the cheesecake to crack during baking. After the eggs, stir in the pure vanilla extract, ground cinnamon, ground nutmeg, and a tiny pinch of salt. Mix on low speed just until combined. The cinnamon and nutmeg here beautifully complement the apple flavors that will be joining our Caramel Apple Cheesecake Bars later.
  4. Final Scrape and Check: Give the entire bowl a final scrape with your rubber spatula, ensuring that no unmixed cream cheese or sugar is hiding at the bottom. The batter should be incredibly smooth, thick, and pourable. Take a moment to appreciate the creamy consistency; it’s a testament to good technique!

Assembling and Baking Your Caramel Apple Cheesecake Bars

With our crust cooled and our velvety filling ready, it’s time to bring these components together and let the oven work its magic.

  1. Pour Filling Over Crust: Gently pour the cheesecake filling over your cooled, par-baked graham cracker crust. Use your rubber spatula to spread the filling evenly across the crust, making sure it goes all the way to the edges. Give the pan a gentle tap or two on the counter to release any large air bubbles and ensure an even top surface.
  2. Bake the Bars: Carefully transfer the pan back into your preheated 350°F (175°C) oven. Bake for approximately 35-45 minutes. Baking times can vary depending on your oven, so it’s important to pay attention to the visual cues.
  3. Check for Doneness: You’ll know the cheesecake is done when the edges are set and appear slightly puffed, but the very center still has a slight, gentle wobble when you gently shake the pan. It’s important not to overbake cheesecake, as this can lead to a dry, cracked surface. If you notice the top browning too quickly, you can loosely tent the pan with aluminum foil for the remainder of the baking time.
  4. Cool Completely: Once baked, carefully remove the pan from the oven. Allow the Caramel Apple Cheesecake Bars to cool on a wire rack at room temperature for at least 1-2 hours. During this cooling period, the center will continue to set. Resist the urge to rush this step! Once cooled to room temperature, loosely cover the pan with plastic wrap and transfer it to the refrigerator to chill for at least 4 hours, or ideally, overnight. Chilling is non-negotiable for cheesecake bars; it allows them to firm up properly, making them easy to slice and ensuring that classic dense, creamy texture.

Creating the Irresistible Caramel Apple Topping

While your cheesecake bars are chilling, we can prepare the warm and aromatic caramel apple topping that will crown our dessert. This topping truly elevates these Caramel Apple Cheesecake Bars to a new level of deliciousness.

  1. Prepare the Apples: Take your chosen apples (Granny Smith and Honeycrisp are my favorites for this recipe), peel them, core them, and dice them into uniform ½-inch pieces. Uniformity is key here so that they cook evenly. I find that this size gives a nice bite without being too chunky on top of the bars.
  2. Cook the Apples with Spices: In a medium-sized saucepan or skillet, melt the 2 tablespoons of unsalted butter over medium heat. Once the butter is shimmering, add the diced apples, light brown sugar, ground cinnamon, ground nutmeg, and a tiny pinch of salt. Stir everything together to coat the apples evenly. Cook the apples for 8-12 minutes, stirring occasionally, until they are tender-crisp but still hold their shape. You don’t want them to become mushy, just softened enough to be easily bitten into. The brown sugar will melt and create a beautiful, syrupy coating that clings to the apples. Once cooked, remove the saucepan from the heat.
  3. Prepare Caramel Sauce: If you’re using store-bought caramel sauce, now is a good time to gently warm it slightly if it’s too thick to pour easily. You can do this by microwaving it in a microwave-safe bowl for 15-30 seconds, or by placing the jar in a bowl of warm water. If you’re making homemade caramel, ensure it’s cooled enough to be pourable but still warm. The goal is a pourable, luscious sauce.
  4. Combine Apples and Caramel: Pour the ½ cup of prepared caramel sauce directly into the saucepan with your cooked apples. Stir gently until all the apples are beautifully coated in the rich caramel. Taste a piece of apple; if you feel it needs a little more sweetness or spice, now is your chance to adjust. Set this glorious caramel apple mixture aside to cool completely before topping the chilled cheesecake bars. It’s important that the topping is cool when it goes onto the cold cheesecake, otherwise, it could melt the surface of your beautiful bars.

The Grand Finale: Topping and Chilling

The moment of truth has arrived! After all your hard work, we’re ready to add the crowning glory and prepare these Caramel Apple Cheesecake Bars for their grand unveiling.

  1. Spread the Topping: Once your cheesecake bars are thoroughly chilled and firm (remember, at least 4 hours, but overnight is truly best for that perfect set), carefully retrieve them from the refrigerator. Remove the plastic wrap. Now, evenly spread your cooled caramel apple topping over the surface of the chilled cheesecake layer. Use an offset spatula or the back of a spoon to create an even layer, making sure every slice will get a generous helping of those delicious apples. The contrast between the cold, creamy cheesecake and the slightly chewy, spiced apples is just heavenly.
  2. Final Chill (Optional but Recommended): While the bars are technically ready to serve, I often like to pop them back into the refrigerator for another 30 minutes to an hour after adding the topping. This helps everything meld together and ensures the topping is nicely set on the cheesecake before slicing. It truly makes for a cleaner cut.
  3. Slicing and Serving: This is the moment you’ve been waiting for! Using the parchment paper overhangs, carefully lift the entire slab of Caramel Apple Cheesecake Bars out of the pan and onto a cutting board. For the cleanest cuts, use a sharp, thin-bladed knife, and wipe the blade clean with a damp cloth between each slice. I typically cut them into 12 generous bars, but you can go smaller for a party or bigger if you’re feeling indulgent! For an extra special touch, drizzle a little extra caramel sauce over each bar just before serving, and perhaps a tiny sprinkle of flaky sea salt to really make the flavors pop. Chopped pecans or walnuts also make a fantastic garnish if you enjoy a little crunch.
  4. Storage Tips: These Caramel Apple Cheesecake Bars are best enjoyed chilled. Store any leftover bars in an airtight container in the refrigerator for up to 4-5 days. If you want to get a head start, you can also freeze the baked (but untopped) cheesecake bars. Wrap them tightly in plastic wrap and then in foil, and they’ll keep in the freezer for up to 1 month. Thaw them in the refrigerator overnight before adding the fresh caramel apple topping. Enjoy every decadent bite!

Caramel Apple Cheesecake Bars Recipe - Easy & Delicious!

Conclusion:

And there you have it, friends! We’ve journeyed through the creation of what I truly believe is one of the most irresistible autumn-inspired treats you’ll ever bake. These aren’t just any dessert bars; they are a symphony of flavors and textures designed to bring comfort, joy, and a serious dose of deliciousness to your kitchen. From the moment that first bite melts in your mouth, you’ll understand precisely why these delightful bars are an absolute must-try. The rich, creamy tang of the cheesecake, perfectly balanced by the sweet, tender pockets of spiced apple, and then elevated with that luscious, gooey caramel drizzle – it’s a combination that simply sings. Every component plays its part to create a truly unforgettable experience, making them perfect for any occasion, big or small. They offer that homemade warmth we all crave, yet present themselves with an elegance that will surely impress your guests.

I can confidently say that if you’re looking to capture the essence of fall in a dessert, look no further. This recipe delivers on all fronts: incredible flavor, satisfying texture, and a beautiful presentation. Imagine the aroma filling your home as these bake – a mix of cinnamon, vanilla, apples, and brown sugar – it’s an intoxicating perfume that promises pure delight. The delightful contrast between the crisp, buttery crust and the smooth, velvety cheesecake filling is truly something special. Then, to top it all off, those tender, spiced apple chunks, glistening under a generous layer of golden caramel, create a truly magnificent finish. It’s a dessert that feels gourmet yet is surprisingly approachable for home bakers. Trust me, once you experience the magic of these bars, they’ll quickly become a cherished part of your seasonal baking repertoire.

Elevate Your Enjoyment: Serving Suggestions & Variations

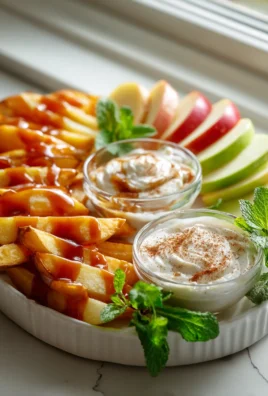
Now, while these bars are absolutely divine straight out of the pan (once cooled, of course!), there are so many wonderful ways to serve them and even put your own spin on the recipe. For a truly decadent experience, I love serving them slightly warm, perhaps with a scoop of premium vanilla bean ice cream melting delicately on top. The cold ice cream against the warm, soft bar creates a sensational temperature and texture contrast. A dollop of freshly whipped cream, perhaps infused with a hint of maple syrup or a dash of bourbon, would also be an exquisite addition. Consider pairing them with a hot cup of spiced chai tea, a robust coffee, or even a glass of sparkling cider for an ultimate cozy afternoon treat. They are also incredibly robust and travel well, making them fantastic for potlucks, family gatherings, or holiday dessert tables where they are sure to be the star.

Feeling adventurous? Don’t hesitate to experiment with variations! Instead of Granny Smith apples, try using Honeycrisp or Fuji for a slightly sweeter, crisper apple component. You could also sprinkle a handful of chopped toasted pecans or walnuts over the caramel layer for an added crunch and nutty flavor – a fantastic addition that complements the apples beautifully. For an extra touch of spice, a pinch of nutmeg or allspice can be added to the apple mixture. If you’re a chocolate lover, a delicate drizzle of melted dark chocolate over the caramel before serving would be a surprisingly delicious twist. And for those who enjoy a bit of salt to cut through the sweetness, a light sprinkle of flaky sea salt over the finished Caramel Apple Cheesecake Bars just before serving is an absolute game-changer, enhancing all the flavors wonderfully. The possibilities for customization are endless, allowing you to tailor this dessert perfectly to your taste.

Your Baking Adventure Awaits!

So, what are you waiting for? Take the plunge and give this recipe a try. I promise you, the smiles and contented sighs from everyone who tastes them will be your greatest reward. There’s something incredibly satisfying about creating such a beautiful and delicious dessert from scratch, and I’m confident that even novice bakers will find this recipe enjoyable and achievable. Don’t be intimidated; follow the steps, enjoy the process, and prepare to be amazed by the results. These Caramel Apple Cheesecake Bars are more than just a dessert; they’re an experience. I genuinely hope you’ll embrace the joy of baking them. And when you do, please, please, please share your creations with me! I absolutely adore seeing your baking successes and hearing about your experiences. Tag me on social media, leave a comment, or simply send a photo. Your feedback and beautiful baking inspire me endlessly. Happy baking, and get ready to enjoy a truly spectacular treat!


Caramel Apple Cheesecake Bars

These Caramel Apple Cheesecake Bars perfectly capture the essence of fall, marrying crisp spiced apples with creamy cheesecake. Featuring a buttery graham cracker crust, a rich, tangy cream cheese filling, and a delightful apple topping, they offer a perfect balance of sweet, tart, and creamy.

Prep Time
40 Minutes
Cook Time
10 Minutes
Total Time
30 Minutes
Servings
12 bars

Ingredients


Instructions


Important Information

Nutrition Facts (Per Serving)

It is important to consider this information as approximate and not to use it as definitive health advice.

Allergy Information

Please check ingredients for potential allergens and consult a health professional if in doubt.

« Previous Post
Easy One Pot Smoked Sausage & Rice Dinner Delight
Next Post »
Best Ina Garten Sweet Potato Casserole with Pecans Recipe

If you enjoyed this…

Brown Sugar Pop Tart Cookies: The Ultimate Recipe & Baking Guide

Italian Pistachio Cream: A Deliciously Nutty Dessert Recipe

No-Bake Strawberry Cheesecake Bars: A Deliciously Easy Dessert Recipe

Primary Sidebar

Browse by Diet

BreakfastDinnerLunchDessertAppetizer

Sweet Peach Yogurt Parfait Delight

One of my fondest memories is from a lazy summer afternoon spent at my grandmother’s house. The sun filtered through the kitchen window, casting a warm glow over the table where she would create her culinary magic. It was during one of those blissful moments that I first tasted her Peach Yogurt Parfait with Honey and Granola. The sweet aroma of ripe peaches mingling with creamy yogurt and the crunch of granola was nothing short of heavenly. It felt like summer captured in a bowl, and I still remember the joy of diving in with a spoon, each layer revealing a new burst of flavor.

When I think about that parfait, I can almost hear the gentle hum of the bees outside, reminding me of the floral notes that honey brings to every bite. The vibrant yellows and soft oranges of the peaches contrast beautifully with the creamy white yogurt and the golden crunch of granola. It’s a dish that not only looks delightful but also tastes like a celebration of fresh, wholesome ingredients.

What makes my version of this Peach Yogurt Parfait special is the careful balance of flavors and textures. I use ripe, juicy peaches, drizzled with locally sourced honey, and a homemade granola that’s bursting with nuts and seeds for an extra crunch. It’s a simple dish, but every layer is crafted with love and attention.

Let me show you exactly how to make this delightful parfait, so you can bring a bit of that summer magic into your kitchen!

Sweet Peach Yogurt Parfait Delight

Why You’ll Love This Recipe

  • Delightfully creamy texture from the Greek yogurt, paired with the juicy sweetness of fresh peaches.
  • Ready in under 20 minutes, making it a quick and satisfying breakfast or snack option.
  • Budget-friendly, using common ingredients that you may already have in your pantry.
  • Customizable with your favorite granola and nuts, allowing you to tailor each parfait to your taste.
  • Perfectly balanced flavors with the bright acidity of lemon juice and the sweetness of honey enhancing the peaches.

Ingredients

  • For the Parfait:
  • 2 cups plain Greek yogurt (or vanilla yogurt for a sweeter option)
  • 2 large ripe peaches, diced (about 2 cups)
  • 1 tablespoon fresh lemon juice (to prevent browning of peaches)
  • 2 tablespoons honey (plus more for drizzling)
  • 1 teaspoon vanilla extract (optional for extra flavor)
  • For the Granola:
  • 1 cup granola (store-bought or homemade; see notes for a simple granola recipe)
  • 1/4 cup sliced almonds (optional for added crunch)
  • 1/4 cup shredded coconut (optional for added flavor)

Let’s dive into some key ingredients that make this Peach Yogurt Parfait so delightful! First, the Greek yogurt is not only creamy but also packed with protein, making it a satisfying option for breakfast or a snack. If you’re looking for a sweeter option, you can easily substitute it with vanilla yogurt, though it may alter the overall flavor balance. Next, the ripe peaches are the star of the show; their natural sweetness shines through, so I recommend choosing peaches that yield slightly to pressure, indicating they’re perfectly ripe. If peaches aren’t in season, feel free to use nectarines or even frozen peaches—just thaw them before use. Finally, honey adds a lovely floral sweetness that ties everything together. If you prefer, maple syrup can serve as a delicious substitute.

Step-by-Step Instructions

  1. Start by preparing the peaches. Wash them thoroughly, then slice and dice them into bite-sized pieces. In a medium bowl, toss the diced peaches with 1 tablespoon of fresh lemon juice to prevent browning. Set aside for about 5 minutes while the lemon juice works its magic.
  2. In a separate bowl, combine the Greek yogurt, 2 tablespoons of honey, and 1 teaspoon of vanilla extract if using. Stir the mixture until smooth and thoroughly blended. This should take about a minute. Avoid overmixing to maintain the creaminess of the yogurt.
  3. Now it’s time to layer your parfait. Grab a clear glass or bowl to showcase your beautiful creation. Start with a generous spoonful of the yogurt mixture at the bottom—about 1/4 cup will do. Use a spoon to spread it evenly.
  4. Add a layer of the diced peaches over the yogurt, ensuring they cover the yogurt completely. You might want to use about half of what you have prepared—roughly 1 cup. This layer should be visually appealing, so arrange the peaches neatly.
  5. Sprinkle 1/4 cup of granola over the peaches. This adds a delightful crunch. Make sure to distribute it evenly to ensure every bite has that satisfying texture. Avoid packing it down too tightly, as you want it to maintain its crunch.
  6. Repeat the layers: spoon in another 1/4 cup of yogurt, followed by another cup of peaches, and another sprinkle of granola. You should have at least two layers, but feel free to add more depending on your glass size.
  7. Finish off your parfait with a drizzle of honey on top for added sweetness and a touch of elegance. If you’re using sliced almonds or shredded coconut, sprinkle them on top now. It adds a lovely visual contrast and extra flavor.
  8. Serve immediately or refrigerate for up to 30 minutes before serving to allow the flavors to meld together. However, I recommend enjoying it fresh to maintain the granola’s crunch.

Pro Tips for the Best Peach Yogurt Parfait With Honey And Granola

  • Make sure to choose ripe peaches for the best flavor and texture. A common mistake is using unripe fruit, which can lead to a less enjoyable parfait. Look for peaches that are fragrant and slightly soft to the touch.
  • Use a clear glass to assemble your parfait; this not only makes for a beautiful presentation but also allows you to see the colorful layers, which adds to the enjoyment of eating it.
  • For an even creamier texture, consider whipping the Greek yogurt with a hand mixer for a couple of minutes before layering. This small adjustment makes a huge difference in mouthfeel.
  • Be mindful of the granola-to-yogurt ratio. Too much granola can overwhelm the parfait, while too little can make it feel too creamy. Aim for about 1/4 cup of granola per layer for the perfect balance.
  • If you’re making this for a gathering, consider preparing the yogurt and peaches ahead of time and layering them just before serving. This ensures the granola stays crunchy!

Variations & Serving Ideas

There are so many ways to get creative with your Peach Yogurt Parfait! For a tropical twist, swap out the peaches for mangoes or pineapples and top with coconut flakes. If you prefer a berry flavor, mix in some blueberries or strawberries with the peaches for added color and taste. For a nutty version, incorporate chopped walnuts or pecans instead of almonds.

As for serving ideas, this parfait pairs beautifully with a side of scrambled eggs for a hearty breakfast or fresh fruit salad for a light lunch. You might also enjoy it alongside whole grain toast with almond butter for an energizing snack. The contrast of flavors and textures will elevate your meal experience!

Storage, Make-Ahead & Reheating

The Peach Yogurt Parfait is best enjoyed fresh, but you can prepare some components ahead of time. Store the layered parfait in an airtight container in the refrigerator for up to 24 hours. However, be cautious; the granola may lose its crunch if stored too long. You can freeze the yogurt and peach mixture for up to 2 months; just remember to thaw it in the refrigerator overnight before serving.

If you plan to enjoy this dish the next day, it can taste even better as the flavors meld together. Just remember to add the granola right before serving to keep its delightful crunch!

Frequently Asked Questions

Can I make Peach Yogurt Parfait With Honey And Granola ahead of time?

Yes — in fact, it tastes even better the next day as the flavors meld. However, I recommend waiting to add the granola until just before serving to maintain its crunch.

What can I substitute for Greek yogurt?

If you prefer a lighter option, you can substitute Greek yogurt with regular yogurt or a dairy-free alternative like coconut yogurt. Just remember that this may alter the creaminess and flavor profile slightly.

Can I use frozen peaches for this parfait?

Absolutely! Just make sure to thaw the frozen peaches before using them. They will still add great flavor, though the texture may be slightly softer than fresh peaches.

How do I make the parfait vegan?

To make a vegan version, substitute the Greek yogurt with a plant-based yogurt alternative, and replace honey with maple syrup or agave nectar. This keeps the parfait sweet while adhering to a vegan diet.

What other fruits can I use in this recipe?

You can mix and match fruits based on your preference. Try using strawberries, blueberries, raspberries, or even bananas. Just make sure to adjust the lemon juice as needed to prevent browning.

Sweet Peach Yogurt Parfait Delight

Final Thoughts

The Peach Yogurt Parfait with Honey and Granola is a delightful blend of creamy yogurt, sweet peaches, and crunchy granola that creates a satisfying and nourishing treat. Each layer bursts with flavor, making it a perfect choice for breakfast or a light dessert.

This is the kind of recipe I come back to again and again, especially when I want something refreshing and wholesome to start my day. The harmony of sweet and tart flavors, combined with the delightful crunch, never fails to lift my spirits!

I encourage you to give this parfait a try and indulge in its comforting goodness. Feel free to share your results or even add your own twist—perhaps a sprinkle of cinnamon or a handful of nuts. Enjoy creating your perfect parfait!

Print
clock clock iconcutlery cutlery iconflag flag iconfolder folder iconinstagram instagram iconpinterest pinterest iconfacebook facebook iconprint print iconsquares squares iconheart heart iconheart solid heart solid icon

Peach Yogurt Parfait


  • Author: Lily author
  • Total Time: 15 minutes
  • Yield: 4 servings 1x
Pin Recipe
Print Recipe

Description

This Peach Yogurt Parfait combines creamy Greek yogurt, juicy peaches, and crunchy granola for a delightful treat. It’s a perfect breakfast or snack that captures the essence of summer in every bite.


Ingredients

Scale
  • For the Parfait:
  • 2 cups plain Greek yogurt (or vanilla yogurt for a sweeter option)
  • 2 large ripe peaches, diced (about 2 cups)
  • 1 tablespoon fresh lemon juice (to prevent browning of peaches)
  • 2 tablespoons honey (plus more for drizzling)
  • 1 teaspoon vanilla extract (optional for extra flavor)
  • For the Granola:
  • 1 cup granola (store-bought or homemade; see notes for a simple granola recipe)
  • 1/4 cup sliced almonds (optional for added crunch)
  • 1/4 cup shredded coconut (optional for added flavor)

Instructions

  1. Start by preparing the peaches. Wash them thoroughly, then slice and dice them into bite-sized pieces. In a medium bowl, toss the diced peaches with 1 tablespoon of fresh lemon juice to prevent browning. Set aside for about 5 minutes while the lemon juice works its magic.
  2. In a separate bowl, combine the Greek yogurt, 2 tablespoons of honey, and 1 teaspoon of vanilla extract if using. Stir the mixture until smooth and thoroughly blended. This should take about a minute. Avoid overmixing to maintain the creaminess of the yogurt.
  3. Now it’s time to layer your parfait. Grab a clear glass or bowl to showcase your beautiful creation. Start with a generous spoonful of the yogurt mixture at the bottom—about 1/4 cup will do. Use a spoon to spread it evenly.
  4. Add a layer of the diced peaches over the yogurt, ensuring they cover the yogurt completely. You might want to use about half of what you have prepared—roughly 1 cup. This layer should be visually appealing, so arrange the peaches neatly.
  5. Sprinkle 1/4 cup of granola over the peaches. This adds a delightful crunch. Make sure to distribute it evenly to ensure every bite has that satisfying texture. Avoid packing it down too tightly, as you want it to maintain its crunch.
  6. Repeat the layers: spoon in another 1/4 cup of yogurt, followed by another cup of peaches, and another sprinkle of granola. You should have at least two layers, but feel free to add more depending on your glass size.
  7. Finish off your parfait with a drizzle of honey on top for added sweetness and a touch of elegance. If you’re using sliced almonds or shredded coconut, sprinkle them on top now. It adds a lovely visual contrast and extra flavor.
  8. Serve immediately or refrigerate for up to 30 minutes before serving to allow the flavors to meld together. However, I recommend enjoying it fresh to maintain the granola’s crunch.
  • Prep Time: 15 mins
  • Cook Time: 0 mins
  • Category: Breakfast
  • Method: No-cook
  • Cuisine: American

Nutrition

  • Serving Size: 1 parfait
  • Calories: 250
  • Sugar: 20 g
  • Sodium: 50 mg
  • Fat: 5 g
  • Saturated Fat: 2 g
  • Unsaturated Fat: 3 g
  • Trans Fat: 0 g
  • Carbohydrates: 40 g
  • Fiber: 3 g
  • Protein: 10 g
  • Cholesterol: 10 mg

Keywords: Choose ripe peaches for the best flavor and texture. Use a clear glass for a beautiful presentation. For creaminess, consider whipping the yogurt before layering. Be mindful of the granola-to-yogurt ratio. Prepare yogurt and peaches ahead of time for gatherings, layering just before serving.

Did you make this recipe?

Share a photo and tag us — we can't wait to see what you've made!

Sun-Kissed Frozen Orange Cream Slush

As a child, summer days felt like they lasted forever. I remember the sticky heat wrapping around me as I played outside, my laughter mingling with the sounds of the neighborhood. But nothing could cool me down quite like the moment I’d spot my grandmother, laboring over her blender, whipping up her famous Frozen Orange Creamsicle Slush. That vibrant orange treat, with its frosty texture and sweet citrus aroma, was like a burst of sunshine in a cup. Just one sip, and I could feel the coolness wash over me, sparking pure joy.

This Frozen Orange Creamsicle Slush has a way of making you feel like a kid again. Its creamy, dreamy consistency is a delightful balance of bright orange and soft vanilla, inviting you to dive right in. The refreshing tang of orange dances on your tongue, while the smooth creaminess envelops you in a comforting embrace. It’s a nostalgic treat that’s perfect for hot summer afternoons or anytime you need a little pick-me-up.

What makes my version of this slush stand out is the addition of a hint of vanilla bean, which elevates the flavor and adds an extra layer of richness. Plus, it’s super easy to whip up with just a few simple ingredients that you probably already have on hand! So, if you’re ready to relive those sun-soaked memories, let me show you exactly how to make it.

Sun-Kissed Frozen Orange Cream Slush

Why You’ll Love This Recipe

  • Each slush is a perfect blend of creamy vanilla and zesty orange, creating a nostalgic flavor reminiscent of summer days.
  • This refreshing treat is ready in under 15 minutes, making it an ideal quick dessert for unexpected guests or hot afternoons.
  • With just 8 simple ingredients, it’s budget-friendly, ensuring you don’t have to break the bank to enjoy a delicious slush.
  • The slush has a perfectly smooth texture, thanks to the combination of ice and ice cream, providing a delightful contrast to the bright citrus flavors.
  • It’s highly customizable; you can easily adjust the sweetness and add fresh herbs for a unique twist that suits your taste.

Ingredients

  • 2 cups orange juice (freshly squeezed or store-bought)
  • 1 cup vanilla ice cream
  • 1 cup crushed ice
  • 1/2 cup milk (whole or 2%)
  • 1/4 cup granulated sugar (adjust based on sweetness preference)
  • 1 teaspoon vanilla extract
  • Zest of 1 orange (for added flavor)
  • Fresh orange slices and mint leaves (for garnish)

The star of this Frozen Orange Creamsicle Slush is the orange juice, which provides the vibrant, citrusy base. Freshly squeezed juice will yield the brightest flavor, but store-bought options can be just as convenient. If you’re opting for store-bought, choose 100% pure juice with no added sugars for the best results. Another essential ingredient is the vanilla ice cream; it adds creaminess and sweetness. You can substitute it with dairy-free ice cream if you’re looking for a vegan option. Whole or 2% milk complements the ice cream, creating a smooth blend. If you want a lower-calorie version, almond or oat milk can be good alternatives.

Lastly, the granulated sugar can be adjusted based on your sweetness preference. If you prefer a more natural sweetener, consider using honey or agave syrup. The orange zest enhances the flavor profile, providing an aromatic pop that brings the whole slush together. Don’t skip it! It adds an extra layer of brightness that makes this slush truly special.

Step-by-Step Instructions

  1. Start by preparing your ingredients. Gather 2 cups of orange juice, 1 cup of vanilla ice cream, and 1 cup of crushed ice. Make sure the ice is finely crushed, as larger chunks can make blending difficult.
  2. In a blender, combine the orange juice, vanilla ice cream, crushed ice, and 1/2 cup of milk. Add 1/4 cup of granulated sugar and 1 teaspoon of vanilla extract. If you like a sweeter slush, consider adding a bit more sugar at this stage.
  3. Add the zest of 1 orange to the blender. This step is crucial for enhancing the citrus flavor of your slush. Make sure not to include the bitter white pith—only the flavorful zest.
  4. Blend the mixture on medium-high speed for about 30-45 seconds. Stop once the ingredients are fully combined and the slush has a smooth, even consistency. If you notice large chunks of ice, blend for an additional 10-15 seconds. Avoid over-blending, as this can make the slush too liquidy.
  5. Once blended, taste the slush. If it needs more sweetness, add a little more sugar and blend for a few more seconds. If it’s too thick, you can add a splash of milk to reach your desired consistency.
  6. Pour the slush into glasses. This recipe typically serves 4, but you can easily double it for larger gatherings. Use a spoon to help guide the slush into the glasses if needed.
  7. Garnish each serving with fresh orange slices and mint leaves. The mint not only adds a pop of color but also a refreshing aroma that complements the citrus flavors beautifully.
  8. Serve immediately and enjoy! If you’ve made extra, you can refrigerate it for a short time, but it’s best enjoyed fresh.

Pro Tips for the Best Frozen Orange Creamsicle Slush

  • Don’t skip the orange zest! It’s a game-changer for flavor. Always zest before juicing to make it easier.
  • Use a high-powered blender for the best texture. A standard blender may struggle with ice, leading to uneven consistency. If you have a food processor, that can work too, but ensure the ice is finely crushed.
  • Adjust the ice-to-liquid ratio carefully. If your slush is too thick, it won’t blend well. Start with less ice and add more until you reach your preferred texture.
  • Be cautious with the sugar! Always start with the lower amount, as you can easily add more, but it’s hard to fix an overly sweet slush.
  • For a fun twist, consider adding a splash of coconut milk or a handful of fresh fruit like strawberries or pineapple. This not only enhances the flavor but also adds a beautiful color contrast.

Variations & Serving Ideas

There are countless ways to put a spin on your Frozen Orange Creamsicle Slush. Consider making a tropical version by adding in some pineapple juice or coconut milk for a delightful tropical twist. If you’re feeling adventurous, try incorporating a handful of frozen mango or peach slices for added sweetness. For a lighter version, swap out the vanilla ice cream for Greek yogurt for a creamy yet tangy alternative.

As for serving ideas, this refreshing slush pairs wonderfully with light summer dishes like grilled chicken skewers, fish tacos, or a simple salad topped with citrus vinaigrette. The bright, zesty flavors of the slush complement these dishes perfectly, making them an ideal pairing for a sunny day.

Storage, Make-Ahead & Reheating

This Frozen Orange Creamsicle Slush is best enjoyed fresh, but if you have leftovers, you can store them in an airtight container in the fridge for up to 2 days. Just keep in mind that the slush may lose some of its texture over time as the ice melts. It doesn’t freeze well, as the ice will turn into a solid block. If you must freeze it, blend again after thawing to restore the slushy consistency. This treat is best the day you make it, as the flavors meld together beautifully overnight, enhancing its deliciousness.

Frequently Asked Questions

Can I make Frozen Orange Creamsicle Slush ahead of time?

Yes — in fact, it tastes even better the next day as the flavors meld. However, it’s best to enjoy it fresh, as the texture can change if stored for too long. If you need to prepare it ahead, keep it in the fridge and re-blend before serving.

What kind of orange juice should I use?

For the best flavor, use freshly squeezed orange juice. However, if you’re short on time, opt for 100% pure store-bought juice without added sugars. This will ensure that your slush remains flavorful and refreshing.

Can I substitute the vanilla ice cream?

Absolutely! If you’re looking for a dairy-free option, coconut milk ice cream or a non-dairy vanilla ice cream can work wonderfully. They will still provide the creamy texture and sweetness you desire.

How can I adjust the sweetness of my slush?

You can easily adjust the sweetness by modifying the amount of sugar added. Start with 1/4 cup and taste the mixture before blending. If you prefer it sweeter, add more sugar gradually until it reaches your desired level.

What should I do if my slush is too thick?

If your slush is too thick, simply add a splash of milk or orange juice and blend again. This will help achieve a more drinkable consistency while maintaining the slushy texture. Adjust gradually to reach your preferred thickness.

Sun-Kissed Frozen Orange Cream Slush

Final Thoughts

The Frozen Orange Creamsicle Slush is a delightful blend of refreshing citrus and creamy goodness, making it a perfect treat for warm days or any time you crave a taste of nostalgia. The way the bright orange flavor dances with the creamy texture truly elevates this slush, transforming it into a satisfying escape from the everyday.

This is the kind of recipe I come back to again and again, especially when I’m looking to cool down or impress guests at a summer gathering. It’s simple to make and always brings smiles all around! I encourage you to try this recipe for yourself—don’t hesitate to share your results or even put your own spin on it. Happy slushing!

Print
clock clock iconcutlery cutlery iconflag flag iconfolder folder iconinstagram instagram iconpinterest pinterest iconfacebook facebook iconprint print iconsquares squares iconheart heart iconheart solid heart solid icon

Frozen Orange Creamsicle Slush


  • Author: Lily author
  • Total Time: 15 minutes
  • Yield: 4 servings 1x
Pin Recipe
Print Recipe

Description

This Frozen Orange Creamsicle Slush is a refreshing treat that combines creamy vanilla and zesty orange flavors. Perfect for hot summer days, it brings back nostalgic memories with every sip.


Ingredients

Scale
  • 2 cups orange juice (freshly squeezed or store-bought)
  • 1 cup vanilla ice cream
  • 1 cup crushed ice
  • 1/2 cup milk (whole or 2%)
  • 1/4 cup granulated sugar (adjust based on sweetness preference)
  • 1 teaspoon vanilla extract
  • Zest of 1 orange (for added flavor)
  • Fresh orange slices and mint leaves (for garnish)

Instructions

  1. Start by preparing your ingredients. Gather 2 cups of orange juice, 1 cup of vanilla ice cream, and 1 cup of crushed ice. Make sure the ice is finely crushed, as larger chunks can make blending difficult.
  2. In a blender, combine the orange juice, vanilla ice cream, crushed ice, and 1/2 cup of milk. Add 1/4 cup of granulated sugar and 1 teaspoon of vanilla extract. If you like a sweeter slush, consider adding a bit more sugar at this stage.
  3. Add the zest of 1 orange to the blender. This step is crucial for enhancing the citrus flavor of your slush. Make sure not to include the bitter white pith—only the flavorful zest.
  4. Blend the mixture on medium-high speed for about 30-45 seconds. Stop once the ingredients are fully combined and the slush has a smooth, even consistency. If you notice large chunks of ice, blend for an additional 10-15 seconds. Avoid over-blending, as this can make the slush too liquidy.
  5. Once blended, taste the slush. If it needs more sweetness, add a little more sugar and blend for a few more seconds. If it’s too thick, you can add a splash of milk to reach your desired consistency.
  6. Pour the slush into glasses. This recipe typically serves 4, but you can easily double it for larger gatherings. Use a spoon to help guide the slush into the glasses if needed.
  7. Garnish each serving with fresh orange slices and mint leaves. The mint not only adds a pop of color but also a refreshing aroma that complements the citrus flavors beautifully.
  8. Serve immediately and enjoy! If you’ve made extra, you can refrigerate it for a short time, but it's best enjoyed fresh.
  • Prep Time: 15 min
  • Cook Time: 0 min
  • Category: Dessert
  • Method: Blending
  • Cuisine: American

Nutrition

  • Serving Size: 1 serving
  • Calories: 200
  • Sugar: 30 g
  • Sodium: 50 mg
  • Fat: 5 g
  • Saturated Fat: 3 g
  • Unsaturated Fat: 2 g
  • Trans Fat: 0 g
  • Carbohydrates: 40 g
  • Fiber: 1 g
  • Protein: 2 g
  • Cholesterol: 20 mg

Keywords: Don't skip the orange zest! It's a game-changer for flavor. Always zest before juicing to make it easier.

Did you make this recipe?

Share a photo and tag us — we can't wait to see what you've made!

Zesty Lemon Poppy Seed Delight

One rainy afternoon, I found myself in my grandmother’s cozy kitchen, the kind that always smelled like warmth and love. She was whipping up her famous Lemon Poppy Seed Loaf, a recipe that had been passed down through generations. As the batter came together, the zesty aroma of fresh lemons filled the air, mingling perfectly with the nutty fragrance of poppy seeds. I can still picture her, apron-clad, as she expertly drizzled a vibrant citrus icing over the loaf, creating a glossy, sun-kissed finish that beckoned us to dive in. It was a moment that sparked my own passion for baking, and this recipe has become a cherished staple in my home ever since.

When you take a bite of this Lemon Poppy Seed Loaf, it’s like a burst of sunshine on your palate. The loaf is beautifully golden, with a tender crumb that melts in your mouth. Each slice is speckled with tiny poppy seeds, adding a delightful crunch that contrasts beautifully with the tangy sweetness of the lemon. And that citrus icing? It’s the finishing touch that elevates this loaf from ordinary to extraordinary, with its bright, zesty flavor dancing on your taste buds.

This recipe stands out because it embraces simplicity while delivering on flavor. I’ve added a hint of vanilla to the batter, enhancing the overall taste and making it even more indulgent. Trust me, once you make this Lemon Poppy Seed Loaf With Citrus Icing, it’ll become a go-to in your baking repertoire.

So, let me show you exactly how to make it!

Zesty Lemon Poppy Seed Delight

Why You’ll Love This Recipe

  • Moist and tender crumb that melts in your mouth, thanks to the perfect balance of butter and buttermilk.
  • Bright, zesty lemon flavor paired with crunchy poppy seeds, creating a delightful texture and taste experience.
  • Easy to whip up in just about an hour, perfect for last-minute gatherings or a cozy afternoon treat.
  • Budget-friendly with everyday ingredients, making it an accessible option for all home bakers.
  • The citrus icing adds a sweet tang that elevates the loaf, turning a simple recipe into a showstopper!

Ingredients

  • 1 ½ cups (190g) all-purpose flour
  • 1 teaspoon baking powder
  • ½ teaspoon baking soda
  • ½ teaspoon salt
  • 3 tablespoons poppy seeds
  • ½ cup (115g) unsalted butter, softened to room temperature
  • 1 cup (200g) granulated sugar
  • 2 large eggs
  • 1 teaspoon vanilla extract
  • 1 teaspoon lemon zest (from about 1 medium lemon)
  • ½ cup (120ml) buttermilk
  • 2 tablespoons fresh lemon juice

For the Citrus Icing:

  • 1 cup (120g) powdered sugar
  • 2 tablespoons fresh lemon juice
  • 1 tablespoon orange juice
  • 1 teaspoon lemon zest (for garnish, optional)

Let’s dive into the key ingredients that make this Lemon Poppy Seed Loaf so special. The all-purpose flour provides the structure and base for the loaf, while the baking powder and baking soda ensure it rises perfectly, giving the loaf a light texture. For a gluten-free variation, you could substitute the flour with a gluten-free all-purpose blend. Poppy seeds not only add a delightful crunch but also contribute to the unique flavor profile that pairs well with the citrus notes.

Unsalted butter is crucial for achieving the buttery richness that makes this loaf so moist. If you’re looking for a dairy-free option, coconut oil or a vegan butter can be used instead. The buttermilk is another essential component, providing acidity that activates the baking soda for a fluffy texture. If you don’t have buttermilk on hand, you can easily make a substitute by mixing ½ cup of milk with 1 tablespoon of vinegar or lemon juice and letting it sit for about 5 minutes.

Step-by-Step Instructions

  1. Preheat your oven to 350°F (175°C). Grease a 9×5-inch loaf pan or line it with parchment paper for easy removal later.
  2. In a medium mixing bowl, whisk together 1 ½ cups of all-purpose flour, 1 teaspoon of baking powder, ½ teaspoon of baking soda, ½ teaspoon of salt, and 3 tablespoons of poppy seeds. This helps to evenly distribute the baking agents and ensures a uniform rise.
  3. In a large mixing bowl, cream together ½ cup of softened unsalted butter and 1 cup of granulated sugar using an electric mixer on medium speed for about 3-4 minutes, until the mixture is light and fluffy. Make sure to scrape down the sides of the bowl occasionally.
  4. Add 2 large eggs, 1 teaspoon of vanilla extract, and 1 teaspoon of lemon zest to the creamed butter and sugar, mixing until fully combined. You want a smooth consistency, so ensure there are no lumps of butter.
  5. In a small bowl, combine ½ cup of buttermilk and 2 tablespoons of fresh lemon juice. Alternately add the dry ingredients and buttermilk mixture to the butter mixture, starting and ending with the dry ingredients. Mix just until combined; do not overmix, as this can lead to a dense loaf.
  6. Pour the batter into the prepared loaf pan. Smooth the top with a spatula, ensuring it’s even. Bake in the preheated oven for 50-60 minutes, or until a toothpick inserted in the center comes out clean. The edges should be lightly golden brown, and the center should feel just set.
  7. Once baked, remove the loaf from the oven and allow it to cool in the pan for about 10 minutes. Then, transfer it to a wire rack to cool completely. Resist the urge to slice too soon, as it will be crumbly if it’s still warm.
  8. While the loaf is cooling, prepare the citrus icing. In a medium bowl, whisk together 1 cup of powdered sugar, 2 tablespoons of fresh lemon juice, and 1 tablespoon of orange juice until smooth. If the icing is too thick, you can add a little more juice to reach your desired consistency.
  9. Once the loaf is completely cool, drizzle the citrus icing over the top. If you like, sprinkle with an additional teaspoon of lemon zest for an extra pop of flavor and color.

Pro Tips for the Best Lemon Poppy Seed Loaf With Citrus Icing

  • Be careful not to overmix your batter; this is a common mistake that can lead to a dense loaf. Mix just until the dry ingredients are incorporated for a light and fluffy texture.
  • Use room temperature ingredients, especially the butter and eggs. This helps to create a smoother batter and ensures even baking. Take your eggs out of the fridge about 30 minutes before you start.
  • For a more pronounced lemon flavor, consider adding a little lemon extract in addition to the zest and juice. Just a half teaspoon can elevate the citrus notes significantly.
  • When measuring your flour, spoon it into the measuring cup and level it off with a knife instead of scooping directly from the bag. This prevents packing and ensures you don’t end up with a dry loaf.
  • Invest in a good quality loaf pan; it makes a difference in heat distribution, which ensures even baking. If your pan is dark-coated, reduce the oven temperature by 25°F to prevent over-browning.

Variations & Serving Ideas

For a delightful twist, consider adding blueberries or raspberries to the batter for a fruity burst of flavor. You can also experiment with different citrus fruits—try lime or grapefruit zest and juice for a refreshing change. For a healthier option, substitute half of the all-purpose flour with whole wheat flour for added fiber without compromising too much on texture.

This Lemon Poppy Seed Loaf pairs beautifully with a light salad, such as a mixed greens salad with a vinaigrette, or a cup of tea for a cozy afternoon treat. It also complements a creamy cheese platter, as the acidity of the loaf balances rich cheeses perfectly. Lastly, a scoop of vanilla ice cream on the side creates a delightful contrast of temperatures and flavors!

Storage, Make-Ahead & Reheating

This Lemon Poppy Seed Loaf can be stored at room temperature for up to 3 days if wrapped tightly in plastic wrap. If you want to keep it longer, it freezes well for up to 3 months. To freeze, wrap the loaf tightly in plastic wrap and then in aluminum foil to prevent freezer burn.

When you’re ready to enjoy it again, simply thaw it in the fridge overnight. Reheat individual slices in the microwave for 15-20 seconds or in a toaster oven until warmed through. Interestingly, many people find that this loaf tastes even better the next day, as the flavors have time to meld!

Frequently Asked Questions

Can I make Lemon Poppy Seed Loaf With Citrus Icing ahead of time?

Yes — in fact, it tastes even better the next day! You can make the loaf a day in advance, allowing the flavors to develop. Just be sure to store it in an airtight container to maintain its moisture.

Can I substitute the poppy seeds?

Absolutely! If you don’t have poppy seeds on hand or prefer an alternative, you can use sesame seeds for a similar crunch or omit them entirely for a smooth loaf.

What can I use instead of buttermilk?

If you don’t have buttermilk, you can easily create a substitute by mixing ½ cup of milk (dairy or plant-based) with 1 tablespoon of vinegar or lemon juice. Let it sit for 5 minutes before using in the recipe.

How can I make this recipe gluten-free?

To make a gluten-free version of this Lemon Poppy Seed Loaf, substitute the all-purpose flour with a gluten-free all-purpose flour blend. Just ensure that the blend contains a binding agent like xanthan gum for the best results.

What is the best way to store leftover loaf?

Leftover Lemon Poppy Seed Loaf should be stored in an airtight container at room temperature for up to 3 days. For longer storage, wrap it tightly and freeze for up to 3 months. Thaw it before serving for the best texture.

Zesty Lemon Poppy Seed Delight

Final Thoughts

The Lemon Poppy Seed Loaf with Citrus Icing is truly a delightful treat that brings a burst of brightness to any occasion. The zesty lemon flavor combined with the subtle crunch of poppy seeds creates a satisfying balance, while the citrus icing adds a touch of sweetness that perfectly complements the loaf’s tanginess.

This is the kind of recipe I come back to again and again, especially when I want to brighten up a gloomy day or celebrate a small victory. The aroma that fills the kitchen as it bakes is absolutely heavenly! I encourage you to give this recipe a try; you might just find it becoming a beloved staple in your home. Don’t forget to share your results or even add your own unique twist—I can’t wait to see what you create!

Print
clock clock iconcutlery cutlery iconflag flag iconfolder folder iconinstagram instagram iconpinterest pinterest iconfacebook facebook iconprint print iconsquares squares iconheart heart iconheart solid heart solid icon

Lemon Poppy Seed Loaf


  • Author: Lily author
  • Total Time: 23 minute
  • Yield: 1 loaf 1x
Pin Recipe
Print Recipe

Description

This Lemon Poppy Seed Loaf is a delightful treat that combines zesty lemon flavor with crunchy poppy seeds. Topped with a citrus icing, it’s perfect for any occasion.


Ingredients

Scale
  • 1 ½ cups (190g) all-purpose flour
  • 1 teaspoon baking powder
  • ½ teaspoon baking soda
  • ½ teaspoon salt
  • 3 tablespoons poppy seeds
  • ½ cup (115g) unsalted butter, softened to room temperature
  • 1 cup (200g) granulated sugar
  • 2 large eggs
  • 1 teaspoon vanilla extract
  • 1 teaspoon lemon zest (from about 1 medium lemon)
  • ½ cup (120ml) buttermilk
  • 2 tablespoons fresh lemon juice
  • 1 cup (120g) powdered sugar
  • 2 tablespoons fresh lemon juice
  • 1 tablespoon orange juice
  • 1 teaspoon lemon zest (for garnish, optional)

Instructions

  1. Preheat your oven to 350°F (175°C). Grease a 9×5-inch loaf pan or line it with parchment paper for easy removal later.
  2. In a medium mixing bowl, whisk together 1 ½ cups of all-purpose flour, 1 teaspoon of baking powder, ½ teaspoon of baking soda, ½ teaspoon of salt, and 3 tablespoons of poppy seeds. This helps to evenly distribute the baking agents and ensures a uniform rise.
  3. In a large mixing bowl, cream together ½ cup of softened unsalted butter and 1 cup of granulated sugar using an electric mixer on medium speed for about 3-4 minutes, until the mixture is light and fluffy. Make sure to scrape down the sides of the bowl occasionally.
  4. Add 2 large eggs, 1 teaspoon of vanilla extract, and 1 teaspoon of lemon zest to the creamed butter and sugar, mixing until fully combined. You want a smooth consistency, so ensure there are no lumps of butter.
  5. In a small bowl, combine ½ cup of buttermilk and 2 tablespoons of fresh lemon juice. Alternately add the dry ingredients and buttermilk mixture to the butter mixture, starting and ending with the dry ingredients. Mix just until combined; do not overmix, as this can lead to a dense loaf.
  6. Pour the batter into the prepared loaf pan. Smooth the top with a spatula, ensuring it’s even. Bake in the preheated oven for 50-60 minutes, or until a toothpick inserted in the center comes out clean. The edges should be lightly golden brown, and the center should feel just set.
  7. Once baked, remove the loaf from the oven and allow it to cool in the pan for about 10 minutes. Then, transfer it to a wire rack to cool completely. Resist the urge to slice too soon, as it will be crumbly if it’s still warm.
  8. While the loaf is cooling, prepare the citrus icing. In a medium bowl, whisk together 1 cup of powdered sugar, 2 tablespoons of fresh lemon juice, and 1 tablespoon of orange juice until smooth. If the icing is too thick, you can add a little more juice to reach your desired consistency.
  9. Once the loaf is completely cool, drizzle the citrus icing over the top. If you like, sprinkle with an additional teaspoon of lemon zest for an extra pop of flavor and color.
  • Prep Time: 15 mins
  • Cook Time: 50-60 mins
  • Category: Dessert
  • Method: Baking
  • Cuisine: American

Nutrition

  • Serving Size: 1 slice
  • Calories: 200
  • Sugar: 15 g
  • Sodium: 150 mg
  • Fat: 8 g
  • Saturated Fat: 5 g
  • Unsaturated Fat: 3 g
  • Trans Fat: 0 g
  • Carbohydrates: 30 g
  • Fiber: 1 g
  • Protein: 3 g
  • Cholesterol: 40 mg

Keywords: Be careful not to overmix your batter; this is a common mistake that can lead to a dense loaf. Use room temperature ingredients for a smoother batter and even baking.

Did you make this recipe?

Share a photo and tag us — we can't wait to see what you've made!

  • Privacy Policy
  • Terms Of Service
  • Contact
  • About
  • GDPR

Copyright © 2025 Homesmad