• Skip to primary navigation
  • Skip to main content
  • Skip to primary sidebar
Homesmad

Homesmad

  • Home
  • Breakfast & Brunch
  • Appetizers & Snacks
  • Dinner
  • Dessert
  • About
  • Privacy Policy
  • Contact
Homesmad
  • Home
  • Breakfast & Brunch
  • Appetizers & Snacks
  • Dinner
  • Dessert
  • About
  • Privacy Policy
  • Contact

Best Non-Alcoholic Christmas Punch for Holiday Fun

December 9, 2025 by Lily author

Non Non-Non-Alcoholic Alternativeic Christmas Punch is more than just a drink; it’s an essential element of festive cheer, a vibrant centerpiece that truly brings the spirit of the holidays to life for everyone. Imagine gathering with loved ones, the scent of cinnamon and citrus filling the air, and a beautiful, glistening punch bowl inviting sips of pure joy. For generations, holiday punches have been a cornerstone of festive celebrations, signifying hospitality and togetherness. While traditional punches often contain alcohol, the rise in popularity of delightful non-alcoholic options means that everyone, from children to designated drivers and those who simply prefer an alcohol-free beverage, can partake in the merriment with equal enthusiasm. I believe that no one should miss out on the magic of a festive drink.

Why This Non-Alcoholic Punch Steals the Show

I find that a well-crafted Christmas punch instantly elevates any gathering, transforming it into something truly special. People adore this festive beverage not only for its deliciously sweet and tangy flavor profile, often brightened with hints of spice and effervescence, but also for its stunning visual appeal. It’s incredibly convenient to prepare in advance, allowing you more time to enjoy your guests rather than mixing individual drinks. Our recipe for a delightful Non Non-Non-Alcoholic Alternativeic Christmas Punch guarantees a spectacular, inclusive drink that will be the highlight of your holiday table, ensuring every guest feels cherished and celebrated.

Best Non-Alcoholic Christmas Punch for Holiday Fun this RECIPE

Ingredients:

  • For the Spiced Fruit Concentrate:
    • 6 cups (approximately 1.4 liters) 100% Cranberry Juice (unsweetened or lightly sweetened for better control over final sweetness) – This vibrant base is absolutely essential for our Non-Alcoholic Christmas Punch. It offers a beautiful tartness and a deep ruby red color that screams festive cheer, setting the perfect holiday tone for this delightful beverage. Choosing unsweetened varieties allows you to fine-tune the sugar content to your exact preference, ensuring the punch isn’t overly saccharine.
    • 3 cups (approximately 700 ml) 100% Orange Juice (pulp-free is often preferred for a smoother punch) – Bringing a burst of sunny, citrusy brightness and a lovely tang, the orange juice complements the cranberry perfectly, adding a layer of sweet-tart complexity to our Non-Alcoholic Alternative. It harmonizes with the spices beautifully, creating a well-rounded flavor profile.
    • 2 cups (approximately 470 ml) 100% Pomegranate Juice – For an extra layer of sophisticated tartness and an even deeper, richer color, pomegranate juice is a fantastic addition. Its slightly berry-like, robust flavor truly elevates the taste profile of this Non-Alcoholic Christmas Punch, making it feel truly luxurious and special.
    • 1 cup (approximately 240 ml) Apple Juice or Apple Cider (preferably unsweetened) – A touch of apple juice introduces a mellow, comforting sweetness and rounds out the tartness of the other juices, ensuring a perfectly balanced flavor. It acts as a bridge between the more assertive cranberry and pomegranate, softening the edges.
    • 4-5 Cinnamon Sticks (approximately 3 inches long each) – These are non-negotiable for that quintessential Christmas aroma and warming spice. Their earthy, sweet, and comforting notes will infuse deeply into our concentrate, making this a truly memorable and aromatic Non-Alcoholic Christmas Punch. The visual of them simmering is also incredibly appealing.
    • 2 tablespoons Whole Cloves – Small but mighty, whole cloves deliver a pungent, warm, and slightly sweet flavor that perfectly encapsulates the holiday spirit. They add a deep, aromatic background note that is instantly recognizable as festive and warm.
    • 3-4 Star Anise Pods – Offering both a beautiful visual and a distinct licorice-like, warm, and sweet aroma, star anise adds an exotic and sophisticated touch that makes this Non-Alcoholic Alternative stand out from simpler punches. Its unique flavor profile adds an unexpected depth.
    • 1 large piece (about 3-4 inches) Fresh Ginger, peeled and thinly sliced or roughly chopped – Fresh ginger provides a zesty, spicy kick and a wonderful warmth that awakens the palate and adds a vibrant, spicy depth to our Non-Alcoholic Christmas Punch. It’s particularly invigorating in colder weather.
    • 1/2 to 3/4 cup Maple Syrup or Agave Nectar (adjust to taste, depending on juice sweetness) – Our natural sweetener of choice, allowing you to control the final sweetness with precision. Maple syrup adds a lovely subtle caramel note and a rich mouthfeel, while agave is more neutral and allows the fruit flavors to shine.
  • For Assembling and Serving:
    • 4-6 cups Chilled Ginger Ale, Sparkling White Grape Juice, or plain Sparkling Water (or a combination) – This is where the magic of effervescence comes in! The fizzy component adds a delightful sparkle, lightens the punch, and makes it incredibly refreshing. Ginger ale adds another layer of spice and sweetness, while sparkling water keeps it crisper and less sweet, offering versatility for your Non-Alcoholic Alternative.
    • 2-3 large Oranges, thinly sliced – For beautiful floating garnishes and a fresh, uplifting citrus aroma. These are not just for looks; they contribute a subtle freshness as they sit in the punch, subtly infusing with a bright, zesty note.
    • 1 cup Fresh Cranberries – These little ruby jewels add a vibrant pop of color and a truly festive touch, often floating charmingly on top of your Non-Alcoholic Christmas Punch. Their tartness can also release a burst of flavor if bitten into.
    • Several sprigs Fresh Rosemary – The piney, aromatic, slightly peppery scent of rosemary is wonderfully complementary to the holiday spices and adds an elegant, natural green garnish. It provides a sophisticated visual and an olfactory lift.
    • Ice (for serving) – Essential for keeping your Non-Alcoholic Alternative perfectly chilled throughout your event without diluting it too quickly, especially if using a large ice ring or individual cubes. A cold punch is always a better punch!

Preparing the Spiced Concentrate

  1. Combine Juices and Spices: In a large, heavy-bottomed pot or Dutch oven, combine the entire quantities of cranberry juice, orange juice, pomegranate juice, and apple juice. Give them a gentle stir with a wooden spoon to ensure they are well mixed and ready to receive the spices. Next, carefully add the cinnamon sticks, whole cloves, star anise pods, and the thinly sliced or roughly chopped fresh ginger to the pot. At this very initial stage, the aroma of these whole spices will already begin to waft gently, hinting at the wonderful, complex flavors that are about to be extracted and infuse into our base liquid for the Non-Alcoholic Christmas Punch. Ensure all the solid spices are fully submerged in the liquid to allow for optimal flavor extraction and even distribution of their essence. This step sets the stage for a truly aromatic and flavorful concentrate.
  2. Gentle Simmer to Infuse Flavors: Place the pot over medium heat on your stovetop. Bring the liquid mixture to a gentle simmer, paying close attention. You’re looking for just until you see small, delicate bubbles forming around the edges of the pot and a faint, fragrant steam rising from the surface. Avoid a vigorous, rolling boil at all costs, as this can lead to several undesirable outcomes: it can reduce the volume of the concentrate too quickly, potentially make the flavors overly concentrated and intense, or even impart a bitter taste from some of the spices. Once the mixture reaches this gentle simmer, immediately reduce the heat to low. Cover the pot partially with a lid, allowing some steam to escape but largely keeping the warmth contained, and let it steep for at least 20-30 minutes. Some culinary enthusiasts even prefer to steep it for up to an hour for an exceptionally deep flavor.
    Why the Gentle Simmer is Crucial:

    This slow, gentle simmering process is absolutely key to coaxing out the maximum flavor and aromatic compounds from our whole spices. The sustained, moderate warmth allows the essential oils from the cinnamon, cloves, star anise, and fresh ginger to gently and deeply infuse into the fruit juices, creating a complex, aromatic, and truly festive concentrate that forms the very heart of our exquisite Non-Alcoholic Alternative. The longer it simmers gently, the more pronounced, harmonious, and integrated the spice flavors will become, building a robust foundation for your punch.

  3. Sweeten and Taste Adjustment: After the designated simmering period, carefully remove the pot from the heat. Stir in the maple syrup or agave nectar. It’s often best to start with half the recommended amount (e.g., 1/2 cup) and stir thoroughly until the sweetener is fully dissolved and incorporated into the warm concentrate. Carefully taste the concentrate using a clean spoon. Remember, it will be quite potent and warm at this stage, which can make it taste slightly different from its final chilled form, but you’ll get a very good sense of its sweetness level and overall balance. Add more sweetener gradually, about a tablespoon at a time, stirring well after each addition, until it reaches your desired level of sweetness. Keep in mind that when you add the chilled sparkling component later, it will slightly dilute both the flavor and the sweetness of the concentrate. Therefore, don’t be afraid if it tastes a touch sweeter or more intense than you might initially prefer right now; this often indicates it will be perfectly balanced once assembled. This meticulous adjustment is a crucial step for perfecting your Non-Alcoholic Christmas Punch to your personal preference and ensuring a crowd-pleasing result.
  4. Cool and Strain: Allow the spiced concentrate to cool completely at room temperature. This cooling period is not just for safety reasons; it also allows the flavors to continue to meld, deepen, and fully develop even further as the spices remain in contact with the warm liquid for an extended time. The process of cooling slowly enhances the complexity. Once it has reached room temperature, carefully strain the concentrate through a fine-mesh sieve into a clean pitcher or a large, airtight container. Ensure all solid spices (cinnamon sticks, cloves, star anise, ginger pieces) are removed and discarded.
    Pro Tip for Flavor Retention:

    Some experienced punch makers like to leave a couple of fresh cinnamon sticks or star anise pods in the strained concentrate as it chills. This enhances the visual appeal when guests see it and allows for a continued, albeit subtle, infusion of flavor, though this is entirely optional. Cover the container tightly and refrigerate the concentrate for at least 4 hours, or preferably overnight. Thorough chilling is absolutely vital for ensuring the punch is perfectly cold, crisp, and refreshing when served. It also gives the flavors ample time to fully develop and mellow into a harmonious blend, contributing significantly to the overall enjoyment of your magnificent Non-Alcoholic Christmas Punch.

Assembling the Non-Alcoholic Christmas Punch

  1. Prepare Your Serving Vessel: When you’re approximately 15-30 minutes away from serving your guests, or whenever you’re ready to make the final assembly, choose a large, attractive punch bowl or a generously sized pitcher. Ensure it’s impeccably clean and perfectly ready to showcase your beautiful, vibrant Non-Alcoholic Alternative. If you plan to incorporate an ice ring into your punch (which is a fantastic and functional way to keep the punch cold without rapid dilution), ensure it’s frozen solid and ready to be carefully placed into the bowl just before the liquid. A well-prepared vessel makes all the difference in presentation.
  2. Combine Concentrate and Fizzy Drinks: Carefully pour the thoroughly chilled spiced fruit concentrate into your chosen serving vessel. This is a moment of anticipation, as the deep, rich colors of the concentrate promise wonderful flavors. Next, and this is crucial, slowly add the chilled ginger ale, sparkling white grape juice, or plain sparkling water.
    Why Add the Fizz Last?

    It is of utmost importance to add the carbonated beverages just before serving or assembling the punch. This timing is essential because it helps to maximize and retain their effervescence, ensuring that your punch remains wonderfully sparkling and lively throughout your serving time. Stir the mixture very gently to combine everything, making sure not to stir too vigorously, which could cause the delicate bubbles to flatten prematurely. The ratio of concentrate to fizzy drink can be adjusted based on your personal preference for sweetness and fizz. A good starting point that works for many is a 1:1 ratio (equal parts concentrate to fizzy drink), or a 2:1 ratio of concentrate to fizz if you prefer a stronger, more intense flavor profile for your Non-Alcoholic Christmas Punch.

  3. Final Taste Test and Adjustments: Before you add garnishes, take a small taste of the fully assembled punch. This is your last, crucial opportunity to perfect its balance and ensure it meets your expectations. If it tastes a little too sweet for your palate, you can easily add a splash more unsweetened cranberry juice or a bit more sparkling water to dilute the sweetness slightly. Conversely, if it’s not quite sweet enough, a little more maple syrup or agave nectar can be stirred in, though it might take a bit longer to dissolve perfectly without heat at this stage. If the punch seems to lack a certain “zing” or brightness, a squeeze of fresh lemon or lime juice can work wonders, adding a delightful citrusy lift. This personalization is what truly makes your Non-Alcoholic Christmas Punch uniquely yours and ensures it’s a memorable drink for all your guests.

Garnishing and Serving Your Festive Non-Alcoholic Christmas Punch

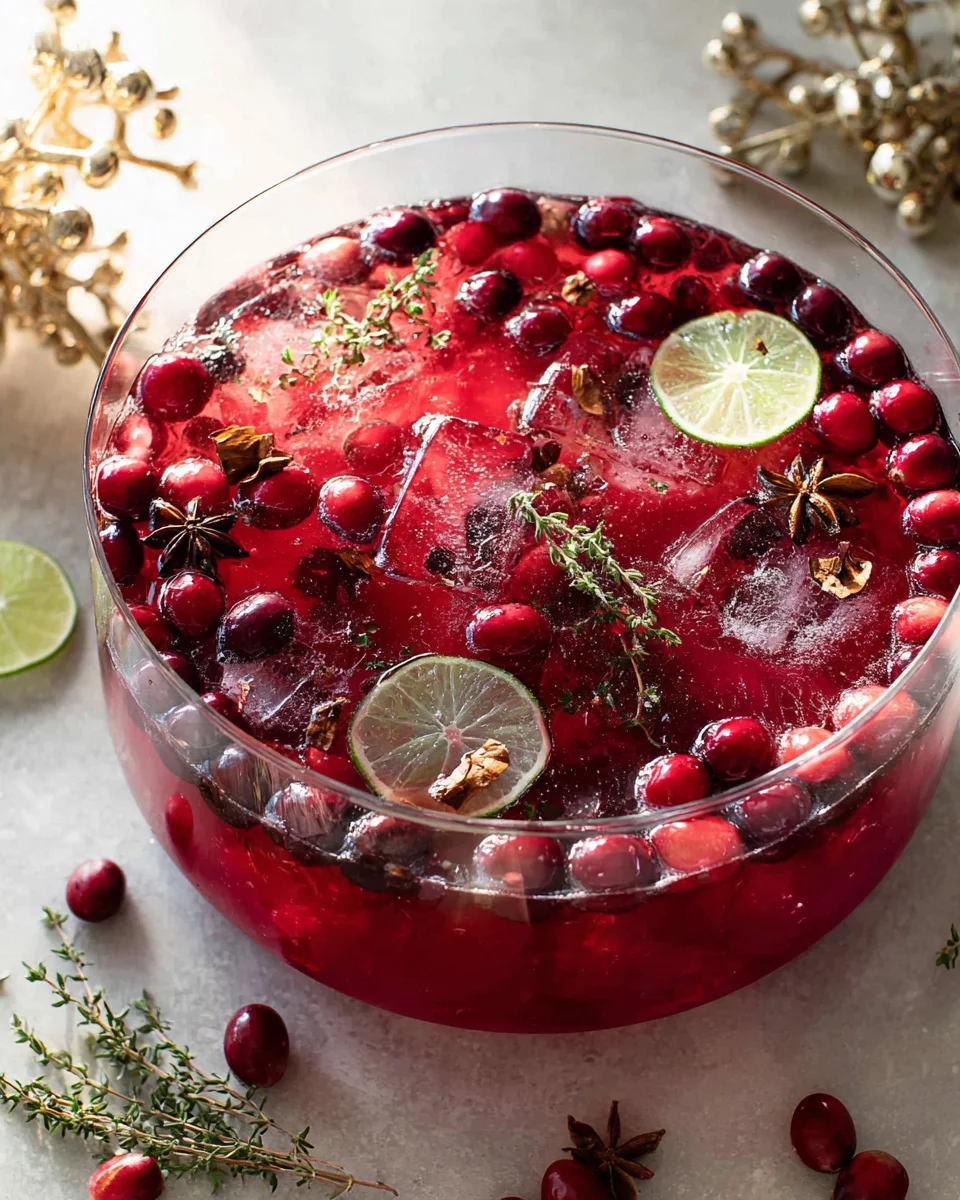
  1. Add Fresh Fruit Garnishes: With the punch now perfectly mixed and balanced, it’s time to make it visually spectacular. Gently place the thinly sliced oranges and fresh cranberries into the punch bowl. The thinly sliced oranges will float beautifully on the surface, adding vibrant, sunny color and releasing a wonderfully fresh citrusy aroma that complements the spices. The fresh cranberries, those little ruby jewels, will mostly sink to the bottom but some will bob gracefully on the surface, creating a stunning and dynamic visual display that is absolutely perfect for any holiday gathering.
    The Visual Appeal:

    Garnishing is not merely about aesthetics for this Non-Alcoholic Alternative; it profoundly enhances the overall sensory experience. The presence of fresh fruit subtly contributes to the aroma and can even offer a slight, refreshing flavor as it macerates gently in the punch over time, engaging more than just the taste buds.

  2. Incorporate Aromatic Herbs: For an added touch of elegance and festive aroma, carefully tuck several sprigs of fresh rosemary amongst the floating fruit in the punch. The deep, verdant green of the rosemary creates an incredibly striking and appealing contrast against the vibrant red of the punch, the bright oranges, and the ruby cranberries. The subtle piney, slightly peppery scent of the rosemary is remarkably complementary to the warming spices already present in the punch, making each sip an olfactory delight and truly enhancing the holiday experience. It’s a sophisticated touch that elevates the entire presentation.
  3. Serve Chilled with Ice: To ensure that each serving of your magnificent Non-Alcoholic Christmas Punch remains wonderfully refreshing and cold, always serve it over ice. For individual servings, fill glasses generously with ice before pouring in the punch. This simple step ensures each glass stays perfectly chilled, allowing the flavors to remain crisp and vibrant. If you’re using a large punch bowl for a gathering, consider placing a large, decorative ice ring directly into the bowl. An ice ring is an excellent choice because it keeps the entire batch chilled effectively without diluting the punch too quickly. You can even elevate your presentation further by freezing extra cranberries and small rosemary sprigs directly into your ice ring – this creates a stunning and festive centerpiece that will surely impress your guests! Provide a clean ladle and a stack of individual punch cups or elegant glasses for your guests to help themselves, inviting them to enjoy this special holiday beverage.

Tips for Success, Variations, and Making Ahead

Making This Non-Alcoholic Alternative Punch Ahead:

One of the absolute best and most practical features of this Non-Alcoholic Christmas Punch recipe is that the spiced concentrate can be prepared well in advance. This significantly reduces stress and workload on the day of your holiday entertaining, allowing you more time to enjoy with your guests. You can easily prepare the concentrate up to 3-4 days before your actual event. Simply follow all the steps for preparing the concentrate, including simmering, sweetening, and thorough cooling, then strain it carefully. Store the strained concentrate covered in an airtight container or pitcher in the refrigerator. On the day of your gathering, all you have to do is take out the chilled concentrate, combine it with the equally chilled fizzy drinks, add your beautiful garnishes, and serve! This brilliant make-ahead strategy allows you to focus on your guests, knowing that a delicious, elegant, and festive Non-Alcoholic Alternative is ready to be unveiled and enjoyed with minimal last-minute effort.

Customizing Your Non-Alcoholic Christmas Punch:

  • Spice Variations: While the core spices provide a perfect foundation, feel free to experiment with other whole spices to tailor the punch to your unique taste! Consider adding a few lightly crushed cardamom pods for a fragrant, exotic note, a few whole black peppercorns for a subtle, unexpected kick that adds complexity, or even a tiny pinch of freshly grated nutmeg or a couple of whole nutmeg pieces to the simmering concentrate. Remember that a little goes a long way with strong, aromatic spices, so add them judiciously and taste as you go.
  • Fruit Additions: Beyond the standard oranges and cranberries, consider adding other thinly sliced fresh fruits to the punch bowl for extra visual appeal and a slight, refreshing flavor contribution. Thinly sliced lemons or limes can add extra brightness, while apple slices can complement the apple juice base. Frozen berries (such as raspberries or blueberries) are another fantastic option; they act like colorful, edible ice cubes while slowly releasing their flavor and contributing beautiful splashes of color.
  • Sweetener Choices: While maple syrup and agave nectar offer a refined, natural sweetness, you have other options. You can also use a homemade simple syrup (equal parts granulated sugar and water, simmered until the sugar dissolves and then cooled) or even a touch of brown sugar in your concentrate for a deeper, molasses-like note that can enhance the warmth of the spices. Always adjust to your desired sweetness level, remembering that this Non-Alcoholic Alternative needs to appeal to a wide range of palates.
  • Fizzy Factor: The choice of carbonated beverage significantly impacts the final taste and sweetness. If you desire a less sweet punch, opt for plain sparkling water or club soda instead of ginger ale or sparkling white grape juice. For a different, perhaps bolder, flavor profile, you could even try a lemon-lime soda for an extra citrusy boost, though be mindful that this might make the punch quite sweet, requiring less initial sweetener in the concentrate.
  • Kid-Friendly Fun: This recipe is inherently family-friendly, ensuring that everyone, regardless of age, can enjoy a special holiday drink. For younger guests, you can create a separate, slightly less spiced version by simply reducing the amount of ginger or cloves, or simply ensure the main punch is balanced and not overly intense in spice. The vibrant colors and fun garnishes are usually a huge hit with children, making this Non-Alcoholic Christmas Punch a delightful beverage for all ages.

Serving Suggestions for a Memorable Experience:

Presentation is truly half the fun and plays a significant role in creating a festive atmosphere when it comes to a celebratory drink like this Non-Alcoholic Christmas Punch. A beautiful, large punch bowl is absolutely ideal for gatherings, as it allows guests to conveniently serve themselves and admire the stunning colors and garnishes. Consider setting up a dedicated “punch station” on your serving table, complete with the main punch bowl, a clean ladle, stacks of elegant glasses, and perhaps a small bowl of extra garnishes like fresh cranberries, orange twists, or extra cinnamon sticks for guests to customize their drinks. If you’re hosting a smaller, more intimate get-together, a large, clear glass pitcher works wonderfully too, allowing the vibrant colors to shine through. For an extra touch of sophistication, individual glasses can be pre-garnished with a thin slice of orange and a charming rosemary sprig perched on the rim. This thoughtful and elegant presentation truly elevates the “Non-Alcoholic Alternative” from a simple drink to a centerpiece of your holiday spread. The vibrant colors, inviting aromas, and sparkling effervescence will make it an instant hit, proving conclusively that festive cheer and sophisticated indulgence don’t need alcohol to be absolutely delightful and memorable.

Why Choose This Non-Alcoholic Christmas Punch?

In an age where health consciousness, mindful choices, and inclusivity are increasingly paramount, offering a sophisticated and delicious Non-Alcoholic Christmas Punch is a truly wonderful and considerate gesture to your guests. It ensures that designated drivers, expectant mothers, children, individuals with dietary restrictions, or simply anyone choosing not to consume alcohol can still enjoy a truly special, celebratory beverage that feels every bit as festive and indulgent as its alcoholic counterparts. This Non-Alcoholic Alternative is far from a mere afterthought or a basic juice mix; it’s a meticulously crafted drink that stands proudly on its own, bursting with complex fruit flavors, tantalizing warming aromas, and stunning visual appeal. It demonstrates thoughtfulness and care on the part of the host, ensuring everyone feels celebrated, included, and valued in the festive spirit. Making this punch is not just about mixing ingredients; it’s about crafting an experience from start to finish. The simmering spices will fill your home with an incredible, comforting holiday fragrance, making the very act of preparation a cherished part of your festive celebration. So, gather your ingredients, follow these detailed steps, and prepare to delight your guests with the most exquisite, flavorful, and beautiful Non-Alcoholic Christmas Punch they’ve ever tasted!

Best Non-Alcoholic Christmas Punch for Holiday Fun

Conclusion:

And there you have it, my friends! We’ve reached the end of our delightful journey through what I truly believe is not just a recipe, but a festive revelation for any gathering. I’m genuinely excited for you to experience the magic that this particular concoction brings to the table. This isn’t just another drink; it’s a vibrant, welcoming centerpiece that promises to delight every single guest, regardless of their age or preferences. Think of those twinkling lights, the soft murmur of happy conversation, and then imagine a beautiful punch bowl, brimming with this ruby-red, sparkling elixir, ready to be ladled out. That’s the kind of joy and festivity I want you to bring into your home this season, and this recipe is absolutely your secret weapon to achieve it effortlessly.

Why is this recipe an absolute must-try? For starters, it’s incredibly simple to whip up, freeing you from last-minute stress so you can actually enjoy the party. You don’t need any fancy bar skills or obscure ingredients; everything you need is readily available at your local grocery store. But beyond its ease, its true charm lies in its universal appeal. It’s a genuinely delicious, refreshing, and beautifully balanced beverage that perfectly captures the spirit of the holidays without relying on alcohol. This means children can enjoy it alongside adults, designated drivers feel fully included, and anyone choosing a sober lifestyle has a sophisticated, celebratory option that doesn’t feel like an afterthought. It’s inclusive hospitality in a glass, a true testament to making everyone feel special and part of the celebration. The combination of sweet, tart, and subtly spiced notes creates a symphony of flavors that is both comforting and exhilarating, a perfect complement to any holiday spread, making it truly indispensable for your festive menu.

Now, let’s talk about making it truly your own and presenting it with flair. While the base recipe is perfect as is, there are so many wonderful ways to elevate your serving game or tweak it to suit specific tastes. For a stunning visual impact, consider creating ice rings or individual ice cubes infused with cranberries, orange slices, or even fresh rosemary sprigs. These not only keep your punch perfectly chilled without diluting the flavor too quickly, but they also add an incredible aesthetic touch that will have your guests reaching for their phones to snap a picture. Speaking of garnishes, a handful of fresh cranberries floating on top, delicate orange or lime slices, or a few sprigs of mint or rosemary can transform your punch from delicious to absolutely divine. For an extra touch of warmth, especially on a chilly evening, a few cinnamon sticks or star anise pods gently stirred into the punch bowl add a subtle, inviting aroma and visual appeal that perfectly embodies the festive season, making each sip a multi-sensory experience.

Want to play with variations? I wholeheartedly encourage it! If you prefer a less sweet profile, consider swapping out some of the soda for sparkling water or a dry ginger ale. For a more pronounced ginger kick, you could add a few thin slices of fresh ginger to the initial simmer with the spices, straining them out before chilling. Fancy a different fruit profile? Experiment with adding a splash of pomegranate juice or even white grape juice for a lighter, brighter alternative. For a truly unique twist, especially for a winter wonderland theme, you could rim your serving glasses with a mixture of sugar and finely grated orange zest – a little detail that adds both visual appeal and a burst of citrus with every sip. This adaptability is precisely why I call it the ultimate Non-Alcoholic Alternative Christmas Punch; it’s versatile enough to fit seamlessly into any holiday celebration, adapting to your specific needs and preferences while always delivering on flavor and festivity that will leave a lasting impression on your guests.

Your Turn: Get Ready to Impress!

I genuinely cannot wait for you to try this recipe. Imagine the smiles, the compliments, and the sheer delight as your loved ones enjoy this vibrant, refreshing drink. It’s more than just a recipe; it’s an experience, a memory in the making, and a testament to joyful, inclusive entertaining. So, please, gather your ingredients, set aside a little time, and bring this wonderful festive punch to life in your own kitchen. I promise you, it will be an absolute hit, and you’ll wonder why you ever served anything else! Once you’ve made it, or even if you’ve put your own creative spin on it, I would absolutely love to hear about your experience. Did you add a secret ingredient? Did you come up with a fabulous new garnish? What was the general consensus among your guests? Share your triumphs, your photos, and your tips with me. Your insights and creativity inspire me and our entire community of home cooks. Let’s make this holiday season the most delicious and inclusive one yet, one unforgettable punch at a time!


Non-Alcoholic Christmas Punch

A vibrant, inclusive non-alcoholic Christmas punch, perfect for holiday gatherings. This festive beverage features a blend of sweet and tangy juices infused with warm spices, offering delicious flavor and stunning visual appeal for all to enjoy.

Prep Time
30 Minutes
Cook Time
30 Minutes
Total Time
30 Minutes
Servings
18 servings

Ingredients


Instructions


Important Information

Nutrition Facts (Per Serving)

It is important to consider this information as approximate and not to use it as definitive health advice.

Allergy Information

Please check ingredients for potential allergens and consult a health professional if in doubt.

« Previous Post
Decadent Chocolate Beef Salami Recipe: A Must-Try!
Next Post »
Delicious Pumpkin Cheesecake Truffles | Perfect Fall Dessert

If you enjoyed this…

Delicious Spinach and Artichoke Dip Cups for Easy Entertaining

Homemade Cheez Its: The Ultimate Guide to Baking Them Yourself

Ultimate Beef Bacon Jalapeño Deviled Eggs with Crispy Topping

Primary Sidebar

Browse by Diet

BreakfastDinnerLunchDessertAppetizer

Sweet Peach Yogurt Parfait Delight

One of my fondest memories is from a lazy summer afternoon spent at my grandmother’s house. The sun filtered through the kitchen window, casting a warm glow over the table where she would create her culinary magic. It was during one of those blissful moments that I first tasted her Peach Yogurt Parfait with Honey and Granola. The sweet aroma of ripe peaches mingling with creamy yogurt and the crunch of granola was nothing short of heavenly. It felt like summer captured in a bowl, and I still remember the joy of diving in with a spoon, each layer revealing a new burst of flavor.

When I think about that parfait, I can almost hear the gentle hum of the bees outside, reminding me of the floral notes that honey brings to every bite. The vibrant yellows and soft oranges of the peaches contrast beautifully with the creamy white yogurt and the golden crunch of granola. It’s a dish that not only looks delightful but also tastes like a celebration of fresh, wholesome ingredients.

What makes my version of this Peach Yogurt Parfait special is the careful balance of flavors and textures. I use ripe, juicy peaches, drizzled with locally sourced honey, and a homemade granola that’s bursting with nuts and seeds for an extra crunch. It’s a simple dish, but every layer is crafted with love and attention.

Let me show you exactly how to make this delightful parfait, so you can bring a bit of that summer magic into your kitchen!

Sweet Peach Yogurt Parfait Delight

Why You’ll Love This Recipe

  • Delightfully creamy texture from the Greek yogurt, paired with the juicy sweetness of fresh peaches.
  • Ready in under 20 minutes, making it a quick and satisfying breakfast or snack option.
  • Budget-friendly, using common ingredients that you may already have in your pantry.
  • Customizable with your favorite granola and nuts, allowing you to tailor each parfait to your taste.
  • Perfectly balanced flavors with the bright acidity of lemon juice and the sweetness of honey enhancing the peaches.

Ingredients

  • For the Parfait:
  • 2 cups plain Greek yogurt (or vanilla yogurt for a sweeter option)
  • 2 large ripe peaches, diced (about 2 cups)
  • 1 tablespoon fresh lemon juice (to prevent browning of peaches)
  • 2 tablespoons honey (plus more for drizzling)
  • 1 teaspoon vanilla extract (optional for extra flavor)
  • For the Granola:
  • 1 cup granola (store-bought or homemade; see notes for a simple granola recipe)
  • 1/4 cup sliced almonds (optional for added crunch)
  • 1/4 cup shredded coconut (optional for added flavor)

Let’s dive into some key ingredients that make this Peach Yogurt Parfait so delightful! First, the Greek yogurt is not only creamy but also packed with protein, making it a satisfying option for breakfast or a snack. If you’re looking for a sweeter option, you can easily substitute it with vanilla yogurt, though it may alter the overall flavor balance. Next, the ripe peaches are the star of the show; their natural sweetness shines through, so I recommend choosing peaches that yield slightly to pressure, indicating they’re perfectly ripe. If peaches aren’t in season, feel free to use nectarines or even frozen peaches—just thaw them before use. Finally, honey adds a lovely floral sweetness that ties everything together. If you prefer, maple syrup can serve as a delicious substitute.

Step-by-Step Instructions

  1. Start by preparing the peaches. Wash them thoroughly, then slice and dice them into bite-sized pieces. In a medium bowl, toss the diced peaches with 1 tablespoon of fresh lemon juice to prevent browning. Set aside for about 5 minutes while the lemon juice works its magic.
  2. In a separate bowl, combine the Greek yogurt, 2 tablespoons of honey, and 1 teaspoon of vanilla extract if using. Stir the mixture until smooth and thoroughly blended. This should take about a minute. Avoid overmixing to maintain the creaminess of the yogurt.
  3. Now it’s time to layer your parfait. Grab a clear glass or bowl to showcase your beautiful creation. Start with a generous spoonful of the yogurt mixture at the bottom—about 1/4 cup will do. Use a spoon to spread it evenly.
  4. Add a layer of the diced peaches over the yogurt, ensuring they cover the yogurt completely. You might want to use about half of what you have prepared—roughly 1 cup. This layer should be visually appealing, so arrange the peaches neatly.
  5. Sprinkle 1/4 cup of granola over the peaches. This adds a delightful crunch. Make sure to distribute it evenly to ensure every bite has that satisfying texture. Avoid packing it down too tightly, as you want it to maintain its crunch.
  6. Repeat the layers: spoon in another 1/4 cup of yogurt, followed by another cup of peaches, and another sprinkle of granola. You should have at least two layers, but feel free to add more depending on your glass size.
  7. Finish off your parfait with a drizzle of honey on top for added sweetness and a touch of elegance. If you’re using sliced almonds or shredded coconut, sprinkle them on top now. It adds a lovely visual contrast and extra flavor.
  8. Serve immediately or refrigerate for up to 30 minutes before serving to allow the flavors to meld together. However, I recommend enjoying it fresh to maintain the granola’s crunch.

Pro Tips for the Best Peach Yogurt Parfait With Honey And Granola

  • Make sure to choose ripe peaches for the best flavor and texture. A common mistake is using unripe fruit, which can lead to a less enjoyable parfait. Look for peaches that are fragrant and slightly soft to the touch.
  • Use a clear glass to assemble your parfait; this not only makes for a beautiful presentation but also allows you to see the colorful layers, which adds to the enjoyment of eating it.
  • For an even creamier texture, consider whipping the Greek yogurt with a hand mixer for a couple of minutes before layering. This small adjustment makes a huge difference in mouthfeel.
  • Be mindful of the granola-to-yogurt ratio. Too much granola can overwhelm the parfait, while too little can make it feel too creamy. Aim for about 1/4 cup of granola per layer for the perfect balance.
  • If you’re making this for a gathering, consider preparing the yogurt and peaches ahead of time and layering them just before serving. This ensures the granola stays crunchy!

Variations & Serving Ideas

There are so many ways to get creative with your Peach Yogurt Parfait! For a tropical twist, swap out the peaches for mangoes or pineapples and top with coconut flakes. If you prefer a berry flavor, mix in some blueberries or strawberries with the peaches for added color and taste. For a nutty version, incorporate chopped walnuts or pecans instead of almonds.

As for serving ideas, this parfait pairs beautifully with a side of scrambled eggs for a hearty breakfast or fresh fruit salad for a light lunch. You might also enjoy it alongside whole grain toast with almond butter for an energizing snack. The contrast of flavors and textures will elevate your meal experience!

Storage, Make-Ahead & Reheating

The Peach Yogurt Parfait is best enjoyed fresh, but you can prepare some components ahead of time. Store the layered parfait in an airtight container in the refrigerator for up to 24 hours. However, be cautious; the granola may lose its crunch if stored too long. You can freeze the yogurt and peach mixture for up to 2 months; just remember to thaw it in the refrigerator overnight before serving.

If you plan to enjoy this dish the next day, it can taste even better as the flavors meld together. Just remember to add the granola right before serving to keep its delightful crunch!

Frequently Asked Questions

Can I make Peach Yogurt Parfait With Honey And Granola ahead of time?

Yes — in fact, it tastes even better the next day as the flavors meld. However, I recommend waiting to add the granola until just before serving to maintain its crunch.

What can I substitute for Greek yogurt?

If you prefer a lighter option, you can substitute Greek yogurt with regular yogurt or a dairy-free alternative like coconut yogurt. Just remember that this may alter the creaminess and flavor profile slightly.

Can I use frozen peaches for this parfait?

Absolutely! Just make sure to thaw the frozen peaches before using them. They will still add great flavor, though the texture may be slightly softer than fresh peaches.

How do I make the parfait vegan?

To make a vegan version, substitute the Greek yogurt with a plant-based yogurt alternative, and replace honey with maple syrup or agave nectar. This keeps the parfait sweet while adhering to a vegan diet.

What other fruits can I use in this recipe?

You can mix and match fruits based on your preference. Try using strawberries, blueberries, raspberries, or even bananas. Just make sure to adjust the lemon juice as needed to prevent browning.

Sweet Peach Yogurt Parfait Delight

Final Thoughts

The Peach Yogurt Parfait with Honey and Granola is a delightful blend of creamy yogurt, sweet peaches, and crunchy granola that creates a satisfying and nourishing treat. Each layer bursts with flavor, making it a perfect choice for breakfast or a light dessert.

This is the kind of recipe I come back to again and again, especially when I want something refreshing and wholesome to start my day. The harmony of sweet and tart flavors, combined with the delightful crunch, never fails to lift my spirits!

I encourage you to give this parfait a try and indulge in its comforting goodness. Feel free to share your results or even add your own twist—perhaps a sprinkle of cinnamon or a handful of nuts. Enjoy creating your perfect parfait!

Print
clock clock iconcutlery cutlery iconflag flag iconfolder folder iconinstagram instagram iconpinterest pinterest iconfacebook facebook iconprint print iconsquares squares iconheart heart iconheart solid heart solid icon

Peach Yogurt Parfait


  • Author: Lily author
  • Total Time: 15 minutes
  • Yield: 4 servings 1x
Pin Recipe
Print Recipe

Description

This Peach Yogurt Parfait combines creamy Greek yogurt, juicy peaches, and crunchy granola for a delightful treat. It’s a perfect breakfast or snack that captures the essence of summer in every bite.


Ingredients

Scale
  • For the Parfait:
  • 2 cups plain Greek yogurt (or vanilla yogurt for a sweeter option)
  • 2 large ripe peaches, diced (about 2 cups)
  • 1 tablespoon fresh lemon juice (to prevent browning of peaches)
  • 2 tablespoons honey (plus more for drizzling)
  • 1 teaspoon vanilla extract (optional for extra flavor)
  • For the Granola:
  • 1 cup granola (store-bought or homemade; see notes for a simple granola recipe)
  • 1/4 cup sliced almonds (optional for added crunch)
  • 1/4 cup shredded coconut (optional for added flavor)

Instructions

  1. Start by preparing the peaches. Wash them thoroughly, then slice and dice them into bite-sized pieces. In a medium bowl, toss the diced peaches with 1 tablespoon of fresh lemon juice to prevent browning. Set aside for about 5 minutes while the lemon juice works its magic.
  2. In a separate bowl, combine the Greek yogurt, 2 tablespoons of honey, and 1 teaspoon of vanilla extract if using. Stir the mixture until smooth and thoroughly blended. This should take about a minute. Avoid overmixing to maintain the creaminess of the yogurt.
  3. Now it’s time to layer your parfait. Grab a clear glass or bowl to showcase your beautiful creation. Start with a generous spoonful of the yogurt mixture at the bottom—about 1/4 cup will do. Use a spoon to spread it evenly.
  4. Add a layer of the diced peaches over the yogurt, ensuring they cover the yogurt completely. You might want to use about half of what you have prepared—roughly 1 cup. This layer should be visually appealing, so arrange the peaches neatly.
  5. Sprinkle 1/4 cup of granola over the peaches. This adds a delightful crunch. Make sure to distribute it evenly to ensure every bite has that satisfying texture. Avoid packing it down too tightly, as you want it to maintain its crunch.
  6. Repeat the layers: spoon in another 1/4 cup of yogurt, followed by another cup of peaches, and another sprinkle of granola. You should have at least two layers, but feel free to add more depending on your glass size.
  7. Finish off your parfait with a drizzle of honey on top for added sweetness and a touch of elegance. If you’re using sliced almonds or shredded coconut, sprinkle them on top now. It adds a lovely visual contrast and extra flavor.
  8. Serve immediately or refrigerate for up to 30 minutes before serving to allow the flavors to meld together. However, I recommend enjoying it fresh to maintain the granola’s crunch.
  • Prep Time: 15 mins
  • Cook Time: 0 mins
  • Category: Breakfast
  • Method: No-cook
  • Cuisine: American

Nutrition

  • Serving Size: 1 parfait
  • Calories: 250
  • Sugar: 20 g
  • Sodium: 50 mg
  • Fat: 5 g
  • Saturated Fat: 2 g
  • Unsaturated Fat: 3 g
  • Trans Fat: 0 g
  • Carbohydrates: 40 g
  • Fiber: 3 g
  • Protein: 10 g
  • Cholesterol: 10 mg

Keywords: Choose ripe peaches for the best flavor and texture. Use a clear glass for a beautiful presentation. For creaminess, consider whipping the yogurt before layering. Be mindful of the granola-to-yogurt ratio. Prepare yogurt and peaches ahead of time for gatherings, layering just before serving.

Did you make this recipe?

Share a photo and tag us — we can't wait to see what you've made!

Sun-Kissed Frozen Orange Cream Slush

As a child, summer days felt like they lasted forever. I remember the sticky heat wrapping around me as I played outside, my laughter mingling with the sounds of the neighborhood. But nothing could cool me down quite like the moment I’d spot my grandmother, laboring over her blender, whipping up her famous Frozen Orange Creamsicle Slush. That vibrant orange treat, with its frosty texture and sweet citrus aroma, was like a burst of sunshine in a cup. Just one sip, and I could feel the coolness wash over me, sparking pure joy.

This Frozen Orange Creamsicle Slush has a way of making you feel like a kid again. Its creamy, dreamy consistency is a delightful balance of bright orange and soft vanilla, inviting you to dive right in. The refreshing tang of orange dances on your tongue, while the smooth creaminess envelops you in a comforting embrace. It’s a nostalgic treat that’s perfect for hot summer afternoons or anytime you need a little pick-me-up.

What makes my version of this slush stand out is the addition of a hint of vanilla bean, which elevates the flavor and adds an extra layer of richness. Plus, it’s super easy to whip up with just a few simple ingredients that you probably already have on hand! So, if you’re ready to relive those sun-soaked memories, let me show you exactly how to make it.

Sun-Kissed Frozen Orange Cream Slush

Why You’ll Love This Recipe

  • Each slush is a perfect blend of creamy vanilla and zesty orange, creating a nostalgic flavor reminiscent of summer days.
  • This refreshing treat is ready in under 15 minutes, making it an ideal quick dessert for unexpected guests or hot afternoons.
  • With just 8 simple ingredients, it’s budget-friendly, ensuring you don’t have to break the bank to enjoy a delicious slush.
  • The slush has a perfectly smooth texture, thanks to the combination of ice and ice cream, providing a delightful contrast to the bright citrus flavors.
  • It’s highly customizable; you can easily adjust the sweetness and add fresh herbs for a unique twist that suits your taste.

Ingredients

  • 2 cups orange juice (freshly squeezed or store-bought)
  • 1 cup vanilla ice cream
  • 1 cup crushed ice
  • 1/2 cup milk (whole or 2%)
  • 1/4 cup granulated sugar (adjust based on sweetness preference)
  • 1 teaspoon vanilla extract
  • Zest of 1 orange (for added flavor)
  • Fresh orange slices and mint leaves (for garnish)

The star of this Frozen Orange Creamsicle Slush is the orange juice, which provides the vibrant, citrusy base. Freshly squeezed juice will yield the brightest flavor, but store-bought options can be just as convenient. If you’re opting for store-bought, choose 100% pure juice with no added sugars for the best results. Another essential ingredient is the vanilla ice cream; it adds creaminess and sweetness. You can substitute it with dairy-free ice cream if you’re looking for a vegan option. Whole or 2% milk complements the ice cream, creating a smooth blend. If you want a lower-calorie version, almond or oat milk can be good alternatives.

Lastly, the granulated sugar can be adjusted based on your sweetness preference. If you prefer a more natural sweetener, consider using honey or agave syrup. The orange zest enhances the flavor profile, providing an aromatic pop that brings the whole slush together. Don’t skip it! It adds an extra layer of brightness that makes this slush truly special.

Step-by-Step Instructions

  1. Start by preparing your ingredients. Gather 2 cups of orange juice, 1 cup of vanilla ice cream, and 1 cup of crushed ice. Make sure the ice is finely crushed, as larger chunks can make blending difficult.
  2. In a blender, combine the orange juice, vanilla ice cream, crushed ice, and 1/2 cup of milk. Add 1/4 cup of granulated sugar and 1 teaspoon of vanilla extract. If you like a sweeter slush, consider adding a bit more sugar at this stage.
  3. Add the zest of 1 orange to the blender. This step is crucial for enhancing the citrus flavor of your slush. Make sure not to include the bitter white pith—only the flavorful zest.
  4. Blend the mixture on medium-high speed for about 30-45 seconds. Stop once the ingredients are fully combined and the slush has a smooth, even consistency. If you notice large chunks of ice, blend for an additional 10-15 seconds. Avoid over-blending, as this can make the slush too liquidy.
  5. Once blended, taste the slush. If it needs more sweetness, add a little more sugar and blend for a few more seconds. If it’s too thick, you can add a splash of milk to reach your desired consistency.
  6. Pour the slush into glasses. This recipe typically serves 4, but you can easily double it for larger gatherings. Use a spoon to help guide the slush into the glasses if needed.
  7. Garnish each serving with fresh orange slices and mint leaves. The mint not only adds a pop of color but also a refreshing aroma that complements the citrus flavors beautifully.
  8. Serve immediately and enjoy! If you’ve made extra, you can refrigerate it for a short time, but it’s best enjoyed fresh.

Pro Tips for the Best Frozen Orange Creamsicle Slush

  • Don’t skip the orange zest! It’s a game-changer for flavor. Always zest before juicing to make it easier.
  • Use a high-powered blender for the best texture. A standard blender may struggle with ice, leading to uneven consistency. If you have a food processor, that can work too, but ensure the ice is finely crushed.
  • Adjust the ice-to-liquid ratio carefully. If your slush is too thick, it won’t blend well. Start with less ice and add more until you reach your preferred texture.
  • Be cautious with the sugar! Always start with the lower amount, as you can easily add more, but it’s hard to fix an overly sweet slush.
  • For a fun twist, consider adding a splash of coconut milk or a handful of fresh fruit like strawberries or pineapple. This not only enhances the flavor but also adds a beautiful color contrast.

Variations & Serving Ideas

There are countless ways to put a spin on your Frozen Orange Creamsicle Slush. Consider making a tropical version by adding in some pineapple juice or coconut milk for a delightful tropical twist. If you’re feeling adventurous, try incorporating a handful of frozen mango or peach slices for added sweetness. For a lighter version, swap out the vanilla ice cream for Greek yogurt for a creamy yet tangy alternative.

As for serving ideas, this refreshing slush pairs wonderfully with light summer dishes like grilled chicken skewers, fish tacos, or a simple salad topped with citrus vinaigrette. The bright, zesty flavors of the slush complement these dishes perfectly, making them an ideal pairing for a sunny day.

Storage, Make-Ahead & Reheating

This Frozen Orange Creamsicle Slush is best enjoyed fresh, but if you have leftovers, you can store them in an airtight container in the fridge for up to 2 days. Just keep in mind that the slush may lose some of its texture over time as the ice melts. It doesn’t freeze well, as the ice will turn into a solid block. If you must freeze it, blend again after thawing to restore the slushy consistency. This treat is best the day you make it, as the flavors meld together beautifully overnight, enhancing its deliciousness.

Frequently Asked Questions

Can I make Frozen Orange Creamsicle Slush ahead of time?

Yes — in fact, it tastes even better the next day as the flavors meld. However, it’s best to enjoy it fresh, as the texture can change if stored for too long. If you need to prepare it ahead, keep it in the fridge and re-blend before serving.

What kind of orange juice should I use?

For the best flavor, use freshly squeezed orange juice. However, if you’re short on time, opt for 100% pure store-bought juice without added sugars. This will ensure that your slush remains flavorful and refreshing.

Can I substitute the vanilla ice cream?

Absolutely! If you’re looking for a dairy-free option, coconut milk ice cream or a non-dairy vanilla ice cream can work wonderfully. They will still provide the creamy texture and sweetness you desire.

How can I adjust the sweetness of my slush?

You can easily adjust the sweetness by modifying the amount of sugar added. Start with 1/4 cup and taste the mixture before blending. If you prefer it sweeter, add more sugar gradually until it reaches your desired level.

What should I do if my slush is too thick?

If your slush is too thick, simply add a splash of milk or orange juice and blend again. This will help achieve a more drinkable consistency while maintaining the slushy texture. Adjust gradually to reach your preferred thickness.

Sun-Kissed Frozen Orange Cream Slush

Final Thoughts

The Frozen Orange Creamsicle Slush is a delightful blend of refreshing citrus and creamy goodness, making it a perfect treat for warm days or any time you crave a taste of nostalgia. The way the bright orange flavor dances with the creamy texture truly elevates this slush, transforming it into a satisfying escape from the everyday.

This is the kind of recipe I come back to again and again, especially when I’m looking to cool down or impress guests at a summer gathering. It’s simple to make and always brings smiles all around! I encourage you to try this recipe for yourself—don’t hesitate to share your results or even put your own spin on it. Happy slushing!

Print
clock clock iconcutlery cutlery iconflag flag iconfolder folder iconinstagram instagram iconpinterest pinterest iconfacebook facebook iconprint print iconsquares squares iconheart heart iconheart solid heart solid icon

Frozen Orange Creamsicle Slush


  • Author: Lily author
  • Total Time: 15 minutes
  • Yield: 4 servings 1x
Pin Recipe
Print Recipe

Description

This Frozen Orange Creamsicle Slush is a refreshing treat that combines creamy vanilla and zesty orange flavors. Perfect for hot summer days, it brings back nostalgic memories with every sip.


Ingredients

Scale
  • 2 cups orange juice (freshly squeezed or store-bought)
  • 1 cup vanilla ice cream
  • 1 cup crushed ice
  • 1/2 cup milk (whole or 2%)
  • 1/4 cup granulated sugar (adjust based on sweetness preference)
  • 1 teaspoon vanilla extract
  • Zest of 1 orange (for added flavor)
  • Fresh orange slices and mint leaves (for garnish)

Instructions

  1. Start by preparing your ingredients. Gather 2 cups of orange juice, 1 cup of vanilla ice cream, and 1 cup of crushed ice. Make sure the ice is finely crushed, as larger chunks can make blending difficult.
  2. In a blender, combine the orange juice, vanilla ice cream, crushed ice, and 1/2 cup of milk. Add 1/4 cup of granulated sugar and 1 teaspoon of vanilla extract. If you like a sweeter slush, consider adding a bit more sugar at this stage.
  3. Add the zest of 1 orange to the blender. This step is crucial for enhancing the citrus flavor of your slush. Make sure not to include the bitter white pith—only the flavorful zest.
  4. Blend the mixture on medium-high speed for about 30-45 seconds. Stop once the ingredients are fully combined and the slush has a smooth, even consistency. If you notice large chunks of ice, blend for an additional 10-15 seconds. Avoid over-blending, as this can make the slush too liquidy.
  5. Once blended, taste the slush. If it needs more sweetness, add a little more sugar and blend for a few more seconds. If it’s too thick, you can add a splash of milk to reach your desired consistency.
  6. Pour the slush into glasses. This recipe typically serves 4, but you can easily double it for larger gatherings. Use a spoon to help guide the slush into the glasses if needed.
  7. Garnish each serving with fresh orange slices and mint leaves. The mint not only adds a pop of color but also a refreshing aroma that complements the citrus flavors beautifully.
  8. Serve immediately and enjoy! If you’ve made extra, you can refrigerate it for a short time, but it's best enjoyed fresh.
  • Prep Time: 15 min
  • Cook Time: 0 min
  • Category: Dessert
  • Method: Blending
  • Cuisine: American

Nutrition

  • Serving Size: 1 serving
  • Calories: 200
  • Sugar: 30 g
  • Sodium: 50 mg
  • Fat: 5 g
  • Saturated Fat: 3 g
  • Unsaturated Fat: 2 g
  • Trans Fat: 0 g
  • Carbohydrates: 40 g
  • Fiber: 1 g
  • Protein: 2 g
  • Cholesterol: 20 mg

Keywords: Don't skip the orange zest! It's a game-changer for flavor. Always zest before juicing to make it easier.

Did you make this recipe?

Share a photo and tag us — we can't wait to see what you've made!

Zesty Lemon Poppy Seed Delight

One rainy afternoon, I found myself in my grandmother’s cozy kitchen, the kind that always smelled like warmth and love. She was whipping up her famous Lemon Poppy Seed Loaf, a recipe that had been passed down through generations. As the batter came together, the zesty aroma of fresh lemons filled the air, mingling perfectly with the nutty fragrance of poppy seeds. I can still picture her, apron-clad, as she expertly drizzled a vibrant citrus icing over the loaf, creating a glossy, sun-kissed finish that beckoned us to dive in. It was a moment that sparked my own passion for baking, and this recipe has become a cherished staple in my home ever since.

When you take a bite of this Lemon Poppy Seed Loaf, it’s like a burst of sunshine on your palate. The loaf is beautifully golden, with a tender crumb that melts in your mouth. Each slice is speckled with tiny poppy seeds, adding a delightful crunch that contrasts beautifully with the tangy sweetness of the lemon. And that citrus icing? It’s the finishing touch that elevates this loaf from ordinary to extraordinary, with its bright, zesty flavor dancing on your taste buds.

This recipe stands out because it embraces simplicity while delivering on flavor. I’ve added a hint of vanilla to the batter, enhancing the overall taste and making it even more indulgent. Trust me, once you make this Lemon Poppy Seed Loaf With Citrus Icing, it’ll become a go-to in your baking repertoire.

So, let me show you exactly how to make it!

Zesty Lemon Poppy Seed Delight

Why You’ll Love This Recipe

  • Moist and tender crumb that melts in your mouth, thanks to the perfect balance of butter and buttermilk.
  • Bright, zesty lemon flavor paired with crunchy poppy seeds, creating a delightful texture and taste experience.
  • Easy to whip up in just about an hour, perfect for last-minute gatherings or a cozy afternoon treat.
  • Budget-friendly with everyday ingredients, making it an accessible option for all home bakers.
  • The citrus icing adds a sweet tang that elevates the loaf, turning a simple recipe into a showstopper!

Ingredients

  • 1 ½ cups (190g) all-purpose flour
  • 1 teaspoon baking powder
  • ½ teaspoon baking soda
  • ½ teaspoon salt
  • 3 tablespoons poppy seeds
  • ½ cup (115g) unsalted butter, softened to room temperature
  • 1 cup (200g) granulated sugar
  • 2 large eggs
  • 1 teaspoon vanilla extract
  • 1 teaspoon lemon zest (from about 1 medium lemon)
  • ½ cup (120ml) buttermilk
  • 2 tablespoons fresh lemon juice

For the Citrus Icing:

  • 1 cup (120g) powdered sugar
  • 2 tablespoons fresh lemon juice
  • 1 tablespoon orange juice
  • 1 teaspoon lemon zest (for garnish, optional)

Let’s dive into the key ingredients that make this Lemon Poppy Seed Loaf so special. The all-purpose flour provides the structure and base for the loaf, while the baking powder and baking soda ensure it rises perfectly, giving the loaf a light texture. For a gluten-free variation, you could substitute the flour with a gluten-free all-purpose blend. Poppy seeds not only add a delightful crunch but also contribute to the unique flavor profile that pairs well with the citrus notes.

Unsalted butter is crucial for achieving the buttery richness that makes this loaf so moist. If you’re looking for a dairy-free option, coconut oil or a vegan butter can be used instead. The buttermilk is another essential component, providing acidity that activates the baking soda for a fluffy texture. If you don’t have buttermilk on hand, you can easily make a substitute by mixing ½ cup of milk with 1 tablespoon of vinegar or lemon juice and letting it sit for about 5 minutes.

Step-by-Step Instructions

  1. Preheat your oven to 350°F (175°C). Grease a 9×5-inch loaf pan or line it with parchment paper for easy removal later.
  2. In a medium mixing bowl, whisk together 1 ½ cups of all-purpose flour, 1 teaspoon of baking powder, ½ teaspoon of baking soda, ½ teaspoon of salt, and 3 tablespoons of poppy seeds. This helps to evenly distribute the baking agents and ensures a uniform rise.
  3. In a large mixing bowl, cream together ½ cup of softened unsalted butter and 1 cup of granulated sugar using an electric mixer on medium speed for about 3-4 minutes, until the mixture is light and fluffy. Make sure to scrape down the sides of the bowl occasionally.
  4. Add 2 large eggs, 1 teaspoon of vanilla extract, and 1 teaspoon of lemon zest to the creamed butter and sugar, mixing until fully combined. You want a smooth consistency, so ensure there are no lumps of butter.
  5. In a small bowl, combine ½ cup of buttermilk and 2 tablespoons of fresh lemon juice. Alternately add the dry ingredients and buttermilk mixture to the butter mixture, starting and ending with the dry ingredients. Mix just until combined; do not overmix, as this can lead to a dense loaf.
  6. Pour the batter into the prepared loaf pan. Smooth the top with a spatula, ensuring it’s even. Bake in the preheated oven for 50-60 minutes, or until a toothpick inserted in the center comes out clean. The edges should be lightly golden brown, and the center should feel just set.
  7. Once baked, remove the loaf from the oven and allow it to cool in the pan for about 10 minutes. Then, transfer it to a wire rack to cool completely. Resist the urge to slice too soon, as it will be crumbly if it’s still warm.
  8. While the loaf is cooling, prepare the citrus icing. In a medium bowl, whisk together 1 cup of powdered sugar, 2 tablespoons of fresh lemon juice, and 1 tablespoon of orange juice until smooth. If the icing is too thick, you can add a little more juice to reach your desired consistency.
  9. Once the loaf is completely cool, drizzle the citrus icing over the top. If you like, sprinkle with an additional teaspoon of lemon zest for an extra pop of flavor and color.

Pro Tips for the Best Lemon Poppy Seed Loaf With Citrus Icing

  • Be careful not to overmix your batter; this is a common mistake that can lead to a dense loaf. Mix just until the dry ingredients are incorporated for a light and fluffy texture.
  • Use room temperature ingredients, especially the butter and eggs. This helps to create a smoother batter and ensures even baking. Take your eggs out of the fridge about 30 minutes before you start.
  • For a more pronounced lemon flavor, consider adding a little lemon extract in addition to the zest and juice. Just a half teaspoon can elevate the citrus notes significantly.
  • When measuring your flour, spoon it into the measuring cup and level it off with a knife instead of scooping directly from the bag. This prevents packing and ensures you don’t end up with a dry loaf.
  • Invest in a good quality loaf pan; it makes a difference in heat distribution, which ensures even baking. If your pan is dark-coated, reduce the oven temperature by 25°F to prevent over-browning.

Variations & Serving Ideas

For a delightful twist, consider adding blueberries or raspberries to the batter for a fruity burst of flavor. You can also experiment with different citrus fruits—try lime or grapefruit zest and juice for a refreshing change. For a healthier option, substitute half of the all-purpose flour with whole wheat flour for added fiber without compromising too much on texture.

This Lemon Poppy Seed Loaf pairs beautifully with a light salad, such as a mixed greens salad with a vinaigrette, or a cup of tea for a cozy afternoon treat. It also complements a creamy cheese platter, as the acidity of the loaf balances rich cheeses perfectly. Lastly, a scoop of vanilla ice cream on the side creates a delightful contrast of temperatures and flavors!

Storage, Make-Ahead & Reheating

This Lemon Poppy Seed Loaf can be stored at room temperature for up to 3 days if wrapped tightly in plastic wrap. If you want to keep it longer, it freezes well for up to 3 months. To freeze, wrap the loaf tightly in plastic wrap and then in aluminum foil to prevent freezer burn.

When you’re ready to enjoy it again, simply thaw it in the fridge overnight. Reheat individual slices in the microwave for 15-20 seconds or in a toaster oven until warmed through. Interestingly, many people find that this loaf tastes even better the next day, as the flavors have time to meld!

Frequently Asked Questions

Can I make Lemon Poppy Seed Loaf With Citrus Icing ahead of time?

Yes — in fact, it tastes even better the next day! You can make the loaf a day in advance, allowing the flavors to develop. Just be sure to store it in an airtight container to maintain its moisture.

Can I substitute the poppy seeds?

Absolutely! If you don’t have poppy seeds on hand or prefer an alternative, you can use sesame seeds for a similar crunch or omit them entirely for a smooth loaf.

What can I use instead of buttermilk?

If you don’t have buttermilk, you can easily create a substitute by mixing ½ cup of milk (dairy or plant-based) with 1 tablespoon of vinegar or lemon juice. Let it sit for 5 minutes before using in the recipe.

How can I make this recipe gluten-free?

To make a gluten-free version of this Lemon Poppy Seed Loaf, substitute the all-purpose flour with a gluten-free all-purpose flour blend. Just ensure that the blend contains a binding agent like xanthan gum for the best results.

What is the best way to store leftover loaf?

Leftover Lemon Poppy Seed Loaf should be stored in an airtight container at room temperature for up to 3 days. For longer storage, wrap it tightly and freeze for up to 3 months. Thaw it before serving for the best texture.

Zesty Lemon Poppy Seed Delight

Final Thoughts

The Lemon Poppy Seed Loaf with Citrus Icing is truly a delightful treat that brings a burst of brightness to any occasion. The zesty lemon flavor combined with the subtle crunch of poppy seeds creates a satisfying balance, while the citrus icing adds a touch of sweetness that perfectly complements the loaf’s tanginess.

This is the kind of recipe I come back to again and again, especially when I want to brighten up a gloomy day or celebrate a small victory. The aroma that fills the kitchen as it bakes is absolutely heavenly! I encourage you to give this recipe a try; you might just find it becoming a beloved staple in your home. Don’t forget to share your results or even add your own unique twist—I can’t wait to see what you create!

Print
clock clock iconcutlery cutlery iconflag flag iconfolder folder iconinstagram instagram iconpinterest pinterest iconfacebook facebook iconprint print iconsquares squares iconheart heart iconheart solid heart solid icon

Lemon Poppy Seed Loaf


  • Author: Lily author
  • Total Time: 49 minute
  • Yield: 1 loaf 1x
Pin Recipe
Print Recipe

Description

This Lemon Poppy Seed Loaf is a delightful treat that combines zesty lemon flavor with crunchy poppy seeds. Topped with a citrus icing, it’s perfect for any occasion.


Ingredients

Scale
  • 1 ½ cups (190g) all-purpose flour
  • 1 teaspoon baking powder
  • ½ teaspoon baking soda
  • ½ teaspoon salt
  • 3 tablespoons poppy seeds
  • ½ cup (115g) unsalted butter, softened to room temperature
  • 1 cup (200g) granulated sugar
  • 2 large eggs
  • 1 teaspoon vanilla extract
  • 1 teaspoon lemon zest (from about 1 medium lemon)
  • ½ cup (120ml) buttermilk
  • 2 tablespoons fresh lemon juice
  • 1 cup (120g) powdered sugar
  • 2 tablespoons fresh lemon juice
  • 1 tablespoon orange juice
  • 1 teaspoon lemon zest (for garnish, optional)

Instructions

  1. Preheat your oven to 350°F (175°C). Grease a 9×5-inch loaf pan or line it with parchment paper for easy removal later.
  2. In a medium mixing bowl, whisk together 1 ½ cups of all-purpose flour, 1 teaspoon of baking powder, ½ teaspoon of baking soda, ½ teaspoon of salt, and 3 tablespoons of poppy seeds. This helps to evenly distribute the baking agents and ensures a uniform rise.
  3. In a large mixing bowl, cream together ½ cup of softened unsalted butter and 1 cup of granulated sugar using an electric mixer on medium speed for about 3-4 minutes, until the mixture is light and fluffy. Make sure to scrape down the sides of the bowl occasionally.
  4. Add 2 large eggs, 1 teaspoon of vanilla extract, and 1 teaspoon of lemon zest to the creamed butter and sugar, mixing until fully combined. You want a smooth consistency, so ensure there are no lumps of butter.
  5. In a small bowl, combine ½ cup of buttermilk and 2 tablespoons of fresh lemon juice. Alternately add the dry ingredients and buttermilk mixture to the butter mixture, starting and ending with the dry ingredients. Mix just until combined; do not overmix, as this can lead to a dense loaf.
  6. Pour the batter into the prepared loaf pan. Smooth the top with a spatula, ensuring it’s even. Bake in the preheated oven for 50-60 minutes, or until a toothpick inserted in the center comes out clean. The edges should be lightly golden brown, and the center should feel just set.
  7. Once baked, remove the loaf from the oven and allow it to cool in the pan for about 10 minutes. Then, transfer it to a wire rack to cool completely. Resist the urge to slice too soon, as it will be crumbly if it’s still warm.
  8. While the loaf is cooling, prepare the citrus icing. In a medium bowl, whisk together 1 cup of powdered sugar, 2 tablespoons of fresh lemon juice, and 1 tablespoon of orange juice until smooth. If the icing is too thick, you can add a little more juice to reach your desired consistency.
  9. Once the loaf is completely cool, drizzle the citrus icing over the top. If you like, sprinkle with an additional teaspoon of lemon zest for an extra pop of flavor and color.
  • Prep Time: 15 mins
  • Cook Time: 50-60 mins
  • Category: Dessert
  • Method: Baking
  • Cuisine: American

Nutrition

  • Serving Size: 1 slice
  • Calories: 200
  • Sugar: 15 g
  • Sodium: 150 mg
  • Fat: 8 g
  • Saturated Fat: 5 g
  • Unsaturated Fat: 3 g
  • Trans Fat: 0 g
  • Carbohydrates: 30 g
  • Fiber: 1 g
  • Protein: 3 g
  • Cholesterol: 40 mg

Keywords: Be careful not to overmix your batter; this is a common mistake that can lead to a dense loaf. Use room temperature ingredients for a smoother batter and even baking.

Did you make this recipe?

Share a photo and tag us — we can't wait to see what you've made!

  • Privacy Policy
  • Terms Of Service
  • Contact
  • About
  • GDPR

Copyright © 2025 Homesmad