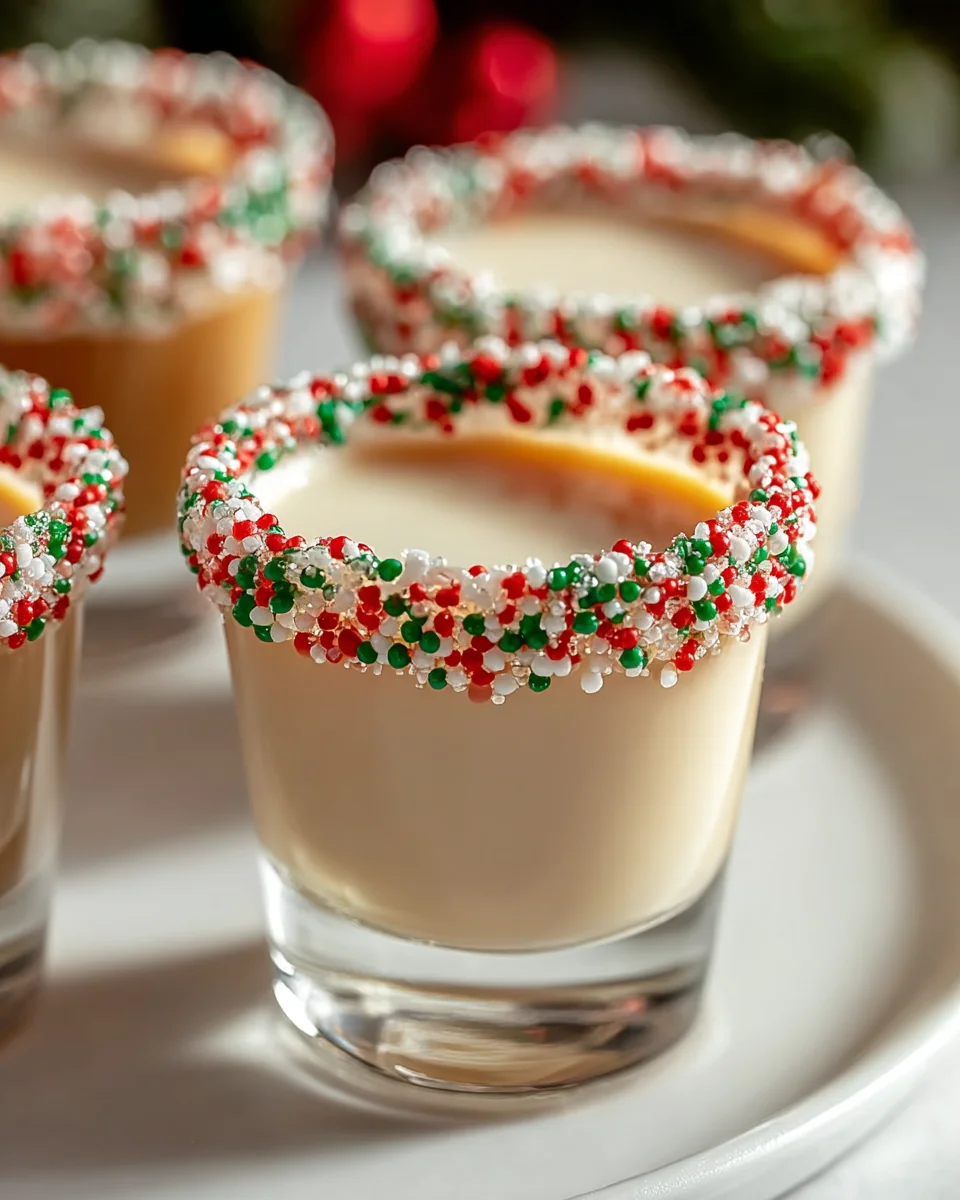
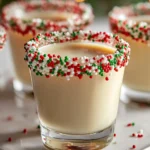
Christmas Sugar Cookie Shots Recipe
Oh my goodness, get ready to sprinkle some extra magic into your holiday celebrations this year with the Christmas Sugar Cookie Shots Recipe! I’m absolutely bursting with excitement to share this festive treat that combines two of my favorite things: delicious sugar cookies and fun, sippable drinks. Forget boring old glassware; we’re stepping up our dessert game by creating edible shot glasses out of sweet, tender sugar cookies.
What makes this recipe truly special, you ask? Well, it’s a delightful, whimsical twist on your classic Christmas cookie, turning it into an interactive experience! Imagine handing out beautiful, sugary cookie cups that guests can enjoy filled with their favorite non-alcoholic holiday beverages, whether that’s creamy milk, rich hot cocoa, or a festive non-alcoholic eggnog. It’s a dessert and a drink all in one amazing, edible package!
I know you’re going to absolutely love these because they are a guaranteed showstopper at any holiday gathering. They’re super fun to make, even more fun to serve, and they create truly memorable moments. Plus, who doesn’t adore the idea of eating their cup after finishing their drink? It’s a brilliant, delicious way to reduce waste and maximize joy! Get ready to impress everyone on your list with these irresistible, festive, and utterly charming cookie shots.

Ingredient Notes
Crafting the perfect Christmas Sugar Cookie Shots begins with selecting quality ingredients that contribute to both the cookie’s structure and its festive flavor. For the cookies themselves, you’ll need the usual suspects, but with a few key considerations to ensure they hold their shot-glass shape beautifully. I always start with unsalted butter, softened, as it creams wonderfully with granulated sugar, forming the foundational sweetness. Eggs are essential for binding and structure, giving our cookies that sturdy yet tender crumb. For flavor, pure vanilla extract is a must, but for a Christmas twist, I sometimes swap a quarter of it for a touch of almond extract or even a hint of peppermint extract – just a little goes a long way!
All-purpose flour gives the best result for holding shape; you’ll want to avoid overworking it to keep the cookies tender. Baking powder is usually enough for a slight lift without too much spread, and a pinch of salt balances all the flavors. To create that crucial inner seal, I rely on melting wafers or candy melts (white or dark chocolate work wonderfully, or even green and red for extra festivity). These create a smooth, leak-proof barrier inside your cookie shots.
For decorating, think festive! Royal icing is fantastic for intricate designs, and plenty of Christmas sprinkles, edible glitter, or crushed candy canes add that extra sparkle. And finally, for the “shot” itself, think warm and comforting non-alcoholic options: warm milk, a luscious hot cocoa, non-alcoholic eggnog, or even a festive peppermint non-alcoholic cream are all delightful choices. My top tip for substitutions? If you need a gluten-free option, a good 1:1 gluten-free baking flour blend works surprisingly well here, just be careful not to overmix the dough. For a dairy-free alternative, plant-based butter and milk can be used, though the texture might vary slightly.
Step-by-Step Instructions
Let’s get baking! Making these Christmas Sugar Cookie Shots is a fun, hands-on process that really brings out the holiday spirit. Here’s how I tackle it:
- Prepare the Dough: In a large mixing bowl, I start by creaming together 1 cup (2 sticks) of softened unsalted butter with 1 cup of granulated sugar until it’s light and fluffy. This usually takes about 2-3 minutes with an electric mixer. Then, I beat in 1 large egg and 1 teaspoon of vanilla extract (or your chosen Christmas flavor) until just combined.
- Combine Dry Ingredients: In a separate bowl, whisk together 2 ½ cups all-purpose flour, 1 teaspoon baking powder, and ½ teaspoon salt. Gradually add the dry ingredients to the wet ingredients, mixing on low speed until just combined. Be careful not to overmix, as this can make your cookies tough. The dough should come together in a cohesive ball.
- Chill the Dough: Shape the dough into a disc, wrap it tightly in plastic wrap, and refrigerate for at least 1-2 hours, or up to overnight. Chilling is absolutely critical for managing the dough and preventing your cookie shots from spreading too much in the oven.
- Preheat and Prepare Molds: Once your dough is chilled, preheat your oven to 375°F (190°C). If you’re using specific cookie shot molds, lightly grease them. If you’re improvising with oven-safe shot glasses, make sure they’re completely clean and dry, and give them a very light spray of cooking oil.
- Form the Cookie Shots: On a lightly floured surface, roll out the chilled dough to about ¼-inch thickness. Using a round cookie cutter that’s slightly larger than the base of your shot glass mold, cut out circles for the bottom. For the sides, either use strips of dough cut to the height of your mold or gently press dough directly into the molds. I find pressing the dough directly works best for me, ensuring an even thickness around the mold. Press the dough firmly but gently around the outside of your chosen shot glass mold, making sure there are no gaps. Trim any excess dough.
- Bake the Cookie Shots: Place the dough-filled molds on a baking sheet. Bake for 12-15 minutes, or until the edges are lightly golden. If using actual shot glasses as molds, you might need to carefully remove the shot glass about halfway through baking to allow the inner cookie surface to crisp up, then return the cookie shell to the oven. However, dedicated cookie shot molds are much easier!
- Cool Completely: Remove from the oven and let the cookie shots cool in their molds for about 5-10 minutes before carefully twisting and removing them. Transfer to a wire rack to cool completely. This is very important; they need to be fully cooled before the next step.
- Seal the Inside: This is the secret to leak-proof cookie shots! Melt your chocolate wafers or candy melts according to package directions. Carefully pour a small amount of melted chocolate into each cooled cookie shot, swirling it around to coat the entire inside surface. Pour out any excess. Place the cookie shots upside down on parchment paper to drip, or just let them set upright. You might need two coats for a truly robust seal. Let the chocolate set completely at room temperature or in the refrigerator for a few minutes.
- Decorate and Fill: Once the chocolate is set, it’s time for the fun part! Decorate the outside of your cookie shots with royal icing, sprinkles, or edible glitter to match your Christmas theme. Just before serving, fill them with your favorite non-alcoholic warm milk, hot cocoa, or festive beverage. Enjoy immediately!
Tips & Suggestions
Making Christmas Sugar Cookie Shots is a delightful experience, but I’ve picked up a few tricks along the way to ensure they turn out perfectly every time. Here are my go-to tips:
- Don’t Skimp on Chilling: I cannot stress enough how important chilling the dough is. Warm dough spreads, and you’ll end up with flat cookies, not the structured shot glasses you’re aiming for. A minimum of 1-2 hours, or even overnight, makes the dough much easier to handle and helps maintain its shape during baking.
- Use the Right Molds: While you can improvise with regular oven-safe shot glasses (and I have!), dedicated cookie shot molds are a game-changer. They make it so much easier to get that perfect shape, and the non-stick ones are a dream for easy removal. If you are using actual shot glasses, make sure they are indeed oven-safe and sturdy glass, not plastic.
- Master the Inner Seal: The melted chocolate or candy melt lining is your best friend. Without it, your delicious beverage will seep right through the cookie. I find that a good quality melting chocolate or candy melts work best because they set firmly and create a strong barrier. For a really secure seal, I sometimes do two thin coats, allowing each to set fully before applying the next.
- Don’t Overfill the Molds: When pressing the dough into your molds, aim for an even thickness of about ¼ inch. Too thick, and they’ll be dense and take ages to bake; too thin, and they might be fragile. Don’t press the dough right up to the very top edge of your mold, as it will rise slightly.
- Get Creative with Flavors and Decorations: This is where the “Christmas” part really shines! Beyond vanilla, try a hint of peppermint, orange zest, or even a touch of gingerbread spice in your cookie dough. For decorating, think festive: red and green sprinkles, edible silver or gold dust, piped royal icing snowflakes, or even a rim of crushed candy canes on the outside, applied while the chocolate seal is still tacky.
- Fill Just Before Serving: These cookie shots are best enjoyed almost immediately after filling. The cookie will start to absorb the liquid over time and become soggy. So, have your fillings ready, let your guests choose, and fill them right before everyone takes their first festive sip.
Storage
Proper storage ensures your Christmas Sugar Cookie Shots remain delicious and ready for festive celebrations!
- Unbaked Dough: If you’ve prepared the dough ahead of time, it’s a lifesaver. Wrap the dough disc tightly in plastic wrap and store it in the refrigerator for up to 3-4 days. For longer storage, you can freeze the dough for up to 2-3 months. Just be sure to thaw it overnight in the refrigerator before rolling and shaping.
- Baked, Unsealed Cookie Shots: Once baked and completely cooled, but before you’ve added the chocolate seal, your cookie shots can be stored in an airtight container at room temperature for up to 3-4 days. They’ll retain their crispness best this way.
- Baked, Sealed, and Undecorated Cookie Shots: After you’ve applied and set the internal chocolate seal, you can store the cookie shots in an airtight container at room temperature for up to 5-7 days. The chocolate coating helps protect the cookie from moisture, keeping it fresher longer. I usually layer them with parchment paper to prevent any accidental sticking or damage.
- Baked, Sealed, and Decorated Cookie Shots: If your cookie shots are fully decorated (with royal icing, sprinkles, etc.), store them in an airtight container, again at room temperature, for up to 5 days. Be mindful of delicate decorations; if you have elaborate royal icing work, storing them in a single layer or with very careful spacing is ideal to prevent smudging.
- Filled Cookie Shots: This is the most crucial storage note: do not store filled cookie shots. They are meant to be filled just before serving and consumed immediately. The liquid will quickly make the cookie soggy, compromising both its structure and taste. Always fill them fresh for the best experience!
Final Thoughts
And there you have it! I truly believe the Christmas Sugar Cookie Shots Recipe is more than just a dessert; it’s an experience waiting to happen. Imagine the joy and surprise on your loved ones’ faces when you present these adorable, edible cups, filled with a delicious non-alcoholic treat or a milky delight. This isn’t just a cookie; it’s a conversation starter, a festive centerpiece, and a testament to holiday cheer. The simple act of baking these unique shots transforms ordinary sugar cookies into something truly magical and memorable. I encourage you to embrace the holiday spirit and make this Christmas Sugar Cookie Shots Recipe a new tradition in your home. You’re not just baking; you’re creating edible joy, and I promise, it’s a recipe that will bring smiles and warmth to everyone who tries them. Happy holidays and happy baking!
Christmas Sugar Cookie Shots Recipe – Perfect Holiday Treat!
- Total Time: 30 minutes
- Yield: 12 cookie shots 1x
Description
Get ready to sprinkle some extra magic into your holiday celebrations with these delightful Christmas Sugar Cookie Shots! These edible shot glasses made from sugar cookies are perfect for serving your favorite non-alcoholic holiday beverages.
Ingredients
- 1 cup (2 sticks) unsalted butter, softened
- 1 cup granulated sugar
- 1 large egg
- 1 teaspoon vanilla extract
- 2 ½ cups all-purpose flour
- 1 teaspoon baking powder
- ½ teaspoon salt
- melting wafers or candy melts (white or dark chocolate, or green and red)
- royal icing
- Christmas sprinkles
- edible glitter
- crushed candy canes
- warm milk
- hot cocoa
- non-alcoholic eggnog
- peppermint non-alcoholic cream
Instructions
- In a large mixing bowl, cream together 1 cup (2 sticks) of softened unsalted butter with 1 cup of granulated sugar until it’s light and fluffy, about 2-3 minutes with an electric mixer. Then, beat in 1 large egg and 1 teaspoon of vanilla extract until just combined.
- In a separate bowl, whisk together 2 ½ cups all-purpose flour, 1 teaspoon baking powder, and ½ teaspoon salt. Gradually add the dry ingredients to the wet ingredients, mixing on low speed until just combined. Be careful not to overmix; the dough should come together in a cohesive ball.
- Shape the dough into a disc, wrap it tightly in plastic wrap, and refrigerate for at least 1-2 hours, or up to overnight.
- Once your dough is chilled, preheat your oven to 375°F (190°C). If you're using specific cookie shot molds, lightly grease them. If using oven-safe shot glasses, ensure they are clean and dry, and give them a light spray of cooking oil.
- On a lightly floured surface, roll out the chilled dough to about ¼-inch thickness. Using a round cookie cutter slightly larger than the base of your shot glass mold, cut out circles for the bottom. For the sides, either use strips of dough cut to the height of your mold or gently press dough directly into the molds.
- Place the dough-filled molds on a baking sheet. Bake for 12-15 minutes, or until the edges are lightly golden. If using shot glasses as molds, carefully remove the shot glass halfway through baking to allow the inner cookie surface to crisp up, then return the cookie shell to the oven.
- Remove from the oven and let the cookie shots cool in their molds for about 5-10 minutes before carefully twisting and removing them. Transfer to a wire rack to cool completely.
- Melt your chocolate wafers or candy melts according to package directions. Carefully pour a small amount of melted chocolate into each cooled cookie shot, swirling it around to coat the entire inside surface. Pour out any excess and let the chocolate set completely.
- Once the chocolate is set, decorate the outside of your cookie shots with royal icing, sprinkles, or edible glitter. Just before serving, fill them with your favorite non-alcoholic warm milk, hot cocoa, or festive beverage.
- Prep Time: 15 mins
- Cook Time: 15 mins
- Category: Dessert
- Method: Baking
- Cuisine: American
Nutrition
- Serving Size: 1 cookie shot
- Calories: 150
- Sugar: 10 g
- Sodium: 50 mg
- Fat: 7 g
- Saturated Fat: 4 g
- Unsaturated Fat: 2 g
- Trans Fat: 0 g
- Carbohydrates: 20 g
- Fiber: 0 g
- Protein: 2 g
- Cholesterol: 30 mg
Keywords: Chilling the dough is crucial for maintaining shape. Use dedicated cookie shot molds for best results. Ensure to seal the inside with melted chocolate to prevent leaks. Fill just before serving to avoid soggy cookies.