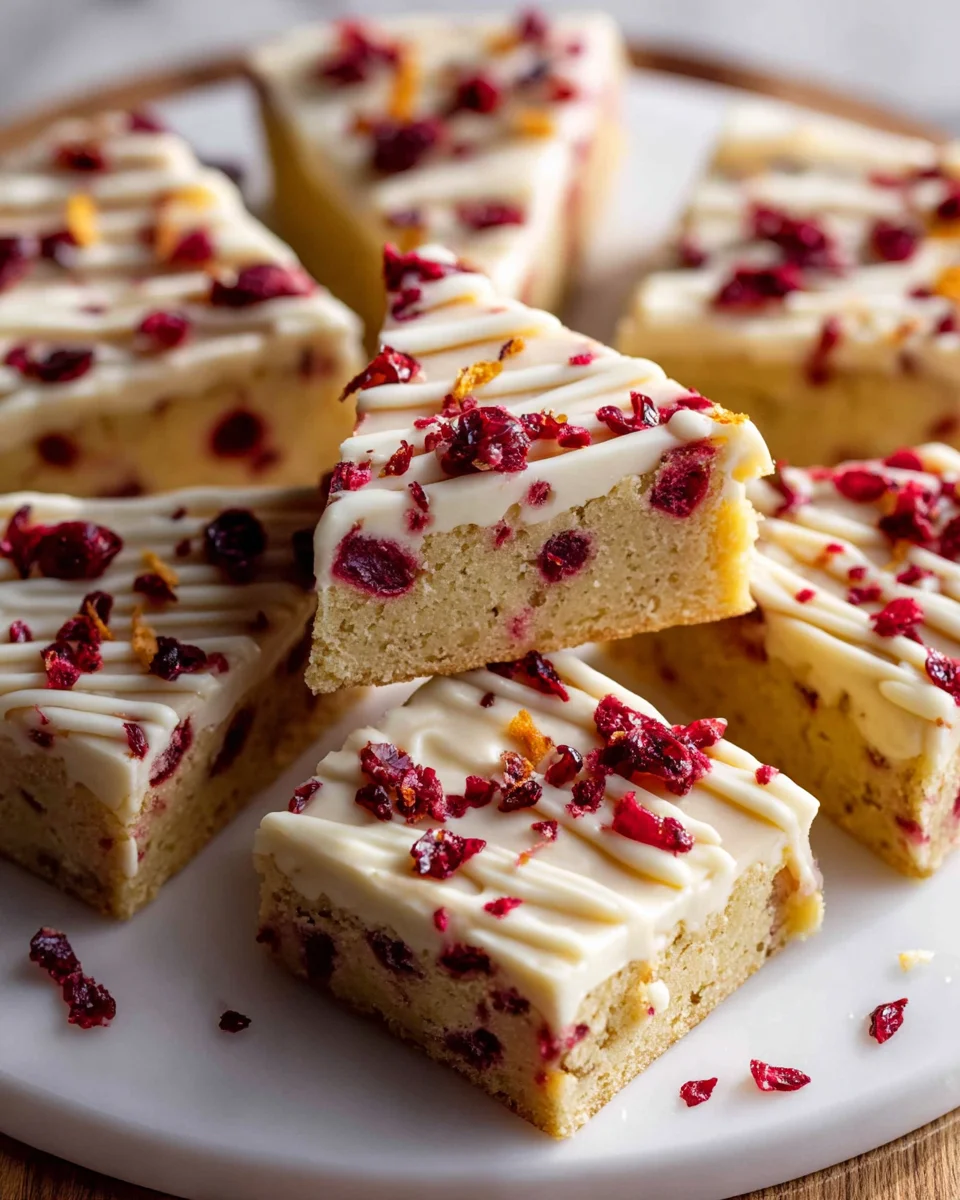
Tasty Starbucks Copycat Cranberry Bliss Bars
Oh my goodness, friends, get ready to experience pure bliss right in your own kitchen! Tasty Starbucks Copycat Cranberry Bliss Bars are here, and I promise you, they are going to become your new favorite holiday (or any day!) treat. I know that iconic Starbucks delight usually only graces us with its presence for a short, glorious season, leaving us craving it for the rest of the year. Well, guess what? Those days are over! I’m so excited to show you how to recreate those incredibly festive, delightfully chewy, and utterly delicious bars anytime you want.
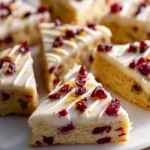
What makes this recipe so incredibly special is how perfectly it captures the magic of the original. Imagine sinking your teeth into a soft, slightly chewy, blondie-like base, generously studded with both tart dried cranberries and sweet white chocolate chips. Then, we elevate it even further by topping it with a luscious, tangy cream cheese frosting, brightened with a hint of orange zest, and finishing it all off with a final flourish of more cranberries and a delicate white chocolate drizzle. It’s truly a symphony of sweet and tart, with a wonderful texture that makes every single bite a little slice of heaven.
You are absolutely going to adore making these Cranberry Bliss Bars yourself. Not only will your home smell like a festive bakery, but you’ll have a beautiful batch of these holiday favorites ready to share (or keep all to yourself, no judgment here!) without ever having to leave your house or pay the coffee shop price tag. They are the ultimate comforting dessert, perfect for gifting to loved ones, bringing to parties, or simply enjoying with a warm cup of coffee or a non-alcohol alternative hot cider. Get ready to bake some pure bliss, right at home!

Ingredient Notes
Crafting these Tasty Starbucks Copycat Cranberry Bliss Bars means getting the right ingredients, as each component plays a crucial role in replicating that irresistible flavor and texture we all love. From the chewy bar base to the tangy cream cheese frosting and the signature white chocolate drizzle, here’s what you’ll need to make these blissfully delicious treats:
- Unsalted Butter: This is the foundation of our bar base and frosting. Using unsalted butter allows us to control the salt content precisely. I always recommend it for baking. If you only have salted butter, you can use it, but reduce the added salt in the bar batter by half a teaspoon.
- Granulated Sugar & Light Brown Sugar: A combination of both sugars gives the bar base its perfect chewiness and depth of flavor. The granulated sugar provides sweetness and helps with crisp edges, while the brown sugar adds moisture and a subtle caramel note that complements the cranberries beautifully.
- Large Egg: An essential binder, the egg helps hold the bar batter together, contributes to its tender texture, and provides a rich golden hue as it bakes.
- Vanilla Extract: Don’t skimp on good quality vanilla! It’s a flavor enhancer that brings warmth and sweetness to both the bar and the frosting, rounding out all the other tastes.
- All-Purpose Flour: The structure of our bars comes from the flour. Make sure to measure it correctly, either by weighing it (my preferred method) or by spooning it into a measuring cup and leveling it off, to avoid a dense or dry bar.
- Baking Powder & Salt: Baking powder gives the bars a slight lift, ensuring they aren’t too dense. Salt balances the sweetness and enhances all the other flavors.
- Dried Cranberries: These are non-negotiable for Cranberry Bliss Bars! Their tart chewiness is absolutely key. I like to chop some of them finely for the bar batter and save some whole or roughly chopped for the topping. Avoid fresh cranberries, as their moisture content is too high and will alter the bar’s texture.
- White Chocolate Chips: The second essential component for the bar base and the signature drizzle. White chocolate provides a creamy sweetness that perfectly balances the tart cranberries and tangy cream cheese. Use good quality white chocolate chips or a chopped white chocolate bar for the best melting and flavor. Substitutions with milk or dark chocolate would drastically change the flavor profile, so I don’t recommend them for a true copycat.
- Full-Fat Cream Cheese: For the frosting, full-fat cream cheese is a must. It yields the creamiest, most stable, and richest frosting. Low-fat or whipped cream cheese will result in a runny frosting that won’t set properly, so please stick to the full-fat block style.
- Powdered Sugar (Confectioners’ Sugar): This provides the sweetness and smooth consistency for our frosting. Sift it if it’s lumpy to ensure a perfectly smooth finish.
- Orange Zest: Ah, the “bliss” in Cranberry Bliss Bars! Fresh orange zest adds a bright, zesty, and aromatic burst that elevates the entire dessert. Don’t skip this ingredient—it’s what makes them truly special and gives them that unique Starbucks flavor. Orange extract can be used in a pinch (about 1/4 teaspoon), but it won’t offer the same fresh vibrancy as real zest.
Step-by-Step Instructions
Making these Cranberry Bliss Bars is a delightful process, and I’m here to guide you through each step to ensure you get perfect results every time. Follow these instructions carefully, and you’ll be enjoying your homemade bliss in no time!
- Prepare for Baking: First things first, preheat your oven to 350°F (175°C). Line a 9×13 inch baking pan with parchment paper, leaving an overhang on the sides. This will act as handles later, making it super easy to lift the entire baked slab out of the pan. Lightly grease the parchment paper for extra assurance.
- Cream Butter and Sugars: In a large mixing bowl, using an electric mixer, cream together the softened unsalted butter, granulated sugar, and light brown sugar until the mixture is light, fluffy, and pale in color. This usually takes about 2-3 minutes. Scrape down the sides of the bowl as needed to ensure everything is well combined.
- Add Wet Ingredients: Beat in the large egg until fully incorporated. Then, stir in the vanilla extract. Continue mixing until the batter is smooth and well combined.
- Combine Dry Ingredients: In a separate medium bowl, whisk together the all-purpose flour, baking powder, and salt. Make sure there are no lumps in the baking powder.
- Mix Wet and Dry: Gradually add the dry ingredient mixture to the wet ingredients, mixing on low speed until just combined. Be careful not to overmix the batter; overmixing can lead to tough bars. A few streaks of flour are okay, as you’ll finish mixing by hand.
- Fold in Cranberries and White Chocolate: Gently fold in about 1 cup of the dried cranberries (roughly chopped) and 1 cup of the white chocolate chips into the batter using a spatula. Distribute them evenly throughout the mixture.
- Bake the Bar Base: Spread the batter evenly into your prepared 9×13 inch baking pan. Use an offset spatula or the back of a spoon to ensure an even layer. Bake for 20-25 minutes, or until the edges are lightly golden and a wooden skewer inserted into the center comes out with moist crumbs, not wet batter.
- Cool Completely: This step is CRUCIAL! Remove the pan from the oven and let the bar base cool completely in the pan on a wire rack. Seriously, do not rush this. A warm base will melt your cream cheese frosting. It can take 1-2 hours.
- Prepare the Cream Cheese Frosting: While the bars are cooling, make the frosting. In a medium mixing bowl, beat the softened full-fat cream cheese and softened unsalted butter with an electric mixer until smooth and creamy, about 2 minutes.
- Finish the Frosting: Gradually add the powdered sugar to the cream cheese mixture, beating on low speed until combined, then increase to medium and beat until smooth and fluffy. Stir in the vanilla extract and, most importantly, the fresh orange zest. Beat for another minute until everything is light and airy.
- Frost the Bars: Once the bar base is completely cool, use the parchment paper overhang to lift it out of the pan and place it on a cutting board or clean surface. Spread the cream cheese frosting evenly over the top of the cooled bar.
- Add Topping & Drizzle: Scatter the remaining chopped dried cranberries (about 1/2 cup) evenly over the frosted bars. Now for the white chocolate drizzle! Melt the remaining 1/2 cup white chocolate chips in a microwave-safe bowl in 15-30 second intervals, stirring until smooth. Alternatively, use a double boiler. Drizzle the melted white chocolate over the bars in a decorative pattern using a spoon or a piping bag with a very small snip.
- Chill and Cut: Place the frosted and decorated slab of bliss bars in the refrigerator for at least 30-60 minutes to allow the frosting and white chocolate drizzle to set. Once chilled, lift the slab out of the pan using the parchment paper handles. Cut into small squares or rectangles, typically 2-inch by 2-inch pieces, to get that classic Starbucks bar size.
Tips & Suggestions
To ensure your Tasty Starbucks Copycat Cranberry Bliss Bars turn out absolutely perfect, and perhaps even better than the original, I’ve gathered a few tips and suggestions from my own baking experiences. These little tricks can make a big difference in both the process and the final delicious result:
- Don’t Overmix the Batter: When combining the wet and dry ingredients for the bar base, mix only until just combined. Overmixing develops the gluten in the flour, which can lead to tough, dry bars instead of the delightfully chewy ones we’re aiming for. A light hand is key here.
- Cool Completely Before Frosting: I cannot stress this enough! A warm or even slightly warm bar base will cause your cream cheese frosting to melt and slide right off, creating a messy situation and a runny frosting. Patience is a virtue in baking, especially with these bars. Allow at least an hour, or even two, for the base to cool down fully on a wire rack.
- Use Room Temperature Ingredients for Frosting: For the smoothest, lump-free cream cheese frosting, make sure both your full-fat cream cheese and unsalted butter are at true room temperature. This means they should be soft enough to easily indent with your finger but not melted. This allows them to cream together beautifully, creating an airy and consistent texture.
- Zest the Orange with Care: When zesting the orange for the “bliss” in your frosting, use a microplane zester and only remove the bright orange outer layer. Avoid the white pith directly underneath, as it can be bitter and will detract from that fresh, bright orange flavor.
- For Clean Cuts, Chill and Use a Warm Knife: To get those beautifully neat, uniform squares or rectangles, chill the frosted bars for at least 30-60 minutes in the refrigerator until the frosting and white chocolate drizzle are firm. Then, when you’re ready to cut, dip a sharp knife into hot water, wipe it clean, and make your cuts. Repeat this process for each cut. The warm knife glides through the frosting and bars smoothly, preventing sticking and crumbling.
- Vary the Cranberry Chop: For the bar base, I like to chop the dried cranberries fairly finely so they distribute well and you get a bit of tartness in every bite. For the topping, I prefer a slightly coarser chop, or even leaving some whole, for visual appeal and textural contrast.
- Perfect the Drizzle: For a professional-looking white chocolate drizzle, you can use a small piping bag (even a Ziploc bag with a tiny corner snipped off works great!) or simply a fork. If using a spoon, try to move your hand quickly and confidently across the bars in parallel lines. If your white chocolate thickens too much while drizzling, microwave it for another 5-10 seconds to loosen it up.
- Make Ahead Option: These bars are excellent for making ahead! You can bake the bar base a day in advance and store it, unfrosted and wrapped tightly, at room temperature. Then, make the frosting and assemble the bars closer to when you plan to serve them.
Storage
Once you’ve made a batch of these glorious Tasty Starbucks Copycat Cranberry Bliss Bars, you’ll want to ensure they stay fresh and delicious for as long as possible. Proper storage is key, especially with that wonderful cream cheese frosting!
- Refrigeration is Essential: Due to the cream cheese in the frosting, these bars absolutely must be stored in the refrigerator. Leaving them at room temperature for extended periods is not safe, and the frosting will become too soft and potentially spoil.
- Air-Tight Container: Once cut into individual bars, arrange them in a single layer (if possible) or stack them with a piece of parchment paper between layers in an air-tight container. This prevents them from drying out, absorbing odors from other foods in the fridge, and protects the delicate frosting.
- Shelf Life: Stored correctly in the refrigerator, your Cranberry Bliss Bars will remain fresh and delightful for up to 5-7 days. The flavors actually tend to meld and deepen a little after the first day, which is a bonus!
- Bringing to Room Temperature: If you prefer to enjoy your bars at a slightly softer texture, similar to how they’re served in coffee shops, you can take them out of the refrigerator about 15-30 minutes before serving. This allows the frosting to soften just slightly, enhancing the creamy texture.
- Freezing for Longer Storage: Yes, you can freeze Cranberry Bliss Bars! This is a fantastic option if you’ve made a large batch or want to save some for later.
- To Freeze Unfrosted: You can bake the bar base, let it cool completely, then wrap it tightly in plastic wrap and then in aluminum foil. It will keep in the freezer for up to 2-3 months. Thaw overnight in the refrigerator before frosting.
- To Freeze Frosted: If you want to freeze them fully assembled, place the cut bars on a baking sheet lined with parchment paper and flash freeze them for about an hour, or until firm. This prevents them from sticking together. Once firm, transfer them to an air-tight freezer-safe container or freezer bag. They will last for 1-2 months. When you’re ready to enjoy them, thaw them overnight in the refrigerator.
Final Thoughts
And there you have it! My hope is that you’re now ready to dive into making these incredibly delicious Tasty Starbucks Copycat Cranberry Bliss Bars. I truly believe that nothing quite compares to the joy of recreating a beloved treat right in your own kitchen, especially when the results are this spectacular.
These Tasty Starbucks Copycat Cranberry Bliss Bars aren’t just a dessert; they’re a little slice of festive heaven. From their chewy blonde brownie base, packed with tart cranberries and a hint of orange, to that luscious cream cheese frosting and those sparkling sugared cranberries, every bite is pure bliss. The satisfaction of pulling a pan of these beauties from your oven and knowing you’ve mastered the Starbucks favorite is simply unmatched.
So, whether you’re baking for a special occasion, looking for a perfect homemade gift, or simply craving that irresistible sweet-tart balance, I urge you to give these Tasty Starbucks Copycat Cranberry Bliss Bars a try. I promise you, they will become a cherished recipe in your collection, bringing smiles and deliciousness with every batch. Enjoy the process, and most importantly, enjoy every single crumb!
Best Starbucks Cranberry Bliss Bars Copycat Recipe
- Total Time: 55 minutes
- Yield: 24 servings 1x
Description
Experience the joy of homemade Cranberry Bliss Bars that capture the festive flavors of Starbucks. These delightful treats feature a chewy base topped with tangy cream cheese frosting and a white chocolate drizzle.
Ingredients
- 1 cup Unsalted Butter, softened
- 1 cup Granulated Sugar
- 1 cup Light Brown Sugar, packed
- 1 Large Egg
- 2 teaspoons Vanilla Extract
- 2 cups All-Purpose Flour
- 1 teaspoon Baking Powder
- 1/2 teaspoon Salt
- 1 1/2 cups Dried Cranberries, chopped
- 1 cup White Chocolate Chips
- 8 oz Full-Fat Cream Cheese, softened
- 2 cups Powdered Sugar (Confectioners' Sugar), sifted
- 1 tablespoon Orange Zest
- 1/2 cup Dried Cranberries, for topping
- 1/2 cup White Chocolate Chips, for drizzle
Instructions
- Preheat your oven to 350°F (175°C). Line a 9×13 inch baking pan with parchment paper, leaving an overhang on the sides. Lightly grease the parchment paper.
- In a large mixing bowl, cream together the softened unsalted butter, granulated sugar, and light brown sugar until light and fluffy, about 2-3 minutes. Scrape down the sides of the bowl as needed.
- Beat in the large egg until fully incorporated. Stir in the vanilla extract until the batter is smooth.
- In a separate medium bowl, whisk together the all-purpose flour, baking powder, and salt until there are no lumps.
- Gradually add the dry ingredient mixture to the wet ingredients, mixing on low speed until just combined. A few streaks of flour are okay.
- Gently fold in about 1 cup of the chopped dried cranberries and 1 cup of the white chocolate chips using a spatula.
- Spread the batter evenly into the prepared baking pan. Bake for 20-25 minutes, or until the edges are lightly golden and a skewer inserted into the center comes out with moist crumbs.
- Remove the pan from the oven and let the bar base cool completely in the pan on a wire rack for 1-2 hours.
- In a medium mixing bowl, beat the softened full-fat cream cheese and softened unsalted butter until smooth and creamy, about 2 minutes.
- Gradually add the powdered sugar to the cream cheese mixture, beating until smooth and fluffy. Stir in the vanilla extract and orange zest.
- Once the bar base is completely cool, lift it out of the pan using the parchment paper overhang and place it on a cutting board. Spread the cream cheese frosting evenly over the top.
- Scatter the remaining chopped dried cranberries over the frosted bars. Melt the remaining 1/2 cup white chocolate chips and drizzle over the bars.
- Place the frosted bars in the refrigerator for at least 30-60 minutes to set. Once chilled, lift the slab out of the pan and cut into 2-inch squares.
- Prep Time: 30 mins
- Cook Time: 25 mins
- Category: Dessert
- Method: Baking
- Cuisine: American
Nutrition
- Serving Size: 1 bar
- Calories: 200
- Sugar: 18 g
- Sodium: 150 mg
- Fat: 10 g
- Saturated Fat: 5 g
- Unsaturated Fat: 3 g
- Trans Fat: 0 g
- Carbohydrates: 25 g
- Fiber: 1 g
- Protein: 2 g
- Cholesterol: 30 mg
Keywords: Ensure to cool the bar base completely before frosting to prevent melting. Use room temperature ingredients for the frosting for a smooth texture.