
Peppermint Swirl Cookies
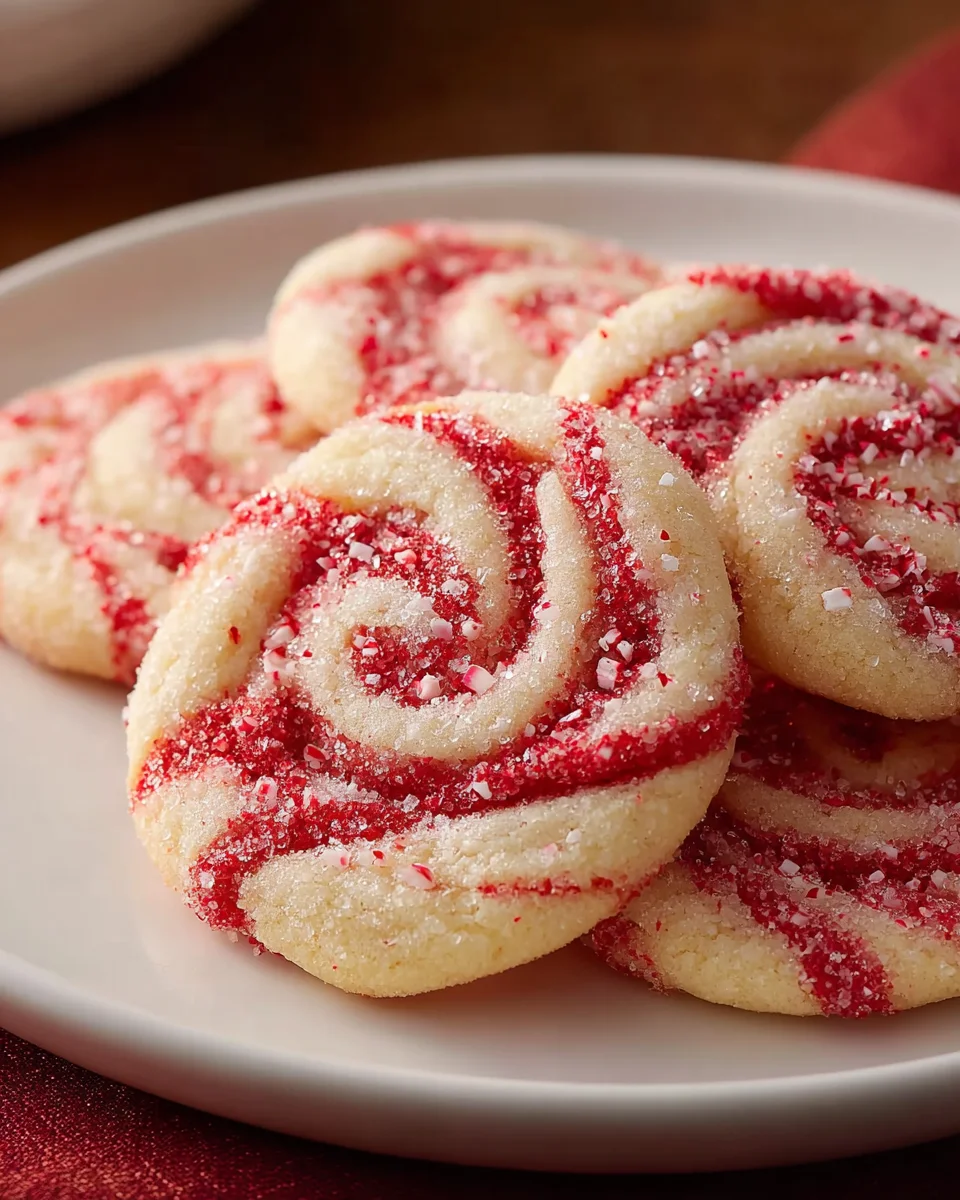
Peppermint Swirl Cookies are truly something special, and I can’t wait for you to try them! I love how these cookies instantly bring a burst of festive joy, making them an absolute must-bake for any holiday gathering or just a cozy winter afternoon. What makes these cookies truly shine is their stunning visual appeal – that classic, eye-catching red and white swirl isn’t just beautiful; it perfectly hints at the delightful, cool peppermint flavor tucked inside.
I know you’re going to adore these cookies because they’re not just incredibly pretty; they’re also wonderfully soft, buttery, and packed with that refreshing minty zing that’s so irresistible. Imagine biting into a tender sugar cookie, with a gentle crunch and then a cool, sweet peppermint finish. They’re a delight for both the eyes and the taste buds, making them perfect for gifting, sharing, or simply treating yourself. Trust me, once you see and taste these festive beauties, you’ll understand why they’re such a beloved classic!

Ingredient Notes
Creating these delightful Peppermint Swirl Cookies relies on a few key ingredients that come together to form their signature flavor and festive look. Here’s what you’ll need and some thoughts on substitutions:
- Unsalted Butter: This is the foundation of our cookie, providing richness and tenderness. I always use unsalted so I can control the salt content precisely. If you only have salted butter, you can use it but reduce the added salt in the recipe by about ¼ teaspoon. For a dairy-free alternative, a high-quality plant-based butter substitute that’s designed for baking will work beautifully. Just make sure it’s firm and well-chilled.
- Granulated Sugar & Powdered Sugar: A blend of sugars gives these cookies their perfect texture. Granulated sugar provides crispness, while powdered sugar contributes to a softer crumb. I wouldn’t recommend substituting one for the other entirely, as it will alter the final cookie texture.
- Large Eggs: Eggs act as a binder and add moisture. Make sure they are at room temperature; this helps them emulsify better with the butter and sugar, leading to a smoother dough.
- Pure Peppermint Extract: This is where the magic happens for our peppermint flavor! Use a good quality pure peppermint extract for the best taste. Be mindful of the strength; some brands are more potent than others. If you prefer a milder peppermint flavor, you can start with a slightly smaller amount and add more to taste. Unfortunately, there isn’t a direct non-alcoholic alternative that provides the same intense peppermint kick without being an extract, but most peppermint extracts you find in grocery stores are already non-alcoholic.
- Pure Vanilla Extract: A touch of vanilla complements the peppermint beautifully, adding depth to the overall flavor profile. Don’t skip it!
- All-Purpose Flour: Standard all-purpose flour works perfectly here. If you’re looking for a gluten-free option, a 1:1 gluten-free baking flour blend that contains xanthan gum usually performs quite well in this type of cookie. Just follow the package directions for any adjustments.
- Baking Powder: Our leavening agent, giving the cookies a slight lift and tenderness.
- Salt: Essential for balancing the sweetness and enhancing all the other flavors.
- Red Gel Food Coloring: This is crucial for achieving that vibrant, festive swirl. I highly recommend using gel food coloring over liquid drops, as it provides a much more intense color without adding excess moisture to your dough. A good quality red gel will give you a deep, rich red.
Step-by-Step Instructions
Let’s get baking! Follow these steps closely to create your perfect Peppermint Swirl Cookies:
- Cream Butter and Sugars: In a large mixing bowl, using an electric mixer, cream together the softened unsalted butter, granulated sugar, and powdered sugar until the mixture is light, fluffy, and pale in color. This usually takes about 3-5 minutes. Don’t rush this step, as it incorporates air, which is key to a tender cookie.
- Add Eggs and Extracts: Beat in the room temperature eggs, one at a time, mixing well after each addition until fully incorporated. Scrape down the sides of the bowl as needed. Then, mix in the pure peppermint extract and pure vanilla extract until just combined.
- Combine Dry Ingredients: In a separate medium bowl, whisk together the all-purpose flour, baking powder, and salt.
- Gradually Add Dry to Wet: With the mixer on low speed, gradually add the dry ingredient mixture to the wet ingredients, mixing until just combined and a soft dough forms. Be careful not to overmix, as this can lead to tough cookies.
- Divide and Color Dough: Divide the dough evenly in half. Leave one half plain. To the other half, add several drops of red gel food coloring. Mix until the color is uniform and vibrant. I find it easiest to do this with a sturdy spoon or by kneading gently with your hands (wearing gloves can prevent staining!).
- Chill the Dough: Shape each dough half into a flat disk, wrap them separately in plastic wrap, and refrigerate for at least 1 hour, or up to 2 hours. Chilling is crucial; it makes the dough easier to handle and prevents the cookies from spreading too much during baking.
- Roll Out the Dough: Once chilled, on a lightly floured surface (or between two sheets of parchment paper for easier handling), roll out the plain dough into an approximately 12×8-inch rectangle, about ¼ inch thick. Repeat with the red dough, aiming for the same size and thickness.
- Create the Swirl: Carefully lay the red dough rectangle directly on top of the plain dough rectangle. Gently press them together to ensure good contact. Starting from one of the longer sides, tightly roll the layered dough into a log. Try to keep it as even as possible to create consistent swirls.
- Chill the Log (Again!): Wrap the dough log tightly in plastic wrap and refrigerate for at least another 2 hours, or until very firm. This second chill is vital for clean slices and maintaining the swirl shape.
- Preheat Oven & Prepare Baking Sheets: When ready to bake, preheat your oven to 375°F (190°C). Line several baking sheets with parchment paper.
- Slice and Bake: Using a sharp knife, slice the chilled dough log into ¼-inch thick rounds. Place the cookie slices about 2 inches apart on the prepared baking sheets.
- Bake: Bake for 8-10 minutes, or until the edges are lightly golden and the centers are just set. Do not overbake, as they will continue to firm up as they cool.
- Cool: Let the cookies cool on the baking sheets for 5 minutes before transferring them to a wire rack to cool completely.
Tips & Suggestions
To ensure your Peppermint Swirl Cookies are absolutely perfect every time, I’ve gathered some of my favorite tips and suggestions:
- Don’t Overmix the Dough: Once you add the flour, mix only until just combined. Overmixing develops the gluten in the flour, which can lead to tough, chewy cookies instead of tender ones.
- Gel Food Coloring is Your Best Friend: For that truly vibrant, festive red, always opt for gel food coloring. Liquid food coloring can thin out your dough and won’t give you the intense color you’re aiming for.
- Chilling is Non-Negotiable: I know it’s tempting to rush, but proper chilling is the secret to a well-defined swirl and preventing your cookies from spreading into flat puddles. Make sure your dough is firm before rolling and slicing.
- Even Rolling is Key: When rolling out your dough rectangles, try to keep them as uniform in thickness and size as possible. This ensures an even swirl pattern throughout your entire log. Using a ruler can help!
- Roll Tightly: When rolling the two layered doughs into a log, roll it as tightly as you can without tearing the dough. A tight roll helps prevent gaps in the swirl and keeps the log from flattening as it chills.
- Use a Sharp Knife for Slicing: A sharp, non-serrated knife will give you clean cuts and preserve the beautiful swirl pattern. If your knife is sticking, you can lightly flour it between cuts.
- Adjust Peppermint Flavor: If you love a strong peppermint kick, feel free to add a tiny bit more extract to the red dough (or even a little to the plain dough). If you prefer a subtle hint, you can slightly reduce the amount.
- Prevent Sticking: When rolling out the dough, use parchment paper both above and below your dough. This prevents sticking and makes it much easier to transfer the dough layers without tearing. A very light dusting of flour on your parchment paper can also help.
- Don’t Overbake: These cookies are best when they are just set in the center and slightly golden at the edges. Overbaking will make them dry and crumbly. They will continue to firm up as they cool on the baking sheet.
Storage
Once you’ve gone to all the effort of making these beautiful Peppermint Swirl Cookies, you’ll want to make sure they stay fresh and delicious! Here’s how I recommend storing them:
- At Room Temperature: Once fully cooled, store your baked Peppermint Swirl Cookies in an airtight container at room temperature. They will stay fresh and soft for up to 5-7 days. To maintain freshness, you can place a slice of bread in the container with the cookies; the cookies will absorb moisture from the bread, keeping them soft.
- In the Refrigerator: While not strictly necessary for baked cookies, if you live in a very warm or humid climate, storing them in the refrigerator in an airtight container can extend their freshness for up to 10 days. Just bring them back to room temperature before serving for the best texture.
- Freezing Baked Cookies: These cookies freeze exceptionally well! Once completely cooled, arrange them in a single layer on a baking sheet and freeze until solid (this prevents them from sticking together). Then, transfer the frozen cookies to a freezer-safe airtight container or heavy-duty freezer bag, layering them with parchment paper if needed. They will keep well in the freezer for up to 2-3 months. Thaw at room temperature when you’re ready to enjoy them.
- Freezing Dough Logs: For convenience, you can freeze the unbaked dough log. After completing step 9 (chilling the rolled log), wrap the log very tightly in several layers of plastic wrap, then an additional layer of aluminum foil. You can store the frozen dough log for up to 1 month. When you’re ready to bake, thaw the log in the refrigerator overnight, then slice and bake as directed. You might need to add an extra minute or two to the baking time if the cookies are still quite cold.
Final Thoughts
Well, there you have it! We’ve journeyed through the steps to create these truly magical Peppermint Swirl Cookies. I absolutely adore how their vibrant red and white swirls instantly evoke the festive spirit, making them a showstopper on any holiday platter. But beyond their stunning looks, it’s the crisp, melt-in-your-mouth texture paired with that delightful burst of cool peppermint that makes these cookies utterly irresistible. They’re not just a treat; they’re an experience, bringing cheer and a touch of elegance to your baking repertoire. Seriously, if you’re looking for a recipe that combines visual appeal with incredible flavor, these Peppermint Swirl Cookies are an absolute must-try. I promise, they’ll become a cherished part of your seasonal traditions, delighting everyone who takes a bite!
Peppermint Swirl Cookies: Festive Holiday Treat Recipe!
- Total Time: 40 minutes
- Yield: 24 cookies 1x
Description
Peppermint Swirl Cookies are a delightful blend of festive joy and irresistible flavor, perfect for any holiday gathering. With their stunning red and white swirls and cool peppermint finish, these cookies are sure to impress everyone!
Ingredients
- 1 cup Unsalted Butter, softened
- 1/2 cup Granulated Sugar
- 1/2 cup Powdered Sugar
- 2 Large Eggs, at room temperature
- 1 teaspoon Pure Peppermint Extract
- 1 teaspoon Pure Vanilla Extract
- 2 1/2 cups All-Purpose Flour
- 1 teaspoon Baking Powder
- 1/4 teaspoon Salt
- Red Gel Food Coloring
Instructions
- In a large mixing bowl, using an electric mixer, cream together the softened unsalted butter, granulated sugar, and powdered sugar until the mixture is light, fluffy, and pale in color. This usually takes about 3-5 minutes.
- Beat in the room temperature eggs, one at a time, mixing well after each addition until fully incorporated. Scrape down the sides of the bowl as needed. Then, mix in the pure peppermint extract and pure vanilla extract until just combined.
- In a separate medium bowl, whisk together the all-purpose flour, baking powder, and salt.
- With the mixer on low speed, gradually add the dry ingredient mixture to the wet ingredients, mixing until just combined and a soft dough forms. Be careful not to overmix.
- Divide the dough evenly in half. Leave one half plain. To the other half, add several drops of red gel food coloring. Mix until the color is uniform and vibrant.
- Shape each dough half into a flat disk, wrap them separately in plastic wrap, and refrigerate for at least 1 hour, or up to 2 hours.
- Once chilled, on a lightly floured surface, roll out the plain dough into an approximately 12×8-inch rectangle, about 1/4 inch thick. Repeat with the red dough.
- Carefully lay the red dough rectangle directly on top of the plain dough rectangle. Gently press them together to ensure good contact. Starting from one of the longer sides, tightly roll the layered dough into a log.
- Wrap the dough log tightly in plastic wrap and refrigerate for at least another 2 hours, or until very firm.
- When ready to bake, preheat your oven to 375°F (190°C). Line several baking sheets with parchment paper.
- Using a sharp knife, slice the chilled dough log into 1/4-inch thick rounds. Place the cookie slices about 2 inches apart on the prepared baking sheets.
- Bake for 8-10 minutes, or until the edges are lightly golden and the centers are just set. Do not overbake.
- Let the cookies cool on the baking sheets for 5 minutes before transferring them to a wire rack to cool completely.
- Prep Time: 30 mins
- Cook Time: 10 mins
- Category: Dessert
- Method: Baking
- Cuisine: American
Nutrition
- Serving Size: 1 cookie
- Calories: 120
- Sugar: 8 g
- Sodium: 50 mg
- Fat: 6 g
- Saturated Fat: 4 g
- Unsaturated Fat: 2 g
- Trans Fat: 0 g
- Carbohydrates: 15 g
- Fiber: 0 g
- Protein: 1 g
- Cholesterol: 30 mg
Keywords: Don't overmix the dough after adding flour, as this can lead to tough cookies. Always use gel food coloring for vibrant colors, and ensure proper chilling to maintain the swirl shape.


