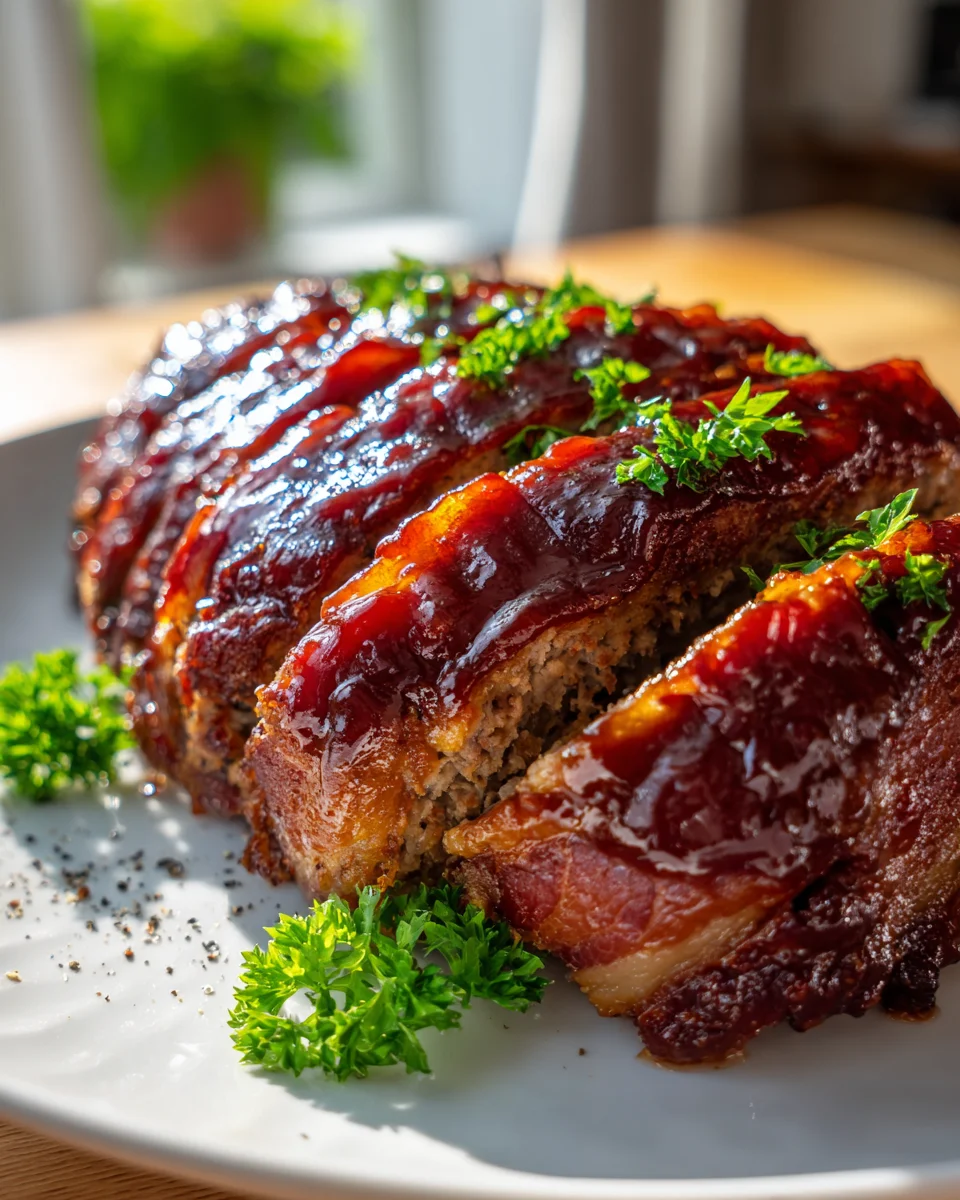
Bbq Beef Bacon Wrapped Meatloaf
Oh, prepare yourselves, because I am so excited to share one of my absolute favorite ways to transform a classic comfort food into something truly spectacular: Bbq Beef Bacon Wrapped Meatloaf. When I set out to create a meatloaf that was anything but ordinary, I knew it had to be bold, flavorful, and incredibly satisfying. And let me tell you, this dish delivers on all fronts and then some!
What makes this recipe so special, you ask? Well, it’s not just a meatloaf; it’s an experience. We’re talking about a perfectly seasoned, juicy ground beef loaf that’s then lovingly enveloped in strips of savory beef bacon. As it bakes, that beef bacon crisps up beautifully, basting the meatloaf with its delicious fat, locking in moisture, and adding an incredible layer of smoky, salty flavor. Then, to take it over the top, we slather it with a tangy, sweet BBQ sauce that caramelizes into a glorious glaze. Seriously, this isn’t your grandma’s dry, boring meatloaf!
You are going to absolutely love this recipe because it takes everything wonderful about a hearty meatloaf and elevates it to a gourmet level, without being complicated. It’s the ultimate crowd-pleaser, perfect for a family dinner, a potluck, or even a special occasion where you want to impress. The combination of the tender, flavorful meatloaf, the crispy, savory beef bacon, and the sticky, sweet BBQ glaze is simply irresistible. It’s comfort food that feels incredibly luxurious and utterly delicious.
In a nutshell, this dish is a masterpiece of textures and flavors. Imagine slicing into a moist, well-seasoned beef meatloaf, each slice adorned with a strip of crispy beef bacon and glistening with BBQ sauce. It’s savory, it’s a little smoky, it’s sweet, and it’s unbelievably satisfying. Get ready to make the best meatloaf of your life!

Ingredient Notes
Crafting the perfect Bbq Beef Bacon Wrapped Meatloaf starts with understanding your core ingredients. This dish is a delicious blend of hearty beef flavors, smoky BBQ goodness, and the crispy, savory embrace of beef bacon. Here’s what you’ll need and how to make the most of each component.
- Ground Beef: For a truly juicy and flavorful meatloaf, I always recommend using a good quality ground beef with an 80/20 lean-to-fat ratio. The fat renders down beautifully, keeping the meatloaf moist and tender. You could use 85/15 if you prefer a slightly leaner option, but I find 80/20 to be ideal for this recipe. Avoid anything leaner than 90/10, as it can result in a dry meatloaf.
- Beef Bacon: This is a star ingredient, providing incredible flavor and a delightful crispy texture to the exterior of your meatloaf. Ensure you get good quality, thinly sliced beef bacon. If beef bacon is difficult to find in your area, you could substitute with turkey bacon for a similar concept, though the flavor profile will differ slightly. However, for the authentic “Bbq Beef Bacon Wrapped Meatloaf” experience, beef bacon is irreplaceable.
- Breadcrumbs: These act as a binder, helping to hold the meatloaf together and absorb some of the meat’s juices, contributing to its moisture. Plain breadcrumbs are perfect, but you can also use panko for a slightly lighter texture. For a gluten-free alternative, crushed gluten-free crackers, almond flour, or even oat flour work well. Just be sure to adjust the quantity slightly if using different binders, as absorption rates can vary.
- Egg: A single large egg is your primary binding agent, helping to emulsify the mixture and keep everything cohesive. There’s no real substitute for the egg here without altering the texture significantly.
- Onion & Garlic: Finely diced yellow onion and minced fresh garlic are essential aromatics that build a foundational layer of savory flavor. If you’re short on time, you can use onion powder and garlic powder, but fresh always delivers a superior taste. I usually go for about half a medium onion and 2-3 cloves of garlic.
- BBQ Sauce: This is where the “BBQ” in our meatloaf shines! Choose your favorite brand and style of BBQ sauce—whether you prefer a sweet, tangy, or smoky variety. This will be used both in the meatloaf mixture and as a glaze. Feel free to experiment with different BBQ sauces to find your perfect match. You can also mix a couple of sauces for a unique flavor.
- Worcestershire Sauce: A dash of Worcestershire sauce adds a wonderful umami depth to the meatloaf. It’s savory and slightly tangy, enhancing the overall flavor profile. If you need an alternative, a bit of soy sauce or coconut aminos can offer a similar savory punch, though with a slightly different taste.
- Seasonings: Beyond salt and black pepper, consider adding a pinch of smoked paprika for an extra layer of smoky flavor, especially if you’re not cooking this in a smoker. A touch of dried oregano or thyme can also complement the beef beautifully.
Step-by-Step Instructions
Let’s get cooking! Follow these simple steps to create a truly irresistible Bbq Beef Bacon Wrapped Meatloaf that will impress everyone at your table.
- Prepare Your Workspace and Ingredients: Preheat your oven to 375°F (190°C). Line a large baking sheet with parchment paper or foil for easy cleanup, and place a wire rack on top. This allows air to circulate around the meatloaf, helping the bacon crisp up nicely. Finely dice your onion and mince your garlic. Get all your other ingredients measured and ready.
- Combine the Meatloaf Mixture: In a large mixing bowl, gently combine the ground beef, breadcrumbs, egg, finely diced onion, minced garlic, half a cup of your chosen BBQ sauce, Worcestershire sauce, a teaspoon of salt, half a teaspoon of black pepper, and any other seasonings you’ve decided to add (like smoked paprika).
- Mix Gently, But Thoroughly: The key here is to mix just until everything is combined. Overmixing can lead to a tough, dense meatloaf. Use your hands, a fork, or a spatula, ensuring all ingredients are evenly distributed without compacting the meat.
- Form the Meatloaf: Transfer the mixture onto the prepared wire rack on your baking sheet. Shape the mixture into a uniform loaf, about 9-10 inches long and 4-5 inches wide. Aim for an even thickness to ensure consistent cooking.
- Wrap with Beef Bacon: This is the fun part! Lay out 5-7 strips of beef bacon side-by-side on a clean surface, slightly overlapping, creating a “mat” that’s a bit wider than your meatloaf. Carefully place your meatloaf on one end of the bacon mat. Gently bring the bacon strips up and over the top of the meatloaf, overlapping as you go, until the entire loaf is wrapped. Tuck the ends underneath if needed to secure them. The bacon not only adds flavor and texture but also helps keep the meatloaf moist.
- First BBQ Glaze: Brush about half of the remaining BBQ sauce evenly over the top and sides of the bacon-wrapped meatloaf. This initial glaze will caramelize nicely as it bakes, infusing the bacon with more BBQ flavor.
- Bake the Meatloaf: Transfer the baking sheet with the meatloaf to your preheated oven. Bake for 45-50 minutes.
- Second BBQ Glaze and Finish Baking: After the initial baking time, remove the meatloaf from the oven. Carefully brush the remaining BBQ sauce over the meatloaf. Return it to the oven and continue baking for another 15-25 minutes, or until an instant-read meat thermometer inserted into the thickest part of the meatloaf reads 160°F (71°C). The beef bacon should be beautifully crisp and golden brown.
- Rest Before Slicing: This step is CRUCIAL! Once cooked, remove the meatloaf from the oven and let it rest on the wire rack for at least 10-15 minutes before slicing. Resting allows the juices to redistribute throughout the meatloaf, ensuring every slice is moist and flavorful. If you cut it too soon, the juices will run out, leaving you with a drier result.
- Slice and Serve: After resting, slice your magnificent Bbq Beef Bacon Wrapped Meatloaf into thick, hearty portions and serve immediately. It pairs wonderfully with mashed potatoes, roasted vegetables, or a simple green salad.
Tips & Suggestions
To ensure your Bbq Beef Bacon Wrapped Meatloaf turns out perfectly every time, and to explore exciting variations, here are some of my go-to tips and suggestions:
- Don’t Overmix the Meat: I can’t stress this enough! Overmixing is the enemy of a tender meatloaf. It develops the proteins in the ground beef, leading to a tough, rubbery texture. Mix just until the ingredients are incorporated.
- Use a Meat Thermometer: The only way to guarantee perfectly cooked, safe, and juicy meatloaf is to use an instant-read meat thermometer. Insert it into the thickest part of the loaf; aim for 160°F (71°C) for ground beef. Remember, the temperature will rise slightly during the resting period.
- Resting is Key: Seriously, don’t skip the rest! Those 10-15 minutes make all the difference, allowing the juices to settle back into the meat, resulting in a much more moist and flavorful slice.
- Enhance the BBQ Flavor: For an extra smoky kick, especially if you’re baking in an oven, you can add half a teaspoon of liquid smoke to the meatloaf mixture. Alternatively, use a tablespoon of a good quality BBQ rub directly on the meatloaf (under the bacon) before the first glaze. If you have a smoker, this meatloaf is absolutely incredible when smoked at 225-250°F (107-121°C) until it reaches the desired internal temperature, brushing with BBQ sauce in the last hour.
- Prevent Cracking: If your meatloaf tends to crack while baking, it might be a sign of too lean ground beef or overmixing. Ensuring a proper fat ratio and gentle mixing helps. Also, shaping it uniformly from the start can prevent uneven cooking that leads to cracks.
- Flavor Variations:
- Cheesy Center: Create a trough in the center of your loaf before wrapping with bacon, fill it with shredded cheddar, smoked gouda, or mozzarella, then close it up before wrapping.
- Veggie Boost: Finely grated carrots, zucchini (squeezed dry), or chopped bell peppers can be added to the mixture for extra nutrients and flavor.
- Spicy Kick: Add a pinch of cayenne pepper, red pepper flakes, or a tablespoon of finely diced jalapeño (remove seeds for less heat) to the meatloaf mixture for some heat.
- Bacon Weave (Optional): For a truly impressive presentation, you can create a full bacon weave to wrap around your meatloaf. It’s a bit more effort but results in a beautiful, evenly covered exterior.
- Don’t Forget the Rack: Baking on a wire rack allows the fat to drip away and promotes even cooking and crispier bacon all around. If you don’t have one, just place it directly on a foil-lined baking sheet, but be aware the bottom bacon might not get as crispy.
Storage
One of the best things about a hearty dish like Bbq Beef Bacon Wrapped Meatloaf is that it often yields delicious leftovers! Here’s how to store and reheat it properly to enjoy it again.
- Refrigeration:
- Once the meatloaf has cooled completely to room temperature (this usually takes about an hour, but don’t leave it out for more than two hours), transfer it to an airtight container.
- Store the container in the refrigerator for up to 3-4 days.
- I recommend slicing the meatloaf into individual portions before storing, as this makes reheating quicker and more uniform.
- Freezing:
- Meatloaf freezes beautifully, making it an excellent option for meal prep. Allow the cooked meatloaf to cool completely.
- You can freeze it whole or in individual slices. For slices, wrap each piece tightly in plastic wrap, then place them in a freezer-safe bag or container. This helps prevent freezer burn.
- For a whole meatloaf, wrap it tightly in several layers of plastic wrap, followed by a layer of aluminum foil.
- Label the container or package with the date. Frozen meatloaf can be stored for up to 2-3 months.
- Reheating:
- From the Refrigerator (Slices):
- Microwave: Place a slice on a microwave-safe plate, add a tablespoon of water or a thin layer of extra BBQ sauce over it to help keep it moist, cover loosely, and microwave in 60-90 second intervals until heated through.
- Oven: For best results and to re-crisp the bacon, preheat your oven to 300-325°F (150-160°C). Place slices on a baking sheet, cover loosely with foil to prevent drying, and heat for 15-25 minutes, or until warmed through. Uncover for the last few minutes if you want crispier bacon.
- From the Freezer:
- Thaw frozen meatloaf slices overnight in the refrigerator before reheating for the best texture.
- Once thawed, reheat using the refrigerator instructions above.
- If reheating from frozen (especially a whole loaf), it will take significantly longer. Wrap a frozen whole loaf loosely in foil and reheat in a 300°F (150°C) oven for 1-1.5 hours, or until an internal temperature of 165°F (74°C) is reached. Remove foil for the last 15-20 minutes to crisp the bacon.
- Tip for Moist Reheating: When reheating in the oven or microwave, adding a little extra BBQ sauce or a splash of beef broth can help keep the meatloaf moist and flavorful, especially if it seems a bit dry.
- From the Refrigerator (Slices):
Final Thoughts
There you have it! What an incredible journey we’ve been on creating the Bbq Beef Bacon Wrapped Meatloaf. I truly believe this isn’t just any meatloaf; it’s a showstopper, a crowd-pleaser, and an absolute game-changer for your dinner table.
From the savory, smoky embrace of the beef bacon to the juicy, flavorful meatloaf nestled within, and that irresistible BBQ glaze tying it all together – every bite is an experience. It’s hearty, it’s comforting, and it packs a punch of flavor that’s hard to beat. The presentation alone, with that beautifully woven beef bacon, is enough to impress anyone.
So, do yourself a favor and give the Bbq Beef Bacon Wrapped Meatloaf a try. I promise you, the aroma filling your kitchen will be just the beginning of a truly delicious adventure. Happy cooking, and enjoy every mouthwatering moment!
BBQ Beef Bacon-Wrapped Meatloaf Recipe – Juicy & Flavorful!
- Total Time: 1 hour 15 minutes
- Yield: 6 servings 1x
Description
Transform a classic comfort food into a gourmet experience with this BBQ Beef Bacon-Wrapped Meatloaf. Enjoy a juicy, flavorful meatloaf enveloped in crispy beef bacon and glazed with tangy BBQ sauce.
Ingredients
- 2 lbs ground beef (80/20 lean-to-fat ratio)
- 5–7 strips of beef bacon
- 1 cup plain breadcrumbs or panko
- 1 large egg
- 1/2 medium yellow onion, finely diced
- 2–3 cloves fresh garlic, minced
- 1/2 cup BBQ sauce (plus more for glazing)
- 1 tablespoon Worcestershire sauce
- 1 teaspoon salt
- 1/2 teaspoon black pepper
- 1 teaspoon smoked paprika (optional)
- 1 teaspoon dried oregano or thyme (optional)
Instructions
- Preheat your oven to 375°F (190°C). Line a large baking sheet with parchment paper or foil and place a wire rack on top.
- In a large mixing bowl, gently combine the ground beef, breadcrumbs, egg, finely diced onion, minced garlic, half a cup of BBQ sauce, Worcestershire sauce, salt, black pepper, and any additional seasonings.
- Mix just until everything is combined without overmixing.
- Transfer the mixture onto the prepared wire rack and shape it into a uniform loaf, about 9-10 inches long and 4-5 inches wide.
- Lay out the beef bacon strips side-by-side, slightly overlapping, and carefully place the meatloaf on one end. Wrap the bacon around the meatloaf, tucking the ends underneath if necessary.
- Brush half of the remaining BBQ sauce over the top and sides of the bacon-wrapped meatloaf.
- Bake for 45-50 minutes in the preheated oven.
- After the initial baking time, remove the meatloaf and brush the remaining BBQ sauce over it. Return to the oven and bake for another 15-25 minutes, or until the internal temperature reaches 160°F (71°C).
- Let the meatloaf rest on the wire rack for at least 10-15 minutes before slicing.
- Slice into thick portions and serve immediately.
- Prep Time: 15 mins
- Cook Time: 1 hour
- Category: Dinner
- Method: Baking
- Cuisine: American
Nutrition
- Serving Size: 1 slice
- Calories: 350
- Sugar: 8 g
- Sodium: 600 mg
- Fat: 20 g
- Saturated Fat: 8 g
- Unsaturated Fat: 10 g
- Trans Fat: 0 g
- Carbohydrates: 20 g
- Fiber: 1 g
- Protein: 25 g
- Cholesterol: 80 mg
Keywords: Avoid overmixing the meat to ensure a tender texture. Use a meat thermometer for perfect doneness, and let the meatloaf rest before slicing to retain moisture.