• Skip to primary navigation
  • Skip to main content
  • Skip to primary sidebar
Homesmad

Homesmad

  • Home
  • Breakfast & Brunch
  • Appetizers & Snacks
  • Dinner
  • Dessert
  • About
  • Privacy Policy
  • Contact
Homesmad
  • Home
  • Breakfast & Brunch
  • Appetizers & Snacks
  • Dinner
  • Dessert
  • About
  • Privacy Policy
  • Contact

Delicious Coconut Rum Coquito Tiramisu (Non-Alcoholic)

March 1, 2026 by Lily author

Coconut Rum Extract Coquito Tiramisu

Get ready to have your dessert world transformed! I’m absolutely thrilled to introduce you to my latest creation: Coconut Rum Extract Coquito Tiramisu. This isn’t just another dessert; it’s a spectacular fusion that brings together the best of two beloved worlds. Imagine the creamy, tropical richness of Puerto Rico’s iconic coquito – made with delightful non-alcohol alternatives, of course – gracefully layered with the sophisticated elegance of Italian tiramisu.

What makes this recipe truly special is its innovative blend of cultures and flavors. We’re talking about soft, delicate ladyfingers, generously soaked in a fragrant, coquito-inspired mixture featuring lovely coconut and non-alcohol rum extract. These are then nestled between luscious layers of light, sweet mascarpone cream, creating a symphony of textures and tastes. You’re going to adore how each spoonful delivers a blissful harmony of coconut, a hint of “rum” warmth (without the alcohol!), and that classic tiramisu indulgence. It’s unique, it’s decadent, and it’s guaranteed to be the star of any gathering. Prepare yourself for a taste experience that’s both familiar and wonderfully new!

Delicious Coconut Rum Coquito Tiramisu (Non-Alcoholic) this RECIPE

Ingredient Notes

Creating my Coconut Rum Extract Coquito Tiramisu is a delightful experience, and the right ingredients are key to achieving its unique tropical-meets-Italian flair. I’ve carefully selected each component to bring out that authentic Coquito flavor profile while maintaining the beloved tiramisu structure.

  • Ladyfingers: These delicate sponge cakes are the foundation of our tiramisu. They’re designed to absorb liquid beautifully without falling apart. I recommend using good quality, firm ladyfingers. If you can find them fresh, even better! While not ideal, if you absolutely can’t find ladyfingers, you could potentially use a sturdy shortbread cookie, but be aware it will alter the classic texture.
  • Mascarpone Cheese: Ah, the heart of our creamy layers! Mascarpone is an Italian cream cheese known for its incredibly rich, smooth, and slightly sweet profile. Always opt for full-fat mascarpone for the best texture and flavor. Make sure it’s at room temperature for easier blending into a silky-smooth cream.
  • Heavy Cream (or Whipping Cream): This will be whipped to create a light, airy texture for our mascarpone cream, making it less dense and more ethereal. Ensure your heavy cream is very cold before whipping for optimal volume and stability.
  • Sweetened Condensed Milk: A quintessential ingredient in traditional Coquito, this adds wonderful sweetness and a creamy richness that’s hard to replicate. It’s a non-negotiable for that authentic tropical base.
  • Cream of Coconut (e.g., Coco Lopez): This is different from coconut milk! Cream of coconut is a sweetened, thicker coconut product, essential for imparting that deep, sweet coconut flavor and velvety texture characteristic of Coquito. Do not substitute with regular coconut milk here, as the sweetness and consistency are crucial.
  • Full-Fat Canned Coconut Milk: While cream of coconut brings the sweetness, full-fat coconut milk adds an extra layer of pure coconut flavor and contributes to the liquid base for our Coquito-inspired components. Shake the can well before opening!
  • Non-Alcoholic Rum Extract: This is where we get our “rum” essence without any actual alcohol. Choose a high-quality non-alcoholic rum extract for the most authentic flavor. It’s truly amazing how much it can mimic the real deal, perfect for making this treat accessible to everyone.
  • Coconut Extract: To supercharge that tropical coconut flavor even further, I love adding a touch of pure coconut extract. It enhances the natural coconut notes beautifully.
  • Strong Brewed Decaf Coffee: For dipping our ladyfingers! While traditional tiramisu uses espresso, I opt for strong brewed decaf coffee to keep the energy levels balanced, especially when serving this as a dessert. You could also use a strong chicory coffee if you prefer a different flavor profile, but decaf coffee is my go-to.
  • Granulated Sugar (optional): I find the sweetened condensed milk and cream of coconut provide ample sweetness, but you can add a tablespoon or two of granulated sugar to the coffee dipping liquid or the cream if you prefer a sweeter dessert.
  • Ground Cinnamon and Nutmeg: These warm spices are characteristic of Coquito and add a lovely aromatic touch to our tiramisu. They can be incorporated into the cream or used as a dusting for garnish.
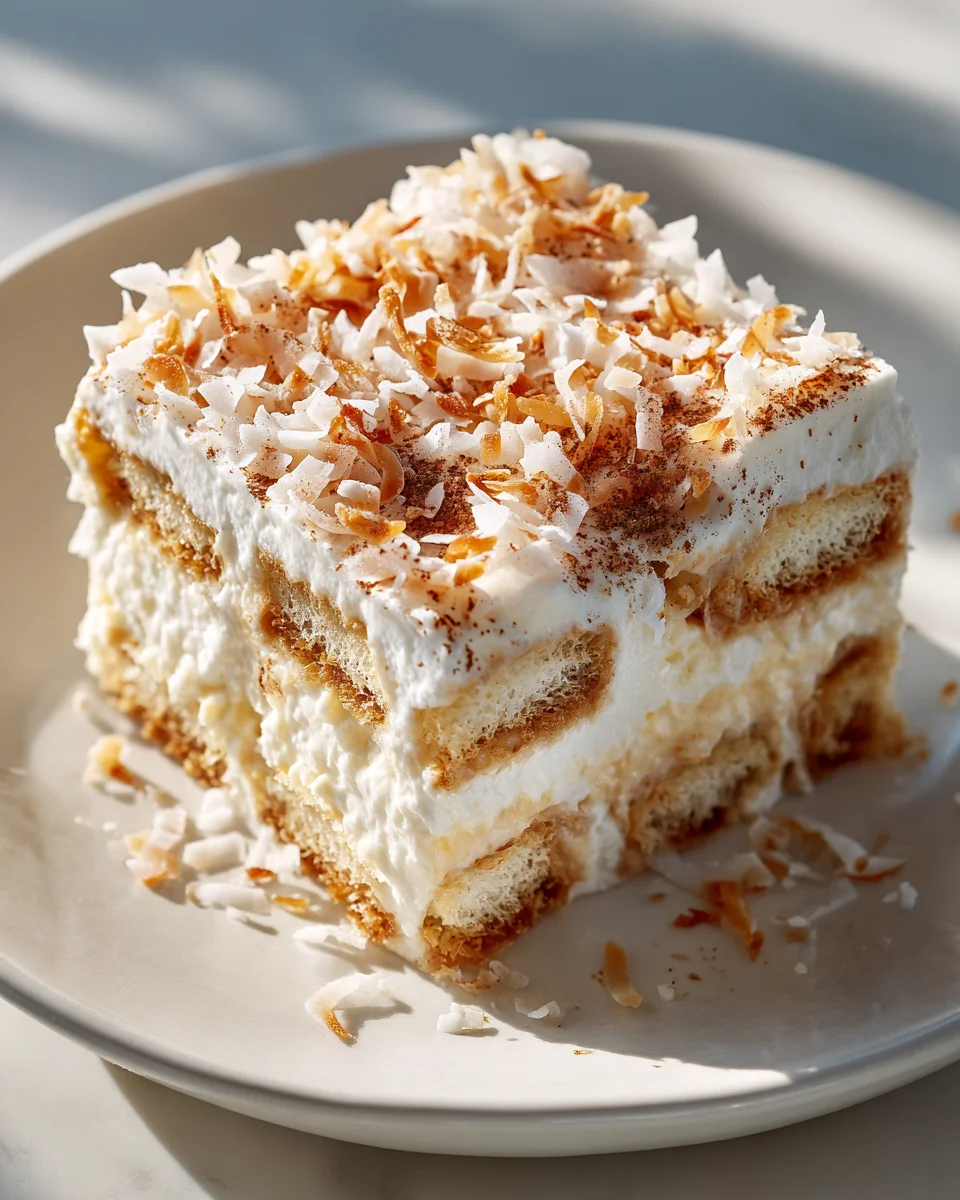
  • Toasted Coconut Flakes or Shredded Coconut: For garnish! Toasted coconut adds texture, visual appeal, and amplifies the coconut flavor, making it a perfect finishing touch.

Step-by-Step Instructions

Let’s dive into assembling this truly special Coconut Rum Extract Coquito Tiramisu. It’s a layering game, and with a bit of care, you’ll create a dessert that’s both stunning and incredibly delicious. Remember, the key is not to rush and allow proper chilling time!

  1. Prepare Your Coquito-Inspired Dipping Liquid: First things first, we need our flavorful dip for the ladyfingers. Brew your strong decaf coffee and let it cool completely. Once cool, pour it into a shallow dish. Stir in 1/2 cup of the sweetened condensed milk, 1/4 cup of the full-fat canned coconut milk, 1 teaspoon of non-alcoholic rum extract, and 1/2 teaspoon of coconut extract. Whisk everything together until well combined. Taste and adjust sweetness if desired, adding a touch more sweetened condensed milk if you like it sweeter. Set this aside.
  2. Make the Mascarpone-Coconut Cream: In a large, very cold mixing bowl, pour your cold heavy cream. Using an electric mixer, whip the cream on medium-high speed until it forms soft peaks. Be careful not to over-whip it into butter! Gently set the whipped cream aside.
  3. In a separate large bowl, combine the room temperature mascarpone cheese, the remaining sweetened condensed milk, the cream of coconut, the remaining non-alcoholic rum extract (about 1.5 teaspoons), and the remaining coconut extract (about 1/2 teaspoon). Add 1/2 teaspoon of ground cinnamon and a pinch of freshly grated nutmeg. Using a whisk or spatula, gently mix these ingredients until they are just combined and smooth. Be careful not to over-mix, as mascarpone can curdle if overworked.
  4. Now, gently fold the whipped cream into the mascarpone mixture in three additions. Use a spatula and a light hand to preserve the airiness of the whipped cream. Keep folding until no streaks of white cream remain, and you have a light, airy, and uniform mascarpone-coconut cream.
  5. Assemble Your Tiramisu: Choose your serving dish – a 9×13 inch baking dish works wonderfully, or you can use individual dessert glasses for a more elegant presentation.
  6. Take one ladyfinger at a time and quickly dip it into the Coquito-inspired coffee liquid. I mean quickly! Just a second or two on each side is enough; we want them moist, not soggy. Over-soaked ladyfingers will make your tiramisu watery and less structured.
  7. Arrange a single layer of the dipped ladyfingers at the bottom of your chosen dish, breaking them to fit as needed.
  8. Spread half of your luscious mascarpone-coconut cream evenly over the first layer of ladyfingers.
  9. Repeat the process: dip another layer of ladyfingers and arrange them over the cream.
  10. Carefully spread the remaining mascarpone-coconut cream over the second layer of ladyfingers, ensuring it’s smooth and even on top.
  11. Chill Thoroughly: This step is non-negotiable for tiramisu, and especially for one with such rich flavors! Cover your dish tightly with plastic wrap and refrigerate for a minimum of 6 hours, but ideally overnight. This allows the ladyfingers to fully soften, the flavors to meld beautifully, and the cream to set properly.
  12. Garnish and Serve: Just before serving, uncover your chilled tiramisu. Dust the top generously with a little extra ground cinnamon and/or nutmeg. For that irresistible tropical touch, sprinkle a generous handful of toasted coconut flakes or shredded coconut over the top. Then, slice and serve!

Tips & Suggestions

I’ve learned a few tricks over the years that truly elevate this Coconut Rum Extract Coquito Tiramisu from good to absolutely phenomenal. Pay attention to these little details, and you’ll be rewarded with a dessert that’s bursting with flavor and perfectly textured.

  • Master the Ladyfinger Dip: This is arguably the most critical step. My biggest tip is to be incredibly swift when dipping the ladyfingers. A quick dunk, flip, and out – think of it as a momentary splash, not a leisurely swim. Ladyfingers are like sponges, and they’ll absorb liquid incredibly fast. If they become oversaturated, your tiramisu will be too wet and lose its structural integrity. You want them moist and flavorful, not mushy.
  • Room Temperature Mascarpone, Cold Cream: For the smoothest, most lump-free mascarpone cream, ensure your mascarpone cheese is at room temperature. This allows it to blend effortlessly with the other ingredients. However, your heavy cream must be very cold straight from the fridge for it to whip up properly and hold its peaks. Temperature contrast is key here!
  • Quality Extracts Make a Difference: Since we’re relying on extracts for our signature “rum” and enhanced coconut flavors, investing in high-quality non-alcoholic rum extract and coconut extract is paramount. A good extract will deliver a more authentic and robust flavor, preventing your tiramisu from tasting artificial.
  • Don’t Skimp on Chilling Time: I know the wait is hard, but patience truly pays off with tiramisu. Chilling your Coconut Rum Extract Coquito Tiramisu for a minimum of 6 hours, and preferably overnight, allows all those wonderful Coquito and tiramisu flavors to fully meld together. It also gives the cream layers ample time to set beautifully, making for clean slices and a more enjoyable texture. Rushing this step will result in a less cohesive and flavorful dessert.
  • Consider Your Serving Dish: A classic 9×13 inch baking dish is great for feeding a crowd, but don’t forget individual glasses or ramekins! Layering this tiramisu in single-serving dishes makes for a stunning presentation and perfectly portioned desserts. It’s especially lovely if you’re hosting a dinner party.
  • Adjust Sweetness to Your Liking: The combination of sweetened condensed milk and cream of coconut makes this tiramisu quite sweet naturally. I recommend tasting the mascarpone cream before you layer it, and even the Coquito-inspired coffee dip. If you prefer a less sweet dessert, you can slightly reduce the amount of sweetened condensed milk in either component, or add a pinch of salt to balance the sweetness. Conversely, if you have a very sweet tooth, a little extra sugar can be added.
  • Garnish Creatively: Beyond toasted coconut flakes and a dusting of cinnamon, consider adding a sprinkle of finely chopped pecans or a swirl of white chocolate shavings for an extra touch of elegance and texture. A sprig of mint can also add a fresh pop of color.

Storage

Once you’ve crafted your beautiful Coconut Rum Extract Coquito Tiramisu, proper storage is essential to keep it fresh and delicious, ready for when you or your guests crave another slice. My advice ensures you can enjoy this delightful dessert for days after making it.

  • Refrigeration is Key: Due to the dairy-rich components (mascarpone, heavy cream, sweetened condensed milk, and coconut milk), this tiramisu must be stored in the refrigerator at all times. This prevents spoilage and keeps the cream layers firm and delicious.
  • Airtight is Best: To maintain its freshness and prevent it from absorbing any unwanted odors from your fridge, always cover your tiramisu tightly with plastic wrap or transfer it to an airtight container. This also helps to prevent the ladyfingers from drying out.
  • Enjoy Within: When stored correctly in the refrigerator, your Coconut Rum Extract Coquito Tiramisu will remain fresh and delightful for up to 3-4 days. The flavors actually tend to deepen and improve on the second day, making it an excellent make-ahead dessert!
  • Freezing Not Recommended: I generally do not recommend freezing tiramisu, especially one with a mascarpone and whipped cream base. The texture of the cream can become grainy or watery upon thawing, and the ladyfingers can turn excessively mushy. It’s truly best enjoyed fresh from the refrigerator within a few days of preparation.

Delicious Coconut Rum Coquito Tiramisu (Non-Alcoholic)

Final Thoughts

I truly hope you’re feeling inspired to try your hand at this incredible creation. The Coconut Rum Extract Coquito Tiramisu is not just another dessert; it’s a delightful journey that marries the comforting familiarity of classic tiramisu with the vibrant, tropical spirit of coquito, all enhanced by that distinctive coconut essence.

I crafted this recipe specifically to bring together these beloved flavors into one show-stopping dish. Imagine the creamy layers, the gentle hint of coffee, and then that unexpected, heartwarming blend of coconut and the festive spice profile of coquito, made accessible and family-friendly with the non-alcoholic rum extract. It’s a symphony of tastes that truly stands apart.

So, whether you’re looking to impress guests, celebrate a special occasion, or simply treat yourself to something uniquely delicious, I promise you that making the Coconut Rum Extract Coquito Tiramisu will be a rewarding experience. It’s a must-try for anyone seeking a dessert that offers both comfort and an exciting twist. Give it a go – you won’t regret it!

Print
clock clock iconcutlery cutlery iconflag flag iconfolder folder iconinstagram instagram iconpinterest pinterest iconfacebook facebook iconprint print iconsquares squares iconheart heart iconheart solid heart solid icon

Delicious Coconut Rum Coquito Tiramisu (Non-Alcoholic)


  • Author: Lily author
  • Total Time: 30 minutes
  • Yield: 8 servings
Pin Recipe
Print Recipe

Description

Experience a delightful fusion of Puerto Rican coquito and Italian tiramisu with this non-alcoholic Coconut Rum Extract Coquito Tiramisu. Each layer offers a creamy, tropical richness that is perfect for any gathering.


Ingredients

  • Ladyfingers
  • Mascarpone Cheese
  • Heavy Cream (or Whipping Cream)
  • Sweetened Condensed Milk
  • Cream of Coconut (e.g., Coco Lopez)
  • Full-Fat Canned Coconut Milk
  • Non-Alcoholic Rum Extract
  • Coconut Extract
  • Strong Brewed Decaf Coffee
  • Granulated Sugar (optional)
  • Ground Cinnamon
  • Nutmeg
  • Toasted Coconut Flakes or Shredded Coconut

Instructions

  1. Prepare Your Coquito-Inspired Dipping Liquid: Brew your strong decaf coffee and let it cool completely. Once cool, pour it into a shallow dish. Stir in 1/2 cup of the sweetened condensed milk, 1/4 cup of the full-fat canned coconut milk, 1 teaspoon of non-alcoholic rum extract, and 1/2 teaspoon of coconut extract. Whisk everything together until well combined. Taste and adjust sweetness if desired, adding a touch more sweetened condensed milk if you like it sweeter. Set this aside.
  2. Make the Mascarpone-Coconut Cream: In a large, very cold mixing bowl, pour your cold heavy cream. Using an electric mixer, whip the cream on medium-high speed until it forms soft peaks. Be careful not to over-whip it into butter! Gently set the whipped cream aside.
  3. In a separate large bowl, combine the room temperature mascarpone cheese, the remaining sweetened condensed milk, the cream of coconut, the remaining non-alcoholic rum extract (about 1.5 teaspoons), and the remaining coconut extract (about 1/2 teaspoon). Add 1/2 teaspoon of ground cinnamon and a pinch of freshly grated nutmeg. Using a whisk or spatula, gently mix these ingredients until they are just combined and smooth. Be careful not to over-mix, as mascarpone can curdle if overworked.
  4. Now, gently fold the whipped cream into the mascarpone mixture in three additions. Use a spatula and a light hand to preserve the airiness of the whipped cream. Keep folding until no streaks of white cream remain, and you have a light, airy, and uniform mascarpone-coconut cream.
  5. Assemble Your Tiramisu: Choose your serving dish – a 9×13 inch baking dish works wonderfully, or you can use individual dessert glasses for a more elegant presentation.
  6. Take one ladyfinger at a time and quickly dip it into the Coquito-inspired coffee liquid. Just a second or two on each side is enough; we want them moist, not soggy.
  7. Arrange a single layer of the dipped ladyfingers at the bottom of your chosen dish, breaking them to fit as needed.
  8. Spread half of your luscious mascarpone-coconut cream evenly over the first layer of ladyfingers.
  9. Repeat the process: dip another layer of ladyfingers and arrange them over the cream.
  10. Carefully spread the remaining mascarpone-coconut cream over the second layer of ladyfingers, ensuring it's smooth and even on top.
  11. Chill Thoroughly: Cover your dish tightly with plastic wrap and refrigerate for a minimum of 6 hours, but ideally overnight.
  12. Garnish and Serve: Just before serving, uncover your chilled tiramisu. Dust the top generously with a little extra ground cinnamon and/or nutmeg. Sprinkle a generous handful of toasted coconut flakes or shredded coconut over the top. Then, slice and serve!
  • Prep Time: 30 mins
  • Cook Time: 0 mins
  • Category: Dessert
  • Method: No-Bake
  • Cuisine: Puerto Rican/Italian

Nutrition

  • Serving Size: 1 slice
  • Calories: 350
  • Sugar: 30 g
  • Sodium: 50 mg
  • Fat: 20 g
  • Saturated Fat: 12 g
  • Unsaturated Fat: 8 g
  • Trans Fat: 0 g
  • Carbohydrates: 35 g
  • Fiber: 1 g
  • Protein: 4 g
  • Cholesterol: 40 mg

Keywords: Ensure your mascarpone cheese is at room temperature for smooth blending and your heavy cream is very cold for optimal whipping. Be swift when dipping ladyfingers to avoid oversaturation.

Did you make this recipe?

Share a photo and tag us — we can't wait to see what you've made!

« Previous Post
Easy Hot Honey Ranch: Sweet & Spicy Sauce for Everything!
Next Post »
Irresistible Chewy Banana Bread Chocolate Chip Cookies!

If you enjoyed this…

Healthy Cookie Dough Bark: A Guilt-Free Dessert Recipe

Orange Ginger Honey Cakes: A Deliciously Sweet and Spicy Treat

Salted Caramel Cupcakes: The Ultimate Recipe for Sweet Indulgence

Primary Sidebar

Browse by Diet

BreakfastDinnerLunchDessertAppetizer

Sweet Peach Yogurt Parfait Delight

One of my fondest memories is from a lazy summer afternoon spent at my grandmother’s house. The sun filtered through the kitchen window, casting a warm glow over the table where she would create her culinary magic. It was during one of those blissful moments that I first tasted her Peach Yogurt Parfait with Honey and Granola. The sweet aroma of ripe peaches mingling with creamy yogurt and the crunch of granola was nothing short of heavenly. It felt like summer captured in a bowl, and I still remember the joy of diving in with a spoon, each layer revealing a new burst of flavor.

When I think about that parfait, I can almost hear the gentle hum of the bees outside, reminding me of the floral notes that honey brings to every bite. The vibrant yellows and soft oranges of the peaches contrast beautifully with the creamy white yogurt and the golden crunch of granola. It’s a dish that not only looks delightful but also tastes like a celebration of fresh, wholesome ingredients.

What makes my version of this Peach Yogurt Parfait special is the careful balance of flavors and textures. I use ripe, juicy peaches, drizzled with locally sourced honey, and a homemade granola that’s bursting with nuts and seeds for an extra crunch. It’s a simple dish, but every layer is crafted with love and attention.

Let me show you exactly how to make this delightful parfait, so you can bring a bit of that summer magic into your kitchen!

Sweet Peach Yogurt Parfait Delight

Why You’ll Love This Recipe

  • Delightfully creamy texture from the Greek yogurt, paired with the juicy sweetness of fresh peaches.
  • Ready in under 20 minutes, making it a quick and satisfying breakfast or snack option.
  • Budget-friendly, using common ingredients that you may already have in your pantry.
  • Customizable with your favorite granola and nuts, allowing you to tailor each parfait to your taste.
  • Perfectly balanced flavors with the bright acidity of lemon juice and the sweetness of honey enhancing the peaches.

Ingredients

  • For the Parfait:
  • 2 cups plain Greek yogurt (or vanilla yogurt for a sweeter option)
  • 2 large ripe peaches, diced (about 2 cups)
  • 1 tablespoon fresh lemon juice (to prevent browning of peaches)
  • 2 tablespoons honey (plus more for drizzling)
  • 1 teaspoon vanilla extract (optional for extra flavor)
  • For the Granola:
  • 1 cup granola (store-bought or homemade; see notes for a simple granola recipe)
  • 1/4 cup sliced almonds (optional for added crunch)
  • 1/4 cup shredded coconut (optional for added flavor)

Let’s dive into some key ingredients that make this Peach Yogurt Parfait so delightful! First, the Greek yogurt is not only creamy but also packed with protein, making it a satisfying option for breakfast or a snack. If you’re looking for a sweeter option, you can easily substitute it with vanilla yogurt, though it may alter the overall flavor balance. Next, the ripe peaches are the star of the show; their natural sweetness shines through, so I recommend choosing peaches that yield slightly to pressure, indicating they’re perfectly ripe. If peaches aren’t in season, feel free to use nectarines or even frozen peaches—just thaw them before use. Finally, honey adds a lovely floral sweetness that ties everything together. If you prefer, maple syrup can serve as a delicious substitute.

Step-by-Step Instructions

  1. Start by preparing the peaches. Wash them thoroughly, then slice and dice them into bite-sized pieces. In a medium bowl, toss the diced peaches with 1 tablespoon of fresh lemon juice to prevent browning. Set aside for about 5 minutes while the lemon juice works its magic.
  2. In a separate bowl, combine the Greek yogurt, 2 tablespoons of honey, and 1 teaspoon of vanilla extract if using. Stir the mixture until smooth and thoroughly blended. This should take about a minute. Avoid overmixing to maintain the creaminess of the yogurt.
  3. Now it’s time to layer your parfait. Grab a clear glass or bowl to showcase your beautiful creation. Start with a generous spoonful of the yogurt mixture at the bottom—about 1/4 cup will do. Use a spoon to spread it evenly.
  4. Add a layer of the diced peaches over the yogurt, ensuring they cover the yogurt completely. You might want to use about half of what you have prepared—roughly 1 cup. This layer should be visually appealing, so arrange the peaches neatly.
  5. Sprinkle 1/4 cup of granola over the peaches. This adds a delightful crunch. Make sure to distribute it evenly to ensure every bite has that satisfying texture. Avoid packing it down too tightly, as you want it to maintain its crunch.
  6. Repeat the layers: spoon in another 1/4 cup of yogurt, followed by another cup of peaches, and another sprinkle of granola. You should have at least two layers, but feel free to add more depending on your glass size.
  7. Finish off your parfait with a drizzle of honey on top for added sweetness and a touch of elegance. If you’re using sliced almonds or shredded coconut, sprinkle them on top now. It adds a lovely visual contrast and extra flavor.
  8. Serve immediately or refrigerate for up to 30 minutes before serving to allow the flavors to meld together. However, I recommend enjoying it fresh to maintain the granola’s crunch.

Pro Tips for the Best Peach Yogurt Parfait With Honey And Granola

  • Make sure to choose ripe peaches for the best flavor and texture. A common mistake is using unripe fruit, which can lead to a less enjoyable parfait. Look for peaches that are fragrant and slightly soft to the touch.
  • Use a clear glass to assemble your parfait; this not only makes for a beautiful presentation but also allows you to see the colorful layers, which adds to the enjoyment of eating it.
  • For an even creamier texture, consider whipping the Greek yogurt with a hand mixer for a couple of minutes before layering. This small adjustment makes a huge difference in mouthfeel.
  • Be mindful of the granola-to-yogurt ratio. Too much granola can overwhelm the parfait, while too little can make it feel too creamy. Aim for about 1/4 cup of granola per layer for the perfect balance.
  • If you’re making this for a gathering, consider preparing the yogurt and peaches ahead of time and layering them just before serving. This ensures the granola stays crunchy!

Variations & Serving Ideas

There are so many ways to get creative with your Peach Yogurt Parfait! For a tropical twist, swap out the peaches for mangoes or pineapples and top with coconut flakes. If you prefer a berry flavor, mix in some blueberries or strawberries with the peaches for added color and taste. For a nutty version, incorporate chopped walnuts or pecans instead of almonds.

As for serving ideas, this parfait pairs beautifully with a side of scrambled eggs for a hearty breakfast or fresh fruit salad for a light lunch. You might also enjoy it alongside whole grain toast with almond butter for an energizing snack. The contrast of flavors and textures will elevate your meal experience!

Storage, Make-Ahead & Reheating

The Peach Yogurt Parfait is best enjoyed fresh, but you can prepare some components ahead of time. Store the layered parfait in an airtight container in the refrigerator for up to 24 hours. However, be cautious; the granola may lose its crunch if stored too long. You can freeze the yogurt and peach mixture for up to 2 months; just remember to thaw it in the refrigerator overnight before serving.

If you plan to enjoy this dish the next day, it can taste even better as the flavors meld together. Just remember to add the granola right before serving to keep its delightful crunch!

Frequently Asked Questions

Can I make Peach Yogurt Parfait With Honey And Granola ahead of time?

Yes — in fact, it tastes even better the next day as the flavors meld. However, I recommend waiting to add the granola until just before serving to maintain its crunch.

What can I substitute for Greek yogurt?

If you prefer a lighter option, you can substitute Greek yogurt with regular yogurt or a dairy-free alternative like coconut yogurt. Just remember that this may alter the creaminess and flavor profile slightly.

Can I use frozen peaches for this parfait?

Absolutely! Just make sure to thaw the frozen peaches before using them. They will still add great flavor, though the texture may be slightly softer than fresh peaches.

How do I make the parfait vegan?

To make a vegan version, substitute the Greek yogurt with a plant-based yogurt alternative, and replace honey with maple syrup or agave nectar. This keeps the parfait sweet while adhering to a vegan diet.

What other fruits can I use in this recipe?

You can mix and match fruits based on your preference. Try using strawberries, blueberries, raspberries, or even bananas. Just make sure to adjust the lemon juice as needed to prevent browning.

Sweet Peach Yogurt Parfait Delight

Final Thoughts

The Peach Yogurt Parfait with Honey and Granola is a delightful blend of creamy yogurt, sweet peaches, and crunchy granola that creates a satisfying and nourishing treat. Each layer bursts with flavor, making it a perfect choice for breakfast or a light dessert.

This is the kind of recipe I come back to again and again, especially when I want something refreshing and wholesome to start my day. The harmony of sweet and tart flavors, combined with the delightful crunch, never fails to lift my spirits!

I encourage you to give this parfait a try and indulge in its comforting goodness. Feel free to share your results or even add your own twist—perhaps a sprinkle of cinnamon or a handful of nuts. Enjoy creating your perfect parfait!

Print
clock clock iconcutlery cutlery iconflag flag iconfolder folder iconinstagram instagram iconpinterest pinterest iconfacebook facebook iconprint print iconsquares squares iconheart heart iconheart solid heart solid icon

Peach Yogurt Parfait


  • Author: Lily author
  • Total Time: 15 minutes
  • Yield: 4 servings 1x
Pin Recipe
Print Recipe

Description

This Peach Yogurt Parfait combines creamy Greek yogurt, juicy peaches, and crunchy granola for a delightful treat. It’s a perfect breakfast or snack that captures the essence of summer in every bite.


Ingredients

Scale
  • For the Parfait:
  • 2 cups plain Greek yogurt (or vanilla yogurt for a sweeter option)
  • 2 large ripe peaches, diced (about 2 cups)
  • 1 tablespoon fresh lemon juice (to prevent browning of peaches)
  • 2 tablespoons honey (plus more for drizzling)
  • 1 teaspoon vanilla extract (optional for extra flavor)
  • For the Granola:
  • 1 cup granola (store-bought or homemade; see notes for a simple granola recipe)
  • 1/4 cup sliced almonds (optional for added crunch)
  • 1/4 cup shredded coconut (optional for added flavor)

Instructions

  1. Start by preparing the peaches. Wash them thoroughly, then slice and dice them into bite-sized pieces. In a medium bowl, toss the diced peaches with 1 tablespoon of fresh lemon juice to prevent browning. Set aside for about 5 minutes while the lemon juice works its magic.
  2. In a separate bowl, combine the Greek yogurt, 2 tablespoons of honey, and 1 teaspoon of vanilla extract if using. Stir the mixture until smooth and thoroughly blended. This should take about a minute. Avoid overmixing to maintain the creaminess of the yogurt.
  3. Now it’s time to layer your parfait. Grab a clear glass or bowl to showcase your beautiful creation. Start with a generous spoonful of the yogurt mixture at the bottom—about 1/4 cup will do. Use a spoon to spread it evenly.
  4. Add a layer of the diced peaches over the yogurt, ensuring they cover the yogurt completely. You might want to use about half of what you have prepared—roughly 1 cup. This layer should be visually appealing, so arrange the peaches neatly.
  5. Sprinkle 1/4 cup of granola over the peaches. This adds a delightful crunch. Make sure to distribute it evenly to ensure every bite has that satisfying texture. Avoid packing it down too tightly, as you want it to maintain its crunch.
  6. Repeat the layers: spoon in another 1/4 cup of yogurt, followed by another cup of peaches, and another sprinkle of granola. You should have at least two layers, but feel free to add more depending on your glass size.
  7. Finish off your parfait with a drizzle of honey on top for added sweetness and a touch of elegance. If you’re using sliced almonds or shredded coconut, sprinkle them on top now. It adds a lovely visual contrast and extra flavor.
  8. Serve immediately or refrigerate for up to 30 minutes before serving to allow the flavors to meld together. However, I recommend enjoying it fresh to maintain the granola’s crunch.
  • Prep Time: 15 mins
  • Cook Time: 0 mins
  • Category: Breakfast
  • Method: No-cook
  • Cuisine: American

Nutrition

  • Serving Size: 1 parfait
  • Calories: 250
  • Sugar: 20 g
  • Sodium: 50 mg
  • Fat: 5 g
  • Saturated Fat: 2 g
  • Unsaturated Fat: 3 g
  • Trans Fat: 0 g
  • Carbohydrates: 40 g
  • Fiber: 3 g
  • Protein: 10 g
  • Cholesterol: 10 mg

Keywords: Choose ripe peaches for the best flavor and texture. Use a clear glass for a beautiful presentation. For creaminess, consider whipping the yogurt before layering. Be mindful of the granola-to-yogurt ratio. Prepare yogurt and peaches ahead of time for gatherings, layering just before serving.

Did you make this recipe?

Share a photo and tag us — we can't wait to see what you've made!

Sun-Kissed Frozen Orange Cream Slush

As a child, summer days felt like they lasted forever. I remember the sticky heat wrapping around me as I played outside, my laughter mingling with the sounds of the neighborhood. But nothing could cool me down quite like the moment I’d spot my grandmother, laboring over her blender, whipping up her famous Frozen Orange Creamsicle Slush. That vibrant orange treat, with its frosty texture and sweet citrus aroma, was like a burst of sunshine in a cup. Just one sip, and I could feel the coolness wash over me, sparking pure joy.

This Frozen Orange Creamsicle Slush has a way of making you feel like a kid again. Its creamy, dreamy consistency is a delightful balance of bright orange and soft vanilla, inviting you to dive right in. The refreshing tang of orange dances on your tongue, while the smooth creaminess envelops you in a comforting embrace. It’s a nostalgic treat that’s perfect for hot summer afternoons or anytime you need a little pick-me-up.

What makes my version of this slush stand out is the addition of a hint of vanilla bean, which elevates the flavor and adds an extra layer of richness. Plus, it’s super easy to whip up with just a few simple ingredients that you probably already have on hand! So, if you’re ready to relive those sun-soaked memories, let me show you exactly how to make it.

Sun-Kissed Frozen Orange Cream Slush

Why You’ll Love This Recipe

  • Each slush is a perfect blend of creamy vanilla and zesty orange, creating a nostalgic flavor reminiscent of summer days.
  • This refreshing treat is ready in under 15 minutes, making it an ideal quick dessert for unexpected guests or hot afternoons.
  • With just 8 simple ingredients, it’s budget-friendly, ensuring you don’t have to break the bank to enjoy a delicious slush.
  • The slush has a perfectly smooth texture, thanks to the combination of ice and ice cream, providing a delightful contrast to the bright citrus flavors.
  • It’s highly customizable; you can easily adjust the sweetness and add fresh herbs for a unique twist that suits your taste.

Ingredients

  • 2 cups orange juice (freshly squeezed or store-bought)
  • 1 cup vanilla ice cream
  • 1 cup crushed ice
  • 1/2 cup milk (whole or 2%)
  • 1/4 cup granulated sugar (adjust based on sweetness preference)
  • 1 teaspoon vanilla extract
  • Zest of 1 orange (for added flavor)
  • Fresh orange slices and mint leaves (for garnish)

The star of this Frozen Orange Creamsicle Slush is the orange juice, which provides the vibrant, citrusy base. Freshly squeezed juice will yield the brightest flavor, but store-bought options can be just as convenient. If you’re opting for store-bought, choose 100% pure juice with no added sugars for the best results. Another essential ingredient is the vanilla ice cream; it adds creaminess and sweetness. You can substitute it with dairy-free ice cream if you’re looking for a vegan option. Whole or 2% milk complements the ice cream, creating a smooth blend. If you want a lower-calorie version, almond or oat milk can be good alternatives.

Lastly, the granulated sugar can be adjusted based on your sweetness preference. If you prefer a more natural sweetener, consider using honey or agave syrup. The orange zest enhances the flavor profile, providing an aromatic pop that brings the whole slush together. Don’t skip it! It adds an extra layer of brightness that makes this slush truly special.

Step-by-Step Instructions

  1. Start by preparing your ingredients. Gather 2 cups of orange juice, 1 cup of vanilla ice cream, and 1 cup of crushed ice. Make sure the ice is finely crushed, as larger chunks can make blending difficult.
  2. In a blender, combine the orange juice, vanilla ice cream, crushed ice, and 1/2 cup of milk. Add 1/4 cup of granulated sugar and 1 teaspoon of vanilla extract. If you like a sweeter slush, consider adding a bit more sugar at this stage.
  3. Add the zest of 1 orange to the blender. This step is crucial for enhancing the citrus flavor of your slush. Make sure not to include the bitter white pith—only the flavorful zest.
  4. Blend the mixture on medium-high speed for about 30-45 seconds. Stop once the ingredients are fully combined and the slush has a smooth, even consistency. If you notice large chunks of ice, blend for an additional 10-15 seconds. Avoid over-blending, as this can make the slush too liquidy.
  5. Once blended, taste the slush. If it needs more sweetness, add a little more sugar and blend for a few more seconds. If it’s too thick, you can add a splash of milk to reach your desired consistency.
  6. Pour the slush into glasses. This recipe typically serves 4, but you can easily double it for larger gatherings. Use a spoon to help guide the slush into the glasses if needed.
  7. Garnish each serving with fresh orange slices and mint leaves. The mint not only adds a pop of color but also a refreshing aroma that complements the citrus flavors beautifully.
  8. Serve immediately and enjoy! If you’ve made extra, you can refrigerate it for a short time, but it’s best enjoyed fresh.

Pro Tips for the Best Frozen Orange Creamsicle Slush

  • Don’t skip the orange zest! It’s a game-changer for flavor. Always zest before juicing to make it easier.
  • Use a high-powered blender for the best texture. A standard blender may struggle with ice, leading to uneven consistency. If you have a food processor, that can work too, but ensure the ice is finely crushed.
  • Adjust the ice-to-liquid ratio carefully. If your slush is too thick, it won’t blend well. Start with less ice and add more until you reach your preferred texture.
  • Be cautious with the sugar! Always start with the lower amount, as you can easily add more, but it’s hard to fix an overly sweet slush.
  • For a fun twist, consider adding a splash of coconut milk or a handful of fresh fruit like strawberries or pineapple. This not only enhances the flavor but also adds a beautiful color contrast.

Variations & Serving Ideas

There are countless ways to put a spin on your Frozen Orange Creamsicle Slush. Consider making a tropical version by adding in some pineapple juice or coconut milk for a delightful tropical twist. If you’re feeling adventurous, try incorporating a handful of frozen mango or peach slices for added sweetness. For a lighter version, swap out the vanilla ice cream for Greek yogurt for a creamy yet tangy alternative.

As for serving ideas, this refreshing slush pairs wonderfully with light summer dishes like grilled chicken skewers, fish tacos, or a simple salad topped with citrus vinaigrette. The bright, zesty flavors of the slush complement these dishes perfectly, making them an ideal pairing for a sunny day.

Storage, Make-Ahead & Reheating

This Frozen Orange Creamsicle Slush is best enjoyed fresh, but if you have leftovers, you can store them in an airtight container in the fridge for up to 2 days. Just keep in mind that the slush may lose some of its texture over time as the ice melts. It doesn’t freeze well, as the ice will turn into a solid block. If you must freeze it, blend again after thawing to restore the slushy consistency. This treat is best the day you make it, as the flavors meld together beautifully overnight, enhancing its deliciousness.

Frequently Asked Questions

Can I make Frozen Orange Creamsicle Slush ahead of time?

Yes — in fact, it tastes even better the next day as the flavors meld. However, it’s best to enjoy it fresh, as the texture can change if stored for too long. If you need to prepare it ahead, keep it in the fridge and re-blend before serving.

What kind of orange juice should I use?

For the best flavor, use freshly squeezed orange juice. However, if you’re short on time, opt for 100% pure store-bought juice without added sugars. This will ensure that your slush remains flavorful and refreshing.

Can I substitute the vanilla ice cream?

Absolutely! If you’re looking for a dairy-free option, coconut milk ice cream or a non-dairy vanilla ice cream can work wonderfully. They will still provide the creamy texture and sweetness you desire.

How can I adjust the sweetness of my slush?

You can easily adjust the sweetness by modifying the amount of sugar added. Start with 1/4 cup and taste the mixture before blending. If you prefer it sweeter, add more sugar gradually until it reaches your desired level.

What should I do if my slush is too thick?

If your slush is too thick, simply add a splash of milk or orange juice and blend again. This will help achieve a more drinkable consistency while maintaining the slushy texture. Adjust gradually to reach your preferred thickness.

Sun-Kissed Frozen Orange Cream Slush

Final Thoughts

The Frozen Orange Creamsicle Slush is a delightful blend of refreshing citrus and creamy goodness, making it a perfect treat for warm days or any time you crave a taste of nostalgia. The way the bright orange flavor dances with the creamy texture truly elevates this slush, transforming it into a satisfying escape from the everyday.

This is the kind of recipe I come back to again and again, especially when I’m looking to cool down or impress guests at a summer gathering. It’s simple to make and always brings smiles all around! I encourage you to try this recipe for yourself—don’t hesitate to share your results or even put your own spin on it. Happy slushing!

Print
clock clock iconcutlery cutlery iconflag flag iconfolder folder iconinstagram instagram iconpinterest pinterest iconfacebook facebook iconprint print iconsquares squares iconheart heart iconheart solid heart solid icon

Frozen Orange Creamsicle Slush


  • Author: Lily author
  • Total Time: 15 minutes
  • Yield: 4 servings 1x
Pin Recipe
Print Recipe

Description

This Frozen Orange Creamsicle Slush is a refreshing treat that combines creamy vanilla and zesty orange flavors. Perfect for hot summer days, it brings back nostalgic memories with every sip.


Ingredients

Scale
  • 2 cups orange juice (freshly squeezed or store-bought)
  • 1 cup vanilla ice cream
  • 1 cup crushed ice
  • 1/2 cup milk (whole or 2%)
  • 1/4 cup granulated sugar (adjust based on sweetness preference)
  • 1 teaspoon vanilla extract
  • Zest of 1 orange (for added flavor)
  • Fresh orange slices and mint leaves (for garnish)

Instructions

  1. Start by preparing your ingredients. Gather 2 cups of orange juice, 1 cup of vanilla ice cream, and 1 cup of crushed ice. Make sure the ice is finely crushed, as larger chunks can make blending difficult.
  2. In a blender, combine the orange juice, vanilla ice cream, crushed ice, and 1/2 cup of milk. Add 1/4 cup of granulated sugar and 1 teaspoon of vanilla extract. If you like a sweeter slush, consider adding a bit more sugar at this stage.
  3. Add the zest of 1 orange to the blender. This step is crucial for enhancing the citrus flavor of your slush. Make sure not to include the bitter white pith—only the flavorful zest.
  4. Blend the mixture on medium-high speed for about 30-45 seconds. Stop once the ingredients are fully combined and the slush has a smooth, even consistency. If you notice large chunks of ice, blend for an additional 10-15 seconds. Avoid over-blending, as this can make the slush too liquidy.
  5. Once blended, taste the slush. If it needs more sweetness, add a little more sugar and blend for a few more seconds. If it’s too thick, you can add a splash of milk to reach your desired consistency.
  6. Pour the slush into glasses. This recipe typically serves 4, but you can easily double it for larger gatherings. Use a spoon to help guide the slush into the glasses if needed.
  7. Garnish each serving with fresh orange slices and mint leaves. The mint not only adds a pop of color but also a refreshing aroma that complements the citrus flavors beautifully.
  8. Serve immediately and enjoy! If you’ve made extra, you can refrigerate it for a short time, but it's best enjoyed fresh.
  • Prep Time: 15 min
  • Cook Time: 0 min
  • Category: Dessert
  • Method: Blending
  • Cuisine: American

Nutrition

  • Serving Size: 1 serving
  • Calories: 200
  • Sugar: 30 g
  • Sodium: 50 mg
  • Fat: 5 g
  • Saturated Fat: 3 g
  • Unsaturated Fat: 2 g
  • Trans Fat: 0 g
  • Carbohydrates: 40 g
  • Fiber: 1 g
  • Protein: 2 g
  • Cholesterol: 20 mg

Keywords: Don't skip the orange zest! It's a game-changer for flavor. Always zest before juicing to make it easier.

Did you make this recipe?

Share a photo and tag us — we can't wait to see what you've made!

Zesty Lemon Poppy Seed Delight

One rainy afternoon, I found myself in my grandmother’s cozy kitchen, the kind that always smelled like warmth and love. She was whipping up her famous Lemon Poppy Seed Loaf, a recipe that had been passed down through generations. As the batter came together, the zesty aroma of fresh lemons filled the air, mingling perfectly with the nutty fragrance of poppy seeds. I can still picture her, apron-clad, as she expertly drizzled a vibrant citrus icing over the loaf, creating a glossy, sun-kissed finish that beckoned us to dive in. It was a moment that sparked my own passion for baking, and this recipe has become a cherished staple in my home ever since.

When you take a bite of this Lemon Poppy Seed Loaf, it’s like a burst of sunshine on your palate. The loaf is beautifully golden, with a tender crumb that melts in your mouth. Each slice is speckled with tiny poppy seeds, adding a delightful crunch that contrasts beautifully with the tangy sweetness of the lemon. And that citrus icing? It’s the finishing touch that elevates this loaf from ordinary to extraordinary, with its bright, zesty flavor dancing on your taste buds.

This recipe stands out because it embraces simplicity while delivering on flavor. I’ve added a hint of vanilla to the batter, enhancing the overall taste and making it even more indulgent. Trust me, once you make this Lemon Poppy Seed Loaf With Citrus Icing, it’ll become a go-to in your baking repertoire.

So, let me show you exactly how to make it!

Zesty Lemon Poppy Seed Delight

Why You’ll Love This Recipe

  • Moist and tender crumb that melts in your mouth, thanks to the perfect balance of butter and buttermilk.
  • Bright, zesty lemon flavor paired with crunchy poppy seeds, creating a delightful texture and taste experience.
  • Easy to whip up in just about an hour, perfect for last-minute gatherings or a cozy afternoon treat.
  • Budget-friendly with everyday ingredients, making it an accessible option for all home bakers.
  • The citrus icing adds a sweet tang that elevates the loaf, turning a simple recipe into a showstopper!

Ingredients

  • 1 ½ cups (190g) all-purpose flour
  • 1 teaspoon baking powder
  • ½ teaspoon baking soda
  • ½ teaspoon salt
  • 3 tablespoons poppy seeds
  • ½ cup (115g) unsalted butter, softened to room temperature
  • 1 cup (200g) granulated sugar
  • 2 large eggs
  • 1 teaspoon vanilla extract
  • 1 teaspoon lemon zest (from about 1 medium lemon)
  • ½ cup (120ml) buttermilk
  • 2 tablespoons fresh lemon juice

For the Citrus Icing:

  • 1 cup (120g) powdered sugar
  • 2 tablespoons fresh lemon juice
  • 1 tablespoon orange juice
  • 1 teaspoon lemon zest (for garnish, optional)

Let’s dive into the key ingredients that make this Lemon Poppy Seed Loaf so special. The all-purpose flour provides the structure and base for the loaf, while the baking powder and baking soda ensure it rises perfectly, giving the loaf a light texture. For a gluten-free variation, you could substitute the flour with a gluten-free all-purpose blend. Poppy seeds not only add a delightful crunch but also contribute to the unique flavor profile that pairs well with the citrus notes.

Unsalted butter is crucial for achieving the buttery richness that makes this loaf so moist. If you’re looking for a dairy-free option, coconut oil or a vegan butter can be used instead. The buttermilk is another essential component, providing acidity that activates the baking soda for a fluffy texture. If you don’t have buttermilk on hand, you can easily make a substitute by mixing ½ cup of milk with 1 tablespoon of vinegar or lemon juice and letting it sit for about 5 minutes.

Step-by-Step Instructions

  1. Preheat your oven to 350°F (175°C). Grease a 9×5-inch loaf pan or line it with parchment paper for easy removal later.
  2. In a medium mixing bowl, whisk together 1 ½ cups of all-purpose flour, 1 teaspoon of baking powder, ½ teaspoon of baking soda, ½ teaspoon of salt, and 3 tablespoons of poppy seeds. This helps to evenly distribute the baking agents and ensures a uniform rise.
  3. In a large mixing bowl, cream together ½ cup of softened unsalted butter and 1 cup of granulated sugar using an electric mixer on medium speed for about 3-4 minutes, until the mixture is light and fluffy. Make sure to scrape down the sides of the bowl occasionally.
  4. Add 2 large eggs, 1 teaspoon of vanilla extract, and 1 teaspoon of lemon zest to the creamed butter and sugar, mixing until fully combined. You want a smooth consistency, so ensure there are no lumps of butter.
  5. In a small bowl, combine ½ cup of buttermilk and 2 tablespoons of fresh lemon juice. Alternately add the dry ingredients and buttermilk mixture to the butter mixture, starting and ending with the dry ingredients. Mix just until combined; do not overmix, as this can lead to a dense loaf.
  6. Pour the batter into the prepared loaf pan. Smooth the top with a spatula, ensuring it’s even. Bake in the preheated oven for 50-60 minutes, or until a toothpick inserted in the center comes out clean. The edges should be lightly golden brown, and the center should feel just set.
  7. Once baked, remove the loaf from the oven and allow it to cool in the pan for about 10 minutes. Then, transfer it to a wire rack to cool completely. Resist the urge to slice too soon, as it will be crumbly if it’s still warm.
  8. While the loaf is cooling, prepare the citrus icing. In a medium bowl, whisk together 1 cup of powdered sugar, 2 tablespoons of fresh lemon juice, and 1 tablespoon of orange juice until smooth. If the icing is too thick, you can add a little more juice to reach your desired consistency.
  9. Once the loaf is completely cool, drizzle the citrus icing over the top. If you like, sprinkle with an additional teaspoon of lemon zest for an extra pop of flavor and color.

Pro Tips for the Best Lemon Poppy Seed Loaf With Citrus Icing

  • Be careful not to overmix your batter; this is a common mistake that can lead to a dense loaf. Mix just until the dry ingredients are incorporated for a light and fluffy texture.
  • Use room temperature ingredients, especially the butter and eggs. This helps to create a smoother batter and ensures even baking. Take your eggs out of the fridge about 30 minutes before you start.
  • For a more pronounced lemon flavor, consider adding a little lemon extract in addition to the zest and juice. Just a half teaspoon can elevate the citrus notes significantly.
  • When measuring your flour, spoon it into the measuring cup and level it off with a knife instead of scooping directly from the bag. This prevents packing and ensures you don’t end up with a dry loaf.
  • Invest in a good quality loaf pan; it makes a difference in heat distribution, which ensures even baking. If your pan is dark-coated, reduce the oven temperature by 25°F to prevent over-browning.

Variations & Serving Ideas

For a delightful twist, consider adding blueberries or raspberries to the batter for a fruity burst of flavor. You can also experiment with different citrus fruits—try lime or grapefruit zest and juice for a refreshing change. For a healthier option, substitute half of the all-purpose flour with whole wheat flour for added fiber without compromising too much on texture.

This Lemon Poppy Seed Loaf pairs beautifully with a light salad, such as a mixed greens salad with a vinaigrette, or a cup of tea for a cozy afternoon treat. It also complements a creamy cheese platter, as the acidity of the loaf balances rich cheeses perfectly. Lastly, a scoop of vanilla ice cream on the side creates a delightful contrast of temperatures and flavors!

Storage, Make-Ahead & Reheating

This Lemon Poppy Seed Loaf can be stored at room temperature for up to 3 days if wrapped tightly in plastic wrap. If you want to keep it longer, it freezes well for up to 3 months. To freeze, wrap the loaf tightly in plastic wrap and then in aluminum foil to prevent freezer burn.

When you’re ready to enjoy it again, simply thaw it in the fridge overnight. Reheat individual slices in the microwave for 15-20 seconds or in a toaster oven until warmed through. Interestingly, many people find that this loaf tastes even better the next day, as the flavors have time to meld!

Frequently Asked Questions

Can I make Lemon Poppy Seed Loaf With Citrus Icing ahead of time?

Yes — in fact, it tastes even better the next day! You can make the loaf a day in advance, allowing the flavors to develop. Just be sure to store it in an airtight container to maintain its moisture.

Can I substitute the poppy seeds?

Absolutely! If you don’t have poppy seeds on hand or prefer an alternative, you can use sesame seeds for a similar crunch or omit them entirely for a smooth loaf.

What can I use instead of buttermilk?

If you don’t have buttermilk, you can easily create a substitute by mixing ½ cup of milk (dairy or plant-based) with 1 tablespoon of vinegar or lemon juice. Let it sit for 5 minutes before using in the recipe.

How can I make this recipe gluten-free?

To make a gluten-free version of this Lemon Poppy Seed Loaf, substitute the all-purpose flour with a gluten-free all-purpose flour blend. Just ensure that the blend contains a binding agent like xanthan gum for the best results.

What is the best way to store leftover loaf?

Leftover Lemon Poppy Seed Loaf should be stored in an airtight container at room temperature for up to 3 days. For longer storage, wrap it tightly and freeze for up to 3 months. Thaw it before serving for the best texture.

Zesty Lemon Poppy Seed Delight

Final Thoughts

The Lemon Poppy Seed Loaf with Citrus Icing is truly a delightful treat that brings a burst of brightness to any occasion. The zesty lemon flavor combined with the subtle crunch of poppy seeds creates a satisfying balance, while the citrus icing adds a touch of sweetness that perfectly complements the loaf’s tanginess.

This is the kind of recipe I come back to again and again, especially when I want to brighten up a gloomy day or celebrate a small victory. The aroma that fills the kitchen as it bakes is absolutely heavenly! I encourage you to give this recipe a try; you might just find it becoming a beloved staple in your home. Don’t forget to share your results or even add your own unique twist—I can’t wait to see what you create!

Print
clock clock iconcutlery cutlery iconflag flag iconfolder folder iconinstagram instagram iconpinterest pinterest iconfacebook facebook iconprint print iconsquares squares iconheart heart iconheart solid heart solid icon

Lemon Poppy Seed Loaf


  • Author: Lily author
  • Total Time: 32 minute
  • Yield: 1 loaf 1x
Pin Recipe
Print Recipe

Description

This Lemon Poppy Seed Loaf is a delightful treat that combines zesty lemon flavor with crunchy poppy seeds. Topped with a citrus icing, it’s perfect for any occasion.


Ingredients

Scale
  • 1 ½ cups (190g) all-purpose flour
  • 1 teaspoon baking powder
  • ½ teaspoon baking soda
  • ½ teaspoon salt
  • 3 tablespoons poppy seeds
  • ½ cup (115g) unsalted butter, softened to room temperature
  • 1 cup (200g) granulated sugar
  • 2 large eggs
  • 1 teaspoon vanilla extract
  • 1 teaspoon lemon zest (from about 1 medium lemon)
  • ½ cup (120ml) buttermilk
  • 2 tablespoons fresh lemon juice
  • 1 cup (120g) powdered sugar
  • 2 tablespoons fresh lemon juice
  • 1 tablespoon orange juice
  • 1 teaspoon lemon zest (for garnish, optional)

Instructions

  1. Preheat your oven to 350°F (175°C). Grease a 9×5-inch loaf pan or line it with parchment paper for easy removal later.
  2. In a medium mixing bowl, whisk together 1 ½ cups of all-purpose flour, 1 teaspoon of baking powder, ½ teaspoon of baking soda, ½ teaspoon of salt, and 3 tablespoons of poppy seeds. This helps to evenly distribute the baking agents and ensures a uniform rise.
  3. In a large mixing bowl, cream together ½ cup of softened unsalted butter and 1 cup of granulated sugar using an electric mixer on medium speed for about 3-4 minutes, until the mixture is light and fluffy. Make sure to scrape down the sides of the bowl occasionally.
  4. Add 2 large eggs, 1 teaspoon of vanilla extract, and 1 teaspoon of lemon zest to the creamed butter and sugar, mixing until fully combined. You want a smooth consistency, so ensure there are no lumps of butter.
  5. In a small bowl, combine ½ cup of buttermilk and 2 tablespoons of fresh lemon juice. Alternately add the dry ingredients and buttermilk mixture to the butter mixture, starting and ending with the dry ingredients. Mix just until combined; do not overmix, as this can lead to a dense loaf.
  6. Pour the batter into the prepared loaf pan. Smooth the top with a spatula, ensuring it’s even. Bake in the preheated oven for 50-60 minutes, or until a toothpick inserted in the center comes out clean. The edges should be lightly golden brown, and the center should feel just set.
  7. Once baked, remove the loaf from the oven and allow it to cool in the pan for about 10 minutes. Then, transfer it to a wire rack to cool completely. Resist the urge to slice too soon, as it will be crumbly if it’s still warm.
  8. While the loaf is cooling, prepare the citrus icing. In a medium bowl, whisk together 1 cup of powdered sugar, 2 tablespoons of fresh lemon juice, and 1 tablespoon of orange juice until smooth. If the icing is too thick, you can add a little more juice to reach your desired consistency.
  9. Once the loaf is completely cool, drizzle the citrus icing over the top. If you like, sprinkle with an additional teaspoon of lemon zest for an extra pop of flavor and color.
  • Prep Time: 15 mins
  • Cook Time: 50-60 mins
  • Category: Dessert
  • Method: Baking
  • Cuisine: American

Nutrition

  • Serving Size: 1 slice
  • Calories: 200
  • Sugar: 15 g
  • Sodium: 150 mg
  • Fat: 8 g
  • Saturated Fat: 5 g
  • Unsaturated Fat: 3 g
  • Trans Fat: 0 g
  • Carbohydrates: 30 g
  • Fiber: 1 g
  • Protein: 3 g
  • Cholesterol: 40 mg

Keywords: Be careful not to overmix your batter; this is a common mistake that can lead to a dense loaf. Use room temperature ingredients for a smoother batter and even baking.

Did you make this recipe?

Share a photo and tag us — we can't wait to see what you've made!

  • Privacy Policy
  • Terms Of Service
  • Contact
  • About
  • GDPR

Copyright © 2025 Homesmad