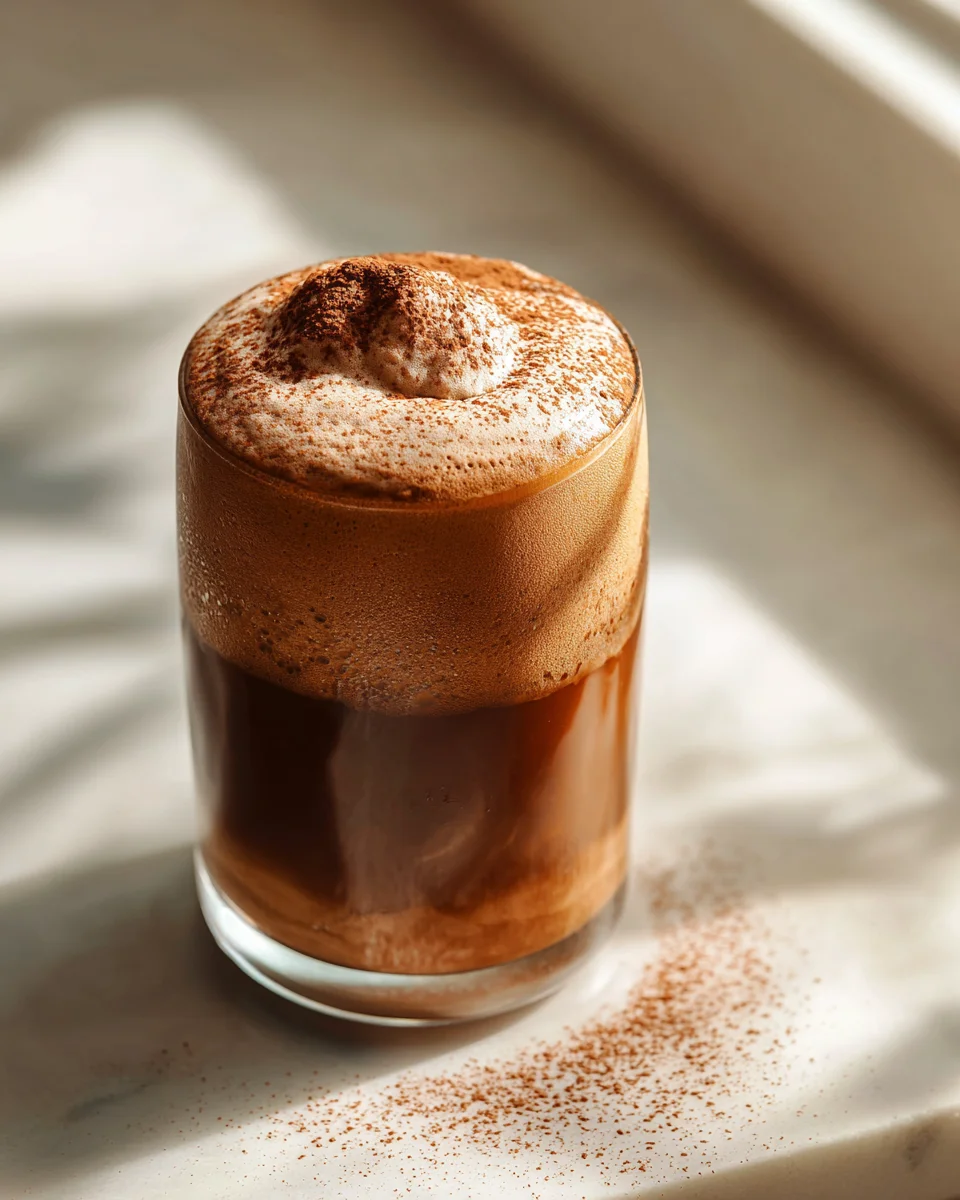
Chocolate Cold Foam Recipe
Oh my goodness, friends, get ready to have your coffee (or any cold drink!) utterly transformed! I’m so excited to share my go-to Chocolate Cold Foam Recipe with you. Forget those expensive coffee shop runs; you’re about to unlock the secret to creating a truly luxurious, velvety chocolate cloud right in your own kitchen.
What makes this recipe so incredibly special? It’s the perfect blend of creamy richness and airy lightness, infused with deep, satisfying chocolate flavor. We’re talking about that irresistible frothy topping that instantly elevates a simple iced coffee into a gourmet indulgence. You’ll love how incredibly easy it is to whip up, turning an everyday beverage into a decadent treat that feels like a hug in a mug (or glass!).
In a nutshell, this is a simple yet spectacular concoction: a beautifully frothed, chocolate-infused cream that floats dreamily on top of your favorite cold drinks. It’s sweet, it’s dreamy, and it adds an extra layer of texture and flavor that makes every sip feel like a special occasion. Get ready to impress yourself and everyone else!

Ingredient Notes
Creating the perfect Chocolate Cold Foam starts with understanding the role each ingredient plays. This isn’t just about combining things; it’s about achieving that luxurious, velvety texture and rich chocolate flavor that elevates any drink. Here are the key players:
- Heavy Cream (or Heavy Whipping Cream): This is the backbone of our cold foam. Its high fat content (typically 36% or more) is what allows it to whip up into a stable, airy foam. For the best results, ensure your cream is very cold straight from the refrigerator.
- Substitution: If you’re looking for a dairy-free alternative, full-fat canned coconut cream (the thick part scooped from the top after refrigerating the can overnight) can work. Be aware that it will impart a subtle coconut flavor and the texture might be slightly different. Some baristas have success with specific oat milks designed for frothing, but they won’t achieve the same density as heavy cream.
- Milk: A splash of milk helps to thin out the heavy cream just enough to make it pourable and maintain a desirable foam consistency, rather than becoming overly stiff like whipped cream. I usually opt for whole milk for a richer mouthfeel, but 2% or even skim will work.
- Substitution: Feel free to use your preferred non-dairy milk here. Oat milk is a fantastic choice as it froths beautifully and adds a lovely creaminess. Almond, soy, or cashew milk can also be used, though they might yield a slightly lighter foam.
- Unsweetened Cocoa Powder: This is where our chocolate magic happens! Using unsweetened cocoa powder allows us to control the sweetness level precisely. I prefer natural unsweetened cocoa for a classic chocolate flavor, but Dutch-processed cocoa powder will give you a darker color and a slightly milder, less acidic chocolate taste.
- Substitution: While cocoa powder is ideal, in a pinch, you could try a high-quality chocolate syrup. However, be mindful of its sweetness and adjust other sweeteners accordingly. It might also alter the foam’s stability slightly due to its liquid nature. For an even deeper chocolate note, a tiny amount of melted dark chocolate (cooled) can be added, but it requires careful mixing to avoid clumping.
- Sweetener: Granulated sugar is my go-to, but liquid sweeteners work wonderfully too, as they dissolve instantly without leaving any grainy texture.
- Substitution: Maple syrup, agave nectar, honey, or a liquid stevia/monk fruit blend are all excellent alternatives. If using a granular sweetener, make sure it dissolves completely as you froth.
- Vanilla Extract: Just a touch of vanilla extract doesn’t make the foam taste like vanilla; instead, it rounds out and deepens the chocolate flavor, making it taste even richer and more complex.
- Substitution: If you prefer to avoid alcohol-based extracts, there are non-alcohol vanilla extracts available. Alternatively, a tiny pinch of vanilla bean powder can provide an intense vanilla aroma. You can also simply omit it if you don’t have any on hand.
- Pinch of Salt: This might seem odd for a sweet treat, but a tiny pinch of fine sea salt is crucial. It doesn’t make the foam salty; rather, it enhances all the other flavors, particularly the chocolate, making it sing. It balances the sweetness and prevents the foam from tasting one-dimensional.
- Substitution: No real substitution here, but ensure it’s a very tiny amount—just enough to awaken the flavors.
Step-by-Step Instructions
Making Chocolate Cold Foam is surprisingly simple and quick, especially once you have your preferred frothing tool. Here’s how I get that perfect, dreamy foam every time:
- Gather and Chill Your Ingredients (and Tools!): This is a crucial first step for the best foam. Ensure your heavy cream and milk are straight from the coldest part of your refrigerator. If possible, pop your mixing bowl, whisk, or frother attachment into the freezer for 5-10 minutes before you start. Cold ingredients and cold equipment make for a more stable and voluminous foam.
- Combine All Ingredients: In your chilled mixing bowl or frothing container, combine the heavy cream, milk, unsweetened cocoa powder, your chosen sweetener, vanilla extract (if using), and that essential pinch of salt.
- Whisk, Froth, or Blend: Now it’s time to create that beautiful foam! Here are a few methods I love:
-
Using a Handheld Frother:
This is my absolute favorite method for single servings. Dip the frother head into the mixture, ensuring it’s mostly submerged but still breaking the surface slightly to incorporate air. Turn it on and froth for 30-60 seconds, moving it up and down gently, until the mixture thickens, doubles in volume, and becomes wonderfully foamy and pourable. -
Using a French Press:
Pour the mixture into a clean French press. Place the lid on and pump the plunger vigorously up and down for about 30-60 seconds, or until it reaches your desired foamy consistency. Be careful not to overfill the French press, as the volume will increase significantly. -
Using a Mason Jar:
For a no-equipment-needed method, pour the ingredients into a clean mason jar with a tight-fitting lid. Fill it no more than halfway. Screw the lid on tightly and shake vigorously for 1-2 minutes, or until the mixture is thick and foamy. This is a good workout! -
Using an Immersion Blender:
In a deep, narrow container, use an immersion blender. Keep the blade just below the surface and blend on medium speed until the foam forms. This can be very quick, so watch carefully to avoid over-whipping. -
Using a Stand Mixer or Hand Mixer:
If making a larger batch, use the whisk attachment on your stand mixer (or a hand mixer). Beat the mixture on medium-high speed. Keep a close eye on it; it will transform quickly. You’re looking for a thick, velvety, pourable foam, not stiff peaks like regular whipped cream. This might take 1-3 minutes.
-
- Check Consistency: The goal for cold foam is a thick, spoonable, yet pourable consistency that can sit on top of your beverage. It shouldn’t be too thin (like milk) or too thick (like stiff whipped cream). If it’s too thin, froth a little longer. If it looks a bit too thick, stir in a tiny dash more cold milk and gently incorporate.
- Taste and Adjust: Take a small spoonful and taste. If you prefer it sweeter, add a tiny bit more sweetener and give it a quick whisk to combine. If the chocolate isn’t strong enough, a minuscule amount more of cocoa powder can be added, followed by another quick froth.
- Serve Immediately: Pour your luscious Chocolate Cold Foam directly over your favorite iced coffee, latte, or any other beverage you desire!
Tips & Suggestions
To truly master the art of Chocolate Cold Foam and make it a regular delightful addition to your drinks, I’ve gathered some of my favorite tips and suggestions:
- Start with the Coldest Ingredients: I cannot stress this enough! Seriously, the colder your heavy cream and milk are, the easier they will froth, and the more stable and voluminous your foam will be. If they’re lukewarm, you’ll struggle to get a good foam.
- Don’t Over-Whip: This is a common mistake. Remember, we’re making “cold foam,” not stiff whipped cream. You want a texture that’s thick and airy but still pourable, able to gently meld with your drink. If you whip it to stiff peaks, it won’t float as nicely or blend as well. If you accidentally go too far, don’t despair! Just stir in a tablespoon or two of cold milk and gently whisk or stir until it loosens up.
- Consider Your Tool: The best tool for you depends on batch size and personal preference. For a single serving, a handheld frother is lightning-fast and super convenient. For larger batches, a stand mixer or a French press works wonderfully. Experiment to find what you like best!
- Adjust Sweetness to Your Liking: The beauty of making your own cold foam is customization. Start with the suggested amount of sweetener, then taste and adjust. Do you like it sweeter? Add more. Prefer a darker, less sweet chocolate profile? Dial back the sugar.
- Experiment with Chocolate Intensity: If you love a rich, dark chocolate flavor, consider using Dutch-processed cocoa powder. You can also slightly increase the amount of cocoa powder for an even bolder taste, just be mindful that more powder might require a tiny bit more liquid to maintain consistency.
- Flavor Variations:
- Mocha Bliss: For a mocha cold foam, add 1/4 teaspoon of instant espresso powder (or instant coffee) to the mixture before frothing. It enhances the chocolate flavor beautifully and adds a subtle coffee kick.
- Mint Chocolate Dream: Add 1-2 drops of food-grade peppermint extract for a refreshing mint chocolate cold foam, perfect for holidays or a unique treat.
- Spiced Chocolate: A tiny pinch of cinnamon, chili powder, or even a dash of cardamom can add an intriguing warmth and complexity to your chocolate foam.
- Orange Chocolate: A tiny bit of orange zest or 1-2 drops of food-grade orange extract can create a delightful Jaffa Cake-inspired flavor.
- Serving Suggestions Beyond Coffee: While it’s fantastic on iced coffee and lattes, don’t limit yourself! Try chocolate cold foam on:
- Iced chai lattes
- Iced matcha lattes
- Smoothies (especially banana or berry smoothies)
- Hot chocolate (yes, “cold foam” on hot drinks is a delicious contrast!)
- Even as a light topping for desserts like fruit salads or puddings.
Storage
While Chocolate Cold Foam is definitely at its absolute best when enjoyed freshly made, I understand that sometimes you might want to prepare a bit extra or save some for later. Here’s what I’ve learned about storing it:
- Best When Fresh: I always recommend making cold foam right before you plan to use it. The bubbles are freshest and most stable immediately after frothing. This is when you’ll get the most voluminous and luxurious texture.
- Refrigeration: If you do have leftovers or want to prep a batch a few hours in advance, transfer the cold foam to an airtight container. Store it in the coldest part of your refrigerator. I’ve found it generally holds up reasonably well for about 12-24 hours.
- Texture Changes Over Time: As it sits, the foam will naturally begin to deflate and separate slightly. The air bubbles will dissipate, and the liquid will settle at the bottom, leaving a denser, creamier layer on top. This is completely normal and expected. It won’t be quite as light and airy as when freshly made.
- Re-frothing (Sometimes Works): If your stored cold foam has deflated, you can often give it a quick refresh. Simply pour it back into your frothing container (or mason jar) and give it another quick froth for 15-30 seconds. This usually helps to reincorporate air and bring back some of that foamy texture. However, it likely won’t achieve the same initial volume or stability as when it was first made.
- Shelf Life: Due to the dairy content, the cold foam should be consumed within 1-2 days when stored properly in the refrigerator. Always give it a sniff test before using – if it smells off, it’s best to discard it.
- Freezing is Not Recommended: I wouldn’t recommend freezing cold foam. The dairy base will likely separate and become grainy or icy when thawed, completely ruining the delicate texture we’re aiming for. Stick to refrigeration for short-term storage.
Final Thoughts
Well, there you have it! My delicious Chocolate Cold Foam Recipe, ready to elevate your everyday beverages into something truly special. I absolutely love how simple yet impactful this recipe is. It’s not just about a topping; it’s about adding a layer of rich, creamy chocolate luxury to your morning coffee, afternoon iced tea, or even a fancy non-alcohol dessert drink. Imagine that velvety chocolate cloud melting into your favorite brew – pure bliss! Trust me, once you try this Chocolate Cold Foam Recipe, you’ll wonder how you ever lived without it. It’s quick, it’s easy, and it delivers an indulgent experience every single time. Go ahead, treat yourself and transform your drink game today!
Chocolate Cold Foam Recipe: Sweet & Creamy Coffee Topper!
- Total Time: 10 minutes
- Yield: 2 servings
Description
Transform your coffee with this luxurious Chocolate Cold Foam that adds a velvety chocolate cloud to any cold drink. It’s easy to make and elevates your beverages into gourmet indulgences!
Ingredients
- Heavy Cream (or Heavy Whipping Cream)
- Milk
- Unsweetened Cocoa Powder
- Sweetener (Granulated sugar, maple syrup, agave nectar, honey, or liquid stevia/monk fruit blend)
- Vanilla Extract
- Pinch of Salt
Instructions
- Gather and Chill Your Ingredients (and Tools!): Ensure your heavy cream and milk are straight from the coldest part of your refrigerator. If possible, pop your mixing bowl, whisk, or frother attachment into the freezer for 5-10 minutes before you start.
- Combine All Ingredients: In your chilled mixing bowl or frothing container, combine the heavy cream, milk, unsweetened cocoa powder, your chosen sweetener, vanilla extract (if using), and that essential pinch of salt.
- Whisk, Froth, or Blend: Use one of the following methods to create the foam: Using a Handheld Frother, Using a French Press, Using a Mason Jar, Using an Immersion Blender, or Using a Stand Mixer or Hand Mixer.
- Check Consistency: The goal for cold foam is a thick, spoonable, yet pourable consistency that can sit on top of your beverage.
- Taste and Adjust: Take a small spoonful and taste. If you prefer it sweeter, add a tiny bit more sweetener and give it a quick whisk to combine. If the chocolate isn't strong enough, a minuscule amount more of cocoa powder can be added.
- Serve Immediately: Pour your luscious Chocolate Cold Foam directly over your favorite iced coffee, latte, or any other beverage you desire!
- Prep Time: 10 mins
- Cook Time: 0 mins
- Category: Beverage
- Method: Frothing
- Cuisine: American
Nutrition
- Serving Size: 1 serving
- Calories: 150
- Sugar: 5 g
- Sodium: 50 mg
- Fat: 12 g
- Saturated Fat: 7 g
- Unsaturated Fat: 3 g
- Trans Fat: 0 g
- Carbohydrates: 10 g
- Fiber: 2 g
- Protein: 2 g
- Cholesterol: 40 mg
Keywords: Start with the coldest ingredients for the best foam. Don't over-whip; aim for a thick and airy texture that's still pourable. Adjust sweetness and chocolate intensity to your liking.