• Skip to primary navigation
  • Skip to main content
  • Skip to primary sidebar
Homesmad

Homesmad

  • Home
  • Breakfast & Brunch
  • Appetizers & Snacks
  • Dinner
  • Dessert
  • About
  • Privacy Policy
  • Contact
Homesmad
  • Home
  • Breakfast & Brunch
  • Appetizers & Snacks
  • Dinner
  • Dessert
  • About
  • Privacy Policy
  • Contact

Amazing High Protein Honey Garlic Shrimp – Easy Dinner!

October 19, 2025 by Lily author

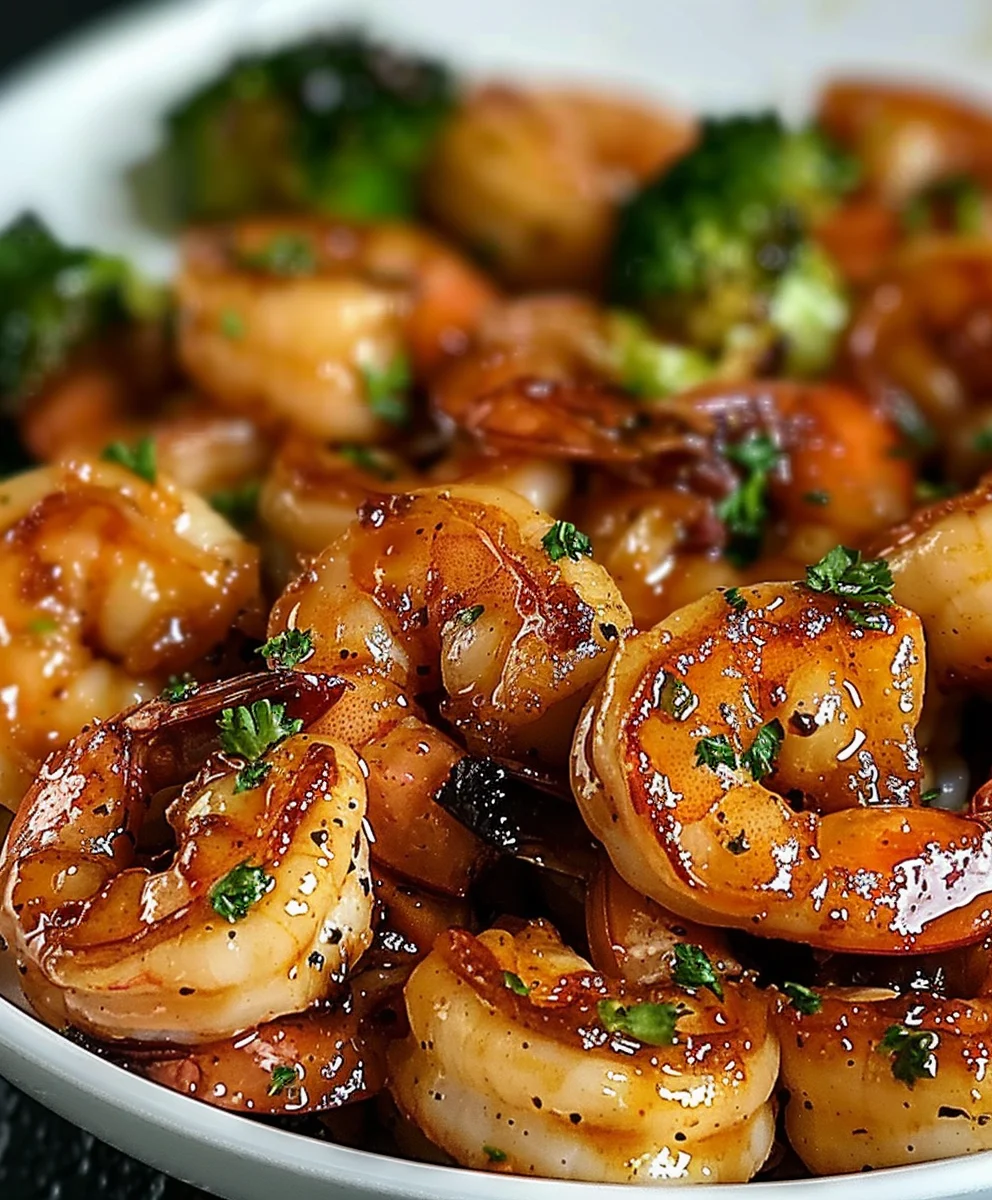
High Protein Honey Garlic Shrimp An Amazing Ultimate Recipe is more than just a meal; it’s a culinary triumph that promises to revolutionize your weeknight dinners! Imagine succulent, perfectly cooked shrimp, bathed in a glossy, irresistible sauce that strikes the ideal balance between sweet and savory, with just the right kick of garlic. This isn’t just about satisfying your taste buds; it’s about providing a powerfully nutritious option that doesn’t compromise on flavor or convenience.

The beauty of the honey garlic flavor profile lies in its universal appeal, drawing inspiration from rich Asian culinary traditions and adapting beautifully to modern, health-conscious kitchens. Shrimp, a lean and versatile protein, becomes an absolute star when paired with this iconic sauce, making it a go-to for healthy eaters and flavor seekers alike. I truly believe you’ll find this dish to be an unparalleled favorite for its effortless preparation and gourmet results.

Why You’ll Adore This High Protein Honey Garlic Shrimp Dish

People absolutely adore this dish for countless reasons. Firstly, its incredible flavor profile – a sticky, golden glaze that coats each piece of shrimp, delivering a symphony of sweet honey, pungent garlic, and a hint of tang, ensuring every bite is a burst of deliciousness. Secondly, its remarkable convenience; shrimp cooks in mere minutes, making this an ideal solution for busy evenings when you crave something extraordinary without the lengthy cooking time. And let’s not forget the outstanding nutritional benefits: packed with high-quality protein, it’s perfect for supporting your energy levels and fitness goals. Truly, this High Protein Honey Garlic Shrimp An Amazing Ultimate Recipe delivers on all fronts, transforming a simple meal into an extraordinary culinary moment.

Amazing High Protein Honey Garlic Shrimp - Easy Dinner! this RECIPE

Ingredients:

  • For the Shrimp:
    • 1.5 – 2 pounds large or jumbo shrimp, peeled and deveined (tails on or off, your preference – I often leave them on for presentation but tails off for easier eating!)
    • 1 tablespoon olive oil or avocado oil, plus more for cooking
    • 1/2 teaspoon salt
    • 1/4 teaspoon black pepper
    • 1/2 teaspoon garlic powder
    • 1/4 teaspoon onion powder
    • Pinch of red pepper flakes (optional, for a subtle kick)
  • For the High Protein Honey Garlic Sauce:
    • 1/2 cup low-sodium soy sauce (or tamari for gluten-free, or coconut aminos for soy-free)
    • 1/3 cup honey (local honey adds a wonderful depth!)
    • 4-5 cloves garlic, minced very finely (I love garlic, so I often lean towards 5 or even 6!)
    • 1 tablespoon fresh ginger, grated or minced finely (I find a microplane zester works wonders here)
    • 1 tablespoon rice vinegar (optional, for a touch of acidity to brighten the sauce)
    • 1/2 teaspoon Sriracha or your favorite hot sauce (optional, for heat)
    • 1 tablespoon cornstarch (or arrowroot powder for an alternative thickener)
    • 2 tablespoons cold water (for the cornstarch slurry)
  • For Garnish and Serving:
    • 2 tablespoons fresh green onions, thinly sliced (the green parts are perfect for color and mild onion flavor)
    • 1 tablespoon sesame seeds (toasted, for an extra nutty crunch and visual appeal)
    • Cooked rice, quinoa, or cauliflower rice, for serving
    • Steamed broccoli or asparagus, for serving
    • Lime wedges, for squeezing over the finished dish (adds a lovely freshness!)

Preparing the Shrimp for Maximum Flavor

  1. Thaw and Prep the Shrimp: If your shrimp are frozen, place them in a colander under cold running water for 10-15 minutes, or until fully thawed. Once thawed, transfer the shrimp to a bowl or lay them out on a clean kitchen towel. It is absolutely crucial to pat the shrimp very, very dry with paper towels. This step is vital for achieving a beautiful sear; any excess moisture will steam the shrimp instead of allowing them to brown and caramelize, preventing that incredible texture we’re aiming for in this High Protein Honey Garlic Shrimp An Amazing Ultimate Recipe.
  2. Season the Shrimp: In a medium bowl, drizzle the patted-dry shrimp with 1 tablespoon of olive oil. Add the salt, black pepper, garlic powder, onion powder, and red pepper flakes (if using). Toss everything gently with your hands or a spoon to ensure the shrimp are evenly coated with the seasonings. I like to let them sit for about 5-10 minutes while I prepare the sauce; this brief marination allows the flavors to really sink in.

Crafting the Irresistible Honey Garlic Sauce

  1. Combine Wet Ingredients: In a medium-sized bowl, combine the low-sodium soy sauce, honey, minced garlic, grated ginger, and rice vinegar (if using). If you’re adding Sriracha for a touch of heat, now is the time to stir that in as well. Whisk all these ingredients together until the honey is fully dissolved and everything is well-combined. You should have a fragrant, sweet, and savory base for our sauce.
  2. Prepare the Cornstarch Slurry: In a small separate bowl, whisk together the 1 tablespoon of cornstarch with 2 tablespoons of cold water until a smooth, lump-free slurry forms. This slurry is our secret weapon for thickening the sauce to that perfect consistency, allowing it to beautifully coat every piece of shrimp. Set this aside; we’ll add it later in the cooking process.

Cooking the Shrimp to Perfection

  1. Heat the Pan: Place a large skillet or wok over medium-high heat. Add 1-2 tablespoons of olive oil (or your preferred high-heat cooking oil, like avocado oil) to the pan. Allow the oil to get hot enough that it shimmers, but not smoking. This usually takes about 2-3 minutes. A hot pan is key for getting a good sear on the shrimp quickly.
  2. Cook the Shrimp in Batches: This is a critical step for preventing overcrowding, which leads to steamed, rubbery shrimp rather than beautifully seared ones. Add about half of the seasoned shrimp to the hot pan in a single layer, ensuring there’s space between each piece. Cook for 1-2 minutes per side, until the shrimp turn pink and opaque and develop a slight golden-brown crust. Do not overcook them! Shrimp cook very quickly. Remove the first batch of cooked shrimp from the pan and set them aside on a clean plate. Repeat with the remaining shrimp, adding a little more oil if necessary. Once all shrimp are cooked, you can temporarily return them to the plate.

Combining and Finishing the High Protein Honey Garlic Shrimp An Amazing Ultimate Recipe

  1. Deglaze and Add Sauce Base: Reduce the heat to medium. If there are any browned bits stuck to the bottom of the pan (which there likely will be, and they’re packed with flavor!), you can deglaze by adding a splash of water or a little more soy sauce and scraping them up with a wooden spoon or spatula. Then, pour the prepared honey garlic sauce mixture (from step 3 in “Crafting the Irresistible Honey Garlic Sauce”) directly into the skillet.
  2. Thicken the Sauce: Bring the sauce to a gentle simmer, stirring occasionally. Once it starts to bubble, give your cornstarch slurry (from step 4) a quick re-whisk, as cornstarch can settle at the bottom. Slowly pour the slurry into the simmering sauce while continuously whisking. Continue to whisk for 1-2 minutes, or until the sauce thickens to your desired consistency – it should be glossy and able to coat the back of a spoon. If it gets too thick, you can always add a tablespoon or two of water to thin it out slightly. This transformation is truly magical, turning a watery mixture into a rich, luscious glaze that will elevate our High Protein Honey Garlic Shrimp An Amazing Ultimate Recipe to new heights.
  3. Return Shrimp and Coat: Once the sauce has thickened beautifully, return all the cooked shrimp to the skillet. Toss the shrimp gently in the sauce using tongs or a spatula, ensuring every single piece is thoroughly coated in that glorious, sticky honey garlic glaze. Let it simmer for just another minute or two, allowing the shrimp to absorb some of the incredible flavors and warm through completely.

Serving Suggestions and Delicious Variations

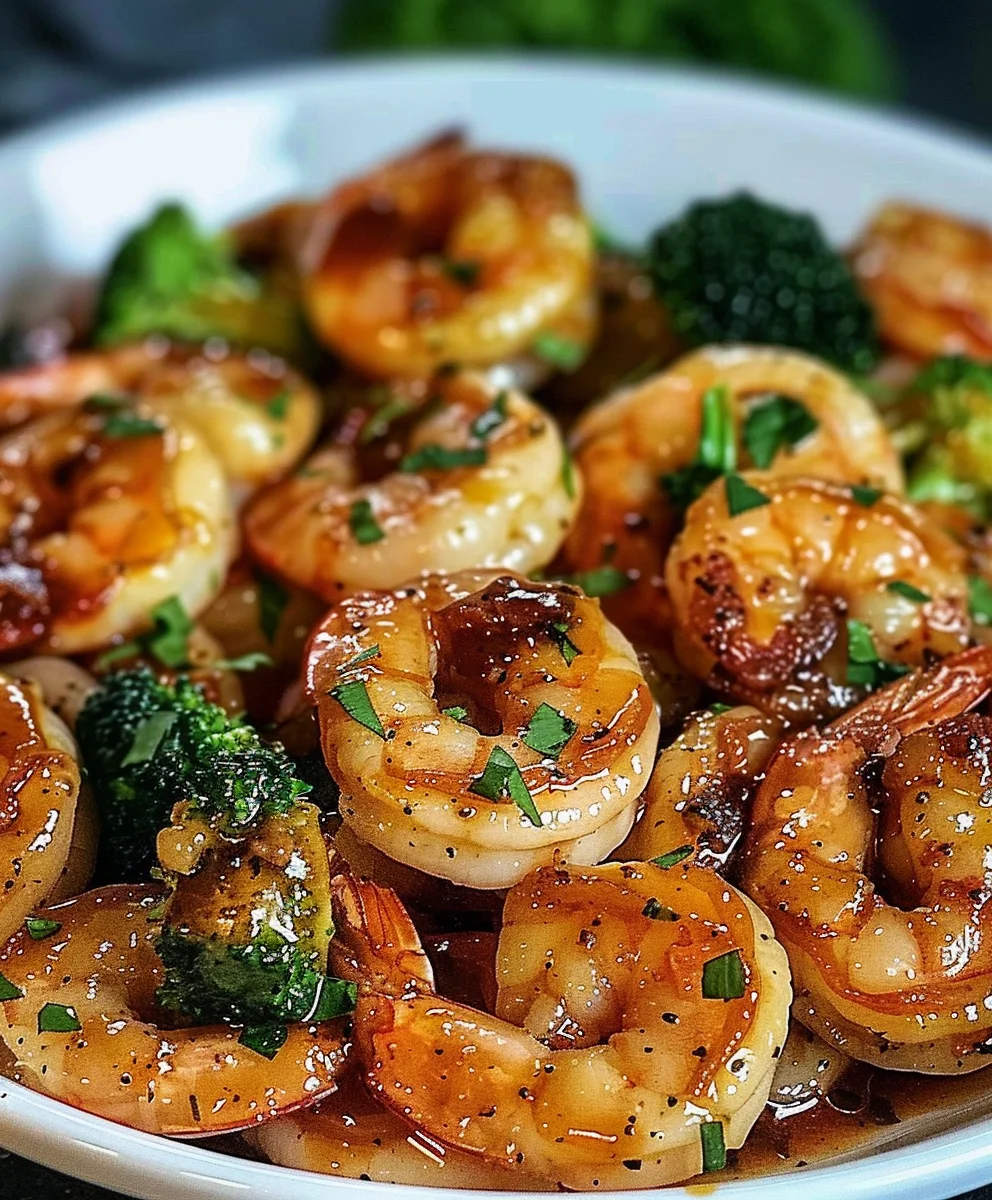
  1. Garnish and Serve Immediately: Remove the skillet from the heat. Sprinkle generously with the fresh, thinly sliced green onions and toasted sesame seeds. The vibrant green of the onions and the subtle crunch of the sesame seeds not only add visual appeal but also contribute wonderful complementary flavors and textures. I love to serve this High Protein Honey Garlic Shrimp An Amazing Ultimate Recipe immediately.
  2. Perfect Pairings: This dish pairs wonderfully with a variety of sides. My go-to is often fluffy white rice or brown rice, which soaks up the extra sauce beautifully. For an extra protein boost, consider serving it with quinoa. If you’re looking for a low-carb option, cauliflower rice is fantastic, as are steamed or stir-fried vegetables like broccoli, snap peas, or asparagus. The freshness of a lime wedge squeezed over the top right before eating truly brightens all the rich flavors, adding a zesty finish that I absolutely adore.
  3. Spicy Kick Variation: If you’re a fan of more heat, don’t hesitate to increase the Sriracha or add an extra pinch of red pepper flakes to the sauce. You could even sauté some thinly sliced fresh chilies like serrano or jalapeño with the garlic and ginger for a bolder spice.
  4. Add Veggies to the Pan: For a one-pan meal, you can easily add quick-cooking vegetables. After cooking the shrimp and before adding the sauce, you can quickly stir-fry some bell peppers, broccoli florets, or snow peas for a few minutes until crisp-tender. Then, pour the sauce over the veggies and shrimp. This is a fantastic way to boost the nutritional value and make it an even more complete meal.
  5. Make it a Meal Prep Star: This High Protein Honey Garlic Shrimp An Amazing Ultimate Recipe is excellent for meal prep! Cook a batch and portion it out with your chosen side for quick, delicious, and high-protein lunches or dinners throughout the week. Store in airtight containers in the refrigerator for up to 3 days. Reheat gently in the microwave or a skillet until warmed through. The sauce might thicken more upon cooling, but it will loosen up when reheated.
  6. Consider Other Proteins: While shrimp is fantastic, this honey garlic sauce is incredibly versatile. You could easily substitute chicken breast or thigh, pork tenderloin, or even firm tofu for a vegetarian high-protein option. Just adjust cooking times accordingly to ensure the protein is cooked through. For chicken or pork, I recommend cutting them into bite-sized pieces for quicker cooking and better sauce absorption.

Amazing High Protein Honey Garlic Shrimp - Easy Dinner!

Conclusion:

As we wrap up our culinary journey with this incredible dish, I truly hope you’re feeling inspired to get into your kitchen and experience the magic for yourself. What we’ve explored today is so much more than just a meal; it’s a testament to how quick, healthy, and utterly delicious cooking can be. This isn’t just another dinner recipe; it’s a game-changer for busy weeknights, a showstopper for casual gatherings, and a fantastic way to nourish your body without compromising on flavor. I’ve poured my heart into perfecting this particular preparation, and I’m genuinely excited for you to discover why it has become such a beloved staple in my own home. It embodies everything I love about simple, wholesome, and incredibly satisfying food.

The beauty of this dish lies in its perfect balance – the sweet, sticky notes of honey, the pungent warmth of garlic, and the tender, succulent texture of perfectly cooked shrimp, all harmonizing to create an explosion of flavor that will undoubtedly tantalize your taste buds. It’s incredibly satisfying, making you feel full and energized thanks to its lean protein content, yet it’s light enough not to weigh you down. This is precisely why I believe the High Protein Honey Garlic Shrimp An Amazing Ultimate Recipe is an absolute must-try for everyone, from novice cooks to seasoned chefs. It offers a delightful escape from mundane meals, providing a burst of exotic yet comforting flavors that are universally appealing. You’ll be amazed at how quickly it comes together, proving that you don’t need hours in the kitchen to create something truly extraordinary and profoundly satisfying.

Now, let’s talk about making this dish truly your own! While it’s utterly fantastic on its own, served directly from the pan, I love to pair it with a few complementary elements to create a complete and unforgettable meal. For a classic and comforting experience, consider serving it over a bed of fluffy jasmine rice or fragrant basmati rice; the rice perfectly soaks up that glorious honey-garlic sauce. If you’re looking for something a bit lighter or low-carb, cauliflower rice or spiralized zucchini noodles are superb alternatives. They add volume and nutrients without the extra carbohydrates, allowing the vibrant flavors of the shrimp to truly shine. For a burst of freshness and color, a simple side of steamed green beans, sautéed asparagus, or a crisp garden salad dressed with a light vinaigrette would be an excellent addition. Don’t underestimate the power of a squeeze of fresh lime or lemon juice over the finished dish; it brightens all the flavors and adds a zesty kick that is simply divine.

Beyond the traditional pairings, feel free to get creative with your serving! Imagine tucking these flavorful shrimp into warm corn tortillas for a delightful taco night, topped with a quick cabbage slaw and a drizzle of sriracha mayo. They also make an incredible protein boost for a vibrant salad, perhaps with mixed greens, avocado, cherry tomatoes, and a light sesame dressing. For a quick and easy appetizer, simply serve the shrimp on skewers with a sprinkle of sesame seeds and chopped green onions. You could even toss them with some al dente pasta for a quick pasta dish, perhaps with a touch of chili flakes for an extra kick. The versatility of this recipe is truly one of its greatest strengths, allowing you to adapt it to almost any mealtime or occasion. I encourage you to experiment with different accompaniments; you might just discover your next favorite meal combination!

And speaking of experimentation, don’t hesitate to play with the recipe itself! If you love a bit of heat, a pinch of red pepper flakes added to the sauce will provide a wonderful fiery kick. For an even more intense garlic flavor, feel free to add an extra clove or two, or try roasting the garlic beforehand for a sweeter, more mellow aroma. You can easily adjust the sweetness by slightly reducing the honey or adding a splash more soy sauce for a saltier profile. If you’re looking to make this recipe gluten-free, simply ensure you use tamari instead of traditional soy sauce. For those who prefer a different protein, chicken or even firm tofu can be substituted for the shrimp, though cooking times will need to be adjusted accordingly. This adaptability means you can truly tailor the dish to your specific preferences and dietary needs, making it a truly inclusive recipe for all.

So, there you have it! My fervent plea for you to try this truly magnificent dish. I’m confident that once you’ve experienced the ease, the aroma, and the incredible taste of this High Protein Honey Garlic Shrimp, it will quickly earn a permanent spot in your weekly rotation. It’s more than just a recipe; it’s an invitation to create joy in your kitchen, to savor every bite, and to share delicious moments with those you love. Don’t just read about it – make it! I am genuinely eager to hear about your culinary adventures. Please, share your experiences, your serving suggestions, your ingenious variations, and especially your photos! Tag me on social media or leave a comment below. Your feedback and creativity inspire me and our entire cooking community. Happy cooking, my friends, and enjoy every single delicious bite!


High Protein Honey Garlic Shrimp - An Amazing Ultimate Recipe

High Protein Honey Garlic Shrimp – An Amazing Ultimate Recipe

Revolutionize your weeknight dinners with succulent shrimp bathed in a glossy, irresistible sweet and savory honey garlic sauce. This high-protein dish is quick, nutritious, and packed with flavor, perfect for busy evenings.

Prep Time
20 Minutes

Cook Time
15 Minutes

Total Time
35 Minutes

Servings
4 servings

Ingredients

  • 1.5-2 lbs large shrimp, peeled & deveined
  • 1-2 tbsp olive oil
  • 1/2 tsp salt
  • 1/4 tsp black pepper
  • 1/2 tsp garlic powder
  • 1/4 tsp onion powder
  • Pinch red pepper flakes (optional)
  • 1/2 cup low-sodium soy sauce
  • 1/3 cup honey
  • 4-6 cloves garlic, minced
  • 1 tbsp fresh ginger, grated
  • 1 tbsp rice vinegar (optional)
  • 1/2 tsp Sriracha (optional)
  • 1 tbsp cornstarch
  • 2 tbsp cold water
  • 2 tbsp green onions, sliced (for garnish)
  • 1 tbsp toasted sesame seeds (for garnish)
  • Cooked rice/quinoa/cauliflower rice (for serving)
  • Steamed broccoli/asparagus (for serving)
  • Lime wedges (for serving)

Instructions

  1. Step 1
    Thaw shrimp if frozen; pat very dry with paper towels. Drizzle with 1 tbsp olive oil, then season with salt, pepper, garlic powder, onion powder, and red pepper flakes (if using). Toss to coat and let sit 5-10 minutes.
  2. Step 2
    In a medium bowl, whisk together soy sauce, honey, minced garlic, grated ginger, rice vinegar (if using), and Sriracha (if using). Set aside.
  3. Step 3
    In a small separate bowl, whisk 1 tbsp cornstarch with 2 tbsp cold water until smooth. Set aside.
  4. Step 4
    Heat 1-2 tbsp olive oil in a large skillet or wok over medium-high heat until shimmering. Cook shrimp in two batches for 1-2 minutes per side until pink, opaque, and lightly seared. Do not overcook. Remove cooked shrimp to a plate.
  5. Step 5
    Reduce heat to medium. Pour the prepared honey garlic sauce base into the skillet, stirring to scrape up any browned bits. Bring to a gentle simmer. Re-whisk the cornstarch slurry and slowly pour into the simmering sauce while continuously whisking for 1-2 minutes, until the sauce thickens to a glossy consistency.
  6. Step 6
    Return all cooked shrimp to the skillet. Toss gently to coat thoroughly in the thickened honey garlic glaze. Simmer for just 1-2 minutes to warm through. Remove from heat, garnish generously with sliced green onions and toasted sesame seeds. Serve immediately with cooked rice/quinoa/cauliflower rice, steamed vegetables, and lime wedges.

Important Information

Nutrition Facts (Per Serving)

It is important to consider this information as approximate and not to use it as definitive health advice.

Allergy Information

Please check ingredients for potential allergens and consult a health professional if in doubt.

« Previous Post
Apple Crisp Mini Cheesecakes: Easy Fall Dessert Recipe
Next Post »
Beef Cheesesteak Tortellini with Rich Provolone Sauce

If you enjoyed this…

Crispy Butter Chicken: The Ultimate Recipe for a Flavorful Feast

Creamy Crack Chicken Gnocchi: A Simple Recipe

White Chicken Chili: The Ultimate Comfort Food Recipe

Primary Sidebar

Browse by Diet

BreakfastDinnerLunchDessertAppetizer

Sweet Peach Yogurt Parfait Delight

One of my fondest memories is from a lazy summer afternoon spent at my grandmother’s house. The sun filtered through the kitchen window, casting a warm glow over the table where she would create her culinary magic. It was during one of those blissful moments that I first tasted her Peach Yogurt Parfait with Honey and Granola. The sweet aroma of ripe peaches mingling with creamy yogurt and the crunch of granola was nothing short of heavenly. It felt like summer captured in a bowl, and I still remember the joy of diving in with a spoon, each layer revealing a new burst of flavor.

When I think about that parfait, I can almost hear the gentle hum of the bees outside, reminding me of the floral notes that honey brings to every bite. The vibrant yellows and soft oranges of the peaches contrast beautifully with the creamy white yogurt and the golden crunch of granola. It’s a dish that not only looks delightful but also tastes like a celebration of fresh, wholesome ingredients.

What makes my version of this Peach Yogurt Parfait special is the careful balance of flavors and textures. I use ripe, juicy peaches, drizzled with locally sourced honey, and a homemade granola that’s bursting with nuts and seeds for an extra crunch. It’s a simple dish, but every layer is crafted with love and attention.

Let me show you exactly how to make this delightful parfait, so you can bring a bit of that summer magic into your kitchen!

Sweet Peach Yogurt Parfait Delight

Why You’ll Love This Recipe

  • Delightfully creamy texture from the Greek yogurt, paired with the juicy sweetness of fresh peaches.
  • Ready in under 20 minutes, making it a quick and satisfying breakfast or snack option.
  • Budget-friendly, using common ingredients that you may already have in your pantry.
  • Customizable with your favorite granola and nuts, allowing you to tailor each parfait to your taste.
  • Perfectly balanced flavors with the bright acidity of lemon juice and the sweetness of honey enhancing the peaches.

Ingredients

  • For the Parfait:
  • 2 cups plain Greek yogurt (or vanilla yogurt for a sweeter option)
  • 2 large ripe peaches, diced (about 2 cups)
  • 1 tablespoon fresh lemon juice (to prevent browning of peaches)
  • 2 tablespoons honey (plus more for drizzling)
  • 1 teaspoon vanilla extract (optional for extra flavor)
  • For the Granola:
  • 1 cup granola (store-bought or homemade; see notes for a simple granola recipe)
  • 1/4 cup sliced almonds (optional for added crunch)
  • 1/4 cup shredded coconut (optional for added flavor)

Let’s dive into some key ingredients that make this Peach Yogurt Parfait so delightful! First, the Greek yogurt is not only creamy but also packed with protein, making it a satisfying option for breakfast or a snack. If you’re looking for a sweeter option, you can easily substitute it with vanilla yogurt, though it may alter the overall flavor balance. Next, the ripe peaches are the star of the show; their natural sweetness shines through, so I recommend choosing peaches that yield slightly to pressure, indicating they’re perfectly ripe. If peaches aren’t in season, feel free to use nectarines or even frozen peaches—just thaw them before use. Finally, honey adds a lovely floral sweetness that ties everything together. If you prefer, maple syrup can serve as a delicious substitute.

Step-by-Step Instructions

  1. Start by preparing the peaches. Wash them thoroughly, then slice and dice them into bite-sized pieces. In a medium bowl, toss the diced peaches with 1 tablespoon of fresh lemon juice to prevent browning. Set aside for about 5 minutes while the lemon juice works its magic.
  2. In a separate bowl, combine the Greek yogurt, 2 tablespoons of honey, and 1 teaspoon of vanilla extract if using. Stir the mixture until smooth and thoroughly blended. This should take about a minute. Avoid overmixing to maintain the creaminess of the yogurt.
  3. Now it’s time to layer your parfait. Grab a clear glass or bowl to showcase your beautiful creation. Start with a generous spoonful of the yogurt mixture at the bottom—about 1/4 cup will do. Use a spoon to spread it evenly.
  4. Add a layer of the diced peaches over the yogurt, ensuring they cover the yogurt completely. You might want to use about half of what you have prepared—roughly 1 cup. This layer should be visually appealing, so arrange the peaches neatly.
  5. Sprinkle 1/4 cup of granola over the peaches. This adds a delightful crunch. Make sure to distribute it evenly to ensure every bite has that satisfying texture. Avoid packing it down too tightly, as you want it to maintain its crunch.
  6. Repeat the layers: spoon in another 1/4 cup of yogurt, followed by another cup of peaches, and another sprinkle of granola. You should have at least two layers, but feel free to add more depending on your glass size.
  7. Finish off your parfait with a drizzle of honey on top for added sweetness and a touch of elegance. If you’re using sliced almonds or shredded coconut, sprinkle them on top now. It adds a lovely visual contrast and extra flavor.
  8. Serve immediately or refrigerate for up to 30 minutes before serving to allow the flavors to meld together. However, I recommend enjoying it fresh to maintain the granola’s crunch.

Pro Tips for the Best Peach Yogurt Parfait With Honey And Granola

  • Make sure to choose ripe peaches for the best flavor and texture. A common mistake is using unripe fruit, which can lead to a less enjoyable parfait. Look for peaches that are fragrant and slightly soft to the touch.
  • Use a clear glass to assemble your parfait; this not only makes for a beautiful presentation but also allows you to see the colorful layers, which adds to the enjoyment of eating it.
  • For an even creamier texture, consider whipping the Greek yogurt with a hand mixer for a couple of minutes before layering. This small adjustment makes a huge difference in mouthfeel.
  • Be mindful of the granola-to-yogurt ratio. Too much granola can overwhelm the parfait, while too little can make it feel too creamy. Aim for about 1/4 cup of granola per layer for the perfect balance.
  • If you’re making this for a gathering, consider preparing the yogurt and peaches ahead of time and layering them just before serving. This ensures the granola stays crunchy!

Variations & Serving Ideas

There are so many ways to get creative with your Peach Yogurt Parfait! For a tropical twist, swap out the peaches for mangoes or pineapples and top with coconut flakes. If you prefer a berry flavor, mix in some blueberries or strawberries with the peaches for added color and taste. For a nutty version, incorporate chopped walnuts or pecans instead of almonds.

As for serving ideas, this parfait pairs beautifully with a side of scrambled eggs for a hearty breakfast or fresh fruit salad for a light lunch. You might also enjoy it alongside whole grain toast with almond butter for an energizing snack. The contrast of flavors and textures will elevate your meal experience!

Storage, Make-Ahead & Reheating

The Peach Yogurt Parfait is best enjoyed fresh, but you can prepare some components ahead of time. Store the layered parfait in an airtight container in the refrigerator for up to 24 hours. However, be cautious; the granola may lose its crunch if stored too long. You can freeze the yogurt and peach mixture for up to 2 months; just remember to thaw it in the refrigerator overnight before serving.

If you plan to enjoy this dish the next day, it can taste even better as the flavors meld together. Just remember to add the granola right before serving to keep its delightful crunch!

Frequently Asked Questions

Can I make Peach Yogurt Parfait With Honey And Granola ahead of time?

Yes — in fact, it tastes even better the next day as the flavors meld. However, I recommend waiting to add the granola until just before serving to maintain its crunch.

What can I substitute for Greek yogurt?

If you prefer a lighter option, you can substitute Greek yogurt with regular yogurt or a dairy-free alternative like coconut yogurt. Just remember that this may alter the creaminess and flavor profile slightly.

Can I use frozen peaches for this parfait?

Absolutely! Just make sure to thaw the frozen peaches before using them. They will still add great flavor, though the texture may be slightly softer than fresh peaches.

How do I make the parfait vegan?

To make a vegan version, substitute the Greek yogurt with a plant-based yogurt alternative, and replace honey with maple syrup or agave nectar. This keeps the parfait sweet while adhering to a vegan diet.

What other fruits can I use in this recipe?

You can mix and match fruits based on your preference. Try using strawberries, blueberries, raspberries, or even bananas. Just make sure to adjust the lemon juice as needed to prevent browning.

Sweet Peach Yogurt Parfait Delight

Final Thoughts

The Peach Yogurt Parfait with Honey and Granola is a delightful blend of creamy yogurt, sweet peaches, and crunchy granola that creates a satisfying and nourishing treat. Each layer bursts with flavor, making it a perfect choice for breakfast or a light dessert.

This is the kind of recipe I come back to again and again, especially when I want something refreshing and wholesome to start my day. The harmony of sweet and tart flavors, combined with the delightful crunch, never fails to lift my spirits!

I encourage you to give this parfait a try and indulge in its comforting goodness. Feel free to share your results or even add your own twist—perhaps a sprinkle of cinnamon or a handful of nuts. Enjoy creating your perfect parfait!

Print
clock clock iconcutlery cutlery iconflag flag iconfolder folder iconinstagram instagram iconpinterest pinterest iconfacebook facebook iconprint print iconsquares squares iconheart heart iconheart solid heart solid icon

Peach Yogurt Parfait


  • Author: Lily author
  • Total Time: 15 minutes
  • Yield: 4 servings 1x
Pin Recipe
Print Recipe

Description

This Peach Yogurt Parfait combines creamy Greek yogurt, juicy peaches, and crunchy granola for a delightful treat. It’s a perfect breakfast or snack that captures the essence of summer in every bite.


Ingredients

Scale
  • For the Parfait:
  • 2 cups plain Greek yogurt (or vanilla yogurt for a sweeter option)
  • 2 large ripe peaches, diced (about 2 cups)
  • 1 tablespoon fresh lemon juice (to prevent browning of peaches)
  • 2 tablespoons honey (plus more for drizzling)
  • 1 teaspoon vanilla extract (optional for extra flavor)
  • For the Granola:
  • 1 cup granola (store-bought or homemade; see notes for a simple granola recipe)
  • 1/4 cup sliced almonds (optional for added crunch)
  • 1/4 cup shredded coconut (optional for added flavor)

Instructions

  1. Start by preparing the peaches. Wash them thoroughly, then slice and dice them into bite-sized pieces. In a medium bowl, toss the diced peaches with 1 tablespoon of fresh lemon juice to prevent browning. Set aside for about 5 minutes while the lemon juice works its magic.
  2. In a separate bowl, combine the Greek yogurt, 2 tablespoons of honey, and 1 teaspoon of vanilla extract if using. Stir the mixture until smooth and thoroughly blended. This should take about a minute. Avoid overmixing to maintain the creaminess of the yogurt.
  3. Now it’s time to layer your parfait. Grab a clear glass or bowl to showcase your beautiful creation. Start with a generous spoonful of the yogurt mixture at the bottom—about 1/4 cup will do. Use a spoon to spread it evenly.
  4. Add a layer of the diced peaches over the yogurt, ensuring they cover the yogurt completely. You might want to use about half of what you have prepared—roughly 1 cup. This layer should be visually appealing, so arrange the peaches neatly.
  5. Sprinkle 1/4 cup of granola over the peaches. This adds a delightful crunch. Make sure to distribute it evenly to ensure every bite has that satisfying texture. Avoid packing it down too tightly, as you want it to maintain its crunch.
  6. Repeat the layers: spoon in another 1/4 cup of yogurt, followed by another cup of peaches, and another sprinkle of granola. You should have at least two layers, but feel free to add more depending on your glass size.
  7. Finish off your parfait with a drizzle of honey on top for added sweetness and a touch of elegance. If you’re using sliced almonds or shredded coconut, sprinkle them on top now. It adds a lovely visual contrast and extra flavor.
  8. Serve immediately or refrigerate for up to 30 minutes before serving to allow the flavors to meld together. However, I recommend enjoying it fresh to maintain the granola’s crunch.
  • Prep Time: 15 mins
  • Cook Time: 0 mins
  • Category: Breakfast
  • Method: No-cook
  • Cuisine: American

Nutrition

  • Serving Size: 1 parfait
  • Calories: 250
  • Sugar: 20 g
  • Sodium: 50 mg
  • Fat: 5 g
  • Saturated Fat: 2 g
  • Unsaturated Fat: 3 g
  • Trans Fat: 0 g
  • Carbohydrates: 40 g
  • Fiber: 3 g
  • Protein: 10 g
  • Cholesterol: 10 mg

Keywords: Choose ripe peaches for the best flavor and texture. Use a clear glass for a beautiful presentation. For creaminess, consider whipping the yogurt before layering. Be mindful of the granola-to-yogurt ratio. Prepare yogurt and peaches ahead of time for gatherings, layering just before serving.

Did you make this recipe?

Share a photo and tag us — we can't wait to see what you've made!

Sun-Kissed Frozen Orange Cream Slush

As a child, summer days felt like they lasted forever. I remember the sticky heat wrapping around me as I played outside, my laughter mingling with the sounds of the neighborhood. But nothing could cool me down quite like the moment I’d spot my grandmother, laboring over her blender, whipping up her famous Frozen Orange Creamsicle Slush. That vibrant orange treat, with its frosty texture and sweet citrus aroma, was like a burst of sunshine in a cup. Just one sip, and I could feel the coolness wash over me, sparking pure joy.

This Frozen Orange Creamsicle Slush has a way of making you feel like a kid again. Its creamy, dreamy consistency is a delightful balance of bright orange and soft vanilla, inviting you to dive right in. The refreshing tang of orange dances on your tongue, while the smooth creaminess envelops you in a comforting embrace. It’s a nostalgic treat that’s perfect for hot summer afternoons or anytime you need a little pick-me-up.

What makes my version of this slush stand out is the addition of a hint of vanilla bean, which elevates the flavor and adds an extra layer of richness. Plus, it’s super easy to whip up with just a few simple ingredients that you probably already have on hand! So, if you’re ready to relive those sun-soaked memories, let me show you exactly how to make it.

Sun-Kissed Frozen Orange Cream Slush

Why You’ll Love This Recipe

  • Each slush is a perfect blend of creamy vanilla and zesty orange, creating a nostalgic flavor reminiscent of summer days.
  • This refreshing treat is ready in under 15 minutes, making it an ideal quick dessert for unexpected guests or hot afternoons.
  • With just 8 simple ingredients, it’s budget-friendly, ensuring you don’t have to break the bank to enjoy a delicious slush.
  • The slush has a perfectly smooth texture, thanks to the combination of ice and ice cream, providing a delightful contrast to the bright citrus flavors.
  • It’s highly customizable; you can easily adjust the sweetness and add fresh herbs for a unique twist that suits your taste.

Ingredients

  • 2 cups orange juice (freshly squeezed or store-bought)
  • 1 cup vanilla ice cream
  • 1 cup crushed ice
  • 1/2 cup milk (whole or 2%)
  • 1/4 cup granulated sugar (adjust based on sweetness preference)
  • 1 teaspoon vanilla extract
  • Zest of 1 orange (for added flavor)
  • Fresh orange slices and mint leaves (for garnish)

The star of this Frozen Orange Creamsicle Slush is the orange juice, which provides the vibrant, citrusy base. Freshly squeezed juice will yield the brightest flavor, but store-bought options can be just as convenient. If you’re opting for store-bought, choose 100% pure juice with no added sugars for the best results. Another essential ingredient is the vanilla ice cream; it adds creaminess and sweetness. You can substitute it with dairy-free ice cream if you’re looking for a vegan option. Whole or 2% milk complements the ice cream, creating a smooth blend. If you want a lower-calorie version, almond or oat milk can be good alternatives.

Lastly, the granulated sugar can be adjusted based on your sweetness preference. If you prefer a more natural sweetener, consider using honey or agave syrup. The orange zest enhances the flavor profile, providing an aromatic pop that brings the whole slush together. Don’t skip it! It adds an extra layer of brightness that makes this slush truly special.

Step-by-Step Instructions

  1. Start by preparing your ingredients. Gather 2 cups of orange juice, 1 cup of vanilla ice cream, and 1 cup of crushed ice. Make sure the ice is finely crushed, as larger chunks can make blending difficult.
  2. In a blender, combine the orange juice, vanilla ice cream, crushed ice, and 1/2 cup of milk. Add 1/4 cup of granulated sugar and 1 teaspoon of vanilla extract. If you like a sweeter slush, consider adding a bit more sugar at this stage.
  3. Add the zest of 1 orange to the blender. This step is crucial for enhancing the citrus flavor of your slush. Make sure not to include the bitter white pith—only the flavorful zest.
  4. Blend the mixture on medium-high speed for about 30-45 seconds. Stop once the ingredients are fully combined and the slush has a smooth, even consistency. If you notice large chunks of ice, blend for an additional 10-15 seconds. Avoid over-blending, as this can make the slush too liquidy.
  5. Once blended, taste the slush. If it needs more sweetness, add a little more sugar and blend for a few more seconds. If it’s too thick, you can add a splash of milk to reach your desired consistency.
  6. Pour the slush into glasses. This recipe typically serves 4, but you can easily double it for larger gatherings. Use a spoon to help guide the slush into the glasses if needed.
  7. Garnish each serving with fresh orange slices and mint leaves. The mint not only adds a pop of color but also a refreshing aroma that complements the citrus flavors beautifully.
  8. Serve immediately and enjoy! If you’ve made extra, you can refrigerate it for a short time, but it’s best enjoyed fresh.

Pro Tips for the Best Frozen Orange Creamsicle Slush

  • Don’t skip the orange zest! It’s a game-changer for flavor. Always zest before juicing to make it easier.
  • Use a high-powered blender for the best texture. A standard blender may struggle with ice, leading to uneven consistency. If you have a food processor, that can work too, but ensure the ice is finely crushed.
  • Adjust the ice-to-liquid ratio carefully. If your slush is too thick, it won’t blend well. Start with less ice and add more until you reach your preferred texture.
  • Be cautious with the sugar! Always start with the lower amount, as you can easily add more, but it’s hard to fix an overly sweet slush.
  • For a fun twist, consider adding a splash of coconut milk or a handful of fresh fruit like strawberries or pineapple. This not only enhances the flavor but also adds a beautiful color contrast.

Variations & Serving Ideas

There are countless ways to put a spin on your Frozen Orange Creamsicle Slush. Consider making a tropical version by adding in some pineapple juice or coconut milk for a delightful tropical twist. If you’re feeling adventurous, try incorporating a handful of frozen mango or peach slices for added sweetness. For a lighter version, swap out the vanilla ice cream for Greek yogurt for a creamy yet tangy alternative.

As for serving ideas, this refreshing slush pairs wonderfully with light summer dishes like grilled chicken skewers, fish tacos, or a simple salad topped with citrus vinaigrette. The bright, zesty flavors of the slush complement these dishes perfectly, making them an ideal pairing for a sunny day.

Storage, Make-Ahead & Reheating

This Frozen Orange Creamsicle Slush is best enjoyed fresh, but if you have leftovers, you can store them in an airtight container in the fridge for up to 2 days. Just keep in mind that the slush may lose some of its texture over time as the ice melts. It doesn’t freeze well, as the ice will turn into a solid block. If you must freeze it, blend again after thawing to restore the slushy consistency. This treat is best the day you make it, as the flavors meld together beautifully overnight, enhancing its deliciousness.

Frequently Asked Questions

Can I make Frozen Orange Creamsicle Slush ahead of time?

Yes — in fact, it tastes even better the next day as the flavors meld. However, it’s best to enjoy it fresh, as the texture can change if stored for too long. If you need to prepare it ahead, keep it in the fridge and re-blend before serving.

What kind of orange juice should I use?

For the best flavor, use freshly squeezed orange juice. However, if you’re short on time, opt for 100% pure store-bought juice without added sugars. This will ensure that your slush remains flavorful and refreshing.

Can I substitute the vanilla ice cream?

Absolutely! If you’re looking for a dairy-free option, coconut milk ice cream or a non-dairy vanilla ice cream can work wonderfully. They will still provide the creamy texture and sweetness you desire.

How can I adjust the sweetness of my slush?

You can easily adjust the sweetness by modifying the amount of sugar added. Start with 1/4 cup and taste the mixture before blending. If you prefer it sweeter, add more sugar gradually until it reaches your desired level.

What should I do if my slush is too thick?

If your slush is too thick, simply add a splash of milk or orange juice and blend again. This will help achieve a more drinkable consistency while maintaining the slushy texture. Adjust gradually to reach your preferred thickness.

Sun-Kissed Frozen Orange Cream Slush

Final Thoughts

The Frozen Orange Creamsicle Slush is a delightful blend of refreshing citrus and creamy goodness, making it a perfect treat for warm days or any time you crave a taste of nostalgia. The way the bright orange flavor dances with the creamy texture truly elevates this slush, transforming it into a satisfying escape from the everyday.

This is the kind of recipe I come back to again and again, especially when I’m looking to cool down or impress guests at a summer gathering. It’s simple to make and always brings smiles all around! I encourage you to try this recipe for yourself—don’t hesitate to share your results or even put your own spin on it. Happy slushing!

Print
clock clock iconcutlery cutlery iconflag flag iconfolder folder iconinstagram instagram iconpinterest pinterest iconfacebook facebook iconprint print iconsquares squares iconheart heart iconheart solid heart solid icon

Frozen Orange Creamsicle Slush


  • Author: Lily author
  • Total Time: 15 minutes
  • Yield: 4 servings 1x
Pin Recipe
Print Recipe

Description

This Frozen Orange Creamsicle Slush is a refreshing treat that combines creamy vanilla and zesty orange flavors. Perfect for hot summer days, it brings back nostalgic memories with every sip.


Ingredients

Scale
  • 2 cups orange juice (freshly squeezed or store-bought)
  • 1 cup vanilla ice cream
  • 1 cup crushed ice
  • 1/2 cup milk (whole or 2%)
  • 1/4 cup granulated sugar (adjust based on sweetness preference)
  • 1 teaspoon vanilla extract
  • Zest of 1 orange (for added flavor)
  • Fresh orange slices and mint leaves (for garnish)

Instructions

  1. Start by preparing your ingredients. Gather 2 cups of orange juice, 1 cup of vanilla ice cream, and 1 cup of crushed ice. Make sure the ice is finely crushed, as larger chunks can make blending difficult.
  2. In a blender, combine the orange juice, vanilla ice cream, crushed ice, and 1/2 cup of milk. Add 1/4 cup of granulated sugar and 1 teaspoon of vanilla extract. If you like a sweeter slush, consider adding a bit more sugar at this stage.
  3. Add the zest of 1 orange to the blender. This step is crucial for enhancing the citrus flavor of your slush. Make sure not to include the bitter white pith—only the flavorful zest.
  4. Blend the mixture on medium-high speed for about 30-45 seconds. Stop once the ingredients are fully combined and the slush has a smooth, even consistency. If you notice large chunks of ice, blend for an additional 10-15 seconds. Avoid over-blending, as this can make the slush too liquidy.
  5. Once blended, taste the slush. If it needs more sweetness, add a little more sugar and blend for a few more seconds. If it’s too thick, you can add a splash of milk to reach your desired consistency.
  6. Pour the slush into glasses. This recipe typically serves 4, but you can easily double it for larger gatherings. Use a spoon to help guide the slush into the glasses if needed.
  7. Garnish each serving with fresh orange slices and mint leaves. The mint not only adds a pop of color but also a refreshing aroma that complements the citrus flavors beautifully.
  8. Serve immediately and enjoy! If you’ve made extra, you can refrigerate it for a short time, but it's best enjoyed fresh.
  • Prep Time: 15 min
  • Cook Time: 0 min
  • Category: Dessert
  • Method: Blending
  • Cuisine: American

Nutrition

  • Serving Size: 1 serving
  • Calories: 200
  • Sugar: 30 g
  • Sodium: 50 mg
  • Fat: 5 g
  • Saturated Fat: 3 g
  • Unsaturated Fat: 2 g
  • Trans Fat: 0 g
  • Carbohydrates: 40 g
  • Fiber: 1 g
  • Protein: 2 g
  • Cholesterol: 20 mg

Keywords: Don't skip the orange zest! It's a game-changer for flavor. Always zest before juicing to make it easier.

Did you make this recipe?

Share a photo and tag us — we can't wait to see what you've made!

Zesty Lemon Poppy Seed Delight

One rainy afternoon, I found myself in my grandmother’s cozy kitchen, the kind that always smelled like warmth and love. She was whipping up her famous Lemon Poppy Seed Loaf, a recipe that had been passed down through generations. As the batter came together, the zesty aroma of fresh lemons filled the air, mingling perfectly with the nutty fragrance of poppy seeds. I can still picture her, apron-clad, as she expertly drizzled a vibrant citrus icing over the loaf, creating a glossy, sun-kissed finish that beckoned us to dive in. It was a moment that sparked my own passion for baking, and this recipe has become a cherished staple in my home ever since.

When you take a bite of this Lemon Poppy Seed Loaf, it’s like a burst of sunshine on your palate. The loaf is beautifully golden, with a tender crumb that melts in your mouth. Each slice is speckled with tiny poppy seeds, adding a delightful crunch that contrasts beautifully with the tangy sweetness of the lemon. And that citrus icing? It’s the finishing touch that elevates this loaf from ordinary to extraordinary, with its bright, zesty flavor dancing on your taste buds.

This recipe stands out because it embraces simplicity while delivering on flavor. I’ve added a hint of vanilla to the batter, enhancing the overall taste and making it even more indulgent. Trust me, once you make this Lemon Poppy Seed Loaf With Citrus Icing, it’ll become a go-to in your baking repertoire.

So, let me show you exactly how to make it!

Zesty Lemon Poppy Seed Delight

Why You’ll Love This Recipe

  • Moist and tender crumb that melts in your mouth, thanks to the perfect balance of butter and buttermilk.
  • Bright, zesty lemon flavor paired with crunchy poppy seeds, creating a delightful texture and taste experience.
  • Easy to whip up in just about an hour, perfect for last-minute gatherings or a cozy afternoon treat.
  • Budget-friendly with everyday ingredients, making it an accessible option for all home bakers.
  • The citrus icing adds a sweet tang that elevates the loaf, turning a simple recipe into a showstopper!

Ingredients

  • 1 ½ cups (190g) all-purpose flour
  • 1 teaspoon baking powder
  • ½ teaspoon baking soda
  • ½ teaspoon salt
  • 3 tablespoons poppy seeds
  • ½ cup (115g) unsalted butter, softened to room temperature
  • 1 cup (200g) granulated sugar
  • 2 large eggs
  • 1 teaspoon vanilla extract
  • 1 teaspoon lemon zest (from about 1 medium lemon)
  • ½ cup (120ml) buttermilk
  • 2 tablespoons fresh lemon juice

For the Citrus Icing:

  • 1 cup (120g) powdered sugar
  • 2 tablespoons fresh lemon juice
  • 1 tablespoon orange juice
  • 1 teaspoon lemon zest (for garnish, optional)

Let’s dive into the key ingredients that make this Lemon Poppy Seed Loaf so special. The all-purpose flour provides the structure and base for the loaf, while the baking powder and baking soda ensure it rises perfectly, giving the loaf a light texture. For a gluten-free variation, you could substitute the flour with a gluten-free all-purpose blend. Poppy seeds not only add a delightful crunch but also contribute to the unique flavor profile that pairs well with the citrus notes.

Unsalted butter is crucial for achieving the buttery richness that makes this loaf so moist. If you’re looking for a dairy-free option, coconut oil or a vegan butter can be used instead. The buttermilk is another essential component, providing acidity that activates the baking soda for a fluffy texture. If you don’t have buttermilk on hand, you can easily make a substitute by mixing ½ cup of milk with 1 tablespoon of vinegar or lemon juice and letting it sit for about 5 minutes.

Step-by-Step Instructions

  1. Preheat your oven to 350°F (175°C). Grease a 9×5-inch loaf pan or line it with parchment paper for easy removal later.
  2. In a medium mixing bowl, whisk together 1 ½ cups of all-purpose flour, 1 teaspoon of baking powder, ½ teaspoon of baking soda, ½ teaspoon of salt, and 3 tablespoons of poppy seeds. This helps to evenly distribute the baking agents and ensures a uniform rise.
  3. In a large mixing bowl, cream together ½ cup of softened unsalted butter and 1 cup of granulated sugar using an electric mixer on medium speed for about 3-4 minutes, until the mixture is light and fluffy. Make sure to scrape down the sides of the bowl occasionally.
  4. Add 2 large eggs, 1 teaspoon of vanilla extract, and 1 teaspoon of lemon zest to the creamed butter and sugar, mixing until fully combined. You want a smooth consistency, so ensure there are no lumps of butter.
  5. In a small bowl, combine ½ cup of buttermilk and 2 tablespoons of fresh lemon juice. Alternately add the dry ingredients and buttermilk mixture to the butter mixture, starting and ending with the dry ingredients. Mix just until combined; do not overmix, as this can lead to a dense loaf.
  6. Pour the batter into the prepared loaf pan. Smooth the top with a spatula, ensuring it’s even. Bake in the preheated oven for 50-60 minutes, or until a toothpick inserted in the center comes out clean. The edges should be lightly golden brown, and the center should feel just set.
  7. Once baked, remove the loaf from the oven and allow it to cool in the pan for about 10 minutes. Then, transfer it to a wire rack to cool completely. Resist the urge to slice too soon, as it will be crumbly if it’s still warm.
  8. While the loaf is cooling, prepare the citrus icing. In a medium bowl, whisk together 1 cup of powdered sugar, 2 tablespoons of fresh lemon juice, and 1 tablespoon of orange juice until smooth. If the icing is too thick, you can add a little more juice to reach your desired consistency.
  9. Once the loaf is completely cool, drizzle the citrus icing over the top. If you like, sprinkle with an additional teaspoon of lemon zest for an extra pop of flavor and color.

Pro Tips for the Best Lemon Poppy Seed Loaf With Citrus Icing

  • Be careful not to overmix your batter; this is a common mistake that can lead to a dense loaf. Mix just until the dry ingredients are incorporated for a light and fluffy texture.
  • Use room temperature ingredients, especially the butter and eggs. This helps to create a smoother batter and ensures even baking. Take your eggs out of the fridge about 30 minutes before you start.
  • For a more pronounced lemon flavor, consider adding a little lemon extract in addition to the zest and juice. Just a half teaspoon can elevate the citrus notes significantly.
  • When measuring your flour, spoon it into the measuring cup and level it off with a knife instead of scooping directly from the bag. This prevents packing and ensures you don’t end up with a dry loaf.
  • Invest in a good quality loaf pan; it makes a difference in heat distribution, which ensures even baking. If your pan is dark-coated, reduce the oven temperature by 25°F to prevent over-browning.

Variations & Serving Ideas

For a delightful twist, consider adding blueberries or raspberries to the batter for a fruity burst of flavor. You can also experiment with different citrus fruits—try lime or grapefruit zest and juice for a refreshing change. For a healthier option, substitute half of the all-purpose flour with whole wheat flour for added fiber without compromising too much on texture.

This Lemon Poppy Seed Loaf pairs beautifully with a light salad, such as a mixed greens salad with a vinaigrette, or a cup of tea for a cozy afternoon treat. It also complements a creamy cheese platter, as the acidity of the loaf balances rich cheeses perfectly. Lastly, a scoop of vanilla ice cream on the side creates a delightful contrast of temperatures and flavors!

Storage, Make-Ahead & Reheating

This Lemon Poppy Seed Loaf can be stored at room temperature for up to 3 days if wrapped tightly in plastic wrap. If you want to keep it longer, it freezes well for up to 3 months. To freeze, wrap the loaf tightly in plastic wrap and then in aluminum foil to prevent freezer burn.

When you’re ready to enjoy it again, simply thaw it in the fridge overnight. Reheat individual slices in the microwave for 15-20 seconds or in a toaster oven until warmed through. Interestingly, many people find that this loaf tastes even better the next day, as the flavors have time to meld!

Frequently Asked Questions

Can I make Lemon Poppy Seed Loaf With Citrus Icing ahead of time?

Yes — in fact, it tastes even better the next day! You can make the loaf a day in advance, allowing the flavors to develop. Just be sure to store it in an airtight container to maintain its moisture.

Can I substitute the poppy seeds?

Absolutely! If you don’t have poppy seeds on hand or prefer an alternative, you can use sesame seeds for a similar crunch or omit them entirely for a smooth loaf.

What can I use instead of buttermilk?

If you don’t have buttermilk, you can easily create a substitute by mixing ½ cup of milk (dairy or plant-based) with 1 tablespoon of vinegar or lemon juice. Let it sit for 5 minutes before using in the recipe.

How can I make this recipe gluten-free?

To make a gluten-free version of this Lemon Poppy Seed Loaf, substitute the all-purpose flour with a gluten-free all-purpose flour blend. Just ensure that the blend contains a binding agent like xanthan gum for the best results.

What is the best way to store leftover loaf?

Leftover Lemon Poppy Seed Loaf should be stored in an airtight container at room temperature for up to 3 days. For longer storage, wrap it tightly and freeze for up to 3 months. Thaw it before serving for the best texture.

Zesty Lemon Poppy Seed Delight

Final Thoughts

The Lemon Poppy Seed Loaf with Citrus Icing is truly a delightful treat that brings a burst of brightness to any occasion. The zesty lemon flavor combined with the subtle crunch of poppy seeds creates a satisfying balance, while the citrus icing adds a touch of sweetness that perfectly complements the loaf’s tanginess.

This is the kind of recipe I come back to again and again, especially when I want to brighten up a gloomy day or celebrate a small victory. The aroma that fills the kitchen as it bakes is absolutely heavenly! I encourage you to give this recipe a try; you might just find it becoming a beloved staple in your home. Don’t forget to share your results or even add your own unique twist—I can’t wait to see what you create!

Print
clock clock iconcutlery cutlery iconflag flag iconfolder folder iconinstagram instagram iconpinterest pinterest iconfacebook facebook iconprint print iconsquares squares iconheart heart iconheart solid heart solid icon

Lemon Poppy Seed Loaf


  • Author: Lily author
  • Total Time: 49 minute
  • Yield: 1 loaf 1x
Pin Recipe
Print Recipe

Description

This Lemon Poppy Seed Loaf is a delightful treat that combines zesty lemon flavor with crunchy poppy seeds. Topped with a citrus icing, it’s perfect for any occasion.


Ingredients

Scale
  • 1 ½ cups (190g) all-purpose flour
  • 1 teaspoon baking powder
  • ½ teaspoon baking soda
  • ½ teaspoon salt
  • 3 tablespoons poppy seeds
  • ½ cup (115g) unsalted butter, softened to room temperature
  • 1 cup (200g) granulated sugar
  • 2 large eggs
  • 1 teaspoon vanilla extract
  • 1 teaspoon lemon zest (from about 1 medium lemon)
  • ½ cup (120ml) buttermilk
  • 2 tablespoons fresh lemon juice
  • 1 cup (120g) powdered sugar
  • 2 tablespoons fresh lemon juice
  • 1 tablespoon orange juice
  • 1 teaspoon lemon zest (for garnish, optional)

Instructions

  1. Preheat your oven to 350°F (175°C). Grease a 9×5-inch loaf pan or line it with parchment paper for easy removal later.
  2. In a medium mixing bowl, whisk together 1 ½ cups of all-purpose flour, 1 teaspoon of baking powder, ½ teaspoon of baking soda, ½ teaspoon of salt, and 3 tablespoons of poppy seeds. This helps to evenly distribute the baking agents and ensures a uniform rise.
  3. In a large mixing bowl, cream together ½ cup of softened unsalted butter and 1 cup of granulated sugar using an electric mixer on medium speed for about 3-4 minutes, until the mixture is light and fluffy. Make sure to scrape down the sides of the bowl occasionally.
  4. Add 2 large eggs, 1 teaspoon of vanilla extract, and 1 teaspoon of lemon zest to the creamed butter and sugar, mixing until fully combined. You want a smooth consistency, so ensure there are no lumps of butter.
  5. In a small bowl, combine ½ cup of buttermilk and 2 tablespoons of fresh lemon juice. Alternately add the dry ingredients and buttermilk mixture to the butter mixture, starting and ending with the dry ingredients. Mix just until combined; do not overmix, as this can lead to a dense loaf.
  6. Pour the batter into the prepared loaf pan. Smooth the top with a spatula, ensuring it’s even. Bake in the preheated oven for 50-60 minutes, or until a toothpick inserted in the center comes out clean. The edges should be lightly golden brown, and the center should feel just set.
  7. Once baked, remove the loaf from the oven and allow it to cool in the pan for about 10 minutes. Then, transfer it to a wire rack to cool completely. Resist the urge to slice too soon, as it will be crumbly if it’s still warm.
  8. While the loaf is cooling, prepare the citrus icing. In a medium bowl, whisk together 1 cup of powdered sugar, 2 tablespoons of fresh lemon juice, and 1 tablespoon of orange juice until smooth. If the icing is too thick, you can add a little more juice to reach your desired consistency.
  9. Once the loaf is completely cool, drizzle the citrus icing over the top. If you like, sprinkle with an additional teaspoon of lemon zest for an extra pop of flavor and color.
  • Prep Time: 15 mins
  • Cook Time: 50-60 mins
  • Category: Dessert
  • Method: Baking
  • Cuisine: American

Nutrition

  • Serving Size: 1 slice
  • Calories: 200
  • Sugar: 15 g
  • Sodium: 150 mg
  • Fat: 8 g
  • Saturated Fat: 5 g
  • Unsaturated Fat: 3 g
  • Trans Fat: 0 g
  • Carbohydrates: 30 g
  • Fiber: 1 g
  • Protein: 3 g
  • Cholesterol: 40 mg

Keywords: Be careful not to overmix your batter; this is a common mistake that can lead to a dense loaf. Use room temperature ingredients for a smoother batter and even baking.

Did you make this recipe?

Share a photo and tag us — we can't wait to see what you've made!

  • Privacy Policy
  • Terms Of Service
  • Contact
  • About
  • GDPR

Copyright © 2025 Homesmad