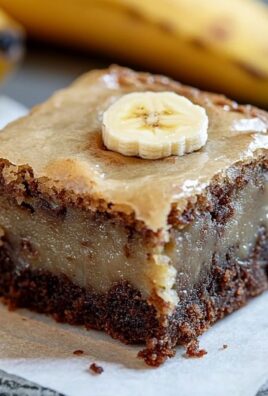
Apple Brownies – is there any combination more wonderfully comforting and utterly irresistible, especially as the crisp autumn air begins to settle in? I find myself continually drawn to the magic that happens when the classic chewiness of a rich chocolate brownie meets the sweet-tart goodness of baked apples. This isn’t just another dessert; it’s a culinary hug, a harmonious blend of textures and flavors that captivates from the very first bite.
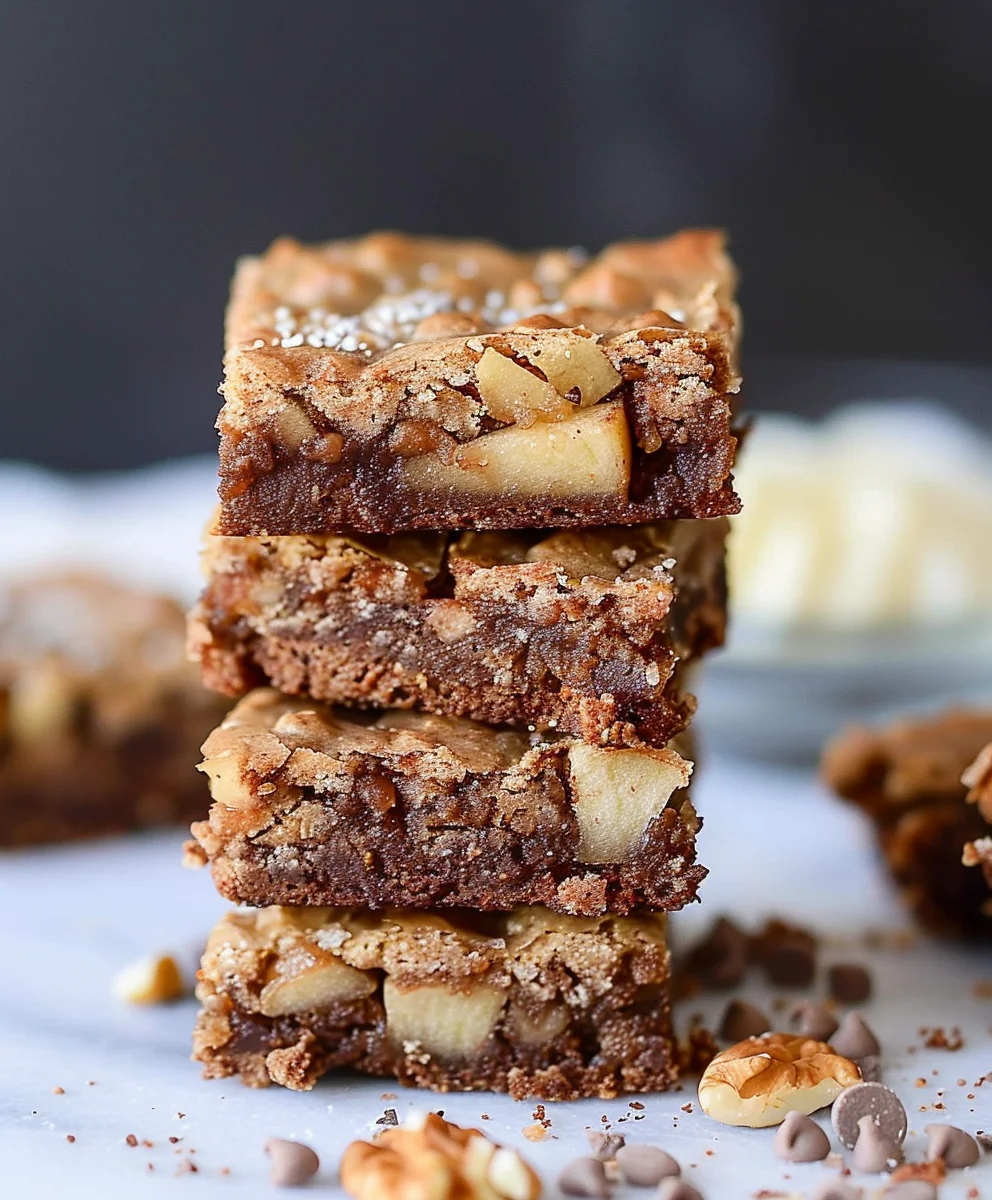
Historically, apples have long been a staple in comforting autumnal dishes, celebrated for their versatility and robust flavor. Integrating them into the beloved American brownie creates a unique fusion that’s both familiar and exciting. People adore this particular treat not only for its incredible taste profile – the deep cocoa notes perfectly balanced by the tender, spiced apple pieces – but also for its delightful textural contrast. Imagine sinking your teeth into a fudgy base, discovering soft pockets of warm fruit, all while a hint of cinnamon and nutmeg dances on your palate. These Apple Brownies offer a surprisingly simple yet profoundly satisfying baking experience, making them a perfect choice for family gatherings, potlucks, or simply a cozy evening in. I am so excited to share this recipe with you!

Ingredients:
- For the Fudgy Brownie Base:
- 1 cup (2 sticks / 226g) unsalted butter: I always reach for unsalted so I can meticulously control the salt content in my baking, ensuring a perfect balance of flavors. This butter is crucial for providing the incredible richness and moisture that defines a truly fudgy brownie, giving it that melt-in-your-mouth texture we all adore.
- 8 ounces (226g) high-quality bittersweet chocolate (60-70% cacao), chopped: Investing in good quality chocolate truly elevates the entire experience, delivering a profound depth of flavor. Bittersweet chocolate is my personal go-to for these brownies because it offers a deep, intense chocolate profile without being overly sweet, creating a beautiful contrast with the apple filling.
- 1 ¾ cups (350g) granulated sugar: This provides the primary sweetness for our brownies and plays a vital role in achieving that signature fudgy, chewy texture. It helps create a dense crumb that is characteristic of a perfect brownie.
- 4 large eggs, at room temperature: It’s a small but significant detail – room temperature eggs incorporate much more smoothly and evenly into the batter. This leads to a more uniform, velvety texture in the final brownie, acting as a powerful binder and adding a luxurious richness.
- 1 tablespoon pure vanilla extract: A generous splash of good quality vanilla isn’t just an enhancer; it brightens and deepens all the chocolate notes, adding a layer of aromatic complexity. Please, don’t skimp on this!
- 1 cup (120g) all-purpose flour: We’re aiming for fudgy, not cakey, so just enough flour to bind all the ingredients together without developing too much gluten is key. This minimal flour content ensures our brownies remain wonderfully dense and moist.
- ½ cup (45g) unsweetened cocoa powder (Dutch-processed recommended): Dutch-processed cocoa powder contributes a beautiful, darker color and a mellower, less acidic chocolate flavor. It creates a lovely, rich base that harmonizes perfectly with the spiced apples.
- ½ teaspoon baking powder: Just a tiny touch of leavening is included to provide a very slight lift, preventing the brownies from becoming overly dense and ensuring they still have a tender crumb.
- ½ teaspoon salt: This ingredient is absolutely essential! Salt doesn’t just make things salty; it magnificently balances the sweetness, enhances the chocolate, and makes all the other flavors truly sing.
- For the Spiced Apple Filling:
- 3 medium-sized firm apples (e.g., Honeycrisp, Fuji, Granny Smith), about 1 ½ pounds total: I love using a blend of apples for complexity. For instance, Honeycrisp offers a lovely sweetness, while Granny Smith contributes a delightful tartness, and both varieties are excellent at holding their shape during baking, preventing them from turning to mush.
- 2 tablespoons unsalted butter: Used to gently sauté the apples, this butter softens them slightly, coaxing out their natural sugars and adding a wonderful layer of richness and flavor to the filling.
- ¼ cup (50g) light brown sugar, packed: Brown sugar introduces a beautiful molasses note and a deeper, more complex sweetness, perfectly complementing the apples with a hint of caramel.
- 1 teaspoon ground cinnamon: The quintessential warm spice that is simply magical when paired with apples. It creates that comforting aroma and flavor profile we all adore.
- ¼ teaspoon ground nutmeg: Just a small pinch of nutmeg elevates the spice blend, adding a fragrant, slightly earthy dimension that beautifully complements the cinnamon.
- ⅛ teaspoon ground cloves (optional, but highly recommended): For those who love a truly complex spice profile, a touch of ground cloves adds a warm, pungent note that provides an extra layer of sophistication to the apple filling. It really makes the spices pop!
- 1 tablespoon fresh lemon juice: A splash of fresh lemon juice is multi-functional: it helps prevent the apples from browning too quickly, brightens their natural flavor, and balances the sweetness.
- For the Optional Cinnamon Glaze:
- 1 cup (120g) powdered sugar (confectioners’ sugar), sifted: Sifting the powdered sugar is a crucial step to eliminate any lumps, guaranteeing a silky-smooth, pourable glaze that will elegantly drizzle over your Apple Brownies.
- 2-3 tablespoons milk (or cream), as needed: The amount of liquid can vary, so add it gradually. This liquid is used to achieve the perfect drizzling consistency for your glaze – not too thick, not too thin.
- ¼ teaspoon ground cinnamon: Adding a touch of cinnamon to the glaze beautifully echoes the spices already present in the apple filling, tying all the flavors of your Apple Brownies together into one harmonious dessert.
Prepare Your Mise en Place:
- Preheat Oven and Prepare Pan: Before we dive into the delightful task of baking, let’s get our workspace ready. Preheat your oven to a comfortable 350°F (175°C). This ensures that when your beautiful batter is ready, the oven is at the optimal temperature for even baking. Next, take a 9×13 inch baking pan and line it with parchment paper, leaving an overhang on the longer sides. This overhang will act as convenient “handles” later, making it incredibly easy to lift your finished Apple Brownies right out of the pan. I also like to lightly grease the parchment paper with a little baking spray or butter, just to be absolutely certain nothing sticks.
- Gather and Measure: Now, let’s gather all our ingredients. I always find it helpful to measure out everything beforehand and have it within arm’s reach. This practice, known as “mise en place,” makes the entire baking process so much smoother and more enjoyable, allowing you to focus on the technique rather than scrambling for ingredients. Ensure your eggs are at room temperature, as this aids in better emulsification with the other ingredients, leading to a smoother batter.
Crafting the Fudgy Brownie Base:
This is where the magic begins for our Apple Brownies – creating that intensely rich and fudgy chocolate foundation.
- Melt Chocolate and Butter: In a large heatproof bowl, combine your chopped bittersweet chocolate and the unsalted butter. Set this bowl over a saucepan of gently simmering water, creating a makeshift double boiler. It’s important that the bottom of the bowl does not touch the water; we want indirect heat here. Stir the mixture occasionally with a rubber spatula or whisk until both the chocolate and butter have completely melted and become a wonderfully smooth, glossy, and homogeneous liquid. The aroma alone is enough to get your taste buds excited! Once fully melted, remove the bowl from the heat and set it aside to cool slightly. We want it warm, but not scorching hot, before we introduce the eggs.
- Whisk in Sugar: Once the chocolate-butter mixture has cooled for about 5-7 minutes – it should still be warm to the touch, but not piping hot – add the granulated sugar directly into the bowl. Using a whisk, vigorously stir the sugar into the chocolate mixture for about 1-2 minutes. This isn’t just about combining; this step is crucial for dissolving some of the sugar crystals, which contributes significantly to the shiny, crackly top and ultra-fudgy texture of our Apple Brownies. You’ll notice the mixture becoming even glossier.
- Add Eggs and Vanilla: Now, one at a time, crack your large, room-temperature eggs into the chocolate mixture, whisking well after each addition until it’s fully incorporated. It’s important to give each egg its moment to blend in before adding the next. This ensures a stable emulsion, contributing to the brownies’ structure and richness. After the eggs, stir in the pure vanilla extract. Continue whisking for another minute or two until the mixture is thick, smooth, and beautifully glossy. This vigorous whisking helps incorporate air and also contributes to that coveted crinkly top.
- Sift Dry Ingredients: In a separate medium-sized bowl, whisk together your all-purpose flour, unsweetened cocoa powder, baking powder, and salt. Sifting these dry ingredients is a small but important step; it ensures they are evenly distributed, lump-free, and aerated, which will make for a lighter, more uniform incorporation into the wet ingredients.
- Combine Wet and Dry: Gently add the sifted dry ingredients into the chocolate-egg mixture. With a rubber spatula, fold them together until just combined. The key here is to mix until no streaks of dry flour remain, but stop immediately once that point is reached. Do not overmix! Overmixing develops gluten in the flour, which can lead to tough, cakey brownies rather than the delightful fudgy ones we’re aiming for. A few small lumps are perfectly fine and often preferred.
Preparing the Spiced Apple Filling:
While our brownie batter rests briefly, let’s prepare the aromatic apple filling that will nestle perfectly within our chocolatey base.
- Prepare the Apples: Take your chosen apples and begin by peeling them thoroughly. Next, core them carefully to remove the seeds and fibrous center. Finally, dice the apples into roughly ½-inch to ¾-inch pieces. I find this size perfect; it ensures the apples soften beautifully during baking but still retain a pleasant texture and don’t disappear into the brownie. Consistency in size also helps them cook evenly.
- Sauté the Apples: In a medium-sized skillet, melt the 2 tablespoons of unsalted butter over medium heat. Once the butter is glistening, add the diced apples to the skillet. Cook, stirring occasionally, for about 5-7 minutes. We’re not trying to make applesauce here; the goal is to just slightly soften them and start to bring out their natural sweetness. They should still have a bit of bite.
- Season the Apples: To the softened apples, add the light brown sugar, ground cinnamon, ground nutmeg, and the optional (but highly recommended!) ground cloves. Pour in the fresh lemon juice as well. Stir everything together thoroughly, ensuring the apples are beautifully coated with the fragrant spice mixture. Continue cooking for another 2-3 minutes, just until the sugar has dissolved and the spices are wonderfully aromatic. The lemon juice will prevent the apples from turning mushy while also brightening their flavor. Remove the skillet from the heat and allow the spiced apples to cool slightly while we prepare for assembly.
Assembling and Baking Your Apple Brownies:
Now comes the exciting part – bringing together our luscious brownie batter and fragrant apple filling to create truly spectacular Apple Brownies!
- Layer the Brownie Batter: Take about two-thirds of your prepared brownie batter and pour it into the parchment-lined 9×13 inch baking pan. Using an offset spatula or the back of a spoon, gently spread the batter evenly across the bottom of the pan. Try to get it as uniform as possible, ensuring a consistent base for our apples. Don’t worry if it’s not perfectly smooth, these are homemade after all!
- Distribute the Apple Filling: Evenly scatter the slightly cooled spiced apple filling over the layer of brownie batter. I like to spread them out so that every bite of our Apple Brownies promises a burst of warm, spiced fruit. Try to leave a small border around the edges, about half an inch, to help contain the apples during baking.
- Top with Remaining Batter: Dollop the remaining one-third of the brownie batter over the apple layer. This can be a bit tricky because the batter is thick, but don’t fret. Use your spatula to gently spread and swirl the top layer of batter over the apples, trying to cover most of them. It’s okay if some apple pieces peek through; it just adds to the rustic charm of these Apple Brownies. The batter doesn’t need to be perfectly smooth or completely cover every single apple piece.
- Bake to Perfection: Carefully place the baking pan into your preheated 350°F (175°C) oven. Bake for approximately 35-45 minutes. Baking times can vary depending on your oven, so keep an eye on them. You’ll know your Apple Brownies are ready when the edges appear set and slightly pulled away from the sides of the pan, and the center is mostly set. A wooden skewer or toothpick inserted into the center should come out with moist crumbs attached, but not wet batter. Overbaking leads to dry, cakey brownies, and we want gloriously fudgy Apple Brownies! The wonderful aroma filling your kitchen will be an excellent indicator that something delicious is happening.
- Cool Completely (This is Important!): Once baked, remove the pan from the oven. This next step is crucial for achieving that ultimate fudgy texture and ensuring easy slicing: allow the Apple Brownies to cool completely in the pan on a wire rack for at least 2-3 hours, or even longer. For the absolute best results, I often let them cool to room temperature, then transfer the pan to the refrigerator for another hour or two. This firming-up period allows the brownies to set properly, intensifying their fudginess and making them much easier to cut into clean squares. Patience is truly a virtue here!
The Optional Cinnamon Glaze:
While your Apple Brownies are cooling, you have the perfect opportunity to whip up a simple, yet elegant, cinnamon glaze to add an extra touch of sweetness and spice.
- Prepare the Glaze: In a medium bowl, combine the sifted powdered sugar and the ¼ teaspoon of ground cinnamon. Sifting the sugar is paramount here, as it prevents any lumps and ensures a smooth, velvety glaze.
- Achieve Desired Consistency: Gradually add the milk (or cream), one tablespoon at a time, whisking continuously until you achieve a smooth, pourable consistency. You want it thick enough to coat the back of a spoon, but thin enough to drizzle beautifully. If it’s too thick, add a tiny bit more milk; if it’s too thin, sift in a little more powdered sugar. It’s all about finding that perfect balance.
- Glaze the Cooled Brownies: Once your Apple Brownies are completely cooled (this is essential – if they’re warm, the glaze will melt right off!), use a spoon or a whisk to drizzle the cinnamon glaze decoratively over the top. You can go for a full coverage, or just a beautiful abstract pattern of lines. The glaze adds an additional layer of flavor and a lovely visual appeal to our already stunning Apple Brownies.
Cooling and Serving:
The final steps to enjoying your homemade Apple Brownies are all about patience and presentation.
- Final Cool Down: If you’ve added the glaze, allow it to set for at least 15-20 minutes before attempting to cut or move the brownies. This ensures the glaze hardens slightly, preventing smudges and sticking. This waiting period also allows the flavors to meld even further, creating a more harmonious taste.
- Slice and Serve: Once the glaze is set and the brownies are thoroughly cooled, use the parchment paper overhang to carefully lift the entire slab of Apple Brownies out of the baking pan and onto a cutting board. For clean cuts, I always recommend using a large, sharp knife. You can wipe the knife clean with a damp cloth between each cut to prevent stickiness and ensure every square looks perfect. Cut them into your desired size squares – 12 to 16 pieces is a good starting point, depending on how generous you want your servings to be.
- Serving Suggestions: These Apple Brownies are absolutely delightful on their own, offering a wonderful balance of rich chocolate and spiced apples. However, if you’re feeling indulgent, they are truly exceptional when served slightly warm (if no glaze is present, or gently reheated if glazed after cutting) with a scoop of vanilla bean ice cream. A dollop of whipped cream or a sprinkle of toasted pecans would also be a fantastic addition, adding another layer of texture and flavor. The combination of warm, gooey brownie, soft spiced apples, and cold ice cream is simply divine. Enjoy every single bite of these homemade treats that are sure to become a new favorite!
Conclusion:
Why These Apple Brownies Are an Absolute Game-Changer
If you’ve followed along with me through this recipe, I truly hope you’re as excited as I am about the prospect of baking these incredible treats. I genuinely believe that once you dive into this recipe, aptly titled Apple Brownies.html, you’ll understand why I’m so enthusiastic. This isn’t just another dessert; it’s a delightful culinary experience that perfectly marries the comforting warmth of apple pie with the fudgy, irresistible texture of a classic brownie. What makes these Apple Brownies a definite must-try is their unique ability to bridge two beloved dessert worlds, creating something entirely new and utterly spectacular. They possess a moist, tender crumb that’s punctuated by soft chunks of caramelized apple, all enveloped in a symphony of warming spices like cinnamon and nutmeg. Every bite is a harmonious blend of sweet, tart, and spiced notes, making them incredibly complex yet wonderfully approachable. They are incredibly easy to make, even for novice bakers, delivering consistently impressive results that will have everyone asking for the recipe. Imagine the aroma filling your kitchen – that alone is reason enough to give them a go! These brownies are a celebration of autumn’s bounty, transforming simple apples into something extraordinary and unexpected. They’re a guaranteed crowd-pleaser, perfect for cozy evenings, festive gatherings, or simply when you’re craving something truly special and comforting. Trust me when I say, they disappear quickly!
Elevate Your Apple Brownie Experience with These Serving Suggestions and Variations
Now that you’re convinced these Apple Brownies are a baking priority, let’s talk about how to make them even more spectacular! While they are absolutely divine on their own, especially when still warm from the oven, a scoop of creamy vanilla bean ice cream melting over the top is pure bliss. The contrast of the warm, spiced brownie with the cold, sweet ice cream is simply out of this world. For an extra touch of decadence, a drizzle of homemade caramel sauce or a sprinkle of flaky sea salt on top of the caramel would elevate them to gourmet status. Don’t underestimate the power of a dollop of freshly whipped cream, perhaps infused with a hint of cinnamon or a touch of maple syrup, to add an airy lightness that complements the rich brownie base beautifully. If you’re a nut lover, consider folding in a handful of toasted pecans or walnuts into the batter for an added crunch and earthy flavor, or simply sprinkle them over the top before baking for a delightful texture contrast. For those who enjoy a little extra chocolate, white chocolate chips can be a fantastic addition, melting into sweet pockets within the brownie. You could also experiment with different apple varieties; Granny Smith will offer a more tart counterpoint, while Honeycrisp or Fuji will lend a sweeter, crisper bite. A swirl of cream cheese frosting, or even a simple dusting of powdered sugar, can add visual appeal and another layer of flavor. They pair wonderfully with a hot cup of coffee, a soothing herbal tea, or even a glass of chilled milk. The possibilities for customizing and enhancing your Apple Brownies are truly endless, allowing you to tailor them to your precise cravings or to suit any occasion.
Your Kitchen Awaits: Bake, Share, and Inspire!
So, what are you waiting for? I wholeheartedly encourage you to set aside some time this week, gather your ingredients, and embark on this delightful baking adventure. You won’t regret it, I promise! There’s a profound joy that comes from creating something delicious with your own hands, and these Apple Brownies offer that satisfaction in spades. Once you’ve pulled these beauties from the oven and experienced their comforting aroma and exquisite taste, I would absolutely love to hear about your experience. Did you add any unique twists? What was your favorite serving suggestion? Please, don’t hesitate to share your thoughts, your successes, and even your “aha!” moments in the comments section below. I also encourage you to snap a photo of your magnificent creations and share them on your social media, tagging me if you can, so I can celebrate your baking triumphs with you! Let’s build a community of enthusiastic bakers who appreciate the magic of these unique treats. Your feedback not only brightens my day but also helps others who are considering trying the recipe. This recipe is more than just instructions; it’s an invitation to create memories, share warmth, and spread happiness through delicious food. So go forth, bake these sensational Apple Brownies, and let your kitchen be filled with the most wonderful, inviting aromas imaginable. Happy baking, my friends!

Apple Brownies Recipe: Chewy, Sweet & Easy Dessert!
Apple Brownies are a culinary hug, a harmonious blend of a chewy bar and sweet-tart baked apples. This treat offers a surprisingly simple yet profoundly satisfying baking experience, perfect for any occasion.
Ingredients
-
1/2 cup (112 g) salted butter, room temperature
-
1 cup (200 g) sugar
-
1 large egg
-
1 cup (133 g) all-purpose flour
-
½ tsp baking powder
-
½ tsp salt
-
½ tsp ground cinnamon
-
1 cup (100 g) chopped apple pieces
-
½ cup (53 g) toasted pecan pieces
Instructions
-
Step 1
Preheat oven to 350°F (175°C). Line a 9×13 inch baking pan with parchment paper, leaving an overhang. Peel, core, and dice the apples into ½-inch to ¾-inch pieces. -
Step 2
In a large bowl, cream the softened salted butter and sugar together until light and fluffy. -
Step 3
Beat in the large egg until fully incorporated and the mixture is smooth. -
Step 4
In a separate medium-sized bowl, whisk together the all-purpose flour, baking powder, salt, and ¼ tsp of the ground cinnamon. -
Step 5
Gradually add the sifted dry ingredients to the wet mixture, folding until just combined. Do not overmix. Gently fold in the chopped apple pieces and toasted pecan pieces. -
Step 6
Pour the batter evenly into the prepared baking pan. Bake for approximately 35-45 minutes, or until the edges are golden and a toothpick inserted into the center comes out with moist crumbs. -
Step 7
Remove the pan from the oven and allow the apple brownies to cool completely in the pan on a wire rack for at least 2-3 hours. For easier slicing and optimal fudgy texture, chill the pan in the refrigerator for an additional hour or two. Lift the cooled slab using the parchment paper, slice into squares, and serve.
Important Information
Nutrition Facts (Per Serving)
It is important to consider this information as approximate and not to use it as definitive health advice.
Allergy Information
Please check ingredients for potential allergens and consult a health professional if in doubt.