Apple Pie: A Timeless American Classic
Apple Pie. Just the name conjures up images of warm, comforting kitchens, family gatherings, and the sweet scent of cinnamon and apples baking in the oven. This isn’t just any dessert; it’s a quintessential symbol of American culinary heritage, a dish so beloved it’s practically woven into the fabric of our national identity.
While the exact origins are debated, the story of Apple Pie is deeply intertwined with the history of apple cultivation in America, dating back centuries. Early settlers brought apple trees across the Atlantic, and the fruit quickly became a staple crop. The combination of readily available apples, simple baking techniques, and the inherent deliciousness of the ingredients led to the evolution of this iconic pie. It wasn’t just a dessert; it was a celebration of the harvest, a symbol of abundance, and a testament to the ingenuity of home cooks.
What makes Apple Pie so universally adored? It’s the perfect balance of sweet and tart, the comforting warmth of the spices, and the delightful contrast between the crisp, flaky crust and the tender, juicy apple filling. The texture is simply irresistible – a satisfying crunch gives way to a soft, flavorful interior. Beyond the taste, it’s also a remarkably versatile dish. From classic recipes passed down through generations to modern twists incorporating unique spices or toppings, there’s an Apple Pie for everyone.
Whether you’re a seasoned baker or a kitchen novice, I invite you to embark on this culinary journey with me. In this recipe, I’ll guide you through creating a truly exceptional Apple Pie, one that will undoubtedly become a cherished addition to your own family traditions.

Ingredients:
- For the Crust:
- 2 1/2 cups all-purpose flour
- 1 teaspoon salt
- 1 cup (2 sticks) unsalted butter, very cold and cut into cubes
- 1/2 cup ice water
- For the Filling:
- 6-8 medium apples (Granny Smith, Honeycrisp, or a mix are recommended), peeled, cored, and thinly sliced
- 3/4 cup granulated sugar
- 1/4 cup packed light brown sugar
- 2 tablespoons all-purpose flour
- 1 teaspoon ground cinnamon
- 1/2 teaspoon ground nutmeg
- 1/4 teaspoon ground allspice
- 1/4 cup lemon juice
- 1 tablespoon unsalted butter, cut into small pieces
Making the Pie Crust
- In a large bowl, whisk together the flour and salt. I like to use a pastry blender for this next part, but you can also use your fingers. Cut in the cold butter until the mixture resembles coarse crumbs. This is crucial for a flaky crust; make sure the butter is really cold!
- Gradually add the ice water, a tablespoon at a time, mixing lightly with a fork until the dough just comes together. Don’t overmix! Overmixing will develop the gluten and result in a tough crust.
- Turn the dough out onto a lightly floured surface and gently form it into two discs, one slightly larger than the other. Wrap each disc in plastic wrap and refrigerate for at least 30 minutes. This allows the gluten to relax and the flavors to meld.
Preparing the Apple Filling
- In a large bowl, combine the sliced apples, granulated sugar, brown sugar, flour, cinnamon, nutmeg, allspice, and lemon juice. Gently toss to coat the apples evenly. The lemon juice helps prevent browning and adds a lovely brightness to the filling.
- Important Tip: Don’t skip the lemon juice! It really makes a difference in the flavor and texture of the pie.
Assembling and Baking the Pie
- On a lightly floured surface, roll out the larger disc of dough into a 12-inch circle. Carefully transfer the dough to a 9-inch pie plate. Trim and crimp the edges.
- Pour the apple filling into the pie crust. Dot the top with the small pieces of butter. This will add richness and help the apples cook evenly.
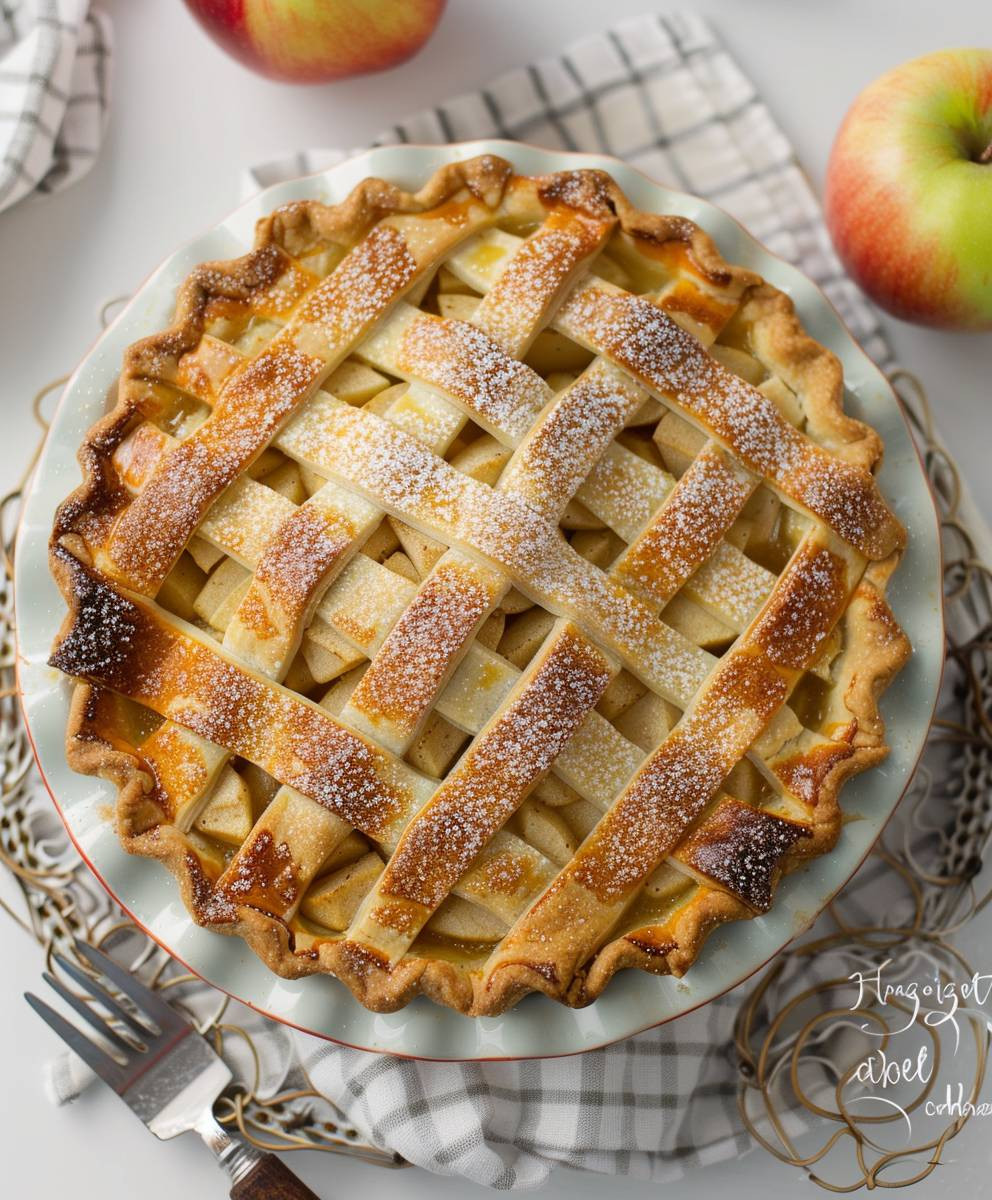
- Roll out the remaining dough into a 10-inch circle. You can either cut this into strips for a lattice top, or simply place it over the filling. Crimp the edges to seal. Cut several slits in the top crust to allow steam to escape. This prevents the pie from bubbling over.
- Preheat your oven to 375°F (190°C). Place the pie on a baking sheet to catch any spills. This is a good idea, trust me!
- Bake for 50-60 minutes, or until the crust is golden brown and the filling is bubbly. If the crust starts to brown too quickly, cover the edges with aluminum foil.
- Let the pie cool completely on a wire rack before slicing and serving. This allows the filling to set properly. Resist the urge to cut into it while it’s still warm!
Tips for the Perfect Apple Pie
- Use a mix of apple varieties for the best flavor and texture. Granny Smith apples provide tartness, while Honeycrisp apples add sweetness and juiciness.
- Don’t overfill the pie. Too much filling can cause it to overflow during baking.
- For a richer crust, use a combination of butter and shortening.
- If you want a sweeter pie, increase the amount of sugar. Taste the filling before adding it to the crust to adjust the sweetness to your preference.
- For a more visually appealing pie, use an egg wash to brush the top crust before baking. This will give it a beautiful golden brown color.
- Store leftover pie in the refrigerator for up to 3 days. You can also freeze it for longer storage.
Serving Suggestions
- Serve your warm apple pie with a scoop of vanilla ice cream or whipped cream for the ultimate indulgence.
- A drizzle of caramel sauce or a sprinkle of cinnamon sugar adds extra flavor and visual appeal.
- Pair your apple pie with a cup of hot coffee or tea for a comforting dessert experience.
Conclusion:
So there you have it – my recipe for the ultimate Apple Pie! I truly believe this recipe is a must-try for several reasons. First, the flavor is simply unparalleled. The combination of sweet, tart apples, fragrant cinnamon, and a perfectly flaky crust creates a symphony of taste that’s hard to resist. It’s the kind of pie that evokes feelings of warmth, comfort, and nostalgia – perfect for any occasion.
Secondly, this Apple Pie recipe is surprisingly easy to follow, even for beginner bakers. I’ve broken down each step clearly, ensuring that even those with limited baking experience can achieve professional-looking and tasting results. Don’t let the thought of making a pie from scratch intimidate you; this recipe is designed to empower you to create something truly special.
Finally, and perhaps most importantly, this Apple Pie is incredibly versatile. You can easily adapt it to your own preferences and dietary needs. Want a richer flavor? Add a tablespoon or two of bourbon or apple brandy to the filling. Prefer a different type of apple? Feel free to experiment! Granny Smith, Honeycrisp, and Braeburn apples all work beautifully in this recipe. You can also adjust the amount of sugar to suit your taste, making it sweeter or tarter depending on your preference.
Serving Suggestions:
This Apple Pie is delicious served warm, straight from the oven. A scoop of vanilla ice cream or a dollop of whipped cream is the classic accompaniment, perfectly complementing the warm spices and sweet apples. For a more sophisticated touch, try serving it with a drizzle of caramel sauce or a sprinkle of cinnamon sugar. It also pairs wonderfully with a cup of strong coffee or a glass of chilled apple cider.
Variations to Try:
To make this Apple Pie even more exciting, consider these variations:
- Crumble Topping: Instead of a traditional lattice top, try a buttery crumble topping for a rustic and delicious twist.
- Spiced Apple Pie: Add a pinch of nutmeg, allspice, or ginger to the filling for a more complex flavor profile.
- Apple Pie with a Streusel Topping: A streusel topping adds a delightful crunch and extra sweetness to the pie.
- Mini Apple Pies: Bake individual mini pies for a charming presentation and portion control.
- Gluten-Free Apple Pie: Use a gluten-free pie crust to make this recipe suitable for those with gluten sensitivities.
I encourage you to try this recipe and make it your own. Experiment with different ingredients, toppings, and serving suggestions to find your perfect Apple Pie. And most importantly, have fun with it! Baking should be a joyful experience, and this recipe is designed to help you create delicious memories in the kitchen.
Share Your Experience!
Once you’ve made this Apple Pie, I’d love to hear about your experience! Share your photos and feedback on social media using #MyApplePieCreation. I can’t wait to see your delicious creations and hear about your baking adventures. Happy baking!
Apple Pie: The Ultimate Guide to Making a Delicious Dessert
Flaky homemade crust filled with a sweet and tart apple filling. A classic American dessert.
Ingredients
Instructions
Recipe Notes
- Use a mix of apple varieties for best flavor and texture.
- Don’t overfill the pie.
- For a richer crust, use a combination of butter and shortening.
- Adjust sugar to your preference.
- An egg wash on the top crust before baking adds a golden brown color.
- Store leftover pie in the refrigerator for up to 3 days or freeze for longer storage.