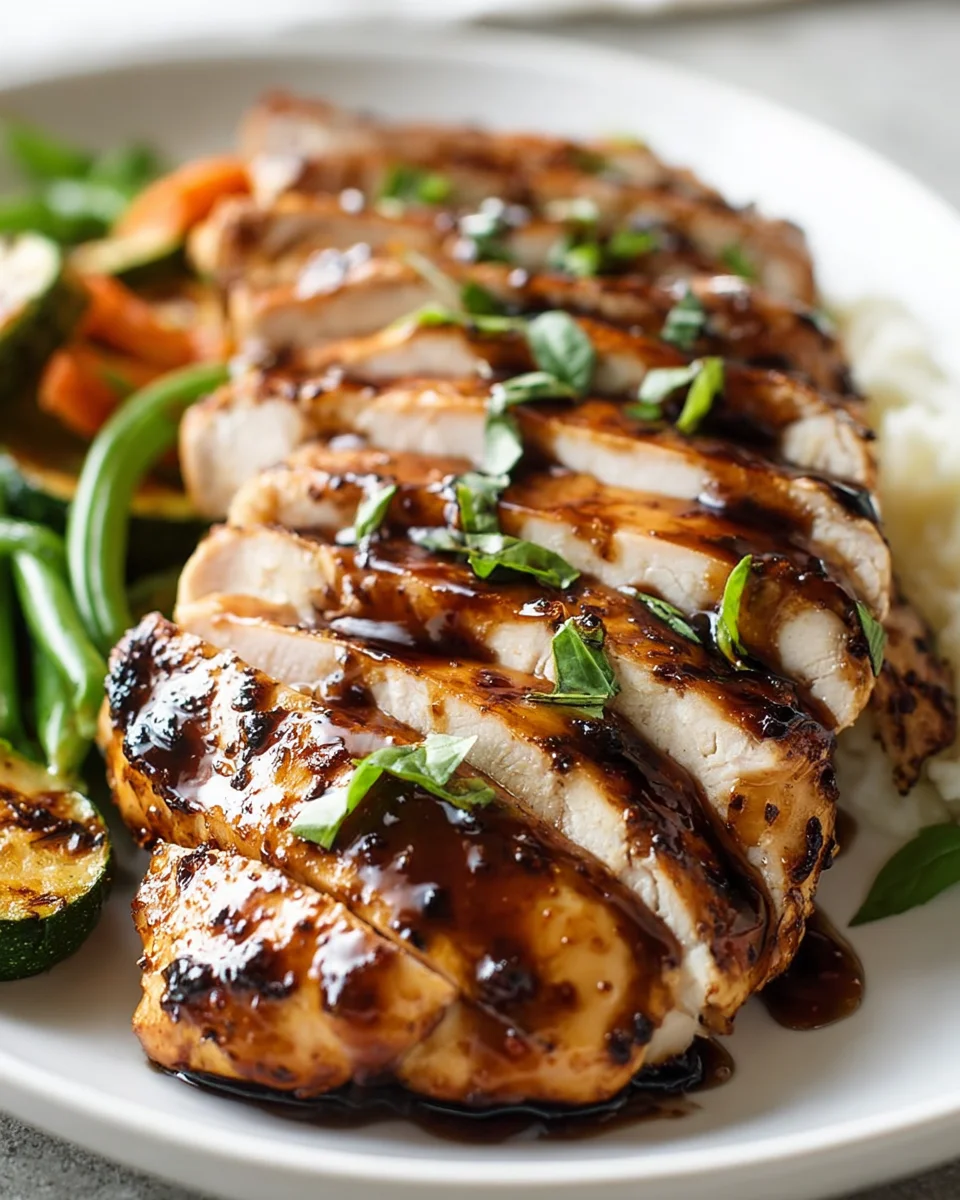
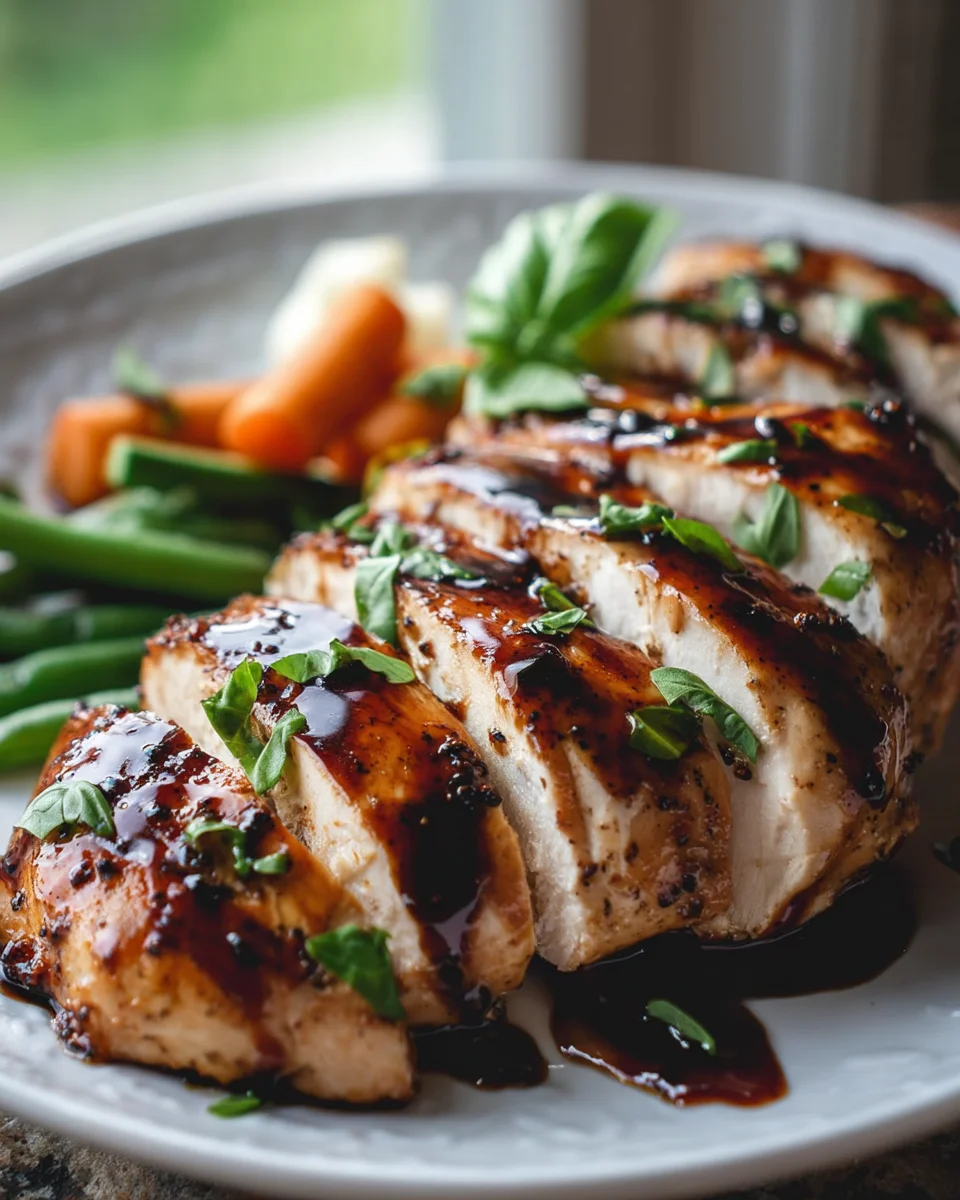
Balsamic Baked Chicken Breast is a true kitchen hero, effortlessly transforming a humble ingredient into a meal bursting with sophisticated flavor. I’m thrilled to share a recipe that combines the rich, sweet tang of authentic balsamic vinegar—a culinary treasure with roots stretching deep into Italian history, particularly from Modena and Reggio Emilia—with the lean versatility of chicken breast. This particular method elevates simple chicken, infusing every bite with that irresistible balance of sweet and savory notes that balsamic is famous for.
Why do I believe you’ll fall in love with this Balsamic Baked Chicken Breast?
Beyond its delectable taste, it’s incredibly convenient, perfect for busy weeknights when you crave something wholesome yet utterly satisfying. The chicken emerges from the oven wonderfully tender and juicy, glazed with a reduction that truly sings on the palate, making it an ideal healthy protein option that never sacrifices on flavor. Get ready to add this deliciously simple and elegant dish to your regular rotation!
Ingredients:
Creating a truly memorable Balsamic Baked Chicken Breast begins with selecting the finest ingredients. Each component plays a crucial role in building the layers of flavor that make this dish so incredibly satisfying. Here’s what you’ll need to gather:
- 4 boneless, skinless chicken breasts: I always opt for good quality, plump chicken breasts, ideally organic or free-range if possible. Aim for pieces that are relatively similar in size to ensure even cooking. This usually equates to about 1.5 to 2 pounds total.
- ½ cup good quality balsamic vinegar: This is the star of our marinade, so don’t skimp here! A high-quality balsamic vinegar, one that’s slightly thicker and sweeter, will make all the difference in the depth of flavor for your Balsamic Baked Chicken Breast. I prefer one that’s aged at least a few years for that extra richness.
- ¼ cup extra virgin olive oil: A robust, fruity extra virgin olive oil complements the balsamic beautifully and helps carry those flavors into the chicken. It also contributes to a lovely tender texture.
- 2 cloves garlic, minced: Freshly minced garlic is absolutely essential here. It provides a pungent aromatic base that perfectly balances the sweetness of the balsamic. Avoid pre-minced garlic in a jar if you can, as the fresh stuff has so much more character.
- 1 tablespoon Dijon mustard: Just a touch of Dijon adds a wonderful tang and emulsifies the marinade, helping it cling better to the chicken. It also provides a subtle spice note that elevates the overall profile.
- 1 tablespoon dried Italian seasoning: This classic herb blend typically includes oregano, basil, thyme, rosemary, and marjoram. It brings a Mediterranean warmth to our Balsamic Baked Chicken Breast. If you don’t have a blend, feel free to use individual dried herbs to your liking.
- 1 teaspoon dried oregano (optional, but recommended): Even if using Italian seasoning, I often add a little extra dried oregano because I love its earthy, slightly peppery flavor with chicken and balsamic.
- ½ teaspoon salt: I recommend a good quality sea salt or kosher salt. We’ll adjust this later, but a good initial seasoning is key for flavor penetration.
- ¼ teaspoon black pepper: Freshly ground black pepper is always my preference. It adds a subtle warmth and aromatic kick.
- 2 tablespoons fresh parsley, chopped (for garnish): A sprinkle of fresh, vibrant green parsley at the end adds a beautiful pop of color and a fresh, clean finish that brightens the entire dish.
- Optional: 1-2 tablespoons brown sugar or honey: If your balsamic is particularly acidic or you prefer a slightly sweeter glaze, a touch of brown sugar or honey can round out the flavors beautifully. I sometimes add this to achieve a richer, more caramelized finish on my Balsamic Baked Chicken Breast.
Kitchen Tools You’ll Need:
Before we dive into the fun part, let’s ensure you have all the necessary kitchen tools at your fingertips. Having these ready will make the cooking process smooth and enjoyable:
- A medium-sized mixing bowl for the marinade.
- A whisk or fork for combining ingredients.
- A shallow dish or a large resealable plastic bag for marinating the chicken.
- A cutting board for prepping the chicken and garlic.
- A sharp knife for mincing garlic and chopping parsley.
- A baking dish (9×13 inch is ideal) or a rimmed baking sheet.
- Aluminum foil or parchment paper (for easy cleanup and preventing sticking).
- Meat thermometer (crucial for ensuring the chicken is cooked through safely).
- Tongs for handling the chicken.
Preparing Your Balsamic Marinade:
The marinade is where the magic truly begins for our Balsamic Baked Chicken Breast. It infuses the chicken with incredible flavor and helps keep it moist and tender during baking. Let’s get started on this flavorful concoction:
- Combine the Liquids: In your medium-sized mixing bowl, pour in the ½ cup of good quality balsamic vinegar and ¼ cup of extra virgin olive oil. I love how these two form the rich, glossy base of our marinade. Give them a quick whisk to start emulsifying them.
- Add the Aromatics and Seasonings: Next, add the 2 cloves of freshly minced garlic. You really want to get that pungent aroma in there! Then, spoon in the 1 tablespoon of Dijon mustard, 1 tablespoon of dried Italian seasoning, and the optional 1 teaspoon of dried oregano. I find that freshly minced garlic and those vibrant herbs are absolutely essential for a truly flavorful Balsamic Baked Chicken Breast.
- Season with Salt and Pepper: Sprinkle in ½ teaspoon of salt and ¼ teaspoon of freshly ground black pepper. Remember, this initial seasoning is crucial for building deep flavor into the chicken itself. If you’re opting for a slightly sweeter marinade, now is the time to stir in 1-2 tablespoons of brown sugar or honey until it fully dissolves. I often lean towards a touch of honey because it adds a beautiful caramelization during baking.
- Whisk Until Well Combined: Take your whisk and vigorously combine all the ingredients until they are thoroughly blended and the mixture looks well emulsified. You’ll notice the distinct aroma of the balsamic, garlic, and herbs filling your kitchen – a promise of the deliciousness to come!
Prepping the Chicken Breasts for Baking:
Properly preparing your chicken breasts is key to achieving that perfect tender and juicy result for your Balsamic Baked Chicken Breast. We want to ensure they absorb as much flavor as possible and cook evenly.
- Prepare the Chicken: Carefully unwrap your 4 boneless, skinless chicken breasts. Take a moment to inspect them. I usually trim off any visible excess fat or dangling bits of skin to ensure a cleaner bake. If your chicken breasts are particularly thick in one area, or you have varying sizes, I highly recommend a technique called “pounding” them.
- Pound for Even Thickness (Optional, but Recommended): Place each chicken breast individually between two sheets of plastic wrap or inside a large resealable bag. Using the flat side of a meat mallet, a heavy rolling pin, or even a sturdy pan, gently pound the thicker parts of the chicken until each breast is about ¾ to 1 inch thick throughout. This ensures even cooking, preventing one part from drying out while another is still cooking. It also creates more surface area for the marinade to adhere to, which means more flavor in every bite of your Balsamic Baked Chicken Breast!
- Marinate the Chicken: Transfer the prepared chicken breasts to a shallow dish or a large resealable plastic bag. Pour the entire balsamic marinade you just prepared over the chicken, making sure each piece is thoroughly coated. I like to massage the marinade into the chicken a bit to ensure it really gets into every crevice.
- Refrigerate and Marinate: Cover the dish or seal the bag and place it in the refrigerator. Allow the chicken to marinate for at least 30 minutes, but for the most flavorful Balsamic Baked Chicken Breast, I recommend marinating for 2 to 4 hours. You can even marinate it overnight (up to 12 hours) for an even deeper flavor infusion, though I find that too much acidity can sometimes change the texture if left for extremely long periods. This marinating step is crucial for both flavor and tenderness, allowing the balsamic and herbs to truly penetrate the meat.
Baking Your Balsamic Baked Chicken Breast:
Now comes the moment of truth: baking! This phase will transform your marinated chicken into a succulent and flavorful Balsamic Baked Chicken Breast that’s sure to impress. Precision here ensures juicy results and a beautiful finish.
- Preheat Your Oven: About 15-20 minutes before you’re ready to bake, preheat your oven to 400°F (200°C). It’s really important to let the oven come to full temperature before putting the chicken in. A properly preheated oven ensures a quick sear on the outside, locking in the juices and giving your Balsamic Baked Chicken Breast a lovely texture.
- Prepare the Baking Dish: Lightly grease a 9×13 inch baking dish or line a rimmed baking sheet with aluminum foil or parchment paper. I often use parchment paper for easy cleanup, and it helps prevent any sticking. If you’re using foil, I still recommend a light spray of cooking oil to be safe.
- Arrange the Chicken: Remove the chicken breasts from the marinade, allowing any excess marinade to drip off slightly. Arrange the chicken breasts in a single layer in your prepared baking dish or on the baking sheet. Discard any remaining marinade that was in contact with the raw chicken to prevent cross-contamination. This is a crucial food safety step. I sometimes reserve a tablespoon or two of the fresh marinade (before it touches the chicken) if I want to brush it on at the end, but never use the used marinade.
- Bake to Perfection: Place the baking dish in the preheated oven. Bake for 20-25 minutes, or until the internal temperature of the thickest part of the chicken reaches 165°F (74°C) using a reliable meat thermometer. Baking times can vary depending on the thickness of your chicken breasts and your oven’s calibration.
Pro Tip for Juicy Chicken:
I always recommend checking the temperature with a meat thermometer. There’s nothing worse than dry chicken, and a thermometer is your best friend in preventing that. Insert it into the thickest part of the breast, avoiding bone if present. If you want a slightly more caramelized top, you can briefly broil the chicken for the last 2-3 minutes, but watch it very carefully to prevent burning!
Serving Suggestions and Finishing Touches:
Once your glorious Balsamic Baked Chicken Breast emerges from the oven, it’s almost ready to be enjoyed. A few final steps will elevate it to restaurant-quality status and ensure maximum deliciousness.
- Rest the Chicken: This is a step I implore you not to skip! Once the chicken reaches 165°F (74°C), remove the baking dish from the oven. Loosely tent the dish with aluminum foil and let the chicken rest for 5-10 minutes. This resting period is absolutely critical. It allows the juices, which have migrated to the center during cooking, to redistribute throughout the meat. The result? Incredibly tender, moist, and juicy Balsamic Baked Chicken Breast every single time. If you cut into it too soon, all those delicious juices will run out, leaving you with dry chicken.
- Prepare a Simple Pan Sauce (Optional, but Highly Recommended): While the chicken is resting, you can quickly make a luscious pan sauce. Carefully pour any accumulated pan juices from the baking dish into a small saucepan. If you reserved some fresh marinade (again, not the one that touched the raw chicken), add a tablespoon or two now. You can also add a splash of chicken broth. Bring this mixture to a simmer over medium heat and cook for 2-3 minutes, stirring frequently, until it slightly thickens into a glossy, flavorful sauce. This concentrated balsamic reduction is phenomenal drizzled over the finished chicken. I sometimes add a small knob of cold butter at the very end and swirl it in off the heat for extra richness and shine.
- Garnish and Serve: Once rested, transfer the Balsamic Baked Chicken Breast to a serving platter. Drizzle generously with the pan sauce, if you made it. Finally, sprinkle liberally with the fresh chopped parsley. The vibrant green not only adds a beautiful visual contrast but also a burst of fresh flavor that cuts through the richness of the balsamic.
Pairing Your Balsamic Baked Chicken Breast:
This versatile dish pairs beautifully with a variety of sides. I often serve it with fluffy quinoa, creamy mashed potatoes, or a light pasta tossed with olive oil and garlic. Roasted asparagus, steamed green beans, or a fresh garden salad with a simple vinaigrette also make fantastic accompaniments. The rich, tangy, and slightly sweet flavor profile of the chicken makes it the star, but it truly shines alongside well-chosen complementary sides. Enjoy the rich, savory, and slightly sweet notes of this perfectly cooked Balsamic Baked Chicken Breast!
Conclusion:
So, there you have it – my go-to recipe for what I truly believe is one of the most satisfying and effortless weeknight meals you can whip up. This isn’t just another chicken recipe; it’s a culinary experience that elevates simple ingredients to extraordinary heights. The incredible depth of flavor from the balsamic glaze, combined with perfectly cooked, tender chicken, makes the Balsamic Baked Chicken Breast an absolute masterpiece of simplicity and taste. I’m talking about succulent, juicy chicken that practically melts in your mouth, infused with that delightful tangy-sweet reduction that makes every bite an absolute pleasure. It’s elegant enough to impress guests at a casual dinner party, yet incredibly quick and easy to prepare on even the busiest Tuesday evening. You’ll be genuinely amazed at how minimal effort yields such profound deliciousness. Trust me, once you try this method, you’ll wonder how you ever cooked chicken any other way. It’s healthful, packed with incredible flavor, and oh-so-versatile, making it an indispensable staple in my kitchen, and I’m confident it will quickly become one in yours too.
Now, let’s talk about making this already fantastic dish even better with some inspired serving suggestions. This chicken is remarkably adaptable, making it a perfect centerpiece for a wide variety of meals, catering to almost any palate or occasion. I personally adore serving my Balsamic Baked Chicken Breast alongside a fluffy bed of quinoa or wild rice; they act like sponges, soaking up all those glorious, flavorful pan juices that are too good to waste. For a complete and vibrantly wholesome meal, consider roasting some seasonal vegetables right alongside the chicken in the same pan – think crisp asparagus spears, tender broccoli florets, colorful bell peppers, or even sweet cherry tomatoes tossed simply with a little olive oil and garlic. The flavors meld together beautifully in the oven, creating a delicious and easy sheet pan wonder that simplifies cleanup. Another fantastic option is a fresh, crisp green salad with a light vinaigrette; the brightness and acidity of the salad provide a wonderful contrast to the richness of the chicken, cutting through the richness beautifully. Don’t forget a generous sprinkle of fresh parsley, basil, or chives right before serving to add a refreshing pop of color and an extra layer of herbaceous freshness. If you’re feeling a bit more indulgent, creamy mashed potatoes are an unbeatable accompaniment, transforming this dish into pure, heartwarming comfort food that’s impossible to resist.
But the culinary adventure truly doesn’t stop there! This recipe is also wonderfully forgiving and incredibly open to your personal creative twists and adaptations. Want to introduce a little bit of heat and spice things up a bit? A pinch of red pepper flakes added to the marinade would provide a lovely, subtle kick. For an aromatic and herbaceous touch, consider adding a sprig of fresh rosemary or thyme to the pan while the chicken bakes, allowing their essential oils to infuse the dish. If you’re a devoted cheese lover, a generous sprinkle of freshly grated Parmesan or creamy crumbled goat cheese over the chicken during the last five to ten minutes of baking will take it to a whole new level of irresistible deliciousness, creating a wonderful crust. You could even transform any potential leftovers (though I warn you, they might be scarce!) into a fantastic chicken salad for lunch the next day, shred it for flavorful tacos, or toss it into a quick pasta dish for an instant gourmet meal. Don’t be afraid to experiment with different types of vinegars in the marinade, though I personally find balsamic to be the undisputed star of this particular show. Perhaps a touch of honey or maple syrup could be brushed on during the last few minutes of baking for an even sweeter glaze if that’s your preference. The possibilities for customization are truly endless, allowing you to tailor this incredible dish to your exact cravings, dietary needs, and what you conveniently have on hand.
My heartfelt encouragement to you is this: Don’t just read about it, truly try it!
I genuinely believe this recipe will quickly become a cherished and frequently revisited addition to your culinary repertoire. It’s more than just a meal; it’s an experience of easy elegance and profoundly satisfying flavor that you’ll be proud to share. Imagine the genuine smiles around your dinner table, the contented sighs, and the sincere compliments you’ll undoubtedly receive – all from a recipe that required so little of your precious time and effort. I am so incredibly excited for you to discover the magic and simplicity of this dish for yourself. Once you’ve cooked it, savored every delicious bite, and perhaps even tweaked it to make it uniquely your own, please come back and share your experience with me! What delightful sides did you pair it with? Did you add any special ingredients or clever twists that you discovered? Your insights, feedback, and culinary adventures are invaluable to me, and I absolutely love hearing how my recipes brighten your kitchens and your family meals. Happy cooking, my friends – you’re truly in for an unforgettable treat!
Balsamic Baked Chicken Breast: Easy & Healthy Dinner
Balsamic Baked Chicken Breast is a true kitchen hero, effortlessly transforming a humble ingredient into a meal bursting with sophisticated flavor. This recipe combines the rich, sweet tang of authentic balsamic vinegar with lean chicken breast, infusing every bite with an irresistible balance of sweet and savory notes. Incredibly convenient and wholesome, it’s perfect for busy weeknights.
Ingredients
Instructions
Important Information
Nutrition Facts (Per Serving)
It is important to consider this information as approximate and not to use it as definitive health advice.
Allergy Information
Please check ingredients for potential allergens and consult a health professional if in doubt.