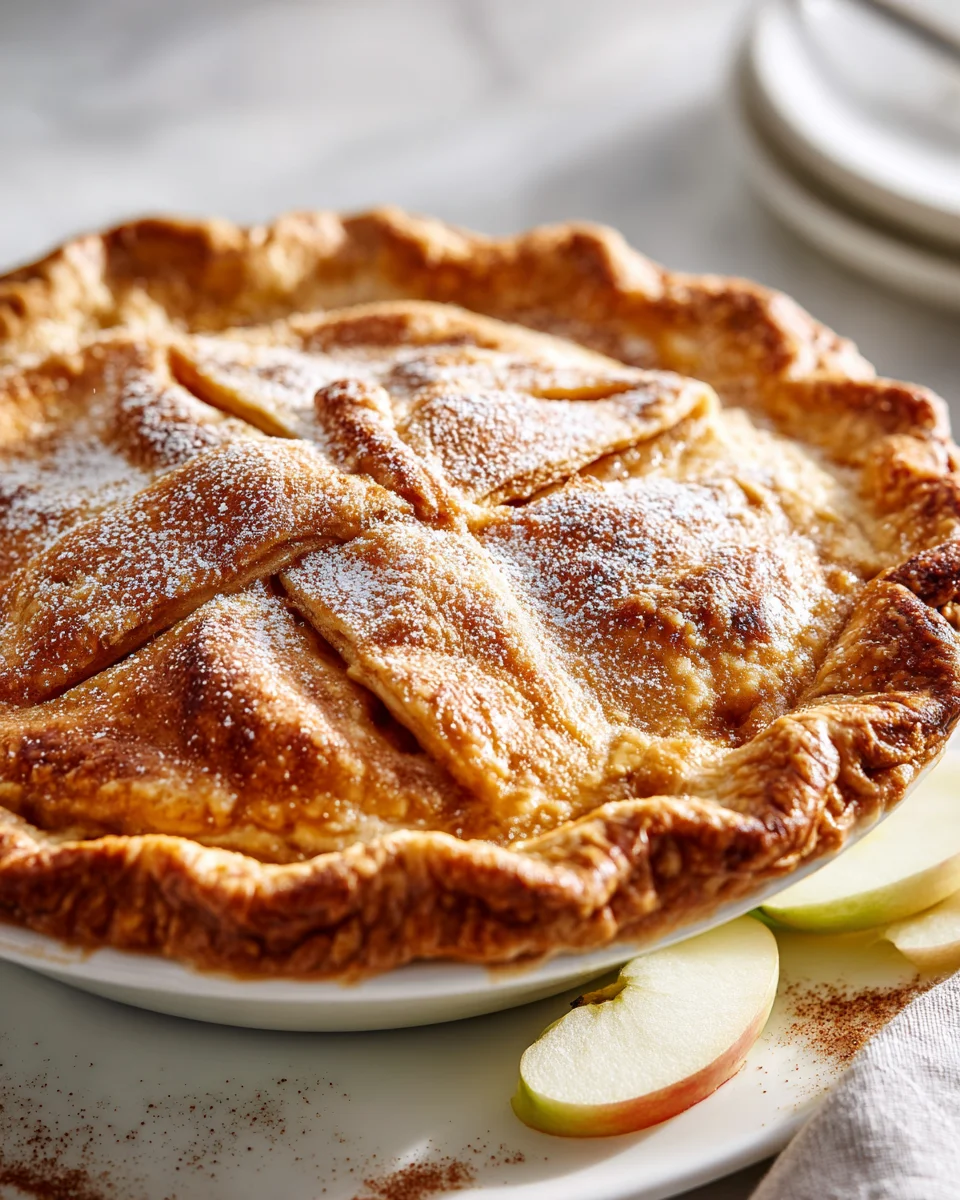
Apple Butter Pie
Apple Butter Pie is not just any apple pie; it’s a hug in pie form, and I am so excited to share it with you! If you’re looking for a dessert that’s bursting with deep, rich apple flavor and all the comforting spices of autumn, this is absolutely the one for you. What makes this pie truly special is the star ingredient: apple butter. Unlike a regular apple pie made with fresh apple slices, this recipe uses that luscious, slow-cooked apple spread, which means every bite delivers an incredibly smooth, almost custardy texture and an intensely concentrated apple essence, wonderfully infused with cinnamon, nutmeg, and cloves. Trust me, the aroma alone as it bakes will make your kitchen feel like the coziest place on earth.
You’re going to love this pie because it offers a delightful twist on a classic, providing a unique depth of flavor that a regular apple pie simply can’t achieve. It’s perfect for holiday gatherings, a special Sunday dinner, or simply when you want to treat yourself to something truly extraordinary and comforting. This dish is essentially a creamy, spiced apple butter filling, usually sweetened just a touch more, baked to golden perfection in a flaky, buttery pie crust. It’s a nostalgic taste of home, elevated, and I think you’ll find it utterly irresistible.

Ingredient Notes
There’s something wonderfully comforting about an Apple Butter Pie, and the beauty of it lies in a few key ingredients that truly shine. Let’s delve into what makes this pie so special and how you can tailor it to your liking.
Apple Butter
- The Star Ingredient: Obviously, apple butter is the heart and soul of this pie! Unlike apple sauce, apple butter is slow-cooked until it’s deeply caramelized, incredibly concentrated, and naturally thick, giving our pie a rich, intense apple flavor and a beautifully smooth texture. I highly recommend using a high-quality apple butter that you love the taste of.
- Homemade vs. Store-Bought: If you have homemade apple butter, that’s fantastic – its unique flavor will truly elevate your pie. If you’re using store-bought, look for one with minimal added sugar and a robust apple flavor. Many brands offer different spice profiles, so pick one that appeals to you!
- Consistency Check: Ensure your apple butter isn’t too runny. If it seems thin, you might want to consider a slight increase in your chosen thickener.
Pie Crust
- The Foundation: A good pie crust is essential. I often opt for a homemade all-butter pastry crust for its flaky texture and rich flavor, which perfectly complements the apple butter. You’ll need enough for a double crust – one for the bottom and either a full top crust or a decorative lattice.
- Store-Bought Option: Don’t feel pressured to make your own crust from scratch! High-quality store-bought pie dough (found in the refrigerated section) works wonderfully and saves a lot of time. Just make sure to get two rounds for a full pie.
- Gluten-Free Alternative: If you’re catering to dietary needs, a good gluten-free pie crust can be substituted without any issues. The filling itself is naturally gluten-free.
Sweeteners, Spices, and Thickeners
- Sweeteners: While apple butter is inherently sweet, a touch of additional sugar often helps balance the flavors and achieve that perfect pie sweetness. I like to use a mix of granulated sugar and a little brown sugar for depth, but you can adjust to your preference. Maple syrup or a touch of honey could also work for a different flavor profile.
- Spices: Your apple butter likely has spices already, but a little extra cinnamon, nutmeg, a pinch of cloves, or allspice can really make the pie sing. It enhances the warmth and coziness. Taste your apple butter first and then decide what to add – you don’t want to overdo it!
- Thickeners: Even though apple butter is thick, a small amount of cornstarch or all-purpose flour ensures the filling sets beautifully and isn’t runny when sliced. For a clear, glossy finish, cornstarch is my go-to.
Optional Extras
- Lemon Zest/Juice: A tiny bit of lemon zest or a squeeze of lemon juice can brighten the flavors, cutting through the richness of the apple butter.
- Egg Wash: For that beautiful golden-brown, shiny crust, an egg wash (one egg beaten with a tablespoon of water or milk) brushed over the top crust before baking is key.
Step-by-Step Instructions
Making an Apple Butter Pie is a delightful process, and I promise you, the aroma filling your kitchen will be absolutely irresistible. Here’s how I bring this comforting dessert to life:
-
Prepare Your Crust: First things first, get your pie crust ready. If you’re using homemade dough, roll out one half and carefully fit it into a standard 9-inch pie plate. Trim the edges, leaving about a 1/2-inch overhang. Pop this into the refrigerator while you prepare the filling. If you’re blind baking (which I sometimes do to prevent a soggy bottom, especially with a very moist apple butter), prick the bottom with a fork, line with parchment paper, fill with pie weights or dried beans, and bake at 375°F (190°C) for 15 minutes. Remove weights and paper, then bake for another 5-10 minutes until lightly golden. Let it cool.
-
Mix the Apple Butter Filling: In a medium bowl, combine your apple butter. Add the granulated sugar, brown sugar (if using), cornstarch (or flour), cinnamon, nutmeg, and any other spices you choose. If using, add a tiny bit of lemon zest or a splash of lemon juice here. Stir everything together until it’s thoroughly combined and smooth. Taste a tiny bit to ensure the sweetness and spice levels are to your liking – remember it will mellow a little during baking.
-
Assemble the Pie: Retrieve your chilled (or blind-baked and cooled) pie crust from the refrigerator. Pour the apple butter filling evenly into the pie shell. Spread it gently with a spatula to ensure it’s distributed from edge to edge.
-
Add the Top Crust: Now, for the top! Roll out the second half of your pie dough. You can either place it directly over the filling, creating vent slits with a sharp knife, or get creative with a lattice top. If you’re doing a full top crust, once it’s in place, trim the edges to match the bottom crust, leaving that same 1/2-inch overhang. Press the top and bottom crusts together and crimp the edges decoratively using your fingers or a fork.
-
Egg Wash and Sugar Sprinkle (Optional but Recommended): If you want a beautiful golden-brown finish, whisk one egg with a tablespoon of water or milk to create an egg wash. Brush this lightly over the top crust. For an extra touch, sprinkle a tablespoon of coarse sugar (like turbinado or demerara) over the top – it adds a lovely sparkle and a bit of crunch.
-
Bake Your Pie: Preheat your oven to 400°F (200°C). Place the pie on a baking sheet (to catch any potential drips). Bake for 15-20 minutes at this higher temperature to help set the crust. Then, reduce the oven temperature to 375°F (190°C) and continue baking for another 35-45 minutes, or until the crust is deeply golden brown and the filling is bubbly and set. If the edges of the crust start browning too quickly, you can loosely tent them with aluminum foil.
-
Cool Completely: This is arguably the most crucial step! Once baked, transfer the pie to a wire rack and let it cool completely for at least 3-4 hours, or even longer. I know it’s hard to wait, but cooling allows the filling to fully set, ensuring clean, beautiful slices. Slicing it too soon will result in a messy, runny pie. Trust me on this one!
Tips & Suggestions
Making an Apple Butter Pie is usually straightforward, but here are a few of my favorite tips and tricks to ensure yours turns out absolutely perfect and gets rave reviews:
- Preventing a Soggy Bottom: This is a common pie challenge! My top trick is to either blind bake your bottom crust before adding the filling, as mentioned in the instructions, or to brush the raw bottom crust with a thin layer of egg white before pouring in the filling. This creates a barrier that helps prevent the crust from becoming saturated.
- Spice Adjustment: Apple butter flavor profiles can vary significantly. Before you add extra spices, taste your apple butter. If it’s already robustly spiced, you might only need a pinch more of cinnamon. If it’s milder, feel free to be a bit more generous with your favorite warm spices like cloves or allspice.
- Crust Decoration: Get creative with your top crust! Beyond a simple lattice, you can use small cookie cutters to create decorative shapes (like leaves or apples) from leftover dough to place on top of a full crust. Brushing with egg wash and sprinkling with coarse sugar always adds a professional touch.
- Serving Suggestions: While this pie is fantastic on its own, it truly shines when served warm with a scoop of good quality vanilla bean ice cream, a dollop of freshly whipped cream, or a drizzle of caramel sauce. A light dusting of extra cinnamon or nutmeg on top of your serving adds a nice finish.
- Don’t Rush the Cooling: I know the waiting is excruciating, but proper cooling is essential for a pie with a firm, sliceable filling. If you cut into it too soon, the filling will be runny. Resist the temptation!
- Baking Sheet for Safety: Always place your pie on a baking sheet before putting it in the oven. This catches any potential drips from the filling or butter bubbling over, making cleanup much easier.
- Flavor Enhancements: For an extra layer of flavor, consider adding a teaspoon of pure vanilla extract to your filling mixture. It beautifully complements the apple and spice notes.
Storage
Once you’ve baked your delicious Apple Butter Pie, proper storage ensures it stays fresh and flavorful for as long as possible. Here’s how I usually handle it:
- At Room Temperature: After the pie has cooled completely, you can store it loosely covered with foil or plastic wrap at room temperature for up to 1-2 days. If your kitchen is particularly warm or humid, I’d lean towards refrigeration sooner.
- In the Refrigerator: For longer storage, or if you live in a warmer climate, the refrigerator is your best friend. Wrap the cooled pie tightly in plastic wrap or aluminum foil, or place it in an airtight pie carrier. It will keep well in the fridge for 3-4 days.
- Freezing Whole Pie: An unbaked Apple Butter Pie freezes beautifully! Assemble the pie as directed, but do not bake. Wrap it tightly in several layers of plastic wrap and then a layer of foil. Freeze for up to 2-3 months. When ready to bake, unwrap and bake from frozen at 400°F (200°C) for 20 minutes, then reduce to 375°F (190°C) and continue baking for 60-90 minutes, or until golden brown and bubbly. You may need to tent the edges with foil partway through.
- Freezing Baked Pie: You can also freeze a baked pie. Let it cool completely, then wrap it tightly as described above. It will last for up to 1-2 months. To reheat, thaw in the refrigerator overnight, then warm in a 300°F (150°C) oven for about 20-30 minutes, or until heated through.
- Reheating Slices: If you just want to warm up a slice, a quick zap in the microwave for 20-30 seconds works, but for a crisper crust, I prefer to pop it in a toaster oven or conventional oven at 350°F (175°C) for 10-15 minutes.
Final Thoughts
And there you have it! I truly believe this Apple Butter Pie isn’t just another dessert; it’s a warm hug in pie form. Its rich, spiced apple butter filling, nestled in a flaky crust, creates a flavor profile that’s both comforting and delightfully unique. I promise, once you experience the deep, concentrated apple goodness and subtle spices of this particular pie, you’ll understand why it’s a staple in my kitchen. It’s perfect for sharing with loved ones or savoring by yourself, a true testament to simple ingredients coming together to create something extraordinary. Don’t just bake a pie, bake the Apple Butter Pie – you won’t regret it!

Best Apple Butter Pie Recipe: Sweet, Spiced, Easy Dessert
- Total Time: 1 hour 30 minutes
- Yield: 8 servings
Description
Apple Butter Pie is a comforting dessert bursting with rich apple flavor and warm spices. This unique twist on a classic apple pie is perfect for any occasion.
Ingredients
- Apple butter
- Granulated sugar
- Brown sugar
- Cornstarch or all-purpose flour
- Cinnamon
- Nutmeg
- Cloves
- Allspice
- Lemon zest or juice (optional)
- Egg (for egg wash)
- Water or milk (for egg wash)
- Coarse sugar (like turbinado or demerara, for sprinkling)
- Homemade or store-bought pie crust (enough for a double crust)
Instructions
- Prepare Your Crust: If using homemade dough, roll out one half and fit it into a 9-inch pie plate. Trim the edges, leaving a 1/2-inch overhang. Refrigerate while preparing the filling. If blind baking, prick the bottom, line with parchment, fill with weights, and bake at 375°F (190°C) for 15 minutes. Remove weights and bake for another 5-10 minutes until lightly golden. Let cool.
- Mix the Apple Butter Filling: In a medium bowl, combine apple butter, granulated sugar, brown sugar, cornstarch (or flour), cinnamon, nutmeg, and any additional spices. Add lemon zest or juice if using. Stir until smooth and taste for sweetness and spice.
- Assemble the Pie: Retrieve the chilled pie crust and pour the apple butter filling evenly into the shell, spreading it gently.
- Add the Top Crust: Roll out the second half of the dough and place it over the filling, creating vent slits or a lattice top. Trim edges to match the bottom crust and crimp edges decoratively.
- Egg Wash and Sugar Sprinkle: Whisk one egg with a tablespoon of water or milk and brush over the top crust. Sprinkle with coarse sugar if desired.
- Bake Your Pie: Preheat oven to 400°F (200°C). Place pie on a baking sheet and bake for 15-20 minutes. Reduce temperature to 375°F (190°C) and bake for another 35-45 minutes until golden brown and bubbly. Tent edges with foil if browning too quickly.
- Cool Completely: Transfer pie to a wire rack and let cool for at least 3-4 hours before slicing.
- Prep Time: 30 mins
- Cook Time: 1 hour
- Category: Dessert
- Method: Baking
- Cuisine: American
Nutrition
- Serving Size: 1 slice
- Calories: 250
- Sugar: 20 g
- Sodium: 150 mg
- Fat: 10 g
- Saturated Fat: 5 g
- Unsaturated Fat: 3 g
- Trans Fat: 0 g
- Carbohydrates: 35 g
- Fiber: 2 g
- Protein: 3 g
- Cholesterol: 50 mg
Keywords: To prevent a soggy bottom, consider blind baking the crust or brushing it with egg white before adding the filling. Adjust spices based on the flavor profile of your apple butter. Serve warm with vanilla ice cream or whipped cream for a delightful treat.