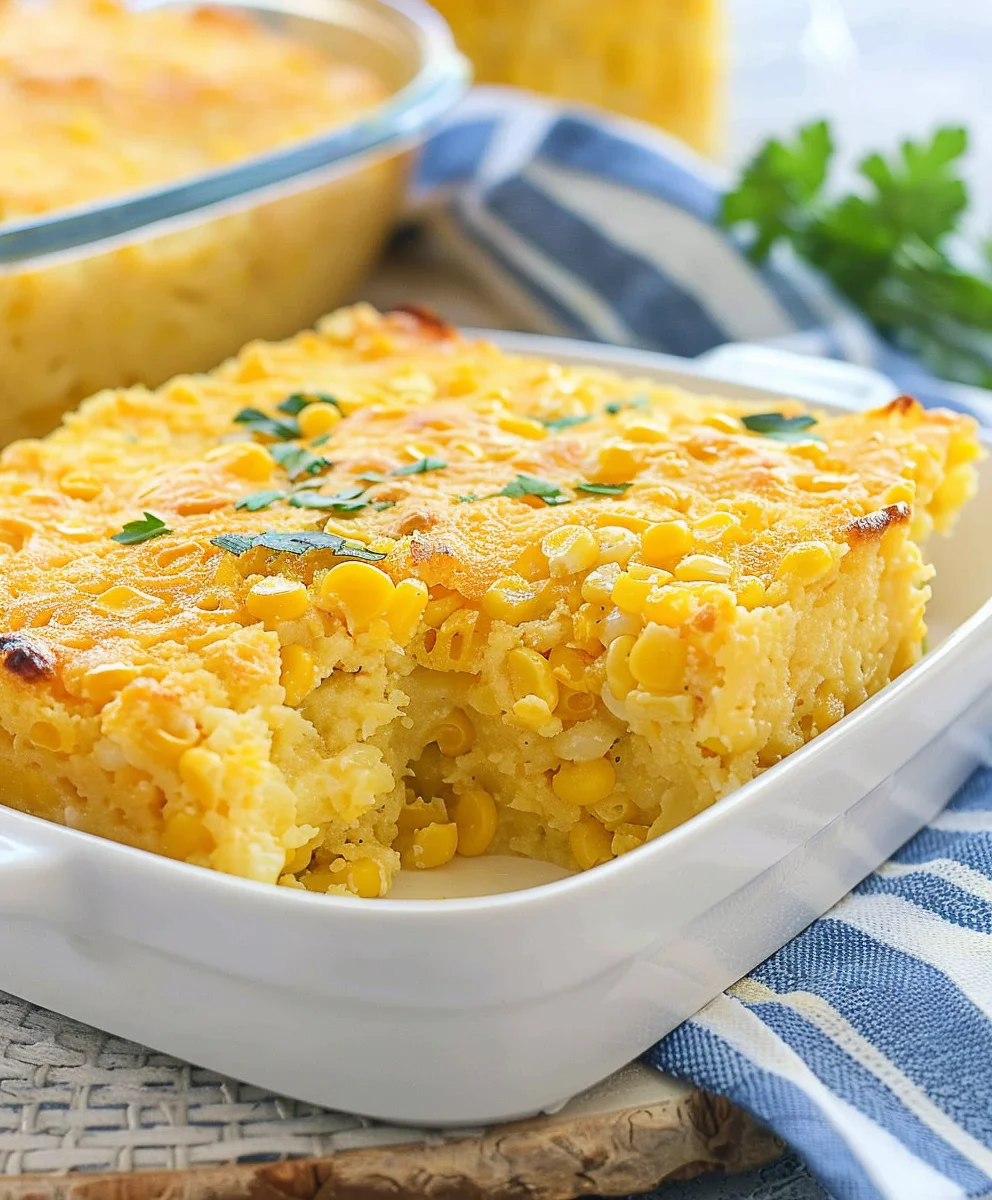
Corn Casserole is more than just a side dish; it’s a warm hug in a baking dish, a testament to comforting, home-style cooking that brings everyone to the table. This beloved dish holds a special place in the hearts of many, particularly throughout the American South, where it frequently graces holiday spreads like Thanksgiving and Christmas, and makes a welcome appearance at potlucks and family gatherings. I’ve always found immense joy in how a few simple ingredients can transform into something so incredibly satisfying and universally loved.
What makes a good Corn Casserole truly irresistible? It’s that perfect balance of sweet, tender corn kernels enveloped in a rich, creamy base, often with a delightful hint of savory cheese or a buttery, slightly crisp topping. The textures alone are enough to make your mouth water – smooth and creamy, punctuated by the burst of fresh corn. Beyond its incredible flavor and comforting texture, its popularity also stems from its surprising ease of preparation. It’s a dish that feels elaborate but comes together with minimal fuss, making it an ideal choice for busy weeknights or when you need a reliable crowd-pleaser for a special occasion. Prepare to fall in love with this timeless classic!
Ingredients:
- Two (2) 15.25-ounce cans of whole kernel corn, well-drained
- One (1) 14.75-ounce can of cream-style corn
- One (1) 8.5-ounce package of corn muffin mix (like Jiffy brand)
- One (1) 16-ounce container of full-fat sour cream
- One-half (1/2) cup (one stick) of unsalted butter, melted
- One (1) cup of shredded sharp cheddar cheese, plus an additional half (1/2) cup for topping (optional)
- Salt and freshly ground black pepper to taste
- For an extra kick (optional): One (1) 4-ounce can of diced mild green chilies, drained
- For garnish (optional): Fresh chopped chives or green onions
Equipment You’ll Need:
Before we dive into creating this delightful corn casserole, let’s gather our tools to ensure a smooth and enjoyable cooking experience. Having everything ready truly makes the process so much more relaxing!
- A 9×13 inch baking dish (or a similar sized oven-safe dish). A ceramic or glass dish works beautifully for even baking.
- A large mixing bowl. This is where all the magic happens as we combine our ingredients.
- A whisk or a sturdy spatula. Either will work perfectly for blending everything together until it’s wonderfully smooth.
- A small microwave-safe bowl or a small saucepan for melting the butter.
- Measuring cups and spoons, naturally, to ensure all our quantities are just right.
- An oven, preheated and ready to transform our mixture into a golden, bubbly casserole.
Preparing Your Corn Casserole:
Get ready to create a truly irresistible side dish that will have everyone asking for seconds! This corn casserole recipe is not only incredibly delicious but also surprisingly simple to put together. Let’s start with the foundational steps to ensure our corn casserole is absolutely perfect, boasting that creamy texture and rich flavor we all adore. We’re aiming for a dish that is both comforting and incredibly flavorful, making it a staple for any meal.
- Preheat Your Oven: First things first, let’s get that oven nice and toasty. Adjust your oven rack to the middle position and preheat it to 350°F (175°C). This ensures that your corn casserole will bake evenly and develop that beautiful golden-brown crust we’re looking for. A properly preheated oven is key to successful baking, preventing the casserole from cooking too quickly on the outside and remaining raw in the center.
- Prepare Your Baking Dish: While the oven is heating up, it’s time to get your baking dish ready. Lightly grease a 9×13 inch baking dish. You can use non-stick cooking spray, butter, or even a little bit of vegetable oil. This small but crucial step will prevent your corn casserole from sticking to the dish, making serving a breeze and ensuring every delicious morsel comes out intact. We don’t want any of that wonderful creamy goodness left behind!
- Drain the Whole Kernel Corn: Grab your two cans of whole kernel corn. Open them up and place the corn into a colander. Allow them to drain really well. We want to get rid of as much excess liquid as possible. While a little moisture is fine, too much can make our corn casserole watery instead of delightfully creamy. You can even give the colander a few gentle shakes to help things along.
Crafting the Creamy Base for Your Corn Casserole:
Now comes the heart of our corn casserole – mixing all the wonderful ingredients together to form that lusciously creamy and flavorful base. This is where all the distinct tastes begin to meld into a harmonious symphony, promising a comforting and incredibly satisfying dish. Don’t be afraid to get a little hands-on here; the goal is a perfectly smooth and uniform mixture.
- Melt the Butter: Take your half cup (one stick) of unsalted butter and melt it. You can do this in a small microwave-safe bowl for about 30-45 seconds, or in a small saucepan over low heat on the stovetop. Once it’s completely melted, set it aside for just a moment to cool down slightly. We don’t want to add super hot butter directly to our other ingredients, especially the sour cream, as it can sometimes affect the texture.
- Combine Wet Ingredients in a Large Bowl: In your large mixing bowl, scoop in the entire 16-ounce container of full-fat sour cream. The full-fat variety truly gives our corn casserole its rich and decadent texture, so I highly recommend sticking with it if you can. Then, add the can of cream-style corn. The cream-style corn is a secret weapon here; it provides that essential creamy, slightly sweet foundation that truly defines a great corn casserole.
- Add the Melted Butter and Mix: Pour the slightly cooled melted butter into the bowl with the sour cream and cream-style corn. Using your whisk or sturdy spatula, mix these ingredients together until they are completely combined and smooth. We want a uniform mixture before we introduce the dry ingredients. This ensures that the butter and sour cream are evenly distributed throughout the casserole.
- Incorporate the Corn Muffin Mix: Now it’s time to add the 8.5-ounce package of corn muffin mix. Sprinkle it evenly over the wet ingredients. Gently fold it into the mixture. Be careful not to overmix at this stage; we want to combine it just until there are no dry streaks of mix visible. Overmixing can sometimes lead to a tougher texture in the finished casserole, and we’re aiming for light and tender!
- Stir in the Drained Corn and Cheese: Add the two cans of well-drained whole kernel corn to the bowl. These provide the wonderful texture and burst of natural corn flavor in every bite. Next, add one cup of your shredded sharp cheddar cheese. The sharp cheddar adds a fantastic savory depth that complements the sweetness of the corn beautifully. Gently fold everything together until all the ingredients are evenly distributed throughout the creamy base.
- Season to Perfection (and Add Optional Ingredients): Taste a tiny bit of the mixture (if you’re comfortable with raw ingredients, otherwise trust your instincts!). Add salt and freshly ground black pepper to taste. Corn can be quite sweet, so a good pinch of salt will enhance all the flavors and balance everything out. If you’re opting for a little heat, this is the perfect time to stir in the drained can of diced mild green chilies. They add a lovely subtle warmth without overpowering the other flavors, creating a more dynamic corn casserole experience.
Assembling and Baking the Perfect Corn Casserole:
We’re on the home stretch! The assembly is quick, and then your oven will do the rest of the work, transforming our simple ingredients into a golden, bubbly, and utterly delicious corn casserole. Get ready for your kitchen to smell absolutely divine!
- Transfer to Baking Dish: Pour the entire corn casserole mixture into your previously greased 9×13 inch baking dish. Use your spatula to spread it evenly into the dish, making sure it fills all corners. We want an even layer for consistent baking.
- Optional Cheese Topping: If you love a cheesy crust (and who doesn’t?), sprinkle the additional half cup of shredded sharp cheddar cheese evenly over the top of the casserole mixture. This will melt down into a beautiful, golden, and slightly crispy topping as it bakes, adding another layer of texture and flavor to our already fantastic corn casserole.
- Bake Until Golden and Bubbly: Place the baking dish into your preheated 350°F (175°C) oven. Bake for approximately 45 to 60 minutes. The exact baking time can vary depending on your oven, so keep an eye on it. You’re looking for the casserole to be set in the center, golden brown and slightly crusty on top, and visibly bubbly around the edges. If you insert a toothpick into the center, it should come out mostly clean. If the top starts to get too dark before the center is set, you can loosely tent it with aluminum foil for the remaining baking time.
- Rest Before Serving: Once your corn casserole emerges from the oven, looking glorious and smelling incredible, resist the urge to dig in immediately! Carefully remove the dish from the oven and place it on a wire rack to cool for about 5-10 minutes. This resting period allows the casserole to set further, making it easier to serve and ensuring that each spoonful is perfectly cohesive and delicious. This brief rest is crucial for the casserole’s final texture and integrity.
Serving Your Delicious Corn Casserole:
Now for the best part – enjoying the fruits of your labor! This corn casserole is incredibly versatile and makes a perfect companion to so many main dishes. It’s a true crowd-pleaser and a staple for holiday meals, potlucks, or just a comforting weeknight dinner.
- Garnish and Serve: Once rested, scoop generous portions of the warm corn casserole onto plates. For an extra touch of freshness and color, sprinkle with fresh chopped chives or green onions, if desired. These garnishes not only look lovely but also add a subtle oniony zest that brightens up the rich flavors of the casserole.
- Pairing Suggestions: This corn casserole pairs wonderfully with roasted chicken, baked ham, grilled pork chops, or even a simple steak. It’s also an absolute must-have for Thanksgiving and Christmas dinners, sitting perfectly alongside mashed potatoes, green bean casserole, and stuffing. Its creamy, slightly sweet, and savory profile makes it a beloved side dish for any hearty meal. It truly elevates any main course it accompanies.
Tips and Tricks for the Best Corn Casserole:
Making a truly exceptional corn casserole isn’t just about following the steps; it’s also about understanding the nuances and little tricks that can elevate your dish from good to unforgettable. Here are some of my favorite tips to ensure your corn casserole is always a hit, full of flavor and perfect texture, every single time you make it. Remember, practice makes perfect, and each batch brings you closer to your ideal corn casserole!
- Don’t Skimp on Full-Fat Sour Cream: While lower-fat options might seem healthier, using full-fat sour cream is really key for achieving that incredibly rich, creamy, and decadent texture that truly defines a great corn casserole. It contributes significantly to the body and lusciousness of the dish, preventing it from becoming dry or crumbly.
- Ensure Corn is Well Drained: This might sound simple, but it’s critical. Excess liquid from the whole kernel corn can lead to a watery or mushy casserole, rather than the firm, creamy consistency we desire. After draining in a colander, you can even gently press the corn with the back of a spoon to squeeze out any lingering moisture.
- Avoid Overmixing the Batter: When you add the corn muffin mix, mix it in gently until just combined. Overmixing can develop the gluten in the corn muffin mix, leading to a tougher, less tender corn casserole. We want a light and airy texture, not a dense one, so a light hand is best!
- Cheese Choice Matters: While mild cheddar is fine, opting for a sharp or extra-sharp cheddar cheese will give your corn casserole a much more pronounced and savory flavor profile, balancing the natural sweetness of the corn beautifully. Feel free to experiment with a blend of cheeses too, like a Colby Jack or even a touch of smoked gouda for an interesting twist.
- Uniform Baking Dish: Using a glass or ceramic 9×13 inch baking dish is ideal because these materials conduct heat evenly, ensuring your corn casserole bakes consistently from edge to edge without burning the sides while the center is still undercooked. Metal pans can sometimes heat up too quickly and cause uneven browning.
- Tent if Browning Too Quickly: If you notice the top of your corn casserole is browning much faster than the rest of the casserole is cooking through, simply loosely tent the baking dish with aluminum foil. This will protect the top from further browning while allowing the inside to finish baking to perfection.
- Resting is Essential: Don’t skip the 5-10 minute resting period after baking. This allows the corn casserole to firm up slightly and cool down to a safe eating temperature, making it much easier to scoop and ensuring it holds its shape beautifully. It also allows the flavors to settle and meld even further.
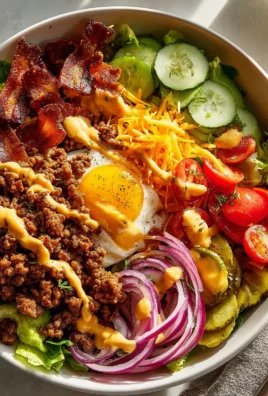
- Customize Your Corn Casserole Experience: Don’t be afraid to make this recipe your own! Consider adding other ingredients like crispy bacon bits, a sprinkle of diced jalapeños for more heat, or even a small amount of finely chopped red bell pepper for color and a touch of sweetness.
- For a Sweeter Profile: If you prefer your corn casserole to be a bit sweeter, you can add 1-2 tablespoons of granulated sugar to the mixture. This is a common preference, especially for those who enjoy a more traditional sweet corn pudding style.
- Make Ahead Option: You can assemble the corn casserole mixture (without the optional cheese topping) the day before, cover it tightly, and refrigerate. When ready to bake, let it sit out at room temperature for about 30 minutes before baking, and add an extra 10-15 minutes to the baking time to ensure it cooks through from a colder start.
Customizing Your Corn Casserole:
One of the best things about this corn casserole recipe is how wonderfully adaptable it is! While it’s absolutely perfect as is, you can easily tweak it to suit your personal tastes or what you have on hand, creating a unique version of this classic comfort food. This flexibility ensures your corn casserole can always feel fresh and exciting.
- Spice It Up: If you love a bit of heat, consider adding a finely diced jalapeño (seeds removed for less heat, or left in for more) to the mixture. A dash of cayenne pepper or a pinch of chili powder can also add a subtle warmth.
- Add Protein: For a heartier dish, stir in some cooked, crumbled bacon bits, diced cooked ham, or even shredded cooked chicken. This transforms it into more of a complete meal or a very robust side.
- Cheesy Variations: Experiment with different cheeses! While sharp cheddar is classic, Monterey Jack, Colby, or even a touch of smoked gouda could add intriguing flavor dimensions. A blend of cheeses can also be incredibly delicious.
- Veggies Welcome: Finely diced red bell pepper or a small amount of finely chopped onion can add extra flavor and color. Sauté them slightly before adding to soften them and bring out their sweetness.
- Herbaceous Notes: Fresh herbs like finely chopped cilantro or parsley can be folded into the mixture or sprinkled on top as a garnish, adding a fresh aroma and flavor.
- Sweetness Level: If you prefer a sweeter corn casserole, often called corn pudding in some regions, you can add 1 to 2 tablespoons of granulated sugar to the batter. This enhances the natural sweetness of the corn even further.
Storing Leftover Corn Casserole:
It’s rare to have leftovers of this incredibly delicious corn casserole, but if you do, don’t worry! It stores and reheats beautifully, ensuring you can enjoy that comforting flavor for a few more days. Proper storage is key to maintaining its texture and taste, so you can savor every last bite of your homemade corn casserole.
- Cool Completely: Before storing, ensure the corn casserole has cooled down completely to room temperature. Placing a warm casserole directly into the refrigerator can create condensation, which can lead to a soggy texture and potentially affect its freshness.
- Airtight Container: Transfer any leftover corn casserole into an airtight container. If you have a serving dish with a lid, that works perfectly. Otherwise, plastic wrap or aluminum foil pressed directly onto the surface of the casserole can also work well to prevent air exposure.
- Refrigerate: Store the covered corn casserole in the refrigerator for up to 3-4 days.
- Reheating Instructions:
- Oven: For best results, reheat in the oven. Preheat your oven to 300°F (150°C). Place the leftover casserole in an oven-safe dish, cover it loosely with foil (to prevent it from drying out), and bake for 15-25 minutes, or until thoroughly heated through. This method helps maintain its original texture.
- Microwave: For a quicker reheat, individual portions can be warmed in the microwave. Place a portion on a microwave-safe plate, cover loosely (a microwave-safe lid or paper towel works well), and heat on medium power for 1-2 minutes, stirring halfway through, until hot. Be careful not to overheat, as this can make the casserole rubbery.
- Freezing (Optional): While it’s best enjoyed fresh or from the fridge, corn casserole can be frozen. Once completely cooled, wrap individual portions tightly in plastic wrap, then again in aluminum foil, or place in freezer-safe containers. It can be frozen for up to 2-3 months. Thaw overnight in the refrigerator before reheating as directed above. Note that freezing might slightly alter the texture, making it a bit softer upon thawing.

Conclusion:
As we wrap up our culinary journey with this incredible recipe, I truly hope you’re feeling inspired and excited to get into your kitchen. If there’s one dish I could insist you try, it’s this Corn Casserole. It’s not just another side; it’s a revelation.
Why is it a must-try?
Picture this: a harmonious blend of creamy, sweet, and savory notes, perfectly balanced by a delightful texture that’s both tender and wonderfully satisfying. It’s the kind of comfort food that instantly transports you back to cherished family gatherings, holiday feasts, or simply a cozy evening at home. The magic of this particular Corn Casserole lies in its deceptive simplicity. You don’t need a pantry full of obscure ingredients or hours of culinary expertise. With straightforward steps and readily available items, you can create something truly spectacular that tastes like it took all day to prepare.
It’s incredibly versatile, making it the perfect companion for almost any meal. Whether you’re hosting a sophisticated dinner party, contributing to a casual potluck, or just looking to elevate your weeknight supper, this casserole effortlessly fits the bill. Its crowd-pleasing appeal is undeniable; adults and children alike find themselves reaching for seconds, often before the first plate is even cleared. The subtle sweetness of the corn shines through, beautifully complemented by the rich, creamy base, offering a comforting warmth that satisfies the soul. It truly has that uncanny ability to bring people together around the dinner table, sparking conversations and creating lasting memories. Trust me, once you experience the ease of preparation and the sheer joy of tasting this dish, it will quickly earn a permanent spot in your recipe rotation.
Elevate Your Meals: Serving Suggestions and Delicious Variations
One of the best things about this Corn Casserole is its incredible adaptability. While it shines brightly as a standalone side dish, there are countless ways to enjoy it and make it uniquely yours. For holiday meals, like Thanksgiving or Christmas, it’s an absolute staple, pairing beautifully with roasted turkey, glazed ham, or a succulent prime rib. Imagine a scoop alongside crispy fried chicken or tender pork chops for a classic Southern-inspired meal. It even makes a fantastic addition to a summer BBQ spread, cutting through the richness of grilled meats like ribs or brisket. Don’t limit it to dinner; a smaller serving can even be a delightful, unexpected addition to a weekend brunch spread, offering a savory-sweet counterpoint to eggs and bacon.
Feeling adventurous? Let’s talk variations! Make it cheesy: A cup of shredded sharp cheddar, Monterey Jack, or even a spicy pepper jack cheese stirred in before baking, or sprinkled on top during the last 15 minutes, adds a wonderful gooey texture and depth of flavor. For those who love a bit of heat, consider adding a finely diced jalapeño or a can of drained diced green chiles to the mixture for a delightful kick. You could also crumble in some cooked bacon bits or diced ham for an extra layer of savory goodness and a touch of protein, transforming it into an even heartier dish. Experiment with herbs: A sprinkle of fresh chives or chopped cilantro stirred in just before serving can brighten the flavors beautifully. For a different texture on top, try crushing some buttery crackers or adding crispy fried onions during the last few minutes of baking. If you’re catering to dietary needs, this recipe can be surprisingly flexible; using dairy-free milk and butter alternatives, along with a vegan sour cream or cream cheese, can make it a delightful option for those avoiding dairy. The possibilities are truly endless for customizing this adaptable dish to suit your taste preferences or the occasion.
Your Turn: Create, Share, and Inspire!
Now, it’s your turn. I wholeheartedly encourage you to roll up your sleeves and give this extraordinary recipe a try. Don’t hesitate to dive in – the process is as rewarding as the outcome is delicious. There’s a unique joy that comes from creating something wonderful in your own kitchen and sharing it with loved ones. Imagine the smiles, the satisfied sighs, and the compliments you’ll receive when you present this masterpiece. I’m genuinely excited for you to experience the magic of this particular Corn Casserole firsthand. Once you’ve made it, I would absolutely love to hear about your experience. Did you add a special twist? What did you serve it with? How did your family and friends react? Please share your thoughts, your successes, and even your culinary experiments. Your feedback and personal variations inspire me and enrich our entire cooking community. Grab your ingredients, preheat your oven, and prepare to fall in love with a dish that promises to become a cherished part of your culinary repertoire. Happy cooking, my friends!
Best Corn Casserole Ever! Simple, Cheesy & Crowd-Pleasing.
Corn Casserole is more than just a side dish; it’s a warm hug in a baking dish, a testament to comforting, home-style cooking that brings everyone to the table. This beloved dish holds a special place in the hearts of many, particularly throughout the American South, where it frequently graces holiday spreads like Thanksgiving and Christmas, and makes a welcome appearance at potlucks and family gatherings. I’ve always found immense joy in how a few simple ingredients can transform into something so incredibly satisfying and universally loved.
What makes a good Corn Casserole truly irresistible? It’s that perfect balance of sweet, tender corn kernels enveloped in a rich, creamy base, often with a delightful hint of savory cheese or a buttery, slightly crisp topping. The textures alone are enough to make your mouth water – smooth and creamy, punctuated by the burst of fresh corn. Beyond its incredible flavor and comforting texture, its popularity also stems from its surprising ease of preparation. It’s a dish that feels elaborate but comes together with minimal fuss, making it an ideal choice for busy weeknights or when you need a reliable crowd-pleaser for a special occasion. Prepare to fall in love with this timeless classic!
Ingredients
-
14.75 oz whole kernel sweet corn, drained
-
14.75 oz cream style sweet corn
-
8.5 oz Jiffy corn muffin mix
-
2 large eggs
-
1 cup sour cream
-
½ cup butter, melted
Instructions
- Step 1
Preheat your oven to 350°F (175°C). Lightly grease a 9×13 inch baking dish. - Step 2
Melt the ½ cup butter; set aside to cool slightly. Drain the 14.75 oz whole kernel corn very well, pressing out excess liquid. - Step 3
In a large mixing bowl, combine the 1 cup sour cream, 14.75 oz cream-style corn, 2 large eggs, and the slightly cooled melted butter. Whisk thoroughly until the mixture is smooth and evenly combined. - Step 4
Add the 8.5 oz corn muffin mix to the wet ingredients. Gently fold the mix into the batter until just combined and no dry streaks remain. Avoid overmixing to ensure a tender casserole. - Step 5
Stir in the well-drained whole kernel corn, distributing it evenly throughout the creamy base. - Step 6
Pour the entire corn casserole mixture into your prepared baking dish. Use a spatula to spread it evenly. - Step 7
Bake in the preheated oven for approximately 45 to 60 minutes, or until the casserole is set in the center, golden brown and slightly bubbly around the edges. A toothpick inserted should come out mostly clean. - Step 8
Once baked, carefully remove the dish from the oven and let the corn casserole rest on a wire rack for 5-10 minutes. This allows it to set further, making it easier to serve.
Important Information
Nutrition Facts (Per Serving)
It is important to consider this information as approximate and not to use it as definitive health advice.
Allergy Information
Please check ingredients for potential allergens and consult a health professional if in doubt.