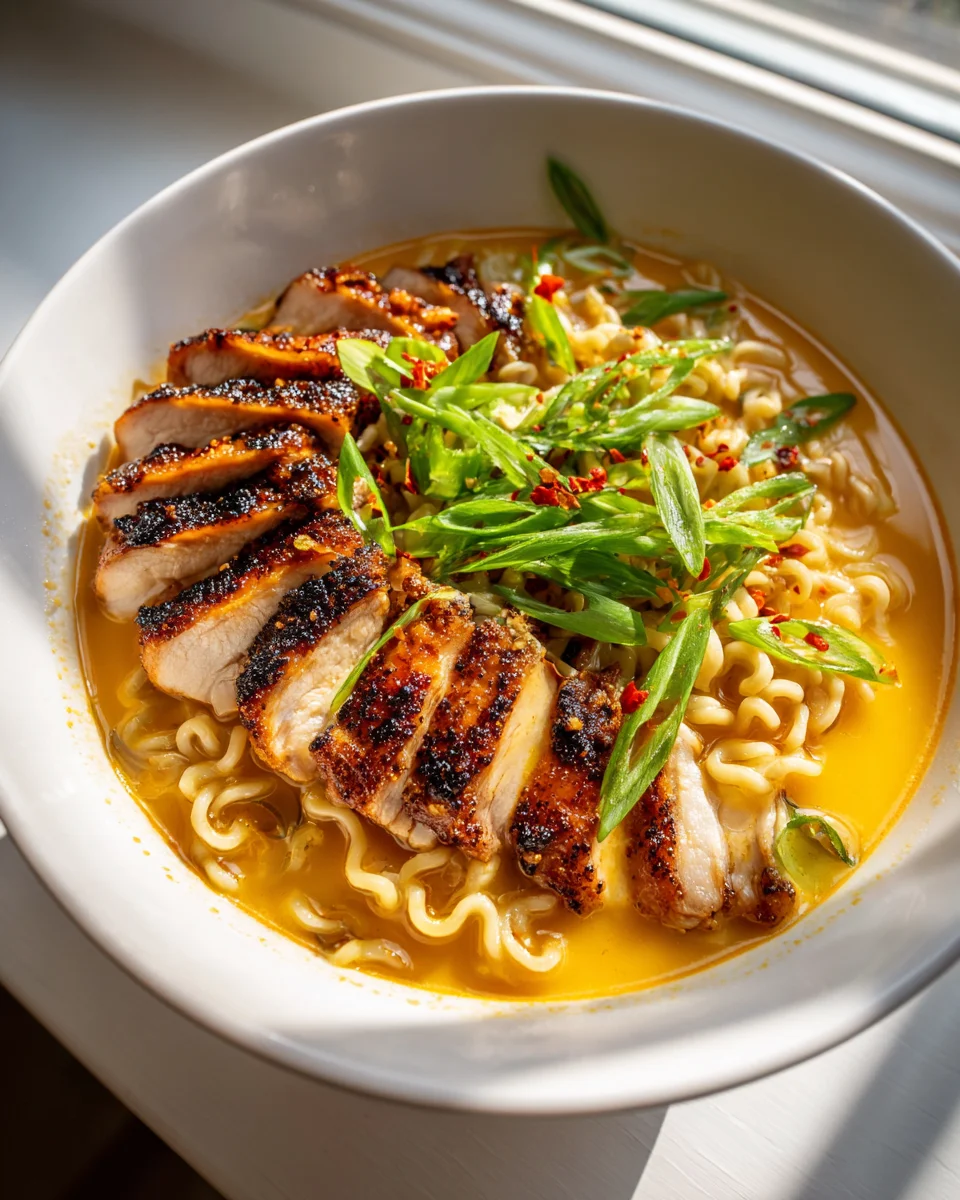
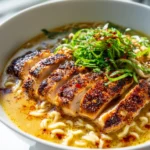
Fiery Chicken Ramen With Creamy Garlic Sauce
Oh, prepare yourselves for a truly unforgettable culinary adventure! When I set out to create Fiery Chicken Ramen With Creamy Garlic Sauce, I wasn’t just aiming for another bowl of noodles; I wanted to craft an experience – a symphony of flavors that hits all the right notes. This isn’t your average ramen; it’s a dynamic dish where fiery heat meets luxurious creaminess in a dance you’ll absolutely adore.
What makes this recipe so special, you ask? It’s the incredible contrast! Imagine succulent pieces of chicken, marinated and cooked to perfection, delivering a beautiful spicy kick that warms you from the inside out. This intense heat is then beautifully tempered and elevated by a rich, velvety garlic sauce – a secret weapon that cascades over the chewy ramen noodles, coating every strand with its savory, aromatic embrace. I promise, you’ll be amazed at how well the vibrant spice of the chicken harmonizes with the cool, comforting creaminess of the garlic sauce.
You’re going to love this dish because it’s the ultimate comfort food with a gourmet twist. It’s perfect for those evenings when you crave something deeply satisfying, incredibly flavorful, and just a little bit adventurous. Get ready to slurp your way through a bowl that offers both a thrilling zing and a soothing hug, all in one delightful bite after another. Trust me, once you try this unique blend of spicy and creamy, there’s no going back!

Ingredient Notes
Creating this Fiery Chicken Ramen with Creamy Garlic Sauce is an adventure in flavor, and getting the right ingredients sets you up for success. I’ve refined these choices to give you that perfect balance of heat, richness, and savory depth.
For the Fiery Chicken:
- Boneless, Skinless Chicken Thighs: I always go for thighs because they stay incredibly juicy and flavorful, even with high heat cooking. You’ll need about 1-1.5 pounds. If you prefer, chicken breast works too, just be careful not to overcook it.
- Fiery Seasoning: My go-to is a mix of gochugaru (Korean chili flakes) for its smoky, vibrant heat, a dash of sriracha, a touch of soy sauce, and a pinch of brown sugar to balance the spice. You can adjust the gochugaru to your spice preference!
For the Ramen Broth:
- Good Quality Chicken Broth: This is the backbone of your ramen. I recommend using low-sodium chicken broth, about 4-6 cups, so you can control the seasoning. If you have homemade, even better!
- Aromatics: Fresh ginger and garlic are non-negotiable for that aromatic base.
- Soy Sauce: I use regular soy sauce for umami, but feel free to use tamari for a gluten-free option.
- Non-Alcoholic Mirin Alternative: To add a touch of sweetness and depth without the alcohol, I use a mixture of rice vinegar and a tiny bit of sugar (about a 3:1 ratio of vinegar to sugar).
- Sesame Oil: A drizzle of toasted sesame oil at the end really brings out the nutty, savory notes.
For the Creamy Garlic Sauce:
- Mayonnaise: While any good quality mayo works, Japanese Kewpie mayonnaise is my absolute favorite here. It’s richer and tangier, making for a truly luxurious sauce.
- Fresh Garlic: Lots of finely minced fresh garlic is key!
- Soy Sauce & Sesame Oil: Just a touch to deepen the savory profile.
- Optional: A tiny bit of water or chicken broth to thin the sauce to your desired consistency.
For the Noodles & Toppings:
- Ramen Noodles: Fresh ramen noodles are ideal for their chew and texture. You can usually find them in the refrigerated section of Asian markets or even many larger grocery stores. Dried ramen blocks (the kind without seasoning packets) are a good second choice.
- Soft-Boiled Eggs: An absolute must for ramen! My preferred jammy, 6-minute egg is perfect.
- Green Onions: Thinly sliced for freshness and a mild onion bite.
- Nori (Seaweed Sheets): Adds a lovely briny, umami crunch.
- Other Favorites: Corn kernels, baby bok choy (lightly blanched), or a sprinkle of toasted sesame seeds are all wonderful additions.
Step-by-Step Instructions
Let’s get cooking! This ramen might seem like a few components, but I promise it comes together beautifully for a deeply satisfying meal.
- Prepare Your Fiery Chicken:
- Pat your chicken thighs dry. In a medium bowl, combine the gochugaru, sriracha, a tablespoon of soy sauce, and a teaspoon of brown sugar. Toss the chicken in this fiery marinade, ensuring it’s well coated. Let it sit for at least 15 minutes, or ideally, an hour in the fridge.
- Heat a tablespoon of neutral oil in a large skillet or cast-iron pan over medium-high heat. Once hot, sear the chicken thighs for 5-7 minutes per side, until deeply browned, cooked through (internal temperature of 165°F/74°C), and slightly charred at the edges. Remove from the pan, let rest for a few minutes, then slice against the grain into ½-inch strips.
- Build the Ramen Broth:
- In the same skillet (don’t clean it, those bits add flavor!), reduce the heat to medium. Add a splash more oil if needed, then sauté your minced ginger (about 1 tbsp) and garlic (about 2-3 cloves, minced) for 1-2 minutes until fragrant, being careful not to burn the garlic.
- Pour in the chicken broth, then add 2 tablespoons of soy sauce and your non-alcoholic mirin alternative (1 tbsp rice vinegar + 1 tsp sugar). Bring to a gentle simmer and let it cook for at least 10 minutes to allow the flavors to meld. Taste and adjust seasoning – you might want a pinch more soy sauce or a dash of black pepper. Keep warm over low heat.
- Whisk Up the Creamy Garlic Sauce:
- While the broth simmers, in a small bowl, combine ½ cup of mayonnaise (Kewpie if you have it), 3-4 cloves of finely minced garlic, 1 teaspoon of soy sauce, and ½ teaspoon of toasted sesame oil. Whisk until smooth and creamy. If it’s too thick, add a tiny splash of water or hot chicken broth, a teaspoon at a time, until it reaches a drizzly consistency.
- Cook the Ramen Noodles:
- Bring a separate pot of water to a rolling boil. Cook your ramen noodles according to package directions. Fresh noodles usually take 1-2 minutes, while dried might take 3-5 minutes. Drain well and rinse briefly under hot water to prevent sticking.
- Assemble Your Fiery Ramen Bowls:
- Divide the cooked ramen noodles among two large ramen bowls.
- Ladle the hot, aromatic broth generously over the noodles.
- Arrange the sliced fiery chicken neatly on top of the noodles.
- Add your prepared soft-boiled eggs (halved), a generous sprinkle of sliced green onions, and a sheet or two of nori.
- Here’s the best part: Drizzle a generous amount of your creamy garlic sauce directly over the chicken and noodles.
- Serve immediately and enjoy the incredible layers of flavor!
Tips & Suggestions
To truly elevate your Fiery Chicken Ramen with Creamy Garlic Sauce, I’ve got a few personal tips and tricks that I always use:
- Spice Level Control: I love a good kick, but you might prefer less or more heat. For less fire, reduce the gochugaru in the chicken marinade. For more, add a pinch of chili flakes to your broth or drizzle some extra chili oil into your finished bowl. You are the master of your spice!
- The Perfect Soft-Boiled Egg: For that irresistible jammy yolk, bring a pot of water to a rolling boil. Gently lower cold eggs into the boiling water and cook for exactly 6 minutes. Immediately transfer them to an ice bath for at least 5 minutes to stop the cooking. This makes them easier to peel and gives you that perfect gooey center.
- Broth Depth: Don’t rush the broth. Letting it simmer for at least 10-15 minutes after adding the soy sauce and mirin alternative really allows the flavors to deepen and meld. A longer simmer means more flavor!
- Noodle TLC: Overcooked noodles are a tragedy in ramen. Cook them just until al dente, according to package directions, and drain them thoroughly. Rinsing them briefly with hot water after draining can also help prevent them from sticking together.
- Creamy Garlic Sauce Consistency: If your sauce is too thick, don’t hesitate to thin it out with a teaspoon of hot broth or water until it reaches a lovely, drizzly consistency. It should coat the back of a spoon without being gloopy.
- Protein Alternatives: If chicken isn’t your preference, this recipe works wonderfully with other proteins. Try thinly sliced beef, pan-fried tofu, or even shrimp. Just adjust cooking times accordingly.
- Topping Variations: Beyond the standard, feel free to experiment with other toppings! Some of my favorites include blanched spinach or baby bok choy, corn kernels, bamboo shoots (menma), or even a sprinkle of toasted sesame seeds.
Storage
Ramen is best enjoyed fresh, but I understand sometimes you need to make components ahead or have leftovers. The key to successful ramen storage is keeping the ingredients separate!
- Noodles: Cooked ramen noodles should be eaten immediately. They will absorb too much broth and become mushy if stored in the liquid. If you absolutely must store cooked noodles, toss them with a tiny bit of sesame oil to prevent sticking, then store in an airtight container in the fridge for up to 1 day. Reheat briefly in boiling water before serving.
- Fiery Chicken: Your cooked, sliced fiery chicken can be stored in an airtight container in the refrigerator for up to 3-4 days. Reheat gently in a pan or microwave before adding to your ramen.
- Ramen Broth: The prepared ramen broth can be stored in an airtight container in the refrigerator for up to 4-5 days, or frozen for up to 2-3 months. Thaw frozen broth in the refrigerator overnight and reheat gently on the stovetop until simmering hot.
- Creamy Garlic Sauce: The creamy garlic sauce, due to the fresh garlic and mayonnaise, is best stored in an airtight container in the refrigerator for up to 3-4 days. Give it a good stir before serving, as some separation might occur.
- Soft-Boiled Eggs & Other Toppings: Soft-boiled eggs are best made fresh for each serving. However, if you have extras, they can be stored unpeeled in the fridge for up to 2 days. Green onions and nori should also be added fresh when serving.
To enjoy leftovers, simply reheat the broth and chicken separately until hot. Cook fresh noodles, then assemble your bowl just before eating with a fresh drizzle of the creamy garlic sauce and any new toppings.
Final Thoughts
I hope you’ve enjoyed preparing this incredible dish as much as I love sharing it. The unique blend of heat and richness in our Fiery Chicken Ramen With Creamy Garlic Sauce truly sets it apart. It’s not just a meal; it’s an experience, a symphony of spicy warmth from the ramen perfectly balanced by the luscious, cooling embrace of that creamy garlic sauce. I find it to be the ultimate comfort food with an exciting kick, a perfect antidote to a long day, or a fantastic way to impress your friends and family. This isn’t just another ramen; it’s a masterpiece of flavor, incredibly satisfying and surprisingly easy to achieve. I genuinely believe that once you try Fiery Chicken Ramen With Creamy Garlic Sauce, it will become a cherished favorite in your culinary repertoire. Get ready to savor every single irresistible spoonful!
Best Fiery Chicken Ramen w/ Creamy Garlic Sauce Recipe
- Total Time: 45 minutes
- Yield: 2 servings 1x
Description
Experience a delightful blend of fiery heat and creamy richness with this Fiery Chicken Ramen. It’s the ultimate comfort food that promises to satisfy your cravings and impress your taste buds.
Ingredients
- 1–1.5 pounds Boneless, Skinless Chicken Thighs
- Gochugaru (Korean chili flakes)
- Sriracha
- Soy Sauce
- Brown Sugar
- 4–6 cups Good Quality Chicken Broth (low-sodium recommended)
- Fresh Ginger
- Fresh Garlic
- Soy Sauce
- Non-Alcoholic Mirin Alternative (mixture of rice vinegar and sugar)
- Sesame Oil
- ½ cup Mayonnaise (preferably Japanese Kewpie)
- 3–4 cloves Fresh Garlic (finely minced)
- Soy Sauce
- Sesame Oil
- Ramen Noodles (fresh or dried)
- Soft-Boiled Eggs
- Green Onions (thinly sliced)
- Nori (Seaweed Sheets)
- Corn kernels (optional)
- Baby bok choy (lightly blanched, optional)
- Toasted sesame seeds (optional)
Instructions
- Pat your chicken thighs dry. In a medium bowl, combine the gochugaru, sriracha, a tablespoon of soy sauce, and a teaspoon of brown sugar. Toss the chicken in this fiery marinade, ensuring it's well coated. Let it sit for at least 15 minutes, or ideally, an hour in the fridge.
- Heat a tablespoon of neutral oil in a large skillet or cast-iron pan over medium-high heat. Once hot, sear the chicken thighs for 5-7 minutes per side, until deeply browned, cooked through (internal temperature of 165°F/74°C), and slightly charred at the edges. Remove from the pan, let rest for a few minutes, then slice against the grain into ½-inch strips.
- In the same skillet (don't clean it, those bits add flavor!), reduce the heat to medium. Add a splash more oil if needed, then sauté your minced ginger (about 1 tbsp) and garlic (about 2-3 cloves, minced) for 1-2 minutes until fragrant, being careful not to burn the garlic.
- Pour in the chicken broth, then add 2 tablespoons of soy sauce and your non-alcoholic mirin alternative (1 tbsp rice vinegar + 1 tsp sugar). Bring to a gentle simmer and let it cook for at least 10 minutes to allow the flavors to meld. Taste and adjust seasoning – you might want a pinch more soy sauce or a dash of black pepper. Keep warm over low heat.
- While the broth simmers, in a small bowl, combine ½ cup of mayonnaise (Kewpie if you have it), 3-4 cloves of finely minced garlic, 1 teaspoon of soy sauce, and ½ teaspoon of toasted sesame oil. Whisk until smooth and creamy. If it’s too thick, add a tiny splash of water or hot chicken broth, a teaspoon at a time, until it reaches a drizzly consistency.
- Bring a separate pot of water to a rolling boil. Cook your ramen noodles according to package directions. Fresh noodles usually take 1-2 minutes, while dried might take 3-5 minutes. Drain well and rinse briefly under hot water to prevent sticking.
- Divide the cooked ramen noodles among two large ramen bowls.
- Ladle the hot, aromatic broth generously over the noodles.
- Arrange the sliced fiery chicken neatly on top of the noodles.
- Add your prepared soft-boiled eggs (halved), a generous sprinkle of sliced green onions, and a sheet or two of nori.
- Drizzle a generous amount of your creamy garlic sauce directly over the chicken and noodles.
- Serve immediately and enjoy the incredible layers of flavor!
- Prep Time: 15 mins
- Cook Time: 30 mins
- Category: Dinner
- Method: Stovetop
- Cuisine: Japanese
Nutrition
- Serving Size: 1 bowl
- Calories: 650
- Sugar: 5 g
- Sodium: 1200 mg
- Fat: 30 g
- Saturated Fat: 5 g
- Unsaturated Fat: 20 g
- Trans Fat: 0 g
- Carbohydrates: 70 g
- Fiber: 3 g
- Protein: 35 g
- Cholesterol: 150 mg
Keywords: To control spice level, adjust the gochugaru in the chicken marinade. For perfect soft-boiled eggs, cook for exactly 6 minutes and transfer to an ice bath. Let the broth simmer for at least 10-15 minutes for deeper flavor.