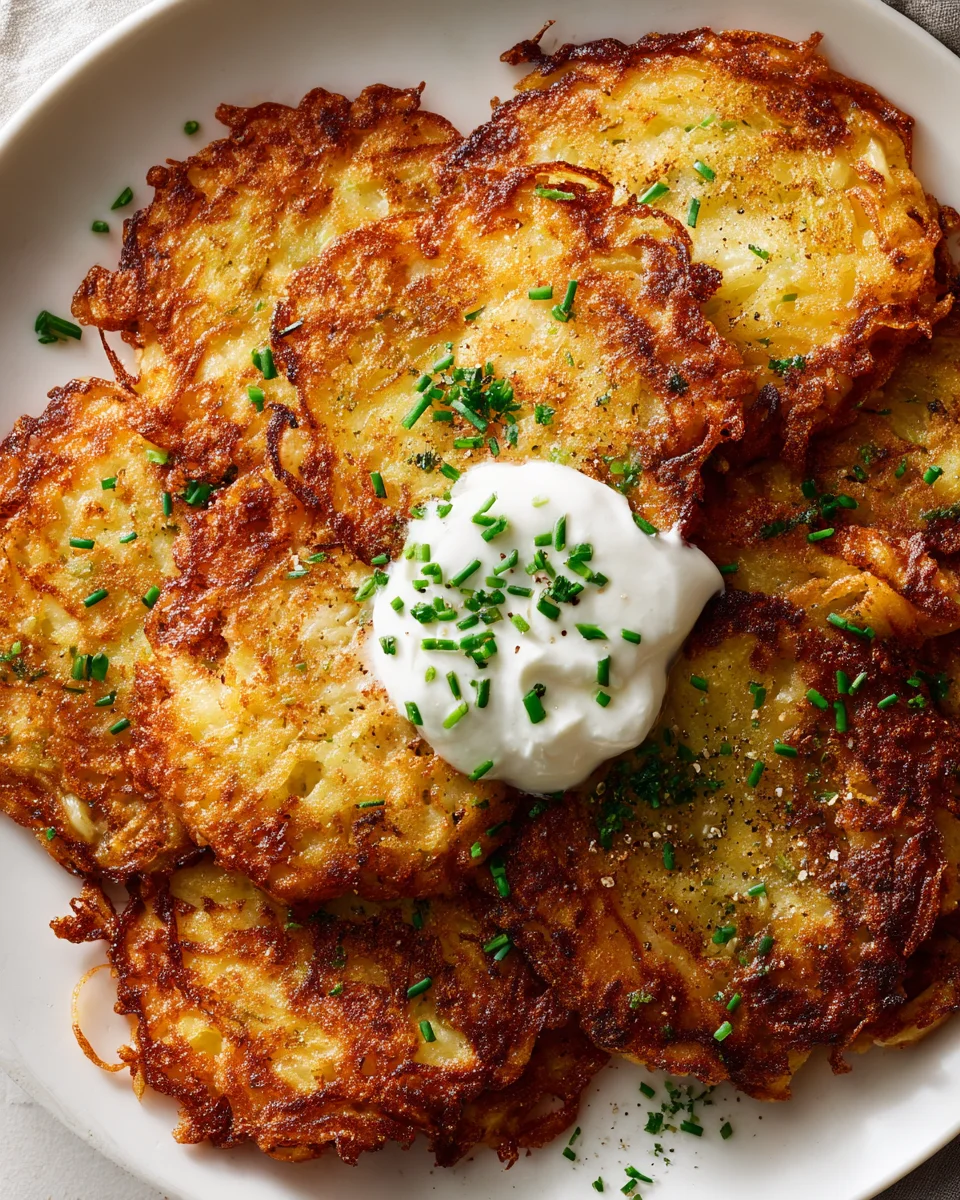
German Potato Pancakes
Oh, my goodness, are you ready to embark on a culinary journey to the heart of Germany right from your kitchen? Because I am so excited to share my absolute favorite recipe for German Potato Pancakes! This isn’t just any potato dish; it’s a crispy, golden masterpiece that holds a special place in my heart and, I’m sure, will soon hold one in yours too. What makes these pancakes so incredibly special, you ask? It’s that magical contrast of a perfectly crisp, deeply golden exterior giving way to a wonderfully tender, flavorful potato interior. It’s simple comfort food at its finest, made with humble ingredients that transform into something truly extraordinary.
You are absolutely going to love making (and devouring!) these because they’re ridiculously satisfying and surprisingly easy to whip up. Forget any intimidation you might feel about making authentic German cuisine – I promise, this recipe is super approachable. Whether you’re looking for a delightful breakfast treat, a hearty brunch option, a fantastic side dish for a beef roast, or even a light, comforting dinner, these potato pancakes fit the bill perfectly. They’re wonderfully versatile, delicious on their own, or served with classic accompaniments like a dollop of applesauce or a spoonful of sour cream. Prepare yourself for a taste experience that’s both comforting and incredibly delicious – a true celebration of potatoes!

Ingredient Notes
Ah, German potato pancakes, or “Kartoffelpuffer” as we call them, are a true delight! Simple ingredients, but the magic happens in the preparation. Here’s what you’ll need to create these crispy, golden wonders, and some friendly notes on each.
- Potatoes: This is, of course, the star of our show! I highly recommend using starchy potatoes like Russets (Idaho potatoes) or baking potatoes. Their high starch content helps them crisp up beautifully and bind together without making the pancake gluey. You’ll want to peel them before grating. While some recipes call for a mix, sticking to starchy varieties gives you that classic crispy texture.
- Onion: A finely grated or minced onion adds a wonderful aromatic depth to the pancakes. It’s subtle but essential for that authentic German flavor profile. Don’t skip it!
- Egg: Just one or two large eggs act as a crucial binder, helping to hold all those grated potatoes and onion together. Without it, your pancakes might fall apart in the pan.
- All-Purpose Flour: A small amount of all-purpose flour provides additional structure and helps absorb any lingering moisture, ensuring your pancakes are crisp and not soggy. You don’t need much; we want potato flavor, not flour flavor.
- Seasoning: A generous pinch of salt and freshly ground black pepper is non-negotiable. Some traditional recipes also include a tiny grating of nutmeg, which I adore as it adds a warm, almost sweet earthiness that complements the potato perfectly. Give it a try!
- Frying Oil: For frying, you’ll need an oil with a high smoke point. Vegetable oil, canola oil, or even sunflower oil are excellent choices. For an extra layer of savory flavor, you could consider using beef tallow, which lends a rich, satisfying taste that reminds me of old-fashioned frying. The key is to use enough oil to generously coat the bottom of your pan and allow the pancakes to shallow-fry until golden.
When it comes to toppings, traditional German potato pancakes are often enjoyed with applesauce or sour cream. However, don’t be afraid to get creative! Savory options like a hearty beef goulash or even smoked salmon make for a truly delicious and satisfying meal. You could also serve them with a dollop of a non-alcoholic fruit compote for a different sweet note.
Step-by-Step Instructions
Making German potato pancakes is a labor of love, but the reward of those crispy, golden discs is absolutely worth it. Here’s how I prepare them for that perfect texture and taste:
- Prepare the Potatoes and Onion: First things first, peel your starchy potatoes. Then, using the fine side of a box grater or a food processor with a grating attachment, grate all the potatoes and the onion. The finer the grate, the crispier your pancakes will be.
- Crucial Moisture Removal: This is perhaps the most important step for truly crispy potato pancakes! Place the grated potato and onion mixture into a clean kitchen towel or a few layers of cheesecloth. Gather the edges of the cloth and twist, squeezing out as much liquid as humanly possible over the sink or into a bowl. You’ll be surprised how much water comes out! The drier your mixture, the crispier your Kartoffelpuffer.
- Combine the Batter: Transfer the squeezed-out potato and onion mixture to a large mixing bowl. Add the egg, all-purpose flour, salt, pepper, and a pinch of nutmeg (if using). Mix everything together thoroughly with your hands or a spoon until well combined. The mixture should feel thick and hold its shape easily.
- Heat the Frying Oil: Place a large, heavy-bottomed skillet (cast iron works wonderfully here) over medium-high heat. Add enough frying oil to create a layer about 1/4 to 1/2 inch deep in the pan. Let the oil get nice and hot – you should see shimmering, but not smoking. To test, drop a tiny bit of potato mixture; it should sizzle immediately.
- Form and Fry the Pancakes: Working in batches to avoid overcrowding the pan, scoop about 2-3 tablespoons of the potato mixture per pancake. Gently flatten the mounds with the back of your spoon or a spatula into discs about 3-4 inches in diameter and about 1/4 inch thick. Don’t make them too thick, or they won’t cook through properly.
- Cook to Golden Perfection: Fry the potato pancakes for about 4-6 minutes per side, or until they are deeply golden brown and beautifully crispy. Keep an eye on them; adjust the heat if they’re browning too quickly.
- Drain and Serve: Once cooked, transfer the crispy pancakes to a plate lined with paper towels to drain any excess oil. Serve them immediately while they’re hot and at their crispiest, perhaps with a side of applesauce, sour cream, or your chosen savory topping. Repeat the process with the remaining batter, adding more oil to the pan if needed. Enjoy!
Tips & Suggestions
Achieving that perfect, crispy German potato pancake is all about technique and a few little tricks I’ve picked up over the years. Here are my best tips for making your Kartoffelpuffer truly shine:
- Master the Moisture Squeeze: I cannot stress this enough – removing excess moisture from the grated potatoes is the absolute key to crispiness. If your mixture is too wet, the pancakes will steam instead of fry, resulting in a soggy texture. Use a strong, clean kitchen towel and squeeze with all your might. This step truly makes all the difference!
- Grating Consistency: For the classic thin, crispy pancake, grate your potatoes and onion finely. A finer grate allows them to cook through quickly and develop a better crisp. If you prefer a slightly chewier interior with crisp edges, a coarser grate can also work, but keep an eye on cooking times.
- Don’t Overcrowd the Pan: When frying, resist the urge to cram too many pancakes into the skillet. Overcrowding lowers the oil temperature and can lead to steaming, again making your pancakes less crispy. Give each pancake enough space to fry properly and develop its golden crust.
- Maintain Oil Temperature: Start with medium-high heat to get the oil hot, then be prepared to adjust it as you go. If the oil is too hot, the pancakes will burn on the outside before cooking through. If it’s too cool, they’ll absorb too much oil and become greasy. A gentle sizzle when the batter hits the pan is what you’re aiming for.
- Seasoning is Key: Don’t be shy with the salt and pepper! Potatoes love seasoning, and well-seasoned pancakes are far more delicious. The hint of nutmeg, while optional, truly elevates the traditional flavor.
- Serving Immediately: German potato pancakes are at their absolute best when served fresh out of the pan, still hot and crispy. If you’re cooking for a crowd, you can keep earlier batches warm on a wire rack set over a baking sheet in a low oven (around 200°F or 95°C) while you finish frying the rest.
- Experiment with Toppings: While applesauce and sour cream are traditional and utterly delicious, don’t limit yourself! A sprinkle of fresh chives or parsley adds brightness. For savory options, try them with a hearty beef stew, a fried egg, or even smoked salmon with a dollop of fresh cream cheese.
Following these tips will help you achieve that perfect balance of crispy exterior and tender interior that makes German potato pancakes such a beloved dish!
Storage
While German potato pancakes are undeniably best enjoyed fresh off the skillet, you can absolutely make them ahead or store leftovers to enjoy later. Here’s how I handle storage to keep them as delicious as possible:
- Cool Completely First: Before storing, it’s crucial to let your cooked potato pancakes cool down completely to room temperature. Storing them while still warm will create condensation, which can lead to sogginess and affect their crispness and texture. Place them on a wire rack to allow air circulation until they are fully cool.
- Refrigeration: Once cooled, stack the potato pancakes with small pieces of parchment paper in between each one to prevent sticking. Place them in an airtight container. They will keep well in the refrigerator for up to 3-4 days.
- Freezing for Longer Storage: If you want to store them for a longer period, freezing is a great option. After cooling completely, arrange the potato pancakes in a single layer on a baking sheet lined with parchment paper. Flash freeze them for about 1-2 hours until solid. This prevents them from sticking together when stored. Once frozen solid, transfer them to a freezer-safe bag or airtight container, again using parchment paper between layers if stacking. They can be frozen for up to 1-2 months.
- Reheating for Best Results:
- Oven or Toaster Oven (Recommended for Crispiness): This is my preferred method for reheating, as it helps bring back that desirable crisp texture. Preheat your oven or toaster oven to 375°F (190°C). Arrange the potato pancakes in a single layer on a baking sheet. Bake for 10-15 minutes (longer if reheating from frozen, around 20-25 minutes), flipping halfway, until heated through and re-crisped.
- Air Fryer: An air fryer also works wonderfully for reheating! Preheat your air fryer to 350°F (175°C). Place the pancakes in a single layer in the air fryer basket and cook for 5-8 minutes (or 10-15 minutes from frozen), shaking the basket once or twice, until hot and crispy.
- Skillet: You can also reheat them in a lightly oiled skillet over medium heat for a few minutes per side until hot and crispy.
- Microwave (Not Recommended for Crispness): While you can technically microwave them, I generally advise against it if you value the crispy texture. The microwave will heat them through but will make them soft and somewhat rubbery. Only use this method if you’re in a real hurry and texture isn’t a primary concern.
With proper storage and reheating, you can still enjoy delicious German potato pancakes even days or weeks after you’ve made them!
Final Thoughts
There’s a special kind of magic that happens when simple ingredients come together to create something truly extraordinary, and that’s precisely what you’ll find with these incredible German Potato Pancakes. I truly believe THIS recipe is a must-try, offering that perfect balance of a wonderfully crispy exterior and a tender, flavorful interior that’s utterly irresistible. Each golden-brown pancake is a testament to comforting, hearty cooking that warms the soul.
Whether you’re serving them as a delightful side dish, a unique main course, or even a savory snack, these German Potato Pancakes are sure to impress. Their savory depth, often enhanced by a hint of onion and spice, makes them incredibly versatile and utterly delicious. I hope you’re inspired to bring this wonderful tradition into your kitchen and experience the pure joy of biting into a perfectly made potato pancake. Get ready to create some delicious memories!

Best German Potato Pancakes – Crispy, Easy & Delicious
- Total Time: 45 minutes
- Yield: 4 servings 1x
Description
Embark on a culinary journey to Germany with these crispy, golden German Potato Pancakes. Perfect for breakfast, brunch, or as a delightful side dish, they are sure to impress with their tender interior and rich flavor.
Ingredients
- Starchy potatoes (like Russets or Idaho potatoes)
- Onion
- 1 or 2 large eggs
- All-purpose flour
- Salt
- Freshly ground black pepper
- Nutmeg (optional)
- Vegetable oil, canola oil, or sunflower oil (for frying)
Instructions
- First things first, peel your starchy potatoes. Then, using the fine side of a box grater or a food processor with a grating attachment, grate all the potatoes and the onion. The finer the grate, the crispier your pancakes will be.
- Place the grated potato and onion mixture into a clean kitchen towel or a few layers of cheesecloth. Gather the edges of the cloth and twist, squeezing out as much liquid as humanly possible over the sink or into a bowl.
- Transfer the squeezed-out potato and onion mixture to a large mixing bowl. Add the egg, all-purpose flour, salt, pepper, and a pinch of nutmeg (if using). Mix everything together thoroughly with your hands or a spoon until well combined.
- Place a large, heavy-bottomed skillet over medium-high heat. Add enough frying oil to create a layer about 1/4 to 1/2 inch deep in the pan. Let the oil get nice and hot.
- Working in batches to avoid overcrowding the pan, scoop about 2-3 tablespoons of the potato mixture per pancake. Gently flatten the mounds into discs about 3-4 inches in diameter and about 1/4 inch thick.
- Fry the potato pancakes for about 4-6 minutes per side, or until they are deeply golden brown and beautifully crispy.
- Once cooked, transfer the crispy pancakes to a plate lined with paper towels to drain any excess oil. Serve them immediately while they’re hot and at their crispiest.
- Prep Time: 15 mins
- Cook Time: 30 mins
- Category: Side Dish
- Method: Frying
- Cuisine: German
Nutrition
- Serving Size: 1 pancake
- Calories: 150
- Sugar: 1 g
- Sodium: 200 mg
- Fat: 7 g
- Saturated Fat: 1 g
- Unsaturated Fat: 5 g
- Trans Fat: 0 g
- Carbohydrates: 20 g
- Fiber: 2 g
- Protein: 3 g
- Cholesterol: 40 mg
Keywords: Removing excess moisture from the grated potatoes is key to achieving crispiness. Don't overcrowd the pan while frying, and feel free to experiment with toppings like applesauce or sour cream.