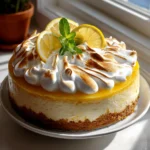
Triple Lemon Meringue Cheesecake
Triple Lemon Meringue Cheesecake – just hearing those words, my mouth starts to water! I’m so excited to share this recipe with you because it’s truly a showstopper, a dessert that brings together so many incredible elements into one harmonious, unbelievably delicious creation. What makes this recipe so special, you ask? Well, it’s right there in the name: it’s triple lemon! We’re talking about an explosion of zesty, tangy lemon goodness layered throughout, perfectly balanced by the rich creaminess of a classic cheesecake and the light, airy sweetness of a meringue.
You are going to absolutely adore this Triple Lemon Meringue Cheesecake. If you, like me, are a dedicated lemon enthusiast, prepare to have your dessert dreams come true. It’s an impressive centerpiece for any gathering, yet it’s surprisingly approachable to make. Every forkful offers a delightful journey: a crisp, buttery crust provides the foundation for a luscious, tangy lemon cheesecake base. Nestled on top is a vibrant, homemade lemon curd, amplifying that irresistible citrus punch. And then, the grand finale – a crown of fluffy, toasted meringue, adding a delicate sweetness and a beautiful textural contrast. It’s sweet, it’s tart, it’s creamy, it’s airy… it’s simply perfect! I can’t wait for you to try it.

Ingredient Notes
Oh, this Triple Lemon Meringue Cheesecake is a symphony of flavors and textures, and getting the ingredients just right is key to its spectacular success! When I say “triple lemon,” I mean it. We’re infusing bright, zesty lemon into three distinct layers, creating a dessert that’s tangy, sweet, and utterly refreshing. Here’s a rundown of what you’ll need and why:
- Graham Cracker Crumbs: These form the buttery, crunchy base of our cheesecake. I find they provide the perfect neutral canvas for the vibrant lemon flavors. If you can’t find graham crackers, good quality digestive biscuits or even vanilla wafer cookies crushed finely will work beautifully. Just ensure they’re finely milled so your crust holds together.
- Unsalted Butter: Melted butter is crucial for binding the crust and adding richness. I always opt for unsalted so I can control the salt content in the recipe. If you only have salted butter, simply omit the pinch of salt from the crust mixture. For a dairy-free option, a good plant-based butter substitute works wonderfully here too.
- Full-Fat Cream Cheese: This is the heart of our cheesecake, providing that classic creamy, dense texture. It’s absolutely essential to use full-fat cream cheese, and make sure it’s at room temperature! Cold cream cheese will lead to lumps in your batter, no matter how much you mix it. There’s really no direct substitute for the unique tang and richness of cream cheese in a cheesecake.
- Granulated Sugar: Sweetness balance is important, especially with all that lemon! We’ll use it in the crust, the cheesecake filling, the lemon curd, and the meringue.
- Large Eggs: Eggs provide structure and richness to both the cheesecake and the lemon curd, and are the star of the meringue. Like the cream cheese, I use room temperature eggs for the cheesecake batter to ensure smooth incorporation. When separating eggs for the meringue, be meticulous – even a tiny bit of yolk can ruin your egg whites!
- Sour Cream or Full-Fat Greek Yogurt: This is my secret weapon for an extra-creamy, slightly tangy cheesecake. It adds moisture and helps create that melt-in-your-mouth texture. Make sure it’s full-fat and at room temperature.
- Fresh Lemons: Ah, the star of our show! For this recipe, fresh lemons are non-negotiable. We’ll be using both the zest (for intense lemon oil flavor) and the juice (for that bright, tangy punch) in the crust, the cheesecake batter, and the luscious lemon curd. I always zest my lemons before juicing them – it’s so much easier!
- Vanilla Extract: A touch of vanilla helps round out the flavors in the cheesecake filling. I always use a good quality non-alcohol vanilla extract.
- Cream of Tartar (for Meringue): This is an optional but highly recommended ingredient for your meringue. It helps stabilize the egg whites, making them whip up faster and hold their volume better. A pinch of fresh lemon juice can also serve a similar purpose if you don’t have cream of tartar.
Step-by-Step Instructions
Making this Triple Lemon Meringue Cheesecake is a delightful journey of layers, and I promise, each step brings you closer to pure dessert bliss. Follow along, and you’ll create a showstopper!
Step 1: Prepare the Crust
- First things first, let’s get that oven preheating to 325°F (160°C). Grab a 9-inch springform pan. I like to lightly grease it and line the bottom with parchment paper – it makes removal so much easier!
- In a medium bowl, combine your graham cracker crumbs, a tablespoon of granulated sugar, a pinch of lemon zest, and your melted butter. Mix thoroughly until the crumbs are evenly moistened.
- Press this mixture firmly and evenly into the bottom of your prepared springform pan. I use the bottom of a flat glass or measuring cup to get a really compact crust. Pop it into the oven for about 8-10 minutes, just until lightly golden and fragrant. Remove and let it cool completely while you prepare the filling.
Step 2: Make the Luscious Lemon Cheesecake Filling
- Reduce your oven temperature to 300°F (150°C). Get out a large mixing bowl.
- Using an electric mixer (handheld or stand mixer), beat your room temperature cream cheese on medium speed until it’s super smooth and creamy – no lumps allowed!
- Gradually add the granulated sugar, beating until just combined and fluffy.
- Now, beat in the sour cream (or Greek yogurt), the fresh lemon zest, fresh lemon juice, and non-alcohol vanilla extract until just incorporated. Remember, we don’t want to overmix!
- Add the eggs, one at a time, beating on low speed only until each egg is just combined. Overmixing at this stage can incorporate too much air, leading to cracks later.
- Pour your smooth cheesecake batter over the cooled crust in the springform pan.
Step 3: Bake in a Water Bath
- This is crucial for a crack-free cheesecake! Wrap the bottom and sides of your springform pan tightly with several layers of heavy-duty aluminum foil to prevent any water from seeping in.
- Place the foil-wrapped springform pan into a larger roasting pan. Carefully pour hot water into the roasting pan until it comes about halfway up the sides of the springform pan.
- Carefully transfer the roasting pan to your preheated oven. Bake for about 60-75 minutes, or until the edges are set but the center still jiggles slightly when gently shaken.
- Turn off the oven, crack the door open an inch or two, and let the cheesecake cool slowly in the water bath for another hour. This slow cooling also helps prevent cracks.
- Remove the cheesecake from the water bath, carefully remove the foil, and let it cool completely on a wire rack. Once fully cooled, cover it and refrigerate for at least 6 hours, or ideally overnight, to allow it to set completely.
Step 4: Prepare the Tangy Lemon Curd Layer
- In a medium saucepan, whisk together 3 large egg yolks, 1/2 cup granulated sugar, 1/4 cup fresh lemon juice, and 2 tablespoons of fresh lemon zest.
- Cook over medium-low heat, whisking constantly, until the mixture thickens enough to coat the back of a spoon (about 5-7 minutes). Do not let it boil!
- Remove from heat and stir in 4 tablespoons of unsalted butter, cut into small pieces, until completely melted and smooth.
- Strain the lemon curd through a fine-mesh sieve into a bowl to remove any zest or cooked egg bits for an ultra-smooth consistency. Cover the surface directly with plastic wrap to prevent a skin from forming and chill in the refrigerator for at least 2 hours until firm.
Step 5: Assemble and Top with Meringue
- Once your cheesecake is fully chilled and set, gently run a thin knife around the edge of the pan before releasing the springform sides.
- Carefully spread the chilled lemon curd evenly over the top of the cheesecake.
- For the meringue: In a very clean, dry bowl (I mean sparkling clean, no grease!), beat 4 large egg whites and 1/4 teaspoon cream of tartar (or a tiny squeeze of lemon juice) with an electric mixer on medium speed until soft peaks form.
- Gradually add 1/2 cup granulated sugar, about a tablespoon at a time, continuing to beat on high speed until stiff, glossy peaks form and the sugar is dissolved. This is a beautiful Italian or Swiss meringue if you’re feeling fancy, but a classic French meringue works wonderfully too.
- Spoon or pipe the meringue over the lemon curd layer, creating pretty swirls and peaks.
- Using a kitchen torch, carefully brown the peaks of the meringue until they are beautifully caramelized. If you don’t have a torch, you can briefly place the cheesecake under a broiler for about 1-2 minutes, watching it very carefully to prevent burning!
- Refrigerate the finished cheesecake for at least 30 minutes before serving to ensure the meringue is set.
Tips & Suggestions
Crafting the perfect Triple Lemon Meringue Cheesecake is all about paying attention to a few details. Over the years, I’ve learned some tricks that really elevate this dessert from good to absolutely phenomenal. Here are my top tips and a few suggestions for making it your own:
- Room Temperature Ingredients are Non-Negotiable: I can’t stress this enough! For the cheesecake filling, ensure your cream cheese, eggs, and sour cream are all at true room temperature. This allows them to blend smoothly without lumps, creating a silky-smooth batter. Plan ahead and take them out of the fridge at least an hour or two before you start baking.
- Don’t Overmix the Cheesecake Batter: Once you add the eggs, mix only until they are just incorporated. Overmixing introduces too much air, which can cause the cheesecake to puff up too much during baking and then collapse, leading to cracks. Gentle is the key!
- The Water Bath is Your Best Friend: Seriously, if you want a creamy, crack-free cheesecake, do not skip the water bath. It provides a moist, even heat that cooks the cheesecake gently. Make sure your springform pan is well-wrapped in foil to prevent any leaks!
- Slow Cooling Prevents Cracks: After baking, resisting the urge to pull the cheesecake out of the oven immediately is hard, but it’s crucial. Let it cool slowly in the turned-off oven with the door ajar. This gradual temperature change helps prevent the cheesecake from shrinking too rapidly and cracking.
- Fresh Lemon Zest and Juice: This recipe demands fresh lemons! Bottled lemon juice just won’t give you the vibrant, authentic lemon flavor we’re aiming for. Always zest your lemons before you juice them – it’s much easier.
- Meringue Mastery: For your meringue, ensure your mixing bowl and beaters are impeccably clean and grease-free. Even a tiny speck of fat can prevent your egg whites from whipping up properly. Using fresh egg whites (not from a carton) also helps, and a touch of cream of tartar or lemon juice provides excellent stability.
- Torch with Confidence (or Broil with Care): Browning the meringue with a kitchen torch is the easiest way to get those beautiful golden peaks. If you don’t have a torch, a broiler can work, but watch it like a hawk! It can go from perfectly golden to burnt in seconds. Keep the cheesecake on a lower rack and the door slightly ajar.
- Patience is a Virtue: This cheesecake requires significant chilling time – both for the cheesecake itself and the lemon curd. Don’t rush it! A properly chilled cheesecake will have the best texture and flavor, and it will be much easier to slice neatly.
- Serving Suggestion: This cheesecake is already a showstopper, but a few fresh berries (raspberries or blueberries complement lemon beautifully) or a sprig of fresh mint can add an extra touch of elegance.
- Portion Control: Because it’s so rich and decadent, thin slices are often perfect!
Storage
Once you’ve gone through all the delightful steps of creating this Triple Lemon Meringue Cheesecake, you’ll want to ensure it stays fresh and delicious for as long as possible. Here’s how I recommend storing it:
Refrigeration:
- Covering: The most important thing is to keep your cheesecake covered. I usually place it gently into an airtight cake carrier. If you don’t have one, loosely cover the cheesecake with aluminum foil or plastic wrap. Be careful not to press the covering directly onto the meringue, as this can flatten those beautiful peaks. You might want to use toothpicks around the edges to create a “tent” for the foil if needed.
- Duration: Stored properly in the refrigerator, this Triple Lemon Meringue Cheesecake will stay fresh and tasting fantastic for up to 3-4 days. After that, while still safe to eat, the meringue can start to weep a bit, and the crust might lose some of its crispness.
- Preventing Odors: Cheesecakes can absorb odors from other foods in your fridge. An airtight container is best to prevent this, ensuring your cheesecake tastes purely of lemon and cream, not last night’s dinner.
Freezing:
- Cheesecake Base Only: While you can freeze plain cheesecake, I generally don’t recommend freezing this Triple Lemon Meringue Cheesecake once the meringue has been added. Meringue doesn’t freeze well; it can become chewy, sticky, and weep a lot upon thawing, completely ruining its delicate texture.
- Freezing Before Meringue: If you want to make parts of this cheesecake ahead of time, you can certainly freeze the baked and chilled cheesecake (without the lemon curd or meringue) for longer storage.
- To do this, ensure the cheesecake is completely chilled.
- Remove it from the springform pan and place it on a cardboard cake round or a flat plate.
- Wrap it tightly in several layers of plastic wrap, then an additional layer of aluminum foil.
- Label with the date and freeze for up to 1 month.
- To thaw, transfer the wrapped cheesecake to the refrigerator overnight. Once thawed, you can proceed with adding the lemon curd and fresh meringue.
- Lemon Curd: The lemon curd can also be made ahead and frozen separately in an airtight container for up to 1 month. Thaw in the refrigerator before using.
Enjoy every zesty bite of your Triple Lemon Meringue Cheesecake!

Final Thoughts
And now, for the grand finale – your incredible Triple Lemon Meringue Cheesecake! I truly hope you’ve savored every step of bringing this show-stopping dessert to life. This isn’t just a cheesecake; it’s a vibrant celebration of all things lemon, boasting that perfect trifecta of zesty curd, creamy filling, and a cloud of toasted meringue. It’s the harmonious blend of rich, tangy, and sweet that makes the Triple Lemon Meringue Cheesecake an absolute must-try. Believe me, the moment you taste its bright, multi-layered flavors, you’ll understand why this recipe is destined to become a cherished favorite. Go on, slice into a piece of pure citrus bliss!
Triple Lemon Meringue Cheesecake Recipe – Zesty & Creamy!
- Total Time: 1 hour 45 minutes
- Yield: 12 servings 1x
Description
This Triple Lemon Meringue Cheesecake is a showstopper dessert that combines zesty lemon flavors with a rich, creamy cheesecake and a light, airy meringue. Perfect for any gathering, this dessert is both impressive and approachable to make.
Ingredients
- 1 1/2 cups graham cracker crumbs
- 1 tablespoon granulated sugar (for crust)
- 1/4 cup unsalted butter, melted
- 24 oz full-fat cream cheese, at room temperature
- 1 cup granulated sugar (for cheesecake filling)
- 1 cup sour cream or full-fat Greek yogurt, at room temperature
- Zest of 2 fresh lemons
- 1/2 cup fresh lemon juice
- 1 teaspoon vanilla extract
- 3 large eggs, at room temperature
- 3 large egg yolks (for lemon curd)
- 1/2 cup granulated sugar (for lemon curd)
- 1/4 cup fresh lemon juice (for lemon curd)
- 2 tablespoons fresh lemon zest (for lemon curd)
- 4 tablespoons unsalted butter, cut into small pieces (for lemon curd)
- 4 large egg whites (for meringue)
- 1/4 teaspoon cream of tartar (for meringue)
- 1/2 cup granulated sugar (for meringue)
Instructions
- Preheat the oven to 325°F (160°C) and prepare a 9-inch springform pan by lightly greasing it and lining the bottom with parchment paper.
- In a medium bowl, combine graham cracker crumbs, 1 tablespoon of granulated sugar, a pinch of lemon zest, and melted butter. Mix thoroughly until evenly moistened.
- Press the mixture firmly into the bottom of the prepared springform pan and bake for 8-10 minutes until lightly golden. Let it cool completely.
- Reduce oven temperature to 300°F (150°C). In a large mixing bowl, beat room temperature cream cheese on medium speed until smooth.
- Gradually add 1 cup of granulated sugar, beating until just combined and fluffy.
- Beat in sour cream (or Greek yogurt), lemon zest, lemon juice, and vanilla extract until just incorporated.
- Add eggs one at a time, beating on low speed until each egg is just combined. Pour the cheesecake batter over the cooled crust.
- Wrap the springform pan tightly with heavy-duty aluminum foil and place it in a larger roasting pan. Pour hot water into the roasting pan until it reaches halfway up the sides of the springform pan.
- Bake for 60-75 minutes until the edges are set but the center jiggles slightly. Turn off the oven, crack the door, and let the cheesecake cool in the water bath for another hour.
- Remove the cheesecake from the water bath, carefully remove the foil, and let it cool completely on a wire rack. Refrigerate for at least 6 hours or overnight.
- In a medium saucepan, whisk together 3 egg yolks, 1/2 cup granulated sugar, 1/4 cup lemon juice, and 2 tablespoons lemon zest. Cook over medium-low heat, whisking constantly, until thickened (about 5-7 minutes).
- Remove from heat and stir in 4 tablespoons of butter until melted. Strain the lemon curd through a fine-mesh sieve into a bowl and cover with plastic wrap. Chill for at least 2 hours.
- Once the cheesecake is chilled, run a knife around the edge before releasing the springform sides. Spread the chilled lemon curd over the cheesecake.
- In a clean bowl, beat 4 egg whites and 1/4 teaspoon cream of tartar until soft peaks form. Gradually add 1/2 cup granulated sugar until stiff peaks form.
- Spoon or pipe the meringue over the lemon curd, creating swirls and peaks. Use a kitchen torch to brown the meringue or broil briefly under a broiler.
- Refrigerate the finished cheesecake for at least 30 minutes before serving.
- Prep Time: 30 mins
- Cook Time: 1 hour 15 mins
- Category: Dessert
- Method: Baking
- Cuisine: American
Nutrition
- Serving Size: 1 slice
- Calories: 450
- Sugar: 35 g
- Sodium: 250 mg
- Fat: 30 g
- Saturated Fat: 15 g
- Unsaturated Fat: 10 g
- Trans Fat: 0 g
- Carbohydrates: 40 g
- Fiber: 1 g
- Protein: 6 g
- Cholesterol: 120 mg
Keywords: Ensure all ingredients are at room temperature for the best texture. Be careful not to overmix the cheesecake batter to prevent cracks. Use fresh lemons for the best flavor.