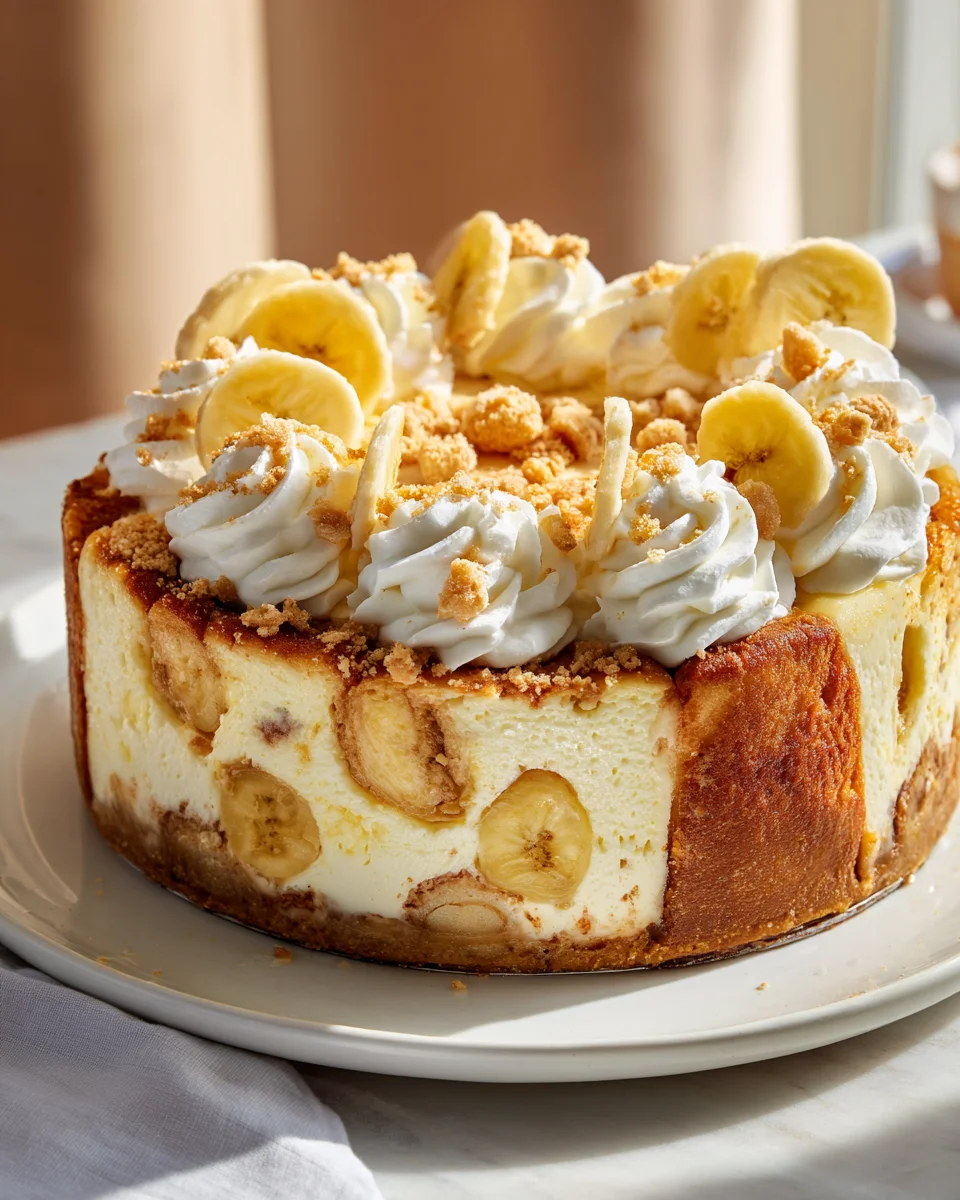
Banana Pudding Cheesecake Dump Cake (southern Inspired Dessert)
Oh boy, do I have a treat for you today! I’m absolutely bursting to share this recipe for Banana Pudding Cheesecake Dump Cake (southern Inspired Dessert) because it’s truly a game-changer. What makes this dessert so incredibly special, you ask? Well, it’s the ultimate love child of three of my all-time favorite comfort foods: the nostalgic creamy goodness of Southern banana pudding, the rich tang of a classic cheesecake, and the sheer effortless magic of a dump cake. Seriously, we’re talking about a dessert that brings together the best of all worlds without a ton of fuss, making it uniquely delicious and surprisingly simple.
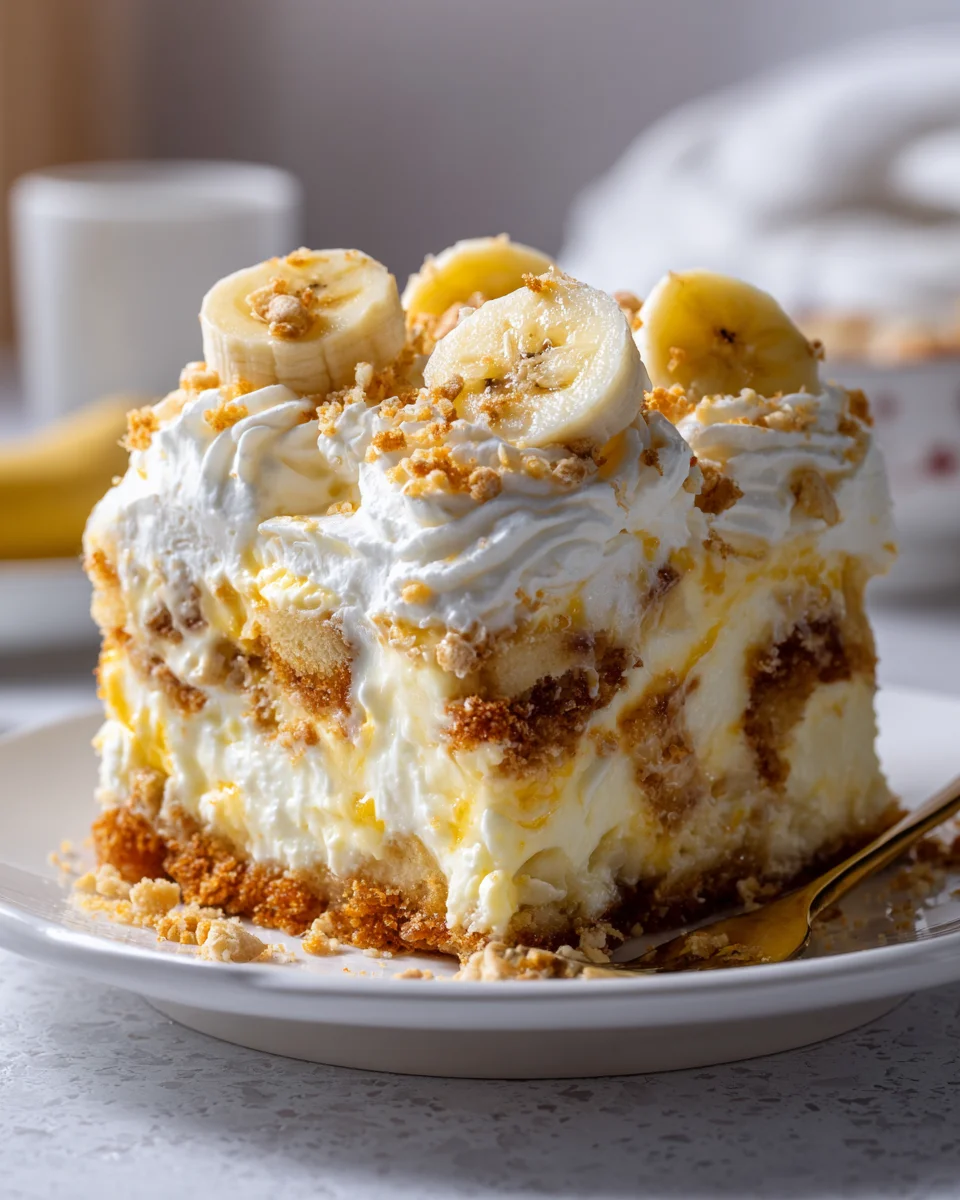
You, my friend, are going to absolutely adore this recipe. Why? Because it delivers incredible flavor and a heartwarming sense of nostalgia with minimal effort. Imagine serving up a warm, gooey dessert that tastes like you spent hours slaving away, but in reality, you just… dumped and baked! This dish is a glorious mashup, featuring layers of sweet, ripe bananas, creamy vanilla wafers, and a luscious cheesecake swirl, all baked into a wonderfully moist cake. It’s got those comforting banana pudding flavors, velvety cheesecake pockets, and a delightful cake-like texture that makes every bite pure bliss. It’s perfect for potlucks, family dinners, or simply when you’re craving something extraordinarily delicious and wonderfully easy. Get ready to impress everyone, including yourself, with this magnificent Southern-inspired creation!
Ingredient Notes
Making this Banana Pudding Cheesecake Dump Cake is an absolute breeze, and it relies on some classic ingredients that come together for a truly comforting Southern-inspired dessert. I love how simple yet impactful each component is. Here’s a rundown of what you’ll need and some handy substitutions:
- Yellow Cake Mix: This is the foundation of our dump cake topping! A standard 15.25-ounce box of yellow cake mix works perfectly, giving us that lovely vanilla-butter flavor.
- Substitution: You can easily swap this for a vanilla cake mix or even a butter pecan cake mix for an extra layer of nutty flavor, although I find yellow cake mix gives the most traditional “dump cake” crust.
- Unsalted Butter: We’ll need two sticks (1 cup) of unsalted butter, melted. This is crucial for creating that golden, crunchy, cakey crust on top of our dump cake. The butter absorbs into the dry cake mix during baking, transforming it into a delicious topping.
- Substitution: If you only have salted butter, you can use it, but I’d recommend slightly reducing any other added salt in the recipe, though typically there isn’t much in a dessert like this.
- Cream Cheese: One 8-ounce block of full-fat cream cheese, softened to room temperature, is key for our creamy cheesecake layer. Softening it ensures a smooth, lump-free mixture.
- Substitution: While full-fat is best for texture and richness, you could use reduced-fat cream cheese. Just be aware it might result in a slightly less rich and creamy texture. I wouldn’t recommend fat-free for this recipe, as the consistency won’t be quite right.
- Granulated Sugar: A bit of granulated sugar sweetens our cream cheese layer perfectly.
- Substitution: You could use a sugar substitute designed for baking, but I find classic granulated sugar gives the best results here.
- Vanilla Extract: Just a teaspoon of good quality vanilla extract enhances the flavors in both the cheesecake and pudding layers.
- Substitution: Almond extract could be used for a different flavor profile, but vanilla is traditional and highly recommended.
- Instant Banana Pudding Mix: Two 3.4-ounce boxes of instant banana pudding mix will create our luscious banana pudding layer. Make sure it’s “instant” – the cook & serve variety will have a different preparation and consistency.
- Substitution: While a homemade banana pudding from scratch would be amazing, for a “dump cake,” the convenience of instant mix is part of the charm. If you want to use a cook & serve mix, just follow its package directions, but be mindful of the thickness needed for layering. You could also try another flavor of pudding, like vanilla, but then it wouldn’t be banana pudding!
- Milk: You’ll need 4 cups of cold whole milk for the pudding. Cold milk helps the instant pudding set quickly and firmly.
- Substitution: 2% milk works fine, but I prefer whole milk for the creamiest, richest pudding. Non-dairy milk alternatives (like almond or soy milk) can sometimes affect the pudding’s setting ability; check the pudding mix package for specific recommendations.
- Fresh Bananas: About 3-4 ripe but firm bananas, sliced, are essential for that fresh banana flavor and texture. Look for bananas that are yellow with just a few brown spots – not too green, not too mushy.
- Substitution: While fresh is best, if you absolutely can’t get fresh, you could use canned sliced bananas packed in water (drained well), but the texture won’t be quite the same.
- Nilla Wafers: One 11-ounce box of Nilla Wafers is a must-have for that classic Southern banana pudding experience. We’ll use some for a bottom layer and some for garnish.
- Substitution: Shortbread cookies or even graham cracker crumbs could work in a pinch for the bottom layer, but Nilla Wafers truly make it authentic.
- Whipped Cream (for serving): A can of whipped cream or homemade whipped cream is the perfect finishing touch.
- Substitution: A dollop of cool whip or even vanilla ice cream would be delightful.
Step-by-Step Instructions
Get ready for a super easy and incredibly delicious dessert! This Banana Pudding Cheesecake Dump Cake lives up to its “dump cake” name, meaning minimal fuss and maximum flavor. Here’s how I put it together:
- Preheat and Prep: First things first, preheat your oven to 350°F (175°C). Lightly grease a 9×13-inch baking dish. Trust me, a little non-stick spray goes a long way here.
- Start with the Wafers: Spread about half of your Nilla Wafers evenly across the bottom of the prepared baking dish. These will soften beautifully and create a lovely base layer, absorbing all those delicious flavors.
- Slice the Bananas: Arrange the sliced fresh bananas over the Nilla Wafers. Try to get a nice, even layer so every bite has some banana goodness.
- Whip Up the Cheesecake Layer: In a medium bowl, beat the softened cream cheese, granulated sugar, and vanilla extract with an electric mixer until it’s smooth and creamy. You don’t want any lumps! Once combined, dollop this creamy cheesecake mixture over the bananas and Nilla Wafers. Gently spread it out as best you can – it doesn’t need to be perfect, as it will melt and spread during baking.
- Prepare the Banana Pudding: In another large bowl, whisk together the two boxes of instant banana pudding mix and 4 cups of cold whole milk for about 2 minutes, or until the pudding starts to thicken. Don’t worry if it’s not super thick yet, it will continue to set. Pour this pudding mixture evenly over the cheesecake layer in your baking dish.
- Add the Dry Cake Mix: Now for the “dump” part! Evenly sprinkle the entire contents of the dry yellow cake mix over the pudding layer. Do NOT stir it in. This is key to getting that wonderful cakey crust.
- Drizzle the Butter: Slowly and evenly drizzle the melted butter over the dry cake mix. Try to cover as much of the cake mix as possible. The butter is what will hydrate the cake mix and turn it into a delicious, golden-brown topping.
- Bake It Off: Place the baking dish in your preheated oven and bake for 45-55 minutes, or until the top is golden brown and bubbly around the edges. A toothpick inserted into the cake topping (avoiding the wet pudding layers below) should come out mostly clean, indicating the cake part is cooked.
- Cool and Chill: Once baked, remove the cake from the oven and let it cool completely on a wire rack at room temperature. This is important for the pudding and cheesecake layers to fully set. Then, cover it with plastic wrap and refrigerate for at least 4 hours, or ideally overnight, for the best texture and flavor. The chilling time really allows all the layers to firm up and meld together beautifully.
- Serve and Garnish: When you’re ready to serve, scoop out generous portions. Top each serving with a dollop of whipped cream, a few extra Nilla Wafers, and a fresh banana slice. Enjoy your Southern-inspired masterpiece!
Tips & Suggestions
To ensure your Banana Pudding Cheesecake Dump Cake turns out absolutely perfect every time, I’ve gathered a few tips and tricks:
- Don’t Stir the Cake Mix: This is the golden rule of dump cakes! Once you sprinkle that dry cake mix over the wet ingredients, resist the urge to stir it. The melted butter will work its magic, and you’ll end up with a delightful, crumbly cake topping.
- Softened Cream Cheese is Key: For a smooth, lump-free cheesecake layer, make sure your cream cheese is at true room temperature. If you’re short on time, you can microwave it in 10-second intervals, but be careful not to melt it.
- Ripe, Firm Bananas: Choose bananas that are ripe (yellow with maybe a few small brown specks) but still firm. Overly ripe bananas can become mushy during baking, and under-ripe ones won’t have enough flavor. To prevent browning on exposed banana slices, you can lightly toss them in a tiny bit of lemon juice, though they’ll be mostly covered in this recipe.
- Chill Time is Crucial: I know it’s hard to wait, but allowing this dump cake to chill for at least 4 hours (or better yet, overnight) is non-negotiable for the best results. This allows the pudding and cheesecake layers to fully set, making for neat slices and a much more enjoyable texture.
- Even Butter Drizzle: Try your best to drizzle the melted butter as evenly as possible over the dry cake mix. This ensures a consistent, golden crust across the entire cake. If there are dry spots, they might not cook through properly.
- Serving Temperature: This dessert is best served chilled. The cold, creamy layers are what make it so refreshing and delicious.
- Fresh Garnishes: Add your whipped cream, extra Nilla Wafers, and fresh banana slices just before serving. This keeps the whipped cream from deflating, the wafers from getting soggy, and the bananas looking fresh.
Storage
Because this Banana Pudding Cheesecake Dump Cake contains dairy, pudding, and fresh bananas, proper storage is essential to keep it delicious and safe to eat. Here’s how I recommend storing it:
- Refrigeration: This cake absolutely needs to be refrigerated. Once it has cooled completely on the counter, cover the baking dish tightly with plastic wrap or aluminum foil. You want to create an airtight seal to prevent it from drying out or absorbing other odors from your fridge.
- Shelf Life: Stored properly in the refrigerator, your Banana Pudding Cheesecake Dump Cake will stay fresh and delicious for about 3-4 days. After that, the bananas might start to break down and the pudding texture can change slightly.
- Freezing: I generally do not recommend freezing this particular dump cake. Fresh bananas tend to get mushy and discolored when frozen and thawed, and the creamy texture of the pudding and cheesecake layers can become grainy or separate. For optimal taste and texture, it’s best enjoyed fresh from the refrigerator within its recommended shelf life.
- Prepping Ahead: You can certainly prepare this cake a day in advance, which is perfect for parties or gatherings. Just cover and chill overnight, then add your fresh garnishes right before serving.
This dessert is so good, I doubt you’ll have much left to store anyway!
Final Thoughts
Well, friends, we’ve reached the sweet crescendo of our culinary journey, and I genuinely hope you’re as excited about this creation as I am! The Banana Pudding Cheesecake Dump Cake (southern Inspired Dessert) truly is a revelation. It takes everything we adore about classic Southern comfort – the creamy, banana-infused goodness of pudding – and marries it with the decadent tang of cheesecake, all while embracing the beloved simplicity of a dump cake. This isn’t just another dessert; it’s a heartwarming hug in every spoonful, a delightful fusion that’s surprisingly easy to achieve but tastes like you spent hours perfecting it. If you’re searching for a show-stopping treat that promises layers of familiar flavors in a fresh, irresistible package, I wholeheartedly urge you to dive into this recipe. Get ready to impress your taste buds and everyone lucky enough to share a bite of this truly unforgettable Southern-inspired masterpiece!
Best Southern Banana Pudding Cheesecake Dump Cake
- Total Time: 1 hour 15 minutes
- Yield: 12 servings 1x
Description
This Banana Pudding Cheesecake Dump Cake is a delightful fusion of classic Southern flavors, combining creamy banana pudding, rich cheesecake, and the simplicity of a dump cake. It’s an effortlessly delicious dessert that will impress your family and friends!
Ingredients
- 1 box (15.25 ounces) yellow cake mix
- 2 sticks (1 cup) unsalted butter, melted
- 1 block (8 ounces) full-fat cream cheese, softened
- Granulated sugar (to taste)
- 1 teaspoon vanilla extract
- 2 boxes (3.4 ounces each) instant banana pudding mix
- 4 cups cold whole milk
- 3–4 ripe but firm bananas, sliced
- 1 box (11 ounces) Nilla Wafers
- Whipped cream (for serving)
Instructions
- Preheat your oven to 350°F (175°C) and lightly grease a 9×13-inch baking dish.
- Spread about half of your Nilla Wafers evenly across the bottom of the prepared baking dish.
- Arrange the sliced fresh bananas over the Nilla Wafers in an even layer.
- In a medium bowl, beat the softened cream cheese, granulated sugar, and vanilla extract with an electric mixer until smooth and creamy. Dollop this mixture over the bananas and Nilla Wafers, spreading it out gently.
- In another large bowl, whisk together the two boxes of instant banana pudding mix and 4 cups of cold whole milk for about 2 minutes, or until the pudding starts to thicken. Pour this pudding mixture evenly over the cheesecake layer in your baking dish.
- Evenly sprinkle the entire contents of the dry yellow cake mix over the pudding layer without stirring.
- Slowly drizzle the melted butter over the dry cake mix, covering as much as possible.
- Bake for 45-55 minutes, or until the top is golden brown and bubbly around the edges. A toothpick inserted into the cake topping should come out mostly clean.
- Once baked, let the cake cool completely on a wire rack at room temperature. Then cover with plastic wrap and refrigerate for at least 4 hours, or ideally overnight.
- When ready to serve, scoop out portions and top with whipped cream, extra Nilla Wafers, and fresh banana slices.
- Prep Time: 20 mins
- Cook Time: 55 mins
- Category: Dessert
- Method: Baking
- Cuisine: Southern
Nutrition
- Serving Size: 1 slice
- Calories: 350
- Sugar: 25 g
- Sodium: 300 mg
- Fat: 18 g
- Saturated Fat: 10 g
- Unsaturated Fat: 5 g
- Trans Fat: 0 g
- Carbohydrates: 45 g
- Fiber: 1 g
- Protein: 4 g
- Cholesterol: 40 mg
Keywords: Ensure your cream cheese is softened for a smooth cheesecake layer. Allowing the cake to chill for at least 4 hours is crucial for the best texture. Don't stir the cake mix after sprinkling it over the pudding layer.