• Skip to primary navigation
  • Skip to main content
  • Skip to primary sidebar
Homesmad

Homesmad

  • Home
  • Breakfast & Brunch
  • Appetizers & Snacks
  • Dinner
  • Dessert
  • About
  • Privacy Policy
  • Contact
Homesmad
  • Home
  • Breakfast & Brunch
  • Appetizers & Snacks
  • Dinner
  • Dessert
  • About
  • Privacy Policy
  • Contact

Best Tomato Soup & Melt-in-Your-Mouth Cheese Dumplings

November 18, 2025 by Lily author

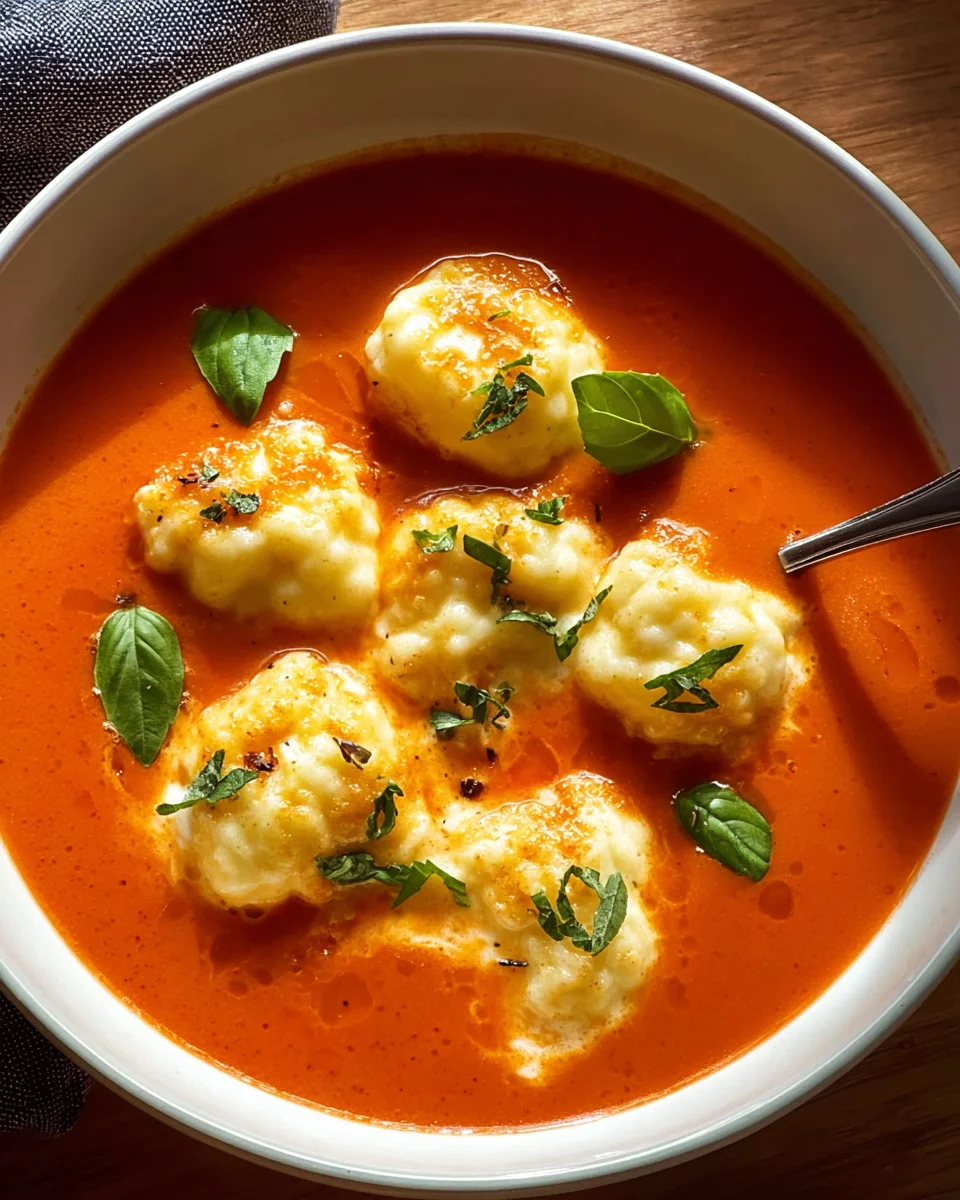
Tomato Soup With Cheese Dumplings – that phrase alone evokes a sense of comforting warmth and delightful indulgence, doesn’t it? I’m incredibly excited to share a recipe that takes a beloved classic and elevates it to an entirely new level of culinary comfort. We all cherish a bowl of rich, velvety tomato soup, a staple that has graced tables for generations, offering solace on a chilly evening or a simple, wholesome meal any day. But imagine enhancing that familiar favorite with something truly special: light, fluffy, and incredibly flavorful cheese dumplings that melt in your mouth.

While traditional tomato soup has roots deeply embedded in European and American kitchens, serving as a testament to simple, honest ingredients, the addition of savory dumplings introduces an exciting, hearty dimension. This isn’t just soup; it’s a complete, soul-satisfying experience. People adore this dish not only for the bright, tangy notes of a perfectly simmered tomato base but also for the surprise and textural pleasure of those pillowy cheese dumplings. They transform a humble soup into an unforgettable meal, making it both incredibly convenient to prepare and wonderfully comforting to eat. I truly believe you’ll find our Tomato Soup With Cheese Dumplings recipe becomes an instant family favorite, offering a delightful twist on tradition.

Best Tomato Soup & Melt-in-Your-Mouth Cheese Dumplings this RECIPE

Ingredients:

Oh, I am so excited to share this recipe with you today! We’re going to be making a truly comforting and delicious bowl of homemade Tomato Soup With Cheese Dumplings. It’s a dish that warms the soul, and honestly, once you try these fluffy, cheesy dumplings nestled in a rich tomato base, you might never go back to plain tomato soup again. Here’s everything we’ll need to create this culinary masterpiece:

  • For the Rich Tomato Soup:
    • 2 tablespoons olive oil, good quality
    • 1 large yellow onion, finely diced
    • 4 cloves garlic, minced
    • 2 medium carrots, peeled and finely diced (about 1 cup)
    • 2 stalks celery, finely diced (about 1 cup)
    • 1 (28-ounce) can crushed tomatoes, preferably San Marzano for best flavor
    • 1 (14.5-ounce) can diced tomatoes, undrained
    • 6 cups vegetable broth, or chicken broth if you prefer
    • 2 tablespoons tomato paste
    • 1 teaspoon granulated sugar, to balance acidity (optional, but recommended)
    • 1 teaspoon dried oregano
    • ½ teaspoon dried basil
    • Salt and freshly ground black pepper to taste
    • ½ cup heavy cream or full-fat coconut milk for a dairy-free option (optional, but adds richness)
    • ¼ cup fresh basil leaves, chopped, for garnish and added fresh flavor
  • For the Fluffy Cheese Dumplings:
    • 1 ½ cups all-purpose flour
    • 2 teaspoons baking powder
    • ½ teaspoon salt
    • ½ cup milk (whole milk works best for richness, but any kind is fine)
    • 1 large egg, lightly beaten
    • 1 cup shredded cheese, a mix of sharp cheddar and Parmesan is my personal favorite, but Monterey Jack or Gruyère would also be delightful
    • 2 tablespoons fresh chives or parsley, finely chopped (optional, for extra flavor and color)

Making the Rich Tomato Soup Base

My philosophy for any great soup, especially one that needs to stand up to hearty dumplings, is that the base has to be incredibly flavorful. So, let’s start by building a beautiful, rich foundation for our Tomato Soup With Cheese Dumplings.

  1. Sauté the Aromatics: Grab a large, heavy-bottomed pot or Dutch oven, and place it over medium heat. Add your 2 tablespoons of olive oil. Once the oil shimmers, toss in your finely diced yellow onion, carrots, and celery. This trio, often referred to as a “mirepoix,” is the cornerstone of so many delicious dishes, and it’s going to infuse our soup with an incredible depth of flavor right from the start. Sauté these vegetables gently for about 8-10 minutes, stirring occasionally, until they’ve softened considerably and the onion is translucent. We’re not looking for any browning here, just a gentle coaxing of their natural sweetness. You’ll notice the aroma starting to fill your kitchen – that’s the magic happening!
  2. Add Garlic and Tomato Paste: Now, push the softened vegetables to one side of the pot and add your minced garlic to the empty space. Let it cook for just about 30 seconds until fragrant, being careful not to let it burn, as burnt garlic can turn bitter very quickly. After the garlic is fragrant, stir in the 2 tablespoons of tomato paste. Stir the tomato paste into the vegetables and cook for another 2-3 minutes. This step is crucial because cooking the tomato paste deepens its flavor, removing any raw taste and enhancing the overall umami of our soup. It will become a darker, almost brick-red color as it cooks down.
  3. Introduce the Tomatoes and Spices: It’s time for the stars of our soup! Pour in both the 28-ounce can of crushed tomatoes and the 14.5-ounce can of diced tomatoes (undrained). Add your dried oregano and dried basil, along with the 1 teaspoon of granulated sugar. The sugar, while optional, really helps to cut through the acidity of the tomatoes, creating a beautifully balanced flavor profile. Stir everything together thoroughly, making sure to scrape up any bits from the bottom of the pot.
  4. Simmer to Perfection: Next, pour in the 6 cups of vegetable broth. Give it another good stir, bring the mixture to a gentle boil, then reduce the heat to low, cover the pot, and let it simmer for at least 30 minutes. This simmering time is essential for the flavors to truly meld and deepen. The longer it simmers, the more complex and delicious your soup will become. If you have the time, an hour or even longer is fantastic. During this time, the vegetables will become incredibly tender, and the tomato base will thicken beautifully.
  5. Blend for Creaminess (Optional but Recommended): Once your soup has simmered and developed its flavors, you have a choice. For a rustic soup, you can leave it as is. However, for that velvety restaurant-quality texture, I highly recommend blending it. You can either use an immersion blender directly in the pot until it reaches your desired smoothness, or carefully transfer batches to a regular blender. If using a regular blender, be extremely cautious when blending hot liquids – fill the blender only halfway, secure the lid, and hold it down with a kitchen towel, starting on a low speed and gradually increasing. Once blended, return the soup to the pot.
  6. Final Seasoning and Enrichment: Taste your beautiful tomato soup and adjust the seasoning with salt and freshly ground black pepper as needed. This is your moment to make it perfect for your palate. If using, stir in the ½ cup of heavy cream (or coconut milk) now. This adds a wonderful richness and a silken mouthfeel, transforming the soup into something truly luxurious. Finally, stir in the fresh chopped basil leaves. The fresh basil will brighten up the flavor profile and add a lovely herbaceous note that complements the tomatoes perfectly. Keep the soup warm over very low heat while we prepare our delicious cheese dumplings.

Crafting the Fluffy Cheese Dumplings

Now, for the exciting part – those incredible cheese dumplings that are going to make this Tomato Soup With Cheese Dumplings so special. These aren’t your dense, chewy dumplings; these are designed to be light, airy, and bursting with cheesy goodness.

  1. Prepare the Dry Ingredients: In a medium-sized mixing bowl, whisk together the 1 ½ cups of all-purpose flour, 2 teaspoons of baking powder, and ½ teaspoon of salt. Make sure these are thoroughly combined; the baking powder is what gives our dumplings that lovely lift and fluffiness, so we want it evenly distributed.
  2. Combine the Wet Ingredients: In a separate smaller bowl, lightly beat the 1 large egg. Then, add the ½ cup of milk and whisk them together until well combined. The consistency should be smooth and uniform.
  3. Gently Mix Wet into Dry: Create a well in the center of your dry ingredients. Pour the wet ingredients into this well. Using a spoon or a rubber spatula, gently mix the ingredients together. The key here is to mix just until combined. Overmixing will develop the gluten in the flour, resulting in tough, rubbery dumplings, which is the exact opposite of what we’re aiming for. A few lumps in the batter are perfectly fine, even desirable!
  4. Fold in the Cheese and Herbs: Now for the star flavor of the dumplings! Gently fold in your 1 cup of shredded cheese (that delightful cheddar and Parmesan mix, or whatever you’ve chosen). If you’re using them, fold in the 2 tablespoons of fresh chives or parsley as well. These add a wonderful fresh pop of color and flavor. Again, mix very gently until the cheese is just distributed throughout the batter. You want those little pockets of cheesy goodness!
  5. Rest the Batter (Optional, but Recommended): Cover the bowl with a clean kitchen towel and let the dumpling batter rest for about 10-15 minutes at room temperature. This brief rest allows the flour to fully hydrate and the baking powder to start working its magic, which will contribute to even fluffier dumplings. This is a small step, but it makes a noticeable difference in the final texture of your cheese dumplings.

Cooking the Perfect Cheese Dumplings in Soup

With our rich tomato soup simmering and our fluffy cheese dumpling batter ready, it’s time to bring these two components together in a harmonious culinary embrace. This step is surprisingly quick and rewarding.

  1. Prepare the Soup for Dumplings: Bring your prepared tomato soup back up to a gentle simmer over medium-low heat. It’s important that the soup isn’t boiling vigorously, as that can cause the dumplings to break apart or cook unevenly. A gentle simmer with small bubbles is perfect for tenderly cooking our cheese dumplings. You want it hot enough to cook them through, but calm enough for them to hold their shape.
  2. Drop the Dumplings: Using two spoons or a small cookie scoop, carefully drop spoonfuls of the cheese dumpling batter directly into the simmering soup. I usually use one spoon to scoop the batter and the other to gently push it off into the soup. Aim for dumplings about 1 to 1 ½ inches in size – they will expand a bit as they cook. Don’t overcrowd the pot; if your pot isn’t large enough to accommodate all the dumplings in a single layer with some space around them, cook them in two batches. This ensures they cook evenly and maintain their shape.
  3. Cover and Simmer: Once all the dumplings are in the soup, cover the pot tightly with a lid. Reduce the heat to low and let the dumplings simmer undisturbed for about 12-15 minutes. The steam created by the tight lid is crucial for cooking the dumplings through. Resist the urge to peek during the first 10 minutes, as this releases the steam and can prevent them from cooking properly.
  4. Check for Doneness: After 12-15 minutes, carefully remove the lid. The dumplings should have puffed up considerably and will look cooked through. To be absolutely sure, you can gently remove one dumpling from the soup and cut it in half. The center should be light, airy, and cooked, with no raw or doughy bits. If it’s still a bit doughy, simply return it to the pot, cover, and cook for another 2-3 minutes.

Assembling and Serving Your “Tomato Soup With Cheese Dumplings”

The moment of truth has arrived! Your kitchen should smell absolutely incredible by now, and you’re just a few steps away from enjoying a truly satisfying meal. This Tomato Soup With Cheese Dumplings is not just a dish; it’s an experience.

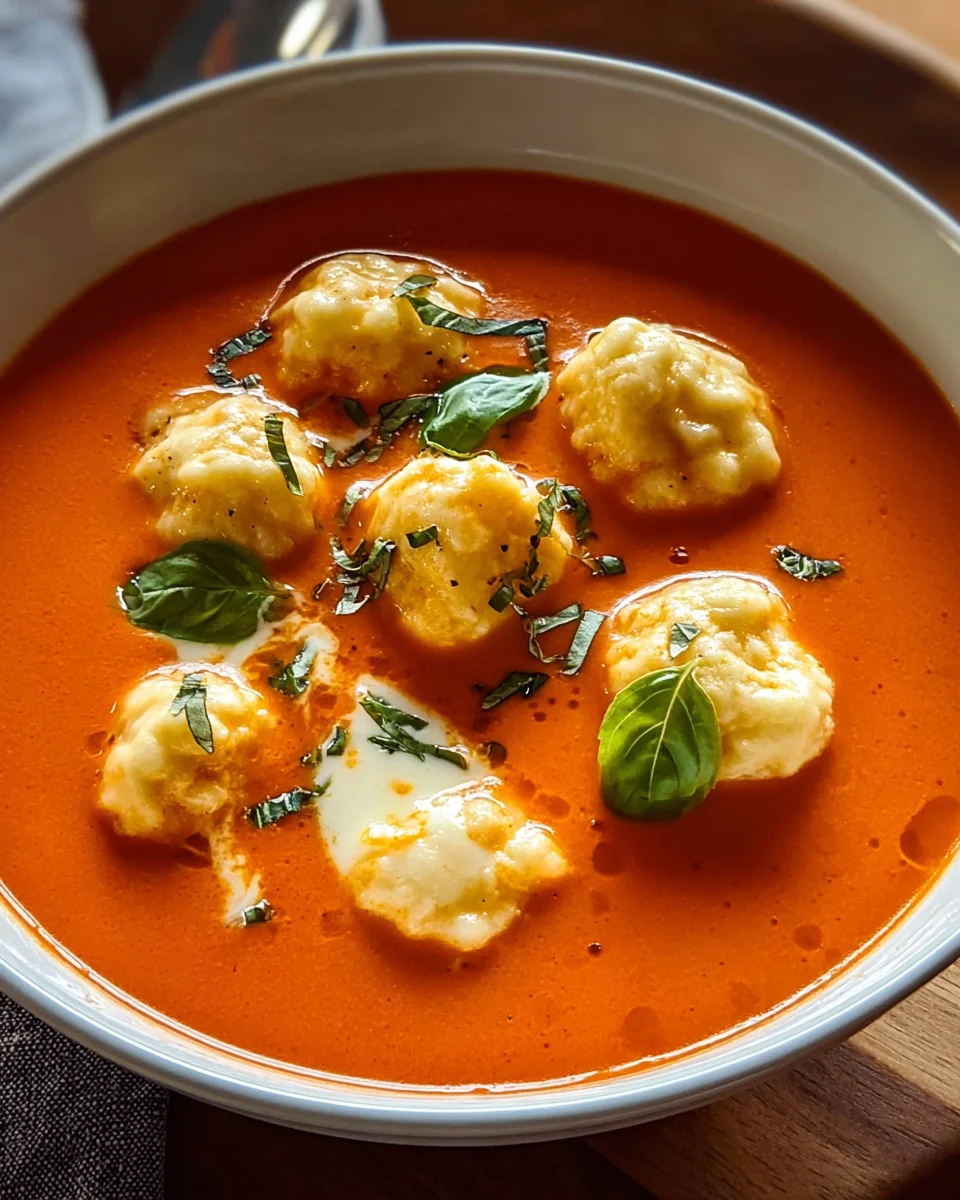
  1. Ladle Generously: With a ladle, carefully scoop the rich tomato soup into individual serving bowls, making sure each bowl gets a good number of those wonderfully fluffy cheese dumplings. I usually aim for 3-4 dumplings per bowl, but honestly, who’s counting when they’re this good?
  2. Garnish and Personalize: For a final flourish and an extra burst of freshness, I love to garnish each serving. A sprinkle of fresh chopped basil or a few more fresh chives adds a beautiful pop of color and an aromatic finish. A swirl of extra heavy cream or a drizzle of good quality olive oil can also be a lovely touch, enhancing the richness even further. If you’re a fan of a little extra cheesy goodness (and who isn’t?), a final grating of fresh Parmesan cheese over the top before serving is absolutely divine.
  3. Serve Immediately: This dish is best enjoyed hot, straight from the pot. The dumplings are at their peak fluffiness and the soup is at its most comforting.
  4. Serving Suggestions: While this Tomato Soup With Cheese Dumplings is a complete meal in itself, it pairs wonderfully with a crusty slice of artisanal bread for dipping, a simple green salad with a light vinaigrette to cut through the richness, or even a grilled cheese sandwich on the side for a double dose of comfort food. Leftovers, if you have any, can be stored in an airtight container in the refrigerator for up to 3 days. Reheat gently on the stovetop or in the microwave, adding a splash of broth if the soup has thickened too much. The dumplings might soften slightly upon reheating, but they’ll still be delicious! Enjoy every comforting spoonful of your homemade Tomato Soup With Cheese Dumplings! It’s a dish that truly brings joy.

Best Tomato Soup & Melt-in-Your-Mouth Cheese Dumplings

Conclusion:

Well, my friends, we’ve reached the end of our culinary journey, and I genuinely hope you’re feeling inspired to roll up your sleeves and dive into this truly remarkable dish. If there’s one recipe I could implore you to try this season, it would undoubtedly be this one. Why, you ask? Because it’s more than just a meal; it’s an experience, a warm embrace in a bowl that promises to comfort your soul and tantalize your taste buds in ways you might not expect from a seemingly simple soup. The magic truly lies in the unexpected harmony of robust, tangy tomato soup — simmered to perfection with aromatic herbs and perhaps a touch of sweetness or a hint of spice — paired with those incredibly tender, pillowy cheese dumplings. Each spoonful is a delightful contrast: the vibrant, velvety smooth soup giving way to a soft, yielding dumpling that bursts with savory cheese. It’s comforting, it’s unique, and frankly, it’s addictively delicious.

This isn’t just your average weeknight dinner; it’s a testament to how humble ingredients can be transformed into something extraordinary. The Tomato Soup With Cheese Dumplings isn’t merely a dish; it’s a celebration of cozy warmth, of home-cooked goodness, and of the pure joy that comes from sharing a truly special meal. It elevates classic tomato soup to an entirely new level, making it not just a starter or a light lunch, but a hearty, satisfying main course that truly sticks with you. The process of making the dumplings might seem a little extra, but trust me, the reward is immeasurable. They absorb the wonderful flavors of the soup while maintaining their distinct, delightful texture, creating a culinary synergy that’s simply irresistible.

Elevate Your Experience with These Serving Suggestions & Variations:

Now, while this dish is absolutely perfect as is, part of the joy of cooking is making it your own! For serving, I always recommend a generous sprinkle of fresh basil or parsley over the top to add a burst of color and freshness. A dollop of sour cream or a swirl of crème fraîche can add an extra layer of creamy richness that complements the tanginess of the tomatoes beautifully. And what’s soup without something to dip? Crusty artisan bread, a grilled cheese sandwich (double the cheese goodness!), or even a simple side salad with a vinaigrette dressing would be fantastic accompaniments, offering a lovely textural contrast to the soft dumplings and smooth soup.

Feeling adventurous with variations? Don’t be afraid to experiment! For the soup base, consider roasting your tomatoes first for a deeper, more caramelized flavor. A pinch of smoked paprika can add a wonderful smoky depth, or for those who like a little kick, a dash of red pepper flakes will definitely wake things up. You could also swirl in a spoonful of pesto right before serving for an herbaceous twist. As for the star dumplings, the possibilities are endless! While a sharp cheddar or a creamy mozzarella works wonders, imagine incorporating crumbled feta for a salty tang, or a smoked gouda for a rich, nutty flavor. You could even fold finely chopped chives or dill into the dumpling dough for an extra layer of herbal freshness. For a heartier version, consider adding some sautéed spinach or finely diced carrots to the soup base along with the tomatoes. This recipe is wonderfully forgiving and adaptable, inviting you to put your own personal stamp on it.

Your Culinary Adventure Awaits!

So, what are you waiting for? I truly believe this recipe will become a cherished favorite in your home, just as it has in mine. It’s perfect for a chilly evening, a comforting weekend lunch, or even an impressive yet unfussy dinner party. The aroma alone as it simmers on the stove is enough to bring smiles to faces. Don’t just read about it; experience it! Gather your ingredients, put on your favorite apron, and embark on this delicious journey. I am genuinely excited for you to taste the magic of this dish. Once you’ve made it, please, please come back and share your experience with me. Did you try a fun variation? What was your favorite part? Did your family rave about it? Your feedback and stories mean the world to me, and I can’t wait to hear how this delightful Tomato Soup With Cheese Dumplings brightens up your kitchen and your mealtime. Happy cooking, everyone!


Tomato Soup With Cheese Dumplings

Elevate classic tomato soup with light, fluffy, melt-in-your-mouth cheese dumplings. This soul-satisfying recipe transforms a beloved comfort food into a hearty and unforgettable meal, offering bright, tangy notes with a delightful textural surprise.

Prep Time
25 Minutes
Cook Time
45 Minutes
Total Time
10 Minutes
Servings
6 servings

Ingredients


Instructions


Important Information

Nutrition Facts (Per Serving)

It is important to consider this information as approximate and not to use it as definitive health advice.

Allergy Information

Please check ingredients for potential allergens and consult a health professional if in doubt.

« Previous Post
Japanese Beef Katsu Bowls: Crispy & Flavorful Dinner Idea
Next Post »
Japanese Cucumber Salad (Sunomono) - Quick & Refreshing

If you enjoyed this…

Flavorful Beef Taco Stuffed Sweet Potatoes – Quick & Healthy

Spicy Maple Chicken & Coconut Rice: A Flavorful Feast

Delicious Maple Butter Glazed Turkey Recipe for Holidays

Primary Sidebar

Browse by Diet

BreakfastDinnerLunchDessertAppetizer

Sweet Peach Yogurt Parfait Delight

One of my fondest memories is from a lazy summer afternoon spent at my grandmother’s house. The sun filtered through the kitchen window, casting a warm glow over the table where she would create her culinary magic. It was during one of those blissful moments that I first tasted her Peach Yogurt Parfait with Honey and Granola. The sweet aroma of ripe peaches mingling with creamy yogurt and the crunch of granola was nothing short of heavenly. It felt like summer captured in a bowl, and I still remember the joy of diving in with a spoon, each layer revealing a new burst of flavor.

When I think about that parfait, I can almost hear the gentle hum of the bees outside, reminding me of the floral notes that honey brings to every bite. The vibrant yellows and soft oranges of the peaches contrast beautifully with the creamy white yogurt and the golden crunch of granola. It’s a dish that not only looks delightful but also tastes like a celebration of fresh, wholesome ingredients.

What makes my version of this Peach Yogurt Parfait special is the careful balance of flavors and textures. I use ripe, juicy peaches, drizzled with locally sourced honey, and a homemade granola that’s bursting with nuts and seeds for an extra crunch. It’s a simple dish, but every layer is crafted with love and attention.

Let me show you exactly how to make this delightful parfait, so you can bring a bit of that summer magic into your kitchen!

Sweet Peach Yogurt Parfait Delight

Why You’ll Love This Recipe

  • Delightfully creamy texture from the Greek yogurt, paired with the juicy sweetness of fresh peaches.
  • Ready in under 20 minutes, making it a quick and satisfying breakfast or snack option.
  • Budget-friendly, using common ingredients that you may already have in your pantry.
  • Customizable with your favorite granola and nuts, allowing you to tailor each parfait to your taste.
  • Perfectly balanced flavors with the bright acidity of lemon juice and the sweetness of honey enhancing the peaches.

Ingredients

  • For the Parfait:
  • 2 cups plain Greek yogurt (or vanilla yogurt for a sweeter option)
  • 2 large ripe peaches, diced (about 2 cups)
  • 1 tablespoon fresh lemon juice (to prevent browning of peaches)
  • 2 tablespoons honey (plus more for drizzling)
  • 1 teaspoon vanilla extract (optional for extra flavor)
  • For the Granola:
  • 1 cup granola (store-bought or homemade; see notes for a simple granola recipe)
  • 1/4 cup sliced almonds (optional for added crunch)
  • 1/4 cup shredded coconut (optional for added flavor)

Let’s dive into some key ingredients that make this Peach Yogurt Parfait so delightful! First, the Greek yogurt is not only creamy but also packed with protein, making it a satisfying option for breakfast or a snack. If you’re looking for a sweeter option, you can easily substitute it with vanilla yogurt, though it may alter the overall flavor balance. Next, the ripe peaches are the star of the show; their natural sweetness shines through, so I recommend choosing peaches that yield slightly to pressure, indicating they’re perfectly ripe. If peaches aren’t in season, feel free to use nectarines or even frozen peaches—just thaw them before use. Finally, honey adds a lovely floral sweetness that ties everything together. If you prefer, maple syrup can serve as a delicious substitute.

Step-by-Step Instructions

  1. Start by preparing the peaches. Wash them thoroughly, then slice and dice them into bite-sized pieces. In a medium bowl, toss the diced peaches with 1 tablespoon of fresh lemon juice to prevent browning. Set aside for about 5 minutes while the lemon juice works its magic.
  2. In a separate bowl, combine the Greek yogurt, 2 tablespoons of honey, and 1 teaspoon of vanilla extract if using. Stir the mixture until smooth and thoroughly blended. This should take about a minute. Avoid overmixing to maintain the creaminess of the yogurt.
  3. Now it’s time to layer your parfait. Grab a clear glass or bowl to showcase your beautiful creation. Start with a generous spoonful of the yogurt mixture at the bottom—about 1/4 cup will do. Use a spoon to spread it evenly.
  4. Add a layer of the diced peaches over the yogurt, ensuring they cover the yogurt completely. You might want to use about half of what you have prepared—roughly 1 cup. This layer should be visually appealing, so arrange the peaches neatly.
  5. Sprinkle 1/4 cup of granola over the peaches. This adds a delightful crunch. Make sure to distribute it evenly to ensure every bite has that satisfying texture. Avoid packing it down too tightly, as you want it to maintain its crunch.
  6. Repeat the layers: spoon in another 1/4 cup of yogurt, followed by another cup of peaches, and another sprinkle of granola. You should have at least two layers, but feel free to add more depending on your glass size.
  7. Finish off your parfait with a drizzle of honey on top for added sweetness and a touch of elegance. If you’re using sliced almonds or shredded coconut, sprinkle them on top now. It adds a lovely visual contrast and extra flavor.
  8. Serve immediately or refrigerate for up to 30 minutes before serving to allow the flavors to meld together. However, I recommend enjoying it fresh to maintain the granola’s crunch.

Pro Tips for the Best Peach Yogurt Parfait With Honey And Granola

  • Make sure to choose ripe peaches for the best flavor and texture. A common mistake is using unripe fruit, which can lead to a less enjoyable parfait. Look for peaches that are fragrant and slightly soft to the touch.
  • Use a clear glass to assemble your parfait; this not only makes for a beautiful presentation but also allows you to see the colorful layers, which adds to the enjoyment of eating it.
  • For an even creamier texture, consider whipping the Greek yogurt with a hand mixer for a couple of minutes before layering. This small adjustment makes a huge difference in mouthfeel.
  • Be mindful of the granola-to-yogurt ratio. Too much granola can overwhelm the parfait, while too little can make it feel too creamy. Aim for about 1/4 cup of granola per layer for the perfect balance.
  • If you’re making this for a gathering, consider preparing the yogurt and peaches ahead of time and layering them just before serving. This ensures the granola stays crunchy!

Variations & Serving Ideas

There are so many ways to get creative with your Peach Yogurt Parfait! For a tropical twist, swap out the peaches for mangoes or pineapples and top with coconut flakes. If you prefer a berry flavor, mix in some blueberries or strawberries with the peaches for added color and taste. For a nutty version, incorporate chopped walnuts or pecans instead of almonds.

As for serving ideas, this parfait pairs beautifully with a side of scrambled eggs for a hearty breakfast or fresh fruit salad for a light lunch. You might also enjoy it alongside whole grain toast with almond butter for an energizing snack. The contrast of flavors and textures will elevate your meal experience!

Storage, Make-Ahead & Reheating

The Peach Yogurt Parfait is best enjoyed fresh, but you can prepare some components ahead of time. Store the layered parfait in an airtight container in the refrigerator for up to 24 hours. However, be cautious; the granola may lose its crunch if stored too long. You can freeze the yogurt and peach mixture for up to 2 months; just remember to thaw it in the refrigerator overnight before serving.

If you plan to enjoy this dish the next day, it can taste even better as the flavors meld together. Just remember to add the granola right before serving to keep its delightful crunch!

Frequently Asked Questions

Can I make Peach Yogurt Parfait With Honey And Granola ahead of time?

Yes — in fact, it tastes even better the next day as the flavors meld. However, I recommend waiting to add the granola until just before serving to maintain its crunch.

What can I substitute for Greek yogurt?

If you prefer a lighter option, you can substitute Greek yogurt with regular yogurt or a dairy-free alternative like coconut yogurt. Just remember that this may alter the creaminess and flavor profile slightly.

Can I use frozen peaches for this parfait?

Absolutely! Just make sure to thaw the frozen peaches before using them. They will still add great flavor, though the texture may be slightly softer than fresh peaches.

How do I make the parfait vegan?

To make a vegan version, substitute the Greek yogurt with a plant-based yogurt alternative, and replace honey with maple syrup or agave nectar. This keeps the parfait sweet while adhering to a vegan diet.

What other fruits can I use in this recipe?

You can mix and match fruits based on your preference. Try using strawberries, blueberries, raspberries, or even bananas. Just make sure to adjust the lemon juice as needed to prevent browning.

Sweet Peach Yogurt Parfait Delight

Final Thoughts

The Peach Yogurt Parfait with Honey and Granola is a delightful blend of creamy yogurt, sweet peaches, and crunchy granola that creates a satisfying and nourishing treat. Each layer bursts with flavor, making it a perfect choice for breakfast or a light dessert.

This is the kind of recipe I come back to again and again, especially when I want something refreshing and wholesome to start my day. The harmony of sweet and tart flavors, combined with the delightful crunch, never fails to lift my spirits!

I encourage you to give this parfait a try and indulge in its comforting goodness. Feel free to share your results or even add your own twist—perhaps a sprinkle of cinnamon or a handful of nuts. Enjoy creating your perfect parfait!

Print
clock clock iconcutlery cutlery iconflag flag iconfolder folder iconinstagram instagram iconpinterest pinterest iconfacebook facebook iconprint print iconsquares squares iconheart heart iconheart solid heart solid icon

Peach Yogurt Parfait


  • Author: Lily author
  • Total Time: 15 minutes
  • Yield: 4 servings 1x
Pin Recipe
Print Recipe

Description

This Peach Yogurt Parfait combines creamy Greek yogurt, juicy peaches, and crunchy granola for a delightful treat. It’s a perfect breakfast or snack that captures the essence of summer in every bite.


Ingredients

Scale
  • For the Parfait:
  • 2 cups plain Greek yogurt (or vanilla yogurt for a sweeter option)
  • 2 large ripe peaches, diced (about 2 cups)
  • 1 tablespoon fresh lemon juice (to prevent browning of peaches)
  • 2 tablespoons honey (plus more for drizzling)
  • 1 teaspoon vanilla extract (optional for extra flavor)
  • For the Granola:
  • 1 cup granola (store-bought or homemade; see notes for a simple granola recipe)
  • 1/4 cup sliced almonds (optional for added crunch)
  • 1/4 cup shredded coconut (optional for added flavor)

Instructions

  1. Start by preparing the peaches. Wash them thoroughly, then slice and dice them into bite-sized pieces. In a medium bowl, toss the diced peaches with 1 tablespoon of fresh lemon juice to prevent browning. Set aside for about 5 minutes while the lemon juice works its magic.
  2. In a separate bowl, combine the Greek yogurt, 2 tablespoons of honey, and 1 teaspoon of vanilla extract if using. Stir the mixture until smooth and thoroughly blended. This should take about a minute. Avoid overmixing to maintain the creaminess of the yogurt.
  3. Now it’s time to layer your parfait. Grab a clear glass or bowl to showcase your beautiful creation. Start with a generous spoonful of the yogurt mixture at the bottom—about 1/4 cup will do. Use a spoon to spread it evenly.
  4. Add a layer of the diced peaches over the yogurt, ensuring they cover the yogurt completely. You might want to use about half of what you have prepared—roughly 1 cup. This layer should be visually appealing, so arrange the peaches neatly.
  5. Sprinkle 1/4 cup of granola over the peaches. This adds a delightful crunch. Make sure to distribute it evenly to ensure every bite has that satisfying texture. Avoid packing it down too tightly, as you want it to maintain its crunch.
  6. Repeat the layers: spoon in another 1/4 cup of yogurt, followed by another cup of peaches, and another sprinkle of granola. You should have at least two layers, but feel free to add more depending on your glass size.
  7. Finish off your parfait with a drizzle of honey on top for added sweetness and a touch of elegance. If you’re using sliced almonds or shredded coconut, sprinkle them on top now. It adds a lovely visual contrast and extra flavor.
  8. Serve immediately or refrigerate for up to 30 minutes before serving to allow the flavors to meld together. However, I recommend enjoying it fresh to maintain the granola’s crunch.
  • Prep Time: 15 mins
  • Cook Time: 0 mins
  • Category: Breakfast
  • Method: No-cook
  • Cuisine: American

Nutrition

  • Serving Size: 1 parfait
  • Calories: 250
  • Sugar: 20 g
  • Sodium: 50 mg
  • Fat: 5 g
  • Saturated Fat: 2 g
  • Unsaturated Fat: 3 g
  • Trans Fat: 0 g
  • Carbohydrates: 40 g
  • Fiber: 3 g
  • Protein: 10 g
  • Cholesterol: 10 mg

Keywords: Choose ripe peaches for the best flavor and texture. Use a clear glass for a beautiful presentation. For creaminess, consider whipping the yogurt before layering. Be mindful of the granola-to-yogurt ratio. Prepare yogurt and peaches ahead of time for gatherings, layering just before serving.

Did you make this recipe?

Share a photo and tag us — we can't wait to see what you've made!

Sun-Kissed Frozen Orange Cream Slush

As a child, summer days felt like they lasted forever. I remember the sticky heat wrapping around me as I played outside, my laughter mingling with the sounds of the neighborhood. But nothing could cool me down quite like the moment I’d spot my grandmother, laboring over her blender, whipping up her famous Frozen Orange Creamsicle Slush. That vibrant orange treat, with its frosty texture and sweet citrus aroma, was like a burst of sunshine in a cup. Just one sip, and I could feel the coolness wash over me, sparking pure joy.

This Frozen Orange Creamsicle Slush has a way of making you feel like a kid again. Its creamy, dreamy consistency is a delightful balance of bright orange and soft vanilla, inviting you to dive right in. The refreshing tang of orange dances on your tongue, while the smooth creaminess envelops you in a comforting embrace. It’s a nostalgic treat that’s perfect for hot summer afternoons or anytime you need a little pick-me-up.

What makes my version of this slush stand out is the addition of a hint of vanilla bean, which elevates the flavor and adds an extra layer of richness. Plus, it’s super easy to whip up with just a few simple ingredients that you probably already have on hand! So, if you’re ready to relive those sun-soaked memories, let me show you exactly how to make it.

Sun-Kissed Frozen Orange Cream Slush

Why You’ll Love This Recipe

  • Each slush is a perfect blend of creamy vanilla and zesty orange, creating a nostalgic flavor reminiscent of summer days.
  • This refreshing treat is ready in under 15 minutes, making it an ideal quick dessert for unexpected guests or hot afternoons.
  • With just 8 simple ingredients, it’s budget-friendly, ensuring you don’t have to break the bank to enjoy a delicious slush.
  • The slush has a perfectly smooth texture, thanks to the combination of ice and ice cream, providing a delightful contrast to the bright citrus flavors.
  • It’s highly customizable; you can easily adjust the sweetness and add fresh herbs for a unique twist that suits your taste.

Ingredients

  • 2 cups orange juice (freshly squeezed or store-bought)
  • 1 cup vanilla ice cream
  • 1 cup crushed ice
  • 1/2 cup milk (whole or 2%)
  • 1/4 cup granulated sugar (adjust based on sweetness preference)
  • 1 teaspoon vanilla extract
  • Zest of 1 orange (for added flavor)
  • Fresh orange slices and mint leaves (for garnish)

The star of this Frozen Orange Creamsicle Slush is the orange juice, which provides the vibrant, citrusy base. Freshly squeezed juice will yield the brightest flavor, but store-bought options can be just as convenient. If you’re opting for store-bought, choose 100% pure juice with no added sugars for the best results. Another essential ingredient is the vanilla ice cream; it adds creaminess and sweetness. You can substitute it with dairy-free ice cream if you’re looking for a vegan option. Whole or 2% milk complements the ice cream, creating a smooth blend. If you want a lower-calorie version, almond or oat milk can be good alternatives.

Lastly, the granulated sugar can be adjusted based on your sweetness preference. If you prefer a more natural sweetener, consider using honey or agave syrup. The orange zest enhances the flavor profile, providing an aromatic pop that brings the whole slush together. Don’t skip it! It adds an extra layer of brightness that makes this slush truly special.

Step-by-Step Instructions

  1. Start by preparing your ingredients. Gather 2 cups of orange juice, 1 cup of vanilla ice cream, and 1 cup of crushed ice. Make sure the ice is finely crushed, as larger chunks can make blending difficult.
  2. In a blender, combine the orange juice, vanilla ice cream, crushed ice, and 1/2 cup of milk. Add 1/4 cup of granulated sugar and 1 teaspoon of vanilla extract. If you like a sweeter slush, consider adding a bit more sugar at this stage.
  3. Add the zest of 1 orange to the blender. This step is crucial for enhancing the citrus flavor of your slush. Make sure not to include the bitter white pith—only the flavorful zest.
  4. Blend the mixture on medium-high speed for about 30-45 seconds. Stop once the ingredients are fully combined and the slush has a smooth, even consistency. If you notice large chunks of ice, blend for an additional 10-15 seconds. Avoid over-blending, as this can make the slush too liquidy.
  5. Once blended, taste the slush. If it needs more sweetness, add a little more sugar and blend for a few more seconds. If it’s too thick, you can add a splash of milk to reach your desired consistency.
  6. Pour the slush into glasses. This recipe typically serves 4, but you can easily double it for larger gatherings. Use a spoon to help guide the slush into the glasses if needed.
  7. Garnish each serving with fresh orange slices and mint leaves. The mint not only adds a pop of color but also a refreshing aroma that complements the citrus flavors beautifully.
  8. Serve immediately and enjoy! If you’ve made extra, you can refrigerate it for a short time, but it’s best enjoyed fresh.

Pro Tips for the Best Frozen Orange Creamsicle Slush

  • Don’t skip the orange zest! It’s a game-changer for flavor. Always zest before juicing to make it easier.
  • Use a high-powered blender for the best texture. A standard blender may struggle with ice, leading to uneven consistency. If you have a food processor, that can work too, but ensure the ice is finely crushed.
  • Adjust the ice-to-liquid ratio carefully. If your slush is too thick, it won’t blend well. Start with less ice and add more until you reach your preferred texture.
  • Be cautious with the sugar! Always start with the lower amount, as you can easily add more, but it’s hard to fix an overly sweet slush.
  • For a fun twist, consider adding a splash of coconut milk or a handful of fresh fruit like strawberries or pineapple. This not only enhances the flavor but also adds a beautiful color contrast.

Variations & Serving Ideas

There are countless ways to put a spin on your Frozen Orange Creamsicle Slush. Consider making a tropical version by adding in some pineapple juice or coconut milk for a delightful tropical twist. If you’re feeling adventurous, try incorporating a handful of frozen mango or peach slices for added sweetness. For a lighter version, swap out the vanilla ice cream for Greek yogurt for a creamy yet tangy alternative.

As for serving ideas, this refreshing slush pairs wonderfully with light summer dishes like grilled chicken skewers, fish tacos, or a simple salad topped with citrus vinaigrette. The bright, zesty flavors of the slush complement these dishes perfectly, making them an ideal pairing for a sunny day.

Storage, Make-Ahead & Reheating

This Frozen Orange Creamsicle Slush is best enjoyed fresh, but if you have leftovers, you can store them in an airtight container in the fridge for up to 2 days. Just keep in mind that the slush may lose some of its texture over time as the ice melts. It doesn’t freeze well, as the ice will turn into a solid block. If you must freeze it, blend again after thawing to restore the slushy consistency. This treat is best the day you make it, as the flavors meld together beautifully overnight, enhancing its deliciousness.

Frequently Asked Questions

Can I make Frozen Orange Creamsicle Slush ahead of time?

Yes — in fact, it tastes even better the next day as the flavors meld. However, it’s best to enjoy it fresh, as the texture can change if stored for too long. If you need to prepare it ahead, keep it in the fridge and re-blend before serving.

What kind of orange juice should I use?

For the best flavor, use freshly squeezed orange juice. However, if you’re short on time, opt for 100% pure store-bought juice without added sugars. This will ensure that your slush remains flavorful and refreshing.

Can I substitute the vanilla ice cream?

Absolutely! If you’re looking for a dairy-free option, coconut milk ice cream or a non-dairy vanilla ice cream can work wonderfully. They will still provide the creamy texture and sweetness you desire.

How can I adjust the sweetness of my slush?

You can easily adjust the sweetness by modifying the amount of sugar added. Start with 1/4 cup and taste the mixture before blending. If you prefer it sweeter, add more sugar gradually until it reaches your desired level.

What should I do if my slush is too thick?

If your slush is too thick, simply add a splash of milk or orange juice and blend again. This will help achieve a more drinkable consistency while maintaining the slushy texture. Adjust gradually to reach your preferred thickness.

Sun-Kissed Frozen Orange Cream Slush

Final Thoughts

The Frozen Orange Creamsicle Slush is a delightful blend of refreshing citrus and creamy goodness, making it a perfect treat for warm days or any time you crave a taste of nostalgia. The way the bright orange flavor dances with the creamy texture truly elevates this slush, transforming it into a satisfying escape from the everyday.

This is the kind of recipe I come back to again and again, especially when I’m looking to cool down or impress guests at a summer gathering. It’s simple to make and always brings smiles all around! I encourage you to try this recipe for yourself—don’t hesitate to share your results or even put your own spin on it. Happy slushing!

Print
clock clock iconcutlery cutlery iconflag flag iconfolder folder iconinstagram instagram iconpinterest pinterest iconfacebook facebook iconprint print iconsquares squares iconheart heart iconheart solid heart solid icon

Frozen Orange Creamsicle Slush


  • Author: Lily author
  • Total Time: 15 minutes
  • Yield: 4 servings 1x
Pin Recipe
Print Recipe

Description

This Frozen Orange Creamsicle Slush is a refreshing treat that combines creamy vanilla and zesty orange flavors. Perfect for hot summer days, it brings back nostalgic memories with every sip.


Ingredients

Scale
  • 2 cups orange juice (freshly squeezed or store-bought)
  • 1 cup vanilla ice cream
  • 1 cup crushed ice
  • 1/2 cup milk (whole or 2%)
  • 1/4 cup granulated sugar (adjust based on sweetness preference)
  • 1 teaspoon vanilla extract
  • Zest of 1 orange (for added flavor)
  • Fresh orange slices and mint leaves (for garnish)

Instructions

  1. Start by preparing your ingredients. Gather 2 cups of orange juice, 1 cup of vanilla ice cream, and 1 cup of crushed ice. Make sure the ice is finely crushed, as larger chunks can make blending difficult.
  2. In a blender, combine the orange juice, vanilla ice cream, crushed ice, and 1/2 cup of milk. Add 1/4 cup of granulated sugar and 1 teaspoon of vanilla extract. If you like a sweeter slush, consider adding a bit more sugar at this stage.
  3. Add the zest of 1 orange to the blender. This step is crucial for enhancing the citrus flavor of your slush. Make sure not to include the bitter white pith—only the flavorful zest.
  4. Blend the mixture on medium-high speed for about 30-45 seconds. Stop once the ingredients are fully combined and the slush has a smooth, even consistency. If you notice large chunks of ice, blend for an additional 10-15 seconds. Avoid over-blending, as this can make the slush too liquidy.
  5. Once blended, taste the slush. If it needs more sweetness, add a little more sugar and blend for a few more seconds. If it’s too thick, you can add a splash of milk to reach your desired consistency.
  6. Pour the slush into glasses. This recipe typically serves 4, but you can easily double it for larger gatherings. Use a spoon to help guide the slush into the glasses if needed.
  7. Garnish each serving with fresh orange slices and mint leaves. The mint not only adds a pop of color but also a refreshing aroma that complements the citrus flavors beautifully.
  8. Serve immediately and enjoy! If you’ve made extra, you can refrigerate it for a short time, but it's best enjoyed fresh.
  • Prep Time: 15 min
  • Cook Time: 0 min
  • Category: Dessert
  • Method: Blending
  • Cuisine: American

Nutrition

  • Serving Size: 1 serving
  • Calories: 200
  • Sugar: 30 g
  • Sodium: 50 mg
  • Fat: 5 g
  • Saturated Fat: 3 g
  • Unsaturated Fat: 2 g
  • Trans Fat: 0 g
  • Carbohydrates: 40 g
  • Fiber: 1 g
  • Protein: 2 g
  • Cholesterol: 20 mg

Keywords: Don't skip the orange zest! It's a game-changer for flavor. Always zest before juicing to make it easier.

Did you make this recipe?

Share a photo and tag us — we can't wait to see what you've made!

Zesty Lemon Poppy Seed Delight

One rainy afternoon, I found myself in my grandmother’s cozy kitchen, the kind that always smelled like warmth and love. She was whipping up her famous Lemon Poppy Seed Loaf, a recipe that had been passed down through generations. As the batter came together, the zesty aroma of fresh lemons filled the air, mingling perfectly with the nutty fragrance of poppy seeds. I can still picture her, apron-clad, as she expertly drizzled a vibrant citrus icing over the loaf, creating a glossy, sun-kissed finish that beckoned us to dive in. It was a moment that sparked my own passion for baking, and this recipe has become a cherished staple in my home ever since.

When you take a bite of this Lemon Poppy Seed Loaf, it’s like a burst of sunshine on your palate. The loaf is beautifully golden, with a tender crumb that melts in your mouth. Each slice is speckled with tiny poppy seeds, adding a delightful crunch that contrasts beautifully with the tangy sweetness of the lemon. And that citrus icing? It’s the finishing touch that elevates this loaf from ordinary to extraordinary, with its bright, zesty flavor dancing on your taste buds.

This recipe stands out because it embraces simplicity while delivering on flavor. I’ve added a hint of vanilla to the batter, enhancing the overall taste and making it even more indulgent. Trust me, once you make this Lemon Poppy Seed Loaf With Citrus Icing, it’ll become a go-to in your baking repertoire.

So, let me show you exactly how to make it!

Zesty Lemon Poppy Seed Delight

Why You’ll Love This Recipe

  • Moist and tender crumb that melts in your mouth, thanks to the perfect balance of butter and buttermilk.
  • Bright, zesty lemon flavor paired with crunchy poppy seeds, creating a delightful texture and taste experience.
  • Easy to whip up in just about an hour, perfect for last-minute gatherings or a cozy afternoon treat.
  • Budget-friendly with everyday ingredients, making it an accessible option for all home bakers.
  • The citrus icing adds a sweet tang that elevates the loaf, turning a simple recipe into a showstopper!

Ingredients

  • 1 ½ cups (190g) all-purpose flour
  • 1 teaspoon baking powder
  • ½ teaspoon baking soda
  • ½ teaspoon salt
  • 3 tablespoons poppy seeds
  • ½ cup (115g) unsalted butter, softened to room temperature
  • 1 cup (200g) granulated sugar
  • 2 large eggs
  • 1 teaspoon vanilla extract
  • 1 teaspoon lemon zest (from about 1 medium lemon)
  • ½ cup (120ml) buttermilk
  • 2 tablespoons fresh lemon juice

For the Citrus Icing:

  • 1 cup (120g) powdered sugar
  • 2 tablespoons fresh lemon juice
  • 1 tablespoon orange juice
  • 1 teaspoon lemon zest (for garnish, optional)

Let’s dive into the key ingredients that make this Lemon Poppy Seed Loaf so special. The all-purpose flour provides the structure and base for the loaf, while the baking powder and baking soda ensure it rises perfectly, giving the loaf a light texture. For a gluten-free variation, you could substitute the flour with a gluten-free all-purpose blend. Poppy seeds not only add a delightful crunch but also contribute to the unique flavor profile that pairs well with the citrus notes.

Unsalted butter is crucial for achieving the buttery richness that makes this loaf so moist. If you’re looking for a dairy-free option, coconut oil or a vegan butter can be used instead. The buttermilk is another essential component, providing acidity that activates the baking soda for a fluffy texture. If you don’t have buttermilk on hand, you can easily make a substitute by mixing ½ cup of milk with 1 tablespoon of vinegar or lemon juice and letting it sit for about 5 minutes.

Step-by-Step Instructions

  1. Preheat your oven to 350°F (175°C). Grease a 9×5-inch loaf pan or line it with parchment paper for easy removal later.
  2. In a medium mixing bowl, whisk together 1 ½ cups of all-purpose flour, 1 teaspoon of baking powder, ½ teaspoon of baking soda, ½ teaspoon of salt, and 3 tablespoons of poppy seeds. This helps to evenly distribute the baking agents and ensures a uniform rise.
  3. In a large mixing bowl, cream together ½ cup of softened unsalted butter and 1 cup of granulated sugar using an electric mixer on medium speed for about 3-4 minutes, until the mixture is light and fluffy. Make sure to scrape down the sides of the bowl occasionally.
  4. Add 2 large eggs, 1 teaspoon of vanilla extract, and 1 teaspoon of lemon zest to the creamed butter and sugar, mixing until fully combined. You want a smooth consistency, so ensure there are no lumps of butter.
  5. In a small bowl, combine ½ cup of buttermilk and 2 tablespoons of fresh lemon juice. Alternately add the dry ingredients and buttermilk mixture to the butter mixture, starting and ending with the dry ingredients. Mix just until combined; do not overmix, as this can lead to a dense loaf.
  6. Pour the batter into the prepared loaf pan. Smooth the top with a spatula, ensuring it’s even. Bake in the preheated oven for 50-60 minutes, or until a toothpick inserted in the center comes out clean. The edges should be lightly golden brown, and the center should feel just set.
  7. Once baked, remove the loaf from the oven and allow it to cool in the pan for about 10 minutes. Then, transfer it to a wire rack to cool completely. Resist the urge to slice too soon, as it will be crumbly if it’s still warm.
  8. While the loaf is cooling, prepare the citrus icing. In a medium bowl, whisk together 1 cup of powdered sugar, 2 tablespoons of fresh lemon juice, and 1 tablespoon of orange juice until smooth. If the icing is too thick, you can add a little more juice to reach your desired consistency.
  9. Once the loaf is completely cool, drizzle the citrus icing over the top. If you like, sprinkle with an additional teaspoon of lemon zest for an extra pop of flavor and color.

Pro Tips for the Best Lemon Poppy Seed Loaf With Citrus Icing

  • Be careful not to overmix your batter; this is a common mistake that can lead to a dense loaf. Mix just until the dry ingredients are incorporated for a light and fluffy texture.
  • Use room temperature ingredients, especially the butter and eggs. This helps to create a smoother batter and ensures even baking. Take your eggs out of the fridge about 30 minutes before you start.
  • For a more pronounced lemon flavor, consider adding a little lemon extract in addition to the zest and juice. Just a half teaspoon can elevate the citrus notes significantly.
  • When measuring your flour, spoon it into the measuring cup and level it off with a knife instead of scooping directly from the bag. This prevents packing and ensures you don’t end up with a dry loaf.
  • Invest in a good quality loaf pan; it makes a difference in heat distribution, which ensures even baking. If your pan is dark-coated, reduce the oven temperature by 25°F to prevent over-browning.

Variations & Serving Ideas

For a delightful twist, consider adding blueberries or raspberries to the batter for a fruity burst of flavor. You can also experiment with different citrus fruits—try lime or grapefruit zest and juice for a refreshing change. For a healthier option, substitute half of the all-purpose flour with whole wheat flour for added fiber without compromising too much on texture.

This Lemon Poppy Seed Loaf pairs beautifully with a light salad, such as a mixed greens salad with a vinaigrette, or a cup of tea for a cozy afternoon treat. It also complements a creamy cheese platter, as the acidity of the loaf balances rich cheeses perfectly. Lastly, a scoop of vanilla ice cream on the side creates a delightful contrast of temperatures and flavors!

Storage, Make-Ahead & Reheating

This Lemon Poppy Seed Loaf can be stored at room temperature for up to 3 days if wrapped tightly in plastic wrap. If you want to keep it longer, it freezes well for up to 3 months. To freeze, wrap the loaf tightly in plastic wrap and then in aluminum foil to prevent freezer burn.

When you’re ready to enjoy it again, simply thaw it in the fridge overnight. Reheat individual slices in the microwave for 15-20 seconds or in a toaster oven until warmed through. Interestingly, many people find that this loaf tastes even better the next day, as the flavors have time to meld!

Frequently Asked Questions

Can I make Lemon Poppy Seed Loaf With Citrus Icing ahead of time?

Yes — in fact, it tastes even better the next day! You can make the loaf a day in advance, allowing the flavors to develop. Just be sure to store it in an airtight container to maintain its moisture.

Can I substitute the poppy seeds?

Absolutely! If you don’t have poppy seeds on hand or prefer an alternative, you can use sesame seeds for a similar crunch or omit them entirely for a smooth loaf.

What can I use instead of buttermilk?

If you don’t have buttermilk, you can easily create a substitute by mixing ½ cup of milk (dairy or plant-based) with 1 tablespoon of vinegar or lemon juice. Let it sit for 5 minutes before using in the recipe.

How can I make this recipe gluten-free?

To make a gluten-free version of this Lemon Poppy Seed Loaf, substitute the all-purpose flour with a gluten-free all-purpose flour blend. Just ensure that the blend contains a binding agent like xanthan gum for the best results.

What is the best way to store leftover loaf?

Leftover Lemon Poppy Seed Loaf should be stored in an airtight container at room temperature for up to 3 days. For longer storage, wrap it tightly and freeze for up to 3 months. Thaw it before serving for the best texture.

Zesty Lemon Poppy Seed Delight

Final Thoughts

The Lemon Poppy Seed Loaf with Citrus Icing is truly a delightful treat that brings a burst of brightness to any occasion. The zesty lemon flavor combined with the subtle crunch of poppy seeds creates a satisfying balance, while the citrus icing adds a touch of sweetness that perfectly complements the loaf’s tanginess.

This is the kind of recipe I come back to again and again, especially when I want to brighten up a gloomy day or celebrate a small victory. The aroma that fills the kitchen as it bakes is absolutely heavenly! I encourage you to give this recipe a try; you might just find it becoming a beloved staple in your home. Don’t forget to share your results or even add your own unique twist—I can’t wait to see what you create!

Print
clock clock iconcutlery cutlery iconflag flag iconfolder folder iconinstagram instagram iconpinterest pinterest iconfacebook facebook iconprint print iconsquares squares iconheart heart iconheart solid heart solid icon

Lemon Poppy Seed Loaf


  • Author: Lily author
  • Total Time: 22 minute
  • Yield: 1 loaf 1x
Pin Recipe
Print Recipe

Description

This Lemon Poppy Seed Loaf is a delightful treat that combines zesty lemon flavor with crunchy poppy seeds. Topped with a citrus icing, it’s perfect for any occasion.


Ingredients

Scale
  • 1 ½ cups (190g) all-purpose flour
  • 1 teaspoon baking powder
  • ½ teaspoon baking soda
  • ½ teaspoon salt
  • 3 tablespoons poppy seeds
  • ½ cup (115g) unsalted butter, softened to room temperature
  • 1 cup (200g) granulated sugar
  • 2 large eggs
  • 1 teaspoon vanilla extract
  • 1 teaspoon lemon zest (from about 1 medium lemon)
  • ½ cup (120ml) buttermilk
  • 2 tablespoons fresh lemon juice
  • 1 cup (120g) powdered sugar
  • 2 tablespoons fresh lemon juice
  • 1 tablespoon orange juice
  • 1 teaspoon lemon zest (for garnish, optional)

Instructions

  1. Preheat your oven to 350°F (175°C). Grease a 9×5-inch loaf pan or line it with parchment paper for easy removal later.
  2. In a medium mixing bowl, whisk together 1 ½ cups of all-purpose flour, 1 teaspoon of baking powder, ½ teaspoon of baking soda, ½ teaspoon of salt, and 3 tablespoons of poppy seeds. This helps to evenly distribute the baking agents and ensures a uniform rise.
  3. In a large mixing bowl, cream together ½ cup of softened unsalted butter and 1 cup of granulated sugar using an electric mixer on medium speed for about 3-4 minutes, until the mixture is light and fluffy. Make sure to scrape down the sides of the bowl occasionally.
  4. Add 2 large eggs, 1 teaspoon of vanilla extract, and 1 teaspoon of lemon zest to the creamed butter and sugar, mixing until fully combined. You want a smooth consistency, so ensure there are no lumps of butter.
  5. In a small bowl, combine ½ cup of buttermilk and 2 tablespoons of fresh lemon juice. Alternately add the dry ingredients and buttermilk mixture to the butter mixture, starting and ending with the dry ingredients. Mix just until combined; do not overmix, as this can lead to a dense loaf.
  6. Pour the batter into the prepared loaf pan. Smooth the top with a spatula, ensuring it’s even. Bake in the preheated oven for 50-60 minutes, or until a toothpick inserted in the center comes out clean. The edges should be lightly golden brown, and the center should feel just set.
  7. Once baked, remove the loaf from the oven and allow it to cool in the pan for about 10 minutes. Then, transfer it to a wire rack to cool completely. Resist the urge to slice too soon, as it will be crumbly if it’s still warm.
  8. While the loaf is cooling, prepare the citrus icing. In a medium bowl, whisk together 1 cup of powdered sugar, 2 tablespoons of fresh lemon juice, and 1 tablespoon of orange juice until smooth. If the icing is too thick, you can add a little more juice to reach your desired consistency.
  9. Once the loaf is completely cool, drizzle the citrus icing over the top. If you like, sprinkle with an additional teaspoon of lemon zest for an extra pop of flavor and color.
  • Prep Time: 15 mins
  • Cook Time: 50-60 mins
  • Category: Dessert
  • Method: Baking
  • Cuisine: American

Nutrition

  • Serving Size: 1 slice
  • Calories: 200
  • Sugar: 15 g
  • Sodium: 150 mg
  • Fat: 8 g
  • Saturated Fat: 5 g
  • Unsaturated Fat: 3 g
  • Trans Fat: 0 g
  • Carbohydrates: 30 g
  • Fiber: 1 g
  • Protein: 3 g
  • Cholesterol: 40 mg

Keywords: Be careful not to overmix your batter; this is a common mistake that can lead to a dense loaf. Use room temperature ingredients for a smoother batter and even baking.

Did you make this recipe?

Share a photo and tag us — we can't wait to see what you've made!

  • Privacy Policy
  • Terms Of Service
  • Contact
  • About
  • GDPR

Copyright © 2025 Homesmad