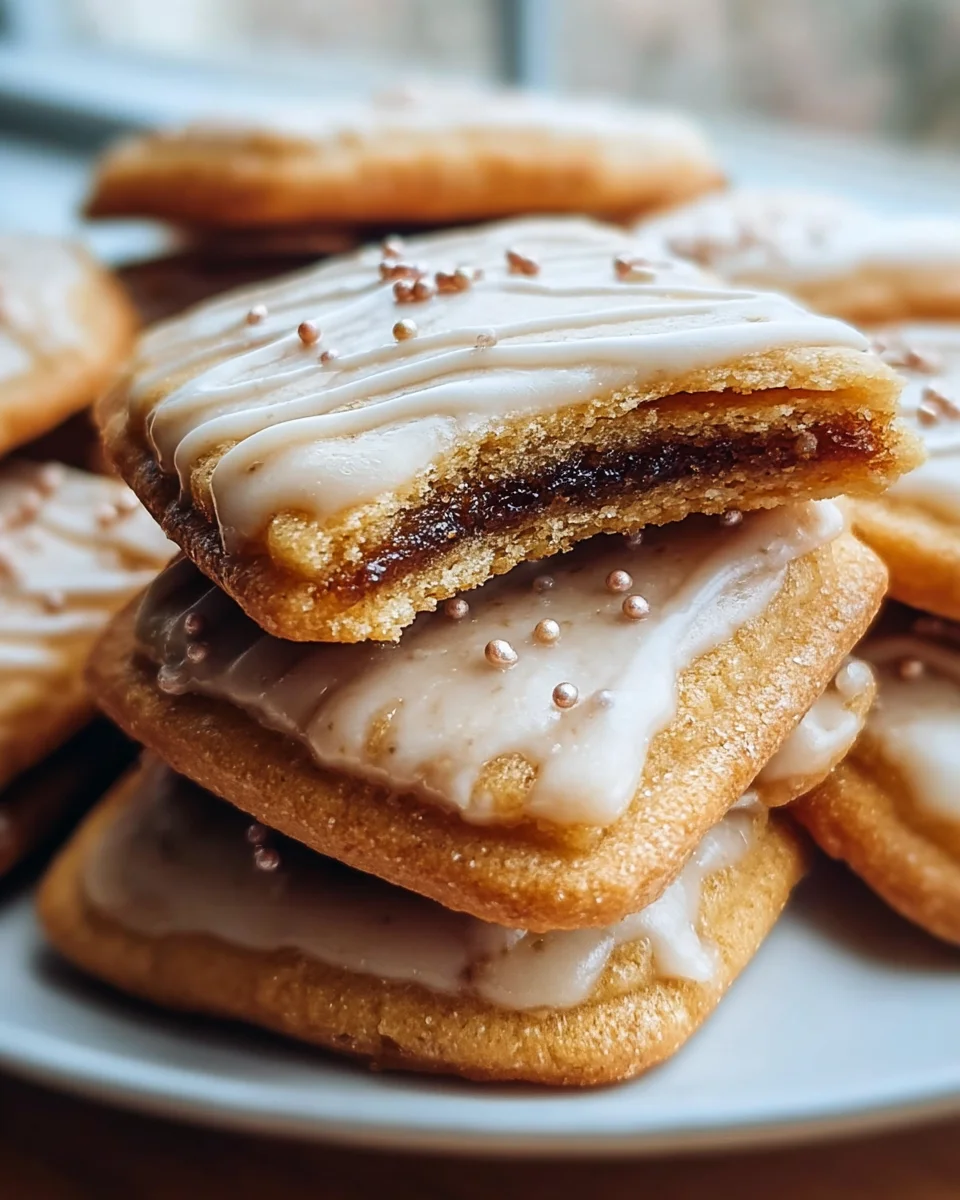
Brown Sugar Pop Tart Cookies are about to become your new favorite obsession, a delightful fusion that brings together the comforting nostalgia of a classic breakfast pastry with the irresistible chewiness of a perfect cookie. Have you ever wished you could bottle that warm, sweet, cinnamon-spiced Pop-Tart filling and infuse it into a dessert that’s easy to bake and even easier to devour? Well, get ready, because that’s precisely what we’re achieving today!
A Sweet Twist on a Timeless Treat
While Pop-Tarts themselves have graced breakfast tables since the 1960s, offering a quick burst of sweetness to busy mornings, these cookies represent a playful evolution, transforming a childhood staple into a gourmet-level treat. It’s truly a testament to culinary creativity, taking something universally loved for its convenience and turning it into a homemade masterpiece. People absolutely adore this dish because it beautifully marries the iconic, caramelized brown sugar cinnamon flavor with the soft, yielding texture of a homemade cookie, often featuring that signature icing drizzle and sprinkle topping. It’s the ultimate edible hug, perfect for sharing with friends or enjoying solo with a cup of coffee. I promise, once you experience the magic of these Brown Sugar Pop Tart Cookies, you’ll understand why they’re quickly becoming a beloved staple in homes everywhere. They truly offer the best of both worlds in every single bite!

Ingredients:
-
For the Flaky Cookie Dough:
- 2 ½ cups (300g) all-purpose flour, plus more for dusting your work surface
- 1 teaspoon baking powder
- ½ teaspoon salt
- 1 cup (226g) unsalted butter, very cold and cut into ½-inch cubes
- ½ cup (100g) granulated sugar
- 1 large egg, cold
- 1 teaspoon pure vanilla extract
- 2 tablespoons cold milk or heavy cream
-
For the Warm Brown Sugar Cinnamon Filling:
- ½ cup (100g) packed light brown sugar (dark brown sugar can be used for a deeper molasses flavor)
- 2 tablespoons all-purpose flour (this helps to thicken the filling and prevent it from becoming too runny during baking)
- 1 teaspoon ground cinnamon
- ¼ cup (56g) unsalted butter, melted
- 2 tablespoons milk or water
-
For the Sweet Vanilla Glaze:
- 1 ½ cups (180g) powdered sugar (confectioners’ sugar), sifted to remove any lumps
- 3-4 tablespoons milk or heavy cream, starting with 3 and adding more as needed for desired consistency
- ½ teaspoon pure vanilla extract
- Optional: Colorful sprinkles, for a fun finishing touch on your “Brown Sugar Pop Tart Cookies”
Equipment You’ll Need:
To embark on this delightful journey of creating “Brown Sugar Pop Tart Cookies,” having the right tools on hand will make the process much smoother and more enjoyable. Here’s what I typically gather before I start:
- Large mixing bowls (at least two)
- Stand mixer with paddle attachment, or a hand mixer (you can do this by hand, but a mixer makes it much easier!)
- Rolling pin
- Sharp knife or a pizza cutter for cutting dough
- Ruler (optional, but helpful for precise rectangle cutting)
- Fork (for crimping edges)
- Baking sheets
- Parchment paper or silicone baking mats
- Wire cooling rack
- Small saucepan (for the filling)
- Whisk (for glaze)
- Pastry brush (optional, for egg wash)
Preparing the Flaky Cookie Dough:
-
Combine Dry Ingredients: In a large mixing bowl, whisk together the 2 ½ cups of all-purpose flour, 1 teaspoon of baking powder, and ½ teaspoon of salt. Set this aside for a moment. This ensures an even distribution of leavening and seasoning throughout our delicious cookie dough.
-
Cream Butter and Sugar: In the bowl of a stand mixer fitted with the paddle attachment, or using a hand mixer, cream together the 1 cup (226g) of very cold, cubed unsalted butter and ½ cup (100g) of granulated sugar. I aim for this mixture to be light and fluffy, but it’s crucial that the butter remains cold, so don’t overmix at this stage. We’re looking for pea-sized butter pieces to help create that wonderfully flaky texture in our “Brown Sugar Pop Tart Cookies.”
-
Add Wet Ingredients: In a separate small bowl, lightly whisk together the cold large egg, 1 teaspoon of pure vanilla extract, and 2 tablespoons of cold milk or heavy cream. Gradually add this mixture to the butter and sugar mixture, mixing on low speed until just combined. The cold temperature of these ingredients is key to maintaining the butter’s firmness, which is essential for a tender, flaky dough.
-
Incorporate Dry into Wet: Slowly add the dry flour mixture to the wet ingredients, mixing on the lowest speed until just combined. I always stop mixing as soon as no dry streaks of flour remain. Overmixing the dough will develop the gluten too much, resulting in tough cookies instead of the delicate, flaky “Brown Sugar Pop Tart Cookies” we’re aiming for.
-
Form and Chill the Dough: Turn the dough out onto a lightly floured surface. Gently bring it together to form a cohesive ball, then flatten it into two ½-inch thick discs. Wrap each disc tightly in plastic wrap. Refrigerate the dough for at least 1 hour, or preferably for 2 hours. Chilling is a critical step; it allows the gluten to relax, makes the dough easier to roll, and prevents the cookies from spreading too much during baking. This also gives the butter time to firm up again, which is vital for the desired flakiness.
Crafting the Warm Brown Sugar Cinnamon Filling:
-
Combine Dry Filling Ingredients: In a small saucepan, combine ½ cup (100g) of packed light brown sugar, 2 tablespoons of all-purpose flour, and 1 teaspoon of ground cinnamon. Whisk these together until they are well blended. The flour in the filling acts as a thickening agent, preventing the brown sugar from becoming a gooey, runny mess when baked, which is something we definitely want to avoid for our perfect “Brown Sugar Pop Tart Cookies.”
-
Add Wet Filling Ingredients: Pour in ¼ cup (56g) of melted unsalted butter and 2 tablespoons of milk or water to the dry mixture. Stir well until everything is thoroughly combined and forms a thick, paste-like consistency.
-
Cook the Filling (Optional but Recommended): For an even richer, more stable filling, I like to gently heat this mixture over low heat for 2-3 minutes, stirring constantly. This helps to dissolve the sugar completely and further activate the flour’s thickening properties, creating a more cohesive and less granular filling. Just be careful not to scorch it.
-
Cool the Filling: Remove the saucepan from the heat and allow the filling to cool completely before using. A warm filling will melt your cold cookie dough, making it difficult to work with. You can even pop it in the fridge for 15-20 minutes to speed up the cooling process, ensuring it’s firm enough to spread easily onto your “Brown Sugar Pop Tart Cookies.”
Assembling and Baking Your Pop Tart Cookies:
-
Preheat Oven and Prep Baking Sheets: Preheat your oven to 375°F (190°C). Line two large baking sheets with parchment paper or silicone baking mats. This prevents sticking and makes cleanup a breeze.
-
Roll Out the Dough: Remove one disc of chilled dough from the refrigerator. On a lightly floured surface, roll out the dough to about ⅛-inch thick. I find that rolling it out between two sheets of parchment paper makes this step incredibly easy and prevents sticking, plus it allows for a more even thickness. The thinner the dough, the crispier your “Brown Sugar Pop Tart Cookies” will be, so aim for a consistent thickness.
-
Cut Dough Rectangles: Using a sharp knife or a pizza cutter and a ruler (if you want precise edges), cut the dough into rectangles measuring approximately 2×3 inches. You’ll need an even number of rectangles for tops and bottoms. Gather any dough scraps, gently press them together, re-wrap, and chill for 15-20 minutes before re-rolling to cut more rectangles. Try not to overwork the scraps. I usually get about 20-24 rectangles from one batch, meaning 10-12 finished “Brown Sugar Pop Tart Cookies.”
-
Fill the Cookies: Lay half of your cut dough rectangles on your prepared baking sheets. Spoon about 1-1 ½ teaspoons of the cooled brown sugar cinnamon filling onto the center of each dough rectangle, leaving a small border around the edges. Be careful not to overfill, as this can lead to messy leaks during baking.
-
Top and Seal: Carefully place a second dough rectangle directly on top of each filled rectangle. Gently press around the edges of the top dough to seal it to the bottom layer. Then, using the tines of a fork, firmly crimp all four edges of each cookie. This creates that iconic Pop-Tart look and, more importantly, helps to seal in the delicious brown sugar filling. Ensure a good seal to prevent the filling from bubbling out.
-
Vent and Bake: Using a skewer or the tip of a knife, poke 2-3 small holes in the top of each cookie. These vents allow steam to escape during baking, preventing the “Brown Sugar Pop Tart Cookies” from puffing up excessively and ensuring a crispier crust. If desired, you can brush the tops with a light egg wash (1 egg yolk whisked with 1 tsp water) for a shinier, golden finish. Bake for 12-15 minutes, or until the edges are lightly golden brown and the tops appear set. Baking time can vary based on your oven and the thickness of your cookies, so keep an eye on them!
-
Cool Completely: Remove the “Brown Sugar Pop Tart Cookies” from the oven and let them cool on the baking sheets for 5 minutes before carefully transferring them to a wire cooling rack to cool completely. It is absolutely essential that the cookies are fully cooled before glazing; otherwise, the glaze will melt and run off, creating a sticky mess.
Whipping Up the Sweet Vanilla Glaze:
-
Combine Glaze Ingredients: In a medium bowl, whisk together the 1 ½ cups of sifted powdered sugar, ½ teaspoon of pure vanilla extract, and 3 tablespoons of milk or heavy cream. Start with 3 tablespoons of liquid.
-
Adjust Consistency: Continue to whisk until the glaze is smooth and lump-free. If the glaze is too thick to drizzle or spread easily, add the remaining tablespoon of milk, or a tiny bit more, ½ teaspoon at a time, until you reach your desired consistency. I like a glaze that is pourable but still thick enough to cling to the “Brown Sugar Pop Tart Cookies.”
-
Glaze the Cooled Cookies: Once your “Brown Sugar Pop Tart Cookies” are completely cool, spoon or spread the vanilla glaze generously over the top of each cookie. You can use the back of a spoon or a small offset spatula for an even coating. If you want to add sprinkles (which I highly recommend for extra fun!), do so immediately after glazing, before the glaze sets.
-
Allow Glaze to Set: Let the glazed cookies sit on the wire rack for at least 15-30 minutes, or until the glaze has fully set. This ensures a beautiful, firm finish on your homemade “Brown Sugar Pop Tart Cookies.”
Tips for Perfect Brown Sugar Pop Tart Cookies:
-
Keep Everything Cold:
The secret to a flaky, tender crust for your “Brown Sugar Pop Tart Cookies” is to keep your butter and other wet ingredients as cold as possible. This prevents the butter from melting into the dough too early, allowing it to create steam pockets during baking that result in those desirable layers. If your kitchen is warm, you might even consider chilling your flour.
-
Don’t Overwork the Dough:
Overmixing develops gluten, which makes for tough cookies. Mix only until the ingredients are just combined and no dry streaks of flour remain. A light hand is your best friend here.
-
Chill, Chill, Chill:
Chilling the dough twice (once after mixing, once after cutting if needed) is non-negotiable. It firms up the butter, relaxes the gluten, and prevents your cookies from spreading too much in the oven, ensuring your “Brown Sugar Pop Tart Cookies” maintain their perfect shape.
-
Even Thickness Matters:
When rolling out the dough, aim for a consistent ⅛-inch thickness. This ensures even baking and a uniform texture across all your Pop Tart Cookies. Uneven thickness can lead to some parts being undercooked and others overcooked.
-
Seal those Edges:
A good crimp with a fork not only looks traditional but is crucial for sealing in the filling. Take your time with this step to prevent any delicious brown sugar filling from leaking out during baking.
-
Don’t Overfill:
It’s tempting to load up on the filling, but too much will inevitably burst out during baking. Stick to the recommended 1-1 ½ teaspoons for the best results.
-
Ventilation is Key:
Poking holes in the top of your “Brown Sugar Pop Tart Cookies” allows steam to escape. This prevents the cookies from puffing up excessively and keeps the crust from getting soggy from trapped moisture.
-
Cool Completely Before Glazing:
Patience is a virtue, especially when it comes to glazing. If your cookies are even slightly warm, the glaze will melt and slide right off.
Storage and Serving Suggestions:
Once your “Brown Sugar Pop Tart Cookies” are fully cooled and the glaze has set, they are ready to be enjoyed! They are absolutely delightful on their own, perhaps with a cup of coffee or tea, making for a perfect breakfast treat or an afternoon snack. My family loves them warmed slightly in the microwave for a few seconds to bring out that warm, gooey brown sugar center, almost like a freshly baked Pop-Tart straight from the toaster.
For storage, these delightful cookies can be kept in an airtight container at room temperature for up to 3-4 days. While they are at their absolute best on the day they are made, they remain wonderfully tasty for a few days. If you want to extend their freshness, you can place them in the refrigerator, where they’ll last for about a week. Just be aware that refrigeration might make the cookie dough slightly firmer, but a quick gentle warming can bring back some of that tender texture.
These “Brown Sugar Pop Tart Cookies” also make fantastic gifts! Package them in a cute box or bag for friends, neighbors, or as a thoughtful homemade present during holidays. They’re always a huge hit! They’re so much fun to customize too; you could try different sprinkles for various occasions or even experiment with a maple glaze for a fall-themed twist. No matter how you serve them, these cookies are guaranteed to bring a smile to anyone’s face.
Conclusion:
So, there you have it! We’ve journeyed through the creation of a truly remarkable treat, and now it’s time to reflect on why these aren’t just any cookies – they’re a revelation. If you’ve been searching for that perfect blend of nostalgic comfort and gourmet delight, your quest ends here. I genuinely believe these Brown Sugar Pop Tart Cookies are destined to become a staple in your baking repertoire, a go-to recipe for those moments when only something extraordinary will do. They embody everything wonderful about homemade desserts: unique flavor, delightful texture, and that undeniable touch of love.
What makes them so utterly irresistible, you ask? It’s that ingenious fusion of a tender, buttery cookie crust – golden and just yielding enough – encasing a rich, warm, and deeply caramelized brown sugar filling. The way the edges crisp up ever so slightly, creating a beautiful contrast with the soft interior, is pure magic. Then, of course, there’s the delicate drizzle of icing, often adorned with a playful scattering of sprinkles, that adds a final flourish of sweetness and visual charm. Every single bite is a symphony of textures and flavors, from the comforting chewiness to the burst of sweet, brown sugar goodness that echoes your favorite childhood breakfast pastry, elevated to a whole new level of homemade sophistication. They offer all the beloved elements of a classic Pop-Tart, but with the undeniable warmth and superior taste that only a lovingly baked homemade treat can provide. There’s an artistry to their rustic beauty, a promise of pure joy in every carefully crafted square. Forget bland store-bought options; these are a testament to how simple ingredients can create something truly spectacular and deeply satisfying. They are an instant classic, guaranteed to impress and delight everyone who tries them.
Now that you’ve mastered the art of making them, let’s talk about how to truly savor these delectable creations. While absolutely divine straight from the oven, still warm and slightly gooey, they’re also fantastic once cooled to room temperature, allowing the flavors to meld even further. Imagine serving them alongside a steaming mug of coffee for a luxurious morning treat, or with a tall glass of cold milk for that quintessential cookie experience. They make an unforgettable addition to any dessert platter, instantly elevating your spread, and are absolutely perfect for sharing at potlucks, brunches, or simply as a thoughtful homemade gift for friends and family. Wrap a few up in pretty parchment paper and a ribbon, and you’ll be giving the gift of pure, unadulterated happiness. Consider pairing them with a scoop of vanilla bean ice cream for an indulgent dessert, or crumbling one over yogurt for a surprising breakfast twist. The possibilities for enjoyment are truly endless.
And don’t stop there! The beauty of this recipe lies in its adaptability. Once you’re comfortable with the core technique, feel free to unleash your inner pastry chef and experiment with variations. For instance, while the brown sugar filling is undeniably king, you could try swapping it out for a delightful strawberry, raspberry, or even apricot jam for a fruitier spin. A chocolate-hazelnut spread could transform them into a decadent dessert, or a simple cinnamon-sugar mixture could offer a spicier, cozy alternative. The icing itself is a canvas for creativity; a hint of lemon zest in the glaze could add a bright counterpoint, or a quick chocolate drizzle could make them even more indulgent. Think about adding a pinch of cardamom or nutmeg to the dough for an unexpected twist, or even a different type of sprinkle for seasonal themes like autumn leaves or festive snowflakes. Your imagination is the only limit to customizing these delightful cookies.
So, what are you waiting for? I wholeheartedly encourage you to roll up your sleeves, gather your ingredients, and embark on this delicious baking adventure. There’s immense satisfaction in creating something so beautiful and incredibly tasty from scratch, and these Brown Sugar Pop Tart Cookies promise to deliver on that satisfaction and then some. Once you experience the joy of biting into your own homemade version, you’ll wonder how you ever lived without them. Don’t forget to share your baking triumphs with me! I absolutely adore seeing your creations, hearing about your experiences, and maybe even learning about your own unique twists. Tag me in your social media posts or drop a comment below; I can’t wait to see what you create. Happy baking, my friends, and prepare to fall head over heels for your new favorite cookie!
Brown Sugar Pop Tart Cookies
Brown Sugar Pop Tart Cookies are about to become your new favorite obsession, a delightful fusion that brings together the comforting nostalgia of a classic breakfast pastry with the irresistible chewiness of a perfect cookie.
Ingredients
Instructions
Important Information
Nutrition Facts (Per Serving)
It is important to consider this information as approximate and not to use it as definitive health advice.
Allergy Information
Please check ingredients for potential allergens and consult a health professional if in doubt.