• Skip to primary navigation
  • Skip to main content
  • Skip to primary sidebar
Homesmad

Homesmad

  • Home
  • Breakfast & Brunch
  • Appetizers & Snacks
  • Dinner
  • Dessert
  • About
  • Privacy Policy
  • Contact
Homesmad
  • Home
  • Breakfast & Brunch
  • Appetizers & Snacks
  • Dinner
  • Dessert
  • About
  • Privacy Policy
  • Contact

Cinnamon French Toast Biscuits: Easy Breakfast Treat!

December 6, 2025 by Lily author

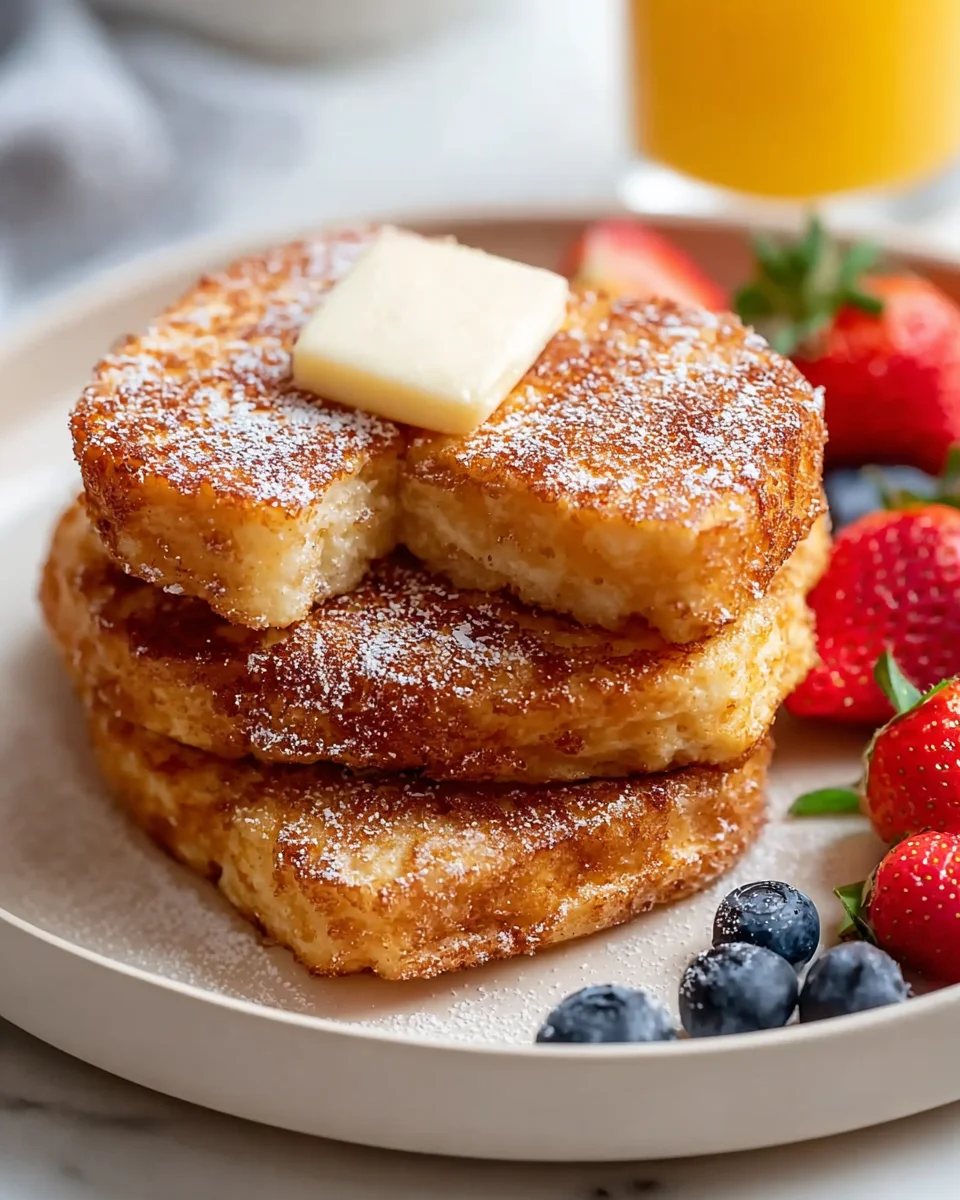
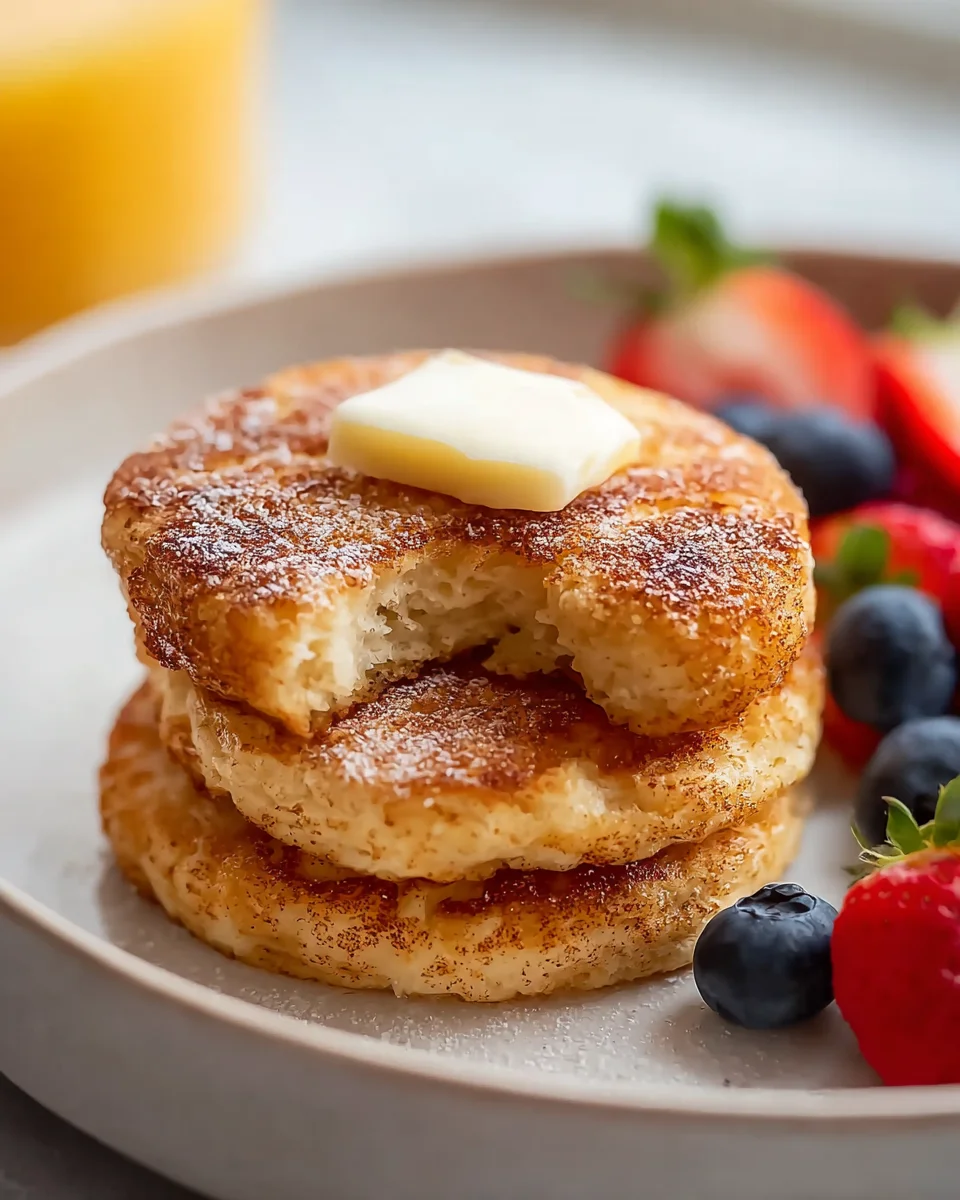
Cinnamon French Toast Biscuits represent a truly inspired culinary innovation, taking two beloved breakfast staples and marrying them into something utterly extraordinary. Have you ever dreamed of a morning treat that combines the warm, spiced comfort of classic French toast with the light, flaky texture of a perfectly baked biscuit? Well, prepare to have your breakfast dreams realized! I’m absolutely thrilled to share this recipe with you, as it consistently brings smiles and satisfied sighs around my own table, making weekend mornings feel extra special.

French toast, with its humble beginnings as a way to salvage stale bread, dates back to ancient Roman times, evolving into the beloved sweet dish we know today. Biscuits, on the other hand, hold a revered place in American culinary history, especially in the Southern states, symbolizing comfort and home cooking. This ingenious recipe takes the very best elements of both – the rich egg custard and fragrant cinnamon from French toast, infused into a tender, buttery biscuit base. People adore this dish not just for its novelty, but for the incredible interplay of flavors and textures: the crispy, caramelized edges, the soft, pull-apart interior, the sweet cinnamon sugar swirl, and that unmistakable hint of maple. This unique creation, our Cinnamon French Toast Biscuits, truly offers the best of both worlds, making it an instant family favorite and a delightful departure from your usual morning routine.

Cinnamon French Toast Biscuits: Easy Breakfast Treat! this RECIPE

Ingredients:

Friends, get ready to dive into the most delightful breakfast or brunch experience with these incredible Cinnamon French Toast Biscuits. This recipe is designed to be approachable and incredibly rewarding, transforming simple ingredients into something truly special. Here’s everything you’ll need to gather:

    • For the Biscuits:
      • 1 can (16.3 oz) refrigerated flaky layers biscuits: I find that the larger “Grands!” style biscuits work best here, as their generous size makes for substantial Cinnamon French Toast Biscuits and their flaky layers create a wonderful texture. If you’re feeling ambitious, homemade biscuits would be absolutely divine, but for convenience, store-bought is perfectly fantastic.
    • For the French Toast Batter:
      • 3 large eggs: These are the foundation of our custardy French toast coating. Make sure they’re at room temperature if you have time, as they’ll blend more smoothly.
      • 1/2 cup whole milk: Whole milk provides a richness that lower-fat milks just can’t quite match, giving our Cinnamon French Toast Biscuits a luxurious mouthfeel. However, feel free to use 2% or even a non-dairy alternative like almond or oat milk if you prefer.
      • 2 tablespoons granulated sugar: Just a touch of sweetness in the batter itself helps to caramelize the exterior and balance the savory notes of the biscuit.
      • 1 teaspoon pure vanilla extract: This is where a lot of that comforting aroma and flavor comes from. Don’t skimp on good quality vanilla!
      • 1 teaspoon ground cinnamon: The star spice for our Cinnamon French Toast Biscuits! It infuses every bite with warmth and coziness.
      • 1/4 teaspoon ground nutmeg (optional): A small pinch of nutmeg elevates the cinnamon and adds another layer of classic French toast spice. Highly recommended!
      • Pinch of salt: Just a tiny bit of salt in the batter helps to enhance all the other flavors, making them pop.
    • For Cooking:
      • 2 tablespoons unsalted butter: For greasing your baking sheet. Butter not only prevents sticking but also contributes to a beautiful golden crust and a delightful buttery flavor.
      • Non-stick cooking spray: An alternative or supplement to butter for greasing, ensuring your Cinnamon French Toast Biscuits don’t stick.
    • For the Cinnamon-Vanilla Glaze:
      • 1 cup powdered sugar (confectioners’ sugar): This forms the sweet, delicate base of our drizzle. Sifting it can help prevent lumps, but vigorous whisking usually does the trick.
      • 2-3 tablespoons whole milk (or half-and-half): You’ll want to add this gradually to achieve your desired glaze consistency – thick enough to cling, but thin enough to drizzle.
      • 1/2 teaspoon pure vanilla extract: More vanilla for that irresistible aroma and taste in the glaze.
      • 1/4 teaspoon ground cinnamon: Tying all the flavors together with another touch of cinnamon in the glaze.

Equipment You’ll Need:

Before we get our hands wonderfully messy with these Cinnamon French Toast Biscuits, let’s make sure we have all our tools ready to go. Having everything at your fingertips will make the process smooth and enjoyable!

      • Large baking sheet(s): You’ll likely need at least one, possibly two, to ensure you don’t overcrowd the biscuits while baking. Overcrowding can lead to steaming instead of browning, which we definitely want to avoid for perfectly golden Cinnamon French Toast Biscuits.
      • Parchment paper or silicone baking mats: Absolutely essential for non-stick baking and super easy cleanup. Trust me, you’ll thank yourself later.
      • Large shallow dish or pie plate: This is crucial for dipping your biscuit pieces into the French toast batter. A dish with wide, low sides works best for easy maneuvering.
      • Large mixing bowl: For whisking together your glorious French toast batter.
      • Medium mixing bowl: For preparing your decadent cinnamon-vanilla glaze.
      • Whisk or fork: To thoroughly combine the batter and the glaze ingredients, ensuring no lumps.
      • Sharp knife or pizza cutter: For easily cutting your biscuits into manageable pieces. A pizza cutter can be surprisingly efficient here!
      • Tongs or a slotted spoon: These will be your best friends for transferring the battered biscuits to the baking sheet and flipping them halfway through cooking. They help prevent messy hands and ensure even handling.
      • Wire cooling rack: Ideal for letting your Cinnamon French Toast Biscuits cool slightly and for drizzling the glaze, allowing any excess to drip away.

Preparing Your Cinnamon French Toast Biscuits:

Let’s get cooking! This section will guide you through transforming those humble biscuits into something truly spectacular. Remember, the key to amazing Cinnamon French Toast Biscuits is thoughtful preparation and attention to detail at each step.

      1. Preheat and Prepare Your Baking Sheets:First things first, preheat your oven to 375°F (190°C). While the oven is warming up, line one or two large baking sheets with parchment paper. This simple step will make cleanup a breeze and ensure your Cinnamon French Toast Biscuits don’t stick. If you don’t have parchment paper, you can lightly grease the baking sheets with butter or non-stick cooking spray, but parchment is highly recommended for that perfect lift-off.
      2. Transforming the Biscuits:Open your can of refrigerated biscuits. Separate each biscuit. Now, with a sharp knife or a pizza cutter, cut each biscuit into four equal pieces. You’ll want to aim for roughly bite-sized or two-bite pieces. For example, you can cut each biscuit in half, then cut each half in half again. This increases the surface area for our delicious French toast batter to cling to, ensuring every piece of your Cinnamon French Toast Biscuits is coated in flavor, and they will cook more evenly and quickly. Plus, smaller pieces are just more fun to eat!
      3. Whisking Up the French Toast Batter:In your large shallow dish or pie plate, crack the three large eggs. Add the 1/2 cup of whole milk, 2 tablespoons of granulated sugar, 1 teaspoon of vanilla extract, 1 teaspoon of ground cinnamon, and the optional 1/4 teaspoon of ground nutmeg, along with that tiny pinch of salt. Using a whisk or a fork, vigorously whisk all these ingredients together until they are completely combined and smooth. You’re looking for a uniform, pale yellow mixture with no streaks of egg white remaining. This is the custardy magic that will turn our plain biscuit pieces into irresistible Cinnamon French Toast Biscuits. Give it a good sniff; it should smell wonderfully fragrant already!
      4. Dipping the Biscuit Pieces:Now for the fun part! Take your prepared biscuit pieces, one by one, and submerge them into the French toast batter. Make sure each piece is fully coated. I like to use a fork or tongs to gently turn them over, ensuring both sides and all the edges soak up that delicious batter. Don’t let them sit in the batter for too long – just a quick dip and flip is usually enough, about 5-10 seconds per piece. These are biscuits, not bread, so they absorb a bit differently. You want them well-coated but not soggy. Once dipped, lift each piece, allowing any excess batter to drip back into the dish. This prevents a watery mess on your baking sheet and ensures a beautiful crust.
      5. Arranging and Baking Your Cinnamon French Toast Biscuits:Carefully arrange the battered biscuit pieces on your prepared baking sheets, making sure to leave a little space between each one. This allows the heat to circulate properly around each piece, promoting even browning and crisp edges. If they’re too close, they’ll steam rather than bake to a golden perfection. Place the baking sheet(s) into your preheated oven. Bake for 12-15 minutes on one side, or until they are puffed up and golden brown on the bottom. Then, using tongs, carefully flip each biscuit piece to the other side. Return them to the oven and continue baking for another 8-12 minutes, or until both sides are beautifully golden brown and cooked through. They should feel firm to the touch and smell absolutely divine, filling your kitchen with the scent of freshly baked Cinnamon French Toast Biscuits. The exact baking time can vary depending on your oven, so keep an eye on them towards the end. We’re looking for that perfect balance of tender interior and a slightly crispy, caramelized exterior.
      6. Alternative Cooking Method: Pan-Frying for Extra Crispness (Optional):If you prefer a more traditional, stovetop French toast texture with crisper edges, you can pan-fry your Cinnamon French Toast Biscuits. Heat 1-2 tablespoons of butter (or a neutral oil like canola) in a large non-stick skillet over medium heat. Once the butter is melted and shimmering, place the battered biscuit pieces in the hot pan, being careful not to overcrowd it. Cook for 2-3 minutes per side, until deeply golden brown and cooked through. You may need to do this in batches. This method results in a slightly chewier, more intensely flavored crust. You can then transfer them to a baking sheet to keep warm in a low oven (about 200°F / 95°C) while you finish the remaining batches.

Whipping Up the Cinnamon-Vanilla Glaze:

No batch of amazing Cinnamon French Toast Biscuits would be complete without a luscious drizzle of glaze! This adds an extra layer of sweetness and cinnamon spice that truly ties everything together.

      1. Combine Glaze Ingredients:While your Cinnamon French Toast Biscuits are baking or cooling slightly, grab your medium mixing bowl. Add the 1 cup of powdered sugar, 1/2 teaspoon of vanilla extract, and 1/4 teaspoon of ground cinnamon. Now, slowly start adding the whole milk, one tablespoon at a time, whisking continuously. The key here is gradual addition. You want to achieve a smooth, pourable glaze that is thick enough to cling to the biscuits but thin enough to drizzle elegantly. It usually takes 2 to 3 tablespoons of milk, but the exact amount can vary slightly based on humidity and how packed your powdered sugar is. If it’s too thick, add a tiny splash more milk; if it’s too thin, whisk in another spoonful of powdered sugar. Whisk until there are no lumps and the glaze is perfectly smooth and shiny. This sweet, spiced topping is the crowning glory for your Cinnamon French Toast Biscuits.
      2. Drizzling the Magic:Once your Cinnamon French Toast Biscuits are out of the oven and have cooled for just a couple of minutes (they should still be warm but not piping hot, otherwise the glaze will just melt away), arrange them on a wire cooling rack set over a piece of parchment paper or a plate. This will catch any drips and make cleanup easier. Now, take your whisk or a spoon and generously drizzle the cinnamon-vanilla glaze over all the warm biscuits. You can go for a delicate web-like pattern or a more robust coating – it’s entirely up to you! The warmth of the biscuits will slightly soften the glaze, allowing it to adhere beautifully and melt into all the nooks and crannies. The aroma at this stage is truly intoxicating.

Serving Suggestions for Your Cinnamon French Toast Biscuits:

Your sensational Cinnamon French Toast Biscuits are now complete and ready to be devoured! While they are absolutely incredible on their own, especially fresh from the oven with that warm glaze, there are so many ways to elevate this dish and turn it into a full-blown brunch feast.

      • Classic Maple Syrup Dip: Offer a small bowl of warm pure maple syrup on the side. Even with the glaze, the rich, earthy sweetness of maple syrup complements the cinnamon and vanilla perfectly, allowing guests to add more sweetness to their liking. This creates a wonderful blend of flavors that truly defines French toast.
      • Fresh Berries: A vibrant medley of fresh berries – think strawberries, blueberries, raspberries, or sliced bananas – adds a burst of freshness, color, and a slight tang that beautifully cuts through the sweetness of the biscuits and glaze. Arrange them artfully around your serving platter of Cinnamon French Toast Biscuits for an impressive presentation.
      • Whipped Cream or Ice Cream: For a more indulgent treat, especially if serving these as a dessert or a very decadent brunch, a dollop of freshly whipped cream or a scoop of vanilla bean ice cream is a game-changer. The cool creaminess provides a delightful contrast to the warm, spiced biscuits.
      • Powdered Sugar Dusting: Even if you’ve glazed them, a final light dusting of powdered sugar just before serving can add a professional, elegant finish and a little extra touch of sweetness. Use a small sieve for the best results.
      • Crispy Bacon or Sausage: Balance the sweet with savory! A side of crispy bacon strips or savory breakfast sausage links provides a fantastic contrast and makes your Cinnamon French Toast Biscuits part of a complete breakfast.
      • Coffee or Tea Pairing: Don’t forget the beverages! A hot cup of freshly brewed coffee, a creamy latte, or a fragrant tea (like Earl Grey or a spiced chai) pairs wonderfully with these warm, comforting treats. The bitterness of coffee or the aromatic notes of tea will complement the rich flavors beautifully, making the entire experience even more satisfying.

Serve them warm for the best experience. The texture is softest and the flavors are most vibrant when they’re still a little warm from the oven or skillet.

Tips for Perfect Cinnamon French Toast Biscuits Every Time:

To ensure your Cinnamon French Toast Biscuits turn out absolutely perfect, every single time you make them, here are a few expert tips and tricks I’ve learned along the way. These little details can make a big difference!

      • Don’t Over-Soak the Biscuits: Unlike traditional bread French toast, which can benefit from a good soak, biscuit dough is much denser and can quickly become soggy if left in the batter too long. A quick dip, ensuring all sides are coated, is all you need. You want the outside to be custardy, but the inside to retain that delightful biscuit fluffiness.
      • Prevent Overcrowding: Whether you’re baking or pan-frying, resist the urge to cram too many biscuit pieces onto one pan or into one skillet. Overcrowding lowers the temperature and traps steam, preventing those beautiful golden-brown exteriors. Give your Cinnamon French Toast Biscuits room to breathe and crisp up!
  • Even Cutting is Key: Try to cut your biscuits into roughly equal sizes. This ensures that all pieces cook at the same rate, preventing some from being undercooked while others are overdone. Uniformity equals perfection!
  • Use a Shallow Dish for Dipping: A pie plate or a shallow baking dish with wide sides is ideal for the batter. It makes it much easier to dip and turn the biscuit pieces without making a huge mess, allowing for easy access and full coating.
  • Adjust Glaze Consistency: The perfect glaze should be pourable but thick enough to cling to the biscuits. Add your milk (or half-and-half for extra richness) slowly to the powdered sugar, a tablespoon at a time, whisking well after each addition until you reach your desired consistency. You want it to slowly drizzle off your whisk.
  • Cool Slightly Before Glazing: While warm Cinnamon French Toast Biscuits are best, letting them cool for just 2-3 minutes before drizzling the glaze will prevent the glaze from immediately melting and disappearing. It allows it to set slightly on the surface, creating that lovely visual appeal and a distinct layer of sweetness.
  • Don’t Be Afraid to Experiment with Spices: While cinnamon and vanilla are classic, consider adding a tiny pinch of cardamom for an exotic twist, or even a dash of ginger. Small additions can create surprising and delightful flavor profiles in your Cinnamon French Toast Biscuits.
  • Taste the Batter: Before you start dipping, taste a tiny drop of your French toast batter. Does it need a little more sugar? A touch more cinnamon? Adjust to your preference! This is your kitchen, after all.
  • Freshness Matters: While convenient, ensure your refrigerated biscuits aren’t past their prime. Fresh biscuits will rise and puff beautifully, contributing to the light and airy texture of the finished Cinnamon French Toast Biscuits.

Storage and Reheating:

It’s rare to have leftovers of these utterly delicious Cinnamon French Toast Biscuits because they tend to disappear so quickly! However, if you do find yourself with a few remaining, here’s how to store and reheat them to enjoy their wonderful flavor again.

  • Storage:Allow any leftover Cinnamon French Toast Biscuits to cool completely to room temperature before storing. Once cool, place them in an airtight container. You can layer them with parchment paper in between to prevent sticking, especially if they are heavily glazed. Store them in the refrigerator for up to 2-3 days. The glaze might soften slightly, but the flavor will still be fantastic.
  • Freezing (for longer storage):If you want to make a big batch of Cinnamon French Toast Biscuits ahead of time, they freeze beautifully! Once cooled, arrange the biscuits in a single layer on a baking sheet and place them in the freezer for about an hour, or until solid. This “flash freezing” prevents them from sticking together. Then, transfer the frozen biscuits to a freezer-safe zip-top bag or airtight container. They will keep well in the freezer for up to 1 month. Make sure to label the bag with the date!
  • Reheating from the Refrigerator:
    • Oven Method: This is my preferred method for reheating, as it helps to crisp them up again. Preheat your oven to 350°F (175°C). Place the biscuits on a baking sheet and warm them for 5-8 minutes, or until heated through. Keep an eye on the glaze so it doesn’t burn.
    • Microwave Method: If you’re in a hurry, you can microwave individual portions for 20-40 seconds, or until warm. Be aware that the texture might be a little softer, and the glaze could become quite gooey. This method is best for a quick snack.
  • Reheating from the Freezer:You can reheat frozen Cinnamon French Toast Biscuits directly from the freezer. Preheat your oven to 350°F (175°C). Place the frozen biscuits on a baking sheet and bake for 10-15 minutes, or until they are thoroughly heated through and crisp again. The exact time will depend on your oven and the size of the biscuits. This method is fantastic for having a quick, ready-made breakfast any day of the week!

No matter how you store or reheat them, these Cinnamon French Toast Biscuits are sure to bring a smile to your face with every delightful bite.

Cinnamon French Toast Biscuits: Easy Breakfast Treat!

Conclusion:

This recipe, my friends, is truly something special. It transcends the ordinary breakfast fare, blending comfort, convenience, and an explosion of flavor into one delightful package. We’re talking about a dish that promises to elevate your mornings, impress your brunch guests, or simply provide that much-needed moment of sweet indulgence. It’s a testament to how simple ingredients, when combined with a little creativity, can create something truly extraordinary. Imagine waking up to the aroma of cinnamon and sweet pastry, knowing that a treat both familiar and fantastically new awaits you. This isn’t just another breakfast item; it’s an experience, a little culinary hug to start your day right, and I am confident it will quickly become a cherished part of your breakfast rotation.

What makes this particular creation so undeniably compelling? It’s the ingenious fusion of two beloved breakfast staples, transformed into something even greater than the sum of its parts. Think about it: the fluffy, tender crumb of a freshly baked biscuit, infused with the rich, eggy custard and warm spice blend typically found in classic French toast. That’s precisely what you get with these incredible Cinnamon French Toast Biscuits. Each bite delivers a harmonious blend of textures and tastes – the slight crispness from a golden exterior, giving way to an incredibly soft, almost melt-in-your-mouth interior, all enveloped in that irresistible cinnamon-sugar embrace. It’s comfort food perfected, a brilliant twist that offers all the nostalgic warmth of French toast without the fuss of dipping individual slices of bread, and all the satisfying richness of a biscuit without needing a separate topping. Truly, it’s a stroke of genius, promising a memorable breakfast or brunch every single time you make them. The combination is simply irresistible, making them a unique standout.

Now, let’s talk about making these beauties shine even brighter. While they are absolutely divine straight out of the oven, perhaps with just a dusting of powdered sugar, there are so many wonderful ways to enjoy your Cinnamon French Toast Biscuits. For a classic approach, a generous drizzle of warm maple syrup is non-negotiable, allowing its sticky sweetness to seep into every delicious crevice. A dollop of softened butter or a pat of compound cinnamon butter would also be a luxurious addition, enhancing the rich flavors. For those who love fresh fruit, consider serving them alongside a vibrant berry compote – a mix of strawberries, blueberries, and raspberries would offer a lovely tart counterpoint to the sweet biscuits. A spoonful of whipped cream or a scoop of vanilla ice cream could even turn them into an indulgent dessert, especially if you’re feeling adventurous and serving them for an evening treat! And let’s not forget the savory side; a strip of crispy bacon or a side of fluffy scrambled eggs would round out a truly magnificent breakfast spread. Don’t limit yourself to just breakfast, either; these are perfect for a cozy afternoon treat with a cup of coffee or tea.

One of the most exciting aspects of cooking is the freedom to make a recipe your own, and these biscuits are no exception. Feel free to experiment with different spices beyond cinnamon. A pinch of nutmeg, a dash of cardamom, or even a touch of ginger could add another layer of aromatic complexity, making them uniquely yours. For a chocolate lover’s dream, try adding mini chocolate chips into the biscuit dough before baking, or drizzling melted chocolate over the finished product. Citrus zest, like orange or lemon, could brighten the flavor profile beautifully, offering a zesty counterpoint to the sweetness. If you’re looking for an extra crunch, sprinkle some chopped pecans or walnuts on top before baking, or even incorporate them directly into the dough. For a slightly different texture, you could even try using different types of biscuit dough, perhaps a buttermilk biscuit for an added tang. The possibilities are truly endless, allowing you to tailor this fantastic recipe for Cinnamon French Toast Biscuits to your personal preferences or whatever ingredients you happen to have on hand. Don’t be afraid to get creative; that’s where the real magic happens!

So, if you’re searching for a recipe that will not only tantalize your taste buds but also bring a little extra joy and warmth to your home, look no further. I wholeheartedly encourage you to roll up your sleeves and give these magnificent Cinnamon French Toast Biscuits a try. They are surprisingly simple to make, incredibly rewarding, and guaranteed to become a new favorite in your breakfast repertoire. Once you’ve experienced the sheer delight of these fluffy, sweet, and perfectly spiced biscuits, I know you’ll be as smitten as I am. And please, please share your culinary adventure with me! I absolutely adore seeing your creations. Snap a picture, tell me about your favorite serving suggestion, or any creative twists you added. Your feedback and experiences inspire me and the entire cooking community to keep exploring delicious possibilities. Happy baking, and get ready to fall in love with your new go-to breakfast sensation!


Cinnamon French Toast Biscuits

An inspired culinary innovation, Cinnamon French Toast Biscuits take two beloved breakfast staples and marry them into something utterly extraordinary. Combining the warm, spiced comfort of classic French toast with the light, flaky texture of perfectly baked biscuits, this recipe brings smiles and satisfied sighs. Experience the incredible interplay of flavors and textures: crispy, caramelized edges, soft interior, sweet cinnamon sugar swirl, and a hint of maple, making it an instant family favorite.

Prep Time
15 Minutes
Cook Time
25 Minutes
Total Time
40 Minutes
Servings
32 Cinnamon French Toast Biscuits

Ingredients


Instructions


Important Information

Nutrition Facts (Per Serving)

It is important to consider this information as approximate and not to use it as definitive health advice.

Allergy Information

Please check ingredients for potential allergens and consult a health professional if in doubt.

« Previous Post
Crispy Deep Fried Strawberry Cheesecake Wonton Bites
Next Post »
Brown Sugar Pop Tart Cookies: Easy Homemade Treats!

If you enjoyed this…

Southern Breakfast Enchiladas with Beef Sausage Gravy

Flaky Crescent Roll Cinnamon Twists – Quick & Sweet Indulgence

Cinnamon Donut Bread: The Ultimate Guide to Baking Deliciousness

Primary Sidebar

Browse by Diet

BreakfastDinnerLunchDessertAppetizer

Sweet Peach Yogurt Parfait Delight

One of my fondest memories is from a lazy summer afternoon spent at my grandmother’s house. The sun filtered through the kitchen window, casting a warm glow over the table where she would create her culinary magic. It was during one of those blissful moments that I first tasted her Peach Yogurt Parfait with Honey and Granola. The sweet aroma of ripe peaches mingling with creamy yogurt and the crunch of granola was nothing short of heavenly. It felt like summer captured in a bowl, and I still remember the joy of diving in with a spoon, each layer revealing a new burst of flavor.

When I think about that parfait, I can almost hear the gentle hum of the bees outside, reminding me of the floral notes that honey brings to every bite. The vibrant yellows and soft oranges of the peaches contrast beautifully with the creamy white yogurt and the golden crunch of granola. It’s a dish that not only looks delightful but also tastes like a celebration of fresh, wholesome ingredients.

What makes my version of this Peach Yogurt Parfait special is the careful balance of flavors and textures. I use ripe, juicy peaches, drizzled with locally sourced honey, and a homemade granola that’s bursting with nuts and seeds for an extra crunch. It’s a simple dish, but every layer is crafted with love and attention.

Let me show you exactly how to make this delightful parfait, so you can bring a bit of that summer magic into your kitchen!

Sweet Peach Yogurt Parfait Delight

Why You’ll Love This Recipe

  • Delightfully creamy texture from the Greek yogurt, paired with the juicy sweetness of fresh peaches.
  • Ready in under 20 minutes, making it a quick and satisfying breakfast or snack option.
  • Budget-friendly, using common ingredients that you may already have in your pantry.
  • Customizable with your favorite granola and nuts, allowing you to tailor each parfait to your taste.
  • Perfectly balanced flavors with the bright acidity of lemon juice and the sweetness of honey enhancing the peaches.

Ingredients

  • For the Parfait:
  • 2 cups plain Greek yogurt (or vanilla yogurt for a sweeter option)
  • 2 large ripe peaches, diced (about 2 cups)
  • 1 tablespoon fresh lemon juice (to prevent browning of peaches)
  • 2 tablespoons honey (plus more for drizzling)
  • 1 teaspoon vanilla extract (optional for extra flavor)
  • For the Granola:
  • 1 cup granola (store-bought or homemade; see notes for a simple granola recipe)
  • 1/4 cup sliced almonds (optional for added crunch)
  • 1/4 cup shredded coconut (optional for added flavor)

Let’s dive into some key ingredients that make this Peach Yogurt Parfait so delightful! First, the Greek yogurt is not only creamy but also packed with protein, making it a satisfying option for breakfast or a snack. If you’re looking for a sweeter option, you can easily substitute it with vanilla yogurt, though it may alter the overall flavor balance. Next, the ripe peaches are the star of the show; their natural sweetness shines through, so I recommend choosing peaches that yield slightly to pressure, indicating they’re perfectly ripe. If peaches aren’t in season, feel free to use nectarines or even frozen peaches—just thaw them before use. Finally, honey adds a lovely floral sweetness that ties everything together. If you prefer, maple syrup can serve as a delicious substitute.

Step-by-Step Instructions

  1. Start by preparing the peaches. Wash them thoroughly, then slice and dice them into bite-sized pieces. In a medium bowl, toss the diced peaches with 1 tablespoon of fresh lemon juice to prevent browning. Set aside for about 5 minutes while the lemon juice works its magic.
  2. In a separate bowl, combine the Greek yogurt, 2 tablespoons of honey, and 1 teaspoon of vanilla extract if using. Stir the mixture until smooth and thoroughly blended. This should take about a minute. Avoid overmixing to maintain the creaminess of the yogurt.
  3. Now it’s time to layer your parfait. Grab a clear glass or bowl to showcase your beautiful creation. Start with a generous spoonful of the yogurt mixture at the bottom—about 1/4 cup will do. Use a spoon to spread it evenly.
  4. Add a layer of the diced peaches over the yogurt, ensuring they cover the yogurt completely. You might want to use about half of what you have prepared—roughly 1 cup. This layer should be visually appealing, so arrange the peaches neatly.
  5. Sprinkle 1/4 cup of granola over the peaches. This adds a delightful crunch. Make sure to distribute it evenly to ensure every bite has that satisfying texture. Avoid packing it down too tightly, as you want it to maintain its crunch.
  6. Repeat the layers: spoon in another 1/4 cup of yogurt, followed by another cup of peaches, and another sprinkle of granola. You should have at least two layers, but feel free to add more depending on your glass size.
  7. Finish off your parfait with a drizzle of honey on top for added sweetness and a touch of elegance. If you’re using sliced almonds or shredded coconut, sprinkle them on top now. It adds a lovely visual contrast and extra flavor.
  8. Serve immediately or refrigerate for up to 30 minutes before serving to allow the flavors to meld together. However, I recommend enjoying it fresh to maintain the granola’s crunch.

Pro Tips for the Best Peach Yogurt Parfait With Honey And Granola

  • Make sure to choose ripe peaches for the best flavor and texture. A common mistake is using unripe fruit, which can lead to a less enjoyable parfait. Look for peaches that are fragrant and slightly soft to the touch.
  • Use a clear glass to assemble your parfait; this not only makes for a beautiful presentation but also allows you to see the colorful layers, which adds to the enjoyment of eating it.
  • For an even creamier texture, consider whipping the Greek yogurt with a hand mixer for a couple of minutes before layering. This small adjustment makes a huge difference in mouthfeel.
  • Be mindful of the granola-to-yogurt ratio. Too much granola can overwhelm the parfait, while too little can make it feel too creamy. Aim for about 1/4 cup of granola per layer for the perfect balance.
  • If you’re making this for a gathering, consider preparing the yogurt and peaches ahead of time and layering them just before serving. This ensures the granola stays crunchy!

Variations & Serving Ideas

There are so many ways to get creative with your Peach Yogurt Parfait! For a tropical twist, swap out the peaches for mangoes or pineapples and top with coconut flakes. If you prefer a berry flavor, mix in some blueberries or strawberries with the peaches for added color and taste. For a nutty version, incorporate chopped walnuts or pecans instead of almonds.

As for serving ideas, this parfait pairs beautifully with a side of scrambled eggs for a hearty breakfast or fresh fruit salad for a light lunch. You might also enjoy it alongside whole grain toast with almond butter for an energizing snack. The contrast of flavors and textures will elevate your meal experience!

Storage, Make-Ahead & Reheating

The Peach Yogurt Parfait is best enjoyed fresh, but you can prepare some components ahead of time. Store the layered parfait in an airtight container in the refrigerator for up to 24 hours. However, be cautious; the granola may lose its crunch if stored too long. You can freeze the yogurt and peach mixture for up to 2 months; just remember to thaw it in the refrigerator overnight before serving.

If you plan to enjoy this dish the next day, it can taste even better as the flavors meld together. Just remember to add the granola right before serving to keep its delightful crunch!

Frequently Asked Questions

Can I make Peach Yogurt Parfait With Honey And Granola ahead of time?

Yes — in fact, it tastes even better the next day as the flavors meld. However, I recommend waiting to add the granola until just before serving to maintain its crunch.

What can I substitute for Greek yogurt?

If you prefer a lighter option, you can substitute Greek yogurt with regular yogurt or a dairy-free alternative like coconut yogurt. Just remember that this may alter the creaminess and flavor profile slightly.

Can I use frozen peaches for this parfait?

Absolutely! Just make sure to thaw the frozen peaches before using them. They will still add great flavor, though the texture may be slightly softer than fresh peaches.

How do I make the parfait vegan?

To make a vegan version, substitute the Greek yogurt with a plant-based yogurt alternative, and replace honey with maple syrup or agave nectar. This keeps the parfait sweet while adhering to a vegan diet.

What other fruits can I use in this recipe?

You can mix and match fruits based on your preference. Try using strawberries, blueberries, raspberries, or even bananas. Just make sure to adjust the lemon juice as needed to prevent browning.

Sweet Peach Yogurt Parfait Delight

Final Thoughts

The Peach Yogurt Parfait with Honey and Granola is a delightful blend of creamy yogurt, sweet peaches, and crunchy granola that creates a satisfying and nourishing treat. Each layer bursts with flavor, making it a perfect choice for breakfast or a light dessert.

This is the kind of recipe I come back to again and again, especially when I want something refreshing and wholesome to start my day. The harmony of sweet and tart flavors, combined with the delightful crunch, never fails to lift my spirits!

I encourage you to give this parfait a try and indulge in its comforting goodness. Feel free to share your results or even add your own twist—perhaps a sprinkle of cinnamon or a handful of nuts. Enjoy creating your perfect parfait!

Print
clock clock iconcutlery cutlery iconflag flag iconfolder folder iconinstagram instagram iconpinterest pinterest iconfacebook facebook iconprint print iconsquares squares iconheart heart iconheart solid heart solid icon

Peach Yogurt Parfait


  • Author: Lily author
  • Total Time: 15 minutes
  • Yield: 4 servings 1x
Pin Recipe
Print Recipe

Description

This Peach Yogurt Parfait combines creamy Greek yogurt, juicy peaches, and crunchy granola for a delightful treat. It’s a perfect breakfast or snack that captures the essence of summer in every bite.


Ingredients

Scale
  • For the Parfait:
  • 2 cups plain Greek yogurt (or vanilla yogurt for a sweeter option)
  • 2 large ripe peaches, diced (about 2 cups)
  • 1 tablespoon fresh lemon juice (to prevent browning of peaches)
  • 2 tablespoons honey (plus more for drizzling)
  • 1 teaspoon vanilla extract (optional for extra flavor)
  • For the Granola:
  • 1 cup granola (store-bought or homemade; see notes for a simple granola recipe)
  • 1/4 cup sliced almonds (optional for added crunch)
  • 1/4 cup shredded coconut (optional for added flavor)

Instructions

  1. Start by preparing the peaches. Wash them thoroughly, then slice and dice them into bite-sized pieces. In a medium bowl, toss the diced peaches with 1 tablespoon of fresh lemon juice to prevent browning. Set aside for about 5 minutes while the lemon juice works its magic.
  2. In a separate bowl, combine the Greek yogurt, 2 tablespoons of honey, and 1 teaspoon of vanilla extract if using. Stir the mixture until smooth and thoroughly blended. This should take about a minute. Avoid overmixing to maintain the creaminess of the yogurt.
  3. Now it’s time to layer your parfait. Grab a clear glass or bowl to showcase your beautiful creation. Start with a generous spoonful of the yogurt mixture at the bottom—about 1/4 cup will do. Use a spoon to spread it evenly.
  4. Add a layer of the diced peaches over the yogurt, ensuring they cover the yogurt completely. You might want to use about half of what you have prepared—roughly 1 cup. This layer should be visually appealing, so arrange the peaches neatly.
  5. Sprinkle 1/4 cup of granola over the peaches. This adds a delightful crunch. Make sure to distribute it evenly to ensure every bite has that satisfying texture. Avoid packing it down too tightly, as you want it to maintain its crunch.
  6. Repeat the layers: spoon in another 1/4 cup of yogurt, followed by another cup of peaches, and another sprinkle of granola. You should have at least two layers, but feel free to add more depending on your glass size.
  7. Finish off your parfait with a drizzle of honey on top for added sweetness and a touch of elegance. If you’re using sliced almonds or shredded coconut, sprinkle them on top now. It adds a lovely visual contrast and extra flavor.
  8. Serve immediately or refrigerate for up to 30 minutes before serving to allow the flavors to meld together. However, I recommend enjoying it fresh to maintain the granola’s crunch.
  • Prep Time: 15 mins
  • Cook Time: 0 mins
  • Category: Breakfast
  • Method: No-cook
  • Cuisine: American

Nutrition

  • Serving Size: 1 parfait
  • Calories: 250
  • Sugar: 20 g
  • Sodium: 50 mg
  • Fat: 5 g
  • Saturated Fat: 2 g
  • Unsaturated Fat: 3 g
  • Trans Fat: 0 g
  • Carbohydrates: 40 g
  • Fiber: 3 g
  • Protein: 10 g
  • Cholesterol: 10 mg

Keywords: Choose ripe peaches for the best flavor and texture. Use a clear glass for a beautiful presentation. For creaminess, consider whipping the yogurt before layering. Be mindful of the granola-to-yogurt ratio. Prepare yogurt and peaches ahead of time for gatherings, layering just before serving.

Did you make this recipe?

Share a photo and tag us — we can't wait to see what you've made!

Sun-Kissed Frozen Orange Cream Slush

As a child, summer days felt like they lasted forever. I remember the sticky heat wrapping around me as I played outside, my laughter mingling with the sounds of the neighborhood. But nothing could cool me down quite like the moment I’d spot my grandmother, laboring over her blender, whipping up her famous Frozen Orange Creamsicle Slush. That vibrant orange treat, with its frosty texture and sweet citrus aroma, was like a burst of sunshine in a cup. Just one sip, and I could feel the coolness wash over me, sparking pure joy.

This Frozen Orange Creamsicle Slush has a way of making you feel like a kid again. Its creamy, dreamy consistency is a delightful balance of bright orange and soft vanilla, inviting you to dive right in. The refreshing tang of orange dances on your tongue, while the smooth creaminess envelops you in a comforting embrace. It’s a nostalgic treat that’s perfect for hot summer afternoons or anytime you need a little pick-me-up.

What makes my version of this slush stand out is the addition of a hint of vanilla bean, which elevates the flavor and adds an extra layer of richness. Plus, it’s super easy to whip up with just a few simple ingredients that you probably already have on hand! So, if you’re ready to relive those sun-soaked memories, let me show you exactly how to make it.

Sun-Kissed Frozen Orange Cream Slush

Why You’ll Love This Recipe

  • Each slush is a perfect blend of creamy vanilla and zesty orange, creating a nostalgic flavor reminiscent of summer days.
  • This refreshing treat is ready in under 15 minutes, making it an ideal quick dessert for unexpected guests or hot afternoons.
  • With just 8 simple ingredients, it’s budget-friendly, ensuring you don’t have to break the bank to enjoy a delicious slush.
  • The slush has a perfectly smooth texture, thanks to the combination of ice and ice cream, providing a delightful contrast to the bright citrus flavors.
  • It’s highly customizable; you can easily adjust the sweetness and add fresh herbs for a unique twist that suits your taste.

Ingredients

  • 2 cups orange juice (freshly squeezed or store-bought)
  • 1 cup vanilla ice cream
  • 1 cup crushed ice
  • 1/2 cup milk (whole or 2%)
  • 1/4 cup granulated sugar (adjust based on sweetness preference)
  • 1 teaspoon vanilla extract
  • Zest of 1 orange (for added flavor)
  • Fresh orange slices and mint leaves (for garnish)

The star of this Frozen Orange Creamsicle Slush is the orange juice, which provides the vibrant, citrusy base. Freshly squeezed juice will yield the brightest flavor, but store-bought options can be just as convenient. If you’re opting for store-bought, choose 100% pure juice with no added sugars for the best results. Another essential ingredient is the vanilla ice cream; it adds creaminess and sweetness. You can substitute it with dairy-free ice cream if you’re looking for a vegan option. Whole or 2% milk complements the ice cream, creating a smooth blend. If you want a lower-calorie version, almond or oat milk can be good alternatives.

Lastly, the granulated sugar can be adjusted based on your sweetness preference. If you prefer a more natural sweetener, consider using honey or agave syrup. The orange zest enhances the flavor profile, providing an aromatic pop that brings the whole slush together. Don’t skip it! It adds an extra layer of brightness that makes this slush truly special.

Step-by-Step Instructions

  1. Start by preparing your ingredients. Gather 2 cups of orange juice, 1 cup of vanilla ice cream, and 1 cup of crushed ice. Make sure the ice is finely crushed, as larger chunks can make blending difficult.
  2. In a blender, combine the orange juice, vanilla ice cream, crushed ice, and 1/2 cup of milk. Add 1/4 cup of granulated sugar and 1 teaspoon of vanilla extract. If you like a sweeter slush, consider adding a bit more sugar at this stage.
  3. Add the zest of 1 orange to the blender. This step is crucial for enhancing the citrus flavor of your slush. Make sure not to include the bitter white pith—only the flavorful zest.
  4. Blend the mixture on medium-high speed for about 30-45 seconds. Stop once the ingredients are fully combined and the slush has a smooth, even consistency. If you notice large chunks of ice, blend for an additional 10-15 seconds. Avoid over-blending, as this can make the slush too liquidy.
  5. Once blended, taste the slush. If it needs more sweetness, add a little more sugar and blend for a few more seconds. If it’s too thick, you can add a splash of milk to reach your desired consistency.
  6. Pour the slush into glasses. This recipe typically serves 4, but you can easily double it for larger gatherings. Use a spoon to help guide the slush into the glasses if needed.
  7. Garnish each serving with fresh orange slices and mint leaves. The mint not only adds a pop of color but also a refreshing aroma that complements the citrus flavors beautifully.
  8. Serve immediately and enjoy! If you’ve made extra, you can refrigerate it for a short time, but it’s best enjoyed fresh.

Pro Tips for the Best Frozen Orange Creamsicle Slush

  • Don’t skip the orange zest! It’s a game-changer for flavor. Always zest before juicing to make it easier.
  • Use a high-powered blender for the best texture. A standard blender may struggle with ice, leading to uneven consistency. If you have a food processor, that can work too, but ensure the ice is finely crushed.
  • Adjust the ice-to-liquid ratio carefully. If your slush is too thick, it won’t blend well. Start with less ice and add more until you reach your preferred texture.
  • Be cautious with the sugar! Always start with the lower amount, as you can easily add more, but it’s hard to fix an overly sweet slush.
  • For a fun twist, consider adding a splash of coconut milk or a handful of fresh fruit like strawberries or pineapple. This not only enhances the flavor but also adds a beautiful color contrast.

Variations & Serving Ideas

There are countless ways to put a spin on your Frozen Orange Creamsicle Slush. Consider making a tropical version by adding in some pineapple juice or coconut milk for a delightful tropical twist. If you’re feeling adventurous, try incorporating a handful of frozen mango or peach slices for added sweetness. For a lighter version, swap out the vanilla ice cream for Greek yogurt for a creamy yet tangy alternative.

As for serving ideas, this refreshing slush pairs wonderfully with light summer dishes like grilled chicken skewers, fish tacos, or a simple salad topped with citrus vinaigrette. The bright, zesty flavors of the slush complement these dishes perfectly, making them an ideal pairing for a sunny day.

Storage, Make-Ahead & Reheating

This Frozen Orange Creamsicle Slush is best enjoyed fresh, but if you have leftovers, you can store them in an airtight container in the fridge for up to 2 days. Just keep in mind that the slush may lose some of its texture over time as the ice melts. It doesn’t freeze well, as the ice will turn into a solid block. If you must freeze it, blend again after thawing to restore the slushy consistency. This treat is best the day you make it, as the flavors meld together beautifully overnight, enhancing its deliciousness.

Frequently Asked Questions

Can I make Frozen Orange Creamsicle Slush ahead of time?

Yes — in fact, it tastes even better the next day as the flavors meld. However, it’s best to enjoy it fresh, as the texture can change if stored for too long. If you need to prepare it ahead, keep it in the fridge and re-blend before serving.

What kind of orange juice should I use?

For the best flavor, use freshly squeezed orange juice. However, if you’re short on time, opt for 100% pure store-bought juice without added sugars. This will ensure that your slush remains flavorful and refreshing.

Can I substitute the vanilla ice cream?

Absolutely! If you’re looking for a dairy-free option, coconut milk ice cream or a non-dairy vanilla ice cream can work wonderfully. They will still provide the creamy texture and sweetness you desire.

How can I adjust the sweetness of my slush?

You can easily adjust the sweetness by modifying the amount of sugar added. Start with 1/4 cup and taste the mixture before blending. If you prefer it sweeter, add more sugar gradually until it reaches your desired level.

What should I do if my slush is too thick?

If your slush is too thick, simply add a splash of milk or orange juice and blend again. This will help achieve a more drinkable consistency while maintaining the slushy texture. Adjust gradually to reach your preferred thickness.

Sun-Kissed Frozen Orange Cream Slush

Final Thoughts

The Frozen Orange Creamsicle Slush is a delightful blend of refreshing citrus and creamy goodness, making it a perfect treat for warm days or any time you crave a taste of nostalgia. The way the bright orange flavor dances with the creamy texture truly elevates this slush, transforming it into a satisfying escape from the everyday.

This is the kind of recipe I come back to again and again, especially when I’m looking to cool down or impress guests at a summer gathering. It’s simple to make and always brings smiles all around! I encourage you to try this recipe for yourself—don’t hesitate to share your results or even put your own spin on it. Happy slushing!

Print
clock clock iconcutlery cutlery iconflag flag iconfolder folder iconinstagram instagram iconpinterest pinterest iconfacebook facebook iconprint print iconsquares squares iconheart heart iconheart solid heart solid icon

Frozen Orange Creamsicle Slush


  • Author: Lily author
  • Total Time: 15 minutes
  • Yield: 4 servings 1x
Pin Recipe
Print Recipe

Description

This Frozen Orange Creamsicle Slush is a refreshing treat that combines creamy vanilla and zesty orange flavors. Perfect for hot summer days, it brings back nostalgic memories with every sip.


Ingredients

Scale
  • 2 cups orange juice (freshly squeezed or store-bought)
  • 1 cup vanilla ice cream
  • 1 cup crushed ice
  • 1/2 cup milk (whole or 2%)
  • 1/4 cup granulated sugar (adjust based on sweetness preference)
  • 1 teaspoon vanilla extract
  • Zest of 1 orange (for added flavor)
  • Fresh orange slices and mint leaves (for garnish)

Instructions

  1. Start by preparing your ingredients. Gather 2 cups of orange juice, 1 cup of vanilla ice cream, and 1 cup of crushed ice. Make sure the ice is finely crushed, as larger chunks can make blending difficult.
  2. In a blender, combine the orange juice, vanilla ice cream, crushed ice, and 1/2 cup of milk. Add 1/4 cup of granulated sugar and 1 teaspoon of vanilla extract. If you like a sweeter slush, consider adding a bit more sugar at this stage.
  3. Add the zest of 1 orange to the blender. This step is crucial for enhancing the citrus flavor of your slush. Make sure not to include the bitter white pith—only the flavorful zest.
  4. Blend the mixture on medium-high speed for about 30-45 seconds. Stop once the ingredients are fully combined and the slush has a smooth, even consistency. If you notice large chunks of ice, blend for an additional 10-15 seconds. Avoid over-blending, as this can make the slush too liquidy.
  5. Once blended, taste the slush. If it needs more sweetness, add a little more sugar and blend for a few more seconds. If it’s too thick, you can add a splash of milk to reach your desired consistency.
  6. Pour the slush into glasses. This recipe typically serves 4, but you can easily double it for larger gatherings. Use a spoon to help guide the slush into the glasses if needed.
  7. Garnish each serving with fresh orange slices and mint leaves. The mint not only adds a pop of color but also a refreshing aroma that complements the citrus flavors beautifully.
  8. Serve immediately and enjoy! If you’ve made extra, you can refrigerate it for a short time, but it's best enjoyed fresh.
  • Prep Time: 15 min
  • Cook Time: 0 min
  • Category: Dessert
  • Method: Blending
  • Cuisine: American

Nutrition

  • Serving Size: 1 serving
  • Calories: 200
  • Sugar: 30 g
  • Sodium: 50 mg
  • Fat: 5 g
  • Saturated Fat: 3 g
  • Unsaturated Fat: 2 g
  • Trans Fat: 0 g
  • Carbohydrates: 40 g
  • Fiber: 1 g
  • Protein: 2 g
  • Cholesterol: 20 mg

Keywords: Don't skip the orange zest! It's a game-changer for flavor. Always zest before juicing to make it easier.

Did you make this recipe?

Share a photo and tag us — we can't wait to see what you've made!

Zesty Lemon Poppy Seed Delight

One rainy afternoon, I found myself in my grandmother’s cozy kitchen, the kind that always smelled like warmth and love. She was whipping up her famous Lemon Poppy Seed Loaf, a recipe that had been passed down through generations. As the batter came together, the zesty aroma of fresh lemons filled the air, mingling perfectly with the nutty fragrance of poppy seeds. I can still picture her, apron-clad, as she expertly drizzled a vibrant citrus icing over the loaf, creating a glossy, sun-kissed finish that beckoned us to dive in. It was a moment that sparked my own passion for baking, and this recipe has become a cherished staple in my home ever since.

When you take a bite of this Lemon Poppy Seed Loaf, it’s like a burst of sunshine on your palate. The loaf is beautifully golden, with a tender crumb that melts in your mouth. Each slice is speckled with tiny poppy seeds, adding a delightful crunch that contrasts beautifully with the tangy sweetness of the lemon. And that citrus icing? It’s the finishing touch that elevates this loaf from ordinary to extraordinary, with its bright, zesty flavor dancing on your taste buds.

This recipe stands out because it embraces simplicity while delivering on flavor. I’ve added a hint of vanilla to the batter, enhancing the overall taste and making it even more indulgent. Trust me, once you make this Lemon Poppy Seed Loaf With Citrus Icing, it’ll become a go-to in your baking repertoire.

So, let me show you exactly how to make it!

Zesty Lemon Poppy Seed Delight

Why You’ll Love This Recipe

  • Moist and tender crumb that melts in your mouth, thanks to the perfect balance of butter and buttermilk.
  • Bright, zesty lemon flavor paired with crunchy poppy seeds, creating a delightful texture and taste experience.
  • Easy to whip up in just about an hour, perfect for last-minute gatherings or a cozy afternoon treat.
  • Budget-friendly with everyday ingredients, making it an accessible option for all home bakers.
  • The citrus icing adds a sweet tang that elevates the loaf, turning a simple recipe into a showstopper!

Ingredients

  • 1 ½ cups (190g) all-purpose flour
  • 1 teaspoon baking powder
  • ½ teaspoon baking soda
  • ½ teaspoon salt
  • 3 tablespoons poppy seeds
  • ½ cup (115g) unsalted butter, softened to room temperature
  • 1 cup (200g) granulated sugar
  • 2 large eggs
  • 1 teaspoon vanilla extract
  • 1 teaspoon lemon zest (from about 1 medium lemon)
  • ½ cup (120ml) buttermilk
  • 2 tablespoons fresh lemon juice

For the Citrus Icing:

  • 1 cup (120g) powdered sugar
  • 2 tablespoons fresh lemon juice
  • 1 tablespoon orange juice
  • 1 teaspoon lemon zest (for garnish, optional)

Let’s dive into the key ingredients that make this Lemon Poppy Seed Loaf so special. The all-purpose flour provides the structure and base for the loaf, while the baking powder and baking soda ensure it rises perfectly, giving the loaf a light texture. For a gluten-free variation, you could substitute the flour with a gluten-free all-purpose blend. Poppy seeds not only add a delightful crunch but also contribute to the unique flavor profile that pairs well with the citrus notes.

Unsalted butter is crucial for achieving the buttery richness that makes this loaf so moist. If you’re looking for a dairy-free option, coconut oil or a vegan butter can be used instead. The buttermilk is another essential component, providing acidity that activates the baking soda for a fluffy texture. If you don’t have buttermilk on hand, you can easily make a substitute by mixing ½ cup of milk with 1 tablespoon of vinegar or lemon juice and letting it sit for about 5 minutes.

Step-by-Step Instructions

  1. Preheat your oven to 350°F (175°C). Grease a 9×5-inch loaf pan or line it with parchment paper for easy removal later.
  2. In a medium mixing bowl, whisk together 1 ½ cups of all-purpose flour, 1 teaspoon of baking powder, ½ teaspoon of baking soda, ½ teaspoon of salt, and 3 tablespoons of poppy seeds. This helps to evenly distribute the baking agents and ensures a uniform rise.
  3. In a large mixing bowl, cream together ½ cup of softened unsalted butter and 1 cup of granulated sugar using an electric mixer on medium speed for about 3-4 minutes, until the mixture is light and fluffy. Make sure to scrape down the sides of the bowl occasionally.
  4. Add 2 large eggs, 1 teaspoon of vanilla extract, and 1 teaspoon of lemon zest to the creamed butter and sugar, mixing until fully combined. You want a smooth consistency, so ensure there are no lumps of butter.
  5. In a small bowl, combine ½ cup of buttermilk and 2 tablespoons of fresh lemon juice. Alternately add the dry ingredients and buttermilk mixture to the butter mixture, starting and ending with the dry ingredients. Mix just until combined; do not overmix, as this can lead to a dense loaf.
  6. Pour the batter into the prepared loaf pan. Smooth the top with a spatula, ensuring it’s even. Bake in the preheated oven for 50-60 minutes, or until a toothpick inserted in the center comes out clean. The edges should be lightly golden brown, and the center should feel just set.
  7. Once baked, remove the loaf from the oven and allow it to cool in the pan for about 10 minutes. Then, transfer it to a wire rack to cool completely. Resist the urge to slice too soon, as it will be crumbly if it’s still warm.
  8. While the loaf is cooling, prepare the citrus icing. In a medium bowl, whisk together 1 cup of powdered sugar, 2 tablespoons of fresh lemon juice, and 1 tablespoon of orange juice until smooth. If the icing is too thick, you can add a little more juice to reach your desired consistency.
  9. Once the loaf is completely cool, drizzle the citrus icing over the top. If you like, sprinkle with an additional teaspoon of lemon zest for an extra pop of flavor and color.

Pro Tips for the Best Lemon Poppy Seed Loaf With Citrus Icing

  • Be careful not to overmix your batter; this is a common mistake that can lead to a dense loaf. Mix just until the dry ingredients are incorporated for a light and fluffy texture.
  • Use room temperature ingredients, especially the butter and eggs. This helps to create a smoother batter and ensures even baking. Take your eggs out of the fridge about 30 minutes before you start.
  • For a more pronounced lemon flavor, consider adding a little lemon extract in addition to the zest and juice. Just a half teaspoon can elevate the citrus notes significantly.
  • When measuring your flour, spoon it into the measuring cup and level it off with a knife instead of scooping directly from the bag. This prevents packing and ensures you don’t end up with a dry loaf.
  • Invest in a good quality loaf pan; it makes a difference in heat distribution, which ensures even baking. If your pan is dark-coated, reduce the oven temperature by 25°F to prevent over-browning.

Variations & Serving Ideas

For a delightful twist, consider adding blueberries or raspberries to the batter for a fruity burst of flavor. You can also experiment with different citrus fruits—try lime or grapefruit zest and juice for a refreshing change. For a healthier option, substitute half of the all-purpose flour with whole wheat flour for added fiber without compromising too much on texture.

This Lemon Poppy Seed Loaf pairs beautifully with a light salad, such as a mixed greens salad with a vinaigrette, or a cup of tea for a cozy afternoon treat. It also complements a creamy cheese platter, as the acidity of the loaf balances rich cheeses perfectly. Lastly, a scoop of vanilla ice cream on the side creates a delightful contrast of temperatures and flavors!

Storage, Make-Ahead & Reheating

This Lemon Poppy Seed Loaf can be stored at room temperature for up to 3 days if wrapped tightly in plastic wrap. If you want to keep it longer, it freezes well for up to 3 months. To freeze, wrap the loaf tightly in plastic wrap and then in aluminum foil to prevent freezer burn.

When you’re ready to enjoy it again, simply thaw it in the fridge overnight. Reheat individual slices in the microwave for 15-20 seconds or in a toaster oven until warmed through. Interestingly, many people find that this loaf tastes even better the next day, as the flavors have time to meld!

Frequently Asked Questions

Can I make Lemon Poppy Seed Loaf With Citrus Icing ahead of time?

Yes — in fact, it tastes even better the next day! You can make the loaf a day in advance, allowing the flavors to develop. Just be sure to store it in an airtight container to maintain its moisture.

Can I substitute the poppy seeds?

Absolutely! If you don’t have poppy seeds on hand or prefer an alternative, you can use sesame seeds for a similar crunch or omit them entirely for a smooth loaf.

What can I use instead of buttermilk?

If you don’t have buttermilk, you can easily create a substitute by mixing ½ cup of milk (dairy or plant-based) with 1 tablespoon of vinegar or lemon juice. Let it sit for 5 minutes before using in the recipe.

How can I make this recipe gluten-free?

To make a gluten-free version of this Lemon Poppy Seed Loaf, substitute the all-purpose flour with a gluten-free all-purpose flour blend. Just ensure that the blend contains a binding agent like xanthan gum for the best results.

What is the best way to store leftover loaf?

Leftover Lemon Poppy Seed Loaf should be stored in an airtight container at room temperature for up to 3 days. For longer storage, wrap it tightly and freeze for up to 3 months. Thaw it before serving for the best texture.

Zesty Lemon Poppy Seed Delight

Final Thoughts

The Lemon Poppy Seed Loaf with Citrus Icing is truly a delightful treat that brings a burst of brightness to any occasion. The zesty lemon flavor combined with the subtle crunch of poppy seeds creates a satisfying balance, while the citrus icing adds a touch of sweetness that perfectly complements the loaf’s tanginess.

This is the kind of recipe I come back to again and again, especially when I want to brighten up a gloomy day or celebrate a small victory. The aroma that fills the kitchen as it bakes is absolutely heavenly! I encourage you to give this recipe a try; you might just find it becoming a beloved staple in your home. Don’t forget to share your results or even add your own unique twist—I can’t wait to see what you create!

Print
clock clock iconcutlery cutlery iconflag flag iconfolder folder iconinstagram instagram iconpinterest pinterest iconfacebook facebook iconprint print iconsquares squares iconheart heart iconheart solid heart solid icon

Lemon Poppy Seed Loaf


  • Author: Lily author
  • Total Time: 25 minute
  • Yield: 1 loaf 1x
Pin Recipe
Print Recipe

Description

This Lemon Poppy Seed Loaf is a delightful treat that combines zesty lemon flavor with crunchy poppy seeds. Topped with a citrus icing, it’s perfect for any occasion.


Ingredients

Scale
  • 1 ½ cups (190g) all-purpose flour
  • 1 teaspoon baking powder
  • ½ teaspoon baking soda
  • ½ teaspoon salt
  • 3 tablespoons poppy seeds
  • ½ cup (115g) unsalted butter, softened to room temperature
  • 1 cup (200g) granulated sugar
  • 2 large eggs
  • 1 teaspoon vanilla extract
  • 1 teaspoon lemon zest (from about 1 medium lemon)
  • ½ cup (120ml) buttermilk
  • 2 tablespoons fresh lemon juice
  • 1 cup (120g) powdered sugar
  • 2 tablespoons fresh lemon juice
  • 1 tablespoon orange juice
  • 1 teaspoon lemon zest (for garnish, optional)

Instructions

  1. Preheat your oven to 350°F (175°C). Grease a 9×5-inch loaf pan or line it with parchment paper for easy removal later.
  2. In a medium mixing bowl, whisk together 1 ½ cups of all-purpose flour, 1 teaspoon of baking powder, ½ teaspoon of baking soda, ½ teaspoon of salt, and 3 tablespoons of poppy seeds. This helps to evenly distribute the baking agents and ensures a uniform rise.
  3. In a large mixing bowl, cream together ½ cup of softened unsalted butter and 1 cup of granulated sugar using an electric mixer on medium speed for about 3-4 minutes, until the mixture is light and fluffy. Make sure to scrape down the sides of the bowl occasionally.
  4. Add 2 large eggs, 1 teaspoon of vanilla extract, and 1 teaspoon of lemon zest to the creamed butter and sugar, mixing until fully combined. You want a smooth consistency, so ensure there are no lumps of butter.
  5. In a small bowl, combine ½ cup of buttermilk and 2 tablespoons of fresh lemon juice. Alternately add the dry ingredients and buttermilk mixture to the butter mixture, starting and ending with the dry ingredients. Mix just until combined; do not overmix, as this can lead to a dense loaf.
  6. Pour the batter into the prepared loaf pan. Smooth the top with a spatula, ensuring it’s even. Bake in the preheated oven for 50-60 minutes, or until a toothpick inserted in the center comes out clean. The edges should be lightly golden brown, and the center should feel just set.
  7. Once baked, remove the loaf from the oven and allow it to cool in the pan for about 10 minutes. Then, transfer it to a wire rack to cool completely. Resist the urge to slice too soon, as it will be crumbly if it’s still warm.
  8. While the loaf is cooling, prepare the citrus icing. In a medium bowl, whisk together 1 cup of powdered sugar, 2 tablespoons of fresh lemon juice, and 1 tablespoon of orange juice until smooth. If the icing is too thick, you can add a little more juice to reach your desired consistency.
  9. Once the loaf is completely cool, drizzle the citrus icing over the top. If you like, sprinkle with an additional teaspoon of lemon zest for an extra pop of flavor and color.
  • Prep Time: 15 mins
  • Cook Time: 50-60 mins
  • Category: Dessert
  • Method: Baking
  • Cuisine: American

Nutrition

  • Serving Size: 1 slice
  • Calories: 200
  • Sugar: 15 g
  • Sodium: 150 mg
  • Fat: 8 g
  • Saturated Fat: 5 g
  • Unsaturated Fat: 3 g
  • Trans Fat: 0 g
  • Carbohydrates: 30 g
  • Fiber: 1 g
  • Protein: 3 g
  • Cholesterol: 40 mg

Keywords: Be careful not to overmix your batter; this is a common mistake that can lead to a dense loaf. Use room temperature ingredients for a smoother batter and even baking.

Did you make this recipe?

Share a photo and tag us — we can't wait to see what you've made!

  • Privacy Policy
  • Terms Of Service
  • Contact
  • About
  • GDPR

Copyright © 2025 Homesmad