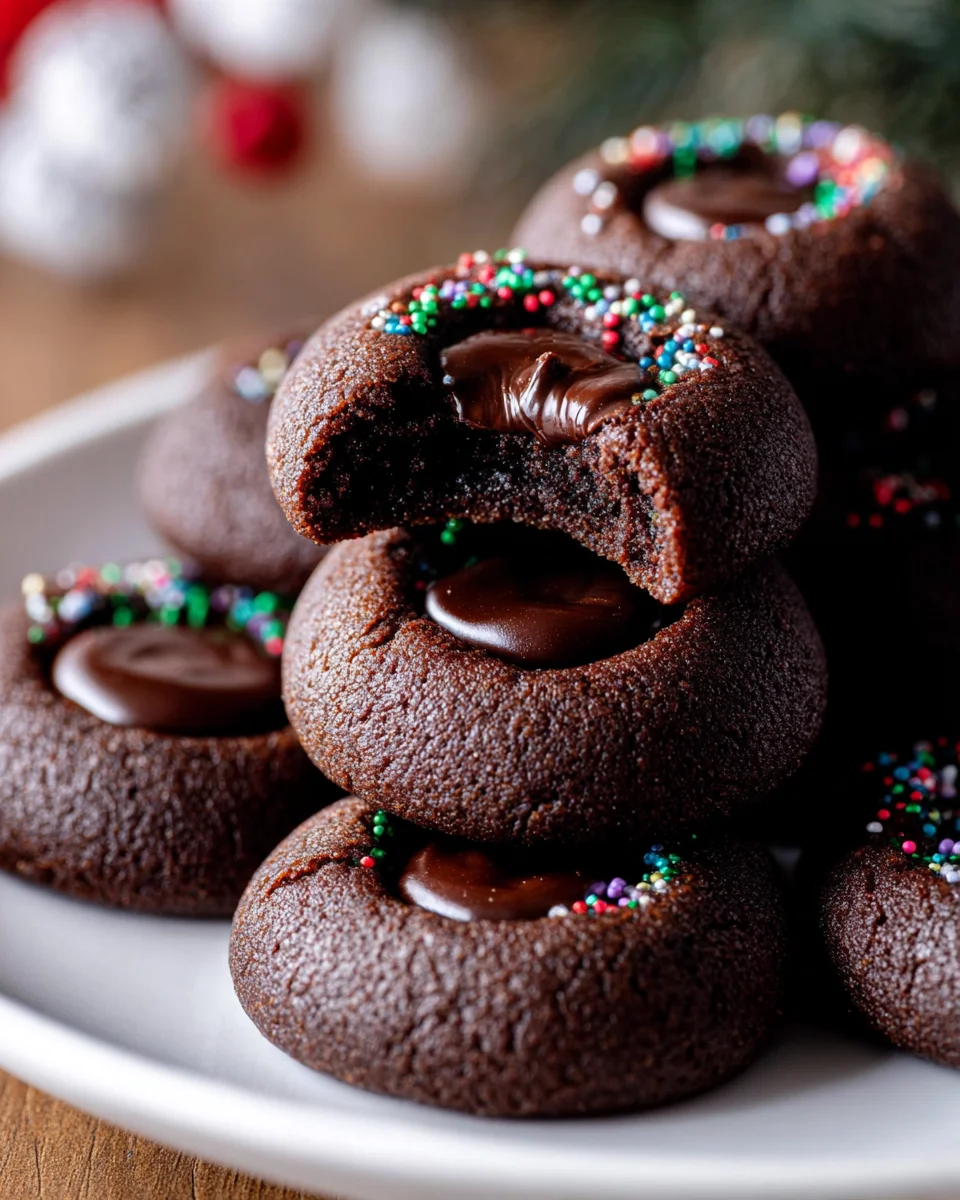
Chocolate Thumbprint Cookies
Oh my goodness, do I have a treat for you! When it comes to cookies, I’m always on the hunt for something that feels both classic and wonderfully indulgent, and these Chocolate Thumbprint Cookies absolutely hit the mark. What makes them so special, you ask? Well, imagine a traditional thumbprint cookie, but instead of a buttery base and a fruit jam center, we’re diving headfirst into a world of rich, dark chocolate. We’re talking a soft, fudgy chocolate cookie base, perfectly molded with a little “thumbprint” indentation, and then – wait for it – filled to the brim with a luscious, decadent chocolate ganache. It’s a double whammy of chocolate that truly elevates the humble cookie! You, my friend, are going to absolutely adore these because they’re surprisingly simple to make, yet they look incredibly impressive and taste like pure bliss. They’re my go-to for special occasions, holiday platters, or frankly, any Tuesday that needs a serious chocolate pick-me-up. Get ready to fall in love with these irresistible chocolate masterpieces!

Ingredient Notes
Making delicious Chocolate Thumbprint Cookies starts with understanding the role of each ingredient. I’ve found that using quality ingredients truly makes a difference in both flavor and texture. Here’s a rundown of what you’ll need and some helpful notes on substitutions.
For the Cookie Dough:
- Unsalted Butter: I always reach for unsalted butter so I can control the salt content in my baking. Make sure your butter is softened to room temperature – not melted, but easily indented. This is crucial for properly creaming with the sugar, creating a light and airy base for your Chocolate Thumbprint Cookies. If you need a dairy-free option, good quality vegan butter sticks work wonderfully as a 1:1 substitute.
- Granulated Sugar: This provides sweetness and helps with the tender texture of the cookies. You can experiment with coconut sugar for a slightly less sweet, more caramel-like note, but be aware it might slightly alter the texture and color.
- Large Egg Yolk: The yolk is key for richness and binding without adding too much moisture, ensuring a tender, melt-in-your-mouth crumb. Some recipes use a whole egg, but I prefer just the yolk for a more delicate cookie.
- Vanilla Extract: A splash of vanilla enhances the chocolate flavor beautifully. Use a good quality pure vanilla extract for the best results.
- All-Purpose Flour: The structure of our cookie! I recommend spooning and leveling your flour rather than scooping it directly from the bag, which can lead to over-measuring and dry cookies. For a gluten-free alternative, a 1:1 gluten-free baking blend that contains xanthan gum usually works well for these types of cookies.
- Unsweetened Cocoa Powder: This is where the rich chocolate flavor of the cookie itself comes from. I typically use natural unsweetened cocoa powder, but Dutch-processed can also be used for a darker, less acidic cookie. Just ensure it’s unsweetened.
- Salt: Don’t skip the salt! It balances the sweetness and brings out the deep chocolate notes.
- Powdered Sugar (for rolling, optional): While optional, rolling the cookie dough balls in powdered sugar before baking gives these Chocolate Thumbprint Cookies a lovely contrasting finish and a delicate crispness.
For the Chocolate Ganache Filling:
- Good Quality Chocolate: I highly recommend using a high-quality semi-sweet or dark chocolate (around 60-70% cacao) for your ganache. Chocolate chips work, but a chopped bar of good baking chocolate will give you a smoother, more luxurious ganache. The better the chocolate, the better your filling will taste!
- Heavy Cream: This creates the luscious, pourable consistency of the ganache. There aren’t many direct substitutions for heavy cream in ganache if you want the traditional texture, but for a dairy-free option, full-fat coconut milk (the canned kind, not the beverage) can be used, though it will impart a subtle coconut flavor.
Step-by-Step Instructions
Let’s get baking! These Chocolate Thumbprint Cookies are a joy to make, and I’ll walk you through each step to ensure perfect results.
Step 1: Prep Work
First things first, let’s set ourselves up for success. Preheat your oven to 350°F (175°C). Line two baking sheets with parchment paper or silicone baking mats. This prevents sticking and makes cleanup a breeze. Also, make sure your butter is softened to room temperature, which is essential for creaming properly.
Step 2: Cream the Butter and Sugar
In a large mixing bowl, using an electric mixer, cream together the softened unsalted butter and granulated sugar on medium speed until the mixture is light, fluffy, and pale in color. This usually takes about 2-3 minutes. This step incorporates air, contributing to the tender texture of your Chocolate Thumbprint Cookies.
Step 3: Add Wet Ingredients
Scrape down the sides of the bowl. Add the egg yolk and vanilla extract to the creamed butter mixture. Beat on medium speed until well combined, making sure there are no streaks of yolk left. The mixture should look cohesive and creamy.
Step 4: Combine Dry Ingredients
In a separate medium bowl, whisk together the all-purpose flour, unsweetened cocoa powder, and salt. Whisking ensures these dry ingredients are evenly distributed, preventing pockets of unmixed flour or cocoa in your cookies.
Step 5: Mix Wet and Dry
Gradually add the dry ingredient mixture to the wet ingredients, mixing on low speed until just combined. Be careful not to overmix! Overmixing can develop the gluten in the flour too much, leading to tough cookies. Stop mixing as soon as you no longer see any dry flour.
Step 6: Chill the Dough (Crucial!)
Shape the dough into a disc, wrap it tightly in plastic wrap, and refrigerate for at least 30 minutes, or up to an hour. Chilling the dough helps firm up the butter, which prevents the cookies from spreading too much in the oven and makes the dough much easier to handle when rolling.
Step 7: Roll and Indent
Once the dough is chilled, remove it from the refrigerator. If using, place powdered sugar in a shallow bowl. Scoop out portions of dough, about 1 tablespoon each, and roll them into smooth balls. I like to make them roughly the size of a walnut. If desired, roll each ball gently in the powdered sugar until lightly coated. Place the balls about 2 inches apart on your prepared baking sheets. Using your thumb, or the back of a lightly floured teaspoon, gently press an indentation into the center of each dough ball. Don’t press all the way through, just enough to create a nice well for the filling.
Step 8: Bake
Bake the Chocolate Thumbprint Cookies for 10-12 minutes, or until the edges are just set and lightly firm. They may still look a little soft in the center, but they will firm up as they cool. If the indentations puff up during baking, you can gently re-press them with the back of a spoon immediately after removing them from the oven.
Step 9: Cool Cookies
Let the cookies cool on the baking sheets for 5 minutes before carefully transferring them to a wire rack to cool completely. This prevents them from breaking and allows them to finish setting up.
Step 10: Make the Chocolate Ganache Filling
While the cookies are cooling, prepare your ganache. Place the chopped good quality chocolate in a heatproof bowl. In a small saucepan, heat the heavy cream over medium heat until it just begins to simmer around the edges (don’t let it boil rapidly). Immediately pour the hot cream over the chocolate. Let it sit for 5 minutes without stirring. Then, gently whisk the mixture from the center outwards until it’s completely smooth, glossy, and lump-free. Let the ganache cool for about 10-15 minutes, stirring occasionally, until it thickens slightly to a spoonable consistency.
Step 11: Fill and Set
Once the cookies are completely cool and the ganache has thickened, spoon or pipe about ½ to 1 teaspoon of ganache into each thumbprint. Allow the ganache to set at room temperature for at least 30 minutes, or in the refrigerator for 15-20 minutes, until firm.
Tips & Suggestions
I’ve learned a few tricks over the years that truly elevate these Chocolate Thumbprint Cookies from good to absolutely phenomenal. Here are my best tips for you:
- Don’t Skip the Chill: I know it’s tempting to rush, but chilling the dough is paramount for thumbprint cookies. It solidifies the butter, which prevents the cookies from spreading too much during baking and helps them hold their shape. It also makes the dough much easier to roll and indent without it becoming sticky or crumbly. Aim for at least 30 minutes, but an hour is even better.
- Perfecting the Indentation: For the classic “thumbprint,” you can certainly use your actual thumb! If you find it sticks, lightly flour your thumb first. Alternatively, the back of a rounded ½ teaspoon measuring spoon or even a small dowel works beautifully to create a neat, consistent well for your chocolate filling. If your cookies puff up during baking and diminish the well, don’t worry! Gently re-press the indentation with the back of a spoon immediately after taking them out of the oven, while they’re still hot and pliable.
- Quality Chocolate Matters: Since the chocolate ganache is the star filling of these Chocolate Thumbprint Cookies, using a good quality chocolate (like a baking bar vs. standard chocolate chips for the ganache) will make a noticeable difference in the richness and silkiness of your filling. It melts smoother and offers a deeper flavor.
- Don’t Overbake: These cookies are meant to be tender and slightly chewy. Overbaking will result in a dry, crumbly cookie. Pull them from the oven when the edges are just set and the centers still look a tiny bit soft. They will continue to set as they cool on the baking sheet.
- Even Baking: If your oven has hot spots, rotate your baking sheets halfway through the baking time. This helps ensure all your Chocolate Thumbprint Cookies bake evenly and prevents some from over-browning while others are undercooked.
- Serving Temperature for Ganache: For the best texture, I like to serve these Chocolate Thumbprint Cookies once the ganache has set but isn’t rock hard from the fridge. Room temperature ganache is wonderfully soft and melt-in-your-mouth.
- Filling Variations (Chocolate-Focused): While these are Chocolate Thumbprint Cookies, you could experiment with different chocolate fillings like a salted caramel chocolate ganache, a dark chocolate espresso ganache (just add a tiny bit of espresso powder to the hot cream), or even a hazelnut chocolate spread (like Nutella) if you’re in a pinch and don’t want to make ganache.
Storage
Properly storing your Chocolate Thumbprint Cookies ensures they stay fresh and delicious for as long as possible. Here’s what I recommend:
- Room Temperature: If your chocolate ganache is quite stable (i.e., not a soft, melty consistency) and your kitchen isn’t overly warm, you can store these Chocolate Thumbprint Cookies in an airtight container at room temperature for up to 3-4 days. I like to place a piece of parchment paper between layers to prevent sticking, especially if the ganache isn’t fully firm.
- Refrigeration: For longer storage, or if your kitchen is warm and you want the ganache to stay firm, store the cookies in an airtight container in the refrigerator for up to 1 week. Bring them back to room temperature for about 15-20 minutes before serving for the best texture and flavor, especially for the ganache.
- Freezing Baked Cookies: These Chocolate Thumbprint Cookies freeze beautifully! Once the ganache is completely set, arrange the cookies in a single layer on a baking sheet and flash freeze for about 30 minutes, or until solid. Then, transfer them to a freezer-safe airtight container or a heavy-duty freezer bag. They will keep well for up to 2-3 months. Thaw them overnight in the refrigerator or at room temperature for a few hours before serving.
- Freezing Cookie Dough: You can also freeze the raw cookie dough balls. Roll the dough into balls, make the indentations, and then flash freeze them on a baking sheet until solid. Transfer the frozen dough balls to a freezer-safe bag. When you’re ready to bake, you can bake them directly from frozen (they might need an extra minute or two in the oven), or let them thaw slightly. You’ll want to add the ganache after they are baked and cooled, as usual.
Final Thoughts
I truly believe these Chocolate Thumbprint Cookies are a delightful creation that brings joy with every bite. The tender, rich chocolate cookie base, perfectly cradling that luscious chocolate filling, creates an irresistible combination. It’s a recipe that’s not only fun to make, especially when pressing those little indentations, but also incredibly rewarding.
Whether you’re baking for a special occasion, a quiet afternoon treat, or to share some homemade happiness, I promise these Chocolate Thumbprint Cookies will impress. They’re a classic with a chocolatey twist that I know you and your loved ones will absolutely adore. So go ahead, treat yourself and dive into the wonderful world of these delectable Chocolate Thumbprint Cookies!

Irresistible Chocolate Thumbprint Cookies Recipe
- Total Time: 27 minutes
- Yield: 24 cookies
Description
These Chocolate Thumbprint Cookies are a delightful treat that combines a rich, fudgy chocolate cookie base with a luscious chocolate ganache filling. Perfect for any occasion, they are surprisingly simple to make yet incredibly impressive.
Ingredients
- Unsalted Butter
- Granulated Sugar
- Large Egg Yolk
- Vanilla Extract
- All-Purpose Flour
- Unsweetened Cocoa Powder
- Salt
- Powdered Sugar (for rolling, optional)
- Good Quality Chocolate
- Heavy Cream
Instructions
- Preheat your oven to 350°F (175°C). Line two baking sheets with parchment paper or silicone baking mats.
- In a large mixing bowl, cream together the softened unsalted butter and granulated sugar on medium speed until light, fluffy, and pale in color (about 2-3 minutes).
- Scrape down the sides of the bowl. Add the egg yolk and vanilla extract to the creamed butter mixture and beat on medium speed until well combined.
- In a separate medium bowl, whisk together the all-purpose flour, unsweetened cocoa powder, and salt.
- Gradually add the dry ingredient mixture to the wet ingredients, mixing on low speed until just combined.
- Shape the dough into a disc, wrap it tightly in plastic wrap, and refrigerate for at least 30 minutes.
- Once the dough is chilled, scoop out portions of dough (about 1 tablespoon each) and roll them into smooth balls. If desired, roll each ball in powdered sugar. Place the balls about 2 inches apart on prepared baking sheets and press an indentation into the center of each dough ball.
- Bake the cookies for 10-12 minutes, or until the edges are just set and lightly firm.
- Let the cookies cool on the baking sheets for 5 minutes before transferring them to a wire rack to cool completely.
- While the cookies are cooling, prepare the ganache by placing chopped good quality chocolate in a heatproof bowl. Heat the heavy cream in a small saucepan until it just begins to simmer, then pour it over the chocolate. Let it sit for 5 minutes, then whisk until smooth.
- Once the cookies are cool and the ganache has thickened, spoon or pipe about ½ to 1 teaspoon of ganache into each thumbprint. Allow the ganache to set at room temperature for at least 30 minutes.
- Prep Time: 15 mins
- Cook Time: 12 mins
- Category: Dessert
- Method: Baking
- Cuisine: American
Nutrition
- Serving Size: 1 cookie
- Calories: 120
- Sugar: 10 g
- Sodium: 50 mg
- Fat: 7 g
- Saturated Fat: 4 g
- Unsaturated Fat: 3 g
- Trans Fat: 0 g
- Carbohydrates: 15 g
- Fiber: 1 g
- Protein: 2 g
- Cholesterol: 20 mg
Keywords: Chilling the dough is crucial to prevent spreading. Use high-quality chocolate for the ganache for the best flavor. If the indentations puff up during baking, gently re-press them while still warm.