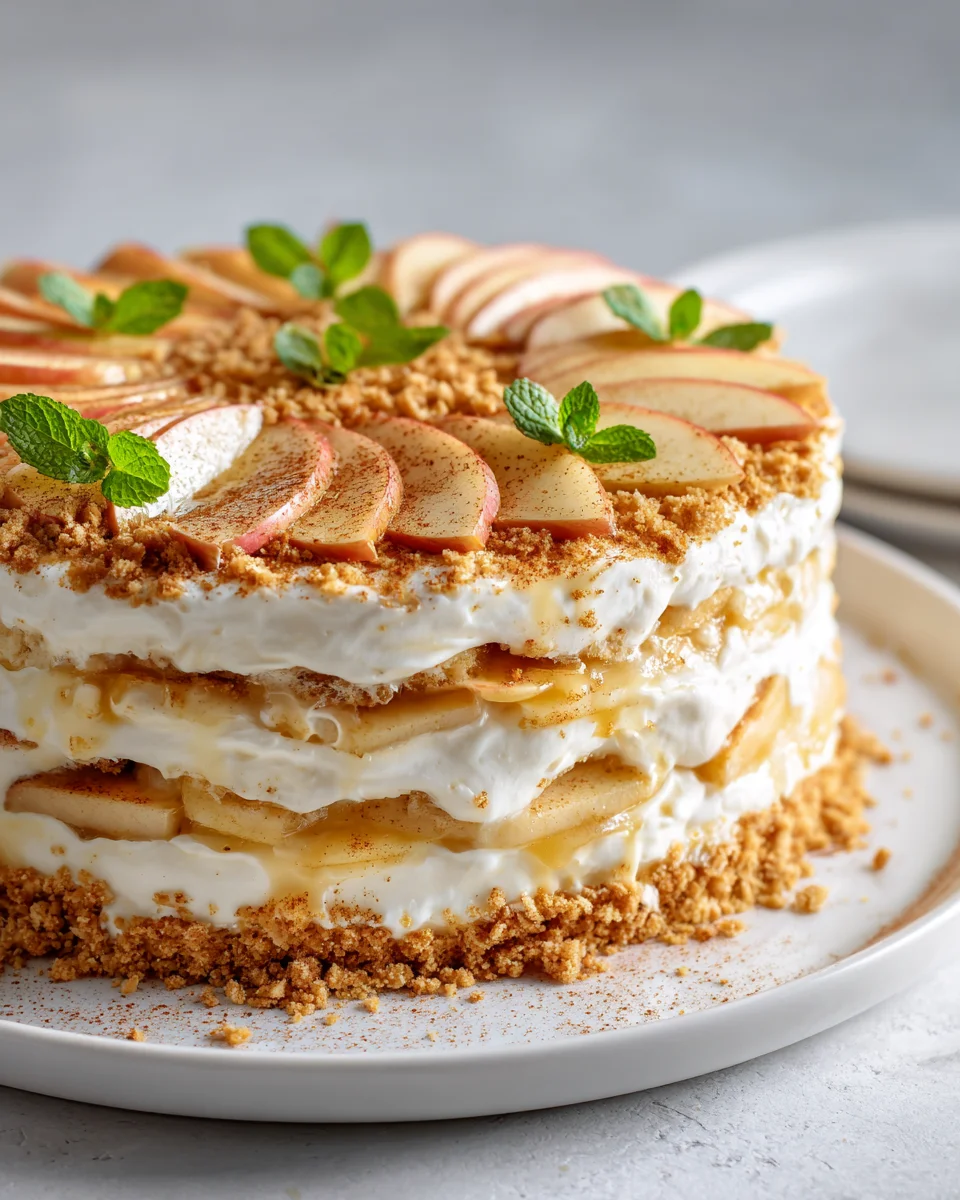
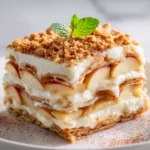
No Bake Apple Pie Icebox Cake
Oh my goodness, get ready to meet your new favorite dessert! When I first thought about combining the cozy, comforting flavors of classic apple pie with the effortless charm of an icebox cake, I knew I was onto something special. And let me tell you, this No Bake Apple Pie Icebox Cake absolutely delivers!
What makes this recipe truly stand out is right there in the name: no bake. That’s right, folks! You get all the delicious, spiced apple goodness without ever having to turn on your oven. This makes it absolutely perfect for those sweltering summer days when the mere thought of baking makes you sweat, or even when you just want a spectacular dessert without all the fuss. You’ll love how incredibly simple it is to put together, making it an ideal treat for busy weeknights or a show-stopping finish to any dinner party.
Imagine layers of crisp graham crackers softening overnight into a tender, cake-like texture, interspersed with a luscious, creamy filling bursting with warm cinnamon-spiced apples. It’s cool, refreshing, and incredibly satisfying – essentially, all the heartwarming flavors of apple pie transformed into a chilled, creamy, and ridiculously easy-to-make dessert. Trust me, once you try this delightful creation, you’ll be making it again and again!

Ingredient Notes
Creating a truly delightful No Bake Apple Pie Icebox Cake starts with understanding the role each ingredient plays. While this recipe is incredibly forgiving, a few thoughtful choices can elevate your dessert from good to absolutely unforgettable. Here’s a breakdown of the key components I love to use and some handy substitutions you might consider.
- Graham Crackers: These are the backbone of our icebox cake, absorbing moisture from the other layers to transform into a tender, cake-like texture. I usually opt for the classic honey graham crackers, but cinnamon-flavored ones would be an amazing complement to the apple pie theme. If you can’t find graham crackers, plain digestive biscuits, vanilla wafers, or even shortbread cookies can be fantastic alternatives. Just be aware that denser cookies might require a bit more chilling time to soften completely.
- Apple Pie Filling: This is where the “apple pie” magic truly happens! I often use a good quality canned apple pie filling for convenience, as it’s already perfectly spiced and ready to go. However, if you’re feeling ambitious, a homemade apple pie filling (cooked apples, sugar, cinnamon, nutmeg, a pinch of allspice, and a touch of lemon juice) will give you unparalleled flavor and texture control. If using canned, look for one with nice, firm apple chunks. You can always add an extra pinch of cinnamon or a dash of nutmeg to boost the spice factor even further, which I highly recommend.
- Heavy Whipping Cream: This forms the luscious, creamy layers that bind everything together. For the best results, ensure your heavy whipping cream is very cold before whipping it. This helps it achieve stiff peaks quickly and holds its structure beautifully. We’ll be whipping it with a little powdered sugar and vanilla extract to create a sweet, airy contrast to the apples.
- Powdered Sugar: Also known as confectioners’ sugar, this fine sugar is perfect for sweetening our whipped cream. It dissolves effortlessly, preventing any grainy texture, and also helps stabilize the whipped cream slightly. Granulated sugar can be used in a pinch, but the texture of your cream might not be as smooth.
- Vanilla Extract: A touch of pure vanilla extract enhances the sweetness and rounds out the flavors in the whipped cream, making it even more inviting. Feel free to use a good quality vanilla bean paste for those little specks of vanilla, adding visual appeal.
- Ground Cinnamon & Nutmeg: While your apple pie filling will already contain these, I love adding an extra sprinkle to the whipped cream or layering them directly onto the apple filling for an extra aromatic kick. It really amplifies that cozy apple pie taste. A tiny pinch of ground allspice can also be a wonderful addition.
- Optional Additions: Want to take it up a notch? Consider drizzling a little homemade or store-bought caramel sauce over some of the layers or as a garnish. A sprinkle of chopped toasted pecans or walnuts would add a lovely crunch and nutty flavor. You could also mix a teaspoon of non-alcohol rum extract into your whipped cream for a hint of sophisticated flavor.
Step-by-Step Instructions
Making a No Bake Apple Pie Icebox Cake is wonderfully straightforward, mostly involving layering and then letting time do its magic in the refrigerator. Just follow these steps, and you’ll have a stunning dessert with minimal effort!
- Prepare Your Pan: First things first, choose your baking dish. I typically use an 8×8 inch or 9×9 inch square baking dish, or a 9×13 inch rectangular dish if I’m serving a larger crowd. For easier removal and cleaner slices, line your dish with parchment paper, leaving an overhang on the sides. This creates “slings” that will help you lift the entire cake out once it’s chilled.
- Whip the Cream: In a large, chilled mixing bowl, combine the very cold heavy whipping cream, powdered sugar, and vanilla extract. Using an electric mixer (handheld or stand mixer with a whisk attachment) on medium-high speed, whip the mixture until it forms stiff peaks. Be careful not to over-whip, or it might become grainy. If you’re adding extra cinnamon or nutmeg, gently fold it into the whipped cream now.
- Layer the Graham Crackers: Arrange a single layer of graham crackers at the bottom of your prepared dish. You might need to break some crackers to fit them snugly and cover the entire base. Don’t worry if there are small gaps; the cream and filling will seep in.
- Apply the First Cream Layer: Spread about one-third of your whipped cream mixture evenly over the graham cracker layer. Take your time to get it right to the edges.
- Add the Apple Pie Filling: Spoon about half of the apple pie filling over the whipped cream. Gently spread it out, being careful not to disturb the cream layer too much. If using, sprinkle a little extra cinnamon or nutmeg here.
- Repeat the Layers: Place another layer of graham crackers on top of the apple pie filling. Then, spread another one-third of the whipped cream evenly over the crackers, followed by the remaining apple pie filling. Again, sprinkle with extra spices if desired.
- Top with Final Layers: Add a final layer of graham crackers. Finish the cake by spreading the remaining whipped cream mixture over the top, creating a smooth, inviting surface.
- Chill, Chill, Chill!: This is the most crucial step! Cover the dish tightly with plastic wrap and refrigerate for at least 6-8 hours, or preferably overnight. The longer it chills, the better the graham crackers will soften and meld with the other flavors, creating that wonderful cake-like texture.
- Garnish and Serve: Once thoroughly chilled, use the parchment paper slings to carefully lift the cake out of the dish and onto a cutting board. Remove the parchment. Now, you can get creative with your garnish! A dusting of ground cinnamon, a drizzle of caramel sauce, or a sprinkle of chopped toasted nuts (like pecans or walnuts) makes for a beautiful presentation. Slice with a sharp knife and serve immediately.
Tips & Suggestions
To ensure your No Bake Apple Pie Icebox Cake is an absolute triumph, I’ve gathered a few of my favorite tips and suggestions. These small details can make a big difference in the final taste and texture of your dessert!
- Don’t Skimp on Chilling Time: I cannot stress this enough! The “icebox” in icebox cake is there for a reason. The extensive chilling period is what transforms the crisp graham crackers into tender, cake-like layers. Rushing this step will result in a crunchy, less cohesive cake. Aim for at least 8 hours, but overnight is truly ideal. You’ll know it’s ready when a knife slices through with minimal resistance and the layers hold together beautifully.
- Preventing a Soggy Bottom (or Top): While we want soft crackers, we don’t want mush! Ensure your apple pie filling isn’t overly watery. If you’re using homemade filling, let it cool completely and thicken before layering. For canned filling, sometimes giving it a gentle stir can help distribute any excess liquid. The whipped cream also acts as a barrier, preventing direct contact between the crackers and the wetter filling.
- Enhance the Spice Factor: Even if your apple pie filling is spiced, I love adding an extra pinch of cinnamon and a tiny dash of nutmeg directly to the whipped cream or sprinkling it over the apple filling layers. This boosts that warm, cozy apple pie aroma and flavor throughout the entire cake.
- Consider a Cream Cheese Layer: For a slightly tangier and more stable cake, consider making a cream cheese whipped cream. Beat 8 ounces of softened cream cheese with 1/2 cup powdered sugar until smooth, then fold it into your whipped cream mixture. This adds a wonderful depth of flavor and helps the cake hold its shape even better.
- Even Spreading is Key: Take your time to spread each layer evenly, especially the whipped cream. This ensures that every bite has a good balance of cracker, cream, and apple filling, and that the graham crackers soften uniformly.
- Clean Slices: For picture-perfect slices, use a sharp knife and wipe it clean with a warm, damp cloth between each cut. This prevents the layers from sticking and dragging, giving you neat edges.
- Make Ahead Magic: This cake is an absolute superstar for make-ahead dessert planning. Because it needs to chill, you can assemble it a day or even two days in advance, leaving you stress-free on the day you plan to serve it. The flavors only deepen and meld over time.
- Serving Suggestions: A scoop of vanilla bean ice cream or a dollop of extra whipped cream on the side always complements this cake beautifully. A small pitcher of warm caramel sauce for guests to drizzle themselves can also be a lovely touch.
Storage
One of the many joys of an icebox cake is its excellent keeping quality, provided it’s stored correctly. It’s a fantastic dessert for making ahead, and leftovers (if there are any!) are still delicious for a few days.
- Refrigeration: Your No Bake Apple Pie Icebox Cake must always be stored in the refrigerator. Cover it tightly with plastic wrap or transfer it to an airtight container. This prevents the cake from absorbing odors from other foods in your fridge and keeps the layers from drying out. When properly covered, this cake will stay fresh and delicious for 3-4 days in the refrigerator. The texture might become slightly softer over time, but the flavors will continue to meld beautifully.
- Freezing: While technically you can freeze an icebox cake, I generally don’t recommend it for optimal texture. Freezing can cause the whipped cream to separate slightly upon thawing, and the graham cracker texture might become a bit grainy or mushy. If you absolutely must freeze it, wrap individual slices or the whole cake very tightly in plastic wrap, then an additional layer of aluminum foil. It can be stored for up to 1 month. Thaw overnight in the refrigerator before serving. Be prepared for a slight change in texture compared to a freshly chilled cake.
- Serving Temperature: This cake is best served cold, straight from the refrigerator. If it sits out at room temperature for too long, especially on a warm day, the whipped cream layers will begin to soften and lose their structure.
Final Thoughts
And there you have it – your incredible No Bake Apple Pie Icebox Cake! I truly believe this recipe is an absolute game-changer, especially when you’re craving that comforting taste of apple pie without the hassle of baking. What makes this particular dessert a must-try is its ingenious simplicity combined with a flavor profile that perfectly captures the essence of a classic. Imagine the cozy warmth of spiced apples, transformed into a cool, creamy, and utterly refreshing layered delight. The way the cinnamon-kissed apples, the luscious whipped cream, and the tender graham crackers meld together is pure magic, creating a dessert that’s both familiar and excitingly new.
I promise you, once you experience the delightful textures and robust apple pie flavors of this No Bake Apple Pie Icebox Cake, you’ll understand why it’s such a fantastic addition to any gathering, a perfect treat for a warm afternoon, or simply an easy indulgence. It’s proof that sometimes the most delicious things don’t require an oven at all. Enjoy sharing this wonderfully easy and undeniably delicious creation!
Easy No Bake Apple Pie Icebox Cake – Perfect Dessert!
- Total Time: 15 minutes
- Yield: 8 servings
Description
This No Bake Apple Pie Icebox Cake combines the comforting flavors of classic apple pie with the effortless charm of an icebox cake. It’s a simple, no-bake dessert that’s perfect for warm days or any gathering.
Ingredients
- Graham Crackers
- Apple Pie Filling
- Heavy Whipping Cream
- Powdered Sugar
- Vanilla Extract
- Ground Cinnamon
- Nutmeg
- Optional Additions: Caramel Sauce, Chopped Toasted Pecans or Walnuts, Non-Alcohol Rum Extract
Instructions
- Prepare Your Pan: Choose your baking dish (8×8 inch, 9×9 inch, or 9×13 inch) and line it with parchment paper.
- Whip the Cream: In a large, chilled mixing bowl, combine heavy whipping cream, powdered sugar, and vanilla extract. Whip until stiff peaks form.
- Layer the Graham Crackers: Arrange a single layer of graham crackers at the bottom of your prepared dish.
- Apply the First Cream Layer: Spread about one-third of your whipped cream mixture evenly over the graham cracker layer.
- Add the Apple Pie Filling: Spoon about half of the apple pie filling over the whipped cream and spread it out gently.
- Repeat the Layers: Place another layer of graham crackers on top, then spread another one-third of the whipped cream, followed by the remaining apple pie filling.
- Top with Final Layers: Add a final layer of graham crackers and spread the remaining whipped cream mixture over the top.
- Chill, Chill, Chill!: Cover the dish tightly with plastic wrap and refrigerate for at least 6-8 hours, preferably overnight.
- Garnish and Serve: Carefully lift the cake out using the parchment paper slings, garnish as desired, slice, and serve.
- Prep Time: 15 mins
- Cook Time: 0 mins
- Category: Dessert
- Method: No Bake
- Cuisine: American
Nutrition
- Serving Size: 1 slice
- Calories: 300
- Sugar: 20 g
- Sodium: 150 mg
- Fat: 15 g
- Saturated Fat: 10 g
- Unsaturated Fat: 5 g
- Trans Fat: 0 g
- Carbohydrates: 35 g
- Fiber: 1 g
- Protein: 3 g
- Cholesterol: 40 mg
Keywords: Ensure to chill the cake for at least 8 hours for the best texture. Use a sharp knife for clean slices, and consider adding extra spices to enhance flavor.