• Skip to primary navigation
  • Skip to main content
  • Skip to primary sidebar
Homesmad

Homesmad

  • Home
  • Breakfast & Brunch
  • Appetizers & Snacks
  • Dinner
  • Dessert
  • About
  • Privacy Policy
  • Contact
Homesmad
  • Home
  • Breakfast & Brunch
  • Appetizers & Snacks
  • Dinner
  • Dessert
  • About
  • Privacy Policy
  • Contact

Christmas Cranberry Beef Meatballs: Quick & Easy Appetizer

November 23, 2025 by Lily author

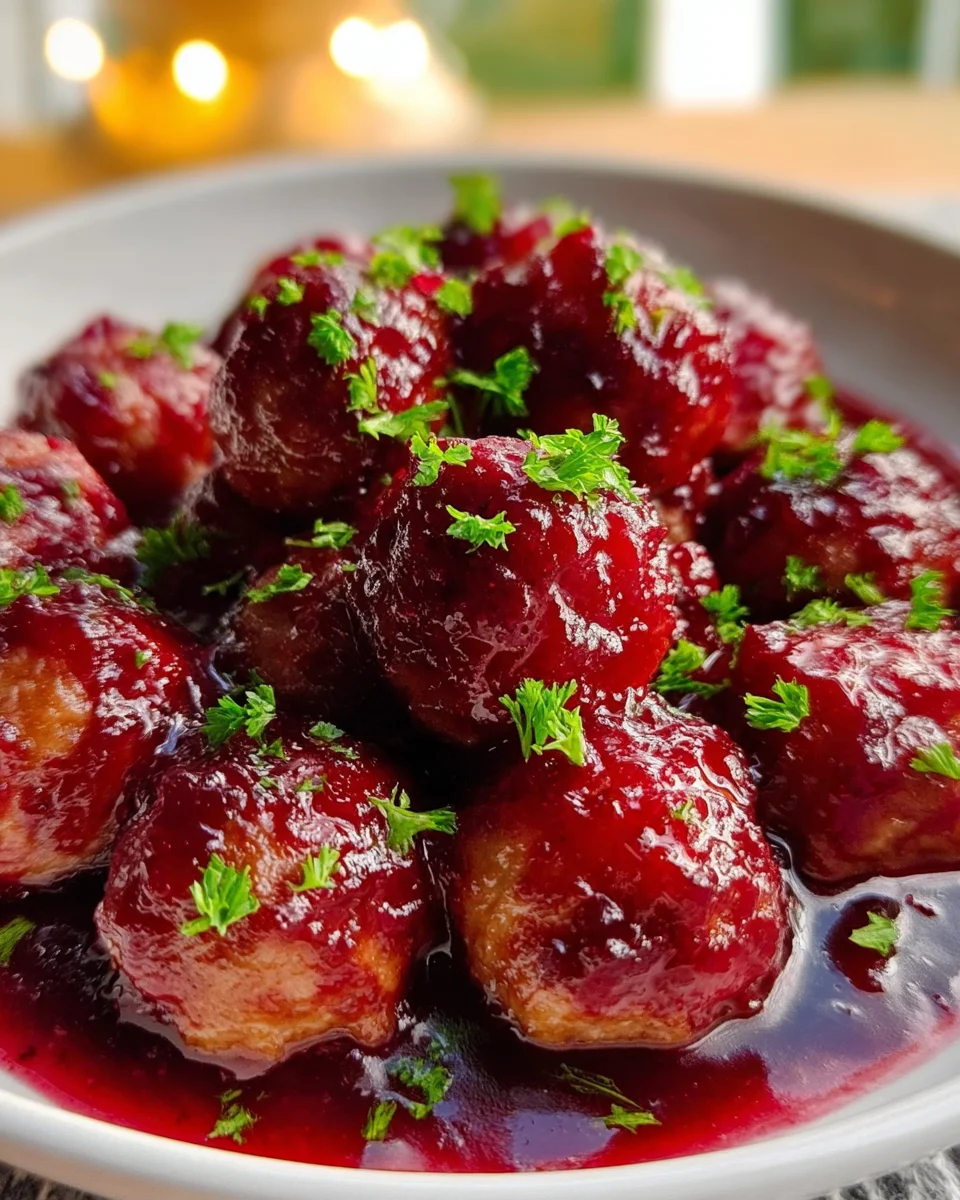
Quick Christmas Cranberry Meatballs are here to revolutionize your holiday entertaining! As the festive season approaches, I know many of us seek that perfect balance: a dish that feels undeniably special and celebratory, yet doesn’t demand hours of precious time in the kitchen. Well, look no further, because I am absolutely thrilled to share a recipe that embodies exactly that. Imagine succulent, tender meatballs bathed in a vibrant, sweet-tart cranberry glaze – it’s a symphony of flavors that simply screams ‘holiday cheer’ from the very first bite.

Why This Dish is a Holiday Must-Have!

The marriage of cranberries and Christmas is a timeless tradition, their brilliant red hue and tangy zest perfectly complementing the rich flavors of winter. Meatballs, a beloved comfort food around the globe, find their place at the holiday table as versatile appetizers, making this combination a truly festive delight. It’s a delightful fusion that brings a modern twist to classic holiday elements. People adore this dish not just for its stunning visual appeal, but for its incredible flavor profile – a delicious dance between savory meat, sweet fruit, and a hint of festive spice that makes every mouthful utterly irresistible.

I can confidently say that these Quick Christmas Cranberry Meatballs are destined to become a staple at your holiday gatherings. Their convenience means less stress for you, allowing more time to enjoy with loved ones, while their incredible taste and festive look will undoubtedly impress all your guests. Get ready to add a touch of effortless gourmet magic to your holiday spread!

Christmas Cranberry Beef Meatballs: Quick & Easy Appetizer this RECIPE

Ingredients:

Meatball Ingredients:

  • 1 ½ pounds ground meat: I usually go for a mix of ground beef (80/20 for amazing flavor) and ground pork, often in a 1:1 ratio. This blend offers richness and moisture that simply can’t be beaten for these Quick Christmas Cranberry Meatballs. If you prefer, you can use all lean ground beef, or even ground turkey or chicken for a lighter version, but you might need to add a touch more moisture (like an extra tablespoon of milk or a bit of olive oil) to keep them tender. The fat content truly contributes to the succulence of the meatballs.
  • ½ cup panko breadcrumbs: These are my absolute go-to for meatballs! Panko breadcrumbs are lighter and flakier than regular breadcrumbs, which helps create a wonderfully tender and airy meatball texture. They absorb moisture effectively without making the meatballs dense or heavy. If you only have regular breadcrumbs, they will work, but I highly recommend seeking out panko for superior results.
  • ¼ cup milk (or unsweetened almond milk): This is an essential ingredient for moistening the breadcrumbs and helping to create a tender meatball. It binds the dry ingredients without adding unwanted flavors. Any kind of milk will do, whether it’s whole, low-fat, or even a non-dairy alternative like unsweetened almond milk.
  • 1 large egg: The egg acts as a crucial binder, ensuring your meatballs hold their shape beautifully during browning and simmering in the sauce. Without it, your delicious holiday meatballs might crumble.
  • ½ cup finely chopped yellow onion: Take the time to chop this onion as finely as possible. We want the aromatic flavor to permeate the meatballs without having large, crunchy chunks. The onion also adds moisture and sweetness as it cooks.
  • 2 cloves garlic, minced: Freshly minced garlic provides an indispensable layer of savory depth and warmth. I always recommend fresh over powdered garlic for its vibrant flavor profile, especially in a dish like these festive cranberry meatballs.
  • 1 ½ teaspoons salt: Proper seasoning is vital. This amount seasons the meat from within, ensuring every bite of your meatball is flavorful. Adjust slightly based on the saltiness of any pre-mixed meat products you might be using.
  • ½ teaspoon black pepper: Freshly ground black pepper adds a delightful piquancy and aroma. It’s always superior to pre-ground pepper.
  • 1 teaspoon dried parsley flakes: This adds a subtle herbaceous note and a touch of color to the meatballs. If you have fresh parsley on hand, about 1 tablespoon, finely chopped, would be an excellent substitute.
  • 1 tablespoon olive oil: Used for browning the meatballs, which is a critical step for developing rich flavor and a lovely crust before they finish cooking in the festive cranberry sauce.

Cranberry Sauce Ingredients:

  • 1 (14-ounce) can whole berry cranberry sauce: This is the hero ingredient for the “quick” aspect of these Quick Christmas Cranberry Meatballs! Using canned sauce is a fantastic shortcut that delivers consistent, robust cranberry flavor without the fuss of making it from scratch. The whole berries add a wonderful texture to the sauce. If you have homemade cranberry sauce, about 1 ½ cups would be an excellent substitute; just ensure it’s on the sweeter side to balance the other flavors.
  • ½ cup orange juice: The bright, citrusy notes of orange juice are a classic pairing with cranberry. It lifts the flavor of the sauce, adds a lovely tang, and makes these meatballs feel even more celebratory and holiday-ready. Freshly squeezed is wonderful, but a good quality store-bought orange juice works perfectly fine.
  • ¼ cup brown sugar (packed): This adds a lovely, deep sweetness with hints of molasses that complements the tartness of the cranberries. You can adjust this amount based on your personal preference for sweetness and the inherent sweetness of your cranberry sauce. Dark brown sugar will lend a richer, more caramel-like flavor, while light brown sugar is a bit milder.
  • 2 tablespoons apple cider vinegar: Do not skip this! While it might seem counterintuitive to add vinegar to a sweet sauce, a touch of acidity is absolutely essential. It cuts through the richness of the meatballs and the sweetness of the cranberry, brightening all the flavors and preventing the sauce from tasting cloying. It creates balance and complexity.
  • 1 teaspoon Dijon mustard: This is another “secret weapon” ingredient that doesn’t make the sauce taste like mustard but adds incredible depth, a subtle tang, and acts as an emulsifier, helping to create a beautifully smooth and cohesive sauce for your Quick Christmas Cranberry Meatballs. It’s an essential flavor enhancer.
  • ½ teaspoon ground ginger: Warm, aromatic ground ginger is a fantastic spice that pairs exquisitely with cranberries and citrus, instantly evoking a festive, holiday feeling. It adds a subtle warmth without being overpowering.
  • ¼ teaspoon ground cinnamon: Just a pinch of cinnamon is all you need to infuse that quintessential holiday spice aroma and taste, making these meatballs undeniably Christmassy.
  • Pinch of cayenne pepper (optional): For those who appreciate a very subtle warmth or a tiny kick to awaken the palate, a small pinch of cayenne pepper is a wonderful addition. It won’t make the dish spicy, but it adds a nuanced layer of flavor.

Garnish (Optional):

  • Fresh parsley, chopped: A sprinkle of vibrant green parsley just before serving adds a beautiful pop of color and a fresh, herbaceous counterpoint to the rich sauce.
  • Orange zest: Finely grated orange zest provides an aromatic flourish, intensifying the citrus notes in the sauce and making the presentation even more appealing.

Preparing the Meatballs

  1. Gather Your Ingredients for the Perfect Meatball Base:

    Before embarking on the mixing process, I always advocate for having all your meatball ingredients prepped and ready. This “mise en place” approach isn’t just for fancy culinary schools; it genuinely streamlines the cooking process and prevents you from scrambling for an ingredient halfway through. In a very large mixing bowl, combine your chosen ground meat (whether it’s the beef and pork blend, all beef, or poultry), the panko breadcrumbs, milk, the large egg, the finely chopped yellow onion, minced garlic, salt, black pepper, and the dried parsley flakes. Everything should be in the bowl, poised for mixing.

  2. Mixing for Tenderness – The Key to Succulent Meatballs:

    Now, this step is crucial for achieving that wonderfully tender, juicy meatball texture. Using your impeccably clean hands, gently, yet thoroughly, mix all the ingredients together in the bowl. The absolute golden rule here is to avoid overmixing! Excessive handling develops the proteins in the meat too much, which can lead to tough, rubbery meatballs – the opposite of what we want for our delectable Quick Christmas Cranberry Meatballs. Mix just until all the ingredients are uniformly combined, and you no longer see isolated pockets of any single ingredient. The mixture should be cohesive but not sticky or pasty. This usually takes no more than 1 to 2 minutes of light, gentle kneading. Stop as soon as it’s combined.

  3. Forming Your Festive Meatballs:

    Once your meat mixture is perfectly combined, it’s time to shape your meatballs. For an appetizer, I typically aim for meatballs that are about 1 to 1 ½ inches in diameter. This size is ideal for popping into your mouth without needing a knife and fork, making them perfect for parties and holiday gatherings. It also ensures they cook through evenly and relatively quickly. You can use a small cookie scoop for uniformity, or simply roll them between the palms of your hands. Don’t stress too much about them being absolutely identical; a little homemade charm is always welcome. As you roll them, place them gently on a clean plate or a baking sheet. From this quantity of mixture, you should yield approximately 30 to 36 beautifully shaped meatballs, ready for the next stage.

  4. Browning for Flavor and Texture:

    Heat the olive oil in a large, heavy-bottomed skillet or a Dutch oven over medium-high heat. You’ll know it’s ready when the oil is shimmering slightly. Carefully add the meatballs to the hot skillet in a single layer. It is incredibly important not to overcrowd the pan! If you put too many meatballs in at once, the temperature of the pan will drop, and instead of browning beautifully, they will steam, resulting in a pale, less flavorful exterior. You will almost certainly need to work in 2 or 3 batches to achieve that desirable golden-brown crust. Turn the meatballs gently with tongs, browning them on all sides until they develop a rich, appetizing color. This browning step is absolutely vital for developing deep, complex flavors and for creating a slight crust that helps them hold their shape better during simmering. It usually takes about 5 to 7 minutes per batch. Once browned, remove the meatballs from the skillet and set them aside on a clean plate. Remember, they don’t need to be cooked through at this point; they will finish cooking to perfection in the delicious cranberry sauce.

Crafting the Quick Cranberry Sauce

  1. Building the Flavor Foundation:

    After all your meatballs are beautifully browned and resting comfortably on the side, you’ll notice a delightful residue of browned bits, known as “fond,” clinging to the bottom of your skillet. Do not discard these! These are concentrated pockets of flavor that will contribute immense depth to your cranberry sauce. Reduce the heat under the skillet to medium-low. Now, add all the cranberry sauce ingredients to the same skillet: the canned whole berry cranberry sauce, orange juice, brown sugar, apple cider vinegar, Dijon mustard, ground ginger, and ground cinnamon. If you’ve opted for it, now is also the time to add that subtle pinch of cayenne pepper.

  2. Simmering to Perfection:

    Stir all the sauce ingredients together thoroughly with a whisk or spoon until they are well combined and the brown sugar has completely dissolved. Bring the mixture to a gentle simmer, stirring occasionally to prevent any sticking. Allow it to simmer gently for about 5 to 7 minutes. This simmering period serves multiple important functions: it allows all the distinct flavors to meld harmoniously, helps the sauce to thicken ever so slightly to a perfect coating consistency, and ensures that any initial raw edge from the vinegar or mustard mellows out. You’ll notice the sauce becoming incredibly fragrant and developing a beautiful, glossy sheen. This is your moment to taste the sauce and adjust the seasonings if needed. Does it require a touch more sweetness? Perhaps a little extra tang from more orange juice or vinegar? Customize it to your liking, keeping in mind that the flavors will further deepen and concentrate once the meatballs are reintroduced.

Bringing It All Together & Cooking

  1. A Merry Reunion:

    Once your cranberry sauce has simmered and achieved its delightful consistency, it’s time for the stars of the show to return! Carefully, and gently, return all the browned meatballs to the skillet, nestling them comfortably into the simmering cranberry sauce. Ensure that they are mostly submerged in the sauce, or at the very least, thoroughly coated. If, for any reason, your sauce appears too thick to generously coat the meatballs, you can easily thin it down by adding a tablespoon or two of water or chicken broth until you reach your preferred consistency.

  2. Gentle Simmering for Deep Flavor and Doneness:

    Reduce the heat to low, cover the skillet with a lid, and allow your Quick Christmas Cranberry Meatballs to simmer gently for 15 to 20 minutes. This slow, gentle simmering period is absolutely crucial. It allows the meatballs to finish cooking through completely, transforming them into incredibly tender and juicy morsels. Simultaneously, they will absorb all the wonderful, festive flavors from the rich cranberry sauce, becoming infused with its sweet, tangy, and spiced goodness. The sauce itself will further thicken and become even more lusciously rich as it slowly cooks. I like to give them a very gentle stir once or twice during this period to ensure every meatball is evenly coated and cooks perfectly. You’ll know they are perfectly done when the internal temperature of the meatballs reaches 160°F (71°C) for ground pork or beef, or 165°F (74°C) for ground poultry, and the sauce is beautifully thick, clinging invitingly to each meatball.

  3. A Moment to Rest and Reflect:

    Once your meatballs are cooked to perfection, remove the skillet from the heat. I wholeheartedly recommend letting the meatballs rest in the sauce, still covered, for about 5 to 10 minutes before serving. This brief, but important, resting period allows the juices within the meatballs to redistribute, ensuring they are at their absolute most tender and flavorful. It also gives all the incredible flavors in the sauce one last chance to fully meld and deepen, resulting in a more cohesive and delicious dish. It’s a small step that makes a significant difference to the overall enjoyment of your homemade holiday meatballs.

Serving Your Quick Christmas Cranberry Meatballs

  1. Garnish and Presentation:

    Just before you bring these delightful Quick Christmas Cranberry Meatballs to the table, give them a final flourish! Sprinkle generously with freshly chopped parsley. The vibrant green not only adds a beautiful pop of color that contrasts wonderfully with the rich red sauce but also provides a fresh, herbaceous note that brightens the entire dish. If you have some fresh oranges on hand, a little finely grated orange zest scattered over the top will further elevate the aroma and presentation, truly highlighting the bright citrus notes already present in the sauce. These meatballs are not just a treat for the palate, but a visual feast too!

  2. Serving Suggestions for Any Occasion:

    These festive meatballs are incredibly versatile and can be enjoyed in a multitude of ways, making them perfect for any holiday gathering or a cozy family meal.

    • As an Appetizer Extravaganza: The most popular way to serve these is undoubtedly as a show-stopping appetizer. Arrange them beautifully on a platter, keeping them warm in a small slow cooker on a buffet table, and provide plenty of toothpicks. They are always the first thing to disappear at holiday parties and potlucks!
    • Over Rice or Egg Noodles for a Hearty Meal: For a comforting and satisfying dinner, spoon the meatballs and their luscious cranberry sauce generously over a bed of fluffy white rice, nutty brown rice, or wide egg noodles. The rich sauce coats the grains or pasta beautifully, creating a complete and balanced meal.
    • With Creamy Mashed Potatoes: The sweet, tangy, and savory sauce is absolutely divine when served alongside a mound of creamy mashed potatoes. The potatoes provide a wonderful canvas for the sauce, soaking up every drop of its incredible flavor. This is a classic comfort food pairing that never disappoints.
    • Delicious Mini Meatball Sliders: Get creative and make delightful mini meatball sliders! Place one or two of these festive meatballs on small dinner rolls. For an extra layer of decadence, you could add a thin slice of provolone cheese, a dollop of cream cheese, or a sprinkle of crumbled goat cheese.
    • Alongside Roasted Vegetables: For a healthier but equally delicious option, these meatballs pair beautifully with a variety of roasted vegetables such as tender roasted Brussels sprouts, crisp green beans, or sweet glazed carrots. This makes for a well-rounded and visually appealing plate.
  3. Make-Ahead and Storage Tips for Holiday Ease:

    One of the many wonderful qualities of these Quick Christmas Cranberry Meatballs is how exceptionally well they can be prepared in advance. This feature is an absolute lifesaver, especially during the often-hectic holiday season, allowing you to focus on other aspects of your entertaining.

    • Refrigeration: If you find yourself with any delicious leftovers (which is a rare occurrence!), they can be stored safely in an airtight container in the refrigerator for up to 3 to 4 days. In fact, many people, myself included, find that the flavors actually deepen and meld even more beautifully overnight, making them taste even better the next day!
    • Freezing for Future Feasts: This recipe freezes like an absolute dream. Once the meatballs are fully cooked and completely cooled down to room temperature, transfer them along with their glorious cranberry sauce to a freezer-safe container or robust, heavy-duty freezer bags. Ensure you leave a little headspace if using containers, as liquids expand when frozen. They will maintain their excellent quality in the freezer for up to 3 months, making them perfect for future spontaneous gatherings or quick weeknight meals. To reheat, simply thaw them overnight in the refrigerator and then gently warm them on the stovetop over low heat, stirring occasionally, or reheat them in a microwave-safe dish. You might find it beneficial to add a splash of water or chicken broth during reheating to help loosen the sauce and restore its original consistency.
    • Slow Cooker Method for Effortless Entertaining: For entertaining, especially for larger gatherings, leveraging your slow cooker is a game-changer. After you’ve completed the steps of browning the meatballs and preparing the sauce as directed, combine them both in your slow cooker. Set it to cook on low for 2 to 3 hours or on high for 1 to 1.5 hours, just until the meatballs are thoroughly heated through and the sauce is gently bubbling. This method is my personal favorite for parties because it frees up valuable stovetop space and keeps the meatballs perfectly warm and inviting for hours, allowing your guests to help themselves whenever they please. It truly simplifies holiday hosting!

    No matter how you choose to prepare or present them, these Quick Christmas Cranberry Meatballs are guaranteed to be a resounding success. They beautifully embody the festive spirit with their vibrant colors, inviting aromas, and comforting sweet-and-savory flavors, making them an absolutely perfect and eagerly anticipated addition to any holiday table or a cozy family dinner. Enjoy every step of creating and sharing this truly delightful dish!

    Christmas Cranberry Beef Meatballs: Quick & Easy Appetizer

    Conclusion:

    Well, my friends, we’ve journeyed through the simple steps of creating something truly special, and I sincerely hope you’re as excited as I am about the prospect of these incredible morsels gracing your table. This isn’t just another recipe; it’s an invitation to elevate your holiday gatherings, weeknight dinners, or casual get-togethers with minimal fuss and maximum flavor. I genuinely believe that once you experience the delightful burst of sweet-tart cranberries perfectly complementing tender, savory meatballs, you’ll understand why I’m so passionate about this dish. It’s the kind of recipe that consistently earns rave reviews, leaving everyone wondering about your secret, and the best part is, it’s incredibly easy to achieve. We’re talking about a dish that perfectly embodies the spirit of festive feasting without demanding hours in the kitchen, making it an absolute game-changer for busy hosts and home cooks alike. The balance of flavors is truly exceptional – that rich, tangy cranberry glaze clinging to every surface of the succulent meatballs is simply irresistible. This is precisely why our Quick Christmas Cranberry Meatballs are, without a doubt, a must-try for anyone looking to add a touch of effortless elegance and festive cheer to their culinary repertoire.

    The beauty of this recipe lies not just in its incredible taste, but also in its unparalleled versatility and user-friendliness. From the moment you start mixing the ingredients to the final simmering of that gorgeous sauce, you’ll appreciate how straightforward and forgiving the process is. There’s a comforting familiarity to the aroma that will fill your kitchen, promising warmth and deliciousness. Imagine serving these at your next holiday party – they disappear almost as quickly as you can put them out! They offer that perfect blend of gourmet appeal and comforting homeliness, striking a balance that’s often hard to find. Whether you’re a seasoned chef or just starting your culinary adventures, this recipe provides a foolproof path to impressing your guests and delighting your family. It’s a guaranteed crowd-pleaser that delivers on all fronts: flavor, ease, and a beautiful presentation that’s just begging to be devoured. Trust me, the sheer joy of watching friends and family enjoy these is a reward in itself, and it all starts with those simple ingredients and a little bit of love.

    Serving Suggestions That Sparkle

    Now, let’s talk about how you can best present and enjoy these delightful morsels. While they shine brightest as a festive appetizer, speared with elegant toothpicks for easy grabbing, their potential extends far beyond the hors d’oeuvre platter. For a more substantial offering, consider serving them as a main course over a bed of fluffy white rice, creamy mashed potatoes, or even alongside some egg noodles to soak up every last drop of that incredible cranberry sauce. Imagine them as the star of a hearty weeknight dinner, paired with a simple green salad for a balanced and satisfying meal. They also make an absolutely fantastic addition to any holiday buffet or potluck – prepare to be asked for the recipe repeatedly! For a casual gathering, pile them high in a beautiful serving bowl, perhaps with a sprig of fresh rosemary or a sprinkle of chopped parsley for a pop of color, allowing guests to serve themselves. Don’t forget about brunch! Yes, they can even make a surprising and delightful appearance at a holiday brunch spread, offering a savory contrast to sweeter pastries and fruits. The possibilities are truly endless, and each serving method highlights a different facet of their charm.

    Unleash Your Creativity: Wonderful Variations

    One of the things I adore most about this recipe is its adaptability. It’s a fantastic base that invites you to play and personalize. If you’re looking to switch things up, consider varying the type of meat you use. While ground beef is classic, a blend of beef and pork can add an extra layer of richness, or you could opt for ground turkey or chicken for a lighter touch – just be mindful that leaner meats might require a touch more moisture or a shorter cooking time to prevent drying out. For my vegetarian and vegan friends, this recipe is incredibly adaptable! Simply swap the meat for a plant-based ground substitute, and ensure your cranberry sauce ingredients are vegan-friendly. The results are still wonderfully flavorful and satisfying.

    Don’t stop there with the meatballs themselves. You can infuse them with different herbs and spices – a pinch of ground ginger or allspice can really lean into that festive holiday flavor profile, while a tiny dash of red pepper flakes could introduce a subtle warmth and kick. Try adding finely minced onion or garlic directly into the meatball mixture for an extra layer of savory depth. You can also experiment with the cranberry sauce. While the core recipe is perfect as is, you could sweeten it a little more with brown sugar or maple syrup, or add a splash of orange zest for a brighter, more citrusy note. For a different fruit profile entirely, consider using cherry preserves or apricot jam for a non-Christmas version; the sweet-tart dynamic remains captivating. Some folks even like to add a tiny splash of balsamic vinegar or Worcestershire sauce to the sauce for an extra umami punch. These simple tweaks allow you to tailor the dish perfectly to your preferences or to suit different occasions throughout the year.

    Your Turn to Shine!

    So, there you have it – my heartfelt endorsement and detailed guide to making these utterly irresistible meatballs. I cannot stress enough how much joy and culinary satisfaction you’ll gain from giving this recipe a try. It’s more than just food; it’s about creating delicious memories, sharing warmth, and bringing people together around a fantastic meal or appetizer. Whether you’re preparing for a grand holiday feast, a casual family dinner, or simply looking for an easy yet impressive dish to bring to a potluck, these Quick Christmas Cranberry Meatballs will not disappoint. They offer a beautiful balance of sweet, savory, and tangy, all wrapped up in a bite-sized package that’s both elegant and comforting.

    I truly encourage you to step into your kitchen and whip up a batch (or two!) of these delightful morsels. You’ll be amazed at how simple they are to make and how wonderfully flavorful they turn out. And when you do, please, please share your experience with me! I absolutely adore hearing about your culinary adventures. Did you try a fun variation? Did your guests rave about them? Snap a photo, drop a comment, or simply tell me how much you enjoyed them. Your feedback and creativity inspire me and others in our cooking community. Let’s make this holiday season, and every season, a little bit more delicious, one incredible meatball at a time. Happy cooking, and bon appétit!


    Quick Christmas Cranberry Beef Meatballs

    Revolutionize your holiday entertaining with these Quick Christmas Cranberry Beef Meatballs! Succulent, tender meatballs bathed in a vibrant, sweet-tart cranberry glaze – a symphony of flavors that screams ‘holiday cheer’ from the first bite.

    Prep Time
    25 Minutes
    Cook Time
    42 Minutes
    Total Time
    15 Minutes
    Servings
    30-36 meatballs

    Ingredients


    Instructions


    Important Information

    Nutrition Facts (Per Serving)

    It is important to consider this information as approximate and not to use it as definitive health advice.

    Allergy Information

    Please check ingredients for potential allergens and consult a health professional if in doubt.

« Previous Post
Cod & Potatoes in Rosemary Cream Sauce: Dinner Delight!
Next Post »
Heaven On Earth Cake: Quick No Bake Recipe for Easy Dessert

If you enjoyed this…

Grilled Shrimp Kabobs: The Ultimate Summer Recipe

Garlic Bread Pull Apart: The Ultimate Recipe for a Deliciously Cheesy Treat

Whipped Feta Honey: The Sweet & Savory Delight You Need

Primary Sidebar

Browse by Diet

BreakfastDinnerLunchDessertAppetizer

Sweet Peach Yogurt Parfait Delight

One of my fondest memories is from a lazy summer afternoon spent at my grandmother’s house. The sun filtered through the kitchen window, casting a warm glow over the table where she would create her culinary magic. It was during one of those blissful moments that I first tasted her Peach Yogurt Parfait with Honey and Granola. The sweet aroma of ripe peaches mingling with creamy yogurt and the crunch of granola was nothing short of heavenly. It felt like summer captured in a bowl, and I still remember the joy of diving in with a spoon, each layer revealing a new burst of flavor.

When I think about that parfait, I can almost hear the gentle hum of the bees outside, reminding me of the floral notes that honey brings to every bite. The vibrant yellows and soft oranges of the peaches contrast beautifully with the creamy white yogurt and the golden crunch of granola. It’s a dish that not only looks delightful but also tastes like a celebration of fresh, wholesome ingredients.

What makes my version of this Peach Yogurt Parfait special is the careful balance of flavors and textures. I use ripe, juicy peaches, drizzled with locally sourced honey, and a homemade granola that’s bursting with nuts and seeds for an extra crunch. It’s a simple dish, but every layer is crafted with love and attention.

Let me show you exactly how to make this delightful parfait, so you can bring a bit of that summer magic into your kitchen!

Sweet Peach Yogurt Parfait Delight

Why You’ll Love This Recipe

  • Delightfully creamy texture from the Greek yogurt, paired with the juicy sweetness of fresh peaches.
  • Ready in under 20 minutes, making it a quick and satisfying breakfast or snack option.
  • Budget-friendly, using common ingredients that you may already have in your pantry.
  • Customizable with your favorite granola and nuts, allowing you to tailor each parfait to your taste.
  • Perfectly balanced flavors with the bright acidity of lemon juice and the sweetness of honey enhancing the peaches.

Ingredients

  • For the Parfait:
  • 2 cups plain Greek yogurt (or vanilla yogurt for a sweeter option)
  • 2 large ripe peaches, diced (about 2 cups)
  • 1 tablespoon fresh lemon juice (to prevent browning of peaches)
  • 2 tablespoons honey (plus more for drizzling)
  • 1 teaspoon vanilla extract (optional for extra flavor)
  • For the Granola:
  • 1 cup granola (store-bought or homemade; see notes for a simple granola recipe)
  • 1/4 cup sliced almonds (optional for added crunch)
  • 1/4 cup shredded coconut (optional for added flavor)

Let’s dive into some key ingredients that make this Peach Yogurt Parfait so delightful! First, the Greek yogurt is not only creamy but also packed with protein, making it a satisfying option for breakfast or a snack. If you’re looking for a sweeter option, you can easily substitute it with vanilla yogurt, though it may alter the overall flavor balance. Next, the ripe peaches are the star of the show; their natural sweetness shines through, so I recommend choosing peaches that yield slightly to pressure, indicating they’re perfectly ripe. If peaches aren’t in season, feel free to use nectarines or even frozen peaches—just thaw them before use. Finally, honey adds a lovely floral sweetness that ties everything together. If you prefer, maple syrup can serve as a delicious substitute.

Step-by-Step Instructions

  1. Start by preparing the peaches. Wash them thoroughly, then slice and dice them into bite-sized pieces. In a medium bowl, toss the diced peaches with 1 tablespoon of fresh lemon juice to prevent browning. Set aside for about 5 minutes while the lemon juice works its magic.
  2. In a separate bowl, combine the Greek yogurt, 2 tablespoons of honey, and 1 teaspoon of vanilla extract if using. Stir the mixture until smooth and thoroughly blended. This should take about a minute. Avoid overmixing to maintain the creaminess of the yogurt.
  3. Now it’s time to layer your parfait. Grab a clear glass or bowl to showcase your beautiful creation. Start with a generous spoonful of the yogurt mixture at the bottom—about 1/4 cup will do. Use a spoon to spread it evenly.
  4. Add a layer of the diced peaches over the yogurt, ensuring they cover the yogurt completely. You might want to use about half of what you have prepared—roughly 1 cup. This layer should be visually appealing, so arrange the peaches neatly.
  5. Sprinkle 1/4 cup of granola over the peaches. This adds a delightful crunch. Make sure to distribute it evenly to ensure every bite has that satisfying texture. Avoid packing it down too tightly, as you want it to maintain its crunch.
  6. Repeat the layers: spoon in another 1/4 cup of yogurt, followed by another cup of peaches, and another sprinkle of granola. You should have at least two layers, but feel free to add more depending on your glass size.
  7. Finish off your parfait with a drizzle of honey on top for added sweetness and a touch of elegance. If you’re using sliced almonds or shredded coconut, sprinkle them on top now. It adds a lovely visual contrast and extra flavor.
  8. Serve immediately or refrigerate for up to 30 minutes before serving to allow the flavors to meld together. However, I recommend enjoying it fresh to maintain the granola’s crunch.

Pro Tips for the Best Peach Yogurt Parfait With Honey And Granola

  • Make sure to choose ripe peaches for the best flavor and texture. A common mistake is using unripe fruit, which can lead to a less enjoyable parfait. Look for peaches that are fragrant and slightly soft to the touch.
  • Use a clear glass to assemble your parfait; this not only makes for a beautiful presentation but also allows you to see the colorful layers, which adds to the enjoyment of eating it.
  • For an even creamier texture, consider whipping the Greek yogurt with a hand mixer for a couple of minutes before layering. This small adjustment makes a huge difference in mouthfeel.
  • Be mindful of the granola-to-yogurt ratio. Too much granola can overwhelm the parfait, while too little can make it feel too creamy. Aim for about 1/4 cup of granola per layer for the perfect balance.
  • If you’re making this for a gathering, consider preparing the yogurt and peaches ahead of time and layering them just before serving. This ensures the granola stays crunchy!

Variations & Serving Ideas

There are so many ways to get creative with your Peach Yogurt Parfait! For a tropical twist, swap out the peaches for mangoes or pineapples and top with coconut flakes. If you prefer a berry flavor, mix in some blueberries or strawberries with the peaches for added color and taste. For a nutty version, incorporate chopped walnuts or pecans instead of almonds.

As for serving ideas, this parfait pairs beautifully with a side of scrambled eggs for a hearty breakfast or fresh fruit salad for a light lunch. You might also enjoy it alongside whole grain toast with almond butter for an energizing snack. The contrast of flavors and textures will elevate your meal experience!

Storage, Make-Ahead & Reheating

The Peach Yogurt Parfait is best enjoyed fresh, but you can prepare some components ahead of time. Store the layered parfait in an airtight container in the refrigerator for up to 24 hours. However, be cautious; the granola may lose its crunch if stored too long. You can freeze the yogurt and peach mixture for up to 2 months; just remember to thaw it in the refrigerator overnight before serving.

If you plan to enjoy this dish the next day, it can taste even better as the flavors meld together. Just remember to add the granola right before serving to keep its delightful crunch!

Frequently Asked Questions

Can I make Peach Yogurt Parfait With Honey And Granola ahead of time?

Yes — in fact, it tastes even better the next day as the flavors meld. However, I recommend waiting to add the granola until just before serving to maintain its crunch.

What can I substitute for Greek yogurt?

If you prefer a lighter option, you can substitute Greek yogurt with regular yogurt or a dairy-free alternative like coconut yogurt. Just remember that this may alter the creaminess and flavor profile slightly.

Can I use frozen peaches for this parfait?

Absolutely! Just make sure to thaw the frozen peaches before using them. They will still add great flavor, though the texture may be slightly softer than fresh peaches.

How do I make the parfait vegan?

To make a vegan version, substitute the Greek yogurt with a plant-based yogurt alternative, and replace honey with maple syrup or agave nectar. This keeps the parfait sweet while adhering to a vegan diet.

What other fruits can I use in this recipe?

You can mix and match fruits based on your preference. Try using strawberries, blueberries, raspberries, or even bananas. Just make sure to adjust the lemon juice as needed to prevent browning.

Sweet Peach Yogurt Parfait Delight

Final Thoughts

The Peach Yogurt Parfait with Honey and Granola is a delightful blend of creamy yogurt, sweet peaches, and crunchy granola that creates a satisfying and nourishing treat. Each layer bursts with flavor, making it a perfect choice for breakfast or a light dessert.

This is the kind of recipe I come back to again and again, especially when I want something refreshing and wholesome to start my day. The harmony of sweet and tart flavors, combined with the delightful crunch, never fails to lift my spirits!

I encourage you to give this parfait a try and indulge in its comforting goodness. Feel free to share your results or even add your own twist—perhaps a sprinkle of cinnamon or a handful of nuts. Enjoy creating your perfect parfait!

Print
clock clock iconcutlery cutlery iconflag flag iconfolder folder iconinstagram instagram iconpinterest pinterest iconfacebook facebook iconprint print iconsquares squares iconheart heart iconheart solid heart solid icon

Peach Yogurt Parfait


  • Author: Lily author
  • Total Time: 15 minutes
  • Yield: 4 servings 1x
Pin Recipe
Print Recipe

Description

This Peach Yogurt Parfait combines creamy Greek yogurt, juicy peaches, and crunchy granola for a delightful treat. It’s a perfect breakfast or snack that captures the essence of summer in every bite.


Ingredients

Scale
  • For the Parfait:
  • 2 cups plain Greek yogurt (or vanilla yogurt for a sweeter option)
  • 2 large ripe peaches, diced (about 2 cups)
  • 1 tablespoon fresh lemon juice (to prevent browning of peaches)
  • 2 tablespoons honey (plus more for drizzling)
  • 1 teaspoon vanilla extract (optional for extra flavor)
  • For the Granola:
  • 1 cup granola (store-bought or homemade; see notes for a simple granola recipe)
  • 1/4 cup sliced almonds (optional for added crunch)
  • 1/4 cup shredded coconut (optional for added flavor)

Instructions

  1. Start by preparing the peaches. Wash them thoroughly, then slice and dice them into bite-sized pieces. In a medium bowl, toss the diced peaches with 1 tablespoon of fresh lemon juice to prevent browning. Set aside for about 5 minutes while the lemon juice works its magic.
  2. In a separate bowl, combine the Greek yogurt, 2 tablespoons of honey, and 1 teaspoon of vanilla extract if using. Stir the mixture until smooth and thoroughly blended. This should take about a minute. Avoid overmixing to maintain the creaminess of the yogurt.
  3. Now it’s time to layer your parfait. Grab a clear glass or bowl to showcase your beautiful creation. Start with a generous spoonful of the yogurt mixture at the bottom—about 1/4 cup will do. Use a spoon to spread it evenly.
  4. Add a layer of the diced peaches over the yogurt, ensuring they cover the yogurt completely. You might want to use about half of what you have prepared—roughly 1 cup. This layer should be visually appealing, so arrange the peaches neatly.
  5. Sprinkle 1/4 cup of granola over the peaches. This adds a delightful crunch. Make sure to distribute it evenly to ensure every bite has that satisfying texture. Avoid packing it down too tightly, as you want it to maintain its crunch.
  6. Repeat the layers: spoon in another 1/4 cup of yogurt, followed by another cup of peaches, and another sprinkle of granola. You should have at least two layers, but feel free to add more depending on your glass size.
  7. Finish off your parfait with a drizzle of honey on top for added sweetness and a touch of elegance. If you’re using sliced almonds or shredded coconut, sprinkle them on top now. It adds a lovely visual contrast and extra flavor.
  8. Serve immediately or refrigerate for up to 30 minutes before serving to allow the flavors to meld together. However, I recommend enjoying it fresh to maintain the granola’s crunch.
  • Prep Time: 15 mins
  • Cook Time: 0 mins
  • Category: Breakfast
  • Method: No-cook
  • Cuisine: American

Nutrition

  • Serving Size: 1 parfait
  • Calories: 250
  • Sugar: 20 g
  • Sodium: 50 mg
  • Fat: 5 g
  • Saturated Fat: 2 g
  • Unsaturated Fat: 3 g
  • Trans Fat: 0 g
  • Carbohydrates: 40 g
  • Fiber: 3 g
  • Protein: 10 g
  • Cholesterol: 10 mg

Keywords: Choose ripe peaches for the best flavor and texture. Use a clear glass for a beautiful presentation. For creaminess, consider whipping the yogurt before layering. Be mindful of the granola-to-yogurt ratio. Prepare yogurt and peaches ahead of time for gatherings, layering just before serving.

Did you make this recipe?

Share a photo and tag us — we can't wait to see what you've made!

Sun-Kissed Frozen Orange Cream Slush

As a child, summer days felt like they lasted forever. I remember the sticky heat wrapping around me as I played outside, my laughter mingling with the sounds of the neighborhood. But nothing could cool me down quite like the moment I’d spot my grandmother, laboring over her blender, whipping up her famous Frozen Orange Creamsicle Slush. That vibrant orange treat, with its frosty texture and sweet citrus aroma, was like a burst of sunshine in a cup. Just one sip, and I could feel the coolness wash over me, sparking pure joy.

This Frozen Orange Creamsicle Slush has a way of making you feel like a kid again. Its creamy, dreamy consistency is a delightful balance of bright orange and soft vanilla, inviting you to dive right in. The refreshing tang of orange dances on your tongue, while the smooth creaminess envelops you in a comforting embrace. It’s a nostalgic treat that’s perfect for hot summer afternoons or anytime you need a little pick-me-up.

What makes my version of this slush stand out is the addition of a hint of vanilla bean, which elevates the flavor and adds an extra layer of richness. Plus, it’s super easy to whip up with just a few simple ingredients that you probably already have on hand! So, if you’re ready to relive those sun-soaked memories, let me show you exactly how to make it.

Sun-Kissed Frozen Orange Cream Slush

Why You’ll Love This Recipe

  • Each slush is a perfect blend of creamy vanilla and zesty orange, creating a nostalgic flavor reminiscent of summer days.
  • This refreshing treat is ready in under 15 minutes, making it an ideal quick dessert for unexpected guests or hot afternoons.
  • With just 8 simple ingredients, it’s budget-friendly, ensuring you don’t have to break the bank to enjoy a delicious slush.
  • The slush has a perfectly smooth texture, thanks to the combination of ice and ice cream, providing a delightful contrast to the bright citrus flavors.
  • It’s highly customizable; you can easily adjust the sweetness and add fresh herbs for a unique twist that suits your taste.

Ingredients

  • 2 cups orange juice (freshly squeezed or store-bought)
  • 1 cup vanilla ice cream
  • 1 cup crushed ice
  • 1/2 cup milk (whole or 2%)
  • 1/4 cup granulated sugar (adjust based on sweetness preference)
  • 1 teaspoon vanilla extract
  • Zest of 1 orange (for added flavor)
  • Fresh orange slices and mint leaves (for garnish)

The star of this Frozen Orange Creamsicle Slush is the orange juice, which provides the vibrant, citrusy base. Freshly squeezed juice will yield the brightest flavor, but store-bought options can be just as convenient. If you’re opting for store-bought, choose 100% pure juice with no added sugars for the best results. Another essential ingredient is the vanilla ice cream; it adds creaminess and sweetness. You can substitute it with dairy-free ice cream if you’re looking for a vegan option. Whole or 2% milk complements the ice cream, creating a smooth blend. If you want a lower-calorie version, almond or oat milk can be good alternatives.

Lastly, the granulated sugar can be adjusted based on your sweetness preference. If you prefer a more natural sweetener, consider using honey or agave syrup. The orange zest enhances the flavor profile, providing an aromatic pop that brings the whole slush together. Don’t skip it! It adds an extra layer of brightness that makes this slush truly special.

Step-by-Step Instructions

  1. Start by preparing your ingredients. Gather 2 cups of orange juice, 1 cup of vanilla ice cream, and 1 cup of crushed ice. Make sure the ice is finely crushed, as larger chunks can make blending difficult.
  2. In a blender, combine the orange juice, vanilla ice cream, crushed ice, and 1/2 cup of milk. Add 1/4 cup of granulated sugar and 1 teaspoon of vanilla extract. If you like a sweeter slush, consider adding a bit more sugar at this stage.
  3. Add the zest of 1 orange to the blender. This step is crucial for enhancing the citrus flavor of your slush. Make sure not to include the bitter white pith—only the flavorful zest.
  4. Blend the mixture on medium-high speed for about 30-45 seconds. Stop once the ingredients are fully combined and the slush has a smooth, even consistency. If you notice large chunks of ice, blend for an additional 10-15 seconds. Avoid over-blending, as this can make the slush too liquidy.
  5. Once blended, taste the slush. If it needs more sweetness, add a little more sugar and blend for a few more seconds. If it’s too thick, you can add a splash of milk to reach your desired consistency.
  6. Pour the slush into glasses. This recipe typically serves 4, but you can easily double it for larger gatherings. Use a spoon to help guide the slush into the glasses if needed.
  7. Garnish each serving with fresh orange slices and mint leaves. The mint not only adds a pop of color but also a refreshing aroma that complements the citrus flavors beautifully.
  8. Serve immediately and enjoy! If you’ve made extra, you can refrigerate it for a short time, but it’s best enjoyed fresh.

Pro Tips for the Best Frozen Orange Creamsicle Slush

  • Don’t skip the orange zest! It’s a game-changer for flavor. Always zest before juicing to make it easier.
  • Use a high-powered blender for the best texture. A standard blender may struggle with ice, leading to uneven consistency. If you have a food processor, that can work too, but ensure the ice is finely crushed.
  • Adjust the ice-to-liquid ratio carefully. If your slush is too thick, it won’t blend well. Start with less ice and add more until you reach your preferred texture.
  • Be cautious with the sugar! Always start with the lower amount, as you can easily add more, but it’s hard to fix an overly sweet slush.
  • For a fun twist, consider adding a splash of coconut milk or a handful of fresh fruit like strawberries or pineapple. This not only enhances the flavor but also adds a beautiful color contrast.

Variations & Serving Ideas

There are countless ways to put a spin on your Frozen Orange Creamsicle Slush. Consider making a tropical version by adding in some pineapple juice or coconut milk for a delightful tropical twist. If you’re feeling adventurous, try incorporating a handful of frozen mango or peach slices for added sweetness. For a lighter version, swap out the vanilla ice cream for Greek yogurt for a creamy yet tangy alternative.

As for serving ideas, this refreshing slush pairs wonderfully with light summer dishes like grilled chicken skewers, fish tacos, or a simple salad topped with citrus vinaigrette. The bright, zesty flavors of the slush complement these dishes perfectly, making them an ideal pairing for a sunny day.

Storage, Make-Ahead & Reheating

This Frozen Orange Creamsicle Slush is best enjoyed fresh, but if you have leftovers, you can store them in an airtight container in the fridge for up to 2 days. Just keep in mind that the slush may lose some of its texture over time as the ice melts. It doesn’t freeze well, as the ice will turn into a solid block. If you must freeze it, blend again after thawing to restore the slushy consistency. This treat is best the day you make it, as the flavors meld together beautifully overnight, enhancing its deliciousness.

Frequently Asked Questions

Can I make Frozen Orange Creamsicle Slush ahead of time?

Yes — in fact, it tastes even better the next day as the flavors meld. However, it’s best to enjoy it fresh, as the texture can change if stored for too long. If you need to prepare it ahead, keep it in the fridge and re-blend before serving.

What kind of orange juice should I use?

For the best flavor, use freshly squeezed orange juice. However, if you’re short on time, opt for 100% pure store-bought juice without added sugars. This will ensure that your slush remains flavorful and refreshing.

Can I substitute the vanilla ice cream?

Absolutely! If you’re looking for a dairy-free option, coconut milk ice cream or a non-dairy vanilla ice cream can work wonderfully. They will still provide the creamy texture and sweetness you desire.

How can I adjust the sweetness of my slush?

You can easily adjust the sweetness by modifying the amount of sugar added. Start with 1/4 cup and taste the mixture before blending. If you prefer it sweeter, add more sugar gradually until it reaches your desired level.

What should I do if my slush is too thick?

If your slush is too thick, simply add a splash of milk or orange juice and blend again. This will help achieve a more drinkable consistency while maintaining the slushy texture. Adjust gradually to reach your preferred thickness.

Sun-Kissed Frozen Orange Cream Slush

Final Thoughts

The Frozen Orange Creamsicle Slush is a delightful blend of refreshing citrus and creamy goodness, making it a perfect treat for warm days or any time you crave a taste of nostalgia. The way the bright orange flavor dances with the creamy texture truly elevates this slush, transforming it into a satisfying escape from the everyday.

This is the kind of recipe I come back to again and again, especially when I’m looking to cool down or impress guests at a summer gathering. It’s simple to make and always brings smiles all around! I encourage you to try this recipe for yourself—don’t hesitate to share your results or even put your own spin on it. Happy slushing!

Print
clock clock iconcutlery cutlery iconflag flag iconfolder folder iconinstagram instagram iconpinterest pinterest iconfacebook facebook iconprint print iconsquares squares iconheart heart iconheart solid heart solid icon

Frozen Orange Creamsicle Slush


  • Author: Lily author
  • Total Time: 15 minutes
  • Yield: 4 servings 1x
Pin Recipe
Print Recipe

Description

This Frozen Orange Creamsicle Slush is a refreshing treat that combines creamy vanilla and zesty orange flavors. Perfect for hot summer days, it brings back nostalgic memories with every sip.


Ingredients

Scale
  • 2 cups orange juice (freshly squeezed or store-bought)
  • 1 cup vanilla ice cream
  • 1 cup crushed ice
  • 1/2 cup milk (whole or 2%)
  • 1/4 cup granulated sugar (adjust based on sweetness preference)
  • 1 teaspoon vanilla extract
  • Zest of 1 orange (for added flavor)
  • Fresh orange slices and mint leaves (for garnish)

Instructions

  1. Start by preparing your ingredients. Gather 2 cups of orange juice, 1 cup of vanilla ice cream, and 1 cup of crushed ice. Make sure the ice is finely crushed, as larger chunks can make blending difficult.
  2. In a blender, combine the orange juice, vanilla ice cream, crushed ice, and 1/2 cup of milk. Add 1/4 cup of granulated sugar and 1 teaspoon of vanilla extract. If you like a sweeter slush, consider adding a bit more sugar at this stage.
  3. Add the zest of 1 orange to the blender. This step is crucial for enhancing the citrus flavor of your slush. Make sure not to include the bitter white pith—only the flavorful zest.
  4. Blend the mixture on medium-high speed for about 30-45 seconds. Stop once the ingredients are fully combined and the slush has a smooth, even consistency. If you notice large chunks of ice, blend for an additional 10-15 seconds. Avoid over-blending, as this can make the slush too liquidy.
  5. Once blended, taste the slush. If it needs more sweetness, add a little more sugar and blend for a few more seconds. If it’s too thick, you can add a splash of milk to reach your desired consistency.
  6. Pour the slush into glasses. This recipe typically serves 4, but you can easily double it for larger gatherings. Use a spoon to help guide the slush into the glasses if needed.
  7. Garnish each serving with fresh orange slices and mint leaves. The mint not only adds a pop of color but also a refreshing aroma that complements the citrus flavors beautifully.
  8. Serve immediately and enjoy! If you’ve made extra, you can refrigerate it for a short time, but it's best enjoyed fresh.
  • Prep Time: 15 min
  • Cook Time: 0 min
  • Category: Dessert
  • Method: Blending
  • Cuisine: American

Nutrition

  • Serving Size: 1 serving
  • Calories: 200
  • Sugar: 30 g
  • Sodium: 50 mg
  • Fat: 5 g
  • Saturated Fat: 3 g
  • Unsaturated Fat: 2 g
  • Trans Fat: 0 g
  • Carbohydrates: 40 g
  • Fiber: 1 g
  • Protein: 2 g
  • Cholesterol: 20 mg

Keywords: Don't skip the orange zest! It's a game-changer for flavor. Always zest before juicing to make it easier.

Did you make this recipe?

Share a photo and tag us — we can't wait to see what you've made!

Zesty Lemon Poppy Seed Delight

One rainy afternoon, I found myself in my grandmother’s cozy kitchen, the kind that always smelled like warmth and love. She was whipping up her famous Lemon Poppy Seed Loaf, a recipe that had been passed down through generations. As the batter came together, the zesty aroma of fresh lemons filled the air, mingling perfectly with the nutty fragrance of poppy seeds. I can still picture her, apron-clad, as she expertly drizzled a vibrant citrus icing over the loaf, creating a glossy, sun-kissed finish that beckoned us to dive in. It was a moment that sparked my own passion for baking, and this recipe has become a cherished staple in my home ever since.

When you take a bite of this Lemon Poppy Seed Loaf, it’s like a burst of sunshine on your palate. The loaf is beautifully golden, with a tender crumb that melts in your mouth. Each slice is speckled with tiny poppy seeds, adding a delightful crunch that contrasts beautifully with the tangy sweetness of the lemon. And that citrus icing? It’s the finishing touch that elevates this loaf from ordinary to extraordinary, with its bright, zesty flavor dancing on your taste buds.

This recipe stands out because it embraces simplicity while delivering on flavor. I’ve added a hint of vanilla to the batter, enhancing the overall taste and making it even more indulgent. Trust me, once you make this Lemon Poppy Seed Loaf With Citrus Icing, it’ll become a go-to in your baking repertoire.

So, let me show you exactly how to make it!

Zesty Lemon Poppy Seed Delight

Why You’ll Love This Recipe

  • Moist and tender crumb that melts in your mouth, thanks to the perfect balance of butter and buttermilk.
  • Bright, zesty lemon flavor paired with crunchy poppy seeds, creating a delightful texture and taste experience.
  • Easy to whip up in just about an hour, perfect for last-minute gatherings or a cozy afternoon treat.
  • Budget-friendly with everyday ingredients, making it an accessible option for all home bakers.
  • The citrus icing adds a sweet tang that elevates the loaf, turning a simple recipe into a showstopper!

Ingredients

  • 1 ½ cups (190g) all-purpose flour
  • 1 teaspoon baking powder
  • ½ teaspoon baking soda
  • ½ teaspoon salt
  • 3 tablespoons poppy seeds
  • ½ cup (115g) unsalted butter, softened to room temperature
  • 1 cup (200g) granulated sugar
  • 2 large eggs
  • 1 teaspoon vanilla extract
  • 1 teaspoon lemon zest (from about 1 medium lemon)
  • ½ cup (120ml) buttermilk
  • 2 tablespoons fresh lemon juice

For the Citrus Icing:

  • 1 cup (120g) powdered sugar
  • 2 tablespoons fresh lemon juice
  • 1 tablespoon orange juice
  • 1 teaspoon lemon zest (for garnish, optional)

Let’s dive into the key ingredients that make this Lemon Poppy Seed Loaf so special. The all-purpose flour provides the structure and base for the loaf, while the baking powder and baking soda ensure it rises perfectly, giving the loaf a light texture. For a gluten-free variation, you could substitute the flour with a gluten-free all-purpose blend. Poppy seeds not only add a delightful crunch but also contribute to the unique flavor profile that pairs well with the citrus notes.

Unsalted butter is crucial for achieving the buttery richness that makes this loaf so moist. If you’re looking for a dairy-free option, coconut oil or a vegan butter can be used instead. The buttermilk is another essential component, providing acidity that activates the baking soda for a fluffy texture. If you don’t have buttermilk on hand, you can easily make a substitute by mixing ½ cup of milk with 1 tablespoon of vinegar or lemon juice and letting it sit for about 5 minutes.

Step-by-Step Instructions

  1. Preheat your oven to 350°F (175°C). Grease a 9×5-inch loaf pan or line it with parchment paper for easy removal later.
  2. In a medium mixing bowl, whisk together 1 ½ cups of all-purpose flour, 1 teaspoon of baking powder, ½ teaspoon of baking soda, ½ teaspoon of salt, and 3 tablespoons of poppy seeds. This helps to evenly distribute the baking agents and ensures a uniform rise.
  3. In a large mixing bowl, cream together ½ cup of softened unsalted butter and 1 cup of granulated sugar using an electric mixer on medium speed for about 3-4 minutes, until the mixture is light and fluffy. Make sure to scrape down the sides of the bowl occasionally.
  4. Add 2 large eggs, 1 teaspoon of vanilla extract, and 1 teaspoon of lemon zest to the creamed butter and sugar, mixing until fully combined. You want a smooth consistency, so ensure there are no lumps of butter.
  5. In a small bowl, combine ½ cup of buttermilk and 2 tablespoons of fresh lemon juice. Alternately add the dry ingredients and buttermilk mixture to the butter mixture, starting and ending with the dry ingredients. Mix just until combined; do not overmix, as this can lead to a dense loaf.
  6. Pour the batter into the prepared loaf pan. Smooth the top with a spatula, ensuring it’s even. Bake in the preheated oven for 50-60 minutes, or until a toothpick inserted in the center comes out clean. The edges should be lightly golden brown, and the center should feel just set.
  7. Once baked, remove the loaf from the oven and allow it to cool in the pan for about 10 minutes. Then, transfer it to a wire rack to cool completely. Resist the urge to slice too soon, as it will be crumbly if it’s still warm.
  8. While the loaf is cooling, prepare the citrus icing. In a medium bowl, whisk together 1 cup of powdered sugar, 2 tablespoons of fresh lemon juice, and 1 tablespoon of orange juice until smooth. If the icing is too thick, you can add a little more juice to reach your desired consistency.
  9. Once the loaf is completely cool, drizzle the citrus icing over the top. If you like, sprinkle with an additional teaspoon of lemon zest for an extra pop of flavor and color.

Pro Tips for the Best Lemon Poppy Seed Loaf With Citrus Icing

  • Be careful not to overmix your batter; this is a common mistake that can lead to a dense loaf. Mix just until the dry ingredients are incorporated for a light and fluffy texture.
  • Use room temperature ingredients, especially the butter and eggs. This helps to create a smoother batter and ensures even baking. Take your eggs out of the fridge about 30 minutes before you start.
  • For a more pronounced lemon flavor, consider adding a little lemon extract in addition to the zest and juice. Just a half teaspoon can elevate the citrus notes significantly.
  • When measuring your flour, spoon it into the measuring cup and level it off with a knife instead of scooping directly from the bag. This prevents packing and ensures you don’t end up with a dry loaf.
  • Invest in a good quality loaf pan; it makes a difference in heat distribution, which ensures even baking. If your pan is dark-coated, reduce the oven temperature by 25°F to prevent over-browning.

Variations & Serving Ideas

For a delightful twist, consider adding blueberries or raspberries to the batter for a fruity burst of flavor. You can also experiment with different citrus fruits—try lime or grapefruit zest and juice for a refreshing change. For a healthier option, substitute half of the all-purpose flour with whole wheat flour for added fiber without compromising too much on texture.

This Lemon Poppy Seed Loaf pairs beautifully with a light salad, such as a mixed greens salad with a vinaigrette, or a cup of tea for a cozy afternoon treat. It also complements a creamy cheese platter, as the acidity of the loaf balances rich cheeses perfectly. Lastly, a scoop of vanilla ice cream on the side creates a delightful contrast of temperatures and flavors!

Storage, Make-Ahead & Reheating

This Lemon Poppy Seed Loaf can be stored at room temperature for up to 3 days if wrapped tightly in plastic wrap. If you want to keep it longer, it freezes well for up to 3 months. To freeze, wrap the loaf tightly in plastic wrap and then in aluminum foil to prevent freezer burn.

When you’re ready to enjoy it again, simply thaw it in the fridge overnight. Reheat individual slices in the microwave for 15-20 seconds or in a toaster oven until warmed through. Interestingly, many people find that this loaf tastes even better the next day, as the flavors have time to meld!

Frequently Asked Questions

Can I make Lemon Poppy Seed Loaf With Citrus Icing ahead of time?

Yes — in fact, it tastes even better the next day! You can make the loaf a day in advance, allowing the flavors to develop. Just be sure to store it in an airtight container to maintain its moisture.

Can I substitute the poppy seeds?

Absolutely! If you don’t have poppy seeds on hand or prefer an alternative, you can use sesame seeds for a similar crunch or omit them entirely for a smooth loaf.

What can I use instead of buttermilk?

If you don’t have buttermilk, you can easily create a substitute by mixing ½ cup of milk (dairy or plant-based) with 1 tablespoon of vinegar or lemon juice. Let it sit for 5 minutes before using in the recipe.

How can I make this recipe gluten-free?

To make a gluten-free version of this Lemon Poppy Seed Loaf, substitute the all-purpose flour with a gluten-free all-purpose flour blend. Just ensure that the blend contains a binding agent like xanthan gum for the best results.

What is the best way to store leftover loaf?

Leftover Lemon Poppy Seed Loaf should be stored in an airtight container at room temperature for up to 3 days. For longer storage, wrap it tightly and freeze for up to 3 months. Thaw it before serving for the best texture.

Zesty Lemon Poppy Seed Delight

Final Thoughts

The Lemon Poppy Seed Loaf with Citrus Icing is truly a delightful treat that brings a burst of brightness to any occasion. The zesty lemon flavor combined with the subtle crunch of poppy seeds creates a satisfying balance, while the citrus icing adds a touch of sweetness that perfectly complements the loaf’s tanginess.

This is the kind of recipe I come back to again and again, especially when I want to brighten up a gloomy day or celebrate a small victory. The aroma that fills the kitchen as it bakes is absolutely heavenly! I encourage you to give this recipe a try; you might just find it becoming a beloved staple in your home. Don’t forget to share your results or even add your own unique twist—I can’t wait to see what you create!

Print
clock clock iconcutlery cutlery iconflag flag iconfolder folder iconinstagram instagram iconpinterest pinterest iconfacebook facebook iconprint print iconsquares squares iconheart heart iconheart solid heart solid icon

Lemon Poppy Seed Loaf


  • Author: Lily author
  • Total Time: 16 minute
  • Yield: 1 loaf 1x
Pin Recipe
Print Recipe

Description

This Lemon Poppy Seed Loaf is a delightful treat that combines zesty lemon flavor with crunchy poppy seeds. Topped with a citrus icing, it’s perfect for any occasion.


Ingredients

Scale
  • 1 ½ cups (190g) all-purpose flour
  • 1 teaspoon baking powder
  • ½ teaspoon baking soda
  • ½ teaspoon salt
  • 3 tablespoons poppy seeds
  • ½ cup (115g) unsalted butter, softened to room temperature
  • 1 cup (200g) granulated sugar
  • 2 large eggs
  • 1 teaspoon vanilla extract
  • 1 teaspoon lemon zest (from about 1 medium lemon)
  • ½ cup (120ml) buttermilk
  • 2 tablespoons fresh lemon juice
  • 1 cup (120g) powdered sugar
  • 2 tablespoons fresh lemon juice
  • 1 tablespoon orange juice
  • 1 teaspoon lemon zest (for garnish, optional)

Instructions

  1. Preheat your oven to 350°F (175°C). Grease a 9×5-inch loaf pan or line it with parchment paper for easy removal later.
  2. In a medium mixing bowl, whisk together 1 ½ cups of all-purpose flour, 1 teaspoon of baking powder, ½ teaspoon of baking soda, ½ teaspoon of salt, and 3 tablespoons of poppy seeds. This helps to evenly distribute the baking agents and ensures a uniform rise.
  3. In a large mixing bowl, cream together ½ cup of softened unsalted butter and 1 cup of granulated sugar using an electric mixer on medium speed for about 3-4 minutes, until the mixture is light and fluffy. Make sure to scrape down the sides of the bowl occasionally.
  4. Add 2 large eggs, 1 teaspoon of vanilla extract, and 1 teaspoon of lemon zest to the creamed butter and sugar, mixing until fully combined. You want a smooth consistency, so ensure there are no lumps of butter.
  5. In a small bowl, combine ½ cup of buttermilk and 2 tablespoons of fresh lemon juice. Alternately add the dry ingredients and buttermilk mixture to the butter mixture, starting and ending with the dry ingredients. Mix just until combined; do not overmix, as this can lead to a dense loaf.
  6. Pour the batter into the prepared loaf pan. Smooth the top with a spatula, ensuring it’s even. Bake in the preheated oven for 50-60 minutes, or until a toothpick inserted in the center comes out clean. The edges should be lightly golden brown, and the center should feel just set.
  7. Once baked, remove the loaf from the oven and allow it to cool in the pan for about 10 minutes. Then, transfer it to a wire rack to cool completely. Resist the urge to slice too soon, as it will be crumbly if it’s still warm.
  8. While the loaf is cooling, prepare the citrus icing. In a medium bowl, whisk together 1 cup of powdered sugar, 2 tablespoons of fresh lemon juice, and 1 tablespoon of orange juice until smooth. If the icing is too thick, you can add a little more juice to reach your desired consistency.
  9. Once the loaf is completely cool, drizzle the citrus icing over the top. If you like, sprinkle with an additional teaspoon of lemon zest for an extra pop of flavor and color.
  • Prep Time: 15 mins
  • Cook Time: 50-60 mins
  • Category: Dessert
  • Method: Baking
  • Cuisine: American

Nutrition

  • Serving Size: 1 slice
  • Calories: 200
  • Sugar: 15 g
  • Sodium: 150 mg
  • Fat: 8 g
  • Saturated Fat: 5 g
  • Unsaturated Fat: 3 g
  • Trans Fat: 0 g
  • Carbohydrates: 30 g
  • Fiber: 1 g
  • Protein: 3 g
  • Cholesterol: 40 mg

Keywords: Be careful not to overmix your batter; this is a common mistake that can lead to a dense loaf. Use room temperature ingredients for a smoother batter and even baking.

Did you make this recipe?

Share a photo and tag us — we can't wait to see what you've made!

  • Privacy Policy
  • Terms Of Service
  • Contact
  • About
  • GDPR

Copyright © 2025 Homesmad