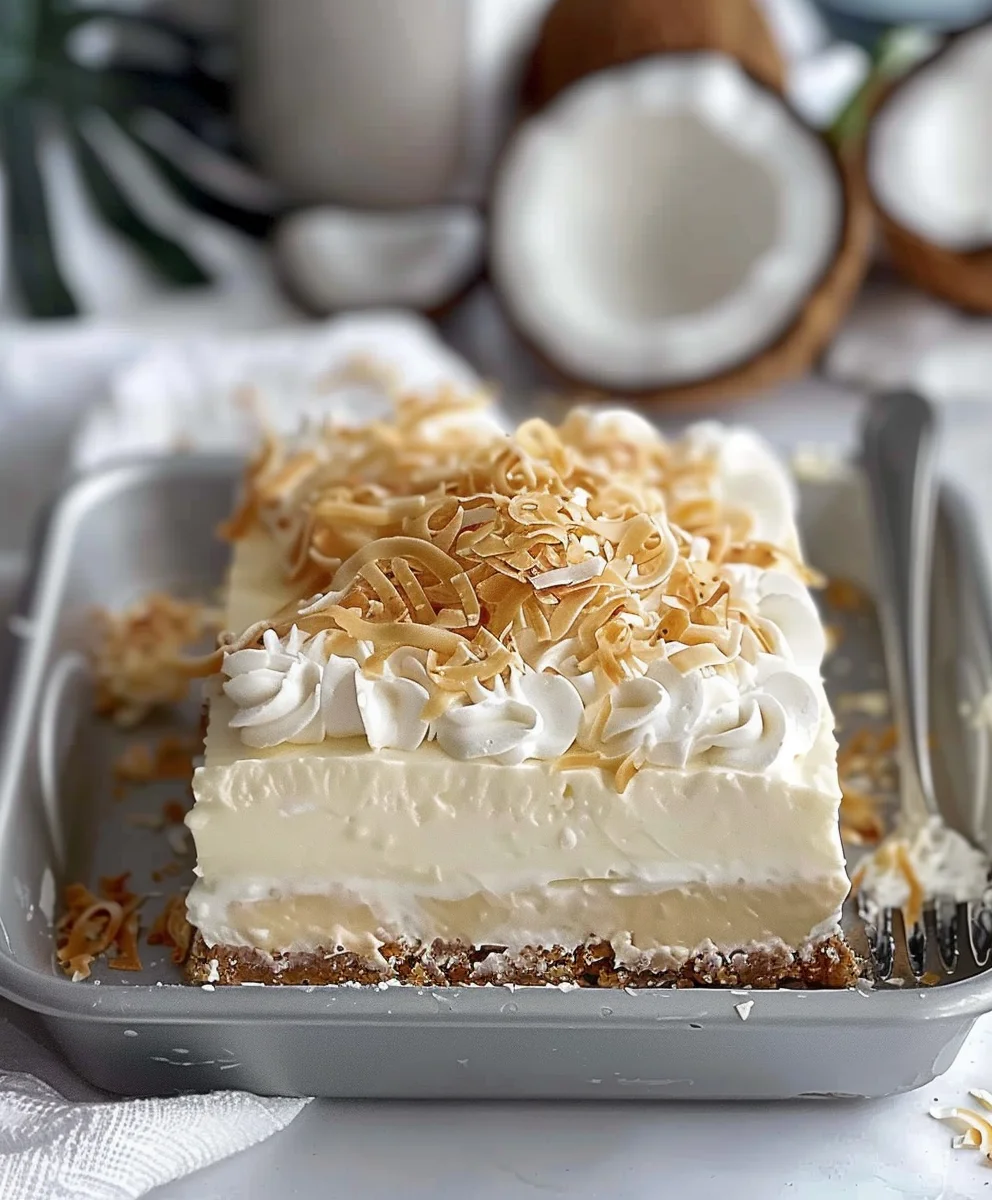
Coconut Cream Lush A Creamy No Bake Dessert For Every Occasion – this captivating title truly encapsulates the delightful experience awaiting your taste buds. I am absolutely thrilled to share a recipe that promises pure bliss without the need to even preheat your oven. Imagine a dessert so effortlessly elegant, so profoundly satisfying, it feels like a dream. This no-bake wonder is precisely that: a layered masterpiece that delivers on every promise of its name.
Historically, coconut has been a revered ingredient in countless cultures, especially across tropical regions, celebrated for its versatility and rich, unique flavor. From refreshing beverages to hearty curries and decadent sweets, its milky essence is a staple. This particular lush draws upon that heritage, transforming the humble coconut into a star, delivering a taste of sun-drenched paradise right to your home, making it a fitting centerpiece for any gathering.
Why This Dessert Will Become Your New Favorite
People absolutely adore this dish for myriad reasons. First and foremost is its incredible convenience – being a no-bake creation means less fuss and more time to enjoy the occasion. Beyond its ease, the luscious combination of a buttery, crunchy crust, a velvety-smooth, rich coconut cream filling, and a light, airy whipped topping creates an unforgettable textural and flavor symphony. It’s wonderfully refreshing, making it an ideal choice for any season, and its universally appealing taste ensures it’s always a crowd-pleaser. Truly, this is the definitive Coconut Cream Lush A Creamy No Bake Dessert For Every Occasion.

Ingredients:
- For the Crust:
- 2 cups (about 20-22 full sheets) graham cracker crumbs (or vanilla wafer crumbs for a different twist)
- 1/2 cup (1 stick) unsalted butter, melted
- 1/4 cup granulated sugar (optional, for a sweeter crust)
- For the Cream Cheese Layer:
- 1 (8-ounce) package full-fat cream cheese, softened to room temperature
- 1 cup powdered sugar (confectioners’ sugar), sifted
- 1 (8-ounce) container frozen whipped topping, thawed (like Cool Whip), divided
- For the Coconut Pudding Layer:
- 2 (3.4-ounce) packages instant vanilla pudding mix (or instant coconut cream pudding mix, if you can find it!)
- 3 cups cold milk (whole milk or 2% works best for creaminess)
- 1 cup shredded coconut, sweetened or unsweetened, divided (plus more for garnish)
- For the Topping and Garnish:
- The remaining 1/2 of the 8-ounce container of thawed whipped topping (about 1 cup)
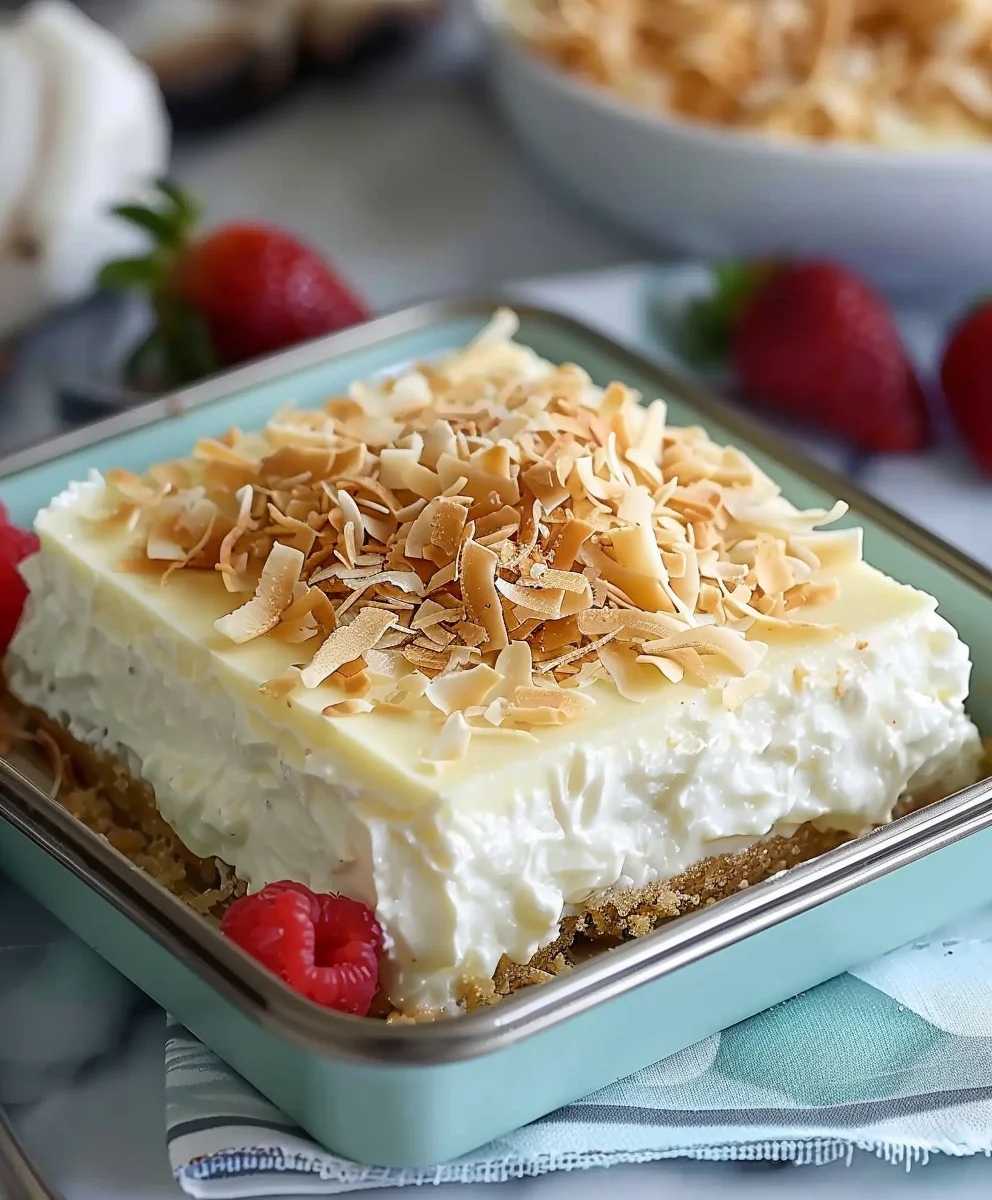
- Additional shredded coconut, toasted if desired, for garnish
Preparing the Irresistible Crust for Your Coconut Cream Lush:
- Prepare Your Baking Dish: First things first, grab a 9×13 inch baking dish. I find a glass dish works wonderfully as you can see the beautiful layers of your Coconut Cream Lush, but any oven-safe baking dish of that size will do. You don’t need to grease it, as the butter in the crust prevents sticking.
- Crush the Graham Crackers: This is where the fun begins! If you’re using whole graham crackers, place them in a large zip-top bag and use a rolling pin or the bottom of a heavy glass to crush them into very fine crumbs. Alternatively, a food processor makes quick work of this, ensuring a consistent texture. You’ll want about 2 cups of crumbs – consistency is key here for a firm crust that holds its shape.
- Melt the Butter: In a microwave-safe bowl, melt the unsalted butter. This should take about 30-45 seconds in a microwave, or you can gently melt it in a small saucepan over low heat on the stovetop. Let it cool slightly for a minute or two; we don’t want it sizzling hot when it meets our crumbs.
- Combine Crust Ingredients: In a medium-sized mixing bowl, combine the graham cracker crumbs, the melted butter, and the optional granulated sugar. Stir them together thoroughly with a fork or a spatula until all the crumbs are moistened and resemble wet sand. Every crumb should be coated in butter; this is what will bind our crust together.
- Press the Crust: Pour the crumb mixture into your prepared 9×13 inch baking dish. Using the bottom of a flat-bottomed glass, a measuring cup, or your clean hands, firmly and evenly press the mixture across the bottom of the dish. Make sure it’s packed down well, especially into the corners. A well-pressed crust is essential for a clean slice later on.
- Chill the Crust: Once pressed, place the baking dish with the crust into the refrigerator. Let it chill for at least 30 minutes. This step is crucial; it allows the butter to solidify and sets the crust, ensuring it doesn’t crumble when you add your subsequent layers or when you slice into this delightful dessert. This simple chilling makes all the difference for a sturdy foundation.
Crafting the Velvety Cream Cheese Layer:
- Soften the Cream Cheese: For a truly smooth and lump-free cream cheese layer, it is absolutely paramount that your full-fat cream cheese is at room temperature. Take it out of the refrigerator at least an hour before you plan to start mixing. If you’re short on time, you can carefully soften it in the microwave in its foil wrapper for 10-15 seconds intervals, checking frequently, but be careful not to melt it.
- Beat the Cream Cheese: In a large mixing bowl, place the softened cream cheese. Using an electric mixer (either a stand mixer with a paddle attachment or a handheld mixer) on medium-high speed, beat the cream cheese for 2-3 minutes until it is incredibly smooth, light, and fluffy. Scrape down the sides of the bowl often to ensure all of it is evenly whipped. This aeration is key to a luscious texture.
- Incorporate Powdered Sugar: Add the sifted powdered sugar to the whipped cream cheese. Sifting the sugar prevents any pesky lumps, which can be hard to dissolve later. Start your mixer on low speed to incorporate the sugar, then gradually increase to medium-high and beat for another 1-2 minutes until thoroughly combined and the mixture is even lighter and creamier. Continue to scrape down the sides of the bowl.
- Fold in Whipped Topping (Part 1): Gently fold in half of the thawed whipped topping (about 1 cup) into the cream cheese mixture. Use a rubber spatula for this step, using gentle, sweeping motions from the bottom of the bowl upwards. Be careful not to deflate the mixture. You want to maintain that airy texture we just created. Continue folding until no streaks of white whipped topping remain and the mixture is uniformly blended and incredibly smooth. This combination is what gives our Coconut Cream Lush its signature rich yet light character.
- Spread the Cream Cheese Layer: Carefully retrieve your chilled crust from the refrigerator. Evenly spread the entire cream cheese mixture over the chilled graham cracker crust. Take your time to gently spread it from edge to edge, ensuring a smooth and consistent layer. Try not to press down too hard, as you don’t want to disturb the crust below. Return the dish to the refrigerator while you prepare the next layer.
Crafting the Dreamy Coconut Pudding Layer:
- Prepare the Pudding Mix: In a separate large mixing bowl, combine the two packages of instant vanilla pudding mix (or coconut cream pudding mix, if you’re lucky enough to find it!). The vanilla works beautifully to complement the coconut flavor.
- Add Cold Milk: Pour in the 3 cups of cold milk. Using very cold milk is essential for instant pudding to set properly and quickly. I recommend using whole milk or 2% milk for the best, creamiest texture. Skim milk might result in a slightly less firm set.
- Whisk Vigorously: Using a whisk or an electric mixer on low speed, beat the pudding mix and milk together for exactly 2 minutes. You’ll notice it starting to thicken almost immediately. Keep whisking to ensure there are no dry lumps of pudding mix left. It should become thick and smooth. Resist the urge to over-mix, as this can sometimes prevent it from setting correctly.
- Incorporate Shredded Coconut: Once the pudding has thickened, gently fold in about 1 cup of the shredded coconut (sweetened or unsweetened, depending on your preference for sweetness). Stir it in until it’s evenly distributed throughout the pudding. This adds an incredible texture and boosts that delightful coconut flavor that makes this Coconut Cream Lush so irresistible.
- Allow Pudding to Set Further: Let the pudding mixture sit for an additional 5 minutes on the counter. This allows it to firm up even more, making it easier to spread evenly over the cream cheese layer without disturbing it. You’ll see it become much thicker and more gel-like during this short waiting period.
- Spread the Pudding Layer: Retrieve your dessert dish from the refrigerator. Carefully spoon the thickened coconut pudding mixture over the cream cheese layer. Using the back of a spoon or a rubber spatula, gently and evenly spread the pudding across the entire surface. Again, be gentle not to mix the layers. We want those distinct, beautiful layers for our no-bake dessert.
Assembling Your Coconut Cream Lush: The Grand Finale!
- Add the Final Whipped Topping Layer: Once the coconut pudding layer is smoothly spread, it’s time for the crowning glory! Take the remaining half of your thawed whipped topping (about 1 cup) and carefully spread it over the coconut pudding layer. Use light, sweeping motions to create a smooth, inviting white top. This layer provides a beautiful contrast and adds to the light, airy texture of the Coconut Cream Lush. Ensure it’s spread right to the edges for a clean finish.
-
Garnish with Shredded Coconut: Now for the artistic touch! Sprinkle the additional shredded coconut generously over the top of the whipped topping.
Optional: Toasting Coconut for Enhanced Flavor and Visual Appeal:
Toasting your coconut takes this Coconut Cream Lush to the next level, adding a beautiful golden color and an intensified nutty flavor. There are two easy ways to do this:
- Stovetop Method: Place your shredded coconut in a dry, non-stick skillet over medium-low heat. Stir constantly with a wooden spoon or spatula. The coconut will quickly turn golden brown, so don’t walk away! This usually takes 3-7 minutes. As soon as it’s golden and fragrant, remove it from the heat and transfer it to a plate to cool completely. Leaving it in the hot pan will cause it to burn.
- Oven Method: Spread the shredded coconut in a single layer on a baking sheet. Bake in a preheated oven at 300°F (150°C) for 5-10 minutes, stirring every 2-3 minutes, until golden brown. Keep a close eye on it, as it can go from perfect to burnt very quickly! Let it cool completely before sprinkling.
Whether you choose toasted or untoasted, the coconut garnish is essential for that signature look and flavor of this creamy no-bake dessert.
Chilling and Serving Your Perfect No-Bake Delight:
- The Crucial Chill Time: This is arguably the most important step for any no-bake dessert. Once all the layers are assembled and garnished, gently cover the baking dish with plastic wrap. Place the entire dish back into the refrigerator to chill for at least 4-6 hours. Even better, chill it overnight! This extended chilling time allows all the layers to firm up completely, meld their flavors beautifully, and ensure clean, picture-perfect slices. Rushing this step will result in a messy, unset dessert. Patience here will be greatly rewarded.
- Serving Your Coconut Cream Lush: When you’re ready to serve this glorious Coconut Cream Lush, remove it from the refrigerator. Using a sharp knife that has been run under hot water and wiped clean (this helps get cleaner cuts), slice the dessert into desired portions. A 9×13 inch pan typically yields 12-15 servings, depending on how generous you are with your portions. Wipe your knife clean between each cut for the neatest presentation.
- Storage: Leftover Coconut Cream Lush should be stored in an airtight container or tightly covered with plastic wrap in the refrigerator for up to 3-4 days. While it’s best enjoyed fresh, the flavors can sometimes deepen over the first day. This makes it a fantastic make-ahead option for any gathering, proving it truly is a creamy no-bake dessert for every occasion.
- Enjoy! Serve immediately and revel in the light, creamy, and wonderfully tropical flavors of your homemade Coconut Cream Lush. Each spoonful offers a delightful journey from the crunchy crust to the soft cream cheese, the rich coconut pudding, and the airy whipped topping. It’s a guaranteed crowd-pleaser and remarkably easy to prepare!
Conclusion:
Well, my friends, we’ve reached the sweet finale of our journey with this incredible no-bake wonder! I truly hope you’re as excited as I am about bringing this delightful dessert into your kitchen. It’s more than just a recipe; it’s an invitation to create joy, effortlessly and deliciously.
Why This Dessert Is an Absolute Must-Try!
From the moment you take your first spoonful, you’ll understand why this isn’t just another dessert; it’s an experience. Imagine a symphony of textures – the tender crunch of the graham cracker crust giving way to layers of unbelievably smooth, rich, and airy coconut cream, all culminating in a cloud of whipped topping. This dessert truly shines because of its simplicity and the sheer impact of its flavor. I promise you, the minimal effort required for its preparation belies the sophisticated taste it delivers. It’s the kind of treat that looks utterly impressive on any table, yet requires no oven, no complex techniques, and honestly, very little stress. That’s what makes our Coconut Cream Lush A Creamy No Bake Dessert For Every Occasion such a standout. It’s perfect for those busy weeknights when you crave something special, or for those grand celebrations where you want to impress without being chained to the stove. The tropical essence of the coconut, combined with the creamy sweetness, creates a refreshing and satisfying finish to any meal, making it an instant crowd-pleaser. I’ve seen faces light up, heard exclamations of delight, and watched slices disappear with astonishing speed whenever I serve this. It’s a testament to its universal appeal and undeniable deliciousness. Trust me, once you make it, you’ll be adding it to your regular dessert rotation.
Elevate Your Dessert: Serving Suggestions and Creative Variations
While this coconut lush is absolutely magnificent on its own, I love experimenting with ways to make it even more special. For a classic presentation, simply slice and serve, perhaps with a sprinkle of toasted coconut flakes or a delicate curl of white chocolate on top – it adds a touch of elegance and extra texture. If you’re feeling a bit adventurous, consider a drizzle of warm caramel sauce just before serving; the sweet and slightly salty notes play beautifully with the coconut. Fresh berries, like raspberries or blueberries, can introduce a vibrant burst of color and a lovely tart counterpoint to the sweetness. For a truly decadent twist, a few shavings of dark chocolate can add a sophisticated bitterness that enhances the coconut’s natural sweetness. Don’t be afraid to think outside the box with the crust, either! While graham crackers are classic, try vanilla wafers, shortbread cookies, or even crushed ginger snaps for a different flavor profile. For those with dietary considerations, gluten-free graham crackers work perfectly. You can also vary the extracts in the cream layers; a tiny drop of almond extract alongside the vanilla can add another layer of complexity. If you’re hosting a party, serving this lush in individual ramekins or small glasses can be a charming and convenient option, making portion control a breeze and presentation even more delightful. Imagine a mini coconut cream lush served with a tiny spoon – simply adorable! The beauty of this recipe lies in its adaptability; it’s a fantastic canvas for your culinary imagination.
Your Turn: Create, Enjoy, and Share!
Now, it’s your moment to shine! I wholeheartedly encourage you to roll up your sleeves – metaphorically, of course, since there’s no baking involved! – and give this incredible recipe a try. You’ll be amazed at how easily such a show-stopping dessert comes together. Don’t just make it; savor the process, enjoy the incredible aromas, and most importantly, relish every single creamy, dreamy bite. Whether you’re making it for a special occasion, a casual get-together, or simply to treat yourself to something wonderful, I’m confident it will become a new favorite. And once you’ve experienced the magic, I would absolutely love to hear all about it! Please, share your creations, your serving suggestions, or any fun variations you come up with. Tag me, leave a comment, or send a message – your feedback and experiences are what make this community so vibrant and inspiring. Happy dessert making!
Coconut Cream Lush: Easy No-Bake Dessert For Any Occasion
A delightful and effortlessly elegant no-bake dessert, this Coconut Cream Lush features a buttery, crunchy crust, a velvety-smooth coconut cream cheese filling, a rich coconut cream pudding layer, and a light whipped topping. It’s a perfect crowd-pleaser for any gathering.
Ingredients
-
1 ½ cups graham cracker crumbs
-
2 tbsp granulated sugar
-
½ cup unsalted butter, melted
-
16 oz cream cheese, softened
-
1 cup powdered sugar
-
1 tsp coconut extract
-
8 oz Cool Whip, thawed (for cream cheese layer)
-
2 (3.4 oz) boxes instant coconut cream pudding mix
-
3 cups half-and-half or whole milk, cold
-
8 oz Cool Whip, thawed (for topping)
-
1 cup sweetened shredded coconut, toasted (for garnish)
Instructions
-
Step 1
Combine graham cracker crumbs, granulated sugar, and melted butter. Press mixture firmly into a 9×13 inch baking dish. Chill for at least 30 minutes. -
Step 2
Beat softened cream cheese until smooth and fluffy (2-3 minutes). Beat in powdered sugar and coconut extract until creamy. Gently fold in 8 oz of thawed Cool Whip. Spread evenly over the chilled crust and return to refrigerator. -
Step 3
Whisk instant coconut cream pudding mix and 3 cups cold half-and-half (or whole milk) vigorously for 2 minutes until thickened. Let stand for 5 minutes. Carefully spread over the cream cheese layer and return to refrigerator. -
Step 4
Spread the remaining 8 oz of thawed Cool Whip evenly over the pudding layer. Garnish generously with toasted shredded coconut. (To toast: Bake at 300°F/150°C for 5-10 mins, stirring, or toast in a dry skillet for 3-7 mins, stirring constantly, until golden. Cool completely before garnishing.) -
Step 5
Cover the dish and chill for a minimum of 4-6 hours, or preferably overnight, to allow all layers to set and flavors to meld. Slice into portions and serve. Store leftovers in the refrigerator for 3-4 days.
Important Information
Nutrition Facts (Per Serving)
It is important to consider this information as approximate and not to use it as definitive health advice.
Allergy Information
Please check ingredients for potential allergens and consult a health professional if in doubt.