• Skip to primary navigation
  • Skip to main content
  • Skip to primary sidebar
Homesmad

Homesmad

  • Home
  • Breakfast & Brunch
  • Appetizers & Snacks
  • Dinner
  • Dessert
  • About
  • Privacy Policy
  • Contact
Homesmad
  • Home
  • Breakfast & Brunch
  • Appetizers & Snacks
  • Dinner
  • Dessert
  • About
  • Privacy Policy
  • Contact

Creamy Blackened Shrimp Stroganoff Recipe – Easy & Flavorful

October 17, 2025 by Lily author

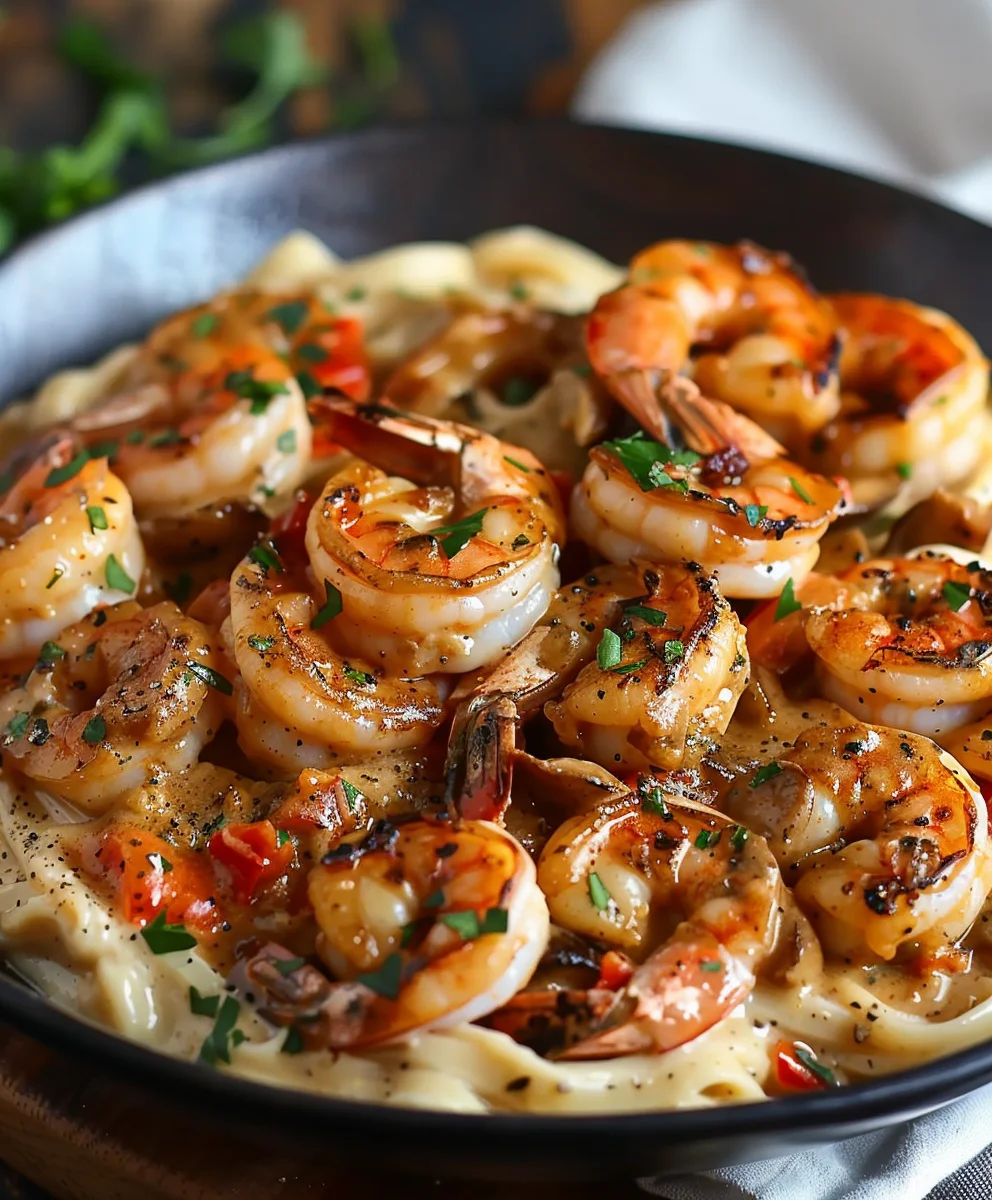
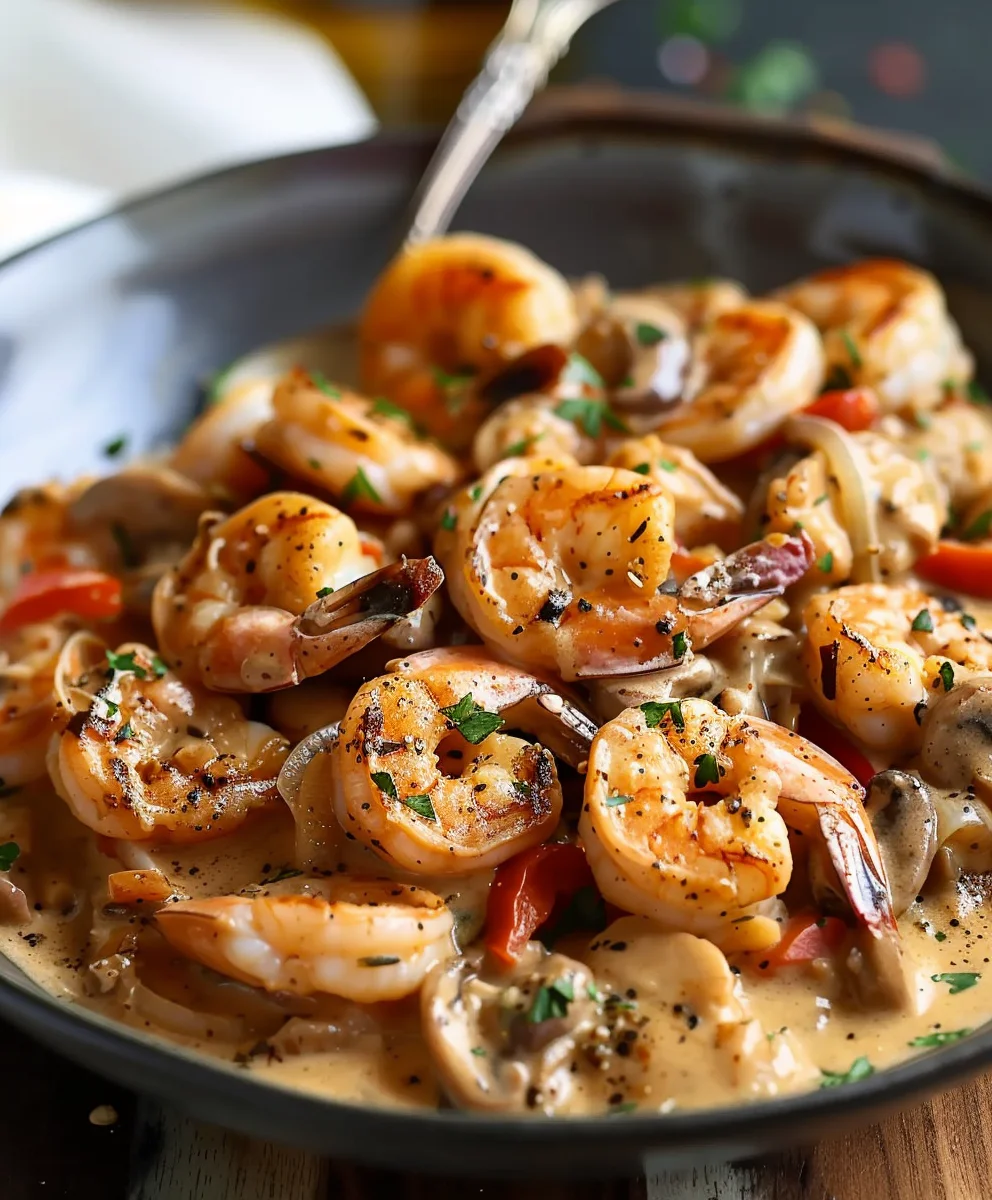
Blackened Shrimp Stroganoff is not just a meal; it’s an exhilarating journey for your taste buds, transforming a timeless comfort food into an unexpectedly vibrant and utterly delicious culinary experience. I’m absolutely thrilled to share this unique recipe, which takes the beloved, hearty essence of traditional Stroganoff and infuses it with a sensational seafood twist. While the original Stroganoff, a classic born in Russia, typically features tender beef nestled in a rich, creamy sauce, I’ve discovered that substituting it with perfectly seasoned, smoky blackened shrimp elevates the dish to an entirely new level of gourmet delight.

You’ll find yourself falling in love with the incredible depth of flavor – the spicy, aromatic crust of the shrimp provides a fantastic counterpoint to the velvety, luxurious sour cream sauce, all embracing perfectly cooked pasta. It’s the harmonious blend of textures and temperatures, from the succulent bite of shrimp to the comforting creaminess, that truly makes this dish irresistible. Whether you’re seeking a sophisticated yet straightforward weeknight dinner or an impressive dish to serve guests, this Blackened Shrimp Stroganoff delivers an unforgettable taste sensation that is both familiar and excitingly new, promising to become a cherished addition to your recipe collection.

Creamy Blackened Shrimp Stroganoff Recipe - Easy & Flavorful this RECIPE

Ingredients:

  • For the Blackened Shrimp:
    • 1.5 lbs (approximately 680g) large shrimp, peeled and deveined, tails on or off (your preference!), patted very dry
    • 2 tablespoons unsalted butter, divided (1 tbsp for seasoning, 1 tbsp for cooking)
    • 2 tablespoons olive oil, divided (1 tbsp for seasoning, 1 tbsp for cooking)
    • 3 tablespoons homemade or store-bought blackening seasoning (I like to make my own blend for freshness and control over spice levels. A good blend includes paprika, onion powder, garlic powder, dried thyme, dried oregano, cayenne pepper, black pepper, and a pinch of salt.)
  • For the Stroganoff Sauce:
    • 2 tablespoons unsalted butter
    • 1 tablespoon olive oil
    • 1 large yellow onion, finely diced (about 1.5 cups)
    • 3-4 cloves garlic, minced (about 1.5 tablespoons)
    • 16 oz (approximately 450g) cremini mushrooms, wiped clean and thinly sliced
    • 3 cups (720ml) beef broth (low sodium is always a good choice so you can adjust salt later)
    • 1 tablespoon Worcestershire sauce
    • 1 tablespoon Dijon mustard (don’t skip this, it adds a lovely tang!)
    • 1/2 cup (120ml) dry white wine (like Sauvignon Blanc or Pinot Grigio), optional, but highly recommended for depth of flavor
    • 1/2 cup (120g) full-fat sour cream, brought to room temperature (this prevents curdling)
    • 1/4 cup (60ml) heavy cream (for extra richness and silkiness)
    • Salt and freshly ground black pepper to taste
    • A pinch of red pepper flakes (optional, for a subtle kick)
  • For the Noodles & Garnish:
    • 16 oz (approximately 450g) wide egg noodles
    • 1/4 cup fresh parsley, finely chopped, for garnish
    • Extra sour cream or fresh dill, for serving (optional)

Preparing the Blackened Shrimp

This is where the magic begins, infusing our shrimp with incredible flavor and a beautiful crust. Trust me, the aroma alone will have your family peeking into the kitchen, wondering what amazing dish you’re preparing! The key to truly excellent Blackened Shrimp Stroganoff starts right here with perfectly cooked, boldly flavored shrimp.

  1. First things first, let’s get those shrimp ready. You’ll want to ensure your shrimp are super dry. I usually lay them out on a few layers of paper towels, then pat them firmly with more paper towels from above. Any excess moisture will cause the shrimp to steam instead of allowing them to develop that fantastic blackened crust, which is what we’re aiming for with our “Blackened Shrimp Stroganoff.” This simple step makes a huge difference in texture and flavor.
  2. In a medium bowl, combine your dry shrimp with 1 tablespoon of melted unsalted butter and 1 tablespoon of olive oil. Toss them gently to ensure each shrimp is lightly coated. This butter and oil mixture acts as a binder, helping the blackening seasoning adhere beautifully to every crevice of the shrimp, and it also contributes to the formation of that desirable crust when it hits the hot pan.
  3. Now, sprinkle your 3 tablespoons of blackening seasoning generously over the coated shrimp. Use your hands to toss and mix them thoroughly, ensuring every single shrimp is evenly coated. You want them to look quite dark and flavorful already, almost as if they’ve already been through a flavor bath! If you’re making your own seasoning blend, feel free to adjust the cayenne pepper to your heat preference – I personally like a good kick, so I might add a little extra.
  4. Heat a large, heavy-bottomed skillet or, even better, a cast-iron pan over medium-high heat until it’s screaming hot. You should see a wisp of smoke or feel intense heat radiating from it when you hold your hand a few inches above the surface. This high heat is absolutely crucial for achieving that authentic blackened crust – it’s what gives our “Blackened Shrimp” its name! Add the remaining 1 tablespoon of unsalted butter and 1 tablespoon of olive oil to the pan. Let the butter melt and sizzle, making sure the entire cooking surface is well-coated.
  5. Carefully add the seasoned shrimp to the hot pan in a single layer. Do not overcrowd the pan! This is a common mistake that can ruin the texture of your shrimp. If your pan isn’t large enough to accommodate all the shrimp in one layer, cook them in two or even three batches. Overcrowding will drastically lower the pan’s temperature and cause the shrimp to steam instead of blacken, resulting in pale, soggy shrimp. We want crisp, flavorful shrimp with a beautiful dark crust, not sad, rubbery ones.
  6. Cook the shrimp for only 1-2 minutes per side. You’ll see the edges start to turn opaque and, more importantly, a beautiful, dark, crusty char will form on the exposed surfaces. Shrimp cook very quickly, so keep a close eye on them to avoid overcooking. Once they’re a lovely blackened color and pink throughout, with that signature C-shape, remove them immediately from the pan and set them aside on a plate. It’s important to remove them promptly to prevent them from becoming tough and rubbery, which would be a travesty after all this careful preparation. This step is absolutely key to the “Blackened Shrimp” part of our “Blackened Shrimp Stroganoff”!

Cooking the Egg Noodles

While our beautifully blackened shrimp are taking a little rest, allowing their flavors to fully settle, let’s get those comforting wide egg noodles ready. These delicate, quick-cooking noodles are the perfect vehicle for soaking up all that incredible stroganoff sauce we’re about to create.

  1. Bring a large pot of heavily salted water to a rolling boil. I like to add a generous amount of salt to the water – it’s your first and best chance to season the noodles from the inside out. Think of it as seasoning pasta water for an Italian dish; the principle is precisely the same here for our Blackened Shrimp Stroganoff. The water should taste like the sea.
  2. Add your 16 oz of wide egg noodles to the vigorously boiling water and cook according to the package directions. Egg noodles are known for their quick cooking time, usually requiring only 6-8 minutes, until they are perfectly al dente. You want them tender enough to be enjoyable but still with a slight, pleasant chew, not mushy.
  3. Before draining, here’s a little chef’s secret: reserve about 1 cup of the starchy pasta water. This magical liquid is incredibly useful for adjusting the consistency of our stroganoff sauce later if it gets too thick, and its starches help to bind the sauce to the noodles beautifully, creating a more cohesive and luxurious dish.
  4. Drain the cooked noodles thoroughly in a colander. You can toss them with a tiny bit of butter or olive oil if you want to prevent them from sticking together, but since they’ll be mixed into the sauce relatively soon, it’s not strictly necessary. Just set them aside while we build our glorious stroganoff sauce, the creamy heart of our “Blackened Shrimp Stroganoff.”

Building the Rich Stroganoff Sauce

Now for the heart of our Blackened Shrimp Stroganoff – the creamy, savory, and wonderfully aromatic sauce. This is where all the wonderful flavors truly come together, creating a depth that will make this dish unforgettable. Patience here will be greatly rewarded!

  1. Using the same skillet you cooked the shrimp in (don’t worry about those little browned bits stuck to the bottom, they’re called “fond” and they’re packed with flavor!), melt 2 tablespoons of unsalted butter and 1 tablespoon of olive oil over medium heat. This fat mixture will be our flavor base, and those browned bits from the shrimp will naturally infuse the sauce with extra deliciousness.
  2. Add the finely diced yellow onion to the pan. Sauté the onion for about 5-7 minutes, stirring occasionally, until it becomes soft and translucent. You’re looking for that sweet, mellow onion flavor to develop, so resist the urge to rush this step. We’re building foundational layers of flavor here for our amazing stroganoff.
  3. Stir in the minced garlic. Cook for another 1 minute, until it becomes wonderfully fragrant. Be careful not to burn the garlic, as burnt garlic can turn bitter very quickly and spoil the delicate balance of the sauce. The kitchen should start smelling absolutely amazing about now, a preview of the deliciousness to come!
  4. Add the sliced cremini mushrooms to the pan. Increase the heat slightly to medium-high. Sauté the mushrooms for 8-10 minutes, stirring occasionally, until they release all their moisture, brown beautifully, and shrink significantly. This browning step is crucial for depth of flavor. You want them to develop a nice, rich, umami taste, adding a meaty texture and profound flavor to the sauce. If the pan seems dry during this process, you can add another tiny pat of butter or a splash of olive oil to help them along.
  5. If you’re using dry white wine, now is the time to add it. Pour in 1/2 cup of white wine (Sauvignon Blanc or Pinot Grigio are excellent choices) and immediately scrape up any browned bits from the bottom of the pan with a wooden spoon. Let the wine simmer vigorously and reduce by about half, which should take 2-3 minutes. This step, called “deglazing,” adds another layer of sophisticated flavor, acidity, and helps release all those tasty fond bits, incorporating them into the sauce. If you’re skipping the wine, you can simply proceed directly to the next step, perhaps adding a little extra broth.
  6. Pour in the 3 cups of beef broth. Stir in the 1 tablespoon of Worcestershire sauce, which adds a fantastic savory depth, and the 1 tablespoon of Dijon mustard. Bring the mixture to a gentle simmer. Reduce the heat to medium-low and let the sauce simmer for 10-15 minutes, allowing the flavors to meld beautifully and the sauce to thicken ever so slightly. This simmering time is important for developing a robust, cohesive flavor profile for our Blackened Shrimp Stroganoff.
  7. While the sauce is simmering, take your 1/2 cup of full-fat sour cream and the 1/4 cup of heavy cream. In a small bowl, whisk them together until completely smooth. It is absolutely essential that your sour cream is at room temperature before adding it to the hot sauce. This simple trick significantly reduces the risk of curdling, ensuring your stroganoff sauce remains beautifully smooth, luxurious, and creamy.
  8. Remove the skillet from the heat, or at least turn the heat to the absolute lowest setting possible. Gradually whisk the sour cream and heavy cream mixture into the simmering sauce. Whisk constantly until fully incorporated and the sauce is wonderfully smooth and creamy. It’s very important not to boil the sauce once the sour cream has been added, as this can cause it to curdle, resulting in a grainy texture. We want a gentle warmth to meld the flavors, not a rolling boil that would break the emulsion.
  9. Taste the sauce and adjust seasonings. Add salt and freshly ground black pepper to your liking. Remember, you started with a low-sodium broth, so you have full control. If you enjoy a little heat, now is the time to stir in that pinch of red pepper flakes for a subtle kick. The sauce should be rich, tangy, and deeply savory. If the sauce seems too thick, add a splash of your reserved pasta water until it reaches your desired consistency – start with a tablespoon or two and add more as needed. If it’s too thin, you can let it simmer very gently for a few more minutes (again, being careful not to boil) or whisk in a slurry of 1 teaspoon cornstarch dissolved in 1 tablespoon cold water, then simmer gently until thickened to perfection.

Combining and Finishing Our Blackened Shrimp Stroganoff

We’re almost there! Now for the exciting part – bringing everything together into a harmonious and incredibly satisfying dish. This is where the Blackened Shrimp Stroganoff truly comes alive, transforming into a comforting masterpiece.

  1. Add the cooked and drained wide egg noodles directly into the prepared stroganoff sauce. Gently toss everything together, ensuring every strand of noodle is thoroughly coated in that luxurious, creamy sauce. The residual warmth from the noodles and the sauce will further soften the noodles and allow them to absorb even more of that incredible flavor.
  2. Carefully fold in the blackened shrimp. You want to do this gently to avoid breaking up the shrimp and to ensure their beautiful blackened crust remains as intact as possible. Just enough to warm them through, about 1-2 minutes, stirring minimally. We’ve already cooked them perfectly to a tender-crisp texture, so we don’t want to overcook them now by prolonged simmering in the hot sauce, which could make them rubbery. The idea is to maintain their tender texture and distinct blackened flavor, making each bite of your Blackened Shrimp Stroganoff a delight.
  3. Give it one final taste. This is your last chance to perfect the flavors before serving. Does it need a little more salt? A generous twist of fresh black pepper? Perhaps another tiny dash of Worcestershire for an extra umami kick? Trust your palate; you’ve created this masterpiece!

Serving Suggestions and Enjoying Your Dish

The moment has arrived to savor your culinary creation! This Blackened Shrimp Stroganoff is truly a showstopper, a delightful twist on a classic that promises to become a new favorite.

  1. Portion generous servings of your delicious Blackened Shrimp Stroganoff into shallow bowls. The rich colors of the sauce, the creamy noodles, and the dark, vibrant shrimp will look incredibly inviting.
  2. Garnish each serving with a sprinkle of fresh, finely chopped parsley. The vibrant green color and fresh herbaceousness of the parsley not only make the dish look more appealing, adding a pop of freshness, but also provide a wonderful contrast and balance to the rich, savory flavors of the stroganoff.
  3. For those who love a little extra something, a dollop of fresh sour cream or a sprinkle of fresh dill on top can be a delightful addition, adding another layer of creaminess or a hint of aromatic freshness that complements the sauce beautifully.
  4. Serve immediately and prepare for compliments! This dish pairs wonderfully with a simple green salad dressed with a light vinaigrette to cut through the richness, or some crusty bread for soaking up any leftover sauce – because trust me, you won’t want to waste a single drop!

I genuinely hope you enjoy making and, more importantly, eating this Blackened Shrimp Stroganoff as much as I do. It’s a fantastic twist on a classic, offering a beautiful balance of creamy comfort and bold, spicy flavor. It’s perfect for a comforting weeknight meal or impressive enough for a dinner party. Happy cooking, my friends!

Creamy Blackened Shrimp Stroganoff Recipe - Easy & Flavorful

Conclusion:

And there you have it, my friends! We’ve reached the delicious culmination of our culinary journey. I genuinely hope you’re as excited to try this recipe as I was to share it with you. If you’re looking for a dish that effortlessly marries comfort food with a vibrant, unforgettable kick, then you simply must give this a whirl. This isn’t just another weeknight meal; it’s an experience, a symphony of flavors that will dance on your palate and leave you craving more. It takes the familiar, beloved concept of a creamy stroganoff and elevates it to a whole new level, infusing it with the smoky, spicy, and utterly irresistible character of perfectly blackened shrimp. The rich, savory sauce, perfectly balanced with a hint of tang, clings to every strand of pasta, while the succulent shrimp burst with flavor in every bite. It’s a dish that feels sophisticated enough for a special occasion, yet surprisingly straightforward to whip up even on your busiest evenings.

What makes this recipe truly stand out is its incredible depth of flavor. The blackening seasoning creates a beautiful crust and a punchy heat that’s beautifully mellowed by the creamy, earthy mushroom sauce. It’s that contrast – the fiery shrimp against the cool, luxurious sauce – that makes each mouthful an absolute delight. I’ve found that it consistently impresses guests, making them wonder if you’ve spent hours slaving away in the kitchen, when in reality, it comes together with surprising speed. Trust me when I say that the effort-to-reward ratio here is off the charts. You’ll be enjoying a restaurant-quality meal without the fuss, and most importantly, without compromising on taste or texture. The tender, perfectly cooked shrimp, coated in that incredible blackening spice, is the star here, but the supporting cast of creamy sauce and al dente noodles truly makes the Blackened Shrimp Stroganoff shine.

Now, let’s talk about how you can make this masterpiece truly your own or serve it up in style. While traditional egg noodles are my go-to for their classic stroganoff appeal, don’t hesitate to experiment! This dish would be equally delightful served over fluffy white rice, nutty wild rice, or even a bed of quinoa for a lighter, grain-forward option. For those seeking a lower-carb alternative, consider pairing it with cauliflower rice or zucchini noodles; the rich sauce is so flavorful it can carry any base. On the side, a simple crisp green salad with a light vinaigrette would offer a refreshing counterpoint to the richness of the stroganoff. A basket of crusty bread for soaking up every last drop of that incredible sauce is also never a bad idea! And don’t forget the garnishes – a sprinkle of fresh chopped parsley or chives adds a burst of color and a fresh, herbaceous note that brightens the entire dish.

Feeling adventurous? You can easily adjust the spice level by varying the amount of blackening seasoning you use, or by adding a pinch of cayenne pepper to the sauce for an extra kick. For a dairy-free version, consider using full-fat coconut milk or a high-quality cashew cream alternative in place of the sour cream and broth, though the flavor profile will shift slightly. If mushrooms aren’t your favorite, you could try incorporating bell peppers, spinach, or even sun-dried tomatoes for different layers of flavor and texture. And while shrimp is king here, if you ever wanted to adapt the sauce concept, thinly sliced chicken breast or even a firm white fish could work in a pinch, though you’d miss the unique magic of the blackened shrimp. Remember, cooking is about creativity and making a recipe truly yours, so feel free to play around with these suggestions!

So, what are you waiting for? I wholeheartedly encourage you to roll up your sleeves, gather your ingredients, and dive into making this incredible Blackened Shrimp Stroganoff. I have no doubt that it will become a cherished staple in your recipe rotation. Once you’ve had a chance to savor every mouthwatering bite, please, please come back and share your experience with me! Did you add a secret ingredient? Did you serve it over something unexpected? How did your family and friends react? I absolutely love hearing about your culinary adventures and seeing your creations. Your feedback not only brightens my day but also helps inspire other home cooks in our community. Let’s spread the joy of good food! Happy cooking, everyone!


Creamy Blackened Shrimp Stroganoff

Creamy Blackened Shrimp Stroganoff

An exhilarating culinary journey for your taste buds, transforming a timeless comfort food into an unexpectedly vibrant and utterly delicious culinary experience. This recipe infuses the hearty essence of traditional Stroganoff with sensational seafood, featuring perfectly seasoned, smoky blackened shrimp in a velvety sour cream sauce with pasta.

Prep Time
25 Minutes

Cook Time
45 Minutes

Total Time
10 Minutes

Servings
4 servings

Ingredients

  • 6 ounces fettuccini pasta
  • ⅔ cup chicken broth
  • ½ cup sour cream
  • 1 cup chicken broth

Instructions

  1. Step 1
    Pat 1.5 lbs shrimp very dry. Toss with 1 tbsp melted unsalted butter, 1 tbsp olive oil, and 3 tbsp blackening seasoning. Heat a large, heavy skillet (preferably cast-iron) over medium-high heat with the remaining 1 tbsp unsalted butter and 1 tbsp olive oil. Cook seasoned shrimp in a single layer for 1-2 minutes per side until blackened and opaque. Do not overcrowd; cook in batches if necessary. Remove shrimp immediately and set aside.
  2. Step 2
    Bring a large pot of heavily salted water to a rolling boil. Add 6 ounces fettuccini pasta and cook according to package directions until al dente. Before draining, reserve about 1 cup of the starchy pasta water. Drain pasta thoroughly and set aside.
  3. Step 3
    Using the same skillet, melt 2 tbsp unsalted butter and 1 tbsp olive oil over medium heat. Sauté 1 large finely diced yellow onion for 5-7 minutes until soft and translucent. Stir in 3-4 cloves minced garlic; cook for 1 minute until wonderfully fragrant. Add 16 oz thinly sliced cremini mushrooms; increase heat to medium-high and sauté for 8-10 minutes until they release moisture, brown beautifully, and shrink significantly.
  4. Step 4
    If using, pour in ½ cup dry white wine (or non-alcoholic white wine alternative/broth), scrape up any browned bits from the pan, and reduce by about half (2-3 minutes). Stir in ⅔ cup chicken broth, 1 cup chicken broth, 1 tbsp Worcestershire sauce, and 1 tbsp Dijon mustard. Bring the mixture to a gentle simmer, then reduce heat to medium-low and let the sauce simmer for 10-15 minutes, allowing flavors to meld and the sauce to thicken slightly.
  5. Step 5
    In a small bowl, whisk ½ cup room-temperature full-fat sour cream with ¼ cup heavy cream until completely smooth. Remove skillet from heat (or set to the absolute lowest setting). Gradually whisk the cream mixture into the simmering sauce until wonderfully smooth and creamy. It’s crucial not to boil the sauce once the sour cream has been added to prevent curdling. Taste the sauce and adjust seasonings with salt, freshly ground black pepper, and an optional pinch of red pepper flakes for a subtle kick. If the sauce seems too thick, add a splash of your reserved pasta water until it reaches your desired consistency.
  6. Step 6
    Add the cooked and drained fettuccini pasta directly into the prepared stroganoff sauce and gently toss everything together, ensuring every strand of pasta is thoroughly coated. Carefully fold in the blackened shrimp, just enough to warm them through (about 1-2 minutes) without overcooking. Give it one final taste and adjust seasonings if necessary. Portion generous servings into shallow bowls and garnish each with a sprinkle of fresh, finely chopped parsley. Optionally, serve with an extra dollop of sour cream or a sprinkle of fresh dill.

Important Information

Nutrition Facts (Per Serving)

It is important to consider this information as approximate and not to use it as definitive health advice.

Allergy Information

Please check ingredients for potential allergens and consult a health professional if in doubt.

« Previous Post
Hearty Slow Cooker Cowboy Potato Casserole Recipe
Next Post »
Loaded Beef Bacon Cheeseburger Pasta: Easy & Delicious!

If you enjoyed this…

Delicious Fall Pasta Salad: Easy & Flavorful Recipe!

Korean Ground Beef

Korean Ground Beef Bowl

Chicken Biryani

Chicken Biryani Recipe – A Fragrant and Flavorful Feast!

Primary Sidebar

Browse by Diet

BreakfastDinnerLunchDessertAppetizer

Sweet Peach Yogurt Parfait Delight

One of my fondest memories is from a lazy summer afternoon spent at my grandmother’s house. The sun filtered through the kitchen window, casting a warm glow over the table where she would create her culinary magic. It was during one of those blissful moments that I first tasted her Peach Yogurt Parfait with Honey and Granola. The sweet aroma of ripe peaches mingling with creamy yogurt and the crunch of granola was nothing short of heavenly. It felt like summer captured in a bowl, and I still remember the joy of diving in with a spoon, each layer revealing a new burst of flavor.

When I think about that parfait, I can almost hear the gentle hum of the bees outside, reminding me of the floral notes that honey brings to every bite. The vibrant yellows and soft oranges of the peaches contrast beautifully with the creamy white yogurt and the golden crunch of granola. It’s a dish that not only looks delightful but also tastes like a celebration of fresh, wholesome ingredients.

What makes my version of this Peach Yogurt Parfait special is the careful balance of flavors and textures. I use ripe, juicy peaches, drizzled with locally sourced honey, and a homemade granola that’s bursting with nuts and seeds for an extra crunch. It’s a simple dish, but every layer is crafted with love and attention.

Let me show you exactly how to make this delightful parfait, so you can bring a bit of that summer magic into your kitchen!

Sweet Peach Yogurt Parfait Delight

Why You’ll Love This Recipe

  • Delightfully creamy texture from the Greek yogurt, paired with the juicy sweetness of fresh peaches.
  • Ready in under 20 minutes, making it a quick and satisfying breakfast or snack option.
  • Budget-friendly, using common ingredients that you may already have in your pantry.
  • Customizable with your favorite granola and nuts, allowing you to tailor each parfait to your taste.
  • Perfectly balanced flavors with the bright acidity of lemon juice and the sweetness of honey enhancing the peaches.

Ingredients

  • For the Parfait:
  • 2 cups plain Greek yogurt (or vanilla yogurt for a sweeter option)
  • 2 large ripe peaches, diced (about 2 cups)
  • 1 tablespoon fresh lemon juice (to prevent browning of peaches)
  • 2 tablespoons honey (plus more for drizzling)
  • 1 teaspoon vanilla extract (optional for extra flavor)
  • For the Granola:
  • 1 cup granola (store-bought or homemade; see notes for a simple granola recipe)
  • 1/4 cup sliced almonds (optional for added crunch)
  • 1/4 cup shredded coconut (optional for added flavor)

Let’s dive into some key ingredients that make this Peach Yogurt Parfait so delightful! First, the Greek yogurt is not only creamy but also packed with protein, making it a satisfying option for breakfast or a snack. If you’re looking for a sweeter option, you can easily substitute it with vanilla yogurt, though it may alter the overall flavor balance. Next, the ripe peaches are the star of the show; their natural sweetness shines through, so I recommend choosing peaches that yield slightly to pressure, indicating they’re perfectly ripe. If peaches aren’t in season, feel free to use nectarines or even frozen peaches—just thaw them before use. Finally, honey adds a lovely floral sweetness that ties everything together. If you prefer, maple syrup can serve as a delicious substitute.

Step-by-Step Instructions

  1. Start by preparing the peaches. Wash them thoroughly, then slice and dice them into bite-sized pieces. In a medium bowl, toss the diced peaches with 1 tablespoon of fresh lemon juice to prevent browning. Set aside for about 5 minutes while the lemon juice works its magic.
  2. In a separate bowl, combine the Greek yogurt, 2 tablespoons of honey, and 1 teaspoon of vanilla extract if using. Stir the mixture until smooth and thoroughly blended. This should take about a minute. Avoid overmixing to maintain the creaminess of the yogurt.
  3. Now it’s time to layer your parfait. Grab a clear glass or bowl to showcase your beautiful creation. Start with a generous spoonful of the yogurt mixture at the bottom—about 1/4 cup will do. Use a spoon to spread it evenly.
  4. Add a layer of the diced peaches over the yogurt, ensuring they cover the yogurt completely. You might want to use about half of what you have prepared—roughly 1 cup. This layer should be visually appealing, so arrange the peaches neatly.
  5. Sprinkle 1/4 cup of granola over the peaches. This adds a delightful crunch. Make sure to distribute it evenly to ensure every bite has that satisfying texture. Avoid packing it down too tightly, as you want it to maintain its crunch.
  6. Repeat the layers: spoon in another 1/4 cup of yogurt, followed by another cup of peaches, and another sprinkle of granola. You should have at least two layers, but feel free to add more depending on your glass size.
  7. Finish off your parfait with a drizzle of honey on top for added sweetness and a touch of elegance. If you’re using sliced almonds or shredded coconut, sprinkle them on top now. It adds a lovely visual contrast and extra flavor.
  8. Serve immediately or refrigerate for up to 30 minutes before serving to allow the flavors to meld together. However, I recommend enjoying it fresh to maintain the granola’s crunch.

Pro Tips for the Best Peach Yogurt Parfait With Honey And Granola

  • Make sure to choose ripe peaches for the best flavor and texture. A common mistake is using unripe fruit, which can lead to a less enjoyable parfait. Look for peaches that are fragrant and slightly soft to the touch.
  • Use a clear glass to assemble your parfait; this not only makes for a beautiful presentation but also allows you to see the colorful layers, which adds to the enjoyment of eating it.
  • For an even creamier texture, consider whipping the Greek yogurt with a hand mixer for a couple of minutes before layering. This small adjustment makes a huge difference in mouthfeel.
  • Be mindful of the granola-to-yogurt ratio. Too much granola can overwhelm the parfait, while too little can make it feel too creamy. Aim for about 1/4 cup of granola per layer for the perfect balance.
  • If you’re making this for a gathering, consider preparing the yogurt and peaches ahead of time and layering them just before serving. This ensures the granola stays crunchy!

Variations & Serving Ideas

There are so many ways to get creative with your Peach Yogurt Parfait! For a tropical twist, swap out the peaches for mangoes or pineapples and top with coconut flakes. If you prefer a berry flavor, mix in some blueberries or strawberries with the peaches for added color and taste. For a nutty version, incorporate chopped walnuts or pecans instead of almonds.

As for serving ideas, this parfait pairs beautifully with a side of scrambled eggs for a hearty breakfast or fresh fruit salad for a light lunch. You might also enjoy it alongside whole grain toast with almond butter for an energizing snack. The contrast of flavors and textures will elevate your meal experience!

Storage, Make-Ahead & Reheating

The Peach Yogurt Parfait is best enjoyed fresh, but you can prepare some components ahead of time. Store the layered parfait in an airtight container in the refrigerator for up to 24 hours. However, be cautious; the granola may lose its crunch if stored too long. You can freeze the yogurt and peach mixture for up to 2 months; just remember to thaw it in the refrigerator overnight before serving.

If you plan to enjoy this dish the next day, it can taste even better as the flavors meld together. Just remember to add the granola right before serving to keep its delightful crunch!

Frequently Asked Questions

Can I make Peach Yogurt Parfait With Honey And Granola ahead of time?

Yes — in fact, it tastes even better the next day as the flavors meld. However, I recommend waiting to add the granola until just before serving to maintain its crunch.

What can I substitute for Greek yogurt?

If you prefer a lighter option, you can substitute Greek yogurt with regular yogurt or a dairy-free alternative like coconut yogurt. Just remember that this may alter the creaminess and flavor profile slightly.

Can I use frozen peaches for this parfait?

Absolutely! Just make sure to thaw the frozen peaches before using them. They will still add great flavor, though the texture may be slightly softer than fresh peaches.

How do I make the parfait vegan?

To make a vegan version, substitute the Greek yogurt with a plant-based yogurt alternative, and replace honey with maple syrup or agave nectar. This keeps the parfait sweet while adhering to a vegan diet.

What other fruits can I use in this recipe?

You can mix and match fruits based on your preference. Try using strawberries, blueberries, raspberries, or even bananas. Just make sure to adjust the lemon juice as needed to prevent browning.

Sweet Peach Yogurt Parfait Delight

Final Thoughts

The Peach Yogurt Parfait with Honey and Granola is a delightful blend of creamy yogurt, sweet peaches, and crunchy granola that creates a satisfying and nourishing treat. Each layer bursts with flavor, making it a perfect choice for breakfast or a light dessert.

This is the kind of recipe I come back to again and again, especially when I want something refreshing and wholesome to start my day. The harmony of sweet and tart flavors, combined with the delightful crunch, never fails to lift my spirits!

I encourage you to give this parfait a try and indulge in its comforting goodness. Feel free to share your results or even add your own twist—perhaps a sprinkle of cinnamon or a handful of nuts. Enjoy creating your perfect parfait!

Print
clock clock iconcutlery cutlery iconflag flag iconfolder folder iconinstagram instagram iconpinterest pinterest iconfacebook facebook iconprint print iconsquares squares iconheart heart iconheart solid heart solid icon

Peach Yogurt Parfait


  • Author: Lily author
  • Total Time: 15 minutes
  • Yield: 4 servings 1x
Pin Recipe
Print Recipe

Description

This Peach Yogurt Parfait combines creamy Greek yogurt, juicy peaches, and crunchy granola for a delightful treat. It’s a perfect breakfast or snack that captures the essence of summer in every bite.


Ingredients

Scale
  • For the Parfait:
  • 2 cups plain Greek yogurt (or vanilla yogurt for a sweeter option)
  • 2 large ripe peaches, diced (about 2 cups)
  • 1 tablespoon fresh lemon juice (to prevent browning of peaches)
  • 2 tablespoons honey (plus more for drizzling)
  • 1 teaspoon vanilla extract (optional for extra flavor)
  • For the Granola:
  • 1 cup granola (store-bought or homemade; see notes for a simple granola recipe)
  • 1/4 cup sliced almonds (optional for added crunch)
  • 1/4 cup shredded coconut (optional for added flavor)

Instructions

  1. Start by preparing the peaches. Wash them thoroughly, then slice and dice them into bite-sized pieces. In a medium bowl, toss the diced peaches with 1 tablespoon of fresh lemon juice to prevent browning. Set aside for about 5 minutes while the lemon juice works its magic.
  2. In a separate bowl, combine the Greek yogurt, 2 tablespoons of honey, and 1 teaspoon of vanilla extract if using. Stir the mixture until smooth and thoroughly blended. This should take about a minute. Avoid overmixing to maintain the creaminess of the yogurt.
  3. Now it’s time to layer your parfait. Grab a clear glass or bowl to showcase your beautiful creation. Start with a generous spoonful of the yogurt mixture at the bottom—about 1/4 cup will do. Use a spoon to spread it evenly.
  4. Add a layer of the diced peaches over the yogurt, ensuring they cover the yogurt completely. You might want to use about half of what you have prepared—roughly 1 cup. This layer should be visually appealing, so arrange the peaches neatly.
  5. Sprinkle 1/4 cup of granola over the peaches. This adds a delightful crunch. Make sure to distribute it evenly to ensure every bite has that satisfying texture. Avoid packing it down too tightly, as you want it to maintain its crunch.
  6. Repeat the layers: spoon in another 1/4 cup of yogurt, followed by another cup of peaches, and another sprinkle of granola. You should have at least two layers, but feel free to add more depending on your glass size.
  7. Finish off your parfait with a drizzle of honey on top for added sweetness and a touch of elegance. If you’re using sliced almonds or shredded coconut, sprinkle them on top now. It adds a lovely visual contrast and extra flavor.
  8. Serve immediately or refrigerate for up to 30 minutes before serving to allow the flavors to meld together. However, I recommend enjoying it fresh to maintain the granola’s crunch.
  • Prep Time: 15 mins
  • Cook Time: 0 mins
  • Category: Breakfast
  • Method: No-cook
  • Cuisine: American

Nutrition

  • Serving Size: 1 parfait
  • Calories: 250
  • Sugar: 20 g
  • Sodium: 50 mg
  • Fat: 5 g
  • Saturated Fat: 2 g
  • Unsaturated Fat: 3 g
  • Trans Fat: 0 g
  • Carbohydrates: 40 g
  • Fiber: 3 g
  • Protein: 10 g
  • Cholesterol: 10 mg

Keywords: Choose ripe peaches for the best flavor and texture. Use a clear glass for a beautiful presentation. For creaminess, consider whipping the yogurt before layering. Be mindful of the granola-to-yogurt ratio. Prepare yogurt and peaches ahead of time for gatherings, layering just before serving.

Did you make this recipe?

Share a photo and tag us — we can't wait to see what you've made!

Sun-Kissed Frozen Orange Cream Slush

As a child, summer days felt like they lasted forever. I remember the sticky heat wrapping around me as I played outside, my laughter mingling with the sounds of the neighborhood. But nothing could cool me down quite like the moment I’d spot my grandmother, laboring over her blender, whipping up her famous Frozen Orange Creamsicle Slush. That vibrant orange treat, with its frosty texture and sweet citrus aroma, was like a burst of sunshine in a cup. Just one sip, and I could feel the coolness wash over me, sparking pure joy.

This Frozen Orange Creamsicle Slush has a way of making you feel like a kid again. Its creamy, dreamy consistency is a delightful balance of bright orange and soft vanilla, inviting you to dive right in. The refreshing tang of orange dances on your tongue, while the smooth creaminess envelops you in a comforting embrace. It’s a nostalgic treat that’s perfect for hot summer afternoons or anytime you need a little pick-me-up.

What makes my version of this slush stand out is the addition of a hint of vanilla bean, which elevates the flavor and adds an extra layer of richness. Plus, it’s super easy to whip up with just a few simple ingredients that you probably already have on hand! So, if you’re ready to relive those sun-soaked memories, let me show you exactly how to make it.

Sun-Kissed Frozen Orange Cream Slush

Why You’ll Love This Recipe

  • Each slush is a perfect blend of creamy vanilla and zesty orange, creating a nostalgic flavor reminiscent of summer days.
  • This refreshing treat is ready in under 15 minutes, making it an ideal quick dessert for unexpected guests or hot afternoons.
  • With just 8 simple ingredients, it’s budget-friendly, ensuring you don’t have to break the bank to enjoy a delicious slush.
  • The slush has a perfectly smooth texture, thanks to the combination of ice and ice cream, providing a delightful contrast to the bright citrus flavors.
  • It’s highly customizable; you can easily adjust the sweetness and add fresh herbs for a unique twist that suits your taste.

Ingredients

  • 2 cups orange juice (freshly squeezed or store-bought)
  • 1 cup vanilla ice cream
  • 1 cup crushed ice
  • 1/2 cup milk (whole or 2%)
  • 1/4 cup granulated sugar (adjust based on sweetness preference)
  • 1 teaspoon vanilla extract
  • Zest of 1 orange (for added flavor)
  • Fresh orange slices and mint leaves (for garnish)

The star of this Frozen Orange Creamsicle Slush is the orange juice, which provides the vibrant, citrusy base. Freshly squeezed juice will yield the brightest flavor, but store-bought options can be just as convenient. If you’re opting for store-bought, choose 100% pure juice with no added sugars for the best results. Another essential ingredient is the vanilla ice cream; it adds creaminess and sweetness. You can substitute it with dairy-free ice cream if you’re looking for a vegan option. Whole or 2% milk complements the ice cream, creating a smooth blend. If you want a lower-calorie version, almond or oat milk can be good alternatives.

Lastly, the granulated sugar can be adjusted based on your sweetness preference. If you prefer a more natural sweetener, consider using honey or agave syrup. The orange zest enhances the flavor profile, providing an aromatic pop that brings the whole slush together. Don’t skip it! It adds an extra layer of brightness that makes this slush truly special.

Step-by-Step Instructions

  1. Start by preparing your ingredients. Gather 2 cups of orange juice, 1 cup of vanilla ice cream, and 1 cup of crushed ice. Make sure the ice is finely crushed, as larger chunks can make blending difficult.
  2. In a blender, combine the orange juice, vanilla ice cream, crushed ice, and 1/2 cup of milk. Add 1/4 cup of granulated sugar and 1 teaspoon of vanilla extract. If you like a sweeter slush, consider adding a bit more sugar at this stage.
  3. Add the zest of 1 orange to the blender. This step is crucial for enhancing the citrus flavor of your slush. Make sure not to include the bitter white pith—only the flavorful zest.
  4. Blend the mixture on medium-high speed for about 30-45 seconds. Stop once the ingredients are fully combined and the slush has a smooth, even consistency. If you notice large chunks of ice, blend for an additional 10-15 seconds. Avoid over-blending, as this can make the slush too liquidy.
  5. Once blended, taste the slush. If it needs more sweetness, add a little more sugar and blend for a few more seconds. If it’s too thick, you can add a splash of milk to reach your desired consistency.
  6. Pour the slush into glasses. This recipe typically serves 4, but you can easily double it for larger gatherings. Use a spoon to help guide the slush into the glasses if needed.
  7. Garnish each serving with fresh orange slices and mint leaves. The mint not only adds a pop of color but also a refreshing aroma that complements the citrus flavors beautifully.
  8. Serve immediately and enjoy! If you’ve made extra, you can refrigerate it for a short time, but it’s best enjoyed fresh.

Pro Tips for the Best Frozen Orange Creamsicle Slush

  • Don’t skip the orange zest! It’s a game-changer for flavor. Always zest before juicing to make it easier.
  • Use a high-powered blender for the best texture. A standard blender may struggle with ice, leading to uneven consistency. If you have a food processor, that can work too, but ensure the ice is finely crushed.
  • Adjust the ice-to-liquid ratio carefully. If your slush is too thick, it won’t blend well. Start with less ice and add more until you reach your preferred texture.
  • Be cautious with the sugar! Always start with the lower amount, as you can easily add more, but it’s hard to fix an overly sweet slush.
  • For a fun twist, consider adding a splash of coconut milk or a handful of fresh fruit like strawberries or pineapple. This not only enhances the flavor but also adds a beautiful color contrast.

Variations & Serving Ideas

There are countless ways to put a spin on your Frozen Orange Creamsicle Slush. Consider making a tropical version by adding in some pineapple juice or coconut milk for a delightful tropical twist. If you’re feeling adventurous, try incorporating a handful of frozen mango or peach slices for added sweetness. For a lighter version, swap out the vanilla ice cream for Greek yogurt for a creamy yet tangy alternative.

As for serving ideas, this refreshing slush pairs wonderfully with light summer dishes like grilled chicken skewers, fish tacos, or a simple salad topped with citrus vinaigrette. The bright, zesty flavors of the slush complement these dishes perfectly, making them an ideal pairing for a sunny day.

Storage, Make-Ahead & Reheating

This Frozen Orange Creamsicle Slush is best enjoyed fresh, but if you have leftovers, you can store them in an airtight container in the fridge for up to 2 days. Just keep in mind that the slush may lose some of its texture over time as the ice melts. It doesn’t freeze well, as the ice will turn into a solid block. If you must freeze it, blend again after thawing to restore the slushy consistency. This treat is best the day you make it, as the flavors meld together beautifully overnight, enhancing its deliciousness.

Frequently Asked Questions

Can I make Frozen Orange Creamsicle Slush ahead of time?

Yes — in fact, it tastes even better the next day as the flavors meld. However, it’s best to enjoy it fresh, as the texture can change if stored for too long. If you need to prepare it ahead, keep it in the fridge and re-blend before serving.

What kind of orange juice should I use?

For the best flavor, use freshly squeezed orange juice. However, if you’re short on time, opt for 100% pure store-bought juice without added sugars. This will ensure that your slush remains flavorful and refreshing.

Can I substitute the vanilla ice cream?

Absolutely! If you’re looking for a dairy-free option, coconut milk ice cream or a non-dairy vanilla ice cream can work wonderfully. They will still provide the creamy texture and sweetness you desire.

How can I adjust the sweetness of my slush?

You can easily adjust the sweetness by modifying the amount of sugar added. Start with 1/4 cup and taste the mixture before blending. If you prefer it sweeter, add more sugar gradually until it reaches your desired level.

What should I do if my slush is too thick?

If your slush is too thick, simply add a splash of milk or orange juice and blend again. This will help achieve a more drinkable consistency while maintaining the slushy texture. Adjust gradually to reach your preferred thickness.

Sun-Kissed Frozen Orange Cream Slush

Final Thoughts

The Frozen Orange Creamsicle Slush is a delightful blend of refreshing citrus and creamy goodness, making it a perfect treat for warm days or any time you crave a taste of nostalgia. The way the bright orange flavor dances with the creamy texture truly elevates this slush, transforming it into a satisfying escape from the everyday.

This is the kind of recipe I come back to again and again, especially when I’m looking to cool down or impress guests at a summer gathering. It’s simple to make and always brings smiles all around! I encourage you to try this recipe for yourself—don’t hesitate to share your results or even put your own spin on it. Happy slushing!

Print
clock clock iconcutlery cutlery iconflag flag iconfolder folder iconinstagram instagram iconpinterest pinterest iconfacebook facebook iconprint print iconsquares squares iconheart heart iconheart solid heart solid icon

Frozen Orange Creamsicle Slush


  • Author: Lily author
  • Total Time: 15 minutes
  • Yield: 4 servings 1x
Pin Recipe
Print Recipe

Description

This Frozen Orange Creamsicle Slush is a refreshing treat that combines creamy vanilla and zesty orange flavors. Perfect for hot summer days, it brings back nostalgic memories with every sip.


Ingredients

Scale
  • 2 cups orange juice (freshly squeezed or store-bought)
  • 1 cup vanilla ice cream
  • 1 cup crushed ice
  • 1/2 cup milk (whole or 2%)
  • 1/4 cup granulated sugar (adjust based on sweetness preference)
  • 1 teaspoon vanilla extract
  • Zest of 1 orange (for added flavor)
  • Fresh orange slices and mint leaves (for garnish)

Instructions

  1. Start by preparing your ingredients. Gather 2 cups of orange juice, 1 cup of vanilla ice cream, and 1 cup of crushed ice. Make sure the ice is finely crushed, as larger chunks can make blending difficult.
  2. In a blender, combine the orange juice, vanilla ice cream, crushed ice, and 1/2 cup of milk. Add 1/4 cup of granulated sugar and 1 teaspoon of vanilla extract. If you like a sweeter slush, consider adding a bit more sugar at this stage.
  3. Add the zest of 1 orange to the blender. This step is crucial for enhancing the citrus flavor of your slush. Make sure not to include the bitter white pith—only the flavorful zest.
  4. Blend the mixture on medium-high speed for about 30-45 seconds. Stop once the ingredients are fully combined and the slush has a smooth, even consistency. If you notice large chunks of ice, blend for an additional 10-15 seconds. Avoid over-blending, as this can make the slush too liquidy.
  5. Once blended, taste the slush. If it needs more sweetness, add a little more sugar and blend for a few more seconds. If it’s too thick, you can add a splash of milk to reach your desired consistency.
  6. Pour the slush into glasses. This recipe typically serves 4, but you can easily double it for larger gatherings. Use a spoon to help guide the slush into the glasses if needed.
  7. Garnish each serving with fresh orange slices and mint leaves. The mint not only adds a pop of color but also a refreshing aroma that complements the citrus flavors beautifully.
  8. Serve immediately and enjoy! If you’ve made extra, you can refrigerate it for a short time, but it's best enjoyed fresh.
  • Prep Time: 15 min
  • Cook Time: 0 min
  • Category: Dessert
  • Method: Blending
  • Cuisine: American

Nutrition

  • Serving Size: 1 serving
  • Calories: 200
  • Sugar: 30 g
  • Sodium: 50 mg
  • Fat: 5 g
  • Saturated Fat: 3 g
  • Unsaturated Fat: 2 g
  • Trans Fat: 0 g
  • Carbohydrates: 40 g
  • Fiber: 1 g
  • Protein: 2 g
  • Cholesterol: 20 mg

Keywords: Don't skip the orange zest! It's a game-changer for flavor. Always zest before juicing to make it easier.

Did you make this recipe?

Share a photo and tag us — we can't wait to see what you've made!

Zesty Lemon Poppy Seed Delight

One rainy afternoon, I found myself in my grandmother’s cozy kitchen, the kind that always smelled like warmth and love. She was whipping up her famous Lemon Poppy Seed Loaf, a recipe that had been passed down through generations. As the batter came together, the zesty aroma of fresh lemons filled the air, mingling perfectly with the nutty fragrance of poppy seeds. I can still picture her, apron-clad, as she expertly drizzled a vibrant citrus icing over the loaf, creating a glossy, sun-kissed finish that beckoned us to dive in. It was a moment that sparked my own passion for baking, and this recipe has become a cherished staple in my home ever since.

When you take a bite of this Lemon Poppy Seed Loaf, it’s like a burst of sunshine on your palate. The loaf is beautifully golden, with a tender crumb that melts in your mouth. Each slice is speckled with tiny poppy seeds, adding a delightful crunch that contrasts beautifully with the tangy sweetness of the lemon. And that citrus icing? It’s the finishing touch that elevates this loaf from ordinary to extraordinary, with its bright, zesty flavor dancing on your taste buds.

This recipe stands out because it embraces simplicity while delivering on flavor. I’ve added a hint of vanilla to the batter, enhancing the overall taste and making it even more indulgent. Trust me, once you make this Lemon Poppy Seed Loaf With Citrus Icing, it’ll become a go-to in your baking repertoire.

So, let me show you exactly how to make it!

Zesty Lemon Poppy Seed Delight

Why You’ll Love This Recipe

  • Moist and tender crumb that melts in your mouth, thanks to the perfect balance of butter and buttermilk.
  • Bright, zesty lemon flavor paired with crunchy poppy seeds, creating a delightful texture and taste experience.
  • Easy to whip up in just about an hour, perfect for last-minute gatherings or a cozy afternoon treat.
  • Budget-friendly with everyday ingredients, making it an accessible option for all home bakers.
  • The citrus icing adds a sweet tang that elevates the loaf, turning a simple recipe into a showstopper!

Ingredients

  • 1 ½ cups (190g) all-purpose flour
  • 1 teaspoon baking powder
  • ½ teaspoon baking soda
  • ½ teaspoon salt
  • 3 tablespoons poppy seeds
  • ½ cup (115g) unsalted butter, softened to room temperature
  • 1 cup (200g) granulated sugar
  • 2 large eggs
  • 1 teaspoon vanilla extract
  • 1 teaspoon lemon zest (from about 1 medium lemon)
  • ½ cup (120ml) buttermilk
  • 2 tablespoons fresh lemon juice

For the Citrus Icing:

  • 1 cup (120g) powdered sugar
  • 2 tablespoons fresh lemon juice
  • 1 tablespoon orange juice
  • 1 teaspoon lemon zest (for garnish, optional)

Let’s dive into the key ingredients that make this Lemon Poppy Seed Loaf so special. The all-purpose flour provides the structure and base for the loaf, while the baking powder and baking soda ensure it rises perfectly, giving the loaf a light texture. For a gluten-free variation, you could substitute the flour with a gluten-free all-purpose blend. Poppy seeds not only add a delightful crunch but also contribute to the unique flavor profile that pairs well with the citrus notes.

Unsalted butter is crucial for achieving the buttery richness that makes this loaf so moist. If you’re looking for a dairy-free option, coconut oil or a vegan butter can be used instead. The buttermilk is another essential component, providing acidity that activates the baking soda for a fluffy texture. If you don’t have buttermilk on hand, you can easily make a substitute by mixing ½ cup of milk with 1 tablespoon of vinegar or lemon juice and letting it sit for about 5 minutes.

Step-by-Step Instructions

  1. Preheat your oven to 350°F (175°C). Grease a 9×5-inch loaf pan or line it with parchment paper for easy removal later.
  2. In a medium mixing bowl, whisk together 1 ½ cups of all-purpose flour, 1 teaspoon of baking powder, ½ teaspoon of baking soda, ½ teaspoon of salt, and 3 tablespoons of poppy seeds. This helps to evenly distribute the baking agents and ensures a uniform rise.
  3. In a large mixing bowl, cream together ½ cup of softened unsalted butter and 1 cup of granulated sugar using an electric mixer on medium speed for about 3-4 minutes, until the mixture is light and fluffy. Make sure to scrape down the sides of the bowl occasionally.
  4. Add 2 large eggs, 1 teaspoon of vanilla extract, and 1 teaspoon of lemon zest to the creamed butter and sugar, mixing until fully combined. You want a smooth consistency, so ensure there are no lumps of butter.
  5. In a small bowl, combine ½ cup of buttermilk and 2 tablespoons of fresh lemon juice. Alternately add the dry ingredients and buttermilk mixture to the butter mixture, starting and ending with the dry ingredients. Mix just until combined; do not overmix, as this can lead to a dense loaf.
  6. Pour the batter into the prepared loaf pan. Smooth the top with a spatula, ensuring it’s even. Bake in the preheated oven for 50-60 minutes, or until a toothpick inserted in the center comes out clean. The edges should be lightly golden brown, and the center should feel just set.
  7. Once baked, remove the loaf from the oven and allow it to cool in the pan for about 10 minutes. Then, transfer it to a wire rack to cool completely. Resist the urge to slice too soon, as it will be crumbly if it’s still warm.
  8. While the loaf is cooling, prepare the citrus icing. In a medium bowl, whisk together 1 cup of powdered sugar, 2 tablespoons of fresh lemon juice, and 1 tablespoon of orange juice until smooth. If the icing is too thick, you can add a little more juice to reach your desired consistency.
  9. Once the loaf is completely cool, drizzle the citrus icing over the top. If you like, sprinkle with an additional teaspoon of lemon zest for an extra pop of flavor and color.

Pro Tips for the Best Lemon Poppy Seed Loaf With Citrus Icing

  • Be careful not to overmix your batter; this is a common mistake that can lead to a dense loaf. Mix just until the dry ingredients are incorporated for a light and fluffy texture.
  • Use room temperature ingredients, especially the butter and eggs. This helps to create a smoother batter and ensures even baking. Take your eggs out of the fridge about 30 minutes before you start.
  • For a more pronounced lemon flavor, consider adding a little lemon extract in addition to the zest and juice. Just a half teaspoon can elevate the citrus notes significantly.
  • When measuring your flour, spoon it into the measuring cup and level it off with a knife instead of scooping directly from the bag. This prevents packing and ensures you don’t end up with a dry loaf.
  • Invest in a good quality loaf pan; it makes a difference in heat distribution, which ensures even baking. If your pan is dark-coated, reduce the oven temperature by 25°F to prevent over-browning.

Variations & Serving Ideas

For a delightful twist, consider adding blueberries or raspberries to the batter for a fruity burst of flavor. You can also experiment with different citrus fruits—try lime or grapefruit zest and juice for a refreshing change. For a healthier option, substitute half of the all-purpose flour with whole wheat flour for added fiber without compromising too much on texture.

This Lemon Poppy Seed Loaf pairs beautifully with a light salad, such as a mixed greens salad with a vinaigrette, or a cup of tea for a cozy afternoon treat. It also complements a creamy cheese platter, as the acidity of the loaf balances rich cheeses perfectly. Lastly, a scoop of vanilla ice cream on the side creates a delightful contrast of temperatures and flavors!

Storage, Make-Ahead & Reheating

This Lemon Poppy Seed Loaf can be stored at room temperature for up to 3 days if wrapped tightly in plastic wrap. If you want to keep it longer, it freezes well for up to 3 months. To freeze, wrap the loaf tightly in plastic wrap and then in aluminum foil to prevent freezer burn.

When you’re ready to enjoy it again, simply thaw it in the fridge overnight. Reheat individual slices in the microwave for 15-20 seconds or in a toaster oven until warmed through. Interestingly, many people find that this loaf tastes even better the next day, as the flavors have time to meld!

Frequently Asked Questions

Can I make Lemon Poppy Seed Loaf With Citrus Icing ahead of time?

Yes — in fact, it tastes even better the next day! You can make the loaf a day in advance, allowing the flavors to develop. Just be sure to store it in an airtight container to maintain its moisture.

Can I substitute the poppy seeds?

Absolutely! If you don’t have poppy seeds on hand or prefer an alternative, you can use sesame seeds for a similar crunch or omit them entirely for a smooth loaf.

What can I use instead of buttermilk?

If you don’t have buttermilk, you can easily create a substitute by mixing ½ cup of milk (dairy or plant-based) with 1 tablespoon of vinegar or lemon juice. Let it sit for 5 minutes before using in the recipe.

How can I make this recipe gluten-free?

To make a gluten-free version of this Lemon Poppy Seed Loaf, substitute the all-purpose flour with a gluten-free all-purpose flour blend. Just ensure that the blend contains a binding agent like xanthan gum for the best results.

What is the best way to store leftover loaf?

Leftover Lemon Poppy Seed Loaf should be stored in an airtight container at room temperature for up to 3 days. For longer storage, wrap it tightly and freeze for up to 3 months. Thaw it before serving for the best texture.

Zesty Lemon Poppy Seed Delight

Final Thoughts

The Lemon Poppy Seed Loaf with Citrus Icing is truly a delightful treat that brings a burst of brightness to any occasion. The zesty lemon flavor combined with the subtle crunch of poppy seeds creates a satisfying balance, while the citrus icing adds a touch of sweetness that perfectly complements the loaf’s tanginess.

This is the kind of recipe I come back to again and again, especially when I want to brighten up a gloomy day or celebrate a small victory. The aroma that fills the kitchen as it bakes is absolutely heavenly! I encourage you to give this recipe a try; you might just find it becoming a beloved staple in your home. Don’t forget to share your results or even add your own unique twist—I can’t wait to see what you create!

Print
clock clock iconcutlery cutlery iconflag flag iconfolder folder iconinstagram instagram iconpinterest pinterest iconfacebook facebook iconprint print iconsquares squares iconheart heart iconheart solid heart solid icon

Lemon Poppy Seed Loaf


  • Author: Lily author
  • Total Time: 20 minute
  • Yield: 1 loaf 1x
Pin Recipe
Print Recipe

Description

This Lemon Poppy Seed Loaf is a delightful treat that combines zesty lemon flavor with crunchy poppy seeds. Topped with a citrus icing, it’s perfect for any occasion.


Ingredients

Scale
  • 1 ½ cups (190g) all-purpose flour
  • 1 teaspoon baking powder
  • ½ teaspoon baking soda
  • ½ teaspoon salt
  • 3 tablespoons poppy seeds
  • ½ cup (115g) unsalted butter, softened to room temperature
  • 1 cup (200g) granulated sugar
  • 2 large eggs
  • 1 teaspoon vanilla extract
  • 1 teaspoon lemon zest (from about 1 medium lemon)
  • ½ cup (120ml) buttermilk
  • 2 tablespoons fresh lemon juice
  • 1 cup (120g) powdered sugar
  • 2 tablespoons fresh lemon juice
  • 1 tablespoon orange juice
  • 1 teaspoon lemon zest (for garnish, optional)

Instructions

  1. Preheat your oven to 350°F (175°C). Grease a 9×5-inch loaf pan or line it with parchment paper for easy removal later.
  2. In a medium mixing bowl, whisk together 1 ½ cups of all-purpose flour, 1 teaspoon of baking powder, ½ teaspoon of baking soda, ½ teaspoon of salt, and 3 tablespoons of poppy seeds. This helps to evenly distribute the baking agents and ensures a uniform rise.
  3. In a large mixing bowl, cream together ½ cup of softened unsalted butter and 1 cup of granulated sugar using an electric mixer on medium speed for about 3-4 minutes, until the mixture is light and fluffy. Make sure to scrape down the sides of the bowl occasionally.
  4. Add 2 large eggs, 1 teaspoon of vanilla extract, and 1 teaspoon of lemon zest to the creamed butter and sugar, mixing until fully combined. You want a smooth consistency, so ensure there are no lumps of butter.
  5. In a small bowl, combine ½ cup of buttermilk and 2 tablespoons of fresh lemon juice. Alternately add the dry ingredients and buttermilk mixture to the butter mixture, starting and ending with the dry ingredients. Mix just until combined; do not overmix, as this can lead to a dense loaf.
  6. Pour the batter into the prepared loaf pan. Smooth the top with a spatula, ensuring it’s even. Bake in the preheated oven for 50-60 minutes, or until a toothpick inserted in the center comes out clean. The edges should be lightly golden brown, and the center should feel just set.
  7. Once baked, remove the loaf from the oven and allow it to cool in the pan for about 10 minutes. Then, transfer it to a wire rack to cool completely. Resist the urge to slice too soon, as it will be crumbly if it’s still warm.
  8. While the loaf is cooling, prepare the citrus icing. In a medium bowl, whisk together 1 cup of powdered sugar, 2 tablespoons of fresh lemon juice, and 1 tablespoon of orange juice until smooth. If the icing is too thick, you can add a little more juice to reach your desired consistency.
  9. Once the loaf is completely cool, drizzle the citrus icing over the top. If you like, sprinkle with an additional teaspoon of lemon zest for an extra pop of flavor and color.
  • Prep Time: 15 mins
  • Cook Time: 50-60 mins
  • Category: Dessert
  • Method: Baking
  • Cuisine: American

Nutrition

  • Serving Size: 1 slice
  • Calories: 200
  • Sugar: 15 g
  • Sodium: 150 mg
  • Fat: 8 g
  • Saturated Fat: 5 g
  • Unsaturated Fat: 3 g
  • Trans Fat: 0 g
  • Carbohydrates: 30 g
  • Fiber: 1 g
  • Protein: 3 g
  • Cholesterol: 40 mg

Keywords: Be careful not to overmix your batter; this is a common mistake that can lead to a dense loaf. Use room temperature ingredients for a smoother batter and even baking.

Did you make this recipe?

Share a photo and tag us — we can't wait to see what you've made!

  • Privacy Policy
  • Terms Of Service
  • Contact
  • About
  • GDPR

Copyright © 2025 Homesmad