• Skip to primary navigation
  • Skip to main content
  • Skip to primary sidebar
Homesmad

Homesmad

  • Home
  • Breakfast & Brunch
  • Appetizers & Snacks
  • Dinner
  • Dessert
  • About
  • Privacy Policy
  • Contact
Homesmad
  • Home
  • Breakfast & Brunch
  • Appetizers & Snacks
  • Dinner
  • Dessert
  • About
  • Privacy Policy
  • Contact

High Protein Chicken Enchiladas: Creamy White Sauce Recipe

November 4, 2025 by Lily author

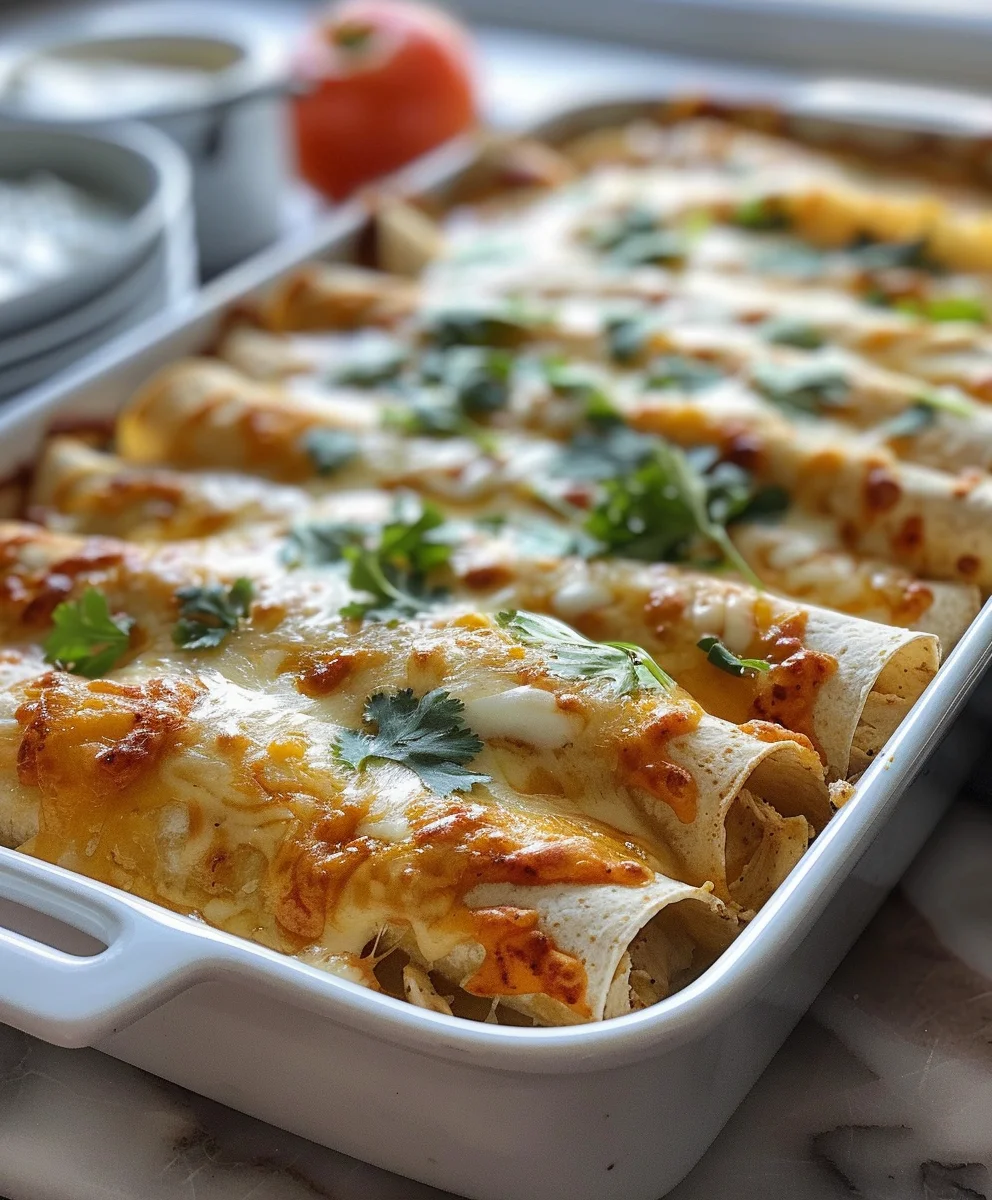
High Protein Chicken Enchiladas With White Sauce are a culinary revelation, transforming a beloved classic into a nutrient-packed powerhouse that I’m incredibly excited to share with you. Imagine sinking your fork into a dish where succulent, seasoned chicken is lovingly wrapped in soft tortillas, all bathed in a rich, creamy white sauce that’s utterly irresistible. This isn’t just a meal; it’s a comforting embrace, delivering immense flavor without compromising your commitment to a protein-rich diet.

Tracing their roots back to ancient Mayan civilizations, enchiladas have a storied history, evolving from simple corn tortillas wrapped around various fillings into the diverse and delectable dishes we cherish today. While traditional red sauces hold a special place, the allure of a luscious, creamy white sauce adds a sophisticated and comforting dimension that truly elevates the experience. I’ve always found immense joy in the satisfying warmth of a well-made enchilada, and this version, featuring our exquisite white sauce, truly sets it apart.

People absolutely adore this dish not only for its incredible taste – a perfect balance of savory chicken, creamy sauce, and soft tortillas – but also for its remarkable versatility and the convenient nutrition it offers. It’s the ultimate meal for anyone looking to enjoy a hearty, flavorful dish that supports their fitness goals. The velvety texture of the sauce, combined with the tender chicken and perfectly cooked tortillas, creates a symphony of flavors and textures that ensures every bite is pure bliss. This recipe for High Protein Chicken Enchiladas With White Sauce is destined to become a staple in your kitchen, offering comfort, satisfaction, and essential nutrients in one delicious package.

High Protein Chicken Enchiladas: Creamy White Sauce Recipe this RECIPE

Ingredients:

Embarking on the journey to create these incredibly satisfying High Protein Chicken Enchiladas With White Sauce requires a selection of fresh, flavorful ingredients. I always find that having everything prepped and measured makes the cooking process so much smoother and more enjoyable. Here’s what you’ll need to gather:

For the High Protein Chicken Filling:

  • 1.5 lbs Boneless, Skinless Chicken Breasts or Thighs: I prefer a mix of breasts and thighs for a balance of lean protein and flavor, but either works beautifully to create that essential high protein base for our enchiladas.
  • 1 tablespoon Olive Oil or Avocado Oil: For sautéing the chicken and aromatics, ensuring a rich flavor foundation.
  • 1 small Yellow Onion: Finely diced, adding a sweet aromatic depth to our chicken filling.
  • 2 cloves Garlic: Minced, because no savory dish is complete without that unmistakable garlic aroma and punch.
  • 1 (4 oz) can Diced Green Chiles: Undrained, these mild chiles are absolutely key for an authentic enchilada flavor without too much heat.
  • 1 teaspoon Ground Cumin: A warm, earthy spice that perfectly complements the chicken and chiles.
  • 1/2 teaspoon Chili Powder: Adds a subtle kick and classic Southwestern flavor profile.
  • 1/4 teaspoon Smoked Paprika: For a lovely smoky undertone that elevates the entire dish.
  • Salt and Freshly Ground Black Pepper: To taste, essential for seasoning every layer of our delicious enchiladas.
  • 1/2 cup Chicken Broth or Water: To help tenderize the chicken and keep the filling moist.
  • 1/2 cup Shredded Monterey Jack Cheese: Or a Mexican blend, melted into the chicken filling for extra creaminess and flavor.
  • 1/4 cup Fresh Cilantro: Chopped, for a burst of freshness and vibrant color, stirred in at the end.

For the Creamy White Enchilada Sauce:

  • 1/4 cup Unsalted Butter: The foundation of our roux, creating a rich base for the sauce.
  • 1/4 cup All-Purpose Flour: The thickening agent for our perfect, smooth white sauce. For a gluten-free option, you can substitute with a 1:1 gluten-free flour blend.
  • 3 cups Milk: Whole milk is preferred for the richest, creamiest texture, but 2% works well too. This is the bulk of our luscious white sauce.
  • 1 cup Chicken Broth: Adds depth and savory notes to the sauce, balancing the richness of the milk.
  • 4 oz Cream Cheese: Softened, for an extra layer of velvety creaminess and a slight tang that makes this white sauce truly irresistible.
  • 1/2 cup Shredded Monterey Jack Cheese: Melted into the sauce for even more cheesy goodness and a fantastic texture.
  • 1/2 teaspoon Garlic Powder: A staple in any good white sauce, providing a mellow garlic flavor.
  • 1/4 teaspoon Onion Powder: Enhances the savory profile of the sauce.
  • Pinch of Cayenne Pepper (Optional): For just a whisper of heat, if you like a little warmth in your white sauce.
  • Salt and Freshly Ground White Pepper: To taste. White pepper is great for white sauces as it doesn’t show up as black flecks.

For Enchilada Assembly:

  • 12-15 Corn or Flour Tortillas (6-inch): Corn tortillas are traditional and provide a great texture; flour tortillas are more pliable and less prone to tearing. Choose your preference for these glorious High Protein Chicken Enchiladas With White Sauce.
  • 1.5 cups Shredded Monterey Jack Cheese or Mexican Blend Cheese: Divided, for layering and topping the enchiladas, ensuring a perfect gooey, cheesy crust.
  • Fresh Cilantro and Diced Red Onion: For garnish, adding a final touch of freshness and color before serving.

Preparing the High Protein Chicken Filling

Let’s dive into making the heart of our High Protein Chicken Enchiladas With White Sauce – the incredibly flavorful and juicy chicken filling. This step is crucial for building the foundational taste of your dish.

  1. Prepare the Chicken: Begin by patting your boneless, skinless chicken breasts or thighs dry with paper towels. This helps achieve a better sear. Season generously with a pinch of salt and freshly ground black pepper.
  2. Sauté Aromatics: In a large skillet or Dutch oven, heat 1 tablespoon of olive oil or avocado oil over medium-high heat. Add the chicken and sear for 3-4 minutes per side until golden brown. You don’t need to cook it through entirely at this stage. Remove the chicken from the skillet and set aside on a plate.
  3. Cook Onion and Garlic: Reduce the heat to medium. Add the finely diced yellow onion to the same skillet, adding a little more oil if needed. Sauté for 5-7 minutes, stirring occasionally, until the onion is softened and translucent. This step is vital as it sweetens the onion and forms a delicious base. Next, add the minced garlic and cook for another 1 minute until fragrant, being careful not to burn it.
  4. Combine and Simmer: Return the seared chicken to the skillet with the sautéed onions and garlic. Stir in the undrained diced green chiles, ground cumin, chili powder, and smoked paprika. Pour in 1/2 cup of chicken broth or water. Bring the mixture to a gentle simmer, then reduce the heat to low, cover the skillet, and let it cook for 15-20 minutes, or until the chicken is cooked through and easily shredded. The goal here is tender, moist chicken that absorbs all these wonderful flavors.
  5. Shred the Chicken: Once the chicken is cooked, remove it from the skillet and place it on a cutting board. Using two forks, shred the chicken into bite-sized pieces. Alternatively, you can use a stand mixer with the paddle attachment on low speed for incredibly quick shredding – it’s a game-changer!
  6. Finish the Filling: Return the shredded chicken to the skillet with the onion and chile mixture. Stir in 1/2 cup of shredded Monterey Jack cheese until it melts and coats the chicken, creating a wonderfully creamy texture. Finally, fold in 1/4 cup of fresh chopped cilantro. Taste and adjust seasoning with more salt and pepper if necessary. Set aside; your delicious high protein chicken filling is ready!

Crafting the Creamy White Enchilada Sauce

Now, let’s create the star of our High Protein Chicken Enchiladas With White Sauce – the rich, velvety, and utterly irresistible white sauce. This sauce is what truly elevates the dish, providing a comforting, creamy counterpoint to the savory chicken.

  1. Make the Roux: In a medium-sized saucepan or Dutch oven, melt 1/4 cup of unsalted butter over medium heat. Once the butter is fully melted and slightly foamy, sprinkle in 1/4 cup of all-purpose flour. Whisk continuously for 1-2 minutes until a smooth paste forms and cooks out the raw flour taste. This is your roux, the foundation of a perfectly thickened sauce. It’s important to cook the roux sufficiently but avoid browning it, as we want a white sauce.
  2. Whisk in Liquids Gradually: Slowly pour in 3 cups of milk, a little at a time, whisking vigorously after each addition to prevent lumps. The mixture will thicken initially, then smooth out as more milk is incorporated. Once all the milk is added, slowly whisk in 1 cup of chicken broth, again ensuring a smooth consistency.
  3. Simmer and Thicken: Bring the sauce to a gentle simmer over medium heat, stirring frequently. Allow it to cook for 5-7 minutes, or until it has thickened to a consistency that coats the back of a spoon. It should be thick enough to cling to the enchiladas but still pourable.
  4. Add Cream Cheese and Seasonings: Reduce the heat to low. Add the softened 4 oz of cream cheese, 1/2 cup of shredded Monterey Jack cheese, 1/2 teaspoon of garlic powder, 1/4 teaspoon of onion powder, and a pinch of cayenne pepper (if using). Continue to whisk gently until both cheeses are completely melted and the sauce is smooth and luxurious. The cream cheese is your secret weapon for an unbelievably silky texture.
  5. Season to Perfection: Taste the sauce and season generously with salt and freshly ground white pepper. Remember that the saltiness of your chicken broth can vary, so taste and adjust carefully. The goal is a perfectly balanced, savory, and creamy sauce. Remove from heat; your luscious white enchilada sauce is now ready to smother those delicious enchiladas!

Assembling Your High Protein Chicken Enchiladas

This is where the magic happens – bringing all the components together to create your spectacular High Protein Chicken Enchiladas With White Sauce. Careful assembly ensures evenly distributed flavors and a beautiful presentation.

  1. Preheat Oven and Prepare Dish: Preheat your oven to 375°F (190°C). Lightly grease a 9×13-inch baking dish with cooking spray or butter.
  2. Prepare Tortillas: For corn tortillas, briefly warm them in a microwave (stacked and covered with a damp paper towel for 30 seconds to 1 minute) or by quickly frying them in a lightly oiled skillet for 10-15 seconds per side. This makes them pliable and prevents tearing. For flour tortillas, warming them for 15-20 seconds in the microwave is usually sufficient to make them flexible. A warm, flexible tortilla is key to easy rolling.
  3. Begin Assembly: Spoon about 1/2 cup of the creamy white enchilada sauce into the bottom of the prepared baking dish and spread it evenly. This prevents the enchiladas from sticking and adds an extra layer of flavor.
  4. Fill and Roll Enchiladas: Take one warmed tortilla. Spoon approximately 1/4 to 1/3 cup of the high protein chicken filling down the center of the tortilla. Sprinkle a small amount of shredded Monterey Jack cheese over the chicken filling (about 1 tablespoon per tortilla).
  5. Roll Neatly: Tightly roll up the tortilla, starting from one edge, enclosing the filling. Place the rolled enchilada seam-side down in the prepared baking dish. Repeat this process with the remaining tortillas and chicken filling, arranging them snugly in a single layer in the baking dish. Depending on the size of your tortillas and dish, you should fit 10-12 enchiladas.
  6. Cover with Sauce and Cheese: Once all the enchiladas are rolled and arranged, pour the remaining creamy white enchilada sauce evenly over the top, making sure to cover all the tortillas. You want every inch of these delicious enchiladas to be coated in that glorious sauce. Finish by generously sprinkling the remaining 1.5 cups of shredded Monterey Jack or Mexican blend cheese over the top of the sauce.

Baking the High Protein Chicken Enchiladas With White Sauce

The final step before you can savor your incredible High Protein Chicken Enchiladas With White Sauce is baking them to golden, bubbly perfection. This phase melds all the flavors together and creates that irresistible cheesy crust.

  1. Bake Uncovered: Place the baking dish in your preheated 375°F (190°C) oven. Bake for 25-30 minutes, uncovered, or until the sauce is bubbly around the edges and the cheese on top is melted, golden brown, and slightly bubbly. Keep an eye on the cheese; you want it nicely browned, not burnt. If you notice the cheese browning too quickly, you can loosely tent the dish with aluminum foil for the last 10 minutes of baking.
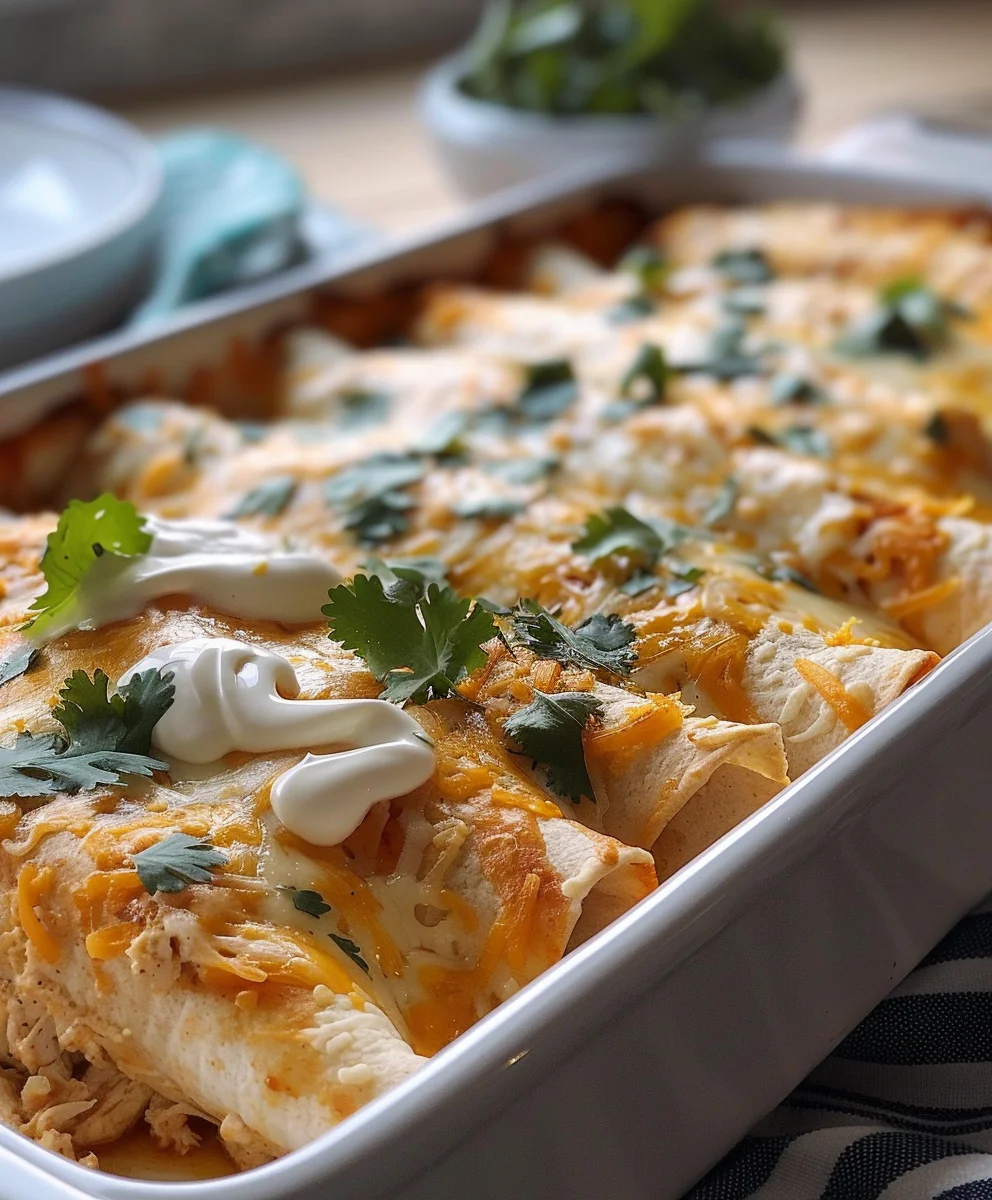
  2. Rest Before Serving: Once baked, carefully remove the enchiladas from the oven. Let them rest for 5-10 minutes before serving. This resting period is important as it allows the sauce to set slightly, making the enchiladas easier to serve without falling apart, and preventing you from burning your mouth on the piping hot filling and sauce.
  3. Garnish and Serve: Garnish your beautiful High Protein Chicken Enchiladas With White Sauce generously with fresh chopped cilantro and a sprinkle of finely diced red onion for a pop of color and fresh zest.

Serving Suggestions and Tips for High Protein Chicken Enchiladas

Now that your magnificent High Protein Chicken Enchiladas With White Sauce are hot out of the oven, it’s time to think about enjoying them! Here are some ideas for serving, along with a few tips to make your enchilada experience even better:

Complementary Sides:

  • Rice and Beans: A classic pairing! Serve with a side of fluffy Spanish rice or simple black beans for a complete meal. The mildness of the rice and the earthiness of the beans beautifully balance the richness of the enchiladas.
  • Fresh Salad: A crisp green salad with a light vinaigrette is a fantastic counterpoint to the creamy enchiladas. The fresh acidity cuts through the richness, making the meal feel balanced and vibrant. Think mixed greens, cherry tomatoes, cucumbers, and a zesty lime dressing.
  • Avocado or Guacamole: Sliced fresh avocado or a dollop of homemade guacamole adds a wonderful creamy texture and healthy fats, enhancing the overall experience. The cool, buttery avocado is a perfect match.
  • Pico de Gallo or Salsa: A spoonful of fresh pico de gallo or a mild salsa on the side provides an additional burst of fresh flavor and a hint of acidity, lifting the rich flavors of the enchiladas.
  • Grilled Corn: Whether on the cob or as a fresh corn salad, grilled corn adds a sweet, smoky element that pairs wonderfully with the enchiladas.

Pro Tips for Success:

  • Don’t Skimp on Warming Tortillas: This is a crucial step, especially for corn tortillas. Warm tortillas are pliable and won’t crack or break when rolled, ensuring your enchiladas hold together beautifully. If using corn tortillas, consider a quick dip in warm oil or enchilada sauce before filling for extra flexibility and flavor, though warming in the microwave works perfectly fine for this recipe.
  • Adjust Heat to Your Liking: The recipe for these High Protein Chicken Enchiladas With White Sauce is designed to be mild. If you prefer more heat, feel free to add a pinch more cayenne pepper to the white sauce, or stir in a dash of your favorite hot sauce to the chicken filling. You could also use a spicier variety of green chiles.
  • Make Ahead Option: Enchiladas are a fantastic make-ahead meal! You can assemble the entire dish, cover it tightly with foil, and refrigerate it for up to 24 hours before baking. When ready to bake, add an extra 10-15 minutes to the baking time to ensure it heats through evenly. You might also want to let it sit at room temperature for about 30 minutes before baking to reduce cold spots.
  • Freezing Instructions: For longer storage, assemble the enchiladas (without baking), cover tightly with plastic wrap and then foil, and freeze for up to 2-3 months. Thaw overnight in the refrigerator before baking as directed, potentially adding more baking time. Alternatively, you can bake from frozen, but this will require a much longer baking time (likely 60-90 minutes at 350°F/175°C), covered for most of the time, then uncovered to brown the cheese.
  • Leftovers: Leftover High Protein Chicken Enchiladas With White Sauce are just as delicious the next day! Store them in an airtight container in the refrigerator for up to 3-4 days. Reheat individual portions in the microwave or cover with foil and warm in a conventional oven at 350°F (175°C) until heated through.
  • Vary Your Cheese: While Monterey Jack is fantastic, feel free to experiment with other cheeses like Colby, mild cheddar, or a blend of Mexican cheeses. Each will offer a slightly different flavor profile and melting quality to your white sauce enchiladas.

Enjoy every delicious, protein-packed bite of your homemade High Protein Chicken Enchiladas With White Sauce!

High Protein Chicken Enchiladas: Creamy White Sauce Recipe

Conclusion:

And there you have it, my friends! We’ve reached the delicious conclusion of our culinary journey together. I genuinely hope you’re feeling inspired and ready to whip up a batch of these incredible enchiladas. What truly sets this recipe apart, making it an absolute must-try for your weekly meal rotation, is its unparalleled combination of robust flavor, satisfying texture, and incredible nutritional value. It’s not just another dinner; it’s a wholesome, hearty experience that everyone at your table will rave about. The creamy, savory white sauce, perfectly complementing the tender, seasoned chicken, creates a symphony of taste that’s both comforting and utterly addictive. This dish strikes that perfect balance between indulgent and incredibly beneficial, offering a generous boost of protein that will keep you feeling full and energized. Forget bland, uninspired meals; this recipe elevates a classic comfort food to new heights, making it accessible and enjoyable for even the busiest of home cooks. Seriously, if you’re looking for a dish that delivers on all fronts – taste, health, and ease – you absolutely have to give this one a go.

Now, let’s talk about making this dish truly your own! While the core recipe is a winner, there are so many fantastic ways to personalize your enchilada experience. For serving, I love pairing these enchiladas with a simple side of fluffy cilantro-lime rice and a fresh, crisp green salad tossed with a light vinaigrette. The bright, acidic notes of the salad cut through the richness of the enchiladas beautifully. You could also serve them alongside a spoonful of homemade refried beans or some tangy Mexican street corn. Don’t forget the garnishes! A generous dollop of sour cream or Greek yogurt, a sprinkle of fresh cilantro, a few slices of creamy avocado, or even a dash of your favorite hot sauce can take each bite to the next level. For variations, consider experimenting with the cheese blend; Monterey Jack, Colby Jack, or even a touch of cotija can add different dimensions. If you’re keen on adding more vegetables, sautéed bell peppers, onions, corn, or even a handful of fresh spinach can be mixed in with the chicken filling for extra fiber and nutrients. For those who love a bit of a kick, finely diced jalapeños or a pinch of cayenne pepper can be incorporated into the filling or the sauce. And remember, while our focus today is on chicken, shredded turkey is a fantastic alternative, especially if you have leftovers from a holiday feast. You can also play with the tortillas; corn tortillas are a wonderful gluten-free option and add an authentic flavor, or you could opt for whole wheat tortillas for an extra boost of fiber. The beauty of this recipe lies in its adaptability, allowing you to tailor it perfectly to your family’s preferences and what you have on hand.

Your Culinary Adventure Awaits!

I truly can’t emphasize enough how much I encourage you to dive into making these incredible High Protein Chicken Enchiladas With White Sauce. This isn’t just a recipe; it’s an invitation to create something truly special in your kitchen. Imagine the aroma filling your home as they bake, the anticipation building with every bubbling cheese melt, and the pure satisfaction of that first bite. It’s a dish that brings people together, perfect for family dinners, a casual get-together with friends, or even as a comforting meal prep option for a busy week ahead. Don’t be intimidated; the steps are straightforward, and the reward is immeasurable. Once you’ve experienced the deliciousness, I would absolutely love to hear about your culinary adventure! Please don’t hesitate to share your thoughts, your successes, and any creative twists you added in the comments section or on social media. Did you add extra spice? Try a different cheese? What did your family think? Your feedback and shared experiences are what truly make this community vibrant and inspiring. Go forth, create, and savor every mouthwatering moment!


High Protein Chicken Enchiladas With White Sauce

High Protein Chicken Enchiladas With White Sauce

High Protein Chicken Enchiladas With White Sauce transform a beloved classic into a nutrient-packed powerhouse. Succulent, seasoned chicken is lovingly wrapped in soft tortillas, all bathed in a creamy white sauce that’s utterly irresistible. This comforting meal delivers immense flavor and supports a protein-rich diet.

Prep Time
20 Minutes

Cook Time
25 Minutes

Total Time
50 Minutes

Servings
8 servings

Ingredients

  • 2 cups cooked chicken, shredded
  • 8 whole wheat tortillas
  • 1 cup Greek yogurt
  • 1/2 cup shredded cheese
  • 1/4 cup milk
  • 1 tbsp olive oil
  • 1 tsp garlic powder
  • 1 tsp cumin
  • 1/2 tsp salt
  • 1/4 tsp black pepper

Instructions

  1. Step 1
    Preheat oven to 375°F (190°C). Lightly grease a 9×13-inch baking dish.
  2. Step 2
    In a medium bowl, combine shredded chicken with 1 tbsp olive oil, 1 tsp cumin, 1/2 tsp salt, and 1/4 tsp black pepper. Mix well to season the chicken.
  3. Step 3
    In a separate bowl, whisk together 1 cup Greek yogurt, 1/4 cup milk, and 1 tsp garlic powder to create the creamy white sauce.
  4. Step 4
    Warm tortillas briefly (e.g., in microwave for 15-20 seconds) to make them pliable. Spread about 1/4 cup of the prepared white sauce evenly on the bottom of the baking dish.
  5. Step 5
    Spoon approximately 1/4 to 1/3 cup of the seasoned chicken filling down the center of each tortilla. Sprinkle a small amount of shredded cheese over the chicken (about 1 tbsp per tortilla). Roll each tortilla tightly and place seam-side down in the baking dish. Repeat for all 8 tortillas.
  6. Step 6
    Pour the remaining white sauce evenly over the rolled enchiladas. Top generously with the remaining shredded cheese (approximately 1/2 cup).
  7. Step 7
    Bake, uncovered, for 20-25 minutes, or until the sauce is bubbly and the cheese on top is melted and golden brown. If cheese browns too quickly, tent with foil.
  8. Step 8
    Remove from oven and let rest for 5-10 minutes before serving. Garnish with fresh cilantro or diced red onion, if desired.

Important Information

Nutrition Facts (Per Serving)

It is important to consider this information as approximate and not to use it as definitive health advice.

Allergy Information

Please check ingredients for potential allergens and consult a health professional if in doubt.

« Previous Post
Hearty Autumn Beef Sausage Pasta with Roasted Squash
Next Post »
Rotisserie Chicken Broccoli Pasta: Easy Family Dinner!

If you enjoyed this…

Cowboy Butter Garlic Chicken Tortellini & Fire Roast Peppers

Bananas Foster Bread Pudding

Bananas Foster Bread Pudding – A Decadent Dessert with a Boozy Twist!

Warm & Cozy Carrot Soup Recipe – Healthy, Simple & Flavorful

Primary Sidebar

Browse by Diet

BreakfastDinnerLunchDessertAppetizer

Sweet Peach Yogurt Parfait Delight

One of my fondest memories is from a lazy summer afternoon spent at my grandmother’s house. The sun filtered through the kitchen window, casting a warm glow over the table where she would create her culinary magic. It was during one of those blissful moments that I first tasted her Peach Yogurt Parfait with Honey and Granola. The sweet aroma of ripe peaches mingling with creamy yogurt and the crunch of granola was nothing short of heavenly. It felt like summer captured in a bowl, and I still remember the joy of diving in with a spoon, each layer revealing a new burst of flavor.

When I think about that parfait, I can almost hear the gentle hum of the bees outside, reminding me of the floral notes that honey brings to every bite. The vibrant yellows and soft oranges of the peaches contrast beautifully with the creamy white yogurt and the golden crunch of granola. It’s a dish that not only looks delightful but also tastes like a celebration of fresh, wholesome ingredients.

What makes my version of this Peach Yogurt Parfait special is the careful balance of flavors and textures. I use ripe, juicy peaches, drizzled with locally sourced honey, and a homemade granola that’s bursting with nuts and seeds for an extra crunch. It’s a simple dish, but every layer is crafted with love and attention.

Let me show you exactly how to make this delightful parfait, so you can bring a bit of that summer magic into your kitchen!

Sweet Peach Yogurt Parfait Delight

Why You’ll Love This Recipe

  • Delightfully creamy texture from the Greek yogurt, paired with the juicy sweetness of fresh peaches.
  • Ready in under 20 minutes, making it a quick and satisfying breakfast or snack option.
  • Budget-friendly, using common ingredients that you may already have in your pantry.
  • Customizable with your favorite granola and nuts, allowing you to tailor each parfait to your taste.
  • Perfectly balanced flavors with the bright acidity of lemon juice and the sweetness of honey enhancing the peaches.

Ingredients

  • For the Parfait:
  • 2 cups plain Greek yogurt (or vanilla yogurt for a sweeter option)
  • 2 large ripe peaches, diced (about 2 cups)
  • 1 tablespoon fresh lemon juice (to prevent browning of peaches)
  • 2 tablespoons honey (plus more for drizzling)
  • 1 teaspoon vanilla extract (optional for extra flavor)
  • For the Granola:
  • 1 cup granola (store-bought or homemade; see notes for a simple granola recipe)
  • 1/4 cup sliced almonds (optional for added crunch)
  • 1/4 cup shredded coconut (optional for added flavor)

Let’s dive into some key ingredients that make this Peach Yogurt Parfait so delightful! First, the Greek yogurt is not only creamy but also packed with protein, making it a satisfying option for breakfast or a snack. If you’re looking for a sweeter option, you can easily substitute it with vanilla yogurt, though it may alter the overall flavor balance. Next, the ripe peaches are the star of the show; their natural sweetness shines through, so I recommend choosing peaches that yield slightly to pressure, indicating they’re perfectly ripe. If peaches aren’t in season, feel free to use nectarines or even frozen peaches—just thaw them before use. Finally, honey adds a lovely floral sweetness that ties everything together. If you prefer, maple syrup can serve as a delicious substitute.

Step-by-Step Instructions

  1. Start by preparing the peaches. Wash them thoroughly, then slice and dice them into bite-sized pieces. In a medium bowl, toss the diced peaches with 1 tablespoon of fresh lemon juice to prevent browning. Set aside for about 5 minutes while the lemon juice works its magic.
  2. In a separate bowl, combine the Greek yogurt, 2 tablespoons of honey, and 1 teaspoon of vanilla extract if using. Stir the mixture until smooth and thoroughly blended. This should take about a minute. Avoid overmixing to maintain the creaminess of the yogurt.
  3. Now it’s time to layer your parfait. Grab a clear glass or bowl to showcase your beautiful creation. Start with a generous spoonful of the yogurt mixture at the bottom—about 1/4 cup will do. Use a spoon to spread it evenly.
  4. Add a layer of the diced peaches over the yogurt, ensuring they cover the yogurt completely. You might want to use about half of what you have prepared—roughly 1 cup. This layer should be visually appealing, so arrange the peaches neatly.
  5. Sprinkle 1/4 cup of granola over the peaches. This adds a delightful crunch. Make sure to distribute it evenly to ensure every bite has that satisfying texture. Avoid packing it down too tightly, as you want it to maintain its crunch.
  6. Repeat the layers: spoon in another 1/4 cup of yogurt, followed by another cup of peaches, and another sprinkle of granola. You should have at least two layers, but feel free to add more depending on your glass size.
  7. Finish off your parfait with a drizzle of honey on top for added sweetness and a touch of elegance. If you’re using sliced almonds or shredded coconut, sprinkle them on top now. It adds a lovely visual contrast and extra flavor.
  8. Serve immediately or refrigerate for up to 30 minutes before serving to allow the flavors to meld together. However, I recommend enjoying it fresh to maintain the granola’s crunch.

Pro Tips for the Best Peach Yogurt Parfait With Honey And Granola

  • Make sure to choose ripe peaches for the best flavor and texture. A common mistake is using unripe fruit, which can lead to a less enjoyable parfait. Look for peaches that are fragrant and slightly soft to the touch.
  • Use a clear glass to assemble your parfait; this not only makes for a beautiful presentation but also allows you to see the colorful layers, which adds to the enjoyment of eating it.
  • For an even creamier texture, consider whipping the Greek yogurt with a hand mixer for a couple of minutes before layering. This small adjustment makes a huge difference in mouthfeel.
  • Be mindful of the granola-to-yogurt ratio. Too much granola can overwhelm the parfait, while too little can make it feel too creamy. Aim for about 1/4 cup of granola per layer for the perfect balance.
  • If you’re making this for a gathering, consider preparing the yogurt and peaches ahead of time and layering them just before serving. This ensures the granola stays crunchy!

Variations & Serving Ideas

There are so many ways to get creative with your Peach Yogurt Parfait! For a tropical twist, swap out the peaches for mangoes or pineapples and top with coconut flakes. If you prefer a berry flavor, mix in some blueberries or strawberries with the peaches for added color and taste. For a nutty version, incorporate chopped walnuts or pecans instead of almonds.

As for serving ideas, this parfait pairs beautifully with a side of scrambled eggs for a hearty breakfast or fresh fruit salad for a light lunch. You might also enjoy it alongside whole grain toast with almond butter for an energizing snack. The contrast of flavors and textures will elevate your meal experience!

Storage, Make-Ahead & Reheating

The Peach Yogurt Parfait is best enjoyed fresh, but you can prepare some components ahead of time. Store the layered parfait in an airtight container in the refrigerator for up to 24 hours. However, be cautious; the granola may lose its crunch if stored too long. You can freeze the yogurt and peach mixture for up to 2 months; just remember to thaw it in the refrigerator overnight before serving.

If you plan to enjoy this dish the next day, it can taste even better as the flavors meld together. Just remember to add the granola right before serving to keep its delightful crunch!

Frequently Asked Questions

Can I make Peach Yogurt Parfait With Honey And Granola ahead of time?

Yes — in fact, it tastes even better the next day as the flavors meld. However, I recommend waiting to add the granola until just before serving to maintain its crunch.

What can I substitute for Greek yogurt?

If you prefer a lighter option, you can substitute Greek yogurt with regular yogurt or a dairy-free alternative like coconut yogurt. Just remember that this may alter the creaminess and flavor profile slightly.

Can I use frozen peaches for this parfait?

Absolutely! Just make sure to thaw the frozen peaches before using them. They will still add great flavor, though the texture may be slightly softer than fresh peaches.

How do I make the parfait vegan?

To make a vegan version, substitute the Greek yogurt with a plant-based yogurt alternative, and replace honey with maple syrup or agave nectar. This keeps the parfait sweet while adhering to a vegan diet.

What other fruits can I use in this recipe?

You can mix and match fruits based on your preference. Try using strawberries, blueberries, raspberries, or even bananas. Just make sure to adjust the lemon juice as needed to prevent browning.

Sweet Peach Yogurt Parfait Delight

Final Thoughts

The Peach Yogurt Parfait with Honey and Granola is a delightful blend of creamy yogurt, sweet peaches, and crunchy granola that creates a satisfying and nourishing treat. Each layer bursts with flavor, making it a perfect choice for breakfast or a light dessert.

This is the kind of recipe I come back to again and again, especially when I want something refreshing and wholesome to start my day. The harmony of sweet and tart flavors, combined with the delightful crunch, never fails to lift my spirits!

I encourage you to give this parfait a try and indulge in its comforting goodness. Feel free to share your results or even add your own twist—perhaps a sprinkle of cinnamon or a handful of nuts. Enjoy creating your perfect parfait!

Print
clock clock iconcutlery cutlery iconflag flag iconfolder folder iconinstagram instagram iconpinterest pinterest iconfacebook facebook iconprint print iconsquares squares iconheart heart iconheart solid heart solid icon

Peach Yogurt Parfait


  • Author: Lily author
  • Total Time: 15 minutes
  • Yield: 4 servings 1x
Pin Recipe
Print Recipe

Description

This Peach Yogurt Parfait combines creamy Greek yogurt, juicy peaches, and crunchy granola for a delightful treat. It’s a perfect breakfast or snack that captures the essence of summer in every bite.


Ingredients

Scale
  • For the Parfait:
  • 2 cups plain Greek yogurt (or vanilla yogurt for a sweeter option)
  • 2 large ripe peaches, diced (about 2 cups)
  • 1 tablespoon fresh lemon juice (to prevent browning of peaches)
  • 2 tablespoons honey (plus more for drizzling)
  • 1 teaspoon vanilla extract (optional for extra flavor)
  • For the Granola:
  • 1 cup granola (store-bought or homemade; see notes for a simple granola recipe)
  • 1/4 cup sliced almonds (optional for added crunch)
  • 1/4 cup shredded coconut (optional for added flavor)

Instructions

  1. Start by preparing the peaches. Wash them thoroughly, then slice and dice them into bite-sized pieces. In a medium bowl, toss the diced peaches with 1 tablespoon of fresh lemon juice to prevent browning. Set aside for about 5 minutes while the lemon juice works its magic.
  2. In a separate bowl, combine the Greek yogurt, 2 tablespoons of honey, and 1 teaspoon of vanilla extract if using. Stir the mixture until smooth and thoroughly blended. This should take about a minute. Avoid overmixing to maintain the creaminess of the yogurt.
  3. Now it’s time to layer your parfait. Grab a clear glass or bowl to showcase your beautiful creation. Start with a generous spoonful of the yogurt mixture at the bottom—about 1/4 cup will do. Use a spoon to spread it evenly.
  4. Add a layer of the diced peaches over the yogurt, ensuring they cover the yogurt completely. You might want to use about half of what you have prepared—roughly 1 cup. This layer should be visually appealing, so arrange the peaches neatly.
  5. Sprinkle 1/4 cup of granola over the peaches. This adds a delightful crunch. Make sure to distribute it evenly to ensure every bite has that satisfying texture. Avoid packing it down too tightly, as you want it to maintain its crunch.
  6. Repeat the layers: spoon in another 1/4 cup of yogurt, followed by another cup of peaches, and another sprinkle of granola. You should have at least two layers, but feel free to add more depending on your glass size.
  7. Finish off your parfait with a drizzle of honey on top for added sweetness and a touch of elegance. If you’re using sliced almonds or shredded coconut, sprinkle them on top now. It adds a lovely visual contrast and extra flavor.
  8. Serve immediately or refrigerate for up to 30 minutes before serving to allow the flavors to meld together. However, I recommend enjoying it fresh to maintain the granola’s crunch.
  • Prep Time: 15 mins
  • Cook Time: 0 mins
  • Category: Breakfast
  • Method: No-cook
  • Cuisine: American

Nutrition

  • Serving Size: 1 parfait
  • Calories: 250
  • Sugar: 20 g
  • Sodium: 50 mg
  • Fat: 5 g
  • Saturated Fat: 2 g
  • Unsaturated Fat: 3 g
  • Trans Fat: 0 g
  • Carbohydrates: 40 g
  • Fiber: 3 g
  • Protein: 10 g
  • Cholesterol: 10 mg

Keywords: Choose ripe peaches for the best flavor and texture. Use a clear glass for a beautiful presentation. For creaminess, consider whipping the yogurt before layering. Be mindful of the granola-to-yogurt ratio. Prepare yogurt and peaches ahead of time for gatherings, layering just before serving.

Did you make this recipe?

Share a photo and tag us — we can't wait to see what you've made!

Sun-Kissed Frozen Orange Cream Slush

As a child, summer days felt like they lasted forever. I remember the sticky heat wrapping around me as I played outside, my laughter mingling with the sounds of the neighborhood. But nothing could cool me down quite like the moment I’d spot my grandmother, laboring over her blender, whipping up her famous Frozen Orange Creamsicle Slush. That vibrant orange treat, with its frosty texture and sweet citrus aroma, was like a burst of sunshine in a cup. Just one sip, and I could feel the coolness wash over me, sparking pure joy.

This Frozen Orange Creamsicle Slush has a way of making you feel like a kid again. Its creamy, dreamy consistency is a delightful balance of bright orange and soft vanilla, inviting you to dive right in. The refreshing tang of orange dances on your tongue, while the smooth creaminess envelops you in a comforting embrace. It’s a nostalgic treat that’s perfect for hot summer afternoons or anytime you need a little pick-me-up.

What makes my version of this slush stand out is the addition of a hint of vanilla bean, which elevates the flavor and adds an extra layer of richness. Plus, it’s super easy to whip up with just a few simple ingredients that you probably already have on hand! So, if you’re ready to relive those sun-soaked memories, let me show you exactly how to make it.

Sun-Kissed Frozen Orange Cream Slush

Why You’ll Love This Recipe

  • Each slush is a perfect blend of creamy vanilla and zesty orange, creating a nostalgic flavor reminiscent of summer days.
  • This refreshing treat is ready in under 15 minutes, making it an ideal quick dessert for unexpected guests or hot afternoons.
  • With just 8 simple ingredients, it’s budget-friendly, ensuring you don’t have to break the bank to enjoy a delicious slush.
  • The slush has a perfectly smooth texture, thanks to the combination of ice and ice cream, providing a delightful contrast to the bright citrus flavors.
  • It’s highly customizable; you can easily adjust the sweetness and add fresh herbs for a unique twist that suits your taste.

Ingredients

  • 2 cups orange juice (freshly squeezed or store-bought)
  • 1 cup vanilla ice cream
  • 1 cup crushed ice
  • 1/2 cup milk (whole or 2%)
  • 1/4 cup granulated sugar (adjust based on sweetness preference)
  • 1 teaspoon vanilla extract
  • Zest of 1 orange (for added flavor)
  • Fresh orange slices and mint leaves (for garnish)

The star of this Frozen Orange Creamsicle Slush is the orange juice, which provides the vibrant, citrusy base. Freshly squeezed juice will yield the brightest flavor, but store-bought options can be just as convenient. If you’re opting for store-bought, choose 100% pure juice with no added sugars for the best results. Another essential ingredient is the vanilla ice cream; it adds creaminess and sweetness. You can substitute it with dairy-free ice cream if you’re looking for a vegan option. Whole or 2% milk complements the ice cream, creating a smooth blend. If you want a lower-calorie version, almond or oat milk can be good alternatives.

Lastly, the granulated sugar can be adjusted based on your sweetness preference. If you prefer a more natural sweetener, consider using honey or agave syrup. The orange zest enhances the flavor profile, providing an aromatic pop that brings the whole slush together. Don’t skip it! It adds an extra layer of brightness that makes this slush truly special.

Step-by-Step Instructions

  1. Start by preparing your ingredients. Gather 2 cups of orange juice, 1 cup of vanilla ice cream, and 1 cup of crushed ice. Make sure the ice is finely crushed, as larger chunks can make blending difficult.
  2. In a blender, combine the orange juice, vanilla ice cream, crushed ice, and 1/2 cup of milk. Add 1/4 cup of granulated sugar and 1 teaspoon of vanilla extract. If you like a sweeter slush, consider adding a bit more sugar at this stage.
  3. Add the zest of 1 orange to the blender. This step is crucial for enhancing the citrus flavor of your slush. Make sure not to include the bitter white pith—only the flavorful zest.
  4. Blend the mixture on medium-high speed for about 30-45 seconds. Stop once the ingredients are fully combined and the slush has a smooth, even consistency. If you notice large chunks of ice, blend for an additional 10-15 seconds. Avoid over-blending, as this can make the slush too liquidy.
  5. Once blended, taste the slush. If it needs more sweetness, add a little more sugar and blend for a few more seconds. If it’s too thick, you can add a splash of milk to reach your desired consistency.
  6. Pour the slush into glasses. This recipe typically serves 4, but you can easily double it for larger gatherings. Use a spoon to help guide the slush into the glasses if needed.
  7. Garnish each serving with fresh orange slices and mint leaves. The mint not only adds a pop of color but also a refreshing aroma that complements the citrus flavors beautifully.
  8. Serve immediately and enjoy! If you’ve made extra, you can refrigerate it for a short time, but it’s best enjoyed fresh.

Pro Tips for the Best Frozen Orange Creamsicle Slush

  • Don’t skip the orange zest! It’s a game-changer for flavor. Always zest before juicing to make it easier.
  • Use a high-powered blender for the best texture. A standard blender may struggle with ice, leading to uneven consistency. If you have a food processor, that can work too, but ensure the ice is finely crushed.
  • Adjust the ice-to-liquid ratio carefully. If your slush is too thick, it won’t blend well. Start with less ice and add more until you reach your preferred texture.
  • Be cautious with the sugar! Always start with the lower amount, as you can easily add more, but it’s hard to fix an overly sweet slush.
  • For a fun twist, consider adding a splash of coconut milk or a handful of fresh fruit like strawberries or pineapple. This not only enhances the flavor but also adds a beautiful color contrast.

Variations & Serving Ideas

There are countless ways to put a spin on your Frozen Orange Creamsicle Slush. Consider making a tropical version by adding in some pineapple juice or coconut milk for a delightful tropical twist. If you’re feeling adventurous, try incorporating a handful of frozen mango or peach slices for added sweetness. For a lighter version, swap out the vanilla ice cream for Greek yogurt for a creamy yet tangy alternative.

As for serving ideas, this refreshing slush pairs wonderfully with light summer dishes like grilled chicken skewers, fish tacos, or a simple salad topped with citrus vinaigrette. The bright, zesty flavors of the slush complement these dishes perfectly, making them an ideal pairing for a sunny day.

Storage, Make-Ahead & Reheating

This Frozen Orange Creamsicle Slush is best enjoyed fresh, but if you have leftovers, you can store them in an airtight container in the fridge for up to 2 days. Just keep in mind that the slush may lose some of its texture over time as the ice melts. It doesn’t freeze well, as the ice will turn into a solid block. If you must freeze it, blend again after thawing to restore the slushy consistency. This treat is best the day you make it, as the flavors meld together beautifully overnight, enhancing its deliciousness.

Frequently Asked Questions

Can I make Frozen Orange Creamsicle Slush ahead of time?

Yes — in fact, it tastes even better the next day as the flavors meld. However, it’s best to enjoy it fresh, as the texture can change if stored for too long. If you need to prepare it ahead, keep it in the fridge and re-blend before serving.

What kind of orange juice should I use?

For the best flavor, use freshly squeezed orange juice. However, if you’re short on time, opt for 100% pure store-bought juice without added sugars. This will ensure that your slush remains flavorful and refreshing.

Can I substitute the vanilla ice cream?

Absolutely! If you’re looking for a dairy-free option, coconut milk ice cream or a non-dairy vanilla ice cream can work wonderfully. They will still provide the creamy texture and sweetness you desire.

How can I adjust the sweetness of my slush?

You can easily adjust the sweetness by modifying the amount of sugar added. Start with 1/4 cup and taste the mixture before blending. If you prefer it sweeter, add more sugar gradually until it reaches your desired level.

What should I do if my slush is too thick?

If your slush is too thick, simply add a splash of milk or orange juice and blend again. This will help achieve a more drinkable consistency while maintaining the slushy texture. Adjust gradually to reach your preferred thickness.

Sun-Kissed Frozen Orange Cream Slush

Final Thoughts

The Frozen Orange Creamsicle Slush is a delightful blend of refreshing citrus and creamy goodness, making it a perfect treat for warm days or any time you crave a taste of nostalgia. The way the bright orange flavor dances with the creamy texture truly elevates this slush, transforming it into a satisfying escape from the everyday.

This is the kind of recipe I come back to again and again, especially when I’m looking to cool down or impress guests at a summer gathering. It’s simple to make and always brings smiles all around! I encourage you to try this recipe for yourself—don’t hesitate to share your results or even put your own spin on it. Happy slushing!

Print
clock clock iconcutlery cutlery iconflag flag iconfolder folder iconinstagram instagram iconpinterest pinterest iconfacebook facebook iconprint print iconsquares squares iconheart heart iconheart solid heart solid icon

Frozen Orange Creamsicle Slush


  • Author: Lily author
  • Total Time: 15 minutes
  • Yield: 4 servings 1x
Pin Recipe
Print Recipe

Description

This Frozen Orange Creamsicle Slush is a refreshing treat that combines creamy vanilla and zesty orange flavors. Perfect for hot summer days, it brings back nostalgic memories with every sip.


Ingredients

Scale
  • 2 cups orange juice (freshly squeezed or store-bought)
  • 1 cup vanilla ice cream
  • 1 cup crushed ice
  • 1/2 cup milk (whole or 2%)
  • 1/4 cup granulated sugar (adjust based on sweetness preference)
  • 1 teaspoon vanilla extract
  • Zest of 1 orange (for added flavor)
  • Fresh orange slices and mint leaves (for garnish)

Instructions

  1. Start by preparing your ingredients. Gather 2 cups of orange juice, 1 cup of vanilla ice cream, and 1 cup of crushed ice. Make sure the ice is finely crushed, as larger chunks can make blending difficult.
  2. In a blender, combine the orange juice, vanilla ice cream, crushed ice, and 1/2 cup of milk. Add 1/4 cup of granulated sugar and 1 teaspoon of vanilla extract. If you like a sweeter slush, consider adding a bit more sugar at this stage.
  3. Add the zest of 1 orange to the blender. This step is crucial for enhancing the citrus flavor of your slush. Make sure not to include the bitter white pith—only the flavorful zest.
  4. Blend the mixture on medium-high speed for about 30-45 seconds. Stop once the ingredients are fully combined and the slush has a smooth, even consistency. If you notice large chunks of ice, blend for an additional 10-15 seconds. Avoid over-blending, as this can make the slush too liquidy.
  5. Once blended, taste the slush. If it needs more sweetness, add a little more sugar and blend for a few more seconds. If it’s too thick, you can add a splash of milk to reach your desired consistency.
  6. Pour the slush into glasses. This recipe typically serves 4, but you can easily double it for larger gatherings. Use a spoon to help guide the slush into the glasses if needed.
  7. Garnish each serving with fresh orange slices and mint leaves. The mint not only adds a pop of color but also a refreshing aroma that complements the citrus flavors beautifully.
  8. Serve immediately and enjoy! If you’ve made extra, you can refrigerate it for a short time, but it's best enjoyed fresh.
  • Prep Time: 15 min
  • Cook Time: 0 min
  • Category: Dessert
  • Method: Blending
  • Cuisine: American

Nutrition

  • Serving Size: 1 serving
  • Calories: 200
  • Sugar: 30 g
  • Sodium: 50 mg
  • Fat: 5 g
  • Saturated Fat: 3 g
  • Unsaturated Fat: 2 g
  • Trans Fat: 0 g
  • Carbohydrates: 40 g
  • Fiber: 1 g
  • Protein: 2 g
  • Cholesterol: 20 mg

Keywords: Don't skip the orange zest! It's a game-changer for flavor. Always zest before juicing to make it easier.

Did you make this recipe?

Share a photo and tag us — we can't wait to see what you've made!

Zesty Lemon Poppy Seed Delight

One rainy afternoon, I found myself in my grandmother’s cozy kitchen, the kind that always smelled like warmth and love. She was whipping up her famous Lemon Poppy Seed Loaf, a recipe that had been passed down through generations. As the batter came together, the zesty aroma of fresh lemons filled the air, mingling perfectly with the nutty fragrance of poppy seeds. I can still picture her, apron-clad, as she expertly drizzled a vibrant citrus icing over the loaf, creating a glossy, sun-kissed finish that beckoned us to dive in. It was a moment that sparked my own passion for baking, and this recipe has become a cherished staple in my home ever since.

When you take a bite of this Lemon Poppy Seed Loaf, it’s like a burst of sunshine on your palate. The loaf is beautifully golden, with a tender crumb that melts in your mouth. Each slice is speckled with tiny poppy seeds, adding a delightful crunch that contrasts beautifully with the tangy sweetness of the lemon. And that citrus icing? It’s the finishing touch that elevates this loaf from ordinary to extraordinary, with its bright, zesty flavor dancing on your taste buds.

This recipe stands out because it embraces simplicity while delivering on flavor. I’ve added a hint of vanilla to the batter, enhancing the overall taste and making it even more indulgent. Trust me, once you make this Lemon Poppy Seed Loaf With Citrus Icing, it’ll become a go-to in your baking repertoire.

So, let me show you exactly how to make it!

Zesty Lemon Poppy Seed Delight

Why You’ll Love This Recipe

  • Moist and tender crumb that melts in your mouth, thanks to the perfect balance of butter and buttermilk.
  • Bright, zesty lemon flavor paired with crunchy poppy seeds, creating a delightful texture and taste experience.
  • Easy to whip up in just about an hour, perfect for last-minute gatherings or a cozy afternoon treat.
  • Budget-friendly with everyday ingredients, making it an accessible option for all home bakers.
  • The citrus icing adds a sweet tang that elevates the loaf, turning a simple recipe into a showstopper!

Ingredients

  • 1 ½ cups (190g) all-purpose flour
  • 1 teaspoon baking powder
  • ½ teaspoon baking soda
  • ½ teaspoon salt
  • 3 tablespoons poppy seeds
  • ½ cup (115g) unsalted butter, softened to room temperature
  • 1 cup (200g) granulated sugar
  • 2 large eggs
  • 1 teaspoon vanilla extract
  • 1 teaspoon lemon zest (from about 1 medium lemon)
  • ½ cup (120ml) buttermilk
  • 2 tablespoons fresh lemon juice

For the Citrus Icing:

  • 1 cup (120g) powdered sugar
  • 2 tablespoons fresh lemon juice
  • 1 tablespoon orange juice
  • 1 teaspoon lemon zest (for garnish, optional)

Let’s dive into the key ingredients that make this Lemon Poppy Seed Loaf so special. The all-purpose flour provides the structure and base for the loaf, while the baking powder and baking soda ensure it rises perfectly, giving the loaf a light texture. For a gluten-free variation, you could substitute the flour with a gluten-free all-purpose blend. Poppy seeds not only add a delightful crunch but also contribute to the unique flavor profile that pairs well with the citrus notes.

Unsalted butter is crucial for achieving the buttery richness that makes this loaf so moist. If you’re looking for a dairy-free option, coconut oil or a vegan butter can be used instead. The buttermilk is another essential component, providing acidity that activates the baking soda for a fluffy texture. If you don’t have buttermilk on hand, you can easily make a substitute by mixing ½ cup of milk with 1 tablespoon of vinegar or lemon juice and letting it sit for about 5 minutes.

Step-by-Step Instructions

  1. Preheat your oven to 350°F (175°C). Grease a 9×5-inch loaf pan or line it with parchment paper for easy removal later.
  2. In a medium mixing bowl, whisk together 1 ½ cups of all-purpose flour, 1 teaspoon of baking powder, ½ teaspoon of baking soda, ½ teaspoon of salt, and 3 tablespoons of poppy seeds. This helps to evenly distribute the baking agents and ensures a uniform rise.
  3. In a large mixing bowl, cream together ½ cup of softened unsalted butter and 1 cup of granulated sugar using an electric mixer on medium speed for about 3-4 minutes, until the mixture is light and fluffy. Make sure to scrape down the sides of the bowl occasionally.
  4. Add 2 large eggs, 1 teaspoon of vanilla extract, and 1 teaspoon of lemon zest to the creamed butter and sugar, mixing until fully combined. You want a smooth consistency, so ensure there are no lumps of butter.
  5. In a small bowl, combine ½ cup of buttermilk and 2 tablespoons of fresh lemon juice. Alternately add the dry ingredients and buttermilk mixture to the butter mixture, starting and ending with the dry ingredients. Mix just until combined; do not overmix, as this can lead to a dense loaf.
  6. Pour the batter into the prepared loaf pan. Smooth the top with a spatula, ensuring it’s even. Bake in the preheated oven for 50-60 minutes, or until a toothpick inserted in the center comes out clean. The edges should be lightly golden brown, and the center should feel just set.
  7. Once baked, remove the loaf from the oven and allow it to cool in the pan for about 10 minutes. Then, transfer it to a wire rack to cool completely. Resist the urge to slice too soon, as it will be crumbly if it’s still warm.
  8. While the loaf is cooling, prepare the citrus icing. In a medium bowl, whisk together 1 cup of powdered sugar, 2 tablespoons of fresh lemon juice, and 1 tablespoon of orange juice until smooth. If the icing is too thick, you can add a little more juice to reach your desired consistency.
  9. Once the loaf is completely cool, drizzle the citrus icing over the top. If you like, sprinkle with an additional teaspoon of lemon zest for an extra pop of flavor and color.

Pro Tips for the Best Lemon Poppy Seed Loaf With Citrus Icing

  • Be careful not to overmix your batter; this is a common mistake that can lead to a dense loaf. Mix just until the dry ingredients are incorporated for a light and fluffy texture.
  • Use room temperature ingredients, especially the butter and eggs. This helps to create a smoother batter and ensures even baking. Take your eggs out of the fridge about 30 minutes before you start.
  • For a more pronounced lemon flavor, consider adding a little lemon extract in addition to the zest and juice. Just a half teaspoon can elevate the citrus notes significantly.
  • When measuring your flour, spoon it into the measuring cup and level it off with a knife instead of scooping directly from the bag. This prevents packing and ensures you don’t end up with a dry loaf.
  • Invest in a good quality loaf pan; it makes a difference in heat distribution, which ensures even baking. If your pan is dark-coated, reduce the oven temperature by 25°F to prevent over-browning.

Variations & Serving Ideas

For a delightful twist, consider adding blueberries or raspberries to the batter for a fruity burst of flavor. You can also experiment with different citrus fruits—try lime or grapefruit zest and juice for a refreshing change. For a healthier option, substitute half of the all-purpose flour with whole wheat flour for added fiber without compromising too much on texture.

This Lemon Poppy Seed Loaf pairs beautifully with a light salad, such as a mixed greens salad with a vinaigrette, or a cup of tea for a cozy afternoon treat. It also complements a creamy cheese platter, as the acidity of the loaf balances rich cheeses perfectly. Lastly, a scoop of vanilla ice cream on the side creates a delightful contrast of temperatures and flavors!

Storage, Make-Ahead & Reheating

This Lemon Poppy Seed Loaf can be stored at room temperature for up to 3 days if wrapped tightly in plastic wrap. If you want to keep it longer, it freezes well for up to 3 months. To freeze, wrap the loaf tightly in plastic wrap and then in aluminum foil to prevent freezer burn.

When you’re ready to enjoy it again, simply thaw it in the fridge overnight. Reheat individual slices in the microwave for 15-20 seconds or in a toaster oven until warmed through. Interestingly, many people find that this loaf tastes even better the next day, as the flavors have time to meld!

Frequently Asked Questions

Can I make Lemon Poppy Seed Loaf With Citrus Icing ahead of time?

Yes — in fact, it tastes even better the next day! You can make the loaf a day in advance, allowing the flavors to develop. Just be sure to store it in an airtight container to maintain its moisture.

Can I substitute the poppy seeds?

Absolutely! If you don’t have poppy seeds on hand or prefer an alternative, you can use sesame seeds for a similar crunch or omit them entirely for a smooth loaf.

What can I use instead of buttermilk?

If you don’t have buttermilk, you can easily create a substitute by mixing ½ cup of milk (dairy or plant-based) with 1 tablespoon of vinegar or lemon juice. Let it sit for 5 minutes before using in the recipe.

How can I make this recipe gluten-free?

To make a gluten-free version of this Lemon Poppy Seed Loaf, substitute the all-purpose flour with a gluten-free all-purpose flour blend. Just ensure that the blend contains a binding agent like xanthan gum for the best results.

What is the best way to store leftover loaf?

Leftover Lemon Poppy Seed Loaf should be stored in an airtight container at room temperature for up to 3 days. For longer storage, wrap it tightly and freeze for up to 3 months. Thaw it before serving for the best texture.

Zesty Lemon Poppy Seed Delight

Final Thoughts

The Lemon Poppy Seed Loaf with Citrus Icing is truly a delightful treat that brings a burst of brightness to any occasion. The zesty lemon flavor combined with the subtle crunch of poppy seeds creates a satisfying balance, while the citrus icing adds a touch of sweetness that perfectly complements the loaf’s tanginess.

This is the kind of recipe I come back to again and again, especially when I want to brighten up a gloomy day or celebrate a small victory. The aroma that fills the kitchen as it bakes is absolutely heavenly! I encourage you to give this recipe a try; you might just find it becoming a beloved staple in your home. Don’t forget to share your results or even add your own unique twist—I can’t wait to see what you create!

Print
clock clock iconcutlery cutlery iconflag flag iconfolder folder iconinstagram instagram iconpinterest pinterest iconfacebook facebook iconprint print iconsquares squares iconheart heart iconheart solid heart solid icon

Lemon Poppy Seed Loaf


  • Author: Lily author
  • Total Time: 25 minute
  • Yield: 1 loaf 1x
Pin Recipe
Print Recipe

Description

This Lemon Poppy Seed Loaf is a delightful treat that combines zesty lemon flavor with crunchy poppy seeds. Topped with a citrus icing, it’s perfect for any occasion.


Ingredients

Scale
  • 1 ½ cups (190g) all-purpose flour
  • 1 teaspoon baking powder
  • ½ teaspoon baking soda
  • ½ teaspoon salt
  • 3 tablespoons poppy seeds
  • ½ cup (115g) unsalted butter, softened to room temperature
  • 1 cup (200g) granulated sugar
  • 2 large eggs
  • 1 teaspoon vanilla extract
  • 1 teaspoon lemon zest (from about 1 medium lemon)
  • ½ cup (120ml) buttermilk
  • 2 tablespoons fresh lemon juice
  • 1 cup (120g) powdered sugar
  • 2 tablespoons fresh lemon juice
  • 1 tablespoon orange juice
  • 1 teaspoon lemon zest (for garnish, optional)

Instructions

  1. Preheat your oven to 350°F (175°C). Grease a 9×5-inch loaf pan or line it with parchment paper for easy removal later.
  2. In a medium mixing bowl, whisk together 1 ½ cups of all-purpose flour, 1 teaspoon of baking powder, ½ teaspoon of baking soda, ½ teaspoon of salt, and 3 tablespoons of poppy seeds. This helps to evenly distribute the baking agents and ensures a uniform rise.
  3. In a large mixing bowl, cream together ½ cup of softened unsalted butter and 1 cup of granulated sugar using an electric mixer on medium speed for about 3-4 minutes, until the mixture is light and fluffy. Make sure to scrape down the sides of the bowl occasionally.
  4. Add 2 large eggs, 1 teaspoon of vanilla extract, and 1 teaspoon of lemon zest to the creamed butter and sugar, mixing until fully combined. You want a smooth consistency, so ensure there are no lumps of butter.
  5. In a small bowl, combine ½ cup of buttermilk and 2 tablespoons of fresh lemon juice. Alternately add the dry ingredients and buttermilk mixture to the butter mixture, starting and ending with the dry ingredients. Mix just until combined; do not overmix, as this can lead to a dense loaf.
  6. Pour the batter into the prepared loaf pan. Smooth the top with a spatula, ensuring it’s even. Bake in the preheated oven for 50-60 minutes, or until a toothpick inserted in the center comes out clean. The edges should be lightly golden brown, and the center should feel just set.
  7. Once baked, remove the loaf from the oven and allow it to cool in the pan for about 10 minutes. Then, transfer it to a wire rack to cool completely. Resist the urge to slice too soon, as it will be crumbly if it’s still warm.
  8. While the loaf is cooling, prepare the citrus icing. In a medium bowl, whisk together 1 cup of powdered sugar, 2 tablespoons of fresh lemon juice, and 1 tablespoon of orange juice until smooth. If the icing is too thick, you can add a little more juice to reach your desired consistency.
  9. Once the loaf is completely cool, drizzle the citrus icing over the top. If you like, sprinkle with an additional teaspoon of lemon zest for an extra pop of flavor and color.
  • Prep Time: 15 mins
  • Cook Time: 50-60 mins
  • Category: Dessert
  • Method: Baking
  • Cuisine: American

Nutrition

  • Serving Size: 1 slice
  • Calories: 200
  • Sugar: 15 g
  • Sodium: 150 mg
  • Fat: 8 g
  • Saturated Fat: 5 g
  • Unsaturated Fat: 3 g
  • Trans Fat: 0 g
  • Carbohydrates: 30 g
  • Fiber: 1 g
  • Protein: 3 g
  • Cholesterol: 40 mg

Keywords: Be careful not to overmix your batter; this is a common mistake that can lead to a dense loaf. Use room temperature ingredients for a smoother batter and even baking.

Did you make this recipe?

Share a photo and tag us — we can't wait to see what you've made!

  • Privacy Policy
  • Terms Of Service
  • Contact
  • About
  • GDPR

Copyright © 2025 Homesmad