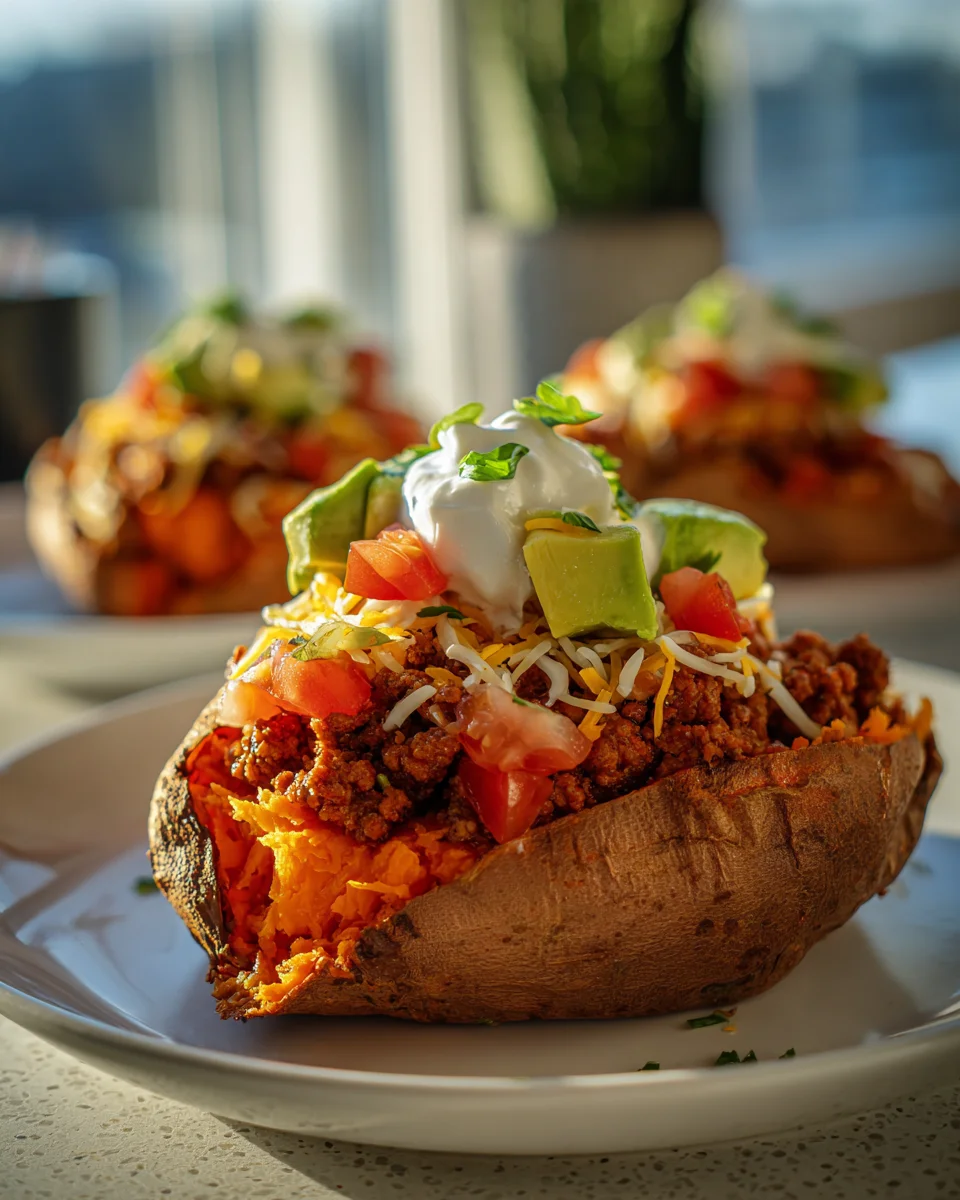
Taco Stuffed Sweet Potatoes
Oh boy, do I have a treat for you! If you’re anything like me, you love a good taco night, but sometimes you’re craving something a little different, a little healthier, and perhaps even more satisfying. That’s exactly where these Taco Stuffed Sweet Potatoes come in! This isn’t just another dinner recipe; it’s a game-changer for your weeknight rotation.
What makes this dish so special, you ask? We’re taking all the beloved, zesty flavors of your favorite beef tacos and tucking them into a perfectly roasted, naturally sweet, and incredibly creamy sweet potato. It’s the ultimate comfort food mash-up that feels incredibly wholesome at the same time. You’ll love how easy it is to assemble, making it a fantastic option for busy evenings when you want something delicious without a lot of fuss.
Imagine this: tender, oven-baked sweet potatoes, bursting with a savory, perfectly seasoned ground beef filling, and then piled high with all your favorite taco toppings like shredded cheese, fresh salsa, creamy avocado, and a dollop of sour cream (or Greek yogurt for an extra healthy twist!). It’s a vibrant, flavorful, and incredibly satisfying meal that’s naturally gluten-free and packed with goodness. Trust me, your taste buds are in for an absolute fiesta!
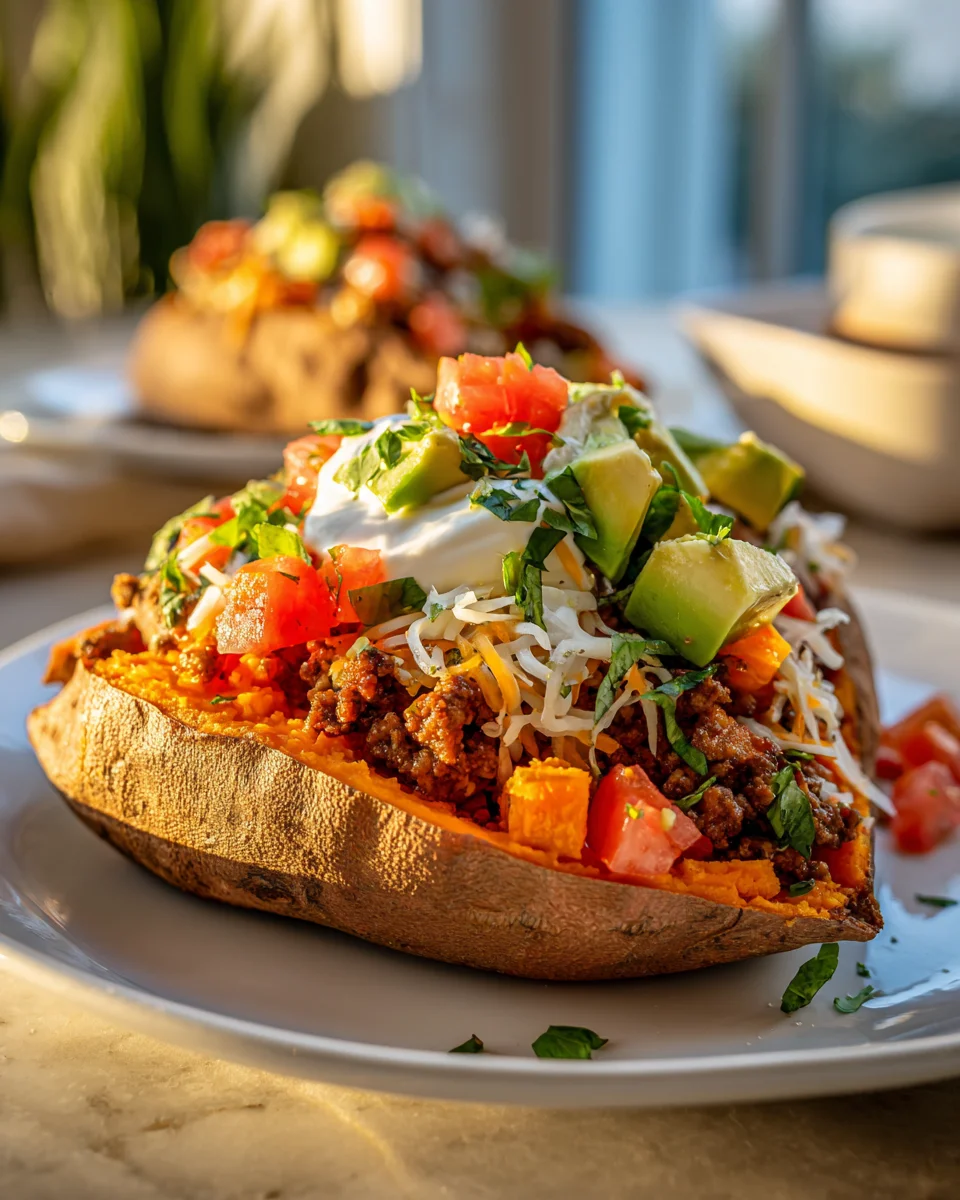
Welcome to one of my absolute favorite weeknight meals: Taco Stuffed Sweet Potatoes! This dish is a fantastic twist on traditional tacos, offering a naturally sweet and incredibly nutritious base for all your favorite savory taco flavors. It’s hearty, satisfying, and surprisingly easy to make. I love how the creamy texture and earthy sweetness of the baked sweet potato perfectly complement the zesty, seasoned ground beef and vibrant toppings. Let’s get cooking!
Ingredient Notes
Creating delicious Taco Stuffed Sweet Potatoes starts with quality ingredients. Here’s what you’ll need and some thoughts on substitutions to make this recipe your own.
- Sweet Potatoes: You’ll want medium to large sweet potatoes for stuffing. Look for ones that are relatively uniform in size so they bake evenly. I prefer orange-fleshed sweet potatoes for their vibrant color and intense sweetness, but Japanese or Hannah sweet potatoes would also work for a slightly different flavor profile. Make sure to scrub them clean before baking.
- Ground Beef: I typically use lean ground beef (85-90%) for my taco filling. This ensures a flavorful base without too much excess fat, which keeps the dish lighter. If you prefer, ground turkey or even a plant-based crumble can be excellent substitutes, offering a similar texture and taking on the taco seasoning beautifully. Just be sure to brown it well and drain any excess fat regardless of your choice.
- Taco Seasoning: A good quality taco seasoning is key to getting that authentic taco flavor. You can use a store-bought packet, or if you’re feeling adventurous, mix your own! A homemade blend often includes chili powder, cumin, paprika, onion powder, garlic powder, and a pinch of cayenne for a little kick. I always keep a jar of my homemade blend on hand.
- Black Beans: Canned black beans are a staple here. Make sure to rinse them thoroughly under cold water before adding them to your filling. This removes excess sodium and any starchy liquid. They add a wonderful texture and protein boost to the taco mixture.
- Corn: Fresh, frozen, or canned corn all work wonderfully. If using canned, drain it well. If using frozen, there’s no need to thaw it beforehand; just add it directly to the pan with the other ingredients, and it will warm through. Corn adds a burst of sweetness and a pleasant chewiness that contrasts nicely with the other textures.
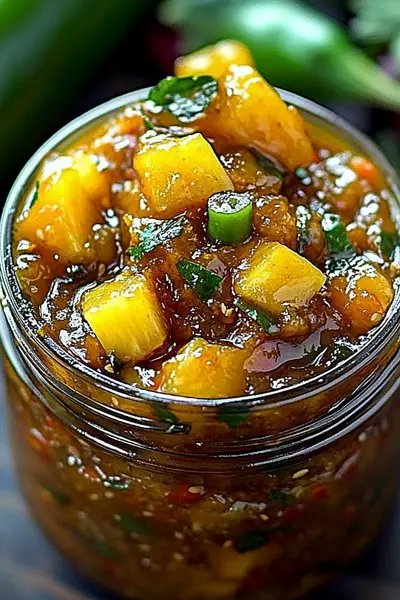
- Salsa: Use your favorite salsa! A mild to medium chunky salsa is my preference, as it adds moisture, flavor, and a bit of tang without overpowering the other ingredients. You can go spicier if you like, or even use a corn and black bean salsa for extra texture.
- Cheese: Shredded cheddar, Monterey Jack, or a Mexican blend cheese are classic choices for topping these stuffed sweet potatoes. They melt beautifully and add a rich, gooey finish. For a dairy-free option, there are many excellent plant-based shredded cheeses available now that melt quite nicely.
- Toppings (Optional, but highly recommended!):
- Avocado: Sliced or diced avocado adds a creamy, healthy fat element.
- Sour Cream or Greek Yogurt: A dollop on top provides a cool, tangy contrast. I often opt for plain Greek yogurt for a protein boost.
- Fresh Cilantro: Chopped fresh cilantro brightens up the entire dish with its herbaceous flavor.
- Lime Wedges: A squeeze of fresh lime juice just before serving ties all the flavors together and adds a zesty finish.
- Hot Sauce: For those who love an extra kick!
- Olive Oil: Just a touch for rubbing the sweet potatoes and browning the beef. Avocado oil is also a great alternative.
Step-by-Step Instructions
Get ready to transform simple ingredients into a show-stopping meal. Follow these steps for perfect Taco Stuffed Sweet Potatoes every time!
- Preheat Oven & Prep Sweet Potatoes: Preheat your oven to 400°F (200°C). Scrub your sweet potatoes clean under running water. Pat them dry. Using a fork, pierce each sweet potato several times all over. This helps steam escape and prevents them from exploding in the oven. You can lightly rub them with a little olive oil and a pinch of salt if you like, which can help crisp the skin slightly.
- Bake the Sweet Potatoes: Place the pierced sweet potatoes directly on an oven rack or on a baking sheet lined with parchment paper. Bake for 45-60 minutes, or until they are very tender when squeezed gently and easily pierced with a fork. Baking time will vary depending on the size of your sweet potatoes. Alternatively, for a quicker option, you can microwave them for 5-10 minutes (depending on size and microwave power), flipping halfway, until tender.
- Cook the Ground Beef: While the sweet potatoes are baking, heat a large skillet over medium-high heat. Add your ground beef and cook, breaking it up with a spoon, until it’s fully browned and no pink remains. Drain any excess fat from the skillet.
- Season the Filling: Reduce the heat to medium. Stir in the taco seasoning and about 1/4 cup of water or beef broth into the cooked ground beef. Let it simmer gently for 2-3 minutes, allowing the flavors to meld and the liquid to absorb.
- Add Beans, Corn, and Salsa: Stir in the rinsed black beans, corn (if using frozen or canned, no need to thaw or cook separately), and salsa. Continue to simmer for another 5-7 minutes, stirring occasionally, until the mixture is heated through and slightly thickened. Taste and adjust seasoning if necessary; you might want a pinch more salt or a dash of hot sauce. Remove the skillet from the heat.
- Prepare Sweet Potatoes for Stuffing: Once the sweet potatoes are tender, carefully remove them from the oven. Using a sharp knife, slice each sweet potato lengthwise down the middle, being careful not to cut all the way through the bottom skin. Fluff the flesh with a fork and scoop out about half of the cooked sweet potato flesh from each potato, leaving a border of flesh around the skin to maintain its structure.
- Combine & Stuff: Add the scooped-out sweet potato flesh directly into the skillet with your ground beef mixture. Gently mash the sweet potato flesh and stir it into the taco filling. This adds a lovely creaminess and ensures every bite is flavorful. Spoon generous amounts of this savory sweet potato and taco filling mixture back into the hollowed-out sweet potato skins, mounding it high.
- Top with Cheese & Final Bake: Sprinkle the shredded cheese generously over the top of each stuffed sweet potato. Return the stuffed sweet potatoes to the oven (or place them under the broiler for a few minutes, watching carefully!) for another 5-10 minutes, or until the cheese is melted and bubbly and the filling is heated through.
- Garnish & Serve: Carefully remove the Taco Stuffed Sweet Potatoes from the oven. Garnish with your favorite toppings like diced avocado, a dollop of sour cream or Greek yogurt, fresh cilantro, and a squeeze of lime juice. Serve immediately and enjoy!
Tips & Suggestions
To make your Taco Stuffed Sweet Potatoes even better and tailor them to your taste, here are some of my favorite tips and suggestions:
- Don’t Overcook the Sweet Potatoes Initially: While you want them tender, you don’t want them mushy if you’re going to scoop out the flesh and then bake them again. Aim for just fork-tender. If you overcook them, the skins might tear when you try to stuff them.
- Get Creative with the Filling: While the ground beef, black bean, and corn combo is a classic, feel free to experiment! You could add finely diced bell peppers, sautéed onions, or even some spinach to the filling for extra veggies. For a vegetarian version, swap the beef for more beans, lentils, or roasted vegetables like zucchini and mushrooms.
- Mashing the Sweet Potato into the Filling: This step is a game-changer! It makes the filling incredibly creamy and ensures that the sweet potato flavor is integrated throughout, rather than just being a separate base. Don’t skip it!
- Spice it Up (or Down): Adjust the heat level of your taco seasoning and salsa to your preference. If you love a kick, add some chopped fresh or pickled jalapeños to the filling or as a topping. For a milder dish, use a mild taco seasoning and salsa, and omit any extra chili flakes.
- Make it a Meal Prep Star: The taco filling can be made ahead of time and stored in the refrigerator for up to 3-4 days. You can also bake the sweet potatoes in advance. When ready to eat, just warm the filling, scoop out the potato flesh, combine, stuff, and bake. This significantly cuts down on active cooking time on busy nights.
- Crispy Skins: If you love a slightly crispy sweet potato skin, consider rubbing the sweet potatoes with a little olive oil and a sprinkle of salt before the initial bake. The skin won’t get super crispy like a baked potato, but it will have a pleasant chew.
- Broiler for a Quick Finish: If your cheese isn’t melting as quickly as you’d like, or you want a slightly browned, bubbly top, pop the stuffed sweet potatoes under the broiler for 1-2 minutes. Watch them very carefully, as cheese can burn quickly under the broiler!
- Serving Suggestions: These stuffed sweet potatoes are a complete meal on their own, but they also pair wonderfully with a simple green salad dressed with a light vinaigrette, or some extra tortilla chips for scooping up any runaway filling.
Storage
One of the best things about these Taco Stuffed Sweet Potatoes is how well they store, making them perfect for meal prepping or enjoying leftovers!
- Refrigeration: Once your Taco Stuffed Sweet Potatoes have cooled completely, transfer them to an airtight container. They will keep beautifully in the refrigerator for up to 3-4 days. I often store them individually to make reheating easier.
- Freezing: Yes, you can freeze these! This is a fantastic option for longer-term meal prep.
- Allow the stuffed sweet potatoes to cool completely after baking.
- Wrap each individual stuffed sweet potato tightly in plastic wrap, then an additional layer of aluminum foil. This double-layer helps prevent freezer burn.
- Place the wrapped sweet potatoes in a freezer-safe bag or container. They can be frozen for up to 2-3 months.
Note: If you plan to freeze them, it’s best to add fresh toppings like avocado, sour cream, and cilantro after reheating, as these don’t freeze and thaw well.
- Reheating from Refrigerator:
- Oven: This is my preferred method for reheating, as it helps the sweet potato skin firm up again. Preheat your oven to 350°F (175°C). Place the stuffed sweet potatoes on a baking sheet and bake for 15-20 minutes, or until heated through.
- Microwave: For a quicker option, you can microwave individual stuffed sweet potatoes. Place one on a microwave-safe plate and heat for 2-4 minutes, depending on your microwave’s power, until hot. The skin might be a little softer with this method, but it’s still delicious!
- Reheating from Frozen:
- Oven: Preheat your oven to 375°F (190°C). Remove the frozen stuffed sweet potatoes from their plastic wrap and foil. Place them on a baking sheet and bake for 30-45 minutes, or until completely heated through to the center. If they start to brown too much, you can loosely tent them with foil.
- Microwave (Less Ideal for Texture): While possible, reheating from frozen in the microwave can sometimes result in a softer, less appealing texture. If you must use a microwave, microwave on medium power for 5-7 minutes, then full power until heated through, checking frequently.
Enjoy your delicious, hearty, and wholesome Taco Stuffed Sweet Potatoes!
Final Thoughts
What I truly love about Taco Stuffed Sweet Potatoes is how they redefine a classic comfort food. It’s such a brilliant twist on taco night, marrying the comforting, savory spices of a perfectly seasoned ground beef filling with the natural sweetness and wholesome goodness of a baked sweet potato. This isn’t just another dinner; it’s an experience that’s both vibrant and incredibly satisfying. The flavors just sing together, offering a meal that feels both indulgent and wonderfully balanced, perfect for the whole family.
Whether you’re looking for a healthier alternative to traditional tacos, a fun way to get more nutritious vegetables into your diet, or simply a delicious, hearty, and satisfying weeknight meal, Taco Stuffed Sweet Potatoes deliver on all fronts. I promise you, once you try this incredible combination, it will quickly become a cherished favorite in your kitchen!

Flavorful Beef Taco Stuffed Sweet Potatoes – Quick & Healthy
- Total Time: 1 hour 15 minutes
- Yield: 4 servings
Description
Enjoy a delicious twist on taco night with these Taco Stuffed Sweet Potatoes, featuring a savory ground beef filling and vibrant toppings. This wholesome meal is easy to prepare and perfect for busy weeknights.
Ingredients
- Medium to large sweet potatoes
- Lean ground beef (85-90%)
- Taco seasoning
- Canned black beans, rinsed
- Corn (fresh, frozen, or canned)
- Salsa (mild to medium chunky)
- Shredded cheddar cheese
- Monterey Jack cheese
- Mexican blend cheese
- Avocado (optional)
- Sour cream or Greek yogurt (optional)
- Fresh cilantro (optional)
- Lime wedges (optional)
- Hot sauce (optional)
- Olive oil
Instructions
- Preheat your oven to 400°F (200°C). Scrub your sweet potatoes clean under running water. Pat them dry. Using a fork, pierce each sweet potato several times all over.
- Place the pierced sweet potatoes directly on an oven rack or on a baking sheet lined with parchment paper. Bake for 45-60 minutes, or until they are very tender when squeezed gently.
- While the sweet potatoes are baking, heat a large skillet over medium-high heat. Add your ground beef and cook, breaking it up with a spoon, until it's fully browned.
- Reduce the heat to medium. Stir in the taco seasoning and about 1/4 cup of water or beef broth into the cooked ground beef. Let it simmer gently for 2-3 minutes.
- Stir in the rinsed black beans, corn, and salsa. Continue to simmer for another 5-7 minutes, until the mixture is heated through and slightly thickened.
- Once the sweet potatoes are tender, carefully remove them from the oven. Slice each sweet potato lengthwise down the middle and fluff the flesh with a fork.
- Add the scooped-out sweet potato flesh directly into the skillet with your ground beef mixture. Gently mash the sweet potato flesh and stir it into the taco filling.
- Spoon generous amounts of this savory sweet potato and taco filling mixture back into the hollowed-out sweet potato skins.
- Sprinkle the shredded cheese generously over the top of each stuffed sweet potato. Return the stuffed sweet potatoes to the oven for another 5-10 minutes, or until the cheese is melted and bubbly.
- Carefully remove the Taco Stuffed Sweet Potatoes from the oven. Garnish with your favorite toppings like diced avocado, a dollop of sour cream or Greek yogurt, fresh cilantro, and a squeeze of lime juice.
- Prep Time: 15 mins
- Cook Time: 60 mins
- Category: Dinner
- Method: Baking
- Cuisine: Mexican
Nutrition
- Serving Size: 1 stuffed sweet potato
- Calories: 450
- Sugar: 10 g
- Sodium: 600 mg
- Fat: 20 g
- Saturated Fat: 8 g
- Unsaturated Fat: 10 g
- Trans Fat: 0 g
- Carbohydrates: 50 g
- Fiber: 8 g
- Protein: 25 g
- Cholesterol: 70 mg
Keywords: Feel free to substitute ground turkey or a plant-based crumble for the beef. You can also add extra veggies like bell peppers or spinach to the filling for added nutrition.