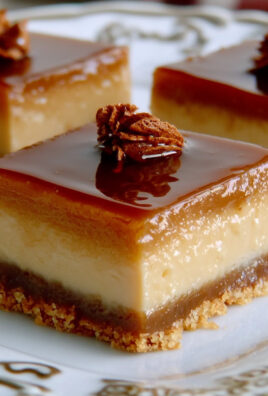
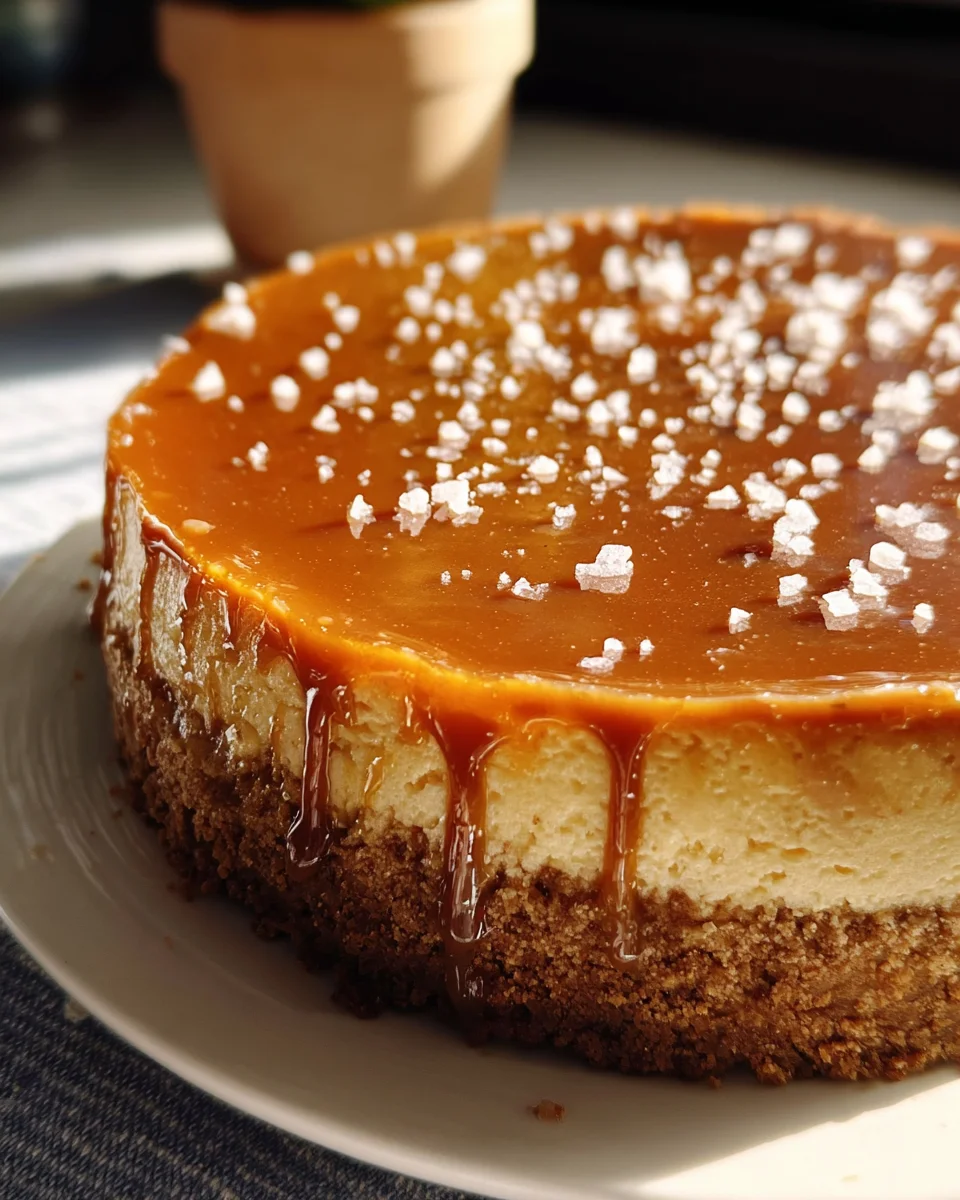
Salted Caramel Cheesecake. Imagine a dessert that perfectly balances rich sweetness with a sophisticated hint of salt, all resting on a buttery graham cracker crust. That’s precisely what we’re diving into today – a culinary masterpiece that promises to impress and delight every palate with its complex yet harmonious flavors.
While the concept of cheesecake itself boasts a fascinating lineage dating back to ancient Greece, evolving through Roman times and becoming the beloved dessert we know today in its rich, New York-style form, the integration of salted caramel is a more recent, yet utterly brilliant, innovation. Caramel, with its own storied past, found a new dimension when paired with a hint of sea salt, rapidly skyrocketing in popularity and transforming countless confections into something truly extraordinary.
Why This Dish Captivates Hearts
This particular rendition of cheesecake offers an unparalleled sensory experience. We find the smooth, velvety texture of the cheesecake base, often subtly infused with vanilla, provides a luxurious foundation that melts in your mouth. Then comes the star: a luscious, homemade salted caramel topping that beautifully cascades over the edges, delivering that irresistible sweet and salty punch. It’s the ultimate indulgence, perfect for marking celebrations, concluding a special dinner, or simply elevating an ordinary evening into something truly memorable. Every single bite is a harmonious blend of creamy, sweet, and perfectly salty, making the Salted Caramel Cheesecake an absolute showstopper that people simply adore for its decadent flavor profile and exquisite texture.

Ingredients:
For the Irresistible Graham Cracker Crust:
- 1 ½ cups (about 180g) Graham cracker crumbs: This is roughly 10-12 full Graham cracker sheets. I like to crush them finely for a solid, uniform crust. You can use a food processor or a Ziploc bag and a rolling pin for this.
- ⅓ cup (75g) unsalted butter: Melted. Using unsalted butter gives us precise control over the overall saltiness of our Salted Caramel Cheesecake.
- ¼ cup (50g) granulated sugar: Just enough to add a touch of sweetness and help bind the crust together, complementing the crackers perfectly.
- ½ teaspoon fine sea salt: A little touch to enhance the flavor of the crust and marry beautifully with the salted caramel.
For the Silky Smooth Salted Caramel Cheesecake Filling:
- 32 ounces (900g) full-fat cream cheese: This is four 8-ounce blocks. This is absolutely crucial: ensure your cream cheese is completely softened to room temperature. I mean, truly soft, like butter left out for hours. This is key for a lump-free, smooth cheesecake.
- 1 ½ cups (300g) granulated sugar: Our main sweetener for the filling, balancing the richness of the cream cheese.
- ¼ cup (60g) sour cream: Full-fat, at room temperature. Sour cream adds an extra layer of creaminess and a slight tang that brightens the cheesecake flavor, while also helping to achieve that signature smooth texture.
- 1 tablespoon pure vanilla extract: Don’t skimp on good quality vanilla; it makes a huge difference in the overall flavor profile.
- ½ teaspoon fine sea salt: To balance the sweetness and really make all the flavors pop.
- 4 large eggs: At room temperature. Using room temperature eggs helps them incorporate more evenly into the cream cheese mixture, preventing overmixing.
For the Dreamy Homemade Salted Caramel Sauce:
- 1 ½ cups (300g) granulated sugar: The foundation of our caramel.
- ¼ cup (60ml) water: Helps dissolve the sugar evenly, which can prevent crystallization and makes the caramel-making process a bit more forgiving for beginners.
- ¾ cup (180ml) heavy cream: Warmed gently. It’s important for the cream to be warm when added to the hot caramel to prevent the mixture from seizing up too much.
- ½ cup (113g) unsalted butter: Cut into cubes and softened slightly. The butter adds richness, gloss, and a wonderful silky texture to the caramel.
- 1-2 teaspoons flaky sea salt: Such as Maldon. The amount can be adjusted to your preference. I recommend starting with 1 teaspoon and tasting, then adding more if desired. This is the star of our “salted caramel.”
For Garnishing (Optional, but highly recommended!):
- Extra flaky sea salt: A sprinkle on top just before serving adds a beautiful finish and a delightful textural crunch with an extra burst of saltiness.
- Whipped cream or ice cream: For serving, if you’re feeling extra indulgent.
Equipment You’ll Need:
- 9-inch springform pan: Essential for easy removal of the cheesecake. I always recommend wrapping the bottom of the pan tightly with heavy-duty aluminum foil, at least two layers, to protect against water bath leaks.
- Large roasting pan: For the water bath. Make sure it’s big enough to comfortably fit your springform pan without touching the sides too much.
- Food processor or Ziploc bag and rolling pin: For crushing Graham crackers.
- Large mixing bowls: Several are needed for different stages.
- Electric mixer: Either a stand mixer with a paddle attachment or a handheld electric mixer. This will make the cream cheese filling incredibly smooth.
- Rubber spatula: For scraping down the bowl thoroughly.
- Small saucepan: For warming the heavy cream for the caramel.
- Heavy-bottomed saucepan (medium size): Crucial for making the caramel sauce, as it distributes heat evenly and prevents scorching.
- Pastry brush: Handy for brushing down sugar crystals from the sides of the pan when making caramel.
- Candy thermometer (optional but recommended for caramel): To ensure precise temperature control, though I’ll also provide visual cues.
Let’s Get Started!
Get ready to embark on a truly delightful baking adventure. Making a Salted Caramel Cheesecake might seem a bit daunting with all the steps, but trust me, each phase is straightforward, and the end result is absolutely worth every bit of effort. The key is patience and paying attention to detail, especially when it comes to ingredients’ temperatures and mixing techniques. Let’s create something truly spectacular together!
Phase 1: Preparing the Irresistible Graham Cracker Crust
- Preheat and Prepare: First things first, let’s get our oven ready. Preheat your oven to 350°F (175°C). While that’s heating up, grab your 9-inch springform pan. It’s a good idea to lightly grease the bottom of the pan to prevent sticking, although the butter in the crust usually does the trick.
- Crush the Graham Crackers: If you haven’t already, take your Graham crackers and turn them into fine crumbs. I love using a food processor for this because it gets them wonderfully uniform, but if you don’t have one, pop them into a sturdy Ziploc bag, seal it, and go to town with a rolling pin until they’re fine and sandy. You’re aiming for about 1 ½ cups of crumbs.
- Combine the Crust Ingredients: In a medium mixing bowl, combine the Graham cracker crumbs, ¼ cup of granulated sugar, and ½ teaspoon of fine sea salt. Give it a good whisk to ensure everything is evenly distributed. Now, pour in the ⅓ cup of melted unsalted butter. Stir everything together with a spoon or a spatula until the crumbs are thoroughly moistened and resemble wet sand. Every crumb should be coated in that beautiful buttery goodness.
- Press into the Pan: Transfer the buttery crumb mixture into the bottom of your prepared springform pan. Using the back of a spoon, or even better, the bottom of a flat-bottomed measuring cup, press the mixture firmly and evenly across the bottom of the pan. You want a compact, solid layer that will hold its shape. Don’t press it up the sides unless you prefer a side crust, but for a classic look, just the bottom is perfect.
- Pre-bake the Crust: Pop the pan with the pressed crust into your preheated oven. Bake for 8-10 minutes, or until the crust is lightly golden brown and fragrant. Pre-baking helps to set the crust, making it sturdy and preventing it from becoming soggy once the cheesecake filling is added. Once baked, remove it from the oven and set it aside to cool completely while you prepare the filling. This also ensures it’s not too hot when we add our creamy filling.
Phase 2: Crafting the Silky Smooth Salted Caramel Cheesecake Filling
This is where patience and proper technique truly shine. Remember, room temperature ingredients are your best friend here!
- Prepare for the Water Bath: While your crust cools, let’s get ready for the water bath. Wrap the bottom of your springform pan (with the cooled crust inside) tightly with two layers of heavy-duty aluminum foil. This is crucial for preventing water from seeping into your cheesecake during baking. Place the foil-wrapped pan inside a larger roasting pan. Set this aside.
- Start with Cream Cheese: In the bowl of your stand mixer fitted with the paddle attachment (or a large mixing bowl if using a hand mixer), place your 32 ounces of softened, room-temperature cream cheese. Beat the cream cheese on medium-low speed for about 2-3 minutes, scraping down the sides of the bowl frequently. You want it to be incredibly smooth and creamy, with no lumps whatsoever. This initial beating is vital for a lump-free cheesecake. Don’t rush this step!
- Add Sugar and Flavorings: Gradually add the 1 ½ cups of granulated sugar to the cream cheese, beating on low speed until just combined. Scrape down the sides of the bowl. Next, add the ¼ cup of room-temperature sour cream, 1 tablespoon of pure vanilla extract, and ½ teaspoon of fine sea salt. Mix on low speed until everything is just incorporated. Again, scrape down the bowl to ensure uniform mixing.
- Incorporate the Eggs: Now for the eggs. Add the 4 room-temperature large eggs one at a time. After each egg, mix on the absolute lowest speed just until it is incorporated into the batter. The golden rule here is to avoid overmixing once the eggs are added. Overmixing introduces too much air into the batter, which can cause your cheesecake to puff up in the oven and then crack as it cools. Gentle mixing is the key to that perfectly smooth, crack-free surface.
- Final Scrape: Give the batter one final, gentle scrape down with your rubber spatula to catch any unmixed bits from the bottom or sides of the bowl. The batter should be incredibly smooth, creamy, and uniform.
Phase 3: The Baking Journey – Achieving Cheesecake Perfection
- Fill the Pan: Carefully pour the cheesecake filling over your cooled, pre-baked Graham cracker crust in the foil-wrapped springform pan. Gently tap the pan on the counter a few times to release any large air bubbles that might be trapped within the batter. You want a smooth, level surface.
- Prepare the Water Bath: Place your roasting pan with the springform pan into the preheated 325°F (160°C) oven. Now, carefully pour hot (not boiling, but very warm) water into the roasting pan, around the springform pan, until the water comes about halfway up the sides of the springform pan. Be careful not to splash water into the cheesecake batter itself! The water bath creates a moist, even heat environment, which is crucial for preventing cracks and ensuring a creamy, evenly baked cheesecake.
- Bake to Perfection: Bake for 60-75 minutes. The exact baking time can vary depending on your oven. You’ll know it’s done when the edges are set, but the center (a circle about 2-3 inches in diameter) still has a slight wobble when you gently jiggle the pan. Do not overbake! Overbaking is a primary cause of cheesecake cracks.
- Cooling – The Critical Phase: Once baked, turn off the oven, but leave the cheesecake in the oven with the door propped open slightly (a wooden spoon works perfectly for this) for 1 hour. This slow, gradual cooling prevents drastic temperature changes that can cause cracks. After an hour, carefully remove the roasting pan from the oven. Take the springform pan out of the water bath, remove the foil, and place the cheesecake on a wire rack to cool completely at room temperature for another 2-3 hours.
- Chill Thoroughly: Once completely cool, cover the cheesecake loosely with plastic wrap and transfer it to the refrigerator to chill for at least 6-8 hours, or ideally, overnight. Chilling is essential for the cheesecake to firm up, set properly, and for the flavors to fully develop. Patience truly is a virtue here; do not rush the chilling process!
Phase 4: Mastering the Art of Homemade Salted Caramel Sauce
Making caramel can seem intimidating, but with a little focus, you’ll be a pro. Just remember, hot sugar is extremely hot, so exercise caution!
- Warm the Cream: In a small saucepan, gently warm the ¾ cup of heavy cream over low heat until it’s steamy but not boiling. You can also do this in the microwave. Keep it warm; we’ll need it soon.
- Sugar and Water: In a clean, heavy-bottomed saucepan, combine the 1 ½ cups of granulated sugar and ¼ cup of water. Stir gently just to moisten all the sugar. Avoid splashing sugar crystals up the sides of the pan. If any crystals do cling to the sides, use a wet pastry brush to gently wash them down into the sugar mixture.
- Cook the Sugar: Place the saucepan over medium-high heat. Allow the sugar mixture to boil without stirring. You’ll see the water evaporate, and the sugar will begin to bubble vigorously. Keep a close eye on it. The edges will start to turn amber, then the color will spread. You’re looking for a deep, rich amber color – like an old copper penny or dark maple syrup. This usually takes about 8-12 minutes. If you have a candy thermometer, you’re aiming for approximately 340-350°F (170-175°C). Do not walk away from the stove during this process; it can go from perfect to burnt very quickly!
- Add Butter: Once the caramel reaches that beautiful deep amber color, immediately remove the pan from the heat. Carefully, yet quickly, add the ½ cup of cubed, slightly softened unsalted butter. The mixture will bubble up violently, so be prepared! Stir continuously with a whisk until all the butter is fully melted and incorporated, creating a smooth, glossy caramel.
- Pour in Warm Cream: Now, slowly and carefully pour in the warm heavy cream while continuously whisking. Again, the mixture will bubble up and steam quite a bit. Keep whisking until the cream is fully incorporated and the caramel is smooth. If you find any lumps or hardened bits of sugar, don’t fret! Return the pan to low heat and whisk gently until they dissolve and the caramel is perfectly smooth again.
- Add Salt and Cool: Stir in 1-2 teaspoons of flaky sea salt. Start with one teaspoon, taste, and add more if you prefer a stronger salty kick. Transfer the salted caramel sauce to a heatproof jar or bowl. Allow it to cool completely at room temperature. As it cools, it will thicken to a luscious, pourable consistency. If it becomes too thick upon standing, you can gently reheat it in the microwave for a few seconds or over very low heat on the stovetop.
Phase 5: The Grand Finale – Assembling and Chilling Your Salted Caramel Cheesecake
- Release from Pan: Once your cheesecake has thoroughly chilled in the refrigerator, carefully run a thin knife around the edge of the pan before unclipping and removing the springform collar. This helps ensure a clean release and prevents the cheesecake from sticking to the sides.
- Top with Caramel: Gently pour a generous amount of your cooled (but still pourable) homemade salted caramel sauce over the top of the cheesecake. You can spread it evenly with an offset spatula, or create decorative swirls. I usually leave about ¼ to ½ cup of caramel aside for serving.
- Chill Again (Optional, but Recommended): For the caramel to set beautifully on top, I like to pop the cheesecake back into the refrigerator for at least another 30 minutes after adding the caramel. This allows the sauce to firm up slightly, making for cleaner slices.
- Slice and Serve: When you’re ready to serve, remove the cheesecake from the refrigerator. For the cleanest slices, dip a sharp, thin-bladed knife in hot water and wipe it clean between each cut. This will give you those perfectly pristine slices. Drizzle each slice with a little extra salted caramel sauce (if you reserved some) and a final sprinkle of flaky sea salt.
Congratulations! You’ve just created a truly magnificent Salted Caramel Cheesecake. This dessert is a showstopper, boasting a perfect balance of sweet and salty, rich and creamy. It’s perfect for special occasions, holidays, or simply when you want to treat yourself and your loved ones to something truly extraordinary. Enjoy every single indulgent bite!
Conclusion:
And there you have it, my friends! We’ve reached the sweet culmination of our culinary journey, and I genuinely hope you’re feeling as inspired as I am to get into the kitchen and create something truly magnificent. This isn’t just another dessert recipe; it’s an invitation to experience pure, unadulterated bliss in every single bite. What truly sets this particular recipe apart and makes it an absolute must-try for any dessert lover is its incredible balance. We’re talking about the rich, creamy texture that defines a perfect cheesecake, beautifully contrasted with that magical dance of sweet and salty from the caramel. It’s a symphony of flavors and textures that tantalizes the palate, leaving a lasting impression long after the last crumb is gone.
Imagine the moment you slice into that beautifully golden top, revealing the smooth, luxurious interior. The gentle tang of the cream cheese, the subtle warmth of vanilla, and then that glorious, glistening layer of homemade salted caramel cascading over the edges. It’s a showstopper, yes, but it’s also an incredibly comforting dessert that speaks to the soul. Whether you’re an experienced baker looking for your next triumph or a enthusiastic home cook wanting to impress, this recipe for Salted Caramel Cheesecake offers both challenge and immense reward. It’s a dessert that consistently earns rave reviews, sparking joy and conversations around the table, making any gathering feel a little more special, a little more indulgent.
Now, to truly elevate your cheesecake experience, consider a few serving suggestions and creative variations. For an impeccable presentation, I always recommend serving this cheesecake chilled, allowing its flavors to fully meld and its texture to firm up perfectly. A delicate dusting of cocoa powder or a few curls of dark chocolate can add a sophisticated visual appeal and a complementary hint of bitterness. For an extra touch of indulgence, a dollop of freshly whipped cream, perhaps infused with a hint of vanilla or a touch of bourbon, makes an excellent accompaniment. If you’re feeling adventurous, try sprinkling some flaky sea salt over the top right before serving to intensify that delightful sweet-salty dynamic even further.
Beyond the classic presentation, feel free to experiment and make this recipe your own!
You could incorporate a layer of toasted pecans or walnuts into the crust for added crunch and nuttiness, or swirl in some espresso powder into the cheesecake batter for a mocha-caramel twist. For individual servings that are perfect for parties, bake the cheesecake in ramekins or muffin tins, adjusting the baking time accordingly. Imagine mini salted caramel cheesecakes, each a perfect, personal treat! Another fantastic idea is to garnish with fresh berries – raspberries or blackberries offer a lovely tart counterpoint to the richness of the cheesecake and caramel. A drizzle of homemade chocolate ganache would also be absolutely divine, adding another layer of decadence.
So, my dear food enthusiasts, I implore you: don’t just read about this incredible dessert. Take the leap, gather your ingredients, and embark on this delicious adventure. Trust me when I say, the effort is incredibly worthwhile, and the smiles you’ll bring to the faces of your loved ones (and your own!) will be priceless. I am so eager to hear about your experiences. Did you try a new variation? What was your favorite part of the process? Did it become your new go-to celebratory dessert? Please, share your stories, your triumphs, and any clever twists you added. Your culinary journey is a story waiting to be told, and I can’t wait to hear all about your spectacular Salted Caramel Cheesecake creations! Happy baking!
Decadent Salted Caramel Cheesecake
A decadent salted caramel cheesecake featuring a buttery Biscoff crust, silky smooth cream cheese filling with a hint of cinnamon, and a luscious homemade salted caramel topping, perfectly balancing sweet and salty flavors.
Ingredients
Instructions
Important Information
Nutrition Facts (Per Serving)
It is important to consider this information as approximate and not to use it as definitive health advice.
Allergy Information
Please check ingredients for potential allergens and consult a health professional if in doubt.